
Type Less with Snippets
You’ve seen how LaunchBar can help you save time by enabling you to launch applications, find files, and search the Web with just a few keystrokes. Another feature, recently added to LaunchBar, is Snippets. Snippets are bits of saved text that you can then insert anywhere you can type. In this chapter, I’ll tell you how to use Snippets to save time when typing.
Create Snippets
LaunchBar’s Snippets feature is a great time-saver, allowing you to configure bits of text—from single words to long boilerplate texts—and have them “typed” for you by just pressing a few keys. Snippets can contain placeholders for things like the current date or time, or the contents of the clipboard. Also, you can direct LaunchBar to position your text cursor at a specific location in an inserted snippet.
To create a new snippet, you first view the Add Snippet field on the bar. Then, you fill in the text of your snippet and save it. You can optionally apply formatting.
View the Add Snippet field with one of these techniques:
- Invoke the bar, then type an abbreviation to bring up the Add Snippet action. (Try typing ADD.) Press the Space bar.
- Type, say, SNIP to find the Snippets indexing rule and press Command-N.
- Display your clipboard history by pressing the Clipboard History shortcut (by default, this is Command-Option-). Now, select a text item in your history, then press the Tab key to invoke the Send To feature. Type an abbreviation to find the Add Snippet action, select Add Snippet, and press Return. (See Save Time with Clipboard History for more on using clipboard history.)
- Select the text that you want in your snippet, and instant-send it by holding your LaunchBar keyboard shortcut until the bar appears with an orange
 icon at the right. The orange icon means that LaunchBar is waiting for you to pick a target for the text. Type an abbreviation (like ADD) for the Add Snippet action, select Add Snippet, and press Return. Your snippet is created automatically; you can skip the steps just below.
Finish your snippet:
- If it’s not already there, enter (or paste) the text you’d like in your snippet (Figure 23).

Figure 23: Create a snippet with LaunchBar’s Add Snippet action.
- Press Return to save the snippet.
- If you wish, you can press Command-Option-A to assign a custom abbreviation to the snippet.
Like any other indexed LaunchBar item, you can now call up this snippet with an abbreviation search. To learn more about methods of inserting a snippet, read Use Snippets, ahead.
Format your snippet:
By default, LaunchBar stores snippets as plain text: it saves only the words and characters, but doesn’t store information about specific fonts, sizes, or styles, such as bold or italic.
Optionally, for a rich text snippet, with styles, do the following:
- Find your snippet with, for instance, an abbreviation search for the Snippets category.
- Press Shift-Return; this opens the snippet in TextEdit.
- Press Command-Shift-T to convert the snippet to rich text.
- Apply any formatting you like to the snippet in TextEdit.
- Save the file, and quit TextEdit (press Command-S and then Command-Q).
The next time you insert the snippet, LaunchBar pastes the styled version, as long as you’re in an application that can accept styled text.
Put Placeholders in Snippets
In addition to storing text, a snippet can contain placeholders that will be replaced with certain information when you insert the snippet. Here are a few examples:
- Date: To insert the current date, type one of the following into the Add Snippet field:
<date short>,<date medium>, or<date long>.The inserted date will use the corresponding format specified in the Region view of the Language & Text pane of System Preferences. - Time: Time placeholders are similar to date placeholders, with
timeinstead ofdate. For example,<time long>could show the time as 3:26 PM GMT. - Clipboard: The contents of the clipboard replaces the
<clipboard>placeholder when a snippet is inserted. You can use an item from your clipboard history with a placeholder such as<clipboard 7>(Figure 24). (See Save Time with Clipboard History.)
Figure 24: Creating a snippet with a placeholder.
- Insert the cursor: The cursor replaces the
<!>placeholder when a snippet is inserted. This is a good way to position the cursor at a specific point in an inserted snippet for you to type something—imagine having a snippet that starts a letter, with the cursor ending up right before the comma in the salutation, as in Dear |,.
Edit & Delete Snippets
If you’ve created a snippet and want to change part of its text, here’s how you can edit it. Select the snippet below the bar—for example, you can do this via sub-search of the Snippets indexing rule, or by an abbreviation search for the snippet. Press Shift-Return to open the snippet in whatever app your Mac uses by default for either plain text or rich text files (this depends on whether the snippet is plain text or rich text), make the changes you want, save the file, and then close it.
To delete a snippet, invoke the bar, select the snippet, then press Command-Delete. You can’t undo this action. However, since snippets are stored as text files, if you accidentally delete one, you can find it in the Trash, Control-click it, and choose Put Back to replace it.
You can also temporarily disable a snippet in the LaunchBar index. This works like disabling any other item in the index, as discussed in Cull Items from Indexing Rules.
Use Snippets
Once you have a collection of snippets, it’s time to use them. As you probably suspect, you can find snippets with an abbreviation search, which is made easier by assigning a custom abbreviation, as I explained earlier in this chapter. But you can also access your snippets in the following ways:
- Invoke the bar, then type, say, SNIP to bring up the Snippets indexing rule or category. Press the Space bar or the right-arrow key to browse or sub-search all your snippets.
- If you’ve assigned a keyboard shortcut to display snippets (see Keyboard Shortcuts Preferences), you can press your shortcut at any time to show snippets without first invoking the bar.
When you display your snippets, the most recently used snippet will be at the top of the list. Figure 25 shows a snippet list.
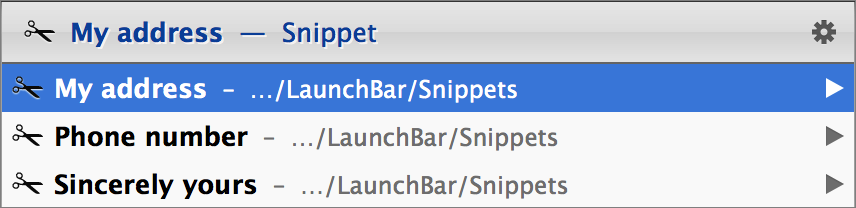
Figure 25: LaunchBar displays your snippets. Press Return to insert the selected snippet.
When you’ve found the snippet you want to use, press Return to insert it in your current application, at the position of your text cursor. If you wish, you can press Command-C to copy it and paste it elsewhere.