
Section 2
Sticks: THE ORIGINAL Wooden TOY
When my dog, Thatcher, is given the choice between a store-bought toy or a stick, hands-down, he will choose the stick each time.
Thatcher is definitely on to something! From helpful tools to fun toys, there is so much to make and do with sticks.
In this section, you’ll learn how to make a functional stick fishing pole (shown here), engineer a rustic stick catapult (shown here), and amaze your friends with DIY stick bubble wands and our top-secret monster bubble formula (shown here).
So get outdoors and start collecting sticks from your yard, the park, and your neighborhood. Sure, you may look weird hauling bundles of sticks around town, but like Thatcher, you know where the real fun is!
Guess What …
While writing and photographing the activities for this book, Thatcher was a master photobomber and stick thief!
Once, while taking a break in between photo sessions, Thatcher crept up to the supply bin and grabbed all four of our Roasting sticks (shown here) at once. The kids ran after him to get then sticks back, but Thatcher was too fast! With a wagging tail and a satisfied grin, Thatcher laid down under an oak tree to chew the marshmallow-coated cooking sticks.

PROJECT
11
Stick Boat Races
![]() Building stick boats and racing them down a bubbling creek is fun way to relax and play when the weather is warm.
Building stick boats and racing them down a bubbling creek is fun way to relax and play when the weather is warm.
When my kids were preschoolers, they enjoyed floating milkweed pod boats in muddy puddles on the dirt road near our house. With a little imagination and resourcefulness, just about any natural material that floats can become a toy boat.

YOUR DESIGN CHALLENGE:
Construct a functional toy boat from sticks, cording, and other natural materials.
 Process
STEP 1: Gather and arrange 5 to 10 pencil-length sticks in a row. You may need to break the sticks or ask an adult to cut them to equal length with a pair of pruning shears.
STEP 2: Use a clove hitch (see here) to secure a 1-yard (91 cm) piece of cording to the outer left stick.
TIP: If your sticks are thicker than a pencil, you may need more cording.
STEP 3: Pick up the second stick and place it on top of the twine, next to the first stick. (fig. 1)

fig. 1
STEP 4: Pull the twine around and over the top of the second stick, and then wrap it around the bottom of the first stick. Next, pull the twine over the top of the first stick, and then pull it under the second stick.
When you are finished, the twine should be in the shape of the number eight.
STEP 5: Repeat in this fashion until all of the sticks are lashed together
STEP 6: Weave the tail end of the twine back through the sticks, being sure to wrap it around the twine already in place (racking turns). This will secure the twine and prevent it from slipping off the boat.
STEP 7: Secure the end of the twine with a clove hitch or tie it off with a tight knot.
STEP 8: Repeat steps 2–7 on the opposite side of the boat.
STEP 9: Secure a mast to the toy boat by wedging a stick upright in the center. If desired, secure the stick to the boat with a small squeeze of hot glue.
STEP 10: Poke a leaf through the mast to give the stick boat a sail. (fig. 2)
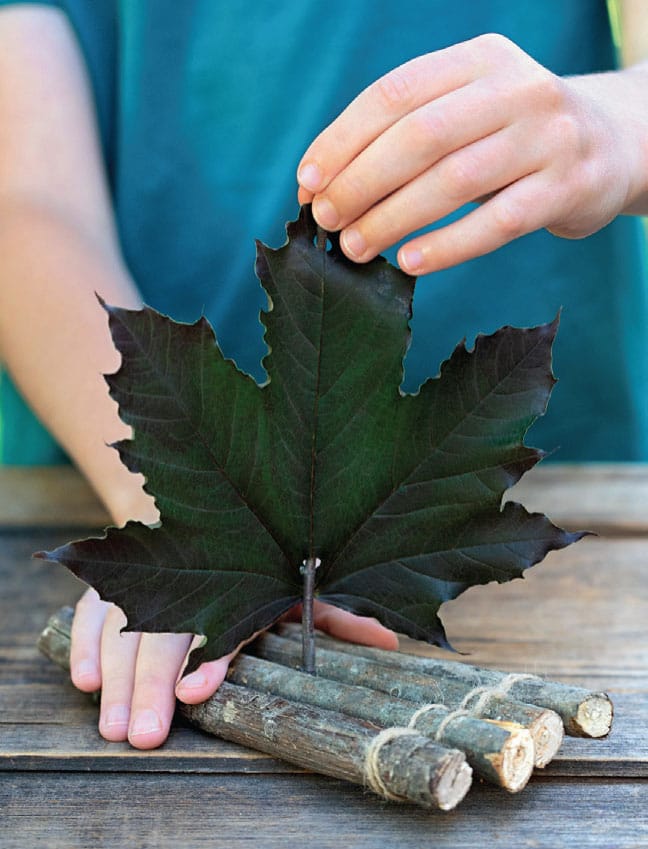
fig. 2
We’ve found that using a single hole paper punch to create two holes in the leaf helps to keep the leaf from tearing. If desired, secure the leaf sail to the mast of the boat with a small piece of tape.
STEP 11: Your stick boat is complete! Enjoy racing your boat down creeks and streams with friends. (fig. 3)
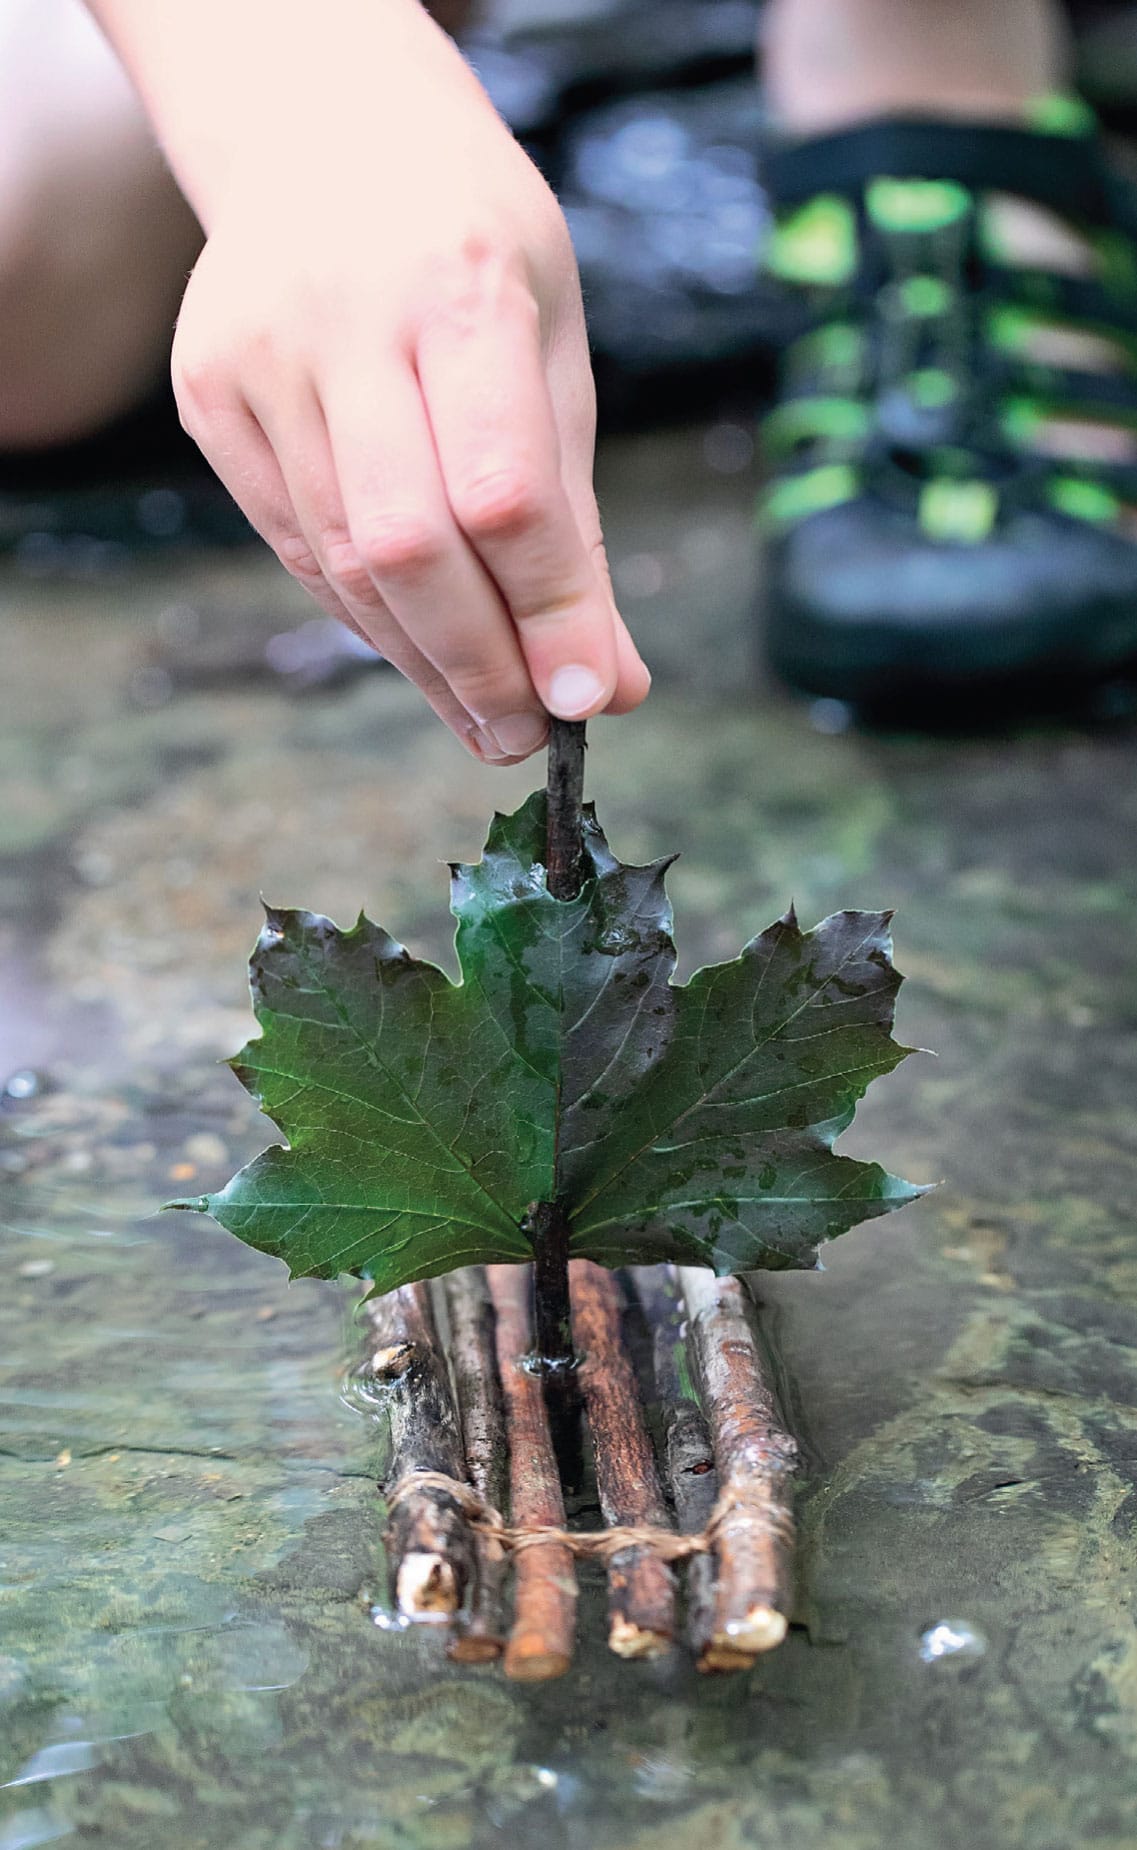
fig. 3
PROJECT
12
Bubble Wands
![]() Is there anything more magical than a cloud of shimmering bubbles floating toward the sky? I don’t think so! Bubbles can liven up parties and events and bust boredom like no toy can!
Is there anything more magical than a cloud of shimmering bubbles floating toward the sky? I don’t think so! Bubbles can liven up parties and events and bust boredom like no toy can!
Over the years, my kids and I have created and tested several homemade bubble solutions. Our favorite solution produces strong, lofty bubbles that float high above the roof of our home.
Paired with DIY stick bubble wands, you too can amaze your friends with gigantic MONSTER bubbles!

YOUR DESIGN CHALLENGE:
Craft rustic bubble wands from backyard sticks, yarn, and basic hardware supplies.
 Process
STEP 1: Gather two 12-inch (30-cm) sticks. You may need to break the sticks or ask an adult to cut them to equal length with a pair of pruning shears.
STEP 2: Twist 1 #10 screw hook into the end of each stick. (fig. 1)

fig. 1
STEP 3: Cut two lengths of cotton yarn. One string should measure about 60 inches (152 cm) long while the other string should measure about 30 inches (76 cm) long.
STEP 4: Tie the ends of both strings onto the screw hook of one stick.
STEP 5: String the metal washer through the 30-inch (76-cm) piece of yarn.
STEP 6: Tie the remaining loose ends of both strings onto the screw hook of the second stick. (fig. 2)

fig. 2
STEP 7: Your stick bubble wand is complete! To create bubbles, dip the strings of your bubble wand into bubble solution, and then gently pull the sticks through the air.
PROJECT
13
Small World in a Log Cabin
![]() Have you ever traipsed around the woods, pretending to be a settler on the great frontier?
Have you ever traipsed around the woods, pretending to be a settler on the great frontier?
Long ago when pioneers settled on new land, one of the first things they needed to do was build a home for their family. Using just an ax and the natural materials around them, many pioneers built small log cabins.
Using modeling clay, sticks, and the same concept as early settlers, you too can build your very own log cabin. Enjoy decorating your log cabin small world with moss, stones, and plastic miniatures. It’s perfect for imaginative play!

YOUR DESIGN CHALLENGE:
Create a log cabin small world scene with sticks, basic craft supplies, and natural materials.
 Process
STEP 1: Paint the surface of the round wooden plaque green. (fig. 1)

fig. 1
STEP 2: While the paint is drying, go outside and collect about twenty-five sticks of equal size. You may need to break the sticks or ask an adult to cut them to equal length with a pair of pruning shears.
STEP 3: Begin stacking the sticks on the wooden plaque, log cabin style. Instead of notching each stick like the pioneers did their logs, use modeling clay to help your sticks fit together. (fig. 2)

fig. 2
STEP 4: Continue building until your log cabin is tall enough. (fig. 3)

fig. 3
STEP 5: Decorate the rest of your wooden plaque with stones, bark, and plastic miniatures. If desired, seal the cracks in your log cabin with modeling clay, mud, or air-dry clay.
STEP 6: Your log cabin small world is complete!

PROJECT
14
Classic Stick Fishing Pole
![]() I once asked my son, “What do you like most about fishing with Grandpa?”
I once asked my son, “What do you like most about fishing with Grandpa?”
He simply replied, “I just like being there.”
I thought about pressing for more details. Did he like the water? The warm sun? The snacks? Then I realized by saying, “I just like being there,” he meant all of those things and more.
Fishing will teach you valuable social-emotional skills like patience and perseverance, and you will also learn how to be fully present with nature and other people. From choosing a quiet fishing hole to waiting for a fish to bite, it’s the process of fishing that hooks you.
Catching a fish is just the bonus!

 Process
YOUR DESIGN CHALLENGE:
Make a usable fishing pole from a stick and basic fishing supplies.
STEP 1: Collect a stick from the forest floor that measures approximately 1 yard (91 cm) in length. Ask your grown-up to help you remove branches and twigs from the stick with a pocketknife or pruning shears. (fig. 1)

fig. 1
STEP 2: Unravel 5 inches (13 cm) of fishing line from the spool. Tie the fishing line to the thick handle end of your stick with a double knot.
STEP 3: Wind the fishing line around the stick all the way to the tip by twisting the stick with your wrist.
STEP 4: Secure the fishing line to the tip of the stick with a half hitch knot.
STEP 5: Use a pocketknife to cut a small split on the tip of your stick. Slide the hanging fishing line through the split.
STEP 6: Grasp the hanging line with your fingers and then pull it back down the stick to the handle. Cut the line free from the spool with scissors or a pocketknife.
STEP 7: Tie the line to the eye end of the small snap swivel with a clinch knot. Remove any excess line with scissors or a pocketknife. (fig. 2)

fig. 2
STEP 8: Place the line end of the snell fish hook through the clip end of the snap swivel. (fig. 3)

fig. 3
DID YOU KNOW?
People have enjoyed bait fishing with stick poles since ancient times. Early fishing hooks were often made from wood, bone, or shells.
STEP 9: Clip the bobber onto the fishing line 2 to 3 feet (61 to 91 cm) from the hook.
STEP 10: Your classic stick fishing pole is complete! Bait the hook with a worm or lure and then toss the line into the water. (fig. 4)

fig. 4
If you catch a fish, pull your line in quickly and smoothly. Ask an adult to help you remove the hook from the fish by grasping and then twisting the hook out with needle-nose pliers. Gently release the fish back into the water. (fig. 5)

fig. 5
TIP: When you are finished fishing, wind the line back toward the handle of your pole. Press the point of the hook into the pole until it is secured.
PROJECT
15
Simple Stick Fence
![]() Since early times, people have built fences out of wood or stone to mark property and protect their homes, animals, and crops.
Since early times, people have built fences out of wood or stone to mark property and protect their homes, animals, and crops.
My family’s crops (okay, our very small vegetable garden) definitely could use a fence. Something—most likely a rabbit or groundhog—has been munching our carrot greens!
In this activity, you will learn how to make a simple fence from sticks and cording. It’s the perfect way to enclose your play area (or, as my kids like to call it, their “base”), protect your veggie patch, or mark trails and boundaries.

YOUR DESIGN CHALLENGE:
After gathering sticks in a variety of sizes, design and build a simple stick fence.
 Process
STEP 1: Choose the location, purpose, and size of your fence.
STEP 2: Gather sticks in a variety of sizes. You will need to collect thick sticks to use as fence posts, as well as smaller sticks and branches to drop between the fence posts.
STEP 3: Use a rock to pound the thick sticks—your fence posts—into the ground. Working in a row, space the fence posts 6 to 12 inches (15 to 30 cm) apart. (fig. 1)

fig. 1
STEP 4: Repeat on the opposite side, placing the new posts about 5 inches (13 cm) across from the initial row.
STEP 5: When the fence posts are secure in the ground, begin dropping smaller sticks and branches between the posts. (fig. 2)

fig. 2
STEP 6: To strengthen your fence and contain the sticks, tie opposite fence posts together with cording. (fig. 3)

fig. 3
STEP 7: Your simple stick fence is complete!
PROJECT
16
Nature Blocks
![]() Homemade nature blocks are easy to make and fun to play with. Use a handsaw to cut flat “tree pancakes” and one-of-a-kind blocks that are small enough to stack, build, and create with.
Homemade nature blocks are easy to make and fun to play with. Use a handsaw to cut flat “tree pancakes” and one-of-a-kind blocks that are small enough to stack, build, and create with.
Additional natural objects such as pine cones, mosses, flowers, twigs, and stones can serve as a creative “expansion pack” for your new nature block set.
We keep our nature blocks outside under a tree, but they are also a great inside toy. Such a simple way to bring the great outdoors in!

Process
STEP 1: Gather a variety of dry sticks and branches that have a diameter of 1 to 3 inches (2.5 to 7.5 cm). You may also enjoy collecting several thick logs that have a diameter of 5 to 7 inches (13 to 18 cm).
Don’t forget about branches that are Y-shaped … they provide a creative building challenge!
STEP 2: Ask an adult to help you cut the branches, sticks, and logs with a handsaw. (fig. 1)

fig. 1
STEP 3: Continue, cutting the branches and sticks in a variety of sizes and shapes. (fig. 2)

fig. 2
STEP 4: When the blocks are cut, smooth any rough edges with sandpaper.
STEP 5: Your nature blocks are complete! Enjoy creating and building inside or outside with them. (fig. 3)

fig. 3

PROJECT
17
Roasting Stick for Outdoor Cooking
![]() There is something incredibly special about gathering with friends and family to roast hot dogs and gooey marshmallows over an open campfire. Sure, you can buy manufactured roasting sticks from the store, but why not make your own? It’s easy, inexpensive, and a great way to get outside.
There is something incredibly special about gathering with friends and family to roast hot dogs and gooey marshmallows over an open campfire. Sure, you can buy manufactured roasting sticks from the store, but why not make your own? It’s easy, inexpensive, and a great way to get outside.
My oldest son loves to search the forest floor for forked sticks so he can roast a hot dog on one side and a marshmallow on the other. Definitely silly, but effective!

YOUR DESIGN CHALLENGE:
Use your pocketknife to carve a roasting stick for outdoor cooking.
Process
STEP 1: Search the forest floor for the perfect roasting stick. For safety reasons, try to choose a stick that is 1 yard (91 cm) in length.
If necessary, ask an adult to help you remove unnecessary branches and twigs with pruning shears.
STEP 2: Use a pocketknife to whittle the narrow end of your stick with long cuts away from your body. Continue in this fashion, rotating your stick to carve the tip into a clean point. (fig. 1 and fig. 2)

fig. 1

fig. 2
STEP 3: Soak your roasting stick in water for at least 30 minutes before using it. This will help prevent the stick from burning while you cook your food.
STEP 4: Your roasting stick is complete! Carefully slide your marshmallow or hot dog onto the stick and then roast it to golden perfection.
PROJECT
18
DIY Tic-Tac-Toe
![]() Sometimes after you’ve been playing outside for a long time, it’s nice to relax under the trees or in a fort with a book or quiet game. Using cording, twigs, and stones, you can make a simple, nature-inspired tic-tac-toe game. My kids like to call it “twig”-tac-toe!
Sometimes after you’ve been playing outside for a long time, it’s nice to relax under the trees or in a fort with a book or quiet game. Using cording, twigs, and stones, you can make a simple, nature-inspired tic-tac-toe game. My kids like to call it “twig”-tac-toe!
Tic-tac-toe is a popular game, but perhaps it’s new to you. Played on a 3 x 3 grid, each player chooses whether he or she wants to be represented by “X’s” or “O’s.” Taking turns, each player places their “X” or “O” on the game board in an attempt to be the first player to get three in a row horizontally, vertically, or diagonally.
YOUR DESIGN CHALLENGE:
Create a rustic, homemade version of tic-tac-toe with sticks and stones.
Process
STEP 1: Search the forest floor for stones, twigs, and four sticks of equal size. You may need to break the sticks and twigs, or ask an adult to cut them to equal length with a pair of pruning shears. (fig. 1)

fig. 1
STEP 2: Use the twine to tie the four sticks together into the shape of a tic-tac-toe board. (fig. 2)

fig. 2
STEP 3: Next, use the twine to tie two twigs together into the shape of a letter X. Repeat three more times to make a total of four game pieces shaped like the letter X. (fig. 3)

fig. 3
STEP 4: Your tic-tac-toe game is complete! Enjoy relaxing and playing with friends and family.

PROJECT
19
Stick Catapult
![]() A catapult is a device that is used to propel objects. Believe it or not, catapults are a type of simple machine called a lever. Levers reduce the amount of force needed to lift and move objects. As you pivot the lever arm of your stick catapult around the fulcrum and stretch the rubber band, you are storing energy in the rubber band. Pulling the lever arm converts the kinetic energy of your moving arm into potential energy, or stored energy, in the rubber band.
A catapult is a device that is used to propel objects. Believe it or not, catapults are a type of simple machine called a lever. Levers reduce the amount of force needed to lift and move objects. As you pivot the lever arm of your stick catapult around the fulcrum and stretch the rubber band, you are storing energy in the rubber band. Pulling the lever arm converts the kinetic energy of your moving arm into potential energy, or stored energy, in the rubber band.
When you let go of the lever arm, the potential energy stored inside of the rubber band is released and rapidly converted back to kinetic energy, or energy in motion. This kinetic energy then transfers to the load causing it to launch through the air.
Building a catapult from sticks is easy and fun … especially around the campfire (shown here). When your friend asks, “Please pass the marshmallows,” you can launch one right over to him or her with your handy stick catapult!

Process
STEP 1: Search the forest floor for ten sticks. Ask an adult to remove excess branches or twigs from the sticks, and then trim them to the suggested length with a pair of pruning shears.
STEP 2: Ask your grown-up to help you squeeze a pea-size blob of superglue on the top of the plastic jar lid. (fig. 1)

fig. 1
STEP 3: Place the end of one “frame stick” into the glue, then set it aside to dry. This stick will serve as the lever arm, or bar, of your catapult.
STEP 4: Place two thick “base” sticks parallel to each other with about 3 inches (7.5 cm) of space in between them.
STEP 5: To build the base of the catapult, position one “frame” stick on each side of the thicker “base” sticks as if you were building a log cabin. Attach the “frame” sticks to the “base” sticks by hammering a nail into each end. (fig. 2)

fig. 2
STEP 6: Use rubber bands to help you stabilize the rest of the structure as you build. First, create a triangular shape on each side of the base, forming the frame of the catapult. Next, secure a stick to the middle of the frame to act as the fulcrum. Then wrap cording, such as twine, around each rubber band to make the catapult appear more rustic. (fig. 3)

fig. 3
STEP 7: Position the lever arm of the catapult behind the fulcrum. Be sure the end of the lever arm is positioned in front of the base stick. Secure the lever arm to the fulcrum with a rubber band. Loosely wrap twine around the rubber band to make the catapult appear more rustic. (fig. 4)

fig. 4
STEP 8: Last, connect the bottom end of the lever arm to the base with a rubber band.
STEP 9: Your stick catapult is complete! Enjoy perfecting your aim as you launch soft loads, such as marshmallows and pom poms, through the air.
PROJECT
20
Garden Markers
![]() Do you love to garden? My kids and I do, but sometimes we forget the names of the plants we buy.
Do you love to garden? My kids and I do, but sometimes we forget the names of the plants we buy.
To solve this problem, we began carving our own little rustic garden markers from backyard sticks. They are perfect for potted plants and gardens, and make a thoughtful homemade gift for friends, teachers, and family.

YOUR DESIGN CHALLENGE:
Use your pocketknife to carve stick garden markers.
Process
STEP 1: Gather a variety of sticks from your yard or local park. You may need to break the sticks or ask an adult to cut them to a length of about 9 inches (23 cm) with a pair of pruning shears.
STEP 2: Use your pocketknife to slice several inches off one end of the stick, leaving a flat, clean surface behind. (fig. 1)

fig. 1
STEP 3: Repeat step 2 until all of the sticks are prepared.
STEP 4: Use a wood-burning tool or a waterproof paint pen to write the names of your plants on the flat surface of the garden marker. (fig. 2)

fig. 2
TIP: If you plan to use a wood-burning tool, be sure to review the directions that came with your tool. While using the tool, it’s best to write with soft, steady strokes.
STEP 5: Your stick garden markers are complete! Push the garden markers into the soil near the plants you wish to label. (fig. 3)

fig. 3

fig. 3
DID YOU KNOW?
The art of wood burning is called pyrography, which literally means writing with fire. It is believed that pyrography dates back to ancient times when early man drew symbols and designs with charred wood.