
Section 1
Create AND BUILD WITH Logs
From remarkable play forts to luxurious bug hotels, there is so much you can create and build with logs!
In this section, you’ll engineer a log survival shelter (shown here), play with friends on a log seesaw while learning about simple machines (shown here), and invite birds to a backyard feast by building a rustic log bird feeder (shown here).
Please understand that none of the activities in this book require you to cut down living trees. All of the projects can be created with logs, sticks, and branches gathered from the forest floor.
Because of this, your finished projects may look different than ours. The diameter, length, and species of your logs may vary. That is perfectly okay! Get outside, be inspired, and enjoy creating and building with logs.

PROJECT
1
Build a Survival Shelter
![]() In emergency situations, a well-constructed survival shelter built on dry land can be lifesaving! The purpose of a survival shelter is to protect your body from rain, wind, or snow. In the summer, a survival shelter can provide shade from the hot sun.
In emergency situations, a well-constructed survival shelter built on dry land can be lifesaving! The purpose of a survival shelter is to protect your body from rain, wind, or snow. In the summer, a survival shelter can provide shade from the hot sun.
As a rule, your survival shelter should only be large enough to fit you and whoever else is with you. This is because large shelters are difficult to heat, and if you are in a survival situation, you want your shelter to keep your body heat where it belongs … close to you!

YOUR DESIGN CHALLENGE:
Build a basic survival shelter using logs, branches, sticks, and leaves.
 Process
STEP 1: After locating a fallen tree or large rock, begin stacking an angled wall of logs, sticks, and branches against it to build a lean-to. (fig. 1)

fig. 1
STEP 2: When the wall is complete, crawl into the lean-to and make sure it’s long enough for your body. If necessary, increase the length of your lean-to by stacking more logs, sticks, and branches. (fig. 2)

fig. 2
STEP 3: Cover the wall of the lean-to with leaves, pine needles, pine boughs, moss, or bark from the forest floor. (fig. 3)

fig. 3
STEP 4: Create a thick bed of dry leaves or pine needles on the floor of your lean-to for comfort and warmth.
STEP 5: Your survival shelter is complete!
PROJECT
2
Making a Log Tripod
![]() A tripod is a stable three-legged frame used for supporting the weight of another object. Perhaps you’ve seen or used a camera tripod. Building and using a log tripod is the same concept!
A tripod is a stable three-legged frame used for supporting the weight of another object. Perhaps you’ve seen or used a camera tripod. Building and using a log tripod is the same concept!
In the great outdoors, a basic tripod is a handy thing to have for cooking over a campfire, hanging a lantern, drying clothes, gardening, and fort building.

YOUR DESIGN CHALLENGE:
Build a functional tripod with logs and cording.
 Process
STEP 1: Locate 3 fallen branches or logs to be the poles of your tripod. The poles you choose should be of similar length and thickness. If needed, have an adult help you cut the poles to equal length with a handsaw.
STEP 2: Lay the three poles next to each other on the ground. Make a clove hitch (shown here) around one of the poles with the cording, cinching it tight. (fig. 1)

fig. 1
STEP 3: Lash the poles together by weaving the cording in and out of the three poles, creating five racking turns on each pole. (fig. 2)

fig. 2
STEP 4: When the racking is complete, pull the twine over the rope in between the poles for two frapping turns. (fig. 3)

fig. 3
STEP 5: Finish the process by making a clove hitch on the same pole you began with. Cut off any excess cording with your scissors or pocketknife.
STEP 6: Stand the poles upright and pull them apart to open the tripod. (fig. 4)

fig. 4
STEP 7: Your tripod is complete! If desired, secure a length of #16 jack chain from the center of the tripod so you can hang a pot for outdoor cooking.
PROJECT
3
Construct a Handy Travois
![]() If you are playing outside and ever come across a rock or log that is too heavy to carry, a travois can help you move it! A travois (pronounced “trav-oy”) is a Native American drag sled that was traditionally pulled by dogs or horses to carry heavy loads on land.
If you are playing outside and ever come across a rock or log that is too heavy to carry, a travois can help you move it! A travois (pronounced “trav-oy”) is a Native American drag sled that was traditionally pulled by dogs or horses to carry heavy loads on land.
The travois you build for outdoor play will be a handy tool for pulling building supplies, backpacks, and little brothers or sisters over flat trails!

YOUR DESIGN CHALLENGE:
Construct a functional travois with logs and cording.
 Process
STEP 1: Locate 2 fallen branches or logs to be the poles of your travois. The poles you choose should be of similar length and thickness. If needed, have an adult help you cut the poles to equal length with a handsaw.
STEP 2: Lay the poles so that the two thinner ends overlap forming the shape of an X. These overlapping poles will be the handles of your travois. (fig. 1)

fig. 1
STEP 3: Tie a clove hitch (shown here) around one of the poles with the cording, cinching it tight.
STEP 4: Weave the twine around the two poles until they are firmly in place. (fig. 2)

fig. 2
STEP 5: When the lashing (weaving) is complete, pull the twine over the rope in between the poles for two frapping turns.
STEP 6: Position a crosspiece in the upper 1/3 of the frame so that the travois looks similar to a letter A. Lash the crosspiece to the frame of the travois with cording. (fig. 3)

fig. 3
STEP 7: Repeat step 6 with as many crosspieces as you would like to use.
STEP 8: Your travois is complete and ready for transporting heavy loads. (fig. 4)

fig. 4
PROJECT
4
A Hotel for Bugs
![]() Building a bug hotel is an easy and fun way to invite beneficial insects like solitary bees, ladybugs, and lacewings into your garden. Once settled, your new six-legged-friends will happily pollinate your fruits and vegetables, and they’ll help control unwanted garden pests such as aphids.
Building a bug hotel is an easy and fun way to invite beneficial insects like solitary bees, ladybugs, and lacewings into your garden. Once settled, your new six-legged-friends will happily pollinate your fruits and vegetables, and they’ll help control unwanted garden pests such as aphids.
Using a premade wooden CD crate from your local craft store and a variety of natural materials including logs, sticks, and pine cones, you can make your bug hotel an inviting and welcoming place for helpful insects to live, lay eggs, and gather.

YOUR DESIGN CHALLENGE:
Use craft supplies, logs, and other natural materials to build a hotel for bugs.
Process
STEP 1: If desired, paint both the inside and outside of the CD crate with outdoor acrylic paint. (fig. 1)

fig. 1
TIP: If you don’t wish to use acrylic paint, try staining the CD crate with DIY ochre paint (shown here).
STEP 2: While the paint is drying, ask an adult to help you cut the log pillars so they fit inside of the CD crate. We cut our log pillars to a length of about 4 inches (10 cm), leaving the bark intact. (fig. 2)

fig. 2
STEP 3: Ask an adult to help you drill holes in your log pillars with a cordless drill. Solitary leafcutter bees prefer holes that are 1/4-inch (6 mm) wide and about 3 inches (7.5 cm) deep. (fig. 3)

fig. 3
STEP 4: When the log pillars are finished, stack them inside of the CD crate.
STEP 5: Fill in the gaps around your pillars with bundles of sticks, pine cones, leaves, moss, and lichens.
STEP 6: Your bug hotel is complete! Place the finished bug hotel near your garden, and enjoy observing the insects that make it home.
DID YOU KNOW?
Ladybugs can eat about seventy-five aphids in a single day, so inviting them to stay at your bug hotel will help keep your plants happy and healthy!

PROJECT
5
Magical Play Fort
![]() Fort building provides opportunities to develop engineering skills while simultaneously flexing problem-solving, communication, and teamwork skills.
Fort building provides opportunities to develop engineering skills while simultaneously flexing problem-solving, communication, and teamwork skills.
Growing up, my brothers and I built log forts all throughout the woods that surrounded our home. They were the perfect place for reading, dreaming, and playing with friends.
If you’ve successfully built a log tripod, then building a magical play fort will be a simple and fun experience, as you will use a tripod as the frame of the fort. Vibrant silk scarves draped over the logs make the fort feel cozy, magical, and made just for kids!

YOUR DESIGN CHALLENGE:
Build a tripod-frame play fort with logs, silk scarves, and cording.
 Process
STEP 1: Use the process from Project 2: Make a Log Tripod (shown here) to build the frame of your fort. (fig. 1)

fig. 1
STEP 2: After the tripod is complete, carefully lean more logs against it. (fig. 2)

fig. 2
To balance the weight on the tripod, we found it best to place new logs in a symmetrical fashion. We ended up using a total of ten logs, but you may wish to use more … or less! (fig. 3)

fig. 3
STEP 3: Drape colorful silk scarves over the logs. Silk is well suited for outdoor play because soft light can shine through the fabric, leaving your fort feeling bright and playful. (fig. 4) (fig. 5)

fig. 4

fig. 5
TIP: If you don’t have silk scarves, light cotton bed sheets, ribbons, or sheer curtains can provide a similar effect.
STEP 4: Your magical play fort is complete! Enjoy relaxing inside of it with friends.
PROJECT
6
DIY Log Bird Feeders
![]() If there is one thing I could happily do all day long, it’s observing birds. I love to watch them flit about in the branches and around the bird feeder. So do my kids!
If there is one thing I could happily do all day long, it’s observing birds. I love to watch them flit about in the branches and around the bird feeder. So do my kids!
This DIY Log Bird Feeder is simple and fun to make. My Dad fondly calls them “Peanut Butter Logs,” as he likes to stuff the holes of the feeder with a mixture of natural peanut butter, birdseed, and cornmeal to attract woodpeckers, chickadees, and nuthatches.
If you don’t wish to use homemade peanut butter and birdseed mixture, you can also stuff the holes with store-bought suet. Look for suet in the same aisle as birdseed.

YOUR DESIGN CHALLENGE:
Build and maintain a log bird feeder to attract wild birds.
 Process
STEP 1: Part of the fun of this project is getting outside to choose your log. Try to choose a firm, healthy log that boasts beautiful, rough bark.
The log you choose should be 4- to 5-inches (10 to 13 cm) in diameter. Have an adult help you cut it with a handsaw to a length of about 12 inches (30 cm).
STEP 2: Ask an adult to help you drill 1-inch (2.5-cm) holes, approximately 1 1/2 inches (3.5 cm) deep, all throughout the log. (fig. 1)

fig. 1
STEP 3: Use an 8/32 inch drill bit to start a small hole at the top of the log for your screw-in hook.
STEP 4: Secure the screw-in hook to the top of the bird feeder. (fig. 2)

fig. 2
STEP 5: Use a spoon or your fingers to fill the holes of the bird feeder with homemade peanut butter birdseed mixture or suet. (fig.3)

fig. 3
STEP 6: Your log bird feeder is complete! Hang it on a branch hook near your favorite bird watching spot, and then keep a record of all the birds that visit.

PROJECT
7
Log Weaving Loom Fort
![]() Weaving is one of the oldest crafts in the world. Dating back to ancient times, weaving was used to create shelters, baskets, and fences out of logs and branches.
Weaving is one of the oldest crafts in the world. Dating back to ancient times, weaving was used to create shelters, baskets, and fences out of logs and branches.
In the forest or backyard, an outdoor weaving loom is a creative way to combine outdoor play with art. Made from logs, cording, and other natural materials, the loom is a fun place to experiment with texture and color while developing engineering skills, fine-motor skills, and mindfulness.

YOUR DESIGN CHALLENGE:
Build an A-frame weaving loom fort with logs, cording, and a variety of other natural materials.
Process
STEP 1: Gather seven logs of equal length and thickness. If necessary, ask an adult to help you cut the logs to equal length with a handsaw.
STEP 2: Lay two of the logs side by side with the top ends crossed in the shape of an X. Lash the logs together with cording, then set them aside.
STEP 3: Repeat step 2 with two more logs.
TIP: Enlist the help of a friend, sibling, or grown-up for step 4. It’s definitely a job for two people!
STEP 4: Stand up the logs with the crossed ends pointing up. Next, place the fifth log on top of the lashed logs, balancing it in the crevice where the logs cross. Lash the “ridge” log to the others with cording. (fig. 1)
After completing this step, the frame should be able to stand on its own.

fig. 1
STEP 5: Now you are going to see your A-frame weaving loom fort come together! Lash the sixth and seventh logs (your support logs) to the bottom sides of the fort with cording.
STEP 6: To stabilize the frame, tie a length of cording in a diagonal fashion from the top right corner to the bottom left corner of each side of the frame.
STEP 7: Prepare the fort for weaving by tying cording over the “ridge” log, then running it down to the bottom “support” log where you will tie it off. (fig. 2)

fig. 2
STEP 8: Continue tying the twine equally along both sides of the frame.
STEP 9: Weave silk scarves, leaves, grasses, ferns, flowers, feathers, and sticks along the frame.
STEP 10: Your log weaving loom fort is complete! Enjoy playing in your fort with friends. (fig. 3)

fig. 3
PROJECT
8
Log Walking Blocks
![]() Have you ever wished to be just a little bit taller? Walking blocks are a form of stilts for kids. They are fun for outdoor picnics and parties and make a thoughtful homemade gift.
Have you ever wished to be just a little bit taller? Walking blocks are a form of stilts for kids. They are fun for outdoor picnics and parties and make a thoughtful homemade gift.
Choose strong, firm logs for your walking blocks. Our pair of sturdy birch walking blocks was about 6 inches (15 cm) high. If you are making walking blocks for a small child, you may wish to cut your logs to a length of 3 inches (7.5 cm).

YOUR DESIGN CHALLENGE:
Build a pair of walking blocks from log pillars and cording.
 Process
STEP 1: Ask an adult to help you cut the log pillars to your desired length with a handsaw. We found 3 to 6 inches (7.5 to 15 cm) to be a safe length for most kids. (fig. 1)

fig. 1
STEP 2: Ask an adult to help you use a cordless drill fitted with a 1/2-inch drill bit to drill a hole completely through the side of the log. We placed our hole about 2 inches (5 cm) down from the top of the log. (fig. 2)

fig. 2
STEP 3: Thread 2 feet (60 cm) of cording through each log pillar and then tie it off. Remove excess cording with a pocketknife or scissors. (fig. 3 and fig. 4)

fig. 3

fig. 4
STEP 4: Your log walking blocks are complete! Carefully stand on them, pull up the cording, and enjoy the challenge of coordinating your arms and legs while you walk on the blocks around your yard.

PROJECT
9
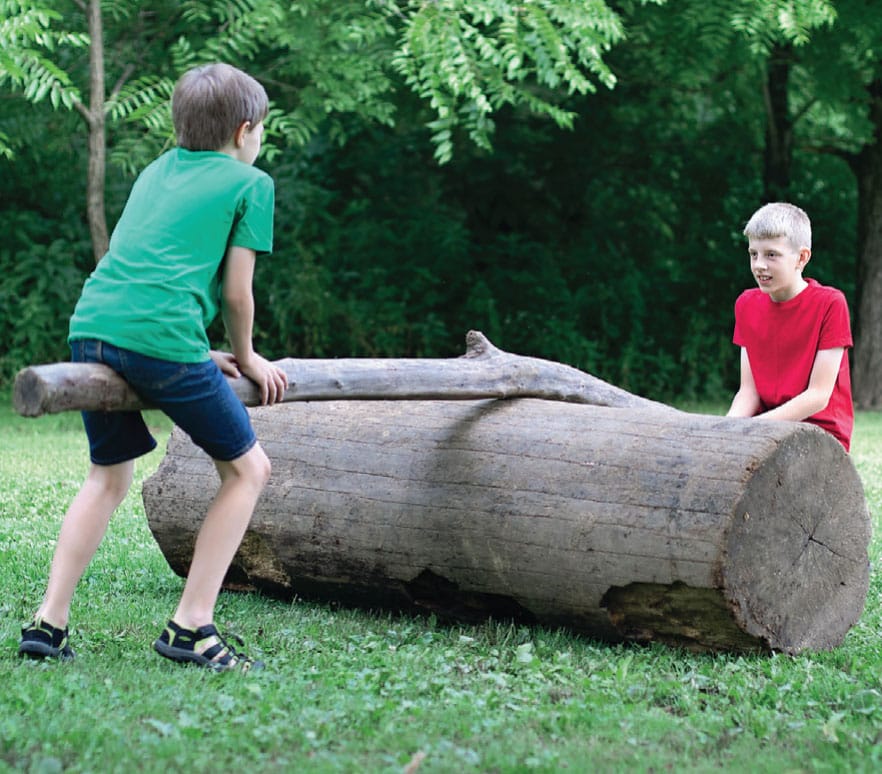
A Simple Seesaw
![]() Let nature be your playground! Making a seesaw from logs is so much fun. While you lift up, your friend goes down … but how does it work?
Let nature be your playground! Making a seesaw from logs is so much fun. While you lift up, your friend goes down … but how does it work?
A seesaw is a type of simple machine called a lever. Simple machines, like levers, are designed to simplify work. Levers, which reduce the amount of force needed to lift and move objects, have four parts:
1. BAR: This is the part of the seesaw you sit on.
2. FULCRUM: This is the part of the seesaw that the bar pivots on.
3. EFFORT: This is the force you apply to move the bar. When you seesaw, you create force by bending your knees and pushing off the ground.
4. LOAD: The load is the object you are trying to move or lift.

YOUR DESIGN CHALLENGE:
Using only logs, build a simple seesaw.
STEP 1: Work with a partner to position one long log (the bar) on top of a shorter log (the fulcrum). (fig. 1 and fig. 2)

fig. 1

fig. 2
STEP 2: Your log seesaw is finished! Invite a friend to sit opposite you on the bar of the seesaw and have fun playing together.

PROJECT
10
Log Easel for Little Artists
![]() From wispy cloud formations in the sky to a rainbow of colors in the garden, nature is full of inspiration and a muse for young artists. Make sketching and painting outside easy and fun with a rustic log easel. It’s perfect for backyards!
From wispy cloud formations in the sky to a rainbow of colors in the garden, nature is full of inspiration and a muse for young artists. Make sketching and painting outside easy and fun with a rustic log easel. It’s perfect for backyards!
The special thing about this tripod easel is that it folds up for convenient storage. We recommend only using the log easel on grass so that it doesn’t wiggle or move while you paint.

YOUR DESIGN CHALLENGE:
Design and build a folding log easel.
Process
STEP 1: Have an adult help you cut three logs to a length of about 45 inches (114 cm). Lay the logs down on the ground side by side.
STEP 2: Ask an adult to help you drill a 1-inch (2.5-cm) hole through the top of each log with a cordless drill. We drilled our holes about 3 inches (7.5 cm) down from the top. (fig. 1)

fig. 1
STEP 3: Slide the stick through the hole in each log, connecting them together. (fig. 2)
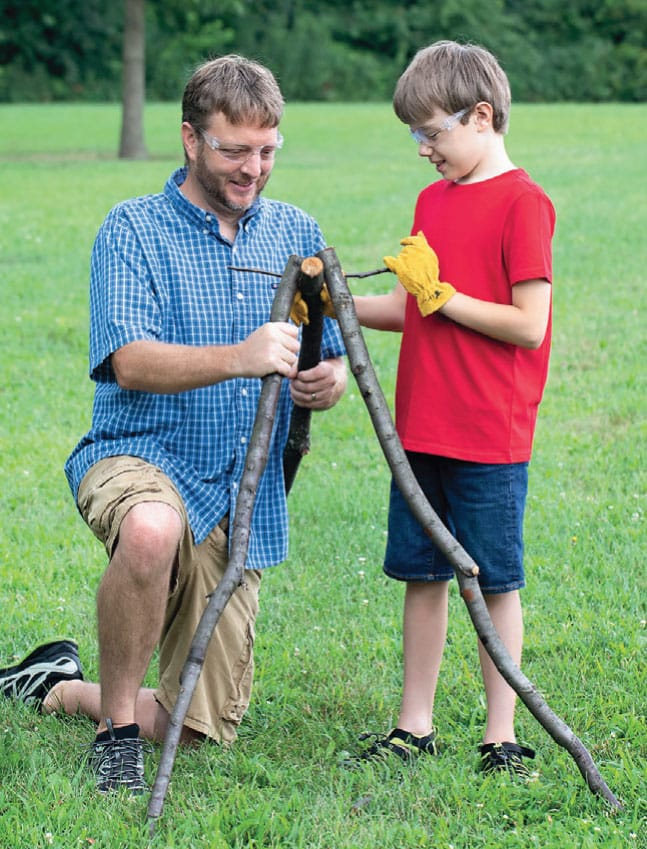
fig. 2
STEP 4: Stand up the logs, then separate the legs of the easel by pushing the middle log back. The easel should stand upright on its own. (fig. 3)

fig. 3
STEP 5: Tie a small log to the front of the easel with cording. This is the part of the easel your canvas will rest on. Remove excess twine with scissors or a pocketknife. (fig. 4)
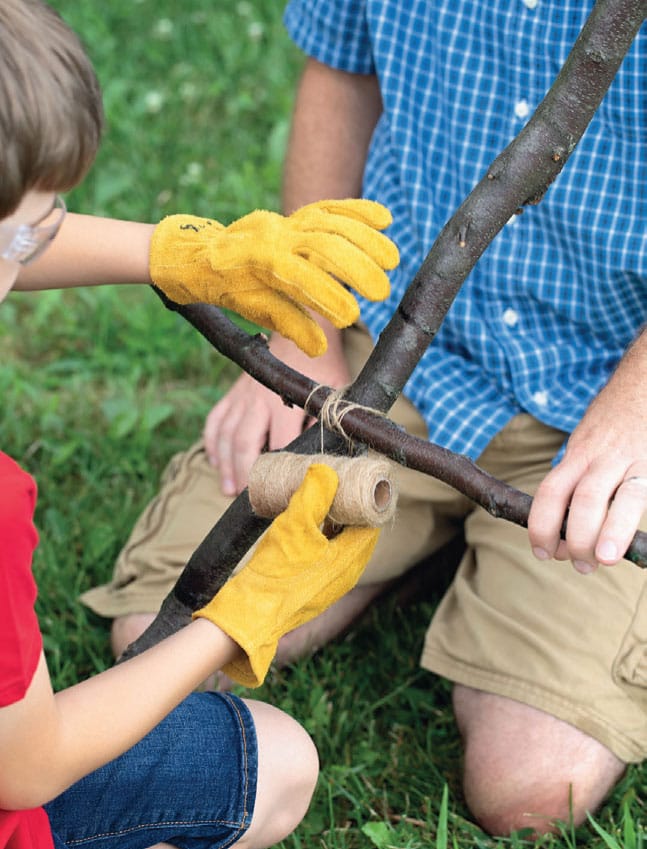
fig. 4
DID YOU KNOW?
People have been using easels for painting since the time of the ancient Egyptians!
STEP 6: Your easel is complete! Enjoy painting and creating outdoors. (fig. 5)

fig. 5