
Section 3
Easy ROCK Projects
Rocks are all around us, and have been for billions of years! Rocks give geologists (scientists who study the Earth) clues as to what our planet was like in the past.
In this section, you’ll engineer a stone bridge (shown here), practice mindfulness while creating land art (shown here), and crush sedimentary rocks to make an ancient earth paint called ochre (shown here).
So pull on your creeking shoes, grab a bucket, and then get outside to collect, create, and learn about rocks.

PROJECT
21
Build a Campfire Ring
![]() A campfire ring can be a beautiful, rustic addition to your backyard or natural play area. My kids love sitting around campfires to roast marshmallows, share stories, and watch for shooting stars.
A campfire ring can be a beautiful, rustic addition to your backyard or natural play area. My kids love sitting around campfires to roast marshmallows, share stories, and watch for shooting stars.
If you are building a campfire ring for imaginary play, it does not matter what materials you use … just have fun building, creating, and playing!
But if you wish to build a functional campfire ring, there are several safety and environmental considerations to be mindful of:
1. If you have the option, always use existing campfire rings rather than choosing to build a new one.
2. Do not light campfires during dry or windy weather, near structures, or without the presence of an adult. Keep campfires small and controlled.
3. Collect firewood from the forest floor. Firewood should be no thicker than your arm.
4. When lighting a fire within a campfire ring, it’s very important to make sure the rocks of your campfire ring are dry. If the rocks are wet or contain water inside of them (like river rocks or sedimentary rocks), the water will boil and turn into steam. As the steam expands, it will put pressure on the rock and may cause it to explode. It’s best to use hard rock, such as granite or marble, when building a campfire ring. Avoid using river rock or sandstone.
5. Keep a water-filled bucket nearby. Never leave a campfire unattended, and completely extinguish the fire when you are finished with it.

YOUR DESIGN CHALLENGE:
Build a functional and safe campfire ring.
 Process
STEP 1: Choose a safe location for your campfire ring that is at least 10 feet (3 m) away from any structures.
STEP 2: Use a shovel to remove the grass where you plan to build your campfire ring. (fig. 1)

fig. 1
STEP 3: Position dry rocks in a circle around the space you cleared. We used large, hard rocks from a dry creek bed. (fig. 2)

fig. 2
STEP 4: To prevent burning embers from igniting natural materials outside of your campfire ring, clear the area of flammable material such as dry leaves, twigs, and other debris before lighting a fire. (fig. 3)

fig. 3
STEP 5: Your campfire ring is complete! Enjoy relaxing around your campfire with friends and family.
PROJECT
22
Construct a Dam
![]() As you probably know, a dam is a type of barrier that restricts and controls the flow of water. The main purposes of today’s dams are to create electricity, prevent flooding, and to provide water for cities and farms.
As you probably know, a dam is a type of barrier that restricts and controls the flow of water. The main purposes of today’s dams are to create electricity, prevent flooding, and to provide water for cities and farms.
Building dams in creeks is a classic activity that is loved by kids of all ages. My kids like to build creek dams to create shallow pools for minnows! Just be sure to dismantle, or take apart, your dam when you are finished playing so it does not harm wildlife or disrupt the environment.

YOUR DESIGN CHALLENGE:
Build a dam outside in a creek or shallow stream to stop or change the flow of water.
 Process
STEP 1: Thoughtfully select the location of your dam. We chose a narrow part of the creek where rocks and stones were plentiful.
STEP 2: Team up with friends and family to haul large rocks to your desired location, and then line them up straight across the creek. (fig.1)

fig. 1
STEP 3: Fill in the large gaps of the dam foundation with medium-size rocks. (fig. 2)

fig. 2
STEP 4: After the large gaps are filled with medium-size rocks, scoop up small pebbles and gravel from the creek bed to fill in smaller gaps. (fig.3)

fig. 3
STEP 5: Your dam is complete! Enjoy splashing in deeper water as the creek fills up and forms a pool behind your dam. (fig. 4)

fig. 4
LEAVE NO TRACE: Always dismantle dams when you are finished playing to avoid disrupting the environment.
PROJECT
23
Leaf-Stamped Stones
![]() Rock hunting groups have rapidly gained popularity in cities around the world. Joining one via social media is a free and fun way to spend time with friends and family while enjoying the great outdoors.
Rock hunting groups have rapidly gained popularity in cities around the world. Joining one via social media is a free and fun way to spend time with friends and family while enjoying the great outdoors.
Stamping rocks with leaves is a creative and simple way to join the rock painting movement. Bonus? Leaf-stamped rocks boast a little bit of camouflage, making them extra fun to hide and find!

YOUR DESIGN CHALLENGE:
After identifying and gathering native leaves, make colorful leaf-stamped stones with acrylic paint.
 Process
STEP 1: Get outside with friends and family to collect leaves and stones.
STEP 2: Lightly coat the back of your leaf (the vein side) with a thin layer of acrylic paint. (fig. 1)

fig. 1
STEP 3: Place the leaf paint side down on top of a rock. Softly press the leaf to transfer the paint to the rock. (fig. 2)

fig. 2
STEP 4: Carefully peel the leaf away from the rock and then set the rock aside to dry. (fig. 3)
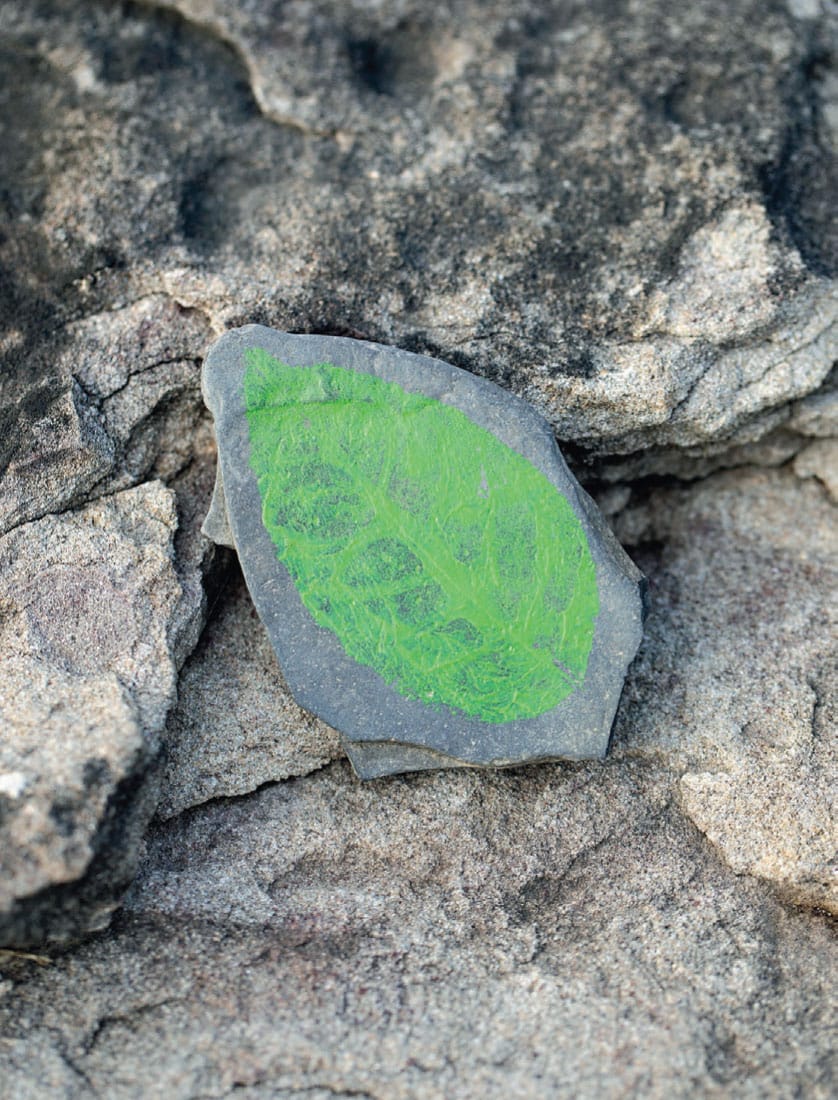
fig. 3
STEP 5: Your leaf-stamped stone is complete! Repeat steps 2–4 to create more beautiful stamped rocks.
PROJECT
24
How to Stack Stone Cairns
![]() All across the world, humans have been building stone cairns since ancient times. By definition, cairns are stacks of balanced rocks traditionally used to mark graves, trails, and important landmarks.
All across the world, humans have been building stone cairns since ancient times. By definition, cairns are stacks of balanced rocks traditionally used to mark graves, trails, and important landmarks.
Building a stone cairn is an engaging challenge that can help kids develop social-emotional skills such as mindfulness, patience, and persistence in a natural setting. It’s also a fantastic activity for discussing science and engineering principles such as geology, gravity, balance, and creative thinking.

YOUR DESIGN CHALLENGE:
After collecting stones, build a towering, balancing stone cairn.
 Process
STEP 1: Gather a variety of rocks that you wish to stack.
STEP 2: Stack the rocks from largest to smallest, paying special attention to the natural shape of the rocks and how they balance, or carry their weight.
STEP 3: Continue to add rocks to your cairn, challenging yourself to build it as high as you safely can. (fig. 1)

fig. 1
STEP 4: Your stone cairn is complete! Snap a picture, then carefully dismantle it and return the stones to the environment because rocks are a key habitat feature for many plants and animals.
LEAVE NO TRACE: Be a good steward—always dismantle your stone cairns when you are finished with them and carefully return the rocks to the environment from which you retrieved them. Many small creatures, such as crayfish, insects, and fish, depend upon rocks to enjoy a long and healthy life cycle.

PROJECT
25
The Rock Garden
![]() Making a rock garden is a fun project to enjoy with friends and family. It feels good to get outside to collect stones, choose plants, dig, water, and enjoy the beauty of a new garden.
Making a rock garden is a fun project to enjoy with friends and family. It feels good to get outside to collect stones, choose plants, dig, water, and enjoy the beauty of a new garden.
Build your rock garden in your yard and fill it with annuals (plants that grow once), perennials (plants that grow back every year), or vegetables, herbs, and fruits (plants you can eat). Or, build it in your natural play area and grow native plants, ferns, and seeds you’ve collected on nature hikes.

YOUR DESIGN CHALLENGE:
Use stones from your environment to build a rock garden.
 Process
STEP 1: Carefully arrange the rocks in the area you wish to build a garden.
We created a round rock garden in the middle of our yard, but you may wish to create a garden along a fence, in your backyard, or in the corner of your yard or play area.
The amount of rocks you need will depend upon the size of your garden. Our small rock garden consisted of twelve large stones, but you may need more … or less. (fig. 1)

fig. 1
STEP 2: Lay brown paper grocery or yard waste bags on top of the grass in your garden. The combination of paper and soil will block light and help discourage weed and grass growth in your new garden. (fig. 2)

fig. 2
STEP 3: Use an empty flowerpot or pail to scoop the garden soil into the garden. We found it helpful to pour the garden soil into a wheelbarrow for easy access, but that is completely optional. Spread the soil around the garden with your hands.
Alternatively, you could ask an adult to help you lift the bag and pour the soil directly into the garden. (fig. 3)

fig. 3
STEP 4: Prepare your soil for planting by using your hands to dig a hole that is large enough to hold a plant and its entire root system.
STEP 5: Now it’s time to plant! When I was a little girl, my grandmother (who was a master gardener and horticulturist) taught me to remove plants from pots by carefully placing my hand around the base of the plant, then tipping the pot so the plant and soil slides out. In some cases, you may need to gently tap or pinch the pot to help the plant break free.
STEP 6: Use the tips of your fingers to gently loosen the plant’s bound roots. Loosening the roots will help the plant grow and thrive in its new environment.
STEP 7: Place the plant in the hole, fill in the hole with soil, and then gently pat the freshly planted area. Repeat steps 4–7 until your entire garden is planted! (fig. 4)

fig. 4
STEP 8: Water your garden with a hose or watering can.
HOW TO CARE FOR NEW PLANTS: When your garden is new, you should take care to water the plants daily for 1 to 2 weeks. As the plants grow and establish deeper roots, water every other day or 2 to 3 times/week, depending on the weather and your plant’s needs.
STEP 9: Your rock garden is complete! Enjoy caring for your plants and watching them change throughout the season.
PROJECT
26
Make and Use Stone Tools
![]() Millions of years ago, early humans made one of the most important advancements in human history: they began to use tools.
Millions of years ago, early humans made one of the most important advancements in human history: they began to use tools.
A tool is an object designed to serve a specific function. For example, a handsaw is designed to cut wood. A hammer is designed to pound and pull nails. Can you name other tools and their functions?
Early tools were created from stone, bone, or shell. In this activity, you will learn how to make a basic pounding tool from a stick, stone, and cording.

YOUR DESIGN CHALLENGE:
Use sticks and stones to make stone tools, and then use them to pound nails.
Process
STEP 1: Gather several medium-size stones and a handful of sticks with a 1-inch (2.5-cm) diameter. If necessary, ask an adult to trim the sticks to equal lengths with a pair of pruning shears.
STEP 2: Lash a rock to a stick by wrapping the cording around both objects in a diagonal fashion (lash from the top left corner to the bottom right corner). Wrap the cording 3 to 5 times. (fig. 1)

fig. 1
STEP 3: Change directions by wrapping the cording around both objects from the top right corner to the bottom left corner 3 to 5 times. When you are finished, your lashing should be in the shape of an X.
STEP 4: Tie off the cording, and then remove any excess with a pocketknife or scissors.
STEP 5: Your stone tool is complete! Enjoy using your stone tool to pound nails, pegs, or sticks.
PROJECT
27
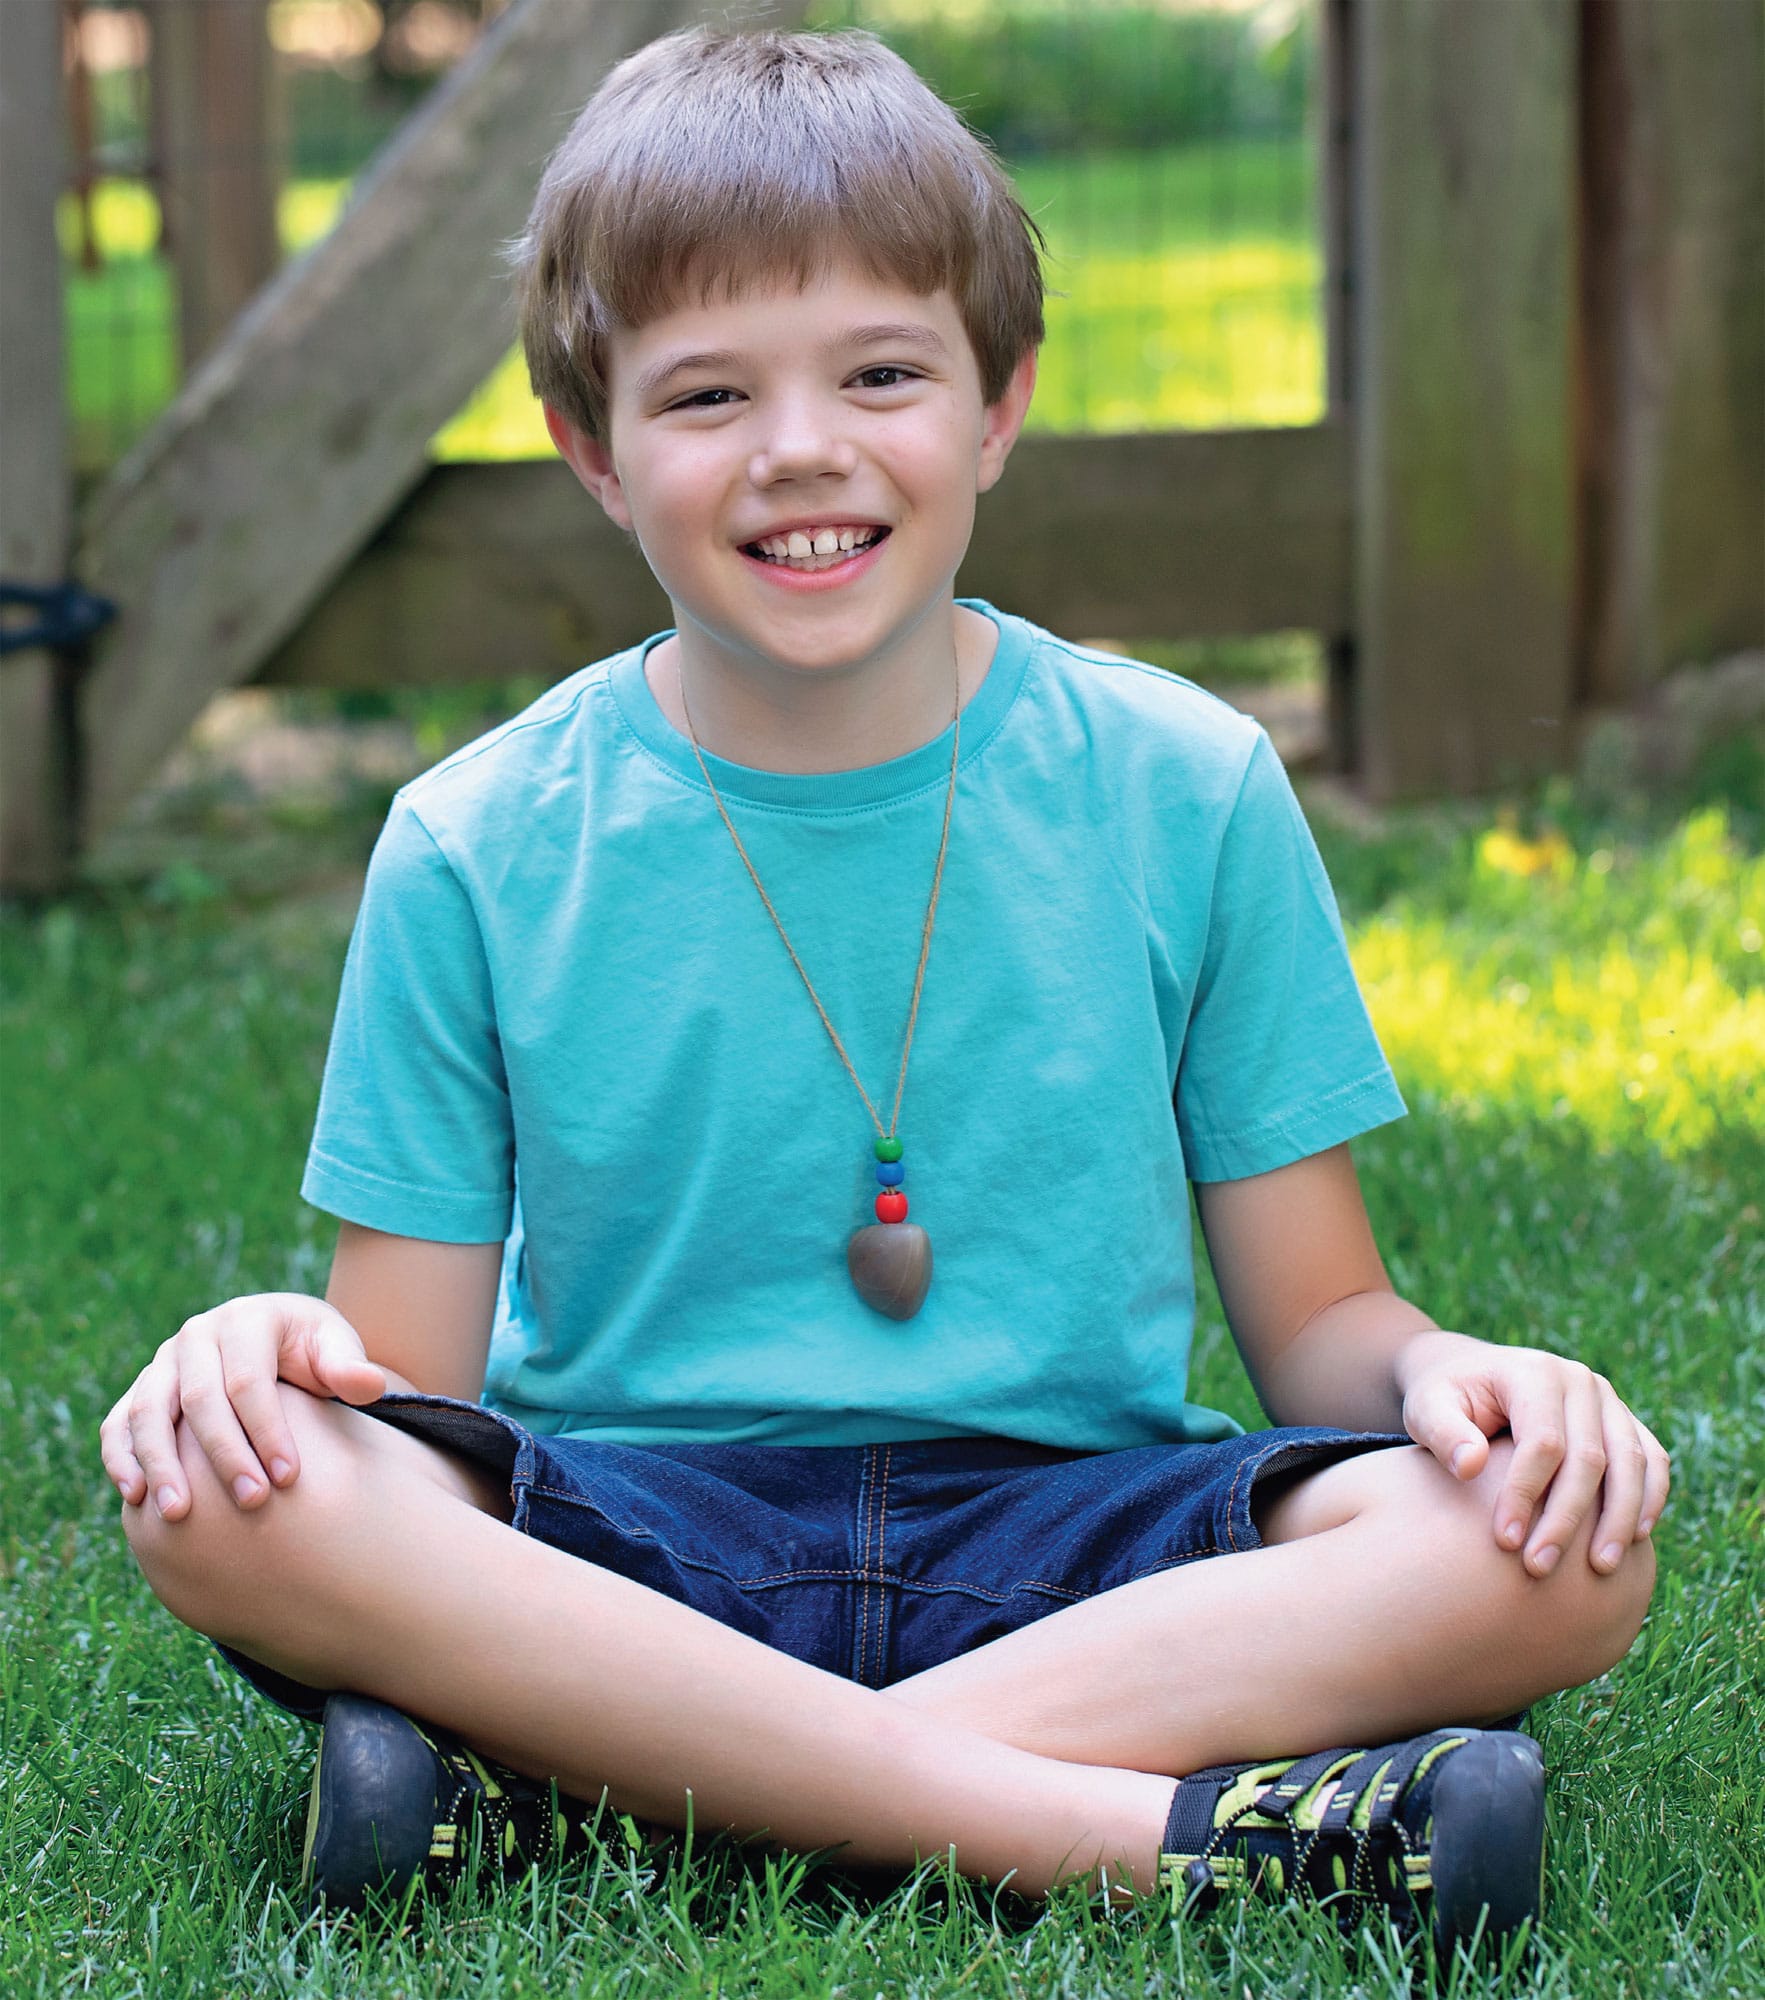
Crafty Stone Pendant
![]() Start saving beautiful rocks from your nature adventures, because making stone pendants is an easy and fun way to be creative and show off your best rock finds.
Start saving beautiful rocks from your nature adventures, because making stone pendants is an easy and fun way to be creative and show off your best rock finds.
Before you begin, be sure to wash your stones in warm, soapy water. My kids use an inexpensive dish scrub brush to remove dirt and plant matter from their rocks. When the rocks are clean, allow them to dry in the sun for several hours before moving on with the steps that follow.
YOUR DESIGN CHALLENGE:
Make a pendant with stone, string, and simple craft supplies.
Process
STEP 1: After gathering supplies, use the scissors to cut a 2-foot (61 cm) length of twine. (fig. 1)

fig. 1
STEP 2: Thread the twine through the clear button, centering the button in the center of the twine. (fig. 2)

fig. 2
STEP 3: Ask an adult to help you squeeze a pea-size blob of superglue on the flat side of the button.
STEP 4: Press the button glue-side-down onto the upper center of your rock, being careful not to get any super glue on your skin or clothes.
In fact, you and your grown-up may wish to wear gloves for this part! (fig. 3)

fig. 3
DID YOU KNOW?
Humans have been making and wearing pendants since the Stone Age. Long ago, pendants were often made from stones, shells, and even teeth or bone! Sometimes pendants were believed to be amulets or talismans, and were thought to give protection against evil and bring the wearer good luck. If you have a “lucky rock,” you may enjoy using it to make your very own magical amulet.
STEP 5: When the glue is dry, pull the strings together and thread three wooden beads on them.
STEP 6: Your stone pendant is complete! Pull the twine apart and ask an adult to help you tie it around your neck. Cut off any excess twine and enjoy.
TIP: My kids prefer to keep their stone pendants loose so they can pull them on and off all by themselves. If you would like to do the same, simply knot the twine in a place where you can still pull the stone pendant over your head. (fig. 4)

fig. 4
PROJECT
28
Make Land Art
![]() In this activity, we are going to relax, breathe deeply, and embrace an attitude of gratitude by creating land art with sticks, stones, and other natural objects.
In this activity, we are going to relax, breathe deeply, and embrace an attitude of gratitude by creating land art with sticks, stones, and other natural objects.
Land art, or earth art, is art that is created directly on land with natural elements. It can be as simple as drawing a design in wet sand with a piece of driftwood, or as complex as building massive sculptures with stone or wood. Some historians suggest that Stonehenge, a monument in England, is a form of prehistoric earth art.

YOUR DESIGN CHALLENGE:
Use sticks, stones, and other natural materials to create mesmerizing land art.
Process
STEP 1: First you will need to decide upon a location for your land art. Perhaps you’ve found a lovely spot in the dirt under a tree, or maybe on top of an old tree stump? Sidewalks are also convenient places to build land art.
Wherever you choose, it helps to use your hands to clear the area of natural debris. Think of it as wiping off a chalkboard or getting a fresh sheet of drawing paper.
STEP 2: After you’ve chosen the location for your land art, scour the ground for natural objects such as sticks, stones, pine cones, pine needles, leaves, flowers, seedpods, berries, nuts, moss, and feathers.
Place your nature finds into an empty container, then head back to where you plan to create your art.
STEP 3: Begin building your land art! It’s always helpful to build your land art from the center out. Choose a beautiful stone to be the center of your land art, or perhaps a flower or acorn.
As you place the centerpiece of your land art, breathe deeply and think of something or someone you feel grateful for.
DID YOU KNOW?
Circular land art with a design that radiates from the center is often called a mandala. By definition, a mandala is a Hindu or Buddhist symbol of the universe. Throughout history, people have used mandalas to aid meditation and spiritual journeys, or to focus attention. On your next nature walk, look for natural mandalas. You may find them on (or inside) plants, flowers, spiderwebs, shells, fruits, and seeds. Let natural mandalas inspire your land art!
STEP 4: With each deep breath, continue adding natural objects to your land art, working symmetrically from the center out. As you place each item, continue naming people and things you feel thankful for.
STEP 5: Your land art is complete! Snap a picture, then return your natural objects to the environment.
TIP: If your land art is 100% natural and not disruptive or impeding a path, you may wish to leave it out for others to discover and enjoy. Many land artists leave their earth art and allow it to blow away, decompose, or become covered with new plant growth over time.

fig. 1

fig. 2
PROJECT
29
Earthy Ochre Paint
![]() Ochre is an earth pigment containing iron oxide, typically found in clays and sedimentary rocks such as shale or sandstone. Traditionally used in cave paintings, as body paint, and even as makeup, ochre can be yellow, red, or deep brown in color.
Ochre is an earth pigment containing iron oxide, typically found in clays and sedimentary rocks such as shale or sandstone. Traditionally used in cave paintings, as body paint, and even as makeup, ochre can be yellow, red, or deep brown in color.
In this activity, you will learn how to make ochre paint with sedimentary rock; rock that is formed when layers of sediment—pebbles, sand, minerals, plant and animal matter—collect and compress over time.
When you are finished painting, it’s best to let your paint air dry (no lid) within the container to prevent mold growth. When you wish to use your paint again, simply add water and stir with a spoon or craft stick.

YOUR DESIGN CHALLENGE:
After identifying and gathering local sedimentary rocks, prepare and paint with ochre paint.
Process
STEP 1: Gather a variety of sedimentary rocks. We always have the best luck finding sedimentary rocks, such as gray, brown, and red shale near creek beds.
STEP 2: Place a small piece of rock inside of the mortar, then grind it into a fine powder with the pestle. (fig. 1)

fig. 1
STEP 3: Use a spoon to scoop the powder into a small glass jar. Fill your second glass jar with water. (fig. 2)

fig. 2
STEP 4: Use a plastic dropper to transfer water into the jar that contains the powder. Stir occasionally with a spoon or craft stick to check the consistency of the mixture, adding more water or powder as you see fit. (fig. 3)

fig. 3
The consistency of your paint should be similar to commercial paint, albeit a tad grittier! (fig. 4)

fig. 4
TIP: If you want your paints to resemble watercolors, simply add more water.
STEP 5: If desired, add a small amount of liquid glycerin to your paint mixture. The glycerin will help your paint feel smoother while extending the length of time it takes to dry.
STEP 6: Your ochre paint is complete. Simply dip your brush into the paint and enjoy making art with your colorful earth pigment!
PROJECT
30
Build a Simple Stone Bridge
![]() When I was a little girl, there was a section of trail in the woods behind our home that flooded after heavy rainfall. To get across the squishy grass and mud, my brothers and I built a bridge with rocks. We used to pretend that the squelching mud was hot lava and hopping from stone to stone was the only safe way to cross to the other side of our adventure!
When I was a little girl, there was a section of trail in the woods behind our home that flooded after heavy rainfall. To get across the squishy grass and mud, my brothers and I built a bridge with rocks. We used to pretend that the squelching mud was hot lava and hopping from stone to stone was the only safe way to cross to the other side of our adventure!
Building a bridge—a structure that enables safe passage over obstacles—above creeks, puddles, and muddy trails is a fun, collaborative engineering project for kids of all ages.
Not only will you develop engineering, teamwork, and problem-solving skills, but you will also learn: 1) how bridges work 2) how bridges help people and 3) which natural materials you can use to build a bridge.

YOUR DESIGN CHALLENGE:
Build a simple stone bridge over water or mud.
Process
STEP 1: Choose a location for your bridge. As you think about building your bridge, consider it’s length, function, and how your bridge will be used.
STEP 2: Place a large rock in the water (or mud) near dry land. (fig. 1)

fig. 1
STEP 3: Continue adding large rocks in a row until you reach the opposite side. Be sure your stone bridge isn’t impeding the natural flow of water in any way. (fig. 2)

fig. 2
TIP: If you want your feet to stay dry, walk back and forth on the rocks you’ve already placed while building.
STEP 4: Your stone bridge is complete! Enjoy traveling on the rocks to reach your destination, all the while staying clean and dry!
DID YOU KNOW?
People have been building bridges from cut wood or stone for centuries. The Ancient Romans revolutionized bridge-building efforts when they introduced arches. Strong arch bridges invited trade, travel, and the growth of new cities.