9
Rehearsals
Rehearsals are the preparation process that leads to public performance. The sound designer/composer needs this time to polish her craft in the same way that the actor needs rehearsal time to develop his character. If the actors rehearse with all of the design elements in mind, those elements seem integral to the production, rather than embellishments tacked on as afterthoughts. When the actors and director have an opportunity to interact with the sound designer’s work, the door to improvements and enhancements is opened.
Sound can help breathe life into rehearsals. As the actors work with the score or effects, they can respond to sound as if it were another character onstage and draw motivation from it. Very often, the only way for you and the director to tell if a piece of underscoring or ambiance works for a scene is to hear it in the context of the actors’ performance.
There is no set rule about when to add sound to rehearsal—each production has its own needs, and directors have their individual preferences. Most directors want to wait until the show has been “blocked”—that is, until the actors have worked through the play and the director has made preliminary decisions about stage business and where and when the actors move. Some directors will wait until the actors are familiar enough with their lines that they no longer carry scripts. When a production has many props and costumes and little sound, the director may not want to give the sound much rehearsal time. If the director is using sound as an intricate element of the production, then she may ask to have it as soon as possible.
Sound should be part of rehearsals no later than the week before tech (the days before opening when all remaining design elements are added to the show). Tech week is not the time to decide whether a cue is working; rather, it is the time to make the final cues sound exactly as you wish them to sound. The importance of incorporating sound into the rehearsals in advance of tech week cannot be stressed enough. Feedback obtained before tech week allows you to develop and refine your sound design without the time pressure of doing so during technical rehearsals. Attending different stages of rehearsal is the best way to understand the production and its development. You should make every effort to be at the first read-through and first run-through to help develop your decisions about the sound design. In some situations, when the sound is considered a character in the production, you may be required to be at all rehearsals. If you’re unfamiliar with the atmosphere of the play—the traits of the actors, the overall spirit of the production—attending more rehearsals will be advantageous. It is also helpful to have a strong line of communication with the stage manager. He can provide a lot of important details that will help your process. This is especially important when you are a guest artist, designing at a distance.
Optimally, you’ll be able to attend numerous rehearsals that include pertinent details about your design, and observe the actors and director developing their work. You can gain new information at each rehearsal by better understanding how the design works within the context of the scenes. Use these opportunities to make important choices about the timing of cues, their placement in the action, and the location onstage from which the effects will originate. You can decide whether a cue is necessary at a specific moment or, if sound seems to be missing, you can choose a particular point where a cue might be added.
Whenever possible, provide the stage manager with rehearsal recordings of music, effects, ambiance, or voiceover announcements. Supply simple phone ringers or doorbells—any cues that can be used in rehearsal. Don’t put off giving the stage manager something because the timing or the quality of the material is not up to performance standards. Even a rough cut of a cue can be helpful—whatever can save the stage manager from saying “ring,” “honk,” or “oink” will certainly be appreciated.
In some situations, you might encounter resistance from the stage management staff about running rehearsal recordings. Since they’re busy moving props, giving lines, and watching the flow of the props and actors, they could find it difficult to do more than they are already doing, and they might consider running rehearsal cues an imposition. With their workload in mind, consider limiting the number of cues to be run. You may need to choose which cues have priority. Nonetheless, you should avoid running the sound in rehearsal yourself. If you’re focusing on that task, you won’t be able to pay attention to how the cues are working.
There are two things you can do to encourage a stage manager to run rehearsal cues. First, explain to her that rehearsal cues are just as useful as rehearsal props or costumes. They can help the actors prepare for their roles and enable technical rehearsals to go more smoothly. Second, make the recordings as user-friendly as possible—if all the stage manager has to do is set a level and press play, it won’t require much of her attention. An ideal rehearsal system would include a simple computerized playback system with a simple mixer and self-powered loudspeakers capable of reproducing sound with good fidelity. Some rehearsal spaces have remarkably high-quality systems. On the other hand, a boom box is adequate for many rehearsal sound systems because it is compact and portable. Many portable systems include a cassette and/or CD player. Remember, these are usually not performance quality.
Rehearsal cues are best played back on a CD player, MiniDisc player, or computer-assisted playback system. The latter will require you to program it, but all the levels and fades are programmed in, making it the easiest for the stage manager to operate. Additionally, the programming you do in rehearsal might become the foundation for the cue sequence you build during tech. This can be a big time saver.
Figure 9.1 shows a configuration of three windows of the SFX computer-assisted playback system. Note the big “GO!” button in the lower left-hand corner. At the top is the transport window. This is especially handy in rehearsal, as its controls allow you to start and stop or find a specific point in an audio file. Below that is the cue list window, which shows the cues and highlights the next cue to be played. Note that cues aren’t necessarily just the initiation of a sound file. They can be volume adjustments or any combination of actions. Below the cue window is the active matrix window, where the volume levels of the cues are set.
FIGURE 9.1 A screenshot of Stage Research, Inc.’s SFX application.

MiniDiscs are also great to use in rehearsals because they are simple to cue up, they have a display that can show the name of the cue, and they can be easily modified to incorporate changes. CDs are also simple to cue up, but the stage manager will have to reference the track numbers on the CD to a cue list to know what track to play. Additionally, if you want to make changes to a rehearsal CD, you will have to burn a new one. As a rule, always rehearse with copies of the CDs or MiniDiscs containing your show cues. You can never be absolutely certain that the equipment won’t fail or the operator won’t damage your media.
Because many CDs or MiniDiscs cue up to the next track, it is preferable to prepare each occurrence of the same cue rather than continuously recueing the same track. If the sound operator will be fading in a cue in performance, record that fade into your rehearsal cue. That way, the stage manager will not have to worry about adjusting volumes.
If a cue is meant to crossfade to another sound onstage, you will need to consider having more than one CD or MiniDisc.
You may find that you have a manually operated sequence of cues that is impossible to run in rehearsal as designed. In this case, have the stage manager play as much of the cue as he can and call out the missing portions, or rehearse the sequence in parts small enough to operate. Don’t expect to work short sections of the play to accommodate sound at every rehearsal. After all, one of the primary purposes of rehearsal is to run sections of the play without interruption so that the actors get a sense of the show’s pacing. Again, using a computer-based playback system will solve this problem elegantly.
PREPARING FOR TECHNICAL REHEARSALS
Virtually all performance spaces have a designated control area. Many have appropriately designed control booths or rooms that accommodate the people and technology necessary for the execution of a theatrical production. In some situations, you have to set up your own control area or sound booth. Setting up the sound booth usually precedes setting up the in-house equipment, since much of the onstage installation cannot begin until the set is completely built. It may be no more than a card table placed behind the back row of seats, but it’s usually an enclosed room with windows overlooking the stage. Some theatres with limited space have the sound operated from a separate room; the sound operator’s only contact with the stage and stage manager is via a production monitor loudspeaker and a communication headset. Other theatres have sound control areas that are open and located in the audience, allowing the sound operator to appropriately mix live microphones as well as run prerecorded cues. Keep the following items in mind whether you’re creating a space in which the sound will be run or simply preparing the existing booth for tech week.
EQUIPMENT LAYOUT
Equipment should be placed so that the sound operator can run the sound without having to dash all over the booth or control area. Be sure you confer with her on the equipment layout in the booth if she is not involved in the actual setup. She could foresee problems that may not occur to you. You might consider building shelves or a special table to hold playback decks, the mixing console, radio microphone racks, signal processing, or other equipment.
Place whatever equipment you use the most in the center of your setup. Locate the gear in a manner that will allow the operator to see the stage, then position the other equipment in close proximity to the mixer, with the playback devices or their remote controls closest to it. Once you’ve determined the layout of the equipment, start patching it together.
Equipment that doesn’t need to be adjusted throughout the running of the show does not have to be centrally located. If you need a bulky digital sampler for playing just a few cues, hook it up to a small keyboard with a MIDI cable, allowing the operator to play the keyboard instead of the sampler itself. Route cables neatly and label them all. This will help you to track down and replace a faulty cable if the need arises.
THE BOOTH WINDOW
When working in an enclosed control booth, position the equipment so that the operator has a view of the stage through a booth window. Most cues are called by the stage manager, but occasionally the sound operator will have to initiate the cue himself from an onstage action. Also, many sound cues are coordinated with lighting cues, so unless you are using a system that communicates with the lighting board via MIDI (allowing either operator to trigger effects simultaneously), the operator will have to see such cues executed. If there is difficulty synchronizing a sound fade with a light cue, have the sound operator watch the light fade and try to coordinate the sound with the lights. This is a more efficient solution than running the cue until you find the right count or instructions to the sound operator about how to make it happen correctly. Ideally, you should be able to open the booth window, allowing the operator to listen to the sound coming from the house, if necessary.
SOUND ISOLATION
The audience should not be able to hear the mechanical noise (such as button clicks or fans) of the playback hardware or the conversations of those running the show. If the controls on your equipment are particularly noisy (something that might happen with a cassette deck), there are several complex solutions, including placing the deck inside a soundproof box with a Plexiglas cover and operating it with remote controls. A simpler way to minimize the noise is to make sure the equipment is not on a resonant surface that mechanically transduces the sound. A two-inch-thick piece of foam or a swatch of carpeting between the deck and table will help to dampen the sound. When operating in an open control area in the house, you’ll have to make sure all your equipment is silent by design.
PRODUCTION MONITOR LOUDSPEAKER
When working inside a booth, make sure there is a production monitor loudspeaker near the sound operator. The only way the operator can hear the stage when the windows are shut is over the production monitor system. Although this doesn’t provide a perfect reproduction of what the audience hears, it does give the operator some information about his cues. The monitor loudspeaker lets the operator know if the sound is getting to the stage. If the monitor is always set at the same volume, the operator will know if a cue is playing too loudly or too softly.
MONITORING FROM THE MIXER
Place the monitor loudspeakers in the booth so that the operator can hear the sound coming directly out of the mixer. This way, the operator can listen to the output of playback devices and processing gear without that sound playing in the theatre. Listening to the mixer output is important if the sound operator needs to troubleshoot problems with the equipment during the show. It is also useful if the operator has to listen carefully to the sound going out to the house to execute the cues. For instance, if he has to fade in another deck after the sixth measure of a piece of music, it will be easier to hear the music if he listens to it directly out of the mixer, as opposed to turning up the volume on the production monitor and hearing the cue along with the actors’ voices. If the operator is in an open control area, he will need a set of isolating headphones to audition or solo microphones or playback devices.
LIGHTING DIMMERS
Place the sound booth’s equipment as far away from lighting dimmers as possible. Dimmers radiate an electromagnetic field that the sound equipment can pick up if everything in the sound system is not properly shielded and grounded. When you’re dealing with sound setups using ten to fifteen devices with hundreds of interconnections, it’s likely that one of those components will let some interference into the system. The further the equipment is placed from the dimmers, the less effect dimmer-generated interference will have on your equipment. Fortunately, most modern theatres have the dimmers set up away from the booth where the lighting board and soundboard are located. The light board communicates with the dimmers over a thin control cable that can be several hundred feet long.
Be sure that the lighting dimmers are not introducing a hum into the system by having the master electrician bring up the lighting instruments to a level of about thirty percent. At this intensity, the dimmers are emitting their strongest electromagnetic interference. Listen to the loudspeakers to hear whether the dimmers are introducing noise into your system. Fortunately, manufacturers of modern lighting dimmers have added substantial filtering to their systems that reduces the transmissions that adversely affect sound systems.
ADEQUATE ELECTRICAL POWER
Insufficient power can cause failure of the equipment, blow a fuse, or trip a circuit breaker. The sound equipment should be drawing its power from a circuit separate from any other devices. In most professional venues, it is now common for the house infrastructure to include isolated sound power that is demarcated by orange-colored AC receptacles in appropriate locations. It is common for sound power to be run to all the necessary points in the theatre, including the mix position, the tech position, the communications rack, the amplifiers, onstage in various areas to accommodate live musicians who might be using electronics, and other places best suited to the production style of the venue. The house electrician should know whether the venue has proper ground isolated audio power. Lighting dimmers, refrigerators, or electric motors on the same circuit can introduce noise or voltage fluctuations that may cause problems with the sound equipment. If you’re experiencing problems with insufficient or noisy power, try to tap electricity from another outlet by running extension cords to your equipment. If you do this, however, make sure that you use extension cords rated for drawing the amounts of power that you’re using. Be aware that local fire regulations may prohibit running extension cords for this purpose. Route and secure cable carefully to avoid tripping hazards. Use white gaff tape or glow tape to identify potential hazards.
PROPER LIGHTING
The lighting in the sound booth should be bright enough for the operator to see the equipment she manipulates during performance. Supporting sound equipment that is not usually adjusted during the performance, such as power amps and the patch bay, need not be illuminated. If something unusual happens (such as a cue failing to play) and the unlit equipment needs to be checked, the operator can use a flashlight or an appropriate dimmable/switched lighting instrument such as a Littlelite.
Make sure that the booth’s lights aren’t so bright that they disturb the audience. There is nothing more distracting than sitting in the house when the lights fade to black and having your eyes drawn up to the control booth, which is shining like the beacon of a lighthouse. Instead of trying to cover a large area with a few lights, illuminate the sound equipment with several low-wattage fixtures, each focused on a specific area. You may use a blue-tinted light bulb or cover the light fixture with blue gel to make the illumination subtler. The master electrician will often have scraps of used gel saved just for this purpose. Beware of putting your lights on a dimmer. Although this seems like a great idea for controlling the intensity of light, some dimmers can produce an electronic interference that some sound systems intercept, producing noise. However, there are small lighting fixtures with dimmers specifically designed for use near sound mixers and other audio equipment.
PAPERWORK
Make sure there is a clear space in the booth for cue sheets, a script, or a prompt book (see ). The cue sheets should be kept in an area that is well lit and close to the control equipment. Ideally, you should have enough room to let the operator lay out a few sheets in case there’s a tight sequence that doesn’t allow him time to flip pages. There is often an area on the mixer big enough for this purpose. Some operators use a music stand, which has the advantage of adjustable angles and height. Even shows that utilize computerbased playback systems are likely to have some operational paperwork that needs to be referred to during the performance, even though they would not be using traditional cue sheets. During loadin, you will also have other organizational paperwork in the booth, such as a schematic block diagram and a system hook-up, that you’ll want to have ready access to.
WRITING SUPPLIES
The sound operator should have a mechanical pencil and a straight edge with her in the booth. If your show is manually operated, you’ll also want to have some colored pencils for color coding and highlighters or markers for underlining. Self-adhesive colored marker labels also work quite well and are easy to move around your cue sheets and script. If you are not using computer-generated cue sheets, the sound operator will need either blank cue sheets or a legal pad on which to handwrite her cues. She should have a dependable eraser handy before she starts tech so that she can erase items completely and leave no confusion as to what note was last written. In addition, a folder, notebook, or manila envelope will help to keep all paperwork together.
STORAGE SPACE
There should be a designated storage place in the booth for show media and backups, as well as emergency supplies. A kit for emergencies should include a flashlight, light bulbs for running lights, gaffer’s and electrician’s tape, a screwdriver, fuses for every piece of equipment in the sound system (labeled accordingly), extra cables, and phone numbers of whom to contact in case of emergency. Include your contact information and that of the audio engineer.
SAFETY PRECAUTIONS
Make sure that the sound setup in the booth doesn’t create any fire or tripping hazards. The equipment should not impede access to fire exits out of the booth. Outlets should not be so crammed full of plugs and power taps that they look like a bad example from a fire safety film. Cables should be secured so that it is impossible to trip over them. Provide a place for the operator to put drinks where they pose no threat if knocked over, or prohibit food and beverages in the booth altogether.
SETTING UP IN THE HOUSE
The sound system needs to be installed in the theatre prior to the start of technical rehearsals. You can assume there will be some equipment already installed, unless you’re bringing a production into a roadhouse—a theatre into which touring shows customarily bring their own equipment—or designing at a theatre with meager facilities. Most small theatres have some kind of house system, usually consisting of various loudspeakers, a mixer, several amplifiers, cabling, and some playback devices. Under most circumstances, you’ll be supplementing and repatching this sound system to meet your special needs. Larger venues can have substantial inventories as well as production budget lines to rent gear that they don’t have.
The degree to which a designer must actually set up her own system depends on the availability and expertise of the theatre’s staff. Your experiences may range from having to set up everything yourself to handing a diagram of the system you want to a sound technician and coming in later to double-check his work, focus loudspeakers, and start setting levels. If the theatre employs a union crew, however, you may not even be allowed to plug in a single cord.
The first step in system setup is choosing loudspeaker locations, which you should do several weeks before bringing in the equipment. In fact, you should have a clear idea of loudspeaker placement as you build your cues. Get a copy of the ground plan of the set. It will be useful for determining exact loudspeaker location. Make sure that the stage manager, director, lighting designer, and technical director know your intentions well ahead of load-in. The stage manager and director can anticipate any backstage traffic problems posed by loudspeakers placed on the floor, and can either work with your placement or alert you to any problems so that you can pick alternate positions. Should you need to hang loudspeakers, tell the lighting designer so that you can negotiate for the positions you need to serve the production. If the master electrician is more accessible than the lighting designer, tell her about the loudspeaker placements that work for you. She usually keeps the lighting designer apprised of any changes. It’s also a good idea to confer with the technical director before making final decisions on loudspeaker locations, to avoid misinterpreting the ground plan or model. It would be advantageous for you to share your loudspeaker plot with the lighting designer as soon as it is developed and approved by the technical director. Letting the technical director know of your plans allows him to keep your needs in mind should there be changes in the set.
Determine how the sound system will be patched together long before technical rehearsals begin. Regardless of whether you’re putting it together yourself or with the aid of a crew, by planning well ahead of time, you can make sure you have all of the equipment, cable, power cords, batteries, and other items required by the design.
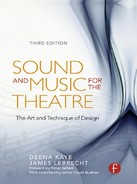
One common way to depict an equipment setup and present it to others is a block diagram (or a line drawing), which is a visual representation of how the system components will be interconnected (see Figure 9.2). The drawing doesn’t detail items like extension cords or where the equipment will be located in the booth, but it does provide all of the information needed when considering those details.
FIGURE 9.2 Diagram of a simple sound system setup.

A block diagram tells whoever will patch the equipment together exactly how the designer wants it done. It contains such information as which mixer output feeds which set of loudspeakers, and what is patched into each mixer input. The block diagram should specify the brand and model of the gear. However, it does not indicate the precise placement of the equipment. These details are usually worked out beforehand by the designer, the producer/theatre, and the sound equipment rental company (if one was involved before the diagram was drawn). If a rental company is used, they will expect to see a detailed equipment list that defines every single piece of equipment, cable, connector, and adapter, as well as expendables—absolutely everything that will be needed. You could also draw a key to identify each piece of equipment on the block diagram, but with relatively small systems such as those shown in Figures 9.2 and 9.3, it wouldn’t be necessary to go into such detail. Additionally, with larger systems you may need to provide a text document, called a hookup. This document lists all the parts of the system in great detail, including all input devices, cables, and connectors including cable length, the mixer, outboard processing, loudspeaker management systems, output paths, digital signal processors, amplifiers, loudspeakers, powered loudspeakers, and practicals. With either a block diagram or an equipment list, you or the sound technician can check the theatre’s inventory and verify first that the equipment actually exists, and second that there is adequate cable, adapters, running lights, tables, intercom, and power outlets to accommodate your needs. Don’t forget a high-speed Internet connection, preferably wireless.
FIGURE 9.3 Another diagram of a simple sound system setup.
It’s important to coordinate the installation of the sound equipment in the house and onstage with the other departments setting up their respective portions of the production. You lose valuable time waiting to share a ladder or tools. You don’t want to work when the lighting crew is focusing lights, plunging the theatre into darkness.
Pay close attention to safety and concealment when installing the loudspeakers, microphones, and offstage effects. Make certain that the loudspeakers and cable do not present a safety hazard to the actors, audience, running crew, or technicians; securely tape down cables in heavy-traffic areas. You might also consider safety cable troughs that protect your cable runs, minimize the trip hazard, and allow equipment to be rolled over the cable without causing damage. If you have loudspeakers within sight of the audience, be sure the cables are as inconspicuous and neat as possible. Check the sightlines of the audience to make sure that loudspeakers and effects meant to be unseen by the audience are indeed so. If you’re next to a loudspeaker and can see a seat, you can be sure the audience will be able to see the loudspeaker.
Hanging loudspeakers is one of the most difficult and potentially dangerous jobs of an installation. If you’re not experienced with rigging techniques, get assistance from those who are—don’t injure yourself or the crew by trying to mount a heavy, bulky loudspeaker many feet above the floor. People with rigging experience will know how to secure the loudspeaker so that it won’t come loose from its position. An experienced rigger will also know how to hang the loudspeaker with the exact focus you desire. Always use safety cables to secure any hanging unit as an extra precaution. If a loudspeaker needs to be positioned and plugged in during the course of the show (possibly during a scene change), make sure that the connector is reliable and easy to use. Look for connectors that lock together, like the Neutrik NL series of connectors.
A number of manufacturers make self-powered loudspeakers that have an amplifier built into the enclosure. You will not have to run speaker cable from the amplifier, but you will need to run a linelevel signal and AC power to the back of the powered loudspeaker.
Keep in mind that using an XLR connector for anything other than patching microphones or line-level devices can be dangerous for your equipment. Ideally, the plug used for patching in a loudspeaker will be distinctive and not easily mistaken for anything else. Current practice now is to use Neutrik NL series loudspeaker connectors also called Speakon connectors. These connectors come in a number of versions for single or multiple loudspeaker circuits. XLR remains the standard for most single circuit line and microphone level connections. When it comes to multicable, there are quite a number of workable variations, from multiple runs of copper to digital fiber-optic cables. The scale of the production will help to determine the appropriate choice.
When all the equipment has been positioned and patched together, you can perform a comprehensive soundcheck. For larger scale installations this process is called “focus and system balance,” and it makes use of quiet time—a time when nothing else is going on in the theatre, a time when you use the valuable commodity silence. During this process, you’ll make sure that every playback device, mixer component, cable and connection, signal processor, amplifier, microphone, and live effect is functioning properly. (Refer to for more information on the soundcheck.) When you schedule your load-in, leave sufficient quiet time for a soundcheck, since troubleshooting can sometimes take hours. Don’t forget that you’ll want to schedule some quiet time for setting cue levels. The larger the show, the longer the time you’ll need. If you are planning to use a computer-based playback system that is programming intensive, make sure you schedule the good part of a day to rough-in the cues so that during tech you can move a bit more quickly.
YOUR TECH POSITION
Once the booth is set up and the soundcheck is completed, the equipment is ready for technical rehearsals—now prepare yourself and the operator for tech. Choose a suitable spot in the theatre for setting up your tech position. You need to be centrally located, yet free to move around easily when necessary.
Set up your tech position so that the director is close at hand, but bear in mind that the director is usually dashing from one location to another during tech and rarely sits still. Don’t set up at the tech table, where the lighting designer and stage manager are, because their conversation can be distracting when you’re trying to hear the sound. If possible, try to find a central location where you can play the part of an average audience member.
At your position, the following items will be helpful:
• Writing and erasing implements; mechanical pencils
• Cue sheets and other corresponding system paperwork, including magic sheet, schematic block diagram, hookup, loudspeaker management system, programming schedules
• A stopwatch
• Your communications headset (or handset)
• Notepads
• A large, flat surface on which to write and put your script
• Your personal digital audio workstation (DAW) including digitized sound/music libraries
• Power strips
If you are working with a computer-based playback system, you’ll want to have your own display to see the programming, and if house/union conditions allow, a keyboard to let you write, play, and modify cues. Most union houses don’t allow you to touch the equipment, but many will, once you build appropriate mutual respect and trust.
All of that paperwork listed above will really come in handy, especially for focus and system balance days. That’s when you’ll make most of your paperwork as you reference all your connection points and log specifics about the processing, delay, levels, EQ, compression, and so on.
At first, you’ll be on the headset a great deal, giving cueing notes, EQ adjustments, and volume changes. It won’t be easy to leave your position unless you have a good assistant. When setting cues, pick one basic spot from which you set all initial levels. Check other locations to see how the sound plays in other parts of the theatre.
Because the headset amplifies every sound you make, always shut off the microphone control button when you put the headset on or take it off. The stage manager usually has the volume turned up on her headset, so gum chewing, eating, laughing loudly, or coughing into the headset can be irritating. Technical rehearsals are stressful enough, so every bit of consideration and courtesy helps—the words “please” and “thank you” cannot be overused.
In most situations, you’ll find a multichannel communications system that will allow the stage management, electrics, and sound and deck crew to have their own independent channels. In a lessthan-perfect situation, you may have to share a headset channel with the backstage crew. Try to work out a mutually agreeable system by which you can communicate with your sound operator and the stage manager can speak to his crew. Some designers own walkie-talkies to use in cases like this or when they need to communicate with someone who can’t be on a headset (like a backstage wireless microphone coordinator). Most headset systems have a call button. When pressed, it illuminates a light on the base station or belt pack. During a run-through or performance, it’s best to flash the light first and let the stage manager acknowledge with either a “go ahead” or “wait” before talking on the headset. You may not know when the stage manager is in the middle of a cue sequence, and you don’t want to inadvertently disrupt a cue call.
PAPER TECH
At paper tech, the stage manager, director, lighting designer, and sound designer talk through the show before going into technical rehearsals. Paper tech does not necessarily happen at every theatre, but when it does, cues are placed in the stage manager’s book and assigned letters or numbers. If you won’t be doing a paper tech, confer with the stage manager about assigning cue numbers or letters. This has to be done before tech so that you have the appropriate letters or numbers for the cues and cue sheets. Otherwise, the stage manager will have to abide by your cueing information.
Most of the called cues in a show are light and sound cues, some of which are called together, especially at the beginnings and ends of acts. Try to get a sense of how the lighting designer and director want the cues to work. By learning as much as you can about the length and intent of scene transitions, you can avoid having to start from scratch as you rough-in counts the first time light and sound cues are played in tandem.
LEVEL SET
When using a computer-based playback system, you need to do an appropriate amount of preprogramming before your level set session. If you are operating manually, prepare plenty of blank cue sheets and start writing in some preliminary information about the cues. By this point, you should know each cue’s number or letter, the device on which it is played, what input on the mixer it’s assigned to, whether it starts at a set volume or fades in, and what loudspeakers or areas it will be assigned to. Have the operator enter this information onto his cue sheets or into the computer before the level set session (or if you don’t get one, before tech). Then instead of him having to write out all of the specifics of the cue, he’ll just need to write new information, such as volume or equalization. You can also use an assistant to write or type this information into cue sheets prior to tech. Never waste the cast and crew’s time waiting for your operator to fill in information that could have been noted prior to tech. This doesn’t mean that the operator can’t take time to write new information during tech carefully and completely. That’s also part of his job. (See for more on training the operator.)
Roughing-in the sound levels should happen at least twenty-four hours before first tech, with the director present to hear the cues in the space. If the director is not available, you should still rough-in your levels. If you are planning to use a computer-based playback system that is programming intensive, do not forget to schedule enough time to make this go smoothly.
If the set has moving pieces, the location of the pieces in relation to the loudspeakers may affect the sound. Make sure someone is available to move the scenery or to show you how and where to move it.
You’ll need absolute quiet at your level set. You may allow the painters to quietly continue their work, but you should not be expected to fight against the sound of hammering, drilling, or banging. This is one instance when sound must take priority over the other design elements.
FIRST TECH
The first time the actors are onstage may be considered a “spacing rehearsal” and not a tech. During this rehearsal, the director and actors will be exploring the staging and there might be a lot of conversation about making adjustments in the blocking. This is probably not the best time to be playing cues. You might sneak some in, but observing these blocking adjustments may give you information about adapting your cues to better fit the situation. Sometimes the first tech “crawl-through” will be merely an opportunity for the design teams to go from cue to cue with the actors present. At first tech, your goals should be getting the sound operator familiar with the material, equipment, and your manner of writing cues and hearing how the cues fit with the production at this rather shaky phase of rehearsal. On computer-based systems, you might be double-checking your basic programming and loudspeaker assignments.
Until this point, you’ve heard your cues set at preliminary levels in an empty theatre or studio. This is the first opportunity for you to gauge the volume of the cues in relation to the actors’ voices. Be advised that you still will not hear the design as a whole. There’s a great deal of “hurry up and wait” going on from all the design elements. You certainly will not be able to get accurate timings at this rehearsal. Concentrate instead on fine-tuning the execution and placement of the cues and the volumes and equalizations.
As a designer and not a technician, you should be presented with problems to solve, not given orders by a director who believes he knows the proper solutions to problems. For example, the director might say, “Take the volume down on this cue,” because she thinks that the cue is too intrusive. However, the problem may not be with the volume, but with the calling of the cue, its placement in the aural landscape, or, in the worst case, its content. One solution might be to start the cue in a less obvious moment in the action. This isn’t to say that the director can’t recommend that a volume be raised or lowered—you may hear her complain, “I can’t hear the cue. Where is it? It was there a moment ago.” Try to relay to your director that there are more options in dealing with the cue than “louder,” “softer,” “there,” or “not there.”
The director will ask for changes in the volume, timing, and placement of cues, but it’s not always necessary to make the changes and rerun the cues right then and there. Don’t waste valuable rehearsal time listening to minor adjustments. Take a note and give the changes to the operator later. However, it is a good idea to give the stage manager changes immediately so that any confusion can be discussed while the details are fresh. If you’re working on a sequence that does need to be run again (for lights or actors), and one cue in the sequence needs an adjustment, take the time to have the operator write down the adjustment so that he can run it correctly in the next pass.
It’s important to confirm that the timings of spot cues and ambiance (including any extra ambiance intended as a “safety buffer”) that you made in rehearsals are long enough. Cue-to-cue rehearsals often have many interruptions, and it may be impossible to get an accurate timing of scenes to know if the ambiance is long enough. Timings can be achieved at the first tech run, which is usually the dress tech. Cue to cue is the proper place to confirm that the lengths of spot cues (a train’s passing, a dog’s barking, a thunderclap) are correct.
When hearing a cue, possibly for the first time in context during tech rehearsal, you may find fault with how it sounds. First determine that the sequence or cue was heard as written, because the problem may not lie with the design, but with the execution. Check the cue’s EQs and volume, and make sure that the stage manager is calling the cue at the correct point in the script. Also confirm that what you originally indicated for the cue’s call is indeed where it should occur. This is the time to make adjustments and fine-tune. You may reach a point where it’s better to leave the cue and come back to it later with fresh ears. Make a note to yourself to pay careful attention to this section at the next run-through.
MAKING CHANGES
What do you do if the director wants to cut your favorite cue—the one that took you forty-seven actors, three days, and two cases of beer to build? Find out what the director didn’t like about it or what, specifically, wasn’t working. If there’s something about the cue that can be adjusted immediately, try that before starting from scratch. If the director has simply changed his mind about including any sound at a particular moment, don’t throw the cue away when you remove it from the current cue list—he may change his mind yet again. He may eventually want the same cue back where it was or inserted somewhere else, either as is or in modified form. Keep every cue and variation of that cue at hand through the tech and preview process.
I was hired to design the sound for a production of a new play centering on a goat from Virginia that decides to become an actor, stands on his hind legs, and moves to New York to star in The King and I. The sound, as well as all other aspects of the production, was decidedly odd. Out of the original fifty-nine cues requested by the director, only twenty-three remained by first tech. Eleven of the cues cut were flushing toilets, meant to be heard from an offstage bathroom. The director’s decision to cut the flushes was based on the obvious distraction of having to hold the action onstage while the plumbing said its “lines.” After the rationalization that the bathroom was far enough away from the onstage room that the audience wouldn’t need to hear what transpired there, another dozen cues involving running water and doors and windows being opened and closed were cut. None of this became definite until I was asked to splice all the flushes and some of the faucets back in and cut them out several times. Because the company became so fond of and familiar with these sounds, I gave out the lengths of tape with the flushes as opening night gifts.
—DK
Be prepared to accept the fact that some cues may never be part of your production at all. This idea can be hard to swallow when you’re particularly proud of the work you’ve done in building the cue. But keep in mind that your design is tailored to the production, and that the director reserves the right to change his mind. The director will gain a new perspective on his work as rehearsals progress, and as a result, there will be changes, cuts, and additions. Use the same artistic attitude and openness that you had when developing the project. Don’t feel that you can’t discuss the merits of certain changes, but keep in mind that the director has a lot going on, especially at tech time. Try to accommodate the director whenever possible. Sometimes a director will have to hear a cue in context before he can tell if it will work.
Once in tech, don’t be surprised if you want to make a change and the director tells you not to. He may not want to try something different if he feels the cue works, or he may have enough problems to worry about without fixing something that isn’t broken. In addition, some directors hesitate to put something new into a show too close to opening night for fear that the actors’ performances will be adversely affected.
Typically, a designer’s commitment to a production doesn’t end until the show opens, and until that time, you must stay open to changes. Only when you get into the theatre will you be able to consider your work as a whole. At this point, you’ll hear the show run on the proper equipment and not just on the rehearsal system. Occasionally, what seems like a good idea in the rehearsal hall is not as effective when heard in the theatre. Perhaps some cues will seem completely wrong and you’ll need to fix or cut them—or you may realize how to make a merely mediocre cue into a perfect one.
DRY TECH
When running sequences of cues that are difficult to execute, try the cue a few times and then move on to other cues in the show. Once you have a sense of the pacing of that sequence, arrange time with the operator for a dry tech—a separate rehearsal outside of tech rehearsal in which you both go over these problem cues and figure out a smooth way to run or reprogram them. Repeat particular sequences until the operator is comfortable with executing them. Some stage managers are more than willing to find time to call sequences in a dry tech. It both gives them the opportunity to become more familiar with calling the cues and allows them to be part of the troubleshooting. These stage managers have a special place in heaven.
If certain cue sequences depend on timings of the actors, first dry tech with the operator, and then ask the director if the cue may be worked at a later rehearsal with the actors available. If the equipment is new to the operator or if she is inexperienced, anticipate that she may be a little nervous when there are tight or tricky sequences to run. Be patient and assure her that there will be a chance to work on these problems without the pressure of tech rehearsal.
DRESS TECH
Dress tech is the first real run-through of the show without constant stopping. You want to be able to hear the show without a headset on, but don’t remove it until you feel confident with the way the show is being called. You must also be sure that the operator doesn’t need your help to get through a run.
Dress tech is a good time for you to move around the theatre and hear the sound from different locations as you further refine it. Start paying close attention to EQ, smoothness of fades, coordination with lights, volume, integration with action—in essence, the way the design works as a whole. If you’ve questioned anything about a particular cue, now is the time to determine if you should make changes.
After dress rehearsals and previews, you’ll have gathered notes relating to the operation of the show. Find a time for you and the operator to discuss these notes, which will include level changes, count changes, and cuts/additions of cues. The sound operator should have been taking notes about any problems encountered during the performance. This meeting is a good opportunity for you to discuss her notes as well. Throughout this note-reviewing process, make sure that the cues were properly executed before you adjust them to compensate for what you heard. The operator may have been distracted by a problem in the booth that prevented her from executing the cues as intended.
PREVIEWS
Many elements of a show are altered when there is a first audience. The acoustics in the space change, and the actors’ reaction times are different. During previews, the show starts to solidify. You’ll never truly know how your design works until it plays before an audience. Because an audience changes the acoustical properties of the house, you’ll probably think that a number of cues are too soft, so make notes on cues that should come up in volume. They may sound too hot in the next day’s rehearsal, but hear them again with an audience to see if your adjustments work. Although many of your volumes depend on being balanced with the actors’ voices, the actors often don’t speak at performance level until there’s an audience present.
You may have found a certain place to listen to the show during rehearsals. At the first preview, listen to the show from this same point to see how the presence of an audience affects the volume level. During the course of previews, check out how the show sounds from different locations.
FINAL REHEARSALS
Unless your design or the entire show is still in a state of flux, the final few rehearsals before opening will be spent refining subtle aspects of the cues. These rehearsals generally take place during the days that previews are scheduled. As the actors get used to having an audience, they’ll develop rhythms around which you can adjust the cues’ timings. Remember, though, that there is a cut-off point when you must stop fixing. The director should stop giving notes at opening, when the show is said to be “frozen.” So should you. Have your operator redo and clean up his cue sheets or playback cue list when there are no more cuts or additions.
When opening night arrives, make sure you have backed up the show materials. After all, if something happens to your playback media or device, it’s easier and quicker to use a copy of the original cue than to remanufacture it. If you are using a computer-based playback system, you can easily back up the entire production every day—and you should.
Save any outtakes that might be valuable in the future. Unless your contract specifies that the theatre owns the sound design, you should get your materials back when the show closes so that your effects or the whole design cannot be used without your permission. Your design now becomes the latest addition to your sound and music library.

If you live in the same area where your show is having a long run and have the opportunity to see it, you’ll find it interesting to hear how it sounds after several weeks or months. With an attentive stage manager and conscientious sound operator, the cues will have solidified and gotten tighter and cleaner. The reverse may happen, of course, and a few precise notes about execution and intention from you to the sound operator or stage manager might help matters. But don’t overdo the notes—the show is no longer in your hands. It is under the capable (you hope) guidance of the stage manager. It’s splendid to attend a show on which you worked, and to be able to sit and enjoy it without being constantly aware of your cues. Look forward to it!