10
Running the Show
The sound designer and operator work together as a team, so they must have a relationship that involves good communication, patience, and trust. As they work together, a common language will develop that will enable them to understand each other more quickly and clearly. A good designer helps the operator learn about the sound system and the intention of the cues. The operator, for his part, should know that things will be changing right up to opening, and that it is the designer’s desire and responsibility to exercise different options before settling on a way to perform or run a cue. Performance is the key word here, whether the show is operated manually or via a computer-based playback system. When working with a computer system, a great programmer understands the subtleties and idiosyncrasies of the software and can translate your cue instructions into appropriate coding that will allow you to realize almost anything you hear in your mind’s ear. Like the actors, the operator must take his task to heart with each show.
I had to design some sounds that would accompany the movements of an actor’s body. When he arched his back, we had to hear his joints creaking. When he bent over, we heard the sound of his blood flowing through his veins. I didn’t feel that the actor was going to be consistent with those movements every night, so I couldn’t make those cues a specific length, and I didn’t want him to be constrained to a length I would dictate. I decided those cues were best executed by the operator playing random, short sounds, laid out within an octave of keys on a digital sampler. The operator would simply tinkle the keys as long as the performer moved. After an hour of rehearsal with just me, the director, the actor, and the operator, we concluded that the cues weren’t synchronizing well. The sounds would play too long or they would start late. Then the operator asked me if he could “play the faders” instead. He wanted to raise and lower a volume fader instead of trying to play the keys. I questioned in my mind whether he would be able to do that any better than he was doing with the keyboard, or whether the fades would sound too obvious. But the way it was going, we needed to try something different anyway. I made a sequence of random notes for each sound, assigning the joints to one output of the sampler and the blood to another. When that section of the show started, the operator started the sequencer with the faders out. Sure enough, all of the cues started right on time and played perfectly. While the operator didn’t feel comfortable playing a keyboard, he could play the mixer like a Stradivarius. The operator and I worked as a team and I learned to trust and respect his judgment.
—JL
Until opening night, the operator should take changes only from the person with whom he teched the show (the sound designer, the associate sound designer, or composer, for example). After the first preview, a director may feel that all the sound is too quiet, and mention to the operator that it should come up a point. But the operator should never accept that kind of recommendation without checking with the designer, who has the best ability to translate the director’s requests into specific instructions. After opening, the stage manager may consult with the designer and make changes according to her judgment on how the cues are working within the show.
The sound operator’s primary responsibility is to execute the sound design. This involves preparing for each performance (the soundcheck), running the show, and shutting down all the equipment at the end of the performance (if appropriate). His job also includes preserving the artistic intent of the sound design throughout the run of the show. To do this, the operator must run the sound precisely and maintain the sound system. He should have an adequate grasp of the technical aspects of sound so that he can identify and correct problems quickly and competently.
Early in my career, I was running the sound for a production of My Heart’s in the Highlands. During one performance, I suspected that one of the input channels on the mixer had gone bad because one of the dog bark cues didn’t play. I checked the board to make sure that it wasn’t just an operator error on my part. Just as I got the “ready” from the stage manager for the next dog cue, I bypassed the bad input by patching into an open channel on the mixer. “Ready,” I responded, proud that I had figured out how to get around the malfunction. When the stage manager said, “GO,” I played the cue. It sounded like there was a nineteen-foot miniature poodle backstage. That was bad. I was certain that the stage manager, known for running an extremely tight and well-executed show, was going to leap over his console yelling, “What’s that? FIX IT!!!” Well, the audience completely lost it when the actor onstage delivered his next line. Peering out the front door, he said, “It’s not a very big dog, Johnny.” Horrified, I looked over to the stage manager, who was laughing so hard he had tears rolling down his face. Somehow, that made me realize that even though I had made a mistake, people would understand that I was only human. After the show, I figured out that when I bypassed the bad input, I had plugged into an input that was calibrated hotter than the bad channel. A level of three on the new channel equaled ten on the faulty channel. After that production, I trimmed all of the inputs on the board to the same value.
—JL
THE SOUNDCHECK
Before each performance, every piece of sound equipment used in the production must be checked thoroughly to be certain that the sound equipment is set up and functioning properly. If a sampler hasn’t been loaded, it won’t matter if the volume has been set correctly—the cue won’t play. If an amplifier hasn’t been turned on, the loudspeakers patched into it will never make a sound. If the equipment isn’t preset properly for the top of the show, the cues will not play properly. The first three steps of the soundcheck are
• Setting up/turning on the equipment
• Checking the equipment for hardware and software integrity
• Presetting the equipment to run the show
The soundcheck should start well ahead of the house opening so that if there is a problem, there will be enough time to fix it. A basic rule of thumb is to allow an extra half-hour. If the soundcheck takes thirty minutes to perform, then it should start an hour before the house opens. Plan on allowing more time as a cushion on musicals or shows with lots of equipment or an inexperienced sound operator. Large-and even medium-scale musicals can easily add an hour or more to the soundcheck.
The most thorough way to do a soundcheck is to have a written list of the duties that need to be performed. A soundcheck list helps to delineate which equipment has to be checked and what the procedure is for checking that equipment. However, there’s no such thing as a generic soundcheck list—every sound system is different, and the setup of each sound system changes from show to show. How detailed the information is should be determined by the situation. If your operator is experienced, then listing what needs to happen in order might be sufficient. If, on the other hand, the sound operator or the backup operator is inexperienced, then it would be a good idea to have a thorough step-by-step list of duties.
FIRING UP THE SYSTEM
Start the soundcheck by properly placing and plugging in any equipment that isn’t kept in its performance position between shows. Equipment such as loudspeakers or microphones on stands may have been moved to accommodate the resetting of scenery or to prevent theft. If you need to plug in a loudspeaker, do so before turning on the amplifiers. This minimizes the chances of shorting out the amplifier in the process.
There’s a definite logic to the order in which you turn on all the equipment. Some components may emit an electronic “pop” when turned on or off. This pop, or transient sound, is actually a loud, very brief signal produced by the equipment because the electronics are not at normal operating values at the instant of turning on and shutting down. The amplifiers—which are near the end of the signal path—should be turned on last, so that if there is a pop, it isn’t amplified through the loudspeakers. The pop is dangerous to loudspeakers because the transient signal can be much stronger than the typical signal the amplifier was designed to receive. When the amplifier tries to reproduce this signal, it sends the loudspeaker a distorted, extremely strong (loud) signal that the loudspeaker tries to reproduce. In trying to reproduce that signal, the loudspeaker may be damaged.
As you turn on your equipment, check any controls that are normally left in one position throughout the show to make sure they are set properly. On amplifiers, check output volumes. Indicate the proper position of a knob or a switch by marking the equipment with a small piece of board tape (white paper tape) marked with an arrow pointing to the correct position. These visual guides are called “spike marks,” a term that more commonly refers to positioning furniture on a set. It might be helpful, for an inexperienced operator, to list all the switches and knobs that are to be checked on each device or draw a diagram.
If there are controls that will not move throughout the run of the show, tape them down to their correct position. Consider whether any equipment in the setup will be used at times other than performances. In some theatres, the equipment used to run sound during a show is also used to produce recordings for the next production. All controls that do get changed throughout the show must have their settings checked when you set up for the top of the show. These controls could include (but are not limited to) EQ, output assignment, effects processors, and loudspeaker controls.
CHECKING THE EQUIPMENT
There is no standard order in which to check the equipment, but as you become more familiar with your sound system, the most efficient procedure for checking will become clear:
• CDs, MiniDiscs, samplers, computer-assisted playback systems, and other sources
• Microphones, wired and wireless
• MIDI gear, triggers, synthesizers, and samplers
• Mixing boards
• Auxiliary equipment (reverb units, equalizers, digital delays)
• Loudspeakers
• Practical sound effects (phone ringers, door bells, and buzzers)
• Equipment that may be the responsibility of the sound operator (headsets, production monitor system, the stage manager’s paging system)
The most precise way to check the loudspeakers is to move around the house and listen to each one. Music is useful for checking loudspeakers because it usually has a wide range of frequencies. You should also use the show recordings for this test. If there is no music in the show, choose a piece of music with which you are familiar. Listen to make sure that the loudspeaker is reproducing the music clearly. If the loudspeaker sounds like it’s working properly, then you also know that the amplifier powering that unit is functioning properly. A muffled, tinny, or distorted sound might indicate that a component in the loudspeaker has failed, that something is wrong with the amplifier, or that there is a bad connection somewhere.
If you are using a computer-assisted playback system, you can build a loudspeaker and effects check. This is similar to the technique that a lot of master electricians use to perform a dimmer check. This check can be built for a one-or two-person operation, but it’s common for the sound operator to do it by herself. The following is a guide to how the sequence might be created.
First, select a broad-band, fairly compressed music selection without a lot of variation. This will make it easy to consistently hear content from each of the loudspeakers units or distribution areas.
Second, identify how many units need to be checked and note their location.
Third, build a sequence that crossfades between each of the loudspeakers or distribution areas. Set an appropriate wait time between each loudspeaker cue to allow the operator to walk around the house and check each unit, even if there are multiple units in an area. If you use real-time effects processing, you can create cues within the sequence that check microphones and effects levels. You should also test complex sequences using the sound cues built for the production.
The next phase of the soundcheck is to make sure that sounds coming from the playback devices, microphones, effects units, or any other equipment are being routed to the proper amplifier at a consistent volume. Volume controls need to be checked to make sure that each control fades up as smoothly as it did in the previous performance. While music is playing through the input, move the fader up and down, listening for a sudden jump or drop in volume. Also listen for static, which would indicate a dirty fader. Test each input channel used in the show by playing something out of each piece of equipment and moving the individual faders up and down. By checking each fader used in the show, you’ll also be checking all of the soundproducing devices (decks, samplers, microphones). If you are working with a digital mixer, you’ll want to check all of your saved scenes.
If you’re using a digital sampler, load the show sound bank. Setting up a test bank that has data routed to each output separately is another good way to check the integrity of each output. If you are using more than one disk or bank in the show, make sure they all load. It is rare for a hard drive not to load, so if a drive reads properly when checked, then it will most likely read during the show. Of course, all drives and disks should be backed up in case of an emergency. When playing a digital sampler with a keyboard, make sure the keys work, and if you’re using a sequencer in conjunction with a sampler or other MIDI equipment, make sure that the sequencer is working properly. Set up one or two specific cues with which the sequencer is used, and run the sequence to ensure that all the equipment and sounds are triggered properly.
Do the microphone check after the loudspeaker check—that way, if there are problems with the sound quality, you’ll know that the loudspeakers are not the problem. Whenever possible, have someone onstage talk into a microphone while the sound operator listens in the house.
Many times when I’ve asked someone to talk into a microphone, they reply, “What should I say?” My stock answer is, “Tell me what you had for lunch yesterday.” If they skipped lunch yesterday, then I ask why. Between the two questions, I can usually get someone to start yammering enough to check the equipment.
—JL
If equipment such as a reverb or compressor is used with the microphone, make sure it is patched in and tested. When wireless microphones are used, check the batteries, antenna, reception, integrity of the microphone cable, as well as the sound quality of the microphone element. Walk the microphone around the playing area while testing it through the loudspeakers. Even the best wireless microphones are susceptible to interference from outside radio transmissions or blockage because of metal objects. For example, a metal ladder placed backstage in a different spot than that used on previous nights could change the characteristics of the reception onstage. It’s not a bad idea to turn all the wireless transmitters on during the RF (radio frequency) system test. This will help you to see if there is any interference due to transmission frequencies being too close together. Go to www.elsevierdirect.com/companions/9780240810119 for links to more detailed information available on the web about using wireless microphones.
All practical sound effects should be tested to see if they are hooked up and whether the switches operating them are functional.
Communication headsets, along with their belt packs and cables, probably receive more abuse (from dropping and yanking) than any other type of equipment in the theatre. Put on the headset and listen to yourself to make sure that the microphone works. Press the page button to make sure that it is functioning, and wiggle cables at the connectors to check for shorts in the wires. Once you’ve checked the headset, make sure the microphone switch is off. When you put the headset back in its resting place, see if the headset cable needs to be coiled. A long cable lying haphazardly on the backstage floor is a tripping hazard.
In most houses, the production monitor—the system that allows the stage to be heard backstage—and the stage manager’s paging setup are parts of the same system. Common to these systems are loudspeakers in various positions (combined with a volume control), a microphone over the stage, and a microphone enabling the stage manager to page various locations throughout the theatre. Some systems also allow the stage manager’s microphone to address the house. This comes in handy during technical rehearsals and emergencies. As with the other equipment, all of the components of the production monitor system need to be checked, which means that loudspeakers, amplifiers, and microphones need to be tested and preset to their performance values. In the same way that actors should check their props before the show, the backstage crew should test every piece of equipment that will be used during the performance. Normally, the stage manager will confirm that her own system is functioning and ready for performance, but the sound operator must incorporate the production monitor system into the flow of his setup. The sound operator should determine that everything is working properly before the stage manager checks her own equipment.
Once all of the equipment has been set up and checked, the operator should preset the controls and equipment that he’ll be using and changing throughout the show.
TOP-OF-SHOW PRESET
The top-of-show preset refers to setting the controls on the sound system for the beginning of the show. How this is done depends on the configuration of the system. For example, it’s always necessary to have the decks routed so that their sound comes out of the proper speaker. If you’re using a home stereo amp for the center of the system, the tape monitor or input selector must be set in the proper position. If you’re using a mixing board, each input must be assigned to the proper output, and that output fader has to be put at its performance setting. Even digital mixing systems require a detailed top-of-show preset check. You should check your opening “snapshot” or “scene” against a printout or list of exact numerical values as opposed to the specific position of a fader or switch. Don’t forget that it’s good practice to back up your settings regularly. All could be lost in a catastrophic hardware failure.
In manually operated systems, a concise and efficient way to preset the equipment is to develop a top-of-show preset sheet containing all settings. Sound systems vary as much as the composition of the top-of-show preset sheet, and there are many ways to display the same information. Whatever the format, though, the preset sheet should provide the sound operator with clear and complete information on how to set the equipment. For a very basic sound system, the preset sheet can be as simple as a list of a few settings, but a more complicated setup requires a layout that clearly charts the information.
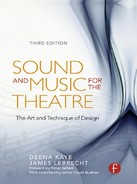
Figure 10.1 is a preset sheet developed for presetting a 16 × 8 mixing board. Here, the numbers 1 through 16 denote the input channels. ER1 and ER2 stand for the echo (or effects) returns available on this particular mixing console. The EQ column tells whether the equalization section of the input is engaged. On some mixing consoles, there is a switch that allows you to bypass this section, so that the setting on an equalization knob has no effect on the signal passing through that input (it’s like having the high, mid, and low controls set at flat). For each channel, the EQ column is marked “in” or “out.” Suppose there is no equalization needed on an input channel at the top of the show, but the channel has equalization later. With the EQ section bypassed (“out”), you can set the equalization knobs to the proper settings for later use, then engage the EQ section later. Channels 5 and 6 show how this would look on the top-ofshow preset sheet. Some other operators might want a column for each input channel’s volume setting. The operator who developed this particular sheet wanted to set the volumes by looking at his cue sheets. He thought that having to look over the first sequence of cues would help him get ready for the show.
FIGURE 10.1 A top-of-show preset sheet.
Other information that could be indicated on a preset sheet includes the following:
• Output to loudspeaker assignments
• First cue number for each playback device
• Pan pot positions
• Auxiliary equipment settings
• Output fader levels
It’s simple to enter such information on the top-of-show preset sheet.
With a blank sheet in front of you, go through the cue sheets for the show (see p. 151) and find the first instance for each input channel on the chart. If the first cue that uses input 5 has no EQ, mark the EQ column for input 5 “out.” Continue through the cues until you find the first instance of input 5 using equalization, and then mark those settings under the high/mid/low column.
With all of the equipment set up and ready to go, the sound operator needs to check the cue sheets to make sure that they are all there and in order. As a final precaution, some operators like to play the first cue that appears on each deck or the computer so that they know the show will start off flawlessly.
Finally, the sound operator needs to turn on all of the running/work lights and tell the stage manager that he is ready for the house to open. The sound is now ready to be run for the performance.
POSTSHOW
For the post-show shutdown, the equipment should be turned off in reverse order from which it was turned on, which means shutting off the amplifiers first. All production playback media should be stored in a safe place. Although keeping them in their players won’t hurt them, securing them away prevents them from being mislaid if someone uses the equipment outside of performance. And if the equipment is stolen, your cues won’t disappear as well. For computerassisted playback systems, it is not necessary to pack up and remove the hard drives when you power down. It is very important to keep one backup of the show in a location that is not the control booth. Keeping a complete copy with your digital audio workstation is the norm. Making DVD archives will preserve the show for the rest of your life (or so we’re told).
FIGURE 10.2 Another top-of-show preset sheet.

OPERATING THE SOUND
As a designer, you want the operator to have the best chance of running the show properly. You’ve built the show so that the sound is as easy as possible to operate. Still, when you are working with a manually run show, the operator must have both concise instructions on what she is to do and a feel for the technique of running the show. While cue sheets provide the instructions, becoming comfortable with the equipment, developing a feel for fades, and understanding the artistic intent of the cues can only come with experience. Of course, with computer-based playback systems, this is less of an issue. But there is still an art in the musicality of pressing the “go” button, especially when the operator is taking the cue on an actor’s action and not a stage manager’s call.
Nothing about running the show should be left to memory. This is not to say that there won’t be a sequence of cues that requires the sound operator to memorize certain moves—but all of those moves should be in front of the operator to review before they are called. Having every move down on paper will also help the operator jump accurately from one part of the show to another during technical rehearsals.
CUE SHEETS
Cue sheets now must be looked at from two different production paradigms: the computer-based playback system and the manually operated setup. Since a computer-based playback system remembers all of the details of each cue in its memory, the paperwork involved with running a show can be rather simple. However, the sound operator of a manually executed show has to have clear instructions to follow.
CUE SHEETS FOR MANUALLY OPERATED PLAYBACK
The format of cue sheets commonly used to operate the show varies greatly. Since cue sheets are tailored to a particular sound system, it’s difficult to present a universal cue sheet. What is common to all cue sheets, however, is that they are clear and comprehensive. An operator’s instructions must be organized so that the cue can be located quickly, with the moves she must execute for each individual cue laid out in sequence.
Ideally, the cue sheets should be so understandable that someone with a working knowledge of sound and that particular sound system could step in for the operator in case of an emergency. Sound operators do not get understudies, but some theatres make sure that someone else on the staff has an overview of the operation for each production’s sound.
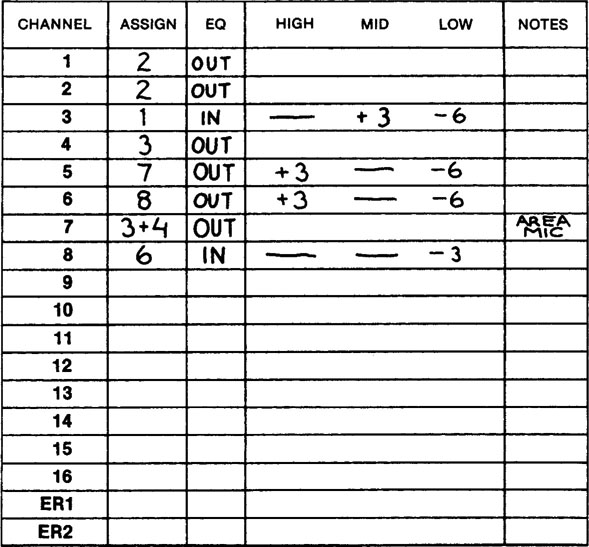
Figure 10.3 is an example of a cue sheet devised for use with a sound system that included an analogue console and different playback devices (which were referred to as “decks”). This cue sheet was developed from a collaboration between the sound operator and the designer. Other operators devised completely different cue sheets for the same sound system. Always provide space on a cue sheet for the cue number, the cue sheet page number, the name of the production, and the action of the cue—including the volume at which a fader is set or moving, the count on which an action is executed, and which deck to use. The cue number should be the most prominent information on the cue sheet, so put it in an uncluttered area. Because the eye is used to reading from left to right in Western culture, most designers and operators put the cue number on the left-hand side of their sheet. Numbering all of the individual cue sheets assures that they are kept in order. It is good practice to write the name of the show on each sheet. This is useful when the theatre is doing more than one show at a time, the show goes on tour, or the show is to be archived.
FIGURE 10.3 A cue sheet for a manually operated system.
Other information that might be shown on a cue sheet (depending on the needs of the production or the desires of the operator and designer) include the following:
• Description or name of the cue
• The script page on which the cue appears
• The act and scene of the cue
• How to operate a practical effect
• Input and output assignments
• Equalization settings
• Changes that must be performed while the cue is running or after the cue is completed
It’s always preferable for the operator to be aware of how the cues being executed relate to the production, so write in what the cue entails on the cue sheet. Figure 10.3 shows that Q15 is the cue for the transition music and includes taking out the area microphone. This helps the operator associate the execution of a cue with an event in the play, not just with a group of numbers and instructions. That connection will help him recall the cue and how it has been performed in the past.
In most cases, including the script page number on which the effect or music appears will help the operator gauge the pace of the cueing until he gets to know the show and feels comfortable with it. Most operators approach a show as a series of clusters of cues. An operator might look at running a ninety-cue show, for example, as a few ten-cue sequences plus a number of three or four-cue sequences. As the operator gets close to a sequence, he will review only that group of cues. By using the script page numbers to show him where the “non-cue areas” are, the operator can easily anticipate an upcoming group of cues.
I worked with a sound operator who would write the note “BREATHE” after especially hard cue sequences. This was a note to remind himself that he had time to come up for air.
—JL
The most common adjustment involved in manually running a show is moving a volume fader. The operator needs to know which fader is involved, to what level the fader should be set, and at what rate (count) this happens. In Figure 10.3, Q16 has Channels 5 and 6 fading up to a level of 7 on a 5 count (CH___ is the area on this cue sheet for writing levels of input channels). Note that the cue sheet does not say where Channels 5 and 6 started. In this case, the operator set up a convention whereby the volume fader starts at 0 (complete attenuation) unless a specific volume is indicated.
Q17 has the volume for Channel 1 set at 2. When the “go” is given for Q17, the operator starts the deck and immediately fades Channel 1 up to a level of 5 on a 10 count. At the same time (or right after starting the deck), Channel 7, which was preset at 5, is turned on (in this setup, Channel 7 is the input channel for the area microphone). Q15 is a spot effect. Its volume is preset before the go is given to start the deck.
The term “count” may seem subjective. Ideally, one count equals one second, but that will never be the case unless your cues are being executed by a computer. In the real world, a count is a unit of time that the operator uses consistently to determine the rate of speed at which an action is performed. As you, the designer, work with an operator, you develop a feel for whether he counts slowly or quickly.
In Figure 10.3, the sound designer and operator determined that if a deck/device is started at the top of a cue, an indication of which device will be used is entered next to DECK. When a cue does not include starting a device, that space is left blank. Instead of writing “deck B—go” as an instruction within the cue, the operator knows that, if a tape deck is listed in that location on the cue sheet, then he should start that deck on the “go.” If the cue called for the operator to start a fade of an input and then start a deck three counts later, then the “go” for the deck might be written as an instruction below the input channel information (CH___).
Remember that there are many different devices that store or emit sounds. An operator needs instructions on how to operate devices as diverse as a practical phone ringer and a digital sampling keyboard. Explanations on the cue sheet for how to manipulate these devices should be concise. For example, a cue may be stated simply “Press red button marked phone bell–2 counts.” The operator needs to know what to move in what direction and for how long.
The assignment (ASSIGN) section of the cue sheet contains information pertaining to how the sound is being routed to the loudspeakers. Depending on the sophistication of the sound system, this information might list an output number (or letter) assignment, or simply a loudspeaker that has been switched on. It is good practice to write in the assignment for each input used within that cue and not just when it changes. This allows a quick double-check before the cue is performed, and it is helpful when jumping around the show during tech week.
When equalizing a cue, make sure that it is clear to what channel the settings relate. In Figure 10.3, there is a space in the ASSIGN box for high, mid-range, and low settings. If you were using a home stereo amplifier in place of a mixer, you might prefer to refer to treble, bass, and possibly mid-range settings.
Space should be left on the cue sheet for writing notes. Operational notes, pertaining to the execution of the cue, should be kept visually within the main body of the form, but actions that happen after the cue is complete, or once it has been executed and is running, can be placed in an adjacent space. In Figure 10.3, the AFTER Q section is for that purpose.
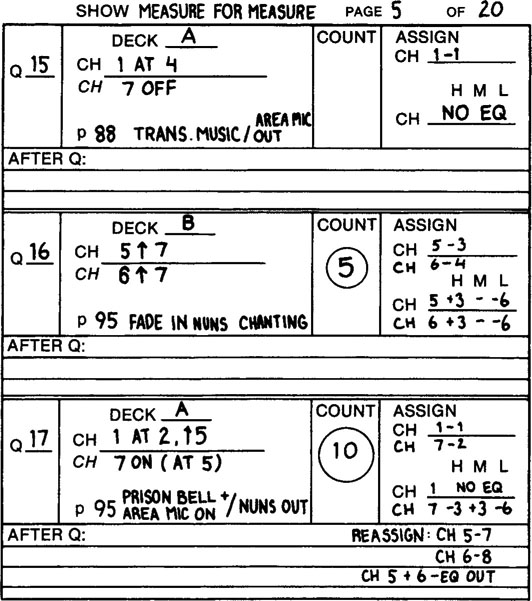
Figures 10.4 and 10.5 are other examples of cue sheet layouts. Note that the cue sheet in Figure 10.4 applies to one particular act and scene, and dedicates a block of space for the decks’ volume and EQ settings as well as speaker assignments for that particular sheet. An advantage to this cue sheet is the adjustable amount of space used to write a specific cue, depending on the length of data. The cue takes as much room on the page as is needed to write the instructions, whereas the cue sheet in Figure 10.3 limits the cue to a specific block of space on the sheet.
FIGURE 10.4 Another cue sheet example.
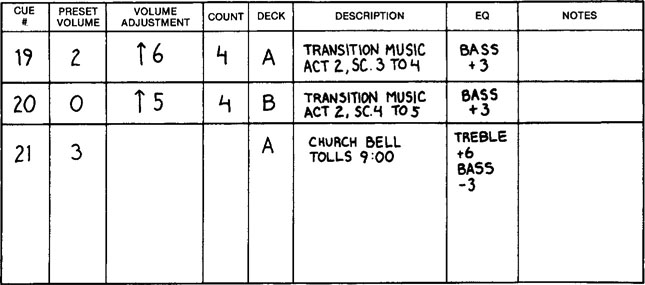
FIGURE 10.5 A different cue sheet.

Many designers and operators make up a blank cue sheet and duplicate it, using it as a standard form for most shows. This doesn’t mean that you can’t write out all of your cue sheets by hand on a legal pad, although it is helpful to be consistent in the layout of the information. Other designers use a database for logging all cue information and then print out a report that contains individual sheets or a full set of cue sheets needed in a production. This also helps keep the process a bit smoother when having to insert a cue into a page that is already full. Once she is familiar with the layout of a cue sheet, the operator will know what part of the sheet to immediately go to in search of specific information.
Figure 10.5 is a cue sheet that was produced using a spreadsheet program on a computer. “U,” which is found under the Level and Aux 1 headings, stands for unity (a level that neither boosts or lessens the signal’s volume). “PT” refers to ProTools, the digital audio workstation that was used as a playback device in performance. The designer that developed this cue sheet used the convention that anything that changed in a cue would be shown in boldface.
When I began designing theatrical sound professionally in 1980, I realized that there wasn’t an established language for sound designers to use. Lighting designers had some standards, but sound designers had a wide variance in the language and terms they used. When writing cues manually, it became extremely important to have the designer, assistant or associate, and operator speaking the same language. So by 1983, when I started teaching at Yale, I developed a list of terms (shown in Figure 10.6) in an attempt to standardize sound design cueing communication. As with all languages, this is a living document that changes and adapts with different creative teams and production styles.
—DB
FIGURE 10.6 Language for cueing chart.

There are many ways to abbreviate the information contained in a cue sheet. Figure 10.6 is a chart that proposes a common language for the abbreviations that are used for cue sheets.
The list of terms in Figure 10.6 can express both simple and complex command statements. The terms can be adapted for use in contemporary computer-assisted playback systems as well as in manual playback systems. Not listed here are many new terms that manufacturers of cue control software have developed that reflect their own control architecture.
CUE SHEETS FOR COMPUTER-BASED PLAYBACK AND MIXING SYSTEMS
In 1985, Richmond Sound Design introduced the Command Cue, a computer-assisted playback system developed for the theatre. Early systems, such as the Command Cue, were limited to basic features, including starting a playback deck or sending a MIDI note message to a sampler. The technical advances in computers, audio, and show control since the mid-1980s have allowed a number of new systems to come to market that have revolutionized and advanced the art and craft of sound design. These new systems eliminate the need for individual stereo playback devices or deck-based playback by providing multiple channels of playback and mixing. They provide automated mixing, panning, and imaging of sound sources as well as automated control of microphones and effects. These systems can automatically back up your work, preserving your design in the event of a catastrophic equipment failure. Probably the most important reason to use this technology is that it can provide consistent playback of very complex sequences.
FIGURE 10.7 SpaceMap window from the Matrix3 audio show control system.
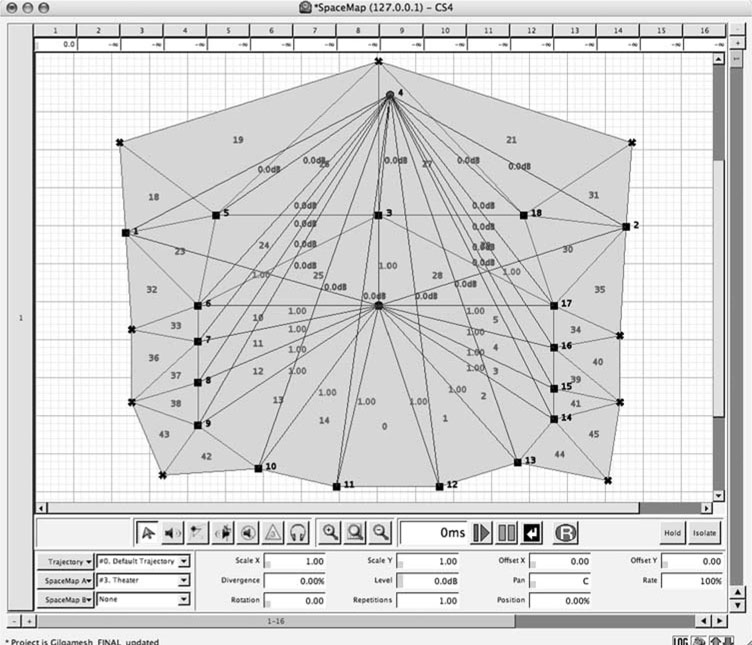
Meyer Sound Laboratories’ LCS Series Matrix3 audio control system is one of the most advanced products for theatrical playback. This integrated software and hardware package allows you practically unlimited control over volume, panning, EQ, and multiple audio file playback, just to mention a few features.
The SpaceMap window is where the sound operator can define speaker locations within the theatre and then draw a path showing where she would like the sound to travel.
The capabilities of the most sophisticated systems are limited only by your budget. Of course, the larger systems can be very powerful and allow you to more closely realize what’s in your mind’s ear when conceiving a sound design. Technologically, they can perform just about any task that the designer asks. They can also be quite expensive, but are well worth the money. However, don’t overlook the less expensive or free programs that are available.
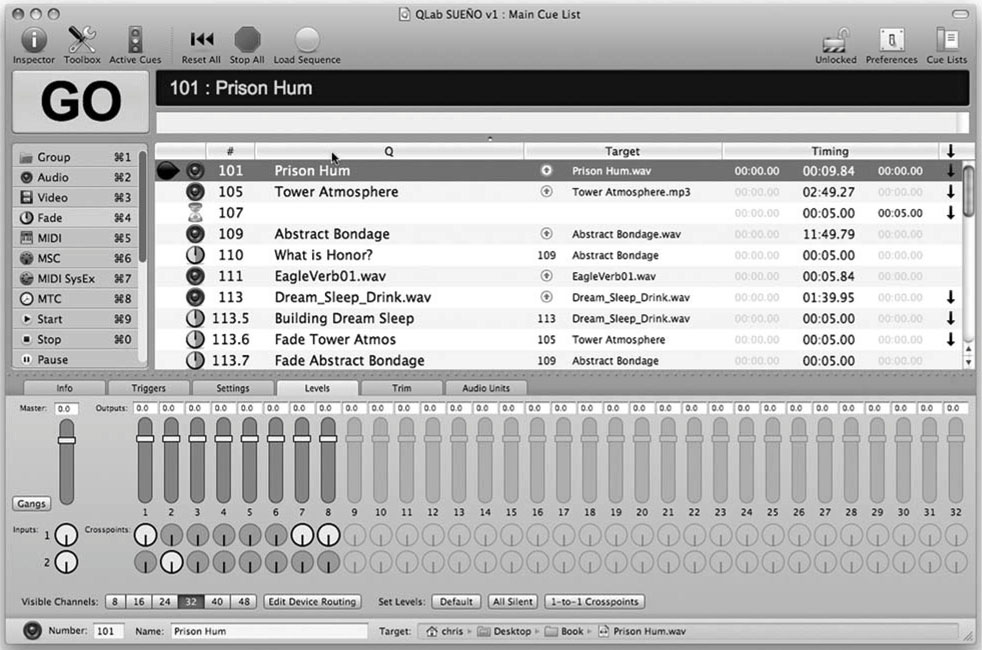
QLab is a versatile, affordable computer-assisted cueing system that is in use at many theatres. It’s easy to learn and use, plus it’s very reliable. Because it’s not dependent on external audio hardware, you can build an extremely portable and useful playback system with just the software and a laptop computer.
There are many other products you may want to become familiar with. These include Stage Research, Inc.’s SFX and ShowBuilder programs and Richmond Sound Design’s SoundMan software and AudioBox hardware.
{You can find additional information about computer-assisted playback systems on our webpage at the Focal Press website–www.elsevierdirect.com/companions/9780240810119.}
Computer-assisted playback systems don’t require a physical operator cue sheet. The cues are displayed in a list that is part of the operational software. The detailed cue information that would be on a cue sheet (if the show was run manually) is all stored as a part of the cue.
Although you won’t need to make operator cue sheets for running the show, you should provide the operator with a cue summary as you would for the stage manager. The cue summary is a useful reference for your operator and comes in handy when you’re building cues with him. That said, you should still track your cue running information by either making a printout of the computer data or manually tracking it in a database or spreadsheet application. You want to have a backup of the cue instructions in case the worst should happen, your primary and backup computer systems fail.
FIGURE 10.8 A screenshot of a cue list from Figure 53’s QLab application
TRAINING THE NOVICE OPERATOR
The first step in training the novice operator is to make her familiar with the equipment. Identify each piece of equipment and describe, in terms as simple as possible, how the various pieces of equipment are hooked together to form the complete sound system. Show her in detail the complete setup and preset of the system—where the power switches are, how to load the CD and MiniDisc players, how to set up for computer playback—even how to recover from a crashed computer. Explain the actual mechanics of running the show, stressing to her that operating sound is different than running another aspect of the show (use the lights as an example). Once a fade into a lighting cue is complete, the lighting operator can relax while in that cue. When running the sound, some devices will continue to play unless stopped by the operator.
Chances are that training the novice operator will happen during tech week. If you can do it earlier, you should. Impress upon the new operator how crucial the soundcheck is. Let her know that if she is running behind, the soundcheck still must happen and that you’ll help her through it. Remember, a technical rehearsal without a proper soundcheck could be fraught with problems and could waste more time than it takes to do the soundcheck correctly in the first place.
Go over all the paperwork with the operator, especially the cue sheets. Make sure that you give her guidance on how to fill in her cue sheets. Explain to her how counts are used in running the show; have her count out loud and adjust her tempo, if necessary. Impress upon her the importance of double-checking the equipment against her cue sheets.
Go to the booth and have the operator run a few cues in your presence. Watch the way she runs those cues, and give pointers where necessary. If there is time, try running the hardest sequence in the show—working those cues by her side, where you can see what she is doing, is better than trying to figure out her problems from the other end of the headset cable. Explain to the operator who the stage manager is, how the cues will be called, and the proper response to the calls.
One word of wisdom to pass on to the new operator is to not become complacent. Even experienced operators tend to become relaxed as they get more confident with the show. Between the terror of running the first shows and the feeling of confidence after running a number of flawless performances lies a transitional phase in which many operators make careless mistakes.
TRAINING A REPLACEMENT OPERATOR
If the current sound operator or mixer has to be replaced, there are some measures to take that will help the transition to her replacement. Assuming that you have advance notice of the operator’s departure, you have the opportunity to train a backup operator. If a backup operator is familiar with the show, then any instance of an operator leaving a show should not become a disaster. In many ways, training a replacement operator is similar to rehearsing an understudy.
Have the replacement operator watch the current sound operator run the show—not just the actual operation of the cues, but also the soundcheck and strike. The replacement operator should have his own copy of the cue sheets (if used) so that he can follow along without looking over the shoulder of the current operator to see her sheets. If he needs to make notes for himself, he can do so on his own copies. If the show isn’t too demanding, the current operator can give a running commentary on what to watch out for.
With this training, the replacement operator should then be given a chance to run the cues outside of performance (dry tech). With the current operator watching, the cues should be called with the same rough timing in which they are called during performance. With difficult sequences, the calls may need to be slowed down to allow a replacement operator time to get the moves down pat. An excellent technique to help the new operator learn the pacing of the show is to record the stage manager calling the show and use that tape during this dry tech.
Once the replacement operator has mastered this phase, it’s time to work him into the show. His first performance behind the controls should include the previous operator standing by to catch any problems and give reminders. Only the judgment of the original sound operator and the stage manager can determine when the replacement is ready to go solo.
TOURING
There are additional tasks that the sound operator may have if he is taking a show on tour. He’ll probably be responsible for setting up the equipment from scratch, or incorporating the equipment into existing equipment at the performance space. He’ll have to devise a procedure for setting up and striking the equipment at each theatre, and he’ll need to prepare packing lists. Plan on allotting a sufficient amount of time for an extensive soundcheck. If you’re using equipment belonging to the performance space, make sure that it is working properly. Often, there is a contact person at the theatre who can clue you in about the idiosyncrasies of the space and equipment.
Microphone and playback levels will change from theatre to theatre. The designer will not always be present on these tours to set new levels, in which case the operator sets levels in the tech session before performances. It’s difficult for the operator to do this if he is isolated in a booth, far away from the stage—and as we’ve seen, to properly set sound levels, he has to be familiar with the volume of the sound in relation to the actors’ voices. Using a house position would be preferable, whenever possible.
Sometimes there will be no designated sound operator, and members of the touring company will be responsible for the equipment and running the sound. Because the assigned person lacks the background of a sound operator or technician, a thorough system for performing the soundcheck and setting levels will need to be developed. Even if a number of people are involved with the setup and operation, one person should be designated to maintain the equipment and the consistency of the execution. This person should be given a complete overview on how the cues work within the production.
It’s imperative to have backups for everything when on tour, because there is usually no way to remake cues while on the road. Carry copies of all playback media. Make sure that there are copies back at home base. This way, if your cues, backups, or the equipment holding the cues is stolen, a new set of cues can be sent.
IN CASE OF EMERGENCY
Problems and emergencies always come up—fuses will blow, a deck will freeze up, a cue will be patched wrong. Steady nerves and preparation will keep these situations from becoming any worse than they already are. “Grace under fire” isn’t something that can be taught in a book. Experience is the best teacher. The longer an operator has worked, the more comfortable he will be with the equipment. It is this understanding of how everything works together that allows an operator to troubleshoot a problem quickly and identify the solution.
When a cue doesn’t play when called, the stage manager will be aware of it as soon as the operator is. The stage manager will probably jump into the situation and decide whether to pass over the cue or to play it. If the problem is an incorrect volume, it’s best to try to get it to the proper volume, and not just to an arbitrary value. The point is to try to cover mistakes as smoothly as possible. It would be impossible to detail all of the technical difficulties that might occur. Some items that it would be wise to keep on hand in case of an emergency are fuses, screwdrivers (all types and sizes), backups, cables, and a flashlight.
AFTER THE SHOW CLOSES
Once the curtain comes down on the final performance of a show, all technical departments strike their equipment, removing their elements from the theatre. There are some extra duties that the sound operator should perform during her portion of the strike. The production playback media and cue sheets must be returned to the designer or composer. If agreed upon in advance, a copy can become part of the theatre’s archives. Ideally, a full copy of all production paperwork was completed after opening, as part of the production archives.
All equipment should be removed from the stage to allow a clean area for the load-in of the next show’s set and lights. Striking the equipment keeps it from being damaged by the next show’s load-in. The sound operator should make sure that all borrowed or rented equipment is returned or given to the person on the theatre’s staff responsible for it. Leave the theatre’s booth and equipment in as good or better condition than you found it.
There’s much more to running sound for a show than just pressing the go button. The designer must supply the operator with a show that is possible to run, and with complete instructions on how to do so. For his part, a sound operator should have a sense of his artistic contribution to the show and be technically adept and levelheaded. When all of these elements come together, the sound design or composition can be presented at its best, working as a vital part of the production’s success.