7
Preparing to Build the Cues
A brilliant sound design or composition is only a collection of ideas and concepts—until it is produced and performed. The art of sound design involves the selection or creation of the proper sounds for a theatrical moment. The science of designing sound for theatre consists of gathering sounds and reproducing them faithfully within the style of the production. It is also essential that the aural elements be played back musically and consistently, while allowing for the subtle shifts within individual performances.
In the not-so-distant past, providing sound for a play used to mean copying sounds from an effects record to tape and editing them. Now that the digital age has arrived, bringing with it expansive aural experiences, audiences expect sound and music for the theatre to be more sophisticated—and at least as high-quality as what they hear at home. More theatres are hiring sound designers and investing in better sound equipment. As a result, technical standards—and audience expectations—for the sound and music in a show keep rising. From the earliest conceptualization through the editing process to the final technical rehearsal, the sound designer must know how to produce what the production needs. A sound designer has to be aesthetically adept and organized, while also possessing the resources that enable him to achieve the design technically. No matter how good your equipment, it will not yield an effective sound design without an aesthetic sensibility behind it.
As the editorial process begins, your design starts coming alive. You hear its voice emerge. The creative process does not stop here. Much experimentation and discovery lie ahead if you have the resources, time, and talent to transform your raw tracks into sonic wonders. If the equipment you’re using is more a mystery than a tool, it will interfere with your experimenting and creating. The exciting part of designing sound is when a sound in your mind’s ear becomes a reality because you know how to produce it.
The current generation of sound designers seem to be remarkably comfortable with sophisticated audio production tools that provide an extraordinary vehicle for creating music and soundscores. Many of these scores are being reproduced through equally sophisticated theatrical sound delivery systems. Once out of reach to most, now computers, digital audio workstations, and software like Digidesign’s ProTools, Apple’s Logic, or Mark of the Unicorn’s Performer are used by almost every designer or composer to produce their work. Playback systems such as Meyer Sound Laboratories’ Matrix3 offer unlimited possibilities for presenting the work of designers and composers.
You don’t have to use ultra-fancy digital equipment and superexpensive microphones to produce crisp, clean sound—what you do need is an understanding of what the equipment you have will do for you. Most designers produce their music and effects on equipment that they own. The tools of a sound designer can consist of a laptop, an audio hard drive, a modest pair of loudspeakers, a simple mixer, a good microphone, and one of the wonderful pieces of creative software that have been written for recording and manipulating audio. The alternatives to using your own tools include using equipment owned by the theatre and renting time at a commercial recording studio. Most theatres cannot afford to build, support, and maintain an independent recording/production facility. Renting studio time can be costly.
The ideal situation is for you to produce your own cues. As you record, mix, and edit each sound, you have complete control over the design every step of the way. This allows you the freedom to experiment as you work, without having to articulate new ideas to another person.
This doesn’t mean that all talented sound designers are engineering geniuses. It isn’t necessary to know all the ins and outs of audio equipment (no pun intended) to become a successful sound designer or composer for the stage. Many designers and composers collaborate with engineers and technicians who can lend their unique creative strengths to the designing process.
ORGANIZING YOUR WORK
Knowing that a cue is required is not the same as knowing what constitutes that cue. After conceptualizing the sound design, you start collecting the sounds that will become cues. Yet before you can even gather your effects, you must determine the specifics of each cue. What does each cue require? Is it made up of a single sound, a layer, or a number of sounds and layers mixed together? For instance, if your show needs a night ambiance, what does it sound like? You could find a selection in a commercial sound effects library that is called “night ambiance,” but it might not be the proper atmosphere for your production. A night ambiance cue could be a single cricket, a field of crickets, or a blend of crickets, cicadas, and owls, with an occasional lonely dog barking in the distance.
Once you’ve determined the specifics of the cue, then you can plan how to create it. Do you gather it yourself with a portable field recorder? Do you set up a session and use the theatre’s equipment to record your source material? Do you transfer the sounds from existing commercial recordings? As you look at your sound plot, you may want to make a separate list of where you’ll be getting each sound. If you keep a list of effects and their sources, then you can plan your approach methodically. Treat the whole endeavor like a shopping trip. If you develop your design using a cue database, one of your fields could be “source,” detailing where you will get that sound.
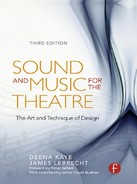
Remember that the sound plot is a list of all the aural ideas you are considering for use in the show, in the order of their occurrence. It’s supposed to offer an easy reference to the flow of the show, but it’s not organized to help you plan the collection of your effects. A separate collection list (see Figure 7.1) is better for that purpose. The collection list presents an overview of how many sound elements—not cues—you are looking for. A show with fifty cues may need only thirty different sounds because there will be many identical cues (doorbells, for example). The collection list will indicate this, and help you gather the sounds more efficiently. You could even cluster together effects that have a similar source on the collection list, especially if you’re designing sound for a huge show.
FIGURE 7.1 Collection list.
Creating any cues needed in rehearsal is a good place to begin, particularly if a cue’s timing depends on the performer’s actions (when, for instance, actors are working with underscoring or sound effects to which they react). It’s easier for the director to work with the cue while rehearsals are going on, since once technical rehearsals begin, there won’t be as much time for either of you to make adjustments.
GATHERING THE SOUND SOURCES
You will have to either pull the sounds that make up your design from available effects libraries or record them live. The longer you work as a sound designer, the more sounds you’ll amass in your own collection. As you get to know others in the business, access to their personal sound libraries is often available on a reciprocal basis. Other sources of prerecorded effects and music are museums and universities with collections of natural sounds, the Internet, train buffs who collect recordings, and collectors and stores specializing in unusual, old, or rare recordings.
Finding an effect is only half the work—being satisfied with it is another story. For example, you might need an elephant trumpeting, but try as you might, you can’t find any recordings that you like. Your choices are to either record a real elephant or try to re-create the sound. The first option is not as impossible as you’d think—with one or two phone calls to a local zoo you might be able to arrange a recording session with an elephant and its trainer in exchange for program credit and some free tickets. There might also be someone with the show who can imitate the elephant, but you’ll never know until you ask.
I designed a production of Love’s Labour’s Lost a few years ago. The composer I was working with asked me to provide the sound of doves cooing to accompany some short music cues. A few days after I got the request, I was complaining to my friend, the production manager, that I had looked everywhere for a good dove recording and didn’t know where I was going to get that sound. He replied, “I do great doves,” and proceeded to do an extraordinary imitation of the most contented doves I had ever heard. Surreptitiously, I recorded his imitation, knowing that if the composer or director knew the source of the cooing, they would hate the cue no matter how authentic it sounded. I was worried that they would feel it was an obvious fabrication. When I played my fi nal, edited dove coos, I let the tape speak for itself. The composer loved the cooing, and the director thought the music cues were fabulous.
—JL
RECORDING YOUR OWN EFFECTS
When you can’t get the right sound from a library, another option is to record it yourself in a studio or make a field recording. One advantage to a studio is that you can record the effect in a quiet room; another is that the recording gear and microphones available in the studio may be better than the field equipment you have at your disposal. Frankly, though, contemporary field recorders have improved remarkably and have become so affordable that they have become a staple of many designers’ gathering process.
Even if the sound you are looking for is available, there is always a chance that you could make a more suitable recording yourself. City ambiance from a sound library may be adequate, but if you live in New York City and have access to good field recording equipment, you can do much better on your own. Choosing where to record will be based on practicalities. You can’t get a fighter jet into a studio and it doesn’t make much sense to record refrigerator doors opening and closing when that sound could be achieved more quickly and cheaply with a portable deck. Recording your own effects often gives you a wealth of material from which to choose, and sometimes you’ll pick up sounds that you had not even considered using.
I was recording a late-night urban ambiance for a production of Philip Gotanda’s Fish Head Soup. This ambiance was for some scenes that take place in the courtyard of a Buddhist temple. As I was recording the background, a firehouse a half-mile away responded to a call. The sirens echoed off the buildings in an eerie fashion. As I listened, I realized that this section of ambiance would be perfect for the scene where one of the characters has a disturbing Vietnam War flashback. I doubt that it would have dawned on me to use distant sirens in that scene if the possibility hadn’t approached me first.
—JL
Recording your own effects is useful for producing variations of the same sound. If a show you are designing calls for ten cues of a subway train entering and then leaving a station, you may locate one recording of the perfect train. But if you repeat it ten times in the show, it will become both boring and obvious to the audience that it was the same recording. Yet if you used two or three different recordings, all from different sources, they wouldn’t sound like they were from the same subway station. By recording your own train sounds at one location, you’ll have a number of versions to choose from, each with its subtle differences and character, but all from the same station.
If you find yourself doing a lot of field recording, invest in some decent equipment. A basic field recording setup includes a portable recorder, microphones, windscreens, headphones, microphone cables, and one or two microphone stands. There are also many allin-one field recording systems with good-quality microphones built right into the “head” of the recorder. If you’re on a very tight budget, a portable MP3 recorder is an affordable way to start recording in the field. But don’t expect a cheap MP3 recorder to match the recording quality of a more expensive recorder. For not much more money, you can obtain a much better unit that has superior microphones, preamps, and the ability to record WAV files at high sampling and bit rates. Regardless of which format you choose, be sure that your portable deck has lighted VU meters and indicator lights that make it easy to use in the dark, as well as a record volume limiter. A limiter gives you added protection against distortion when recording in unpredictable situations.
What type of microphone to use for field work depends on what you’ll be recording. An omnidirectional microphone works well for recording ambiance when you want to pick up everything around you, but a directional microphone (cardioid or hypercardioid) is better if you want to be selective about what sounds you’re picking up. Because it is sometimes difficult to know ahead of time what microphone to use, you might want to carry a number of different microphones or use a microphone system with interchangeable elements. In about the same space it takes to carry one microphone, you can carry a base unit and three microphone capsules, each with a different pickup pattern. If you are recording ambiance, you might choose to use a stereo microphone because a stereo recording might sound more realistic than a mono recording. Stereo microphones can be used to record spot effects, although most spot effects are played back in mono. Recordings made with a good single point stereo microphone system can be mixed down to mono without experiencing comb filtering. Another choice you’ll need to make is whether to use a dynamic or a condenser microphone. Dynamic microphones are very rugged. They can tolerate the abuse of live performance, loud volumes, as well as inclement weather. Condenser microphones tend to be brighter and can make more detailed recordings. They have a louder output, which means that you don’t have to boost the microphone preamp level as much as with a dynamic. That’s important if you’re using a moderately priced recorder that might not have the quietest microphone preamp.
Specialized windscreens are necessary for most outdoor recording situations because wind blowing across the microphone produces noise. Most microphone manufacturers make foam rubber windscreens for their particular equipment, although windscreens made by manufacturers that specialize in only that product usually provide superior results—they provide noise-free operation at higher wind velocities.
When buying a set of headphones for the field, consider those that are designed to isolate the ear from outside sounds. When you record, trust your ears to determine whether you are getting the sounds you want. It’s hard to know what your microphones are picking up if sound is leaking in around the headphones’ ear pads.
Microphone cables are a necessity, unless your microphone comes with its own permanently attached cable or the microphones are built into the recorder. A 25-foot microphone cable is long enough for most situations, and four 25-foot cables in your stock of equipment will assure you that you have longer cable lengths if you need them. Note that extending the length of the cable attached to a cheap dynamic microphone will probably open you up to interference. Typically, these microphones use unbalanced cables, which use two conductors. Balanced microphone cables use three conductors, which by their design cancel out interference trying to get into the cable.
One or two lightweight microphone stands are important to have since, generally speaking, microphones should not be held while recording. Imagine trying to record five minutes of ambiance without shifting the microphone in your hand. Handling can easily be picked up on many microphones. If you don’t want to bring a fullsized stand with you, there are short, folding microphone stands, small enough to fit in a pocket. If you’re recording in stereo with two microphones, you can buy an adapter that screws onto the top of the stand, allowing you to attach two microphone clips to it.
In addition to your field recording gear, bring a flashlight, a pencil, and a notebook or tracksheet to write down any details that will make your work easier once you return to the production studio. You can even log field session information right into a database on your laptop.
ASSESSING CUE PARAMETERS
Before your raw sounds can be made into finished cues, you have to plan how to manufacture and reproduce them. You already have a good idea about what each cue is and where it happens in the action of the play—now you have to determine method of playback, how to mix the cue elements (layers), and the aural imaging in the performance venue. (See Chapter 5 for a discussion of figuring out how to organize the playback of a cue). Refer to your sound plot with specifics about how you intend to build each cue. You should now have decided:
• How long the cue will be (duration)
• On what source channel(s) you’ll assign the cue
• On what kind of playback device the cue will be played
• What loudspeaker or group of loudspeakers you plan to use
• If the cue will be executed live or as a practical effect
• If the cue requires significant processing, such as radical equalization, heavy reverberation, or other digital signal processing
• If the cue is an operator-triggered MIDI event, sequence, processor, or special effect
• If the cue is literally triggered by an actors action
Most importantly, make sure that you know under what conditions your design will be performed before you build your cues. Don’t design a thunderstorm soundscape that calls for fifteen cues played from ten sources if those playback devices aren’t available. Even if the playback devices are available, you need to know whether the sound operator is competent enough to operate such a complex show manually, and whether the theatre’s mixer can accommodate all of those playback decks. As you plan how many and which playback devices to use and other details, keep in mind the amount and condition of the equipment you’re working with, the budget, and the expertise of the running crew. For smooth operation of complex sound designs, it is advantageous to use a computer-based playback system. The manufacturers of these systems have built in a range of sophisticated control features. You can play back many sounds simultaneously from a single, relatively compact computer system. Usually, the more you can spend on the system, the more sounds you can play at one time. A basic system should be able to play eight sounds at a time, whereas more expensive systems have practically no limit on how many sounds they can play concurrently. The basic versions of these systems allow the designer to control the number of sources, level, position, and movement (panning) with ease. You can initiate a complex series of cues with a single click of a button. In the more advanced (and yes, expensive) systems, you can add equalization, delay, digital signal processing, and other parameters of a sound in real time, giving you an extraordinary tool set to shape your designs.
THE EQUIPMENT
Find out what equipment the theatre is providing for the production. Many companies keep an equipment list that they give to designers, but be aware of the possible inaccuracy of that list. Sometimes the production office sends it out without the sound department having updated it. You don’t want to set up your show only to find out that some essential item broke last year and was retired—and you hadn’t known because the equipment list wasn’t kept current.
PLAYBACK
Ask the theatre specific questions about its equipment. You should know how many simultaneous playback tracks are available. If the theatre uses a computer-based playback system, find out how much sound file storage space is available.
AMPLIFICATION
You should know the brand and model of house amplifiers, how many total channels of amplification are available, and how those amplifier outputs are distributed around the theatre. Some theatres are hard wired and some use portable cabling for all their hookups. If it’s a small theatre with limited resources, find out whether the amplifiers are professional power amps or home stereo amps.
LOUDSPEAKERS
Familiarize yourself with the theatre’s loudspeakers. Are any of the loudspeakers self-powered? Again, knowing the manufacturer and model number will allow you to easily research individual specifications and determine how you might be able to best use the unit. If you’ve never heard of the brand and model number of the loudspeaker, look it up. The Internet is full of specifications on current and what have come to be called legacy (older, no longer manufactured) products. If that fails, ask about the number of drivers and size of the woofer. Knowing the size of the loudspeakers won’t tell you if they sound good, but a general rule of thumb is that larger speakers with big (fifteen-inch and up) woofers are better for reproducing the deep, low frequencies and volume needed for cues like thunder and explosions. When checking out these systems, bring some prerecorded program material and listen to the individual units. Make some notes about their performance and, if necessary, use that information to ask the production manager whether renting better or more appropriate loudspeakers is possible. It’s also important to know which loudspeakers are permanently mounted and which ones can be moved. You’ll also want to know how many specialty loudspeakers are in stock for practicals, under-balcony fill, front fill, and other unique applications.
ACOUSTICS
If you are designing sound for a theatre you’re not familiar with, try to spend some time listening to the room before you start to build your cues. Sitting in the house and hearing music or effects over the theatre’s loudspeaker system will help you evaluate the overall quality of the system and give you a sense of how your cues or microphones will sound in that particular space. Knowing the sound of the space can be an important part of your design. Long reverberation times can cause problems with the intelligibility of the actors’ speech. If you sense a problem related to excess reverberation, try to reduce the problem. Experiment a little by hanging a thick velour curtain in a strategic location to absorb some of the sound that is bouncing around. Don’t deaden the room too much, though, because actors rely on a certain amount of “lift” from the acoustics of the room to carry their voices into the deep recesses of the house.
AURAL IDENTIFIERS
Let’s say you’re doing a scene that takes place at a beach. Your inclination might be to provide soft ocean waves throughout the scene to support the location. But if the performance space is highly reverberant, the actors’ words will never have time to die out between lines so that the sound of the waves can be heard. If you know that a soft ambiance won’t be heard in that space before you enter technical rehearsals, don’t waste your energy building something that won’t work. Instead, try improving the acoustics of the performing space or saying “beach” with a few well-placed seagulls. These leading sounds added to a characteristic foundation layer are called identifiers. There are many circumstances where identifiers are extremely valuable.
MIXING SYSTEMS (CONSOLES, DESKS, AND CONTROL SURFACES)
If the theatre has a manually operated mixing console or mixing desk, check into how many inputs and outputs it has, and how the mixer routes the input signal to the outputs. Some manufacturers’ mixers allow you to have access to the outputs in any combination, while others will let you work with only two at a time. Most semi-professional and professional mixing desks provide a high degree of flexibility as well as many input and output points. For analogue and digital mixers, inquire about the number of effects sends and returns. These pathways are used for sending a signal to a reverb unit (or other processing equipment) and directing that processed signal back into the mixer. Effects sends and returns can also be used as auxiliary outputs and inputs. Many smaller digital consoles have a modest amount of built-in effects, such as reverberation, equalization, and delay. You should still understand the effects send and receive structure on this type of mixer in case you’d like to add another piece of outboard gear. If the theatre has a computercontrolled mixing system, find out its full capabilities. Can it trigger playback devices or does it just mix tracks? Is it capable of show control that would allow it to trigger lighting effects or other stage machinery? Don’t assume anything. If the mixing system has lots of bells and whistles, make sure that you or the sound operator knows how to utilize those features. You might be the most ambitious sound designer to work in that space in a long time and the operator may not have had to learn all the functions of the mixing console.
OUTBOARD GEAR
Does the theatre have any specialized signal-processing gear, such as reverberation systems compressors, equalizers, or delays? If so, you can embellish the cue later if you were too conservative in the studio. If not, you’ll have to pay close attention to your recording approach and to the amount of processing given to the cue when mixing.
MICROPHONES
The number and types of microphones available is extremely important if your show calls for sound reinforcement or a need for a specialized microphone. When considering the house microphones, look at pickup patterns, sensitivity, and sound quality. What might not be included on an equipment list are the microphones that many theatres have pointed at the stage for use with the backstage monitor system. If the playback system can access those microphones, they could be used to add reverb or other effects to the actors’ voices.
INTERCONNECTIVITY
Ask how much cable the theatre has. If you’re doing something out of the ordinary, like using a number of live microphones or putting loudspeakers in unusual locations, you might have to rent or purchase loudspeaker or microphone cable out of your show budget. Contemporary sound delivery systems have a lot more than microphone and loudspeaker cable. Loudspeaker cables alone have a number of variants in capacity, length, and connector type. Connectivity is not just about connecting loudspeakers and microphones. The control side (or the “front end”) of many systems will make use of Ethernet, video, coax, display and keyboard extenders, optical fiber, and even proprietary cable systems. Cable runs and their associated connectors can be very expensive. Staff sound engineers must consider building their house inventory to cover an increasing number of sound situations.
ADDITIONAL GEAR
Equipment that the theatre doesn’t have may be rented or borrowed. Some theatres have wonderful relationships with vendors who want to support the arts by lending or renting at a reduced rate to a notfor-profit organization. Ask the production manager whether any such relationships exist.
If the theatre has gear that you are unfamiliar with, such as a digital sampler, a multitrack playback device, or a multi-effect digital sound processor, ask the sound engineer or sound technician about it. Most likely, she’ll not only teach you how to use it, but will also show you how to get the most out of its capabilities.
THE BUDGET
In venues that have a good house sound delivery system, the bulk of your design budget will go to the cost of producing the sound cues. These expenses could include your studio time, research materials (music CDs, sheet music, stock sound effects), and blank media like CD-Rs and DVD-Rs. Other costs you may incur include equipment rental, batteries, supplies for creating live effects, fees for musicians and engineers, commercial studio time, and purchases of equipment specific to your production. When working on the production of a musical, you’ll find the majority of your budget will be directed toward system rental: loudspeakers, radio microphones, and associated microphone costs including batteries, microphone elements, and materials to mount microphones on actors. A supply of batteries is essential if you’re using wireless microphones. Even if a theatre owns wireless units, it doesn’t mean that you can afford to use them. Over the course of an eight-performance-per-week, six-week run, one wireless microphone could consume 48–96 batteries.
In some venues, you may find that the only way to execute your cues is with extra equipment. Some theatres don’t own much house equipment, preferring to augment their system by renting extra equipment for the season. The problem is that most productions don’t have budgets big enough to afford renting the equipment you might need.
For live effects, expect to pay for items such as pots and pans for a live crash effect, or for the wood to construct an offstage door slam unit. Miscellaneous items like a small loudspeaker, a boom box, or a doorbell may be needed for your show. Depending on the scale of the company, the theatre’s annual budget may provide for some equipment purchases, but don’t expect the money for your item to come from that budget just because a particular item you need can be used in future productions. If you can justify it, the production manager may allow that to happen, but don’t count on it. Additionally, if you spend money out of your design budget on recordings, you will have to negotiate as to whether you will keep them or return them to the producer.
THE RUNNING CREW
A well-established and well-paying theatre usually offers a competent staff. Theatres generally go out of their way to hire an experienced stage manager because so much of each production is his responsibility. You’ll find that the better theatres see the wisdom of hiring experienced running crew, too. But this is not always the case.
Find out how long the operator has been running sound, in general and at that theatre, specifically. Designing the show with the operator in mind lets you decide the best way for the cues to be executed. With a computer-assisted playback system, the operator’s resume isn’t as critical as it is for a manually operated system. As a rule of thumb, the more experience the operator has, the more flexible you can make your design. Unlike an operator who gets flustered when there is more than one device playing at a time, a talented sound operator can run a large number of separate cues in a sequence. If you’re working with a less experienced operator, you may have to make a sequence of cues into one cue. The difficulty with this approach is that the actors will have to time themselves to the recording, and consequently will have less flexibility with their performances.
Early in my career designing sound, I created extremely ambitious sound cue sequences that had to be operated manually. Frank, the best sound operator I had ever worked with, seemed to take each new design as a competitive challenge. One cue sequence required controlling an eighttrack tape deck, five auto-cueing DAT players, and two CD players while mixing all twenty-two channels of audio manually on an analogue mixer. With me at the tech table and Frank in the booth, we worked intensely until he memorized the FIFTY + moves within the sequence. It was not possible to read this cue sequence off cuesheets while executing it. Everyone was so impressed with his masterful execution that the entire crew and cast erupted into applause at the completion of the sequence. I was surprised and delighted. At the run-through later that evening, I peered through the doorway of the booth to observe the running of this cue in real time from his perspective. I was astonished to see a gymnastic ballet, with Frank using nearly every part of his body to make the effect work in concert with the stage manager. I was impressed!
—DB
While the story above harkens back to a time when there was a significant art to being a manual sound operator, today, significantly more complex sequences can be triggered by computer-based playback systems that provide incredible precision and repeatability.

No matter what the sophistication of the technology at hand, the art of our discipline remains in how the designer builds and arranges the cue elements, in the stage manager’s musicality in calling the cues, and in the precise way the operator responds to those calls. The current tools of our trade simply allow us to make incredibly complex and well-developed cues seem effortless.