
Chapter 2. Harmony with the web
| This chapter covers |
|
Throughout chapter 1, we introduced Silverlight 2 and discussed the productivity and performance gains it brings to the RIA party. This banquet is hosted within the bounds of the web browser and includes a number of other well-known guests such as the ubiquitous HTML, AJAX, and Flash technologies; each of these technologies adds its own special something to the soiree. But, before we explore the special features that Silverlight brings to the party, we first need to cover how Silverlight content can be integrated within a web page.
Throughout this chapter, you’ll gain a deep and intimate understanding of the Silverlight plug-in. The reason why is because this plug-in is a required component of every Silverlight application. Once you have an understanding of this component, you’ll see the Silverlight Application Model. This application model gives you the keys to drive home your full-featured Silverlight applications. These applications allow you to do things like manage the HTML DOM from managed code, a topic also covered in this chapter. Before we can do any of this, let’s look at the relationship between Silverlight and the HTML DOM .
2.1. The relationship between Silverlight and the HTML DOM
As mentioned in chapter 1, Silverlight is a browser-based plug-in. This plug-in was designed to be consistent with the well-established web architecture. This design decision ensures that you can integrate Silverlight content within any new, or existing, web property. The web property could be anything from a web page, blog, intranet portal, or desktop gadget. As shown in the following illustration, this decision gives you the flexibility to use as little or as much Silverlight as you want.
Figure 2.1 shows the amount of flexibility you have when it comes to using Silverlight. In reality, you can place Silverlight anywhere you want within a web property. This is accomplished through Silverlight’s harmonious relationship with the well-known HTML DOM. The DOM allows you to embed a Silverlight plug-in within it. Once embedded, the overall application tree expands to something similar to that shown in figure 2.2.
Figure 2.1. Two theoretical uses of Silverlight. The shaded areas represent Silverlight applications. These applications are part of a web property.

Figure 2.2. The darkly shaded area represents the HTML DOM. The lightly shaded area represents the Silverlight control. This control hosts the Silverlight Object Model.

This figure shows from a high level how Silverlight content is hosted within a web property. It also shows the relationship between the HTML DOM and Silverlight. Throughout this section, we’ll examine the key items of this relationship. We’ll begin by discussing the outermost layer, the HTML DOM. From there, we’ll drill into the HTML DOM and discuss the embedded Silverlight control. This control, which is also known as the Silverlight plug-in, ultimately hosts your Silverlight content. This content defines the Silverlight Object Model, which will be the final topic covered in this section. For now, though, let’s turn our focus to the HTML DOM itself.
2.1.1. The HTML Document Object Model
The HTML DOM enables you to easily access and manage content in a web page. As illustrated in figure 2.2, this content is represented as a structured tree of elements. These elements represent children of a tree and contain attributes and text that give them definition. Each child of the tree can be accessed through the HTML DOM. This gives you the ability to add, edit, or remove content as needed. Unfortunately, as the tree has grown, it has become somewhat unwieldy.
In 1998, the World Wide Web Consortium (W3C) published the first version of the HTML DOM specification.[1] Since then, this specification has been implemented, at least in some form, by every web browser. Over time, developers of several of those web browsers have decided to augment the original specification to provide additional functionality, causing a number of inconsistencies that can make it difficult to deliver platform-neutral content.
1 Refsnes Data, “W3C DOM Activities,” W3Schools Online Web Tutorials, http://www.w3schools.com/w3c/w3c_dom.asp
To ensure that Silverlight could deliver platform-neutral content, the browsers mentioned in chapter 1 (section 1.1) had to be identified. Each of these browsers uses one of the Silverlight-supported DOM variants. These DOM variants and their descriptions are shown in table 2.1.
Table 2.1. The DOM variants supported by Silverlight
|
Specification |
Browser(s) |
Description |
|---|---|---|
| DHTML Object Model | Internet Explorer | The DHTML Object Model gives developers programmatic access to the individual elements within a web property. |
| Gecko DOM | Firefox Mozilla Netscape Safari | The Gecko DOM approach parses and renders HTML content and utilizes the HTML DOM. |
Most of the web browsers in the world implement one of the DOM variants supported by Silverlight. This fact is backed by the browser statistics shown in chapter 1 (section 1.1). Regardless, these DOM variants enable you to programmatically access and manipulate the HTML DOM. Because of this, you can easily add an instance of the Silverlight plug-in to a new, or existing, web page.
2.1.2. The Silverlight plug-in
The Silverlight plug-in is a lightweight browser plug-in responsible for rendering Silverlight content. This content is intended to be rendered consistently across platforms. To ensure that this occurs, the Silverlight plug-in must take advantage of each platform’s plug-in technology. This requirement forces the plug-in to be packaged differently across platforms. For instance, when Silverlight runs within Microsoft’s Internet Explorer browser, the ActiveX model is used. Alternatively, if Safari is used, the WebKit model is used. When any other browser is used, the plug-in uses the Netscape plug-in approach. Regardless of the browser users choose, only one version of Silverlight needs to be installed on their machines.
The Silverlight installation is extremely small and compact. This installation requires that users have administrative privileges on their machines. If they don’t have these privileges, an administrator will need to assist them. Once the Silverlight runtime is installed on their machines, users are free to enjoy rich Silverlight content in the browser of their choice. This content forms a hierarchical tree known as the Silverlight Object Model.
2.1.3. The Silverlight Object Model
The Silverlight Object Model is represented as a hierarchical tree structure. This tree structure is similar to the HTML DOM, except this tree represents a Silverlight XAML file. Each file is composed of a series of child elements that represent the UI. Each of these elements is rendered recursively, in order, from left to right. This rendering process is demonstrated in figure 2.3.
Figure 2.3. The order in which the Silverlight Object Model renders content

The rendering process begins at the root element. From there, each child is rendered from left to right in sequential fashion. Additionally, if an element has children, those children are rendered before any sibling elements.
The rendering order is important because it determines when elements are displayed. Elements that are rendered later naturally appear on top of previously rendered elements. This recursive task of traversing a hierarchical tree and drawing elements is the responsibility of the Silverlight plug-in itself.
The Silverlight 2 Object Model essentially extends the HTML Document Object Model. But you can’t access elements of the Silverlight Object Model directly from the HTML DOM; instead, you must rely on an instance of the Silverlight plug-in. This plug-in gives you the ability to navigate the Silverlight Object Model and deliver your Silverlight applications within a web page. Before you’re able to add an instance of the plug-in to a web page, you first must create a Silverlight plug-in.
2.2. Creating a Silverlight plug-in
The goal of creating a Silverlight plug-in is to host a Silverlight application. This plug-in can be created in at least two different ways. One of these approaches is to use the Silverlight server control that’s part of the Silverlight 2 Software Development Kit (SDK).[2] In general, if you’re an ASP.NET developer, this is the approach you’ll want to use. But we’re going to discuss the specifics of a Silverlight plug-in while covering another approach.
2 The Silverlight server control is part of the System.Web.Silverlight.dll assembly. This assembly is distributed with the Silverlight SDK and can be found in the C:Program FilesMicrosoft SDKsSilverlightv2.0LibrariesServer directory.
Another approach for creating a Silverlight plug-in enables you to deliver Silverlight content through any server technology. You can use Silverlight along with a variety of technologies including PHP, JSP, ASP, and ASP.NET. To get Silverlight to work with these technologies, you use the two steps covered in this section. The first step is to reference the required Silverlight utility file. The second step involves writing the JavaScript that will create an instance of the Silverlight plug-in.
2.2.1. The Silverlight utility file: Silverlight.js
The Silverlight.js utility file is part of the free Silverlight 2 SDK. This SDK is available through the Silverlight website at http://www.silverlight.net/getstarted. Once you’ve downloaded the SDK, you can find the Silverlight.js file in the Tools directory of the installation.[3] This file is an integral part of every Silverlight application, so you should know where to find it. Once it’s found, you can distribute and reference this file within your applications. Once it’s referenced, you can use any number of the valuable features exposed by this file.
3 Microsoft periodically releases new versions of the Silverlight.js file. To facilitate distribution to developers, Microsoft created a Code Gallery project for Silverlight.js. You can download the latest version of Silverlight.js from http://code.msdn.microsoft.com/silverlightjs.
Referencing the Silverlight.Js file
Referencing the Silverlight.js file is as easy as referencing any other script file. The Silverlight.js file is licensed under the Microsoft Public License (Ms-PL), which allows you to modify the file to suit your own needs. But there shouldn’t be a reason to do so. Your main focus is referencing this file. And to do this, you set the src property of an HTML script tag as shown in snippet 2.1.
Snippet 2.1. HTML: Referencing the Silverlight.Js utility file
<html xmlns="http://www.w3.org/1999/xhtml" >
<head>
 <title>My Silverlight Project</title>
 <script type="text/javascript" src="Silverlight.js"></script>
 <!-- Other Script and Style References -->
</head>

<body>
 <!-- We will create a Silverlight plug-in here -->
</body>
</html>
You gain the ability to create a Silverlight plug-in by adding one line of code ![]() . This single line of code gives you access to a number of useful utility methods. These utility methods expose a number of
valuable functions.
. This single line of code gives you access to a number of useful utility methods. These utility methods expose a number of
valuable functions.
The Functions of the Silverlight.js File
The Silverlight.js file exposes a number of valuable functions. These functions give you the flexibility to tailor a custom experience within a web application. Table 2.2 describes the available functions in alphabetical order.
Table 2.2. The primary utility functions exposed through the Silverlight.js utility file
|
Function name |
Function description |
|---|---|
| buildPromptHTML | This method returns the HTML that creates the Silverlight installation prompt. This method takes a Silverlight object in order to determine the prompt to build. |
| createObject | Initializes and creates a Silverlight plug-in. The details and a sample of this method are posted in the next section. |
| createObjectEx | Initializes and creates a Silverlight plug-in. The details and a sample of this method are posted in the next section. In addition, the next section will explain the difference between the createObjectEx and createObject functions. |
| HtmlAttributeEncode | This method performs some basic operations to encode a string into an HTML-encoded string. This function was primarily designed
to be used only within the realm of the Silverlight.js file, so use caution if using it. Here’s an example:
var result = Silverlight.HtmlAttributeEncode('"Hello"'), |
| isInstalled | Returns whether or not a specific version of the Silverlight runtime is available. This method takes one parameter, which is a string that represents a version number. Here’s an example: var result = Silverlight.isInstalled("2.0"); |
These methods provide a powerful arsenal of options to help deliver the appropriate experience to your users. But two options do encapsulate most of the other functions under one roof—the createObject and createObjectEx functions. These two utility functions shoulder the responsibility of creating an instance of the Silverlight plug-in.
2.2.2. Creating an instance of the Silverlight plug-in
To initialize and create a Silverlight plug-in, you use one of two utility functions: createObject or createObjectEx. These methods do exactly the same thing; in fact, the createObjectEx function calls the createObject function. But the createObjectEx function uses the more verbose JavaScript Object Notation (JSON)[4] approach to pass in the necessary parameters. For this reason, we’ll use the createObjectEx function throughout this book.
4 For a JSON tutorial, see www.json.org.
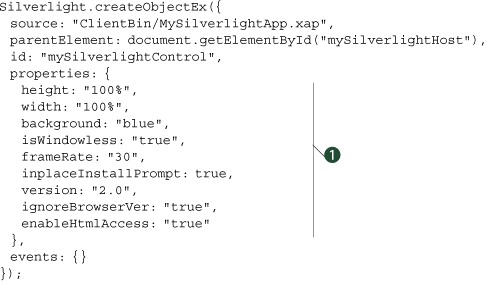
The createObjectEx function requires an HTML element as a parameter. This element ultimately serves as the host for the Silverlight plug-in. Because of this, you must first either identify or create the HTML element to serve as the host. Then within that element, you call the createObjectEx method to add a Silverlight control, as a child, to the hosting HTML element. This relationship was illustrated in figure 2.2, and the creation process is best exemplified in snippet 2.2.
Snippet 2.2. HTML: Instantiating the Silverlight control

This snippet demonstrates the two main steps of creating a Silverlight plug-in. The first step is to reference the Silverlight.js
utility file ![]() . Once this file is referenced, you create an instance of the Silverlight plug-in using the createObjectEx function
. Once this file is referenced, you create an instance of the Silverlight plug-in using the createObjectEx function ![]() .
.
This createObjectEx function accepts a wide range of parameters. These parameters are responsible for specifying which Silverlight application to run. In addition, these parameters specify how that application should be integrated within a web page. Because a Silverlight application will ultimately be integrated within a web page, we’ll need to discuss how to integrate a Silverlight control.
2.3. Integrating a Silverlight plug-in
Once you’ve decided to create a Silverlight plug-in, you must ensure it integrates nicely within your web property. This integration must not only look right, but it must also behave properly. Because of this, we’ll build an in-depth understanding of the items you can control. At a high level, these items give you the ability to do the following:
- Relate your Silverlight application to the HTML DOM
- Clarify the initial experience
- Handle plug-in events
- Send initialization parameters
These general tasks cover quite a bit of ground, but we’re going to dive into the details that make each task possible. We’ll warn you that this can be a bit overwhelming. We recommend you grab a cup of coffee, take a deep breath, and buckle up.
2.3.1. Relating the Silverlight application to the HTML DOM
The first three parameters of createObjectEx function build the relationship between a Silverlight application and the HTML DOM. These parameters are called source, parentElement, and id .
Source
The source parameter specifies the URI of the Silverlight content that should be loaded. This content is usually bundled up as a .xap[5] file. A .xap file is a compressed file that packages up a Silverlight application. The details of this file type are explained in section 2.4. More relevant to our current needs: The source property can reference a .xap file on the hosting server or on a remote server. This gives you the ability to easily share your Silverlight applications and improve server performance through load balancing. This isn’t as easy with Silverlight 1.0.
5 Pronounced as zap
Silverlight 1.0 doesn’t have support for .xap files. Instead, Silverlight 1.0 relies on setting the source of a plug-in through one of two approaches. The first approach involves referencing a .xaml file that exists on the hosting server. The other approach is to reference XAML content defined in the hosting web page. This type of XAML content is known as inline XAML. Either way, both of these approaches are dependent upon the JavaScript programming model. Silverlight 2 still supports these approaches so that the source property in Silverlight 2 can be used in three different ways, all of which are shown in table 2.3.
Table 2.3. The three approaches for referencing a Silverlight application
|
Approach |
File extension |
Example[*] |
|---|---|---|
| Packaged | .xap | source: "http://www.myserver.com/myApp.xap" |
| Loose | .xaml | source: "/relativePath/page.xaml" |
| Inline | [none] | source: "#myXamlID" |
* Assume this is part of a createObjectEx call.
We aren’t discussing the loose and inline approaches in detail because the packaged approach is the most widely used. It’s recommended because of its flexible, compact, and portable nature, as you’ll see in section 2.4. Regardless of the approach you choose, the Silverlight plug-in is always placed inside the parentElement .
ParentElement
The parentElement parameter specifies the HTML object that hosts the Silverlight plug-in. It’s important to recognize that this property requires an object and not just the ID of the parent. You may need to use the HTML DOM approach of retrieving an object using document.getElementById, as demonstrated in snippet 2.2. Once the object is retrieved, a new HTML element will be appended to it when the Silverlight plug-in is created.
When a Silverlight plug-in is created, a new HTML object is generated. The specific type of object is based on the browser the user is using. If the user is using Internet Explorer or Firefox, an HTML OBJECT element is created. Alternatively, if the user is using Safari, an HTML EMBED element is created. Regardless of the type of object, it gets appended to the element you defined as the parentElement .
More interestingly, this newly created HTML object is given the unique identifier you set in the id parameter.
Id
The unique identifier of the Silverlight plug-in is specified by the third parameter of the createObjectEx method, id. The value set to this parameter is assigned to the id attribute of the OBJECT or EMBED element mentioned in the previous section. This parameter is the primary hook from the HTML DOM to the Silverlight plug-in. You can easily access a Silverlight plug-in using the document.getElementById function. This function is available within the HTML DOM Document object, and you can use it from a scripting environment such as JavaScript. This fact will come into play at the end of this chapter. But we should first discuss how to clarify a user’s default experience.
You may choose to explicitly create the object tag that hosts your Silverlight application. This approach is used in the “Instantiating a Silverlight Plug-In” section of the Silverlight SDK. The reason the Silverlight.js approach is used in this book is because there are additional methods, such as buildPromptInstall and isInstalled, in the Silverlight.js file. If you want to explicitly create an object tag, you can do so by embedding code similar to the following in your web page:
     <html xmlns="http://www.w3.org/1999/xhtml">
     <head runat="server">
      <title>My Silverlight Project</title>
     </head>
     <body>
      <div id="mySilverlightHost" style="height:100%;">
       <object
        id="SilverlightPlugInID"
        data="data:application/x-silverlight,"
        type="application/x-silverlight"
        width="100%" height="100%">
        <param name="source" value="ClientBin/MySilverlightApp.xap" />
       </object>
       </div>
     </body>
     </html>
In general, the properties specific to the Silverlight plug-in can be set through the param element. There are some exceptions to this. If you decide to explicitly create the object tag, we recommend referring to the documentation in the Silverlight SDK.
2.3.2. Clarifying the initial experience
While a Silverlight plug-in is being initialized, a number of properties clarify how that plug-in will initially render. These properties are demonstrated in snippet 2.3.
Snippet 2.3. HTML: The initialization properties used by createObjectEx
These properties ![]() can be used to define an initial experience. (All the properties in snippet 2.3 use pretend values to show the syntax.) We’ll explain the details of each of these properties in the order they’re shown.
In addition, these properties will be logically grouped together when possible, such as height and width.
can be used to define an initial experience. (All the properties in snippet 2.3 use pretend values to show the syntax.) We’ll explain the details of each of these properties in the order they’re shown.
In addition, these properties will be logically grouped together when possible, such as height and width.
Height and Width
The height and width properties specify the boundaries of the rectangular region that the Silverlight application will be presented within. By default, these property values represent a rectangle with no height and no width. You can change this by providing either a pixel or percentage value. Snippet 2.4 shows how to use pixel and percentage units for the height and width properties.
As you can see, you’re able to employ relative sizing by appending a % to the height and width property values. Relative sizing is a powerful and widely used technique within the HTML world, so it’s nice to see that the Silverlight plug-in provides this option to simplify integration efforts. To truly integrate your Silverlight content within the HTML realm, you need to master the background and isWindowless properties.
Snippet 2.4. The Silverlight plug-in on the left uses absolute sizing by specifying pixel values for the height and width properties. The Silverlight plug-in on the right uses relative sizing by providing percentages for the height and width properties.
|
Relative sizing |
|
|---|---|
Silverlight.createObjectEx({ |
Silverlight.createObjectEx({ |
Background and isWindowless
The background property allows you to specify the color of the rectangular region where the Silverlight plug-in should be. By default, this property is set to null, which is the same as white. You have the option of setting this property value to one of two values. The first option is to use a hexadecimal color value. The second option is to use a color name recognized by the user’s browser, such as silver. Perhaps the most interesting option, though, enables you to hide the background entirely.
By setting the background property to transparent, you can make the background of the plug-in region invisible. At the same time, your Silverlight application is still completely visible. Before you get too excited, we strongly recommend searching for alternatives before using this option. When the background property is set to transparent, your Silverlight applications will incur a significant performance hit, which may detract from a user’s experience. In addition, if you choose to use the transparent option, it’s important to take the isWindowless property into consideration.
The isWindowless property lets you determine whether or not the plug-in allows any underlying HTML content to display through any transparent areas. By default, this property is set to false, meaning that your Silverlight plug-in will appear on top of any underlying HTML content. The reason why this property defaults to false is because, once again, when this value is set to true, your Silverlight application will take a performance hit.
Setting the isWindowless property to true does have an advantage. When this property is true, any underlying HTML content will show through the transparent areas of the Silverlight plug-in. This option is most useful when you want seamless integration with an HTML page. As figure 2.4 shows, the background and isWindowless properties are somewhat reliant upon each other.
Figure 2.4. The consequences of various background and isWindowless property combinations. The outermost rectangle represents a section of HTML within a web page. The inner rectangle represents the region occupied by a Silverlight plug-in. The rounded rectangle is the pure Silverlight content that will be explained later.

As figure 2.4 shows, it’s critical to your integration efforts to understand how the background and isWindowless properties cooperate. As the third image illustrates, setting the background property to transparent is only half the battle. The fourth image shows that you truly have the ability to seamlessly integrate Silverlight content within your web assets. The process of integration will become clearer once we begin discussing actual Silverlight content within the next chapter. Once Silverlight content is loaded, you may want to throttle it.
frameRate
The frameRate property enables you to determine the maximum number of frames you want to render per second. This built-in throttling mechanism ensures that your Silverlight plug-in isn’t hogging the system resources. By default, this property is set to render 24 frames per second, which is comparable to a 35 mm movie camera. Alternatively, you can specify a value as large as 64 frames per second. Ultimately, the frame rate is based on the system resources.
Version
When instantiating a Silverlight plug-in, you need to set the version property in the createObjectEx function. This property represents the minimum runtime version required by your Silverlight application. If users don’t have at least this version of the Silverlight runtime installed, they’ll be greeted by an installation prompt. This installation prompt looks like that in figure 2.5
Figure 2.5. The Silverlight installation prompt

This figure shows the visual prompt users will see if they don’t have the necessary version of Silverlight installed. Once Silverlight is installed, it will automatically install future versions of Silverlight. These updates will continue to be installed as long as the users don’t disable this feature in the Silverlight Configuration dialog box. Figure 2.6 shows the Silverlight Configuration dialog box, which can be accessed by right-clicking any Silverlight application through the browser.
Figure 2.6. The Silverlight Configuration dialog box. This dialog box is accessible by right-clicking Silverlight content within a web browser.

As you can see, this dialog box gives you the option of turning off automatic updates of Silverlight. But by default, users’ machines will always have the latest and greatest version of Silverlight.
IgnoreBrowserVer
The ignoreBrowserVer option empowers you to specify whether or not you should check to see if Silverlight can run within the browser environment. By default, this parameter is set to false, which ensures that only supported browsers will run a Silverlight application. You can set this property value to true to bypass this safety check. This brute-force approach can slightly speed up the plug-in initialization process, but can lead to undesired effects.
EnableHtmlAccess
The final Boolean-based property in the Silverlight plug-in initialization provides you with an extra layer of security. This property, called enableHtmlAccess, specifies whether or not the managed code running within a plug-in instance can access the HTML DOM. By default, this property is set to true for same domain applications and false for cross-domain applications. This ensures a safe-by-default development experience. You can turn this property value to true for cross-domain applications, but you should first consider the ramifications.
Let’s pretend for a second, that a political candidate, we’ll call Jason Mackey, has created a Silverlight control that everybody wants. This control is so amazing that even the competing political candidate, named Matt Henkler, wants it. Jason makes this control available for free download via a third-party control site. Jason has deceptively added code that will edit the hosting web page’s DOM to say Vote for Jason on a future date before the election. Unfortunately for Matt, he put this control on his website, and now his campaign site has been trashed with Vote for Jason all over it. What an embarrassment!
Matt could’ve easily avoided this time-bomb embarrassment by explicitly setting the enableHtmlAccess property value to false. When this property value is false, any managed code associated with the plug-in instance that attempts to access the HTML DOM will trigger an error. And fortunately, an error is just a type of event, which Silverlight enables you to elegantly handle (more on that in a moment).
The enableHtmlAccess property is but one of the many configuration options you have. The others include ignoreBrowserVer, inplaceInstallPrompt, version, isWindowless, background, height, and width. Collectively, these options are all set through the properties nested object within the createObjectEx. This nested object syntax may seem awkward at first, but know it’s just part of JSON syntax. This syntax gives you a way to logically group together items, making it easy to separate the items that define the look of a Silverlight plug-in instance from its behavior. The behavioral items are part of the events nested object.
2.3.3. Handling plug-in events
At this point, we’ve covered all of the items that are required to create an instance of the Silverlight plug-in. Remember that this plug-in has events that affect it, and in turn, your application. These events are onLoad and onError. We’ll discuss each of these events in detail in a moment. But first, let’s look at how to wire these event handlers up with a plug-in instance. This can be done in the createObjectEx function in the events sub-object as shown in snippet 2.5.
Snippet 2.5. HTML: Registering events associated with a plug-in instance

This snippet shows how to wire up the two events associated with a Silverlight plug-in ![]() . In reality, neither of these has to be set. But by setting them, you can create a more tailored experience. This experience
may need to be tailored when the application loads. Alternatively, you may need to make adjustments if there’s an unexpected
error. Either way, you can accomplish what you need to by responding to the onLoad and onError events.
. In reality, neither of these has to be set. But by setting them, you can create a more tailored experience. This experience
may need to be tailored when the application loads. Alternatively, you may need to make adjustments if there’s an unexpected
error. Either way, you can accomplish what you need to by responding to the onLoad and onError events.
onLoad
The onLoad event occurs immediately after your Silverlight application has been loaded. By default, nothing special will happen when this event occurs. You do have the option of creating an event handler for when this event fires. Regardless of how you intend to use it, you can create an event handler by using JavaScript as in snippet 2.6.
Snippet 2.6. JavaScript: A sample Silverlight plug-in onLoad event handler
function plugin_Load(sender, context, source)
{
 alert("loaded");
}
This snippet shows an extremely basic onLoad event handler. This event handler shows the three parameters that are passed with the onLoad event. These three parameters are sender, context, and source. Each of these parameters serves a valuable purpose, which is described in table 2.4.
Table 2.4. The parameters of the onLoad event handler
|
Parameter |
Description |
|---|---|
| sender | This value is a handle to the Silverlight plug-in itself. |
| context | This is a value specified to distinguish the plug-in instance. This value is provided by a developer. This parameter is discussed in 2.3.4. |
| source | This is the root element of the content loaded into the plug-in. |
In addition to the parameters of this event, you should know that there are times when this event won’t fire. This event won’t be triggered if you attempt to reference a Silverlight application that doesn’t exist. Along the same line, the onLoad event won’t fire if there’s an error in your createObjectEx function call. You may think that an error will fire the onError event; in reality, the onError event will fire only after the Silverlight application has loaded.
OnError
The onError event is triggered when an exception hasn’t been handled in your application. We’ll discuss handling errors at the application level in section 2.4.2. But some errors can’t be handled at the application level. Because of this, you may want to create an error handler at the plug-in level. This can be accomplished by using an onError event handler such as the one shown in snippet 2.7.
Snippet 2.7. JavaScript: A sample Silverlight plug-in onError event handler
function plugin_Error(sender, errorArgs)
{
 alert("An unexpected error has occurred.");
}
This snippet shows an all-purpose onError event handler. The event handler can be used to gracefully handle errors that haven’t been caught elsewhere. If this occurs, the sender argument will represent the plug-in where the error occurred. The second parameter, errorArgs, describes the error. This description is accessible through a variety of publicly visible properties. These properties are listed and described in table 2.5.
Table 2.5. The properties associated with the errorArgs parameter
|
Property |
Description |
|---|---|
| ErrorCode | A numeric code associated with the error. This property can’t be set. |
| ErrorMessage | A read-only description of the error. |
| ErrorType | The category of the error. |
| Name | The name of the object that caused the error. |
You can learn a lot about an error through the errorArgs parameter. This parameter is a valuable part of the onError event handler. As hinted at earlier, this event handler is useful for some situations that can’t be covered by application-level error handling. An example of such an error would be a stack-overflow exception. Regardless of the error, it’s nice to know that there’s a way to handle those errors that can’t be handled elsewhere. It’s also nice to know how to pass some initialization information to a Silverlight application when it starts.
2.3.4. Sending initialization parameters
A Silverlight application is a lot like any other .NET application. As an example, imagine a basic command-line program. This program allows you to pass parameters to it before it starts. Then, when the application does start, it’s responsible for parsing the parameters. Once parsed, the application then decides what to do with these parameters. This is exactly how Silverlight uses initialization parameters as well.
The initialization parameters in Silverlight are sent through an argument called initParams. initParams is another parameter in the createObjectEx function. Likewise, there’s another parameter called context. This parameter allows you to uniquely tag a Silverlight plug-in instance. Both of these parameters are shown in snippet 2.8.
Snippet 2.8. HTML: Registering initialization parameters with a plug-in instance
Silverlight.createObjectEx({
 source: "ClientBin/MySilverlightApp.xap",
 parentElement: document.getElementById("mySilverlightHost"),
 id: "mySilverlightControl",
 properties: {
  height: "100%",
  width: "100%",
  version: "2.0"
 },
 events: { },
 initParams: "key1=value1, key2=123, keyX=valueY",
 context: "27d3b786-4e0c-4ae2-97a3-cee8921c7d3d"
});
This snippet demonstrates the basic usage of the initParams ![]() and context
and context ![]() parameters. Each of these parameters serves its own special purpose. In reality, you’ll probably only use the initParams parameter because the context parameter doesn’t have as much value in the Silverlight 2 world. The reason why is because each Silverlight application runs
within its own domain, and code sharing isn’t necessary like it is in the scripting world of Silverlight 1.0. Regardless,
we’ll cover them both in detail for the sake of completeness.
parameters. Each of these parameters serves its own special purpose. In reality, you’ll probably only use the initParams parameter because the context parameter doesn’t have as much value in the Silverlight 2 world. The reason why is because each Silverlight application runs
within its own domain, and code sharing isn’t necessary like it is in the scripting world of Silverlight 1.0. Regardless,
we’ll cover them both in detail for the sake of completeness.
initParams
The initParams parameter empowers you to send any number of user-defined, key-value pairs to a Silverlight application. The application is then responsible for reading and interpreting the key-value pairs when it starts. We’ll discuss how this is accomplished in section 2.4.2. But first, let’s build an understanding of how these key-value pairs are created.
The key-value pairs are created by following a strict structure, which resembles a comma-delimited list of entries. Each entry follows a template that resembles “[key]=[value]” to ensure that each entry will represent a key-value pairing. Naturally, the entire string of initParams represents a collection of key-value pairs. This is different from the initParams of Silverlight 1.0.
In Silverlight 1.0, the initParams parameter took a list of comma-delimited values. This is important to recognize if you’re promoting your Silverlight 1.0 application to Silverlight 2 because this approach isn’t valid in 2. If you are, in fact, doing this kind of migration, you may want to consider how the context parameter is used as well.
Context
The context parameter gives you a way to uniquely identify a Silverlight plug-in. This plug-in passes the value of the context parameter to the onLoad event associated with the plug-in. The event then uses this string value to distinguish the plug-in from others without having to check the HTML DOM. This empowers you to share scripted code across multiple Silverlight plug-ins that exist on the same web page.
The context and initParams serve as valuable initializers in the plug-in creation process, which involves deciding how to handle the onError and onLoad events impacting the plug-in. The initial look of this plug-in is set up through a variety of property settings declared within the properties sub-object. More importantly, the source parameter specifies which Silverlight application will get loaded into the plug-in. This application will share a variety of attributes with other Silverlight 2 applications. These common attributes represent the Silverlight Application Model.
2.4. The Silverlight Application Model
At this point, you should have a firm understanding of how to add a Silverlight plug-in to any web page. With that necessary task behind us, we can shift our attention to loading a Silverlight application into that plug-in. As you learned, this application will generally be bundled up in a .xap file—a compressed archive with a consistent structure—that looks like figure 2.7.
Figure 2.7. The structure of a .xap file
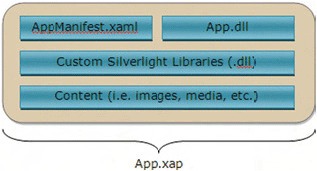
This compressed file will always contain a manifest file named AppManifest.xaml. In addition, there will always be a .dll file that serves as the entry point into the Silverlight application. This application may require other Silverlight libraries or other types of content. Both of these items may or may not be in a .xap file; either way, they represent the dependencies of the application.
2.4.1. The manifest file
The manifest file is responsible for describing the Silverlight application to the Silverlight runtime. This file is created at build time by Visual Studio. Because of this, we won’t go over all of the details. The main thing to know is that the Silverlight runtime reads the AppManifest.xaml file beginning with the root-most element, Deployment. This element exposes two attributes that tell the Silverlight runtime how to start the Silverlight application. These two attributes are shown in snippet 2.9.
Snippet 2.9. XML: A sample manifest file in XML
<Deployment
 xmlns="http://schemas.microsoft.com/client/2007/deployment"
 xmlns:x="http://schemas.microsoft.com/winfx/2006/xaml"
 EntryPointAssembly="MyApp" EntryPointType="MyApp.App"
 RuntimeVersion="2.0.30808.0">
 <Deployment.Parts>
  <AssemblyPart x:Name="MyApp" Source="MyApp.dll" />
 </Deployment.Parts>
</Deployment>
This snippet shows a basic manifest file, which uses the EntryPointAssembly and EntryPointType attributes ![]() to launch the Silverlight application. The first attribute, EntryPointAssembly, will always reference one of the AssemblyPart elements
to launch the Silverlight application. The first attribute, EntryPointAssembly, will always reference one of the AssemblyPart elements ![]() in the Deployment.Parts
in the Deployment.Parts ![]() section. The second attribute, EntryPointType, explains which class should be used to start the Silverlight application.[6] The third attribute, called RuntimeVersion
section. The second attribute, EntryPointType, explains which class should be used to start the Silverlight application.[6] The third attribute, called RuntimeVersion ![]() , broadcasts the version of the Silverlight runtime that the Silverlight application was built with.
, broadcasts the version of the Silverlight runtime that the Silverlight application was built with.
6 AppManifest.xaml is generated during project compilation based on settings found in the project’s property pages. If you change the name and/or namespace of the startup application class (that is, App), then you should adjust the Startup object setting in the Silverlight property page.
2.4.2. The Silverlight application
The entry point into the Silverlight application is the App object. This object is defined in the App.xaml and App.xaml.cs files, and derives from the System.Windows.Application type. This type allows you to interact with the three events affecting the application’s lifecycle. These events include the start of the application, the unhandled errors in the application, and the exit of the application. In addition to these events, you can also read the settings of the hosting plug-in.
Managing the Start of a Silverlight Application
Once the App object has been created, the Startup event fires. By default, this event loads the default XAML page into view. You can also use this event to perform any other type of application initialization task. For instance, you may want to use this event to set application-wide resources or properties. Or, you may want to use this event to load the initParams that were passed into the application (section 2.3.4). Either way, this type of task can be accomplished by using the Startup event as demonstrated in snippet 2.10.
Snippet 2.10. C#: A sample Startup event handler
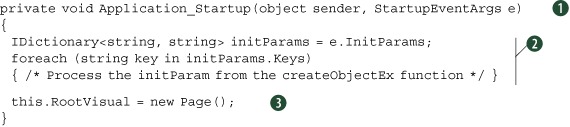
This particular event handler shows how to parse the initParams that may have been passed into the application. The Startup event creates a StartupEventArgs variable that assists in the initialization tasks ![]() . The first task loads the initialization parameters
. The first task loads the initialization parameters ![]() . The other task in this snippet displays the first page of the application
. The other task in this snippet displays the first page of the application ![]() . Both of these tasks introduce important facts about the Silverlight application lifecycle.
. Both of these tasks introduce important facts about the Silverlight application lifecycle.
The first important fact is that the StartupEventArgs type is created only by the Startup event. No other event in Silverlight will create a StartupEventArgs object. Because of this, it’s logical to deduce that the InitParams used in snippet 2.8 are only available during application Startup. If you’re going to use initialization parameters, the Startup event is your only chance to use them. In addition to the initialization parameters, you should consider the RootVisual .
The second important fact is that the RootVisual of the application can’t be changed once it’s set; once the RootVisual is set in the Startup event, you’re stuck with it. This may cause confusion because you may wonder how to switch pages in a Silverlight application. Unfortunately, there isn’t a way to directly accomplish this in Silverlight 2. But there are ways to fake it! We’ll discuss this in chapter 12. For now, know that, when the Startup event has completed, the RootVisual will be loaded and rendered. And at this point, a Silverlight application will be visible to your users, so let’s begin discussing how to guard against unforeseen errors.
Handling Unforeseen Errors
The Application.UnhandledException event empowers you to handle uncaught exceptions. Any Exception that hasn’t been caught by a try - catch block in the application will be tossed here. This is the last chance to gracefully deal with an unknown problem. This serves as an excellent opportunity to log an error, as shown in snippet 2.11.
Snippet 2.11. C#: A sample UnhandledException event handler
private void Application_UnhandledException(object sender,
 ApplicationUnhandledExceptionEventArgs e)
{
 LogError(e.ExceptionObject);
 e.Handled = true;
}
This snippet shows a basic UnhandledException event handler. The event handler uses an argument to assist in properly handling an unhandled exception. This argument is
of the ApplicationUnhandledExceptionEventArgs type ![]() , which gives you access to the Exception that caused the event through the ExceptionObject property
, which gives you access to the Exception that caused the event through the ExceptionObject property ![]() . Once this Exception has been dealt with, you need to signal that you’ve found an acceptable solution. You can accomplish this by setting the
ApplicationUnhandledExceptionEventArgs object’s Handled property
. Once this Exception has been dealt with, you need to signal that you’ve found an acceptable solution. You can accomplish this by setting the
ApplicationUnhandledExceptionEventArgs object’s Handled property ![]() .
.
The Handled property is a bool value that signals whether or not an exception has been addressed. By default, this property value is set to false, but you have the opportunity to set it to true within your code. By setting this property to true, you signal that your Silverlight application should continue to run. If this property remains false, the Silverlight plug-in will unload the application, causing the plug-in’s onError event to be fired. This event was discussed in section 2.3.3. Note that this unnatural way of ending an application won’t trigger the valuable Application.Exit event.
Exiting the Silverlight Application
The Application.Exit event is the last thing that occurs before an application is shut down, and provides one last opportunity to wrap things up. This event can be useful for logging information or performing last-minute saves. Although these are only two examples, it’s probably more important to understand when this event will be fired. The Application.Exit event is fired when one of the following happens:
- The user closes the browser window.
- The user closes the browser tab that the Silverlight application is running in.
- The user navigates away from the Silverlight application (such as going from www.mySilverlightApplication.com to www.silverlightinaction.com).
- The HTML element associated with the Silverlight plug-in is removed from the HTML DOM.
This event doesn’t have any special event handling parameters like the Startup and UnhandledException events, but it can still read settings associated with the plug-in if needed.
Reading Plug-In Settings
Once the Silverlight application has been loaded, you can retrieve information about the hosting plug-in. This plug-in exposes valuable information set during the creation of the plug-in (createObjectEx, section 2.3.3). This information is useful throughout the entire life of the application and can be accessed through the Host property of an Application. This can be retrieved at any point in time using the code found in snippet 2.12.
Snippet 2.12. C#: Retrieving settings associated with hosting plug-in
Application application = Application.Current;
SilverlightHost host = application.Host;
This snippet shows how to retrieve the settings associated with a hosting plug-in. The first step involves retrieving a reference
to the currently running Application ![]() . This Application can be retrieved from anywhere in your code by using the statically visible Current property. This property gives you access to the hosting plug-in through the Host property
. This Application can be retrieved from anywhere in your code by using the statically visible Current property. This property gives you access to the hosting plug-in through the Host property ![]() . This property is a SilverlightHost, which gives you access to information about the plug-in. The information is listed and described in table 2.6.
. This property is a SilverlightHost, which gives you access to information about the plug-in. The information is listed and described in table 2.6.
Table 2.6. The properties of the SilverlightHost object
|
Property |
Description |
|---|---|
| Background | Retrieves the background Color of the plug-in. |
| Content | The content sub-object of the createObjectEx function call. This includes the height and width of the plug-in. |
| IsLoaded | Returns whether or not the hosting plug-in has completed loading. |
| Settings | The settings sub-object of the createObjectEx function call. This sub-object relays information about the Silverlight application's instantiation settings. In addition, this sub-object provides values associated with the HTML DOM. |
| Source | The Uri of the currently loaded XAML content. |
This table shows the properties available through the SilverlightHost object. These properties give you access to most of the information discussed in section 2.3. This data empowers you to dynamically create a truly integrated experience. This experience will have a beginning, which can be managed through the Startup event. In addition, this experience will have an ending, which can be handled through the Exit event. These are the main events affecting the life of an Application. In addition, this Application may have other types of content that it’s dependent upon. This content makes up what are known as the application dependencies.
2.4.3. Application dependencies
The application dependencies are the items that your application needs to run correctly. These items include assemblies, images, audio or video files, fonts, XAML files, or any other type of file. Each file that will be used by the Silverlight application can be included in the .xap file. This approach can ensure a faster access time, but it can also cause a slower initial download of your application.
To help you overcome long load times, Silverlight allows you to divide your application into smaller chunks. These chunks can be downloaded as they’re needed. This approach can ensure a faster initial application download, but it doesn’t happen automatically. Instead, you must rely on a class called WebClient, which is discussed in section 11.4. For now though, just know that you have a way of including application dependencies.
Application dependencies belong to just one set of the items you may find in a .xap file. This file also includes a .dll, which contains an Application. This Application is described by the AppManifest.xaml file. This file is used by the Silverlight runtime to start the application. Ultimately, this application is hosted within the HTML DOM, so you may need to interact with the HTML DOM from a Silverlight application.
2.5. Interacting with the HTML DOM
At this point, you should have a basic understanding of what a Silverlight application is. If you don’t, that’s OK because it will become clearer throughout this book. The main thing to understand is that a Silverlight application is associated with the HTML DOM—you can use a Silverlight application to interact with the HTML DOM. To do this, you use the System.Windows.Browser namespace.
Note
The System.Windows.Browser namespace is a special feature of the Silverlight API. This namespace isn’t currently found in other versions of the .NET Framework, so WPF can’t use the System.Windows.Browser namespace.
The System.Windows.Browser namespace exposes a number of classes that encapsulate the features of the HTML DOM. The entry point into this DOM is accessible through the HtmlPage class. This statically visible class gives you the ability to manage a web page from managed code. In addition, you can use the HtmlPage class to interact with users through their browser windows. Perhaps, most interesting: The System.Windows.Browser namespace empowers you to completely bridge the scripting and managed code worlds.
2.5.1. Managing the web page from managed code
The HtmlPage object exposes a property called Document. This property is an Html-Document object that embodies the currently loaded HTML page. This object gives you admission to all the elements available within the page. This may sound familiar because the Document object within the HTML DOM exposes the same kind of functionality. The Silverlight version gives you the ability to do all this from managed code. This enables you to navigate the contents of a web page, work with individual element properties and styles, and retrieve information from the query string.
Navigating Web Page Contents
The HtmlDocument gives you two entry points into the currently loaded document. These entry points are represented as properties and are shown in table 2.7.
Table 2.7. The entry points into the HtmlDocument
|
Property |
Description |
|---|---|
| DocumentElement | This property represents the root element of the HTML DOM. It always represents the "HTML" element of a web page. |
| Body | This property gives you immediate access to the contents of the "BODY" element of a web page. |
These properties represent great ways to enter into an HtmlDocument. More specifically, these items are geared for navigating an HtmlDocument using a top-down approach. For situations where you need to dive into the middle of the action and find a nested element, you have two other options. These options are shown in table 2.8.
Table 2.8. The navigation methods of an HtmlDocument
|
Method |
Description |
|---|---|
| GetElementById | Empowers you to find any element within an HtmlDocument by referencing its unique identifier. If the element is found, an object-oriented version of the element, known as an HtmlElement, is returned. If the element isn’t found, null will be returned. |
| GetElementsByTagName | Finds all the elements with a specified tag name. The results are returned as a collection of browser elements. |
This table introduces the powerful and often used GetElementById and GetElementsByTagName methods. Notice that these method names match their HTML DOM equivalents, so you have a familiar approach for retrieving elements. Snippet 2.13 demonstrates how to retrieve an element using managed code.
Snippet 2.13. C#: Referencing an HTML element via managed code
HtmlDocument document = HtmlPage.Document;
HtmlElement element = document.GetElementById("myDiv");
Note that the "myDiv" element is simply an HTML DIV element within the HTML page hosting the Silverlight plug-in. This snippet shows how to retrieve an HTML element via managed code. More importantly, it introduces the important HtmlElement class. This class represents a strongly typed wrapper for any element in the HTML DOM.
This wrapper exposes several properties that empower you to interact with an element from managed code. These properties are listed in table 2.9.
Table 2.9. The navigation properties of an HtmlElement
|
Property |
Description |
|---|---|
| Children | A collection of items hosted by the current HtmlElement . |
| CssClass | The name of the Cascading Style Sheet (CSS) class in use by the HtmlElement . |
| Id | The unique identifier of the HtmlElement. |
| Parent | The HtmlElement that hosts the calling item. If the calling item is the DocumentElement, this value will be null. |
| TagName | The name of the tag used by the HtmlElement. |
This table shows the properties that define an HtmlElement. The Children and Parent properties give you the ability to navigate a web page from a specific element. Each element will have a specific tag associated with it. This tag can be viewed through the TagName property. If this tag is an input tag, you can give it the focus by calling a method that’s appropriately named Focus(). Beyond the Focus method and the properties listed in table 2.9, each HTML tag may contain several properties unique to it. Let’s look at how to work with these element-specific properties.
Working With Element Properties
Each element in the HTML DOM exposes a number of descriptive properties. Some of these properties are shared with all other elements in the HTML DOM (such as TagName). At the same time, some properties are only relevant to some HTML elements—for example, the value property of an HTML input tag. Because this property is only relevant to one kind of element, you may be wondering how the HtmlElement works in these situations.
The HtmlElement exposes two utility methods designed to interact with the properties of an HTML element. The first method, GetProperty, retrieves the value assigned to a property. The other method, SetProperty, can be used to assign a value to a property. These general methods give you the flexibility to work with any kind of HtmlElement. Snippet 2.14 shows one way these methods can be used.
Snippet 2.14. C#: Using the GetProperty and SetProperty methods
HtmlDocument document = HtmlPage.Document;
HtmlElement myTextField = document.GetElementById("myTextField");
int value = Convert.ToInt32(myTextField.GetProperty("value"));
value = value + 1;
myTextField.SetProperty("value", Convert.ToString(value));
This snippet shows how the GetProperty and SetProperty methods can be used. Note that this sample retrieves the value associated with the "value" attribute of an HTML Input field. This value is incremented by one and assigned back to the field. The GetProperty method takes a string that represents the name of the property value to retrieve ![]() . This value is then returned as a string. In a similar fashion, the SetProperty method takes a string that represents the value to set to a property
. This value is then returned as a string. In a similar fashion, the SetProperty method takes a string that represents the value to set to a property ![]() . This property is identified by the first parameter in the SetProperty method. Either way, this snippet shows how easy it is to work with property values programmatically. Thankfully, it is just
as easy to work with an element’s CSS information.
. This property is identified by the first parameter in the SetProperty method. Either way, this snippet shows how easy it is to work with property values programmatically. Thankfully, it is just
as easy to work with an element’s CSS information.
Handling CSS Information
Elements within the HTML DOM are designed to separate content from presentation. The presentation information is stored in a variety of styles that describe how the element should be shown. These styles are set through a number of attributes that belong to the CSS recommendation. These attributes have values that can be accessed or assigned from managed code, similar to that shown in snippet 2.15.
Snippet 2.15. C#: Assigning a style attribute from managed code
HtmlDocument document = HtmlPage.Document;
HtmlElement myDiv = document.GetElementById("myDiv");
myDiv.SetStyleAttribute("backgroundColor", "gray");
This snippet shows how to use a style attribute from managed code. The first step is to retrieve the HtmlElement whose style needs to be used. Then, the style can be set using the SetStyleAttribute method ![]() . Alternatively, you can retrieve the current style of an HtmlElement by using the GetStyleAttribute method. Both of these methods require you to reference a style using the scripting naming approach.
. Alternatively, you can retrieve the current style of an HtmlElement by using the GetStyleAttribute method. Both of these methods require you to reference a style using the scripting naming approach.
The scripting naming approach is the approach used to interact with styles from JavaScript. This approach uses lower camel casing for style names. This is slightly different than the HTML approach, which uses dashes to separate words. This means that the HTML name for the "backgroundColor" property used in snippet 2.15 is "background-color". If you’re an experienced web developer, you’ve probably run into this discrepancy before. Note that Silverlight requires the scripting approach. If you try to reference a style using the HTML approach, an Exception won’t be thrown, but the style value also won’t be set or retrieved. Either way, it’s nice to know there are ways to get and set style attributes. It’s also nice to know how to retrieve values from the query string.
Accessing the Query String
One of the common approaches for managing state in a web application involves using the query string. The query string empowers you to store small amounts of data relevant to a user’s session. In addition, the query string can be used as sort of a bookmark to allow a user to come back to a specific location at a later point in time. As an example, let’s pretend we want to send you the search results for a query on Silverlight; we could email you the following web address: http://search.msn.com/results.aspx?q=Silverlight&mkt=en-us&FORM=LVCP
This web address enables you to see the search results we’re referring to. This is more convenient than telling someone to go to a search engine, enter Silverlight into the query box, and wait for the results. This simpler approach is made possible through the values that are stored after the ? (question mark). These values represent the QueryString of an HtmlDocument.
The QueryString of an HtmlDocument is readable through a collection of key/ value pairs. This collection is part of a larger entity known as the DocumentUri. The DocumentUri represents the Uri of the current page, allowing you to always gain your current bearings within an application. Figure 2.8 shows how the parts of the DocumentUri are related.
Figure 2.8. The elements of a web address

This figure shows the breakdown of a web address. Notice that, significantly, the QueryString starts after the ? in a web address. In addition, each key/value pair is separated by an &. The QueryString in figure 2.8 has two key/value pairs. These key/ value pairs could be read using the code from snippet 2.16.
Snippet 2.16. C# Showing the pairs of the QueryString
HtmlWindow window = HtmlPage.Window;
HtmlDocument document = HtmlPage.Document;
foreach (string key in document.QueryString.Keys)
{
 window.Alert("Key: " + key + "; Value: " + document.QueryString[key]);
}
This snippet shows how to retrieve the individual key/value pairs of a QueryString. Note that you can’t set the key/value pairs of this collection from code. Instead, if you need to set the QueryString values, you’ll need to use the navigation techniques shown in section 2.5.1. This will reset the values associated with the QueryString, as well as the contents of the page. Once the contents of the page are loaded, you can use the HtmlDocument to navigate the page.
2.5.2. Working with the user’s browser window
The hosting browser window is represented as an HtmlWindow object. This object can’t be instantiated from code, but you can get the current instance of the HtmlWindow through the Window property of the HtmlPage class. This can be accomplished by using the code in snippet 2.17.
Snippet 2.17. C#: Retrieving in-memory representation of hosting browser window in C#
HtmlWindow window = HtmlPage.Window;
This snippet demonstrates how to retrieve the hosting browser window, which can be used to perform a variety of useful tasks. For instance, you can use the HtmlWindow to display prompts to a user. Alternatively, you can use this object to navigate the browser to a different location. Either way, this browser window stores valuable information that can be discovered and used to enhance the user’s experience.
Prompting the User
The HtmlWindow class enables you to deliver HTML prompts to your users. It’s important to note that these prompts aren’t Silverlight items. Instead, these prompts are constructed entirely by the user’s browser window, so you have an extremely limited ability to customize how these prompts are displayed. The good news is that these prompts provide a quick way to show or collect information from your users. The three prompt options available through the HtmlWindow class are listed in table 2.10.
Table 2.10. The prompt options available through the HtmlWindow class
|
Method |
Description |
|---|---|
| Alert(…) | Shows a single message in an HTML alert window. |
| Confirm(…) | Prompts the user to agree or disagree with a statement or question. This prompt displays two buttons: OK and Cancel. The text of these buttons can’t be customized. If a user selects OK, this method will return true; if a user selects Cancel, this method will return false. |
| Prompt(…) | Creates a dialog window that displays a single message. In addition, this dialog displays a single text box that the user can enter information into. If the user selects the OK button from this dialog window, the value of that text box will be returned as a string. Otherwise, if a user selects Cancel or exits the window, null will be returned. |
These prompt options mimic the prompt choices available through the HTML DOM Window object. Using Silverlight, you can launch these prompts from managed code. As an example, snippet 2.18 shows how to display an alert to a user using C#.
Snippet 2.18. C#: Displaying an alert to a user
HtmlWindow window = HtmlPage.Window;
window.Alert("Welcome!");
Note how easy it is to deliver an HTML prompt to a user. It’s also important to note that these prompts prevent the execution of succeeding code until the user responds to the prompt. Either way, you can use this approach to use the other prompt types shown in table 2.11. Luckily, it’s just as easy to perform navigation tasks through the browser window.
Table 2.11. The navigation options available through the HtmlWindow class
|
Method |
Description |
|---|---|
| Navigate(…) | This method will redirect the browser window to the provided URI. This URI can be loaded in an optional target window. The specifications of this target window can be set via an optional third parameter. The name and specification of the target window parameters match those used by the HTML DOM window.open function. |
| NavigateToBookmark(…) | This method is used to navigate to a location within the current HTML page. |
Navigating the Browser Window
Navigation is an important part of any web application. There may be times where you want to redirect a user to another web page; or, perhaps, you want to launch another browser window and load a web page into it. Either way, the HtmlWindow class provides two methods that can be used to get the job done. These two options are shown in table 2.11.
It’s important to recognize that these navigation methods can have undesired effects on your Silverlight application. For instance, if you redirect the hosting browser window away from the hosting web page; your Silverlight application will be unloaded. You should strongly consider loading a different web page into a new browser window as shown in snippet 2.19.
Snippet 2.19. C#: Launching the official Silverlight 2 in Action website in a new browser window
Uri uri = new Uri("http://www.silverlightinaction.com");
HtmlWindow window = HtmlPage.Window;
window.Navigate(uri, "_blank");
One of the key items to notice from this snippet is the fact that you must always use a Uri for a web address ![]() . In addition, you can still use a target with an address
. In addition, you can still use a target with an address ![]() , just like in HTML, making it easy to fully control the experience. This is but one of the features exposed by the HtmlWindow class. This class also exposes a property that allows you to discover information about the hosting browser window.
, just like in HTML, making it easy to fully control the experience. This is but one of the features exposed by the HtmlWindow class. This class also exposes a property that allows you to discover information about the hosting browser window.
Discovering the Browser Properties
The statically visible BrowserInformation property exposes detailed statistics about a user’s browser. This information is stored within a System.Windows.Browser.BrowserInformation object that corresponds nicely to the Navigator object available within the HTML DOM. Table 2.12 shows the properties exposed by the Browser-Information object and the equivalent Navigator property.
Table 2.12. Descriptions of the BrowserInformation properties and their corresponding Navigator properties
|
BrowserInformation |
Navigator |
Description |
|---|---|---|
| BrowserVersion | appVersion | Represents the platform and version associated with the browser. |
| CookiesEnabled | cookieEnabled | Specifies whether or not cookies are enabled within the browser. |
| Name | appName | The name of the browser |
| Platform | Platform | The operating system |
| UserAgent | userAgent | The value of the user-agent header that will be sent from the browser to a server |
Based on these options, you can see that you have access to a lot of valuable information. This information can be useful for creating a statistical analysis of those who use your Silverlight applications. To accomplish this, you must first get to the Browser-Information by using the code shown in snippet 2.20.
Snippet 2.20. C#: Displaying the name of the user’s browser
BrowserInformation browserInfo = HtmlPage.BrowserInformation;
HtmlWindow window = HtmlPage.Window;
window.Alert(browserInfo.Name);
This snippet shows how you can retrieve the statistics associated with a user’s browser. These statistics can be valuable if you’re modifying the HTML DOM from managed code because of the rendering differences between different browsers. With the BrowserInformation class, you can easily code against these inconsistencies.
The BrowserInformation class empowers you to learn about the user’s browser window, which is represented by the HtmlWindow class. With this class, you can navigate to locations within a web page or on the internet. In addition, you can reach out to users and communicate with them through HTML prompts if needed. These prompts are something you’re probably familiar with if you’ve developed web applications using JavaScript. And, if you have used JavaScript in the past, you’ll probably be excited to know that there are ways to bridge the scripting world with the managed code world.
2.5.3. Bridging the scripting and managed code worlds
For anyone who has endured the mind-numbing nuisance of parsing XML content via JavaScript, Silverlight provides an exciting feature. Silverlight allows you to create a bridge between the scripting and managed code worlds! This empowers you to use Silverlight purely for its rich and powerful .NET features; Silverlight can provide value even if you don’t need a rich vivid user interface. To take advantage of these features, you need to learn to call managed code from JavaScript. In addition, you’ll also learn how to use JavaScript from managed code.
Calling Managed Code From JavaScript
Calling managed code from JavaScript is a fairly simple process. This process includes three basic steps intended to expose managed code elements to the scripting world. Once these tasks have been performed, you’re free to reference the managed elements from JavaScript. To demonstrate, let’s pretend you want to use a method from managed code to call a web service.
The first step in calling managed code from JavaScript involves using the ScriptableType attribute. This attribute, which is part of the System.Windows.Browser namespace, makes a class accessible to the JavaScript world. This attribute doesn’t expose any special properties, so you can apply this attribute to any class using the approach shown in snippet 2.21.
Snippet 2.21. C#: Preparing a type for scripting
[ScriptableType]
public partial class Page : UserControl
This snippet shows how to make a type accessible to JavaScript by exposing the default Silverlight page to JavaScript. In reality, you can make any class accessible to the scripting world. Once a class has been marked as a ScriptableType, all public properties, methods, and events are available to JavaScript. Alternatively, you can decide to only expose select member items. Fortunately, this is also an easy process.
To expose member items, you use one similar, but different, attribute. This attribute is called ScriptableMember. The ScriptableMember attribute can be applied to the events, methods, and properties that can be used with script. You add the attribute as shown in snippet 2.22.
Snippet 2.22. C#: Exposing a managed code item to the scripting world
[ScriptableMember]
public void ExecuteWebService()
{
 // Make a call to a web service
}
This snippet shows the basic usage of the ScriptableMember attribute. This attribute gives you the ability to set a scripting alias if you so desire—which you can accomplish by setting the string -typed ScriptAlias property. This can be useful if you want to prevent naming conflicts within script. Everything you’ve seen up to this point is pretty basic, but we haven’t created the bridge to JavaScript quite yet.
To create the bridge to the scripting world, you must register an instance of the class to be exposed by using the statically visible RegisterScriptableObject method. This method, which belongs to the HtmlPage class, empowers you to give a class instance an alias. This alias can then be used from script. You can accomplish this by using the code shown in snippet 2.23.
Snippet 2.23. C#: Exposing an object to the scripting world
public Page()
{
 InitializeComponent();
 HtmlPage.RegisterScriptableObject("bridge", this);
}
This snippet demonstrates the basic usage of the RegisterScriptableObject method. This method accepts an instance of a class described as being a Scriptable-Type. The object is registered with the scripting engine by passing it as the second parameter to the RegisterScriptableObject method, which then uses the first parameter to create an alias for the class instance. This alias is appended to the content property of the hosting Silverlight plug-in.
The Silverlight plug-in exposes a sub-object called content, which exposes the content of a Silverlight plug-in; this is the scripting version of the Content property of the SilverlightHost class mentioned in table 2.7. You can access your scriptable object by first retrieving the plug-in instance and then referencing the ScriptableMember you want, as demonstrated in snippet 2.24.
Snippet 2.24. JavaScript: Referencing a managed item from the scripting world
<!DOCTYPE html PUBLIC "-//W3C//DTD XHTML 1.0 Transitional//EN" "http://
 www.w3.org/TR/xhtml1/DTD/xhtml1-transitional.dtd">
<html xmlns="http://www.w3.org/1999/xhtml" >
<head>
 <title>Silverlight Project Test Page </title>
 <script type="text/javascript" src="Silverlight.js"></script>
 <script type="text/javascript">
  function buttonClick()
  {
   var plugin = document.getElementById("mySilverlightControl");
   plugin.content.bridge.ExecuteWebService();
  }
 </script>
</head>

<body style="height:100%;">
 <div id="mySilverlightHost" style="height:100%;">
  <script type="text/javascript">
   var host = document.getElementById("mySilverlightHost");
   Silverlight.createObjectEx({
    source: "ClientBin/MySilverlightApp.xap",
    parentElement: host,
    id: "mySilverlightControl",
    properties: {
     height: "100%",
     width: "100%",
     version: "2.0"
    },
    events: { }
   });
  </script>
 </div>
 <input type="button" onclick="buttonClick();"
  value="Execute Web Service" />
</body>
</html>
This snippet demonstrates how a scriptable object can be accessed from a plug-in instance. This plug-in gives you the ability to use managed code from JavaScript. This can be valuable in situations where you don’t need the rich visual features of Silverlight. For instance, you may decide to create something known as a headless Silverlight application .
A headless Silverlight application is a Silverlight application that doesn’t have a UI. Instead, this type of application uses objects registered as ScriptableType elements as the brains for a traditional web page. This approach allows you to write non-visual components using the .NET Framework and integrate existing code libraries. This type of application is valuable because you can use it to perform tasks that the browser’s JavaScript engine can’t do. For instance, you may choose to use a headless Silverlight application to make cross-domain requests or listen to a socket (both items discussed in chapter 6). Regardless, you may still need to rely on the features of a preexisting JavaScript library. For these situations you can use Silverlight to call JavaScript from managed code.
Using JavaScript from Managed Code
Silverlight gives you the flexibility to call JavaScript from managed code, and in turn, the ability to call any method on an HTML or JavaScript object. This can be very useful if you’re integrating Silverlight with a preexisting web application. There’s one spot in particular where this feature is especially valuable: printing.
Silverlight doesn’t have a built-in printing feature, but the Window object in the HTML DOM does expose a print method. You can use Silverlight’s ability to call a function on a JavaScript object to deliver this functionality. To accomplish this, you use a method called Invoke. This method can be used to execute a JavaScript function from managed code, as demonstrated in snippet 2.25.
Snippet 2.25. C#: Calling JavaScript object’s function from managed code
HtmlWindow window = HtmlPage.Window;
window.Invoke("print", new object[]{});
This code can be used to print the current web page, including your Silverlight application. The Invoke method can be applied to any HtmlDocument, HtmlElement, or HtmlWindow object. The first parameter of this method represents the name of the function to be executed, or invoked. The second parameter represents the arguments that will be passed to this function when it’s called. As you can see, this parameter is an array of objects, so you have the flexibility to pass anything you need to a JavaScript function.
Silverlight gives you the ability to execute JavaScript code from managed code. In addition, you can go the other way and call managed code from JavaScript. These two features show how you can use Silverlight to bridge the scripting and managed code worlds. This is important because you need to use this approach if you want to communicate between two different Silverlight plug-ins.
Using JavaScript to Communicate Between Silverlight Plug-Ins
Silverlight plug-ins are standalone and oblivious to other Silverlight plug-ins running on the same web page. This ignorance prevents you from communicating directly between different Silverlight plug-ins. But, you can use the information shared in the past two sub-sections to exchange information between different Silverlight plug-ins. To do this, you must create a JavaScript function that serves as a bridge between plug-in instances. This bridge is responsible for passing messages from one Silverlight plug-in to another. This wouldn’t be possible if the Silverlight plug-in didn’t attach itself to the HTML DOM. This task of communicating between plug-ins is a great opportunity to test yourself over the items you’ve learned in this section; but, if you just want the code, you can download it from http://www.silverlightinaction.com.
Silverlight gives you the ability to bridge scripting and managed code running inside the browser. In addition, you can use Silverlight to learn about the user’s browser window. Perhaps even more interesting: You can use managed code to interact with the HTML DOM. All this is made possible by the rich HTML DOM API that is an integral part of Silverlight.
2.6. Summary
Silverlight was designed to be consistent with the well-established web architecture. This allows you to easily embed rich, interactive Silverlight content within any web asset. To embed Silverlight content into a web page, you first reference the Silverlight.js utility file. This utility file enables you to create a plug-in instance through the createObjectEx utility method.
Once a Silverlight plug-in instance is embedded, you can use Silverlight to manipulate the HTML DOM via managed code. This gives you the advantages of compile-time type checking and an easy, consistent development approach through a familiar language such as C#. Although manipulating the HTML DOM from managed code is exciting, ultimately, the goal is to be manipulating Silverlight content. Let’s now get down to business and learn about the fundamentals of Silverlight: layout and text.