
Chapter 1. Introducing Silverlight
| This chapter covers |
|
You’ve purchased this book wanting to learn about Microsoft’s Silverlight 2 platform, and your first question might be: what is it? Silverlight is a client-side runtime that enables you to design, develop, and deliver rich, interactive experiences over the internet. Truly interactive experiences have traditionally been confined to desktop applications. But, unlike the 1.0 version, Silverlight 2 provides the power of the .NET framework to help you reach beyond the desktop to deliver these experiences across a variety of browsers, platforms, and devices.[1]
1 Silverlight content has been shown to run on Windows Mobile 6 and Nokia devices running the Symbian OS., but this book will focus on developing Silverlight content within a browser. The reason why is because the timeframe for Silverlight on mobile devices is beyond the scope of this book.
This chapter will lay the groundwork for the rest of this book. To prepare for our journey together, we’ll first discuss what Silverlight offers within the rich interactive application space. Then, we’ll examine the designer/developer collaboration advancements allotted by Silverlight. These collaboration advancements are enabled by an XML-based language, called XAML, which we’ll also cover. In order to begin, let’s raise the sails on our catamaran and begin on this fast-paced journey.
1.1. Silverlight up your life
The winds of excitement are whipping around the World Wide Web as individuals increasingly rely on the internet for their software needs. When the internet began, it was primarily used for sharing static content; but, as web adoption exploded, users gradually desired more pizzazz through their web browsers. They wanted to perform their banking and shopping through the web. They wanted to use their computer to share pictures, songs, and videos to strengthen existing friendships and build new ones. Users wanted all this and more in a rich and responsive manner.
The technologies created for delivering static content quickly became constrictive when it came time to deliver these more dynamic experiences. The web development community attempted to meet these challenges by cobbling together a multitude of technologies that tended more toward wizardry than recommended development practices. JavaScript emerged as a fundamental contrivance for these magicians to perform their tricks. And skilled web developers navigated the HTML Document Object Model (DOM) much like safari leaders wielding small daggers within a treacherous jungle.
The jungle of technologies thickened as a variety of browser-based plug-ins arose to address the needs of the user interface. Often these solutions were, and are, incomplete. They often overlook the importance of a true development experience. But Silverlight doesn’t. Silverlight delivers the three tools that enable you to slash through this overgrown jungle. These tools are the three Ps of Silverlight: Productivity, Performance, and Portability.
1.1.1. Productivity
Imagine how painful grocery shopping would be if only one store sold bread, and another sold only milk, and yet another sold only meat. We haven’t even discussed cereal, toilet paper, and other day-to-day items. But, as you can imagine, grocery shopping would be a frequent source of frustration in your life. Strangely, web development often imitates this piecemeal type of shopping.
Silverlight addresses the inherent difficulties of traditional web-based software by unifying 2D graphics, animation, input, media, and text into a single application programming interface (API). This API gives you the flexibility to create networked applications that seamlessly integrate with data and services. Integration with data and services assists you in overcoming the disconnected nature of the internet and allows you to deliver a more responsive experience in a more productive manner.
A robust, powerful development experience is critical for creating valuable solutions. This kind of development experience allows you to create products more quickly, enabling you to focus on solutions instead of problems. With a powerful development experience, you have a greater degree of flexibility, which breeds innovation. This experience allows you to take advantage of previous development endeavors by minimizing integration efforts and encourages robustness through more efficient testing mechanism. Silverlight enables all of this (and more) because, when it comes to web-based software, Silverlight has a unified development story that is second to none.
This development story is incredibly powerful. Often, though, powerful tools are large and unwieldy; they tend toward oafish, clumsy behavior. (These types of adjectives generally apply to things like bumbling giants in fairytales.) But Silverlight isn’t any of these things. In fact, it’s an incredibly nimble and performant platform that allows you to create highly responsive and performant solutions.
1.1.2. Performance
Getting stuck in the quicksand of long response times can be a frustrating experience. Long response times within an application can cause users to squirm and fidget in an attempt to remove the pain-inducing wait times, but these attempts ultimately cause users to sink further into despair and frustration. Whether you’re developing an exciting entertainment experience or a line-of-business application that will be used for hours on end, performance is important.
As you’ll see shortly, performance flows through Silverlight’s veins like that of a Triple-Crown-winning thoroughbred. Silverlight outpaces similar technologies, so you can light up the jungle with highly responsive user experiences that are both calming and engaging. These calming experiences can help users rise up out of the quicksand pits associated with web-based applications and run toward a responsive web.
To separate the ponies from the horses, Alexey Gavrilov, an independent developer, put together a series of animations that compares various web-focused frameworks. Each animation involves animating 16 balls bouncing around a box and calculating the frames per second (fps). As figure 1.1 shows, Silverlight clearly outperforms the rest.
Figure 1.1. Calculated frames per second, per technology, per platform, and per browser[2]
2 The Internet Explorer and Firefox statistics were compiled using a freshly formatted Dell Inspiron 6000 with an Intel Pentium M 2.00 GHz processor, 1GB of RAM, and Windows XP (SP2) installed. The Safari statistics were compiled using an Apple MacPro 2.66 GHz DuoCore processor with 2GB of RAM. These tests, along with source code, are available at http://www.bubblemark.com.
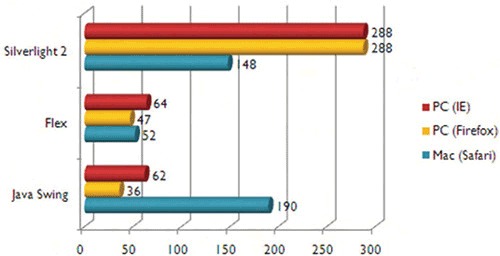
As this figure illustrates, Silverlight can perform magnitudes more efficiently than similar technologies. These performance advantages are not limited to the Microsoft Windows platform. Silverlight goes beyond expectations, and the Microsoft platform, to give freedom through portability.
1.1.3. Portability
Silverlight is a cross-browser, cross-platform user experience juggernaut designed with portability in mind. Before the official name of Silverlight was announced, it was publicly known as Windows Presentation Foundation Everywhere, or WPF/E for short, because Silverlight uses a subset of the Windows Presentation Foundation (WPF) specification that can be delivered beyond the Windows platform.
Those interested in Silverlight often ask: What does everywhere really mean? Well, natively, Silverlight content has the capacity to run on approximately 96% of the computers on the internet because Silverlight has been built and tested to run on specific operating systems and browsers.
Silverlight, like most software, must run on an operating system. Silverlight natively supports the Microsoft Windows and Apple Macintosh platforms. In addition, Microsoft is in partnership with Novell to provide a Silverlight implementation for Linux through the Moonlight project. The chart in figure 1.2 shows the list of operating systems, and their market shares, that Silverlight supports.[3]
3 Net Applications, “Operating System Market Share,” Marketing Share for Browsers, Operating Systems and Search Engines, http://marketshare.hitslink.com/report.aspx?qprid=8
Figure 1.2. Silverlight supports the platforms listed. The Other portion represents the platforms that Silverlight doesn’t support.

The specific operating systems listed in this figure account for approximately 97% of the operating systems used on the internet. The remaining 3% represents the operating systems not supported by Silverlight.
Note
Figure 1.2 doesn’t separate out the Mac OS X versions. Silverlight 2 doesn’t support Mac OS X on PowerPC-based machines. Silverlight 2 will work with Mac OS X as long as it’s running on an x86 machine.
Because Silverlight is a browser plug-in, it must run within the security sandbox of an internet browser. Silverlight supports the most popular web browsers by addressing 96% of the browsers used in the market. In addition to Internet Explorer, Silverlight also supports the Firefox, Opera, and Safari web browsers. In addition, the Moonlight project extends support to the Konquerer browser on Linux. The chart in figure 1.3 shows the market shares of these browsers.[4]
4 Net Applications, “Browser Market Share,” Marketing Share for Browsers, Operating Systems and Search Engines, http://marketshare.hitslink.com/report.aspx?qprid=0
Figure 1.3. Silverlight content can run within the browsers and versions listed within the chart. The Other portion represents the browsers not supported by Silverlight or Moonlight.

The browsers explicitly listed in this figure are supported by either the Silverlight or Moonlight runtimes. As this chart (and the one in figure 1.2) illustrates, Silverlight can reach approximately 96% of the computers on the internet.
At this point, it’s clear that Silverlight is a wildfire burning up the jungle of technologies associated with the traditional web. The performance and productivity characteristics make Silverlight a wise choice for developing rich interactive applications. The cross-browser, cross-platform reach of Silverlight makes it the responsible choice. One more productive advantage is so big that it requires its own section: the designer/developer collaboration.
1.2. Why can’t we be friends?
Traditionally, the tools and technologies involved in web-based software development have separated designers and developers like the Berlin Wall separated East and West Germany. Designers would use powerful illustrative toolsets to create vivid, intricate user-interface designs in the form of a mockup. The mockup would then be tossed over the great wall and developers would dissect it and extract the necessary images in an effort to re-create the visual depictions.
Despite the most committed efforts, these designs would occasionally stretch beyond the capabilities of traditional web standards, forcing a compromise between design and development. This compromise would often result in the selection of the lowest common denominator. But, if we review the tiers associated with a web page, as shown in figure 1.4, it’s clear that the divide between designers and developers doesn’t need to exist.
Figure 1.4. The tiers of a web page

The illustration in this figure clearly shows a separation between the code (represented by the Logic and Data Sources blocks) and the design (represented by the User Interface blocks). If you recall the role definitions mentioned in the preface, you’ll probably remember that designers are generally skilled at creating intricate user interfaces and that developers generally possess strong coding and architecting skills. As figure 1.4 illustrates, a clear separation exists between the tasks associated with these roles. In fact, if we revisit the previous illustration and add the designer and developer roles to the illustration, we get something that looks like figure 1.5.
Figure 1.5. Designer/Developer work distribution

As this figure clearly shows, an undeniable separation exists between the designer and developer roles. This separation seemingly mimics the segregation we’re attempting to avoid. So, how do you bridge these two worlds? By using an XML-based language called XAML.
The details of XAML are covered in section 1.3. For now, it’s important to understand that XAML acts as a bridge between your design and your code that makes crossing this divide child’s play. This approach enables a refreshing collaborative experience between designers and developers that allows you to create valuable software solutions in shorter amounts of time. By keeping design separate from code, you can take advantage of tools targeted for specific tasks while, at the same time, working in a manner that you’re used to.
You’re probably accustomed to writing software without a designer. XAML gives the flexibility to work with a designer as much, or as little, as necessary. Regardless of your development approach, it’s still important that we build a firm understanding of the user interface bubbles in figure 1.5. By fostering this understanding, we can ensure that you can proficiently code to the user interface or go as far as creating the entire user interface. With that said, figure 1.5 may be more appropriately depicted as the illustration shown in figure 1.6.
Figure 1.6. Another Designer/Developer work distribution viewpoint

This figure clearly illustrates the breadth and depth of knowledge required by a Silverlight developer. This makes it easier to visualize the developer and designer experiences available within Silverlight.
1.2.1. The developer experience
What makes the development experience in Silverlight so special? One word: .NET. (Or is it two words dot NET?)
Silverlight 2 contains a full-featured version of the .NET Common Language Runtime (CLR) along with a trimmed-down version of the framework class library that enables you to easily create rich and connected applications across platforms. This version of the framework is specific to Silverlight 2, but it still includes all of the powerful presentation, data, networking, and other programming features you’d expect as a developer. It simply omits features such as com-interop that are irrelevant in web-application development.
As an additional bonus, this powerful version of the framework is backed by some of the industry’s leading tools, including Visual Studio. Visual Studio is probably the most widely recognized tool when it comes to .NET development. With an established collection of world-class tools, you can rely on the fact that your time will be spent on solutions instead of annoyances.
Typically, integration between tools can be an annoying problem that can make collaboration frustratingly difficult, but Visual Studio allows a Silverlight template that seamlessly integrates the developer and designer worlds and promotes collaboration. This collaboration enables you to easily deliver a highly stylized Silverlight application, thanks in part to the terrific designer experience available within Microsoft Expression Blend.
1.2.2. The designer experience
Microsoft Expression Blend, or Blend, is a professional design tool that empowers designers to create rich, vivid user experiences. Although Blend allows you to create rich Windows-based applications, it also enables you to create rich, connected web-based applications with Silverlight. Blend can be used to simplify the process of incorporating blurs, gradients, and other complex design elements, such as animations, within your Silverlight applications.
The significance of Blend in relation to Silverlight lies in two riveting details. First, as intricate design elements are constructed within Blend, the XAML for these elements is automatically created for you. Second, the Silverlight project structure schema within Blend is consistent with the project schema in Visual Studio. This schema allows for frictionless collaboration between designers and developers, as well as using both tools simultaneously on your own computer.
As depicted, this valuable tool is worth becoming familiar with; in addition, Microsoft has provided a free trial version of Blend through its website, so there’s really no reason not to use it with this book. We should mention that Blend isn’t required for Silverlight development, but we will be using it through some of the optional “Blending it together” walk-throughs in this book. Unlike Blend, XAML is virtually required for Silverlight development.
1.3. XAML
The eXtensible Application Markup Language (XAML) is a declarative language that enables you to initialize objects in XML format. This format enables you to easily visualize a hierarchy of elements while, at the same time, separating content from code. This separation is possible because each XAML element maps to a .NET type. Each attribute within an element corresponds to a property within a .NET type. This concept is probably best illustrated by figure 1.7.
Figure 1.7. Any object that you create in XAML can also be created within code.

The illustration in this figure shows three code equivalents to a segment of XAML. Notice that the TextBlock element in the XAML code corresponds to an initialization statement within the code segments. This initialization occurs because, each time an element is created in XAML, the corresponding .NET type’s default constructor is called behind the scenes. Also occurring behind the scenes is the executable code defined within the code-behind files.
1.3.1. Code behind
Much like ASP.NET, XAML pages support the concept of code-behind pages. Code-behind pages enable you to separate code from design by placing the UI-related code in the XAML and the executable code within a linked source file. This relationship between XAML and source code is best exemplified by figure 1.8.
Figure 1.8. The relationship between an XAML file and a code-behind file within a C# project
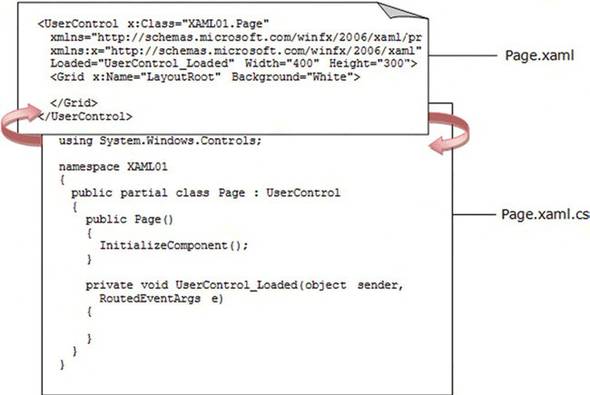
As this figure illustrates, the XAML code is stored within a .xaml file while the code-behind class definition is stored within a .xaml.cs file. (The extension will vary based upon what language you’re using.) In all honesty, the class definition is stored within two files: a file with the .xaml.cs suffix and a file with the .xaml.g.cs suffix, which is automatically created by Visual Studio. The .xaml.g.cs file provides the variable and method declaration for ease of development. In fact, the InitializeComponent method from figure 1.8 is stored within the .xaml.g.cs file. Your coding efforts should take place within the .xaml.cs file though; for this reason, we’ll focus on that file.
The XAML file references the code-behind file through the x:Class attribute. This class definition is compiled and stored within an assembly that gets placed within a directory relative to the application called ClientBin. The class definition is primarily used to handle the events triggered through the user interface defined within the corresponding XAML file. As shown in figure 1.8, through the Loaded attribute, you can specify the name of the event-handling method within the XAML code. When using this approach, the compiler expects a method named after the value of the attribute within the code-behind file. You must ensure that the method accepts the correct number and type of parameters.
In addition to handling events, the code-behind file may also be used to define public properties, which can then be set through the XAML code. This practice is most often used when creating custom controls, a topic discussed in chapter 12. Although adding properties to classes is a common task, it’s probably more common to add classes to namespaces.
1.3.2. Namespaces
A namespace provides a way of organizing related objects within a common grouping. These groupings, or namespaces, give you a way to define where the compiler should look for a type. To specify where to look, you reference a namespace within the root element of an XAML file. Snippet 1.1 illustrates the use of two namespaces.
Snippet 1.1. XAML: A basic XAML file referencing two namespaces
<UserControl x:Class="XAML01.Page"
 xmlns="http://schemas.microsoft.com/winfx/2006/xaml/presentation"
 xmlns:x="http://schemas.microsoft.com/winfx/2006/xaml"
 Width="400" Height="300">
 <Grid x:Name="LayoutRoot" Background="White">
  <TextBlock x:Name="myTextBlock" Text="Hello"
   FontFamily="Verdana" FontSize="12"
   MouseEnter="myTextBlock_MouseEnter"/>
 </Grid>
</UserControl>
As this snippet illustrates, you’re permitted to summon multiple namespaces within a single XAML file. When you reference multiple namespaces, each namespace must be uniquely prefaced. For instance, the x prefix in this example is used in association with the http://schemas.microsoft.com/winfx/2006/xaml namespace. At the same time, the http://schemas.microsoft.com/winfx/2006/xaml/presentation namespace doesn’t use a prefix.
These two namespaces we just mentioned will be used in almost every Silverlight application you work with or see. These namespaces are generally defined in the following manner and expose these features to your Silverlight applications:
- http://schemas.microsoft.com/winfx/2006/xaml/presentation— Provides your applications with the core Silverlight elements. For this reason, this namespace generally omits a prefix, making it the default namespace within the page. This approach enables you to reference elements within this specific namespace without having to include the prefix.
- xmlns:x="http://schemas.microsoft.com/winfx/2006/xaml"— Provides functionality that’s common across XAML. It’s important to remember that XAML is used by other technologies, such as WPF and Windows Workflow Foundation (WF), all of which need access to common features such as Name, Key, and Class properties.
In addition to the http://Schemas.microsoft.com/winfx/2006/xaml/presentation namespace, the Silverlight runtime supports http://schemas.micro-soft.com/client/2007 as the default namespace. But, you should use http://schemas.microsoft.com/winfx/2006/xaml/presentation as the default namespace because Visual Studio and Blend recognize this namespace. This namespace also makes it easier to promote your Silverlight applications to WPF applications if you need to at a later point.
In addition to these two commonly used namespaces, Silverlight gives you the flexibility to reference other namespaces including those within your own custom assemblies. When another assembly is referenced, it gets copied into a subdirectory of your Silverlight application called ClientBin. In fact, when you compile your Silverlight application, it itself gets compiled into an assembly that gets placed in this directory. We’ll discuss the application model itself a little bit later; for now, in order to reference these assemblies, you need to define a new namespace, which includes a prefix, namespace, and assembly. Snippet 1.2 illustrates this concept.
Snippet 1.2. XAML: This example references a custom assembly called MyAssembly.dll that contains a namespace called MyNamespace. To access the elements within MyNamespace, the my prefix is defined.
<UserControl x:Class="XAML02.Page"
 xmlns="http://schemas.microsoft.com/client/2007"
 xmlns:x="http://schemas.microsoft.com/winfx/2006/xaml"
 xmlns:my="clr-namespace:MyNamespace;assembly=MyAssembly"
 Width="400" Height="300">
 <Grid x:Name="LayoutRoot" Background="White">
  <my:MyElement x:Name="myElement1"></my:MyElement>
 </Grid>
</UserControl>
As this snippet illustrates, referencing other elements, including custom elements, only requires you to provide a couple more details. Although the process of creating custom elements is detailed in chapter 12, this snippet also contains a few other XAML-related concepts that we should discuss—the least of which is the incredibly powerful compound property feature.
1.3.3. Compound properties
Although the illustration in figure 1.6 shows the relationship between XAML and .NET types and properties, we did omit one detail pertaining to properties. Properties within XAML may consist of elements significantly more complex and detailed than primitive types. For instance, the XAML in snippet 1.3 uses another kind of .NET object, called a LinearGradientBrush, to define the background of a Grid.
Snippet 1.3. XAML: A Grid with a gradient background
<UserControl x:Class="CompoundProperties01.Page"
 xmlns="http://schemas.microsoft.com/client/2007"
 xmlns:x="http://schemas.microsoft.com/winfx/2006/xaml"
 Width="400" Height="300">
 <Grid x:Name="LayoutRoot">
  <Grid.Background>
   <LinearGradientBrush>
    <GradientStop Offset="0" Color="White"/>
    <GradientStop Offset=".5" Color="Navy"/>
    <GradientStop Offset="1" Color="White"/>
   </LinearGradientBrush>
  </Grid.Background>
 </Grid>
</UserControl>
The concept of a GradientBrush is discussed in chapter 8; but, as you can see, you define the Background element inside the XAML hierarchy. This approach is enabled by a compound property.
A compound property enables you to use the syntax of TypeName.PropertyName within an element to define more complex items within an element. This powerful feature gives you the ability to easily see the hierarchy of an object structure. In addition, it gives you a significant amount of flexibility when you’re creating control templates, a topic we’ll discuss in chapter 10. But first, another kind of property is as equally important as the compound property.
1.3.4. Attached properties
An attached property is a property specified within an element other than the element that references it. Although this seems like a mouthful, it really isn’t. You can easily recognize an attached property by its consistent syntax of Attached-Element.PropertyName. These special attributes are generally used within the context of layout panels, which we discuss in chapter 3.
As an example, let’s pretend you need to define a Rectangle within a Canvas. This Rectangle will have an offset of 10 pixels from the top and 10 pixels from the left of the Canvas. The subject (Rectangle) is presented relative to the parent (Canvas), so, as snippet 1.4 shows, the subject is attached to the parent.
Snippet 1.4. XAML: An example showing the use of two attached properties in action
<UserControl x:Class="AttachedProperties01.Page"
 xmlns="http://schemas.microsoft.com/client/2007"
 xmlns:x="http://schemas.microsoft.com/winfx/2006/xaml"
 Width="400" Height="300">
 <Canvas x:Name="LayoutRoot" Height="300" Width="400" Background="White">
  <Rectangle Canvas.Left="10" Canvas.Top="10"
   Height="40" Width="120" Fill="Silver"/>
 </Canvas>
</UserControl>
This snippet uses the Canvas.Left and Canvas.Top attached properties to position the Rectangle within the Canvas. As you can see, the attached properties are set just like traditional properties.
1.4. Blending it together
Now that you have a fundamental understanding of the value that Silverlight brings to the web, we can begin exploring the application development experience. To begin our journey, let’s create a basic media player using Silverlight.
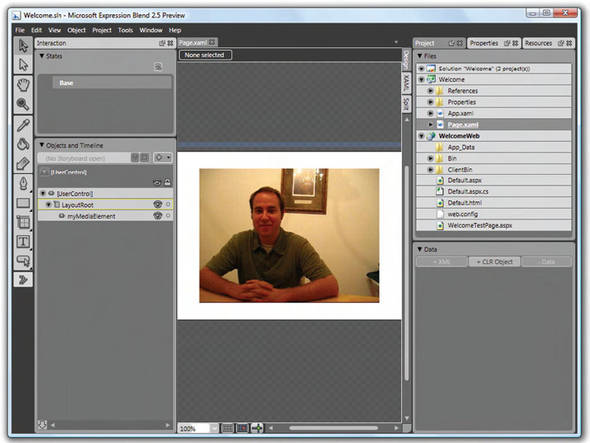
This walk-through is designed to illustrate the seamless integration between the Microsoft Visual Studio and Blend tools. If you do not have these tools, you can learn how to set them up by visiting http://silverlight.net/GetStarted/. Once installed, you can moveforward with this walk-through. Although the tasks may seem tedious at first, it’s important to learn what each tool is geared for. When you’re done with the exercises in this section, you’ll have a media player that looks like that in figure 1.9.
Figure 1.9. The finished product of this “Blending it together” session

The creation of the media player shown in this figure will demonstrate some of the fundamental concepts of Silverlight development. Perhaps the most fundamental concept involves learning to use the tools. You’ll gain exposure to one of these tools, Microsoft Expression Blend, in just a moment. Let’s begin creating the media experience using an old familiar friend: Visual Studio.
Walk-through 1.1. Creating a Silverlight media experience in Visual Studio 2008
1.
Launch Microsoft Visual Studio 2008.
2.
Select File > New > Project…
3.
From the New Project dialog box, select the Silverlight project type. Then, select the Silverlight Application template. (Note that, if you don’t have the Microsoft Silverlight Tools for Visual Studio 2008 installed, you won’t have these options. Please install the Microsoft Silverlight Tools for Visual Studio 2008 to continue.)
4.
Once you’ve selected the Silverlight Application template, enter the following project properties within the New Project dialog box:

5.
Click OK. At this point, the Add Silverlight Application dialog box appears. This dialog box gives you the option to specify how you’ll use your Silverlight application. For the sake of this book, use the first option, as shown in the following figure:

6.
Click OK. Once the Silverlight project is loaded within Visual Studio, the Page.xaml file will open.
7.
Within the Page.xaml file, there’s a Grid element. Within the Grid element, add the following XAML:
<MediaElement x:Name="myMediaElement"
Margin="20" Height="240" Width="320"
Source="http://www.silverlightinaction.com/video1.wmv" />This code segment uses a MediaElement object to reference a video file over the internet. Once you’ve inserted the MediaElement, the Page.xaml file should look similar to the following:
<UserControl x:Class="Welcome.Page"
xmlns="http://schemas.microsoft.com/winfx/2006/xaml/presentation"
xmlns:x="http://schemas.microsoft.com/winfx/2006/xaml"
Width="400" Height="300">
<Grid x:Name="LayoutRoot" Background="White">
<MediaElement x:Name="myMediaElement"
Margin="20" Height="240" Width="320"
Source="http://www.silverlightinaction.com/video1.wmv" />
</Grid>
</UserControl>
8.
9.
After watching the video, close the web-browser window that was launched. Leave Microsoft Visual Studio Open!
In this walk-through, you successfully created a Silverlight application that plays media related content by adding one simple element. As engaging as the application is, let’s now turn our focus to using Microsoft Expression Blend to stylize the media.
Walk-through 1.2. Matting a MediaElement using Expression Blend 2
1.
Launch Microsoft Expression Blend 2.5
2.
Select Open Project… from the startup dialog box or File > Open Project…, depending on your preference.
3.
Browse to the directory where you created the project in walk-through 1.1.
4.
Select the Welcome.sln file and click the Open button. Alternatively, you could select the Welcome.csproj[5] file because Blend has built-in support for both the solution and project file schemas. Once the project is loaded, open the Page.xaml. You should see something similar to the following:
5.
From the Toolbox along the left side of the Blend, select the Rectangle tool. The Rectangle tool looks like the following:

6.
With the Rectangle tool selected, draw a Rectangle from the upper-left corner of the Canvas to the lower-right corner of the MediaElement that’s already there.
[Unsupported tag: inlinemediaobject/caption]
From the upper-left corner, drag the mouse down and to the right.
[Unsupported tag: inlinemediaobject/caption]
Continue to drag until the MediaElement is covered by the Rectangle.
[Unsupported tag: inlinemediaobject/caption]
When the element is covered, release the mouse.
7.
Next, to ensure that this Rectangle provides a nice mat for the MediaElement, set the Height and Width properties. Check to see that the Properties panel is selected within the upper-right corner of Blend. If it isn’t selected, please select it now.
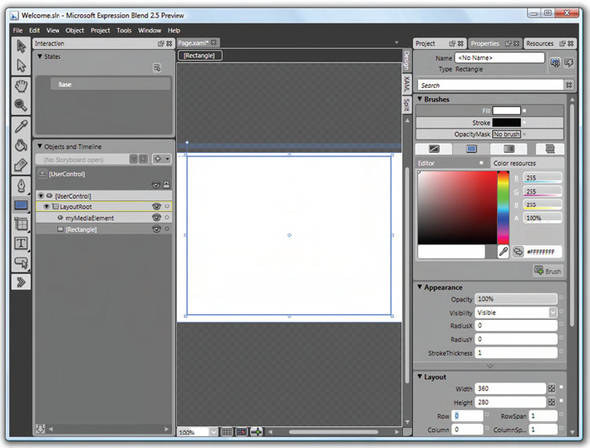
8.
Manually set the Width and Height properties within the Layout category of the Properties panel. The Width should be set to 360, and the Height should be set to 280.

9.
Select the Brushes category.
10.
Select the Gradient Brush tab within the Brushes category and ensure that the Fill property is selected.

11.
Now fill the Rectangle with a gradient by doing the following:
[Unsupported tag: inlinemediaobject/caption]
Click the leftmost gradient and set the value to a dark gray, such as #FF383737, as shown in the picture.
[Unsupported tag: inlinemediaobject/caption]
Add a new gradient stop by clicking the middle of the gradient slider. Set the value of this gradient stop to a light gray such as #FFB4B4B4.
[Unsupported tag: inlinemediaobject/caption]
Set the third and rightmost gradient stop to the same gray you used for the leftmost gradient stop (a dark gray or #FF383737)
12.
At this point, you have a Rectangle on top of the MediaElement, hiding it. If you were to run the project, you’d hear the MediaElement playing, but you wouldn’t be able to see it. Your project should look something like this:

13.
Select the [Rectangle] within the Objects and Timeline category within the Interaction panel, which is to the right of the toolbox used to draw the Rectangle.

14.
You need to place the Rectangle behind the MediaElement. To do this, make sure the Rectangle is selected, as shown above, and then go to Object > Order > Send to Back.
15.
Now the MediaElement should be on top of the Rectangle like this:

16.
Press F5 to run the application. Notice how this is consistent with Visual Studio.
17.
Close the web browser window that was launched.
5 If you attempt to open a .csproj file, Blend will open the corresponding solution file.
This walk-through demonstrates how you can open Silverlight projects created from Visual Studio and stylize them within Blend. In addition, you were introduced to some of the basic elements available within Blend. As you can see, Blend makes it easy to reach beyond traditional web graphics and add richer elements such as gradients. As the next walk-through shows, these elements seamlessly transition back to the Visual Studio environment.
Walk-through 1.3. Implementing the behavior of the video player in Visual Studio 2008
1.
Either Alt-Tab back to Microsoft Visual Studio, or select it from the taskbar.
2.
Note that you’ll be prompted to Reload the Page.xaml file in a dialog box that will look like the following:

3.
Click Yes in this dialog box.
4.
Note that the XAML code is automatically updated to include the XAML for the Rectangle created in walk-through 1.2.
5.
Press F5 to run the application to show how everything was migrated over without any migration process.
6.
Close the web-browser window that was launched.
7.
Select View > Code to open the Page.xaml.cs file.
8.
Within the Page constructor body, add the following line of code:
myMediaElement.MouseLeftButtonUp += new
MouseButtonEventHandler(myMediaElement_MouseLeftButtonUp);
9.
After this line of code is added, the Page constructor should look like the following:
public Page()
{
InitializeComponent();
myMediaElement.MouseLeftButtonUp += new
MouseButtonEventHandler(
myMediaElement_MouseLeftButtonUp);
}
10.
Implement the following event handler:
void myMediaElement_MouseLeftButtonUp(
object sender, MouseButtonEventArgs e)
{
if (myMediaElement.CurrentState ==
MediaElementState.Playing)
myMediaElement.Pause();
else
myMediaElement.Play();
}
11.
Press F5 to run the application.
At this point, you’ve successfully created a basic media player that illustrates many of the core concepts of Silverlight. The details surrounding these concepts will be exposed as we progress through this book.
1.5. Summary
Silverlight is Microsoft’s offering for delivering rich, cross-browser, cross-platform user experiences over the internet. These experiences have the potential of revolutionizing the internet and can be witnessed by approximately 96% of the internet’s population.
With the power of the .NET Framework, Silverlight enables greater developer productivity, opportunity, and choice. In addition, the collaboration, enabled with designers through XAML and a consistent project schema between tools, encourages higher quality products built with smaller amounts of effort. To deliver these high-quality interactive products, you need to have an in-depth knowledge of how to enable a web page to host Silverlight content. Building this knowledge is the purpose of chapter 2.