
appendix c
Stripe and MongoDB setup
This appendix covers
- Setting up your Stripe account and retrieving Stripe API keys
- Installing and configuring MongoDB
Setting up your Stripe account and retrieving Stripe API keys
Creating and configuring a Stripe account and obtaining the API keys is required for chapter 12 when you create your serverless payment service. The process consists of the following steps:
- Sign up for a Stripe account.
- Retrieve your Stripe API keys.
- Create the serverless Stripe payment service using Claudia API Builder.
If you have a Stripe account but haven’t retrieved your keys yet, skip to the section “Getting your Stripe API keys.”
Creating a Stripe account
Creating a Stripe account is quick and easy. Open your browser and go to https://stripe.com. Click Create Account, which takes you to the Stripe registration page.
Type in your email address, full name, and password. After you submit the form, Stripe asks you to add a mobile recovery number. We recommend you do so in case you forget your password.
After that, your account is created, but don’t forget to confirm your email address—Stripe will not allow you to accept live payments until you do this. That’s it; you have your very first Stripe account!
Getting your Stripe API keys
When you want to use Stripe to accept payments in your applications, you are required to use Stripe’s API. Stripe needs to be able to identify you when you’re using its API. To identify your account, Stripe gives you a pair of secret hashed keys that are meant to be used in all communications with its API. These keys are automatically generated for you by Stripe when you initially create your Stripe account.
Once you’ve created your account, as described in the previous section, you need to retrieve your API keys. To do that, open the Stripe Dashboard at https://dashboard.stripe.com.
From the navigation menu, choose the API option (see figure C.1).

Figure C.1 The Stripe Dashboard
The API page contains two tables, for standard API keys and restricted API keys (figure C.2). You want standard API keys; they are the most commonly used and the key type you’ll use for your serverless payment service.
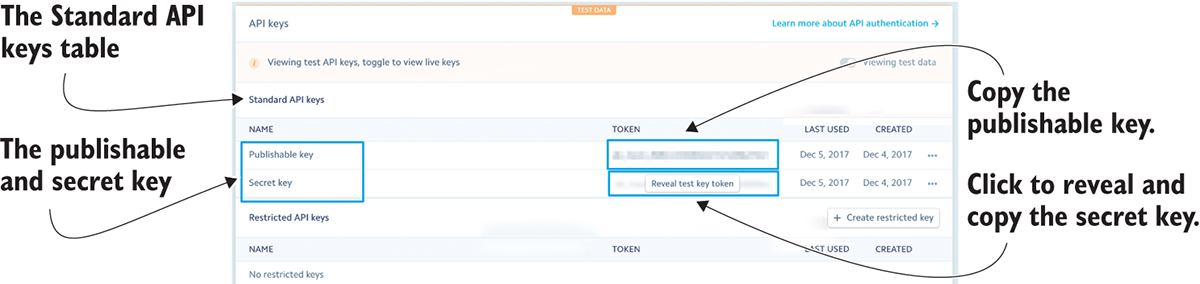
Figure C.2 The standard API keys table
As mentioned before, two standard API keys are automatically generated for you when you create your account: a publishable key and a secret key. The publishable key can be used as a public key in your front-end web or mobile applications. It may be publicly seen, as it is something as your email. But either way, you don’t want everyone to have it.
The secret key provides your applications or APIs access to Stripe resources. This is what lets Stripe know it’s you using its resources. It’s similar to a password, and you must hide it from everyone—but don’t worry, if you suspect someone might have seen it, you can regenerate both the public and secret key.
Copy both keys to a blank document on your computer for ease of access now, but be sure to delete the document after you finish chapter 12.
Installing and configuring MongoDB
MongoDB Atlas is a cloud-hosted and managed MongoDB service, engineered and run by the same team that built the database. In this section you’ll create and configure a free instance of MongoDB, which is sufficient to follow along with the code examples from chapter 13 and to run a small real-world application.
Creating an account
To learn more about the product and create a MongoDB Atlas account, go to https://www.mongodb.com/cloud/atlas in your browser (see figure C.3).

Figure C.3 The MongoDB Atlas landing page

Figure C.4 Choose a cloud provider on the Pricing tab.
Click Pricing to open the Pricing tab, where you can choose a cloud provider, region, and instance size. Select AWS, as shown in figure C.4, and then scroll down.
Below the cloud provider section, select the region you used for your Lambda function (we used eu-central-1). Then choose the M0 instance, which costs $0 per month, and click Get Started Free, as shown in figure C.5.

Figure C.5 Choose a region and instance size.
In the sign-up form that appears, fill out the required fields and click Continue, as shown in figure C.6. MongoDB Atlas does not require your credit card details for a free account, so clicking Continue creates your account and take you to the configuration page.
Configuring your cluster
After you create an account, you need to create your first cluster. A database cluster is a collection of databases that is managed by a single instance of a running database server. As shown in figure C.7, you need to add a cluster name (for example, “RobertosTaxiCompany”). Make sure the price is still $0, and then click the Confirm & Deploy button.
Now that your cluster is created, you’ll be able to see your MongoDB Atlas dashboard. The next step is to create a new user for your MongoDB database. To do so, select the Security tab and then click the Add New User button, as shown in figure C.8.
In the Add New User pop-up, enter a username (for example, “roberto”) and password for your new database. Then show the advanced options in the User Privileges section. This allows you to select more granular permissions for your new user. To add the user for a single database only, select readWrite from the drop-down on the left, and then enter the database name in the database field as shown in figure C.9. Because your database doesn’t exist yet, you can enter “taxi” and the database will be automatically created for you. When you’re done, click Add User.

Figure C.6 Create your MongoDB Atlas account.

Figure C.7 Build a cluster.

Figure C.8 The Security tab of the MongoDB Atlas dashboard
After creating your new user, you return to the Security tab of the MongoDB Atlas dashboard. The last step in the database configuration is to get the connection string. To do so, select the Overview tab, and then click on the RobertosTaxiCompany cluster, as shown in figure C.10.

Figure C.9 Create a new user.

Figure C.10 The cluster overview
As shown in figure C.11, click the Connect button to open the connection pop-up.
To be able to create a connection string, you need to whitelist at least one IP address that will communicate with your MongoDB cluster. To do so, click the Add Entry button, as shown in figure C.12.

Figure C.11 The RobertosTaxiCompany cluster overview

Figure C.12 Connect to your cluster.
But because you don’t know all the IP addresses that AWS Lambda will use, you need to open your MongoDB cluster to all IP addresses by adding the 0.0.0.0/0 value to the IP address field. Then add a description and click the Save button, as shown in figure C.13.

Figure C.13 Whitelist all IP addresses because you don’t know the AWS Lambda IP addresses.
The last step is to select the connection method. Select Connect Your Application, as shown in figure C.14, because you want to get a MongoDB connection string.

Figure C.14 Get a connection string (step 1).
A connection string is shown in the pop-up (see figure C.15). Click the I Am Using Driver 3.4 or Earlier button, because this is the driver you’ll use in chapter 13, and then copy the connection string. Make sure you update the username value in the connection string to “roberto” (or whatever you used) and the password value to the password you entered when you created the new user.
Now that you have a MongoDB connection string, you’ll be able to deploy and test the Express.js application from chapter 13.

Figure C.15 Get a connection string (step 2).