
appendix a
Installation and configuration
This appendix provides details on how to install and configure Claudia and other libraries for its ecosystem: Claudia API Builder and Bot Builder.
This appendix, like this book in general, assumes that you are familiar with the basics of the AWS platform and that you have an account. If that assumption is incorrect, we strongly recommend that you create an account and try to become more familiar with AWS in general, and with its user and permission system in particular, before reading on. You can create an account on the AWS website: https://aws.amazon.com. To better understand users and roles, the official documentation is a good starting point: http://docs.aws.amazon.com/IAM/latest/UserGuide/id.html.
Installing Claudia
Claudia is a regular Node.js module, published on NPM.
To install Claudia and make the claudia command available in your terminal, run the following:
npm install claudia -g
Another option is to install Claudia as a development dependency to your Node.js project by running the following command in your project:
npm install claudia --save-dev
In this case Claudia will not be installed globally, so you can’t use it from your terminal. Instead, you need to run it as an NPM script. The following listing shows the minimal version of package.json with Claudia installed as a development dependency, and with the required NPM scripts.
Listing A.1 Example of package.json file with local version of Claudia
{
  "name": "pizza-api",
  "version": "1.0.0",
  "description": "",
  "main": "api.js",
  "scripts": {
    "create": "claudia create --region eu-central-1 --api-module api",   ①
    "update": "claudia update"   ②
  },
  "keywords": [],
  "license": "MIT",
  "devDependencies": {
    "claudia": "^4.0.0"   ③
  },
}
After updating the package.json file with the content from listing A.1, you can create your Lambda function and API Gateway definition by running the npm run create command from the terminal in your project folder, or update it by running the npm run update command.
The full process of Claudia installation is also explained on the Claudia website: https://claudiajs.com/tutorials/installing.html.
Configuring Claudia prerequisites
Despite its easy installation, Claudia has one prerequisite: keys for the AWS profile.
If you haven’t created an AWS profile yet, see the next section.
Claudia uses the AWS SDK for Node.js to function, and that SDK requires AWS profile keys. There are a few ways to configure the keys. The easiest is to create an .aws folder in the home directory on your operating system. Then create the credentials file inside that folder, without an extension, with the following content:
[default]   ①
aws_access_key_id=YOUR_ACCESS_KEY   ②
aws_secret_access_key=YOUR_ACCESS_SECRET   ③
If you named your profile with any other name than the default, you need to provide that profile name to Claudia. You can do that by passing the --profile flag with a profile name (for example, claudia update --profile yourProfileName) or by setting an AWS_PROFILE environment variable (for example, AWS_PROFILE=yourProfileName claudia update).
For a full guide on configuring the AWS SDK for Node.js, visit http://docs.aws.amazon.com/sdk-for-javascript/v2/developer-guide/configuring-the-jssdk.html.
Creating an AWS profile and getting the keys
To create a new AWS profile for Claudia, go to the AWS web console (https://console.aws.amazon.com) and log in.
Then go to the Users tab of the IAM section (https://console.aws.amazon.com/iam/home#/users). Click the Add User button to create a new user, as shown in figure A.1.

Figure A.1 The Users tab of the IAM section of the AWS web console
To add a new user, you need to go through a four-step process. First, you need to name your user (claudia is a good name for your first user) and set its access type. Because you’ll use it only through the AWS CLI and AWS SDK for Node.js, select the Programmatic Access option. Click the Next: Permissions button (see figure A.2).
For the second step, you need to add permissions to your user. Select the Attach Existing Policies Directly tab, as shown in figure A.3. Then use the input field to search for the policies you want to add.
The recommended policies you need for this book are
- IAMFullAccess—Required if you want Claudia to automatically create execution roles for your Lambda function (which is recommended for beginners). The other option is to do that on your own and pass the existing role name using the
--roleflag when issuing theclaudia createcommand. - AWSLambdaFullAccess—Required for Claudia deployments.
- AmazonAPIGatewayAdministrator—Required for Claudia API Builder and Claudia Bot Builder.
- AmazonDynamoDBFullAccess—Required for managing a DynamoDB database.
- AmazonAPIGatewayPushToCloudWatchLogs—Optional; used for logging full requests and responses from API Gateway.
Production apps require careful selection; this topic is beyond the scope of this book, but we recommend that you learn more about AWS roles and policies before deploying more serious applications to production.

Figure A.2 The first step of adding an AWS user: setting the user details

Figure A.3 The second step of adding an AWS user: setting user permissions
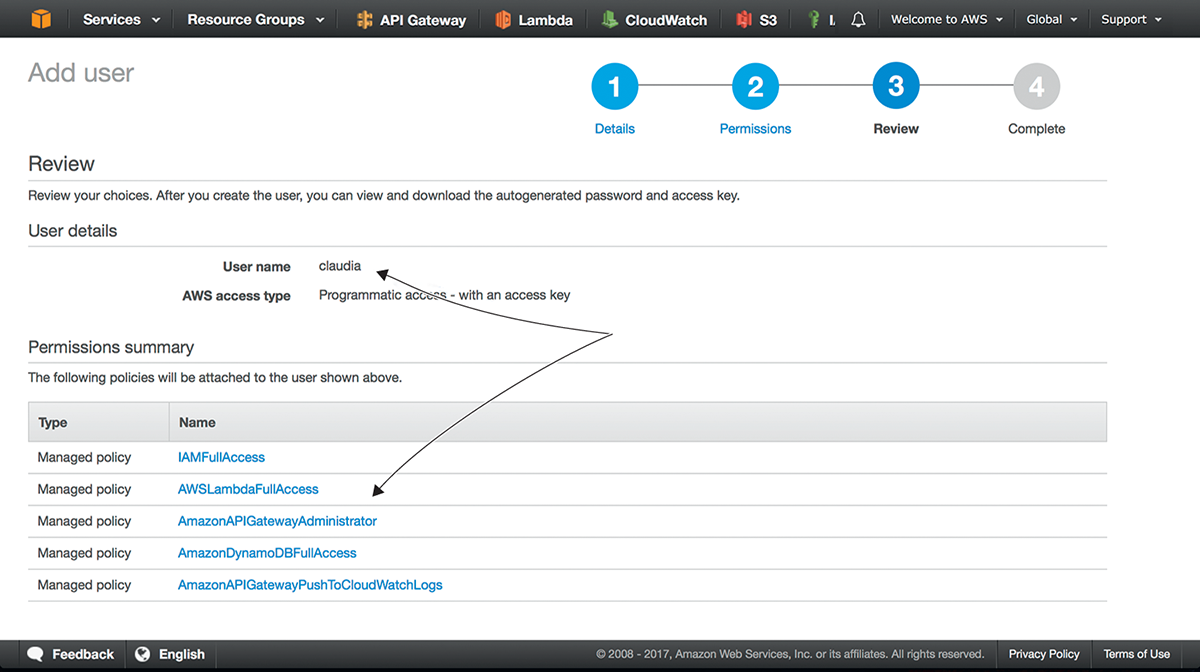
Figure A.4 The third step of adding an AWS user: review
The third step is reviewing your new user, as shown in figure A.4. If all the information seems right, click the Create User button at the bottom of the page to create your new user.
You finish with the confirmation step, as shown in figure A.5. This step is important because it gives you an access key ID and a secret access key for your new user.
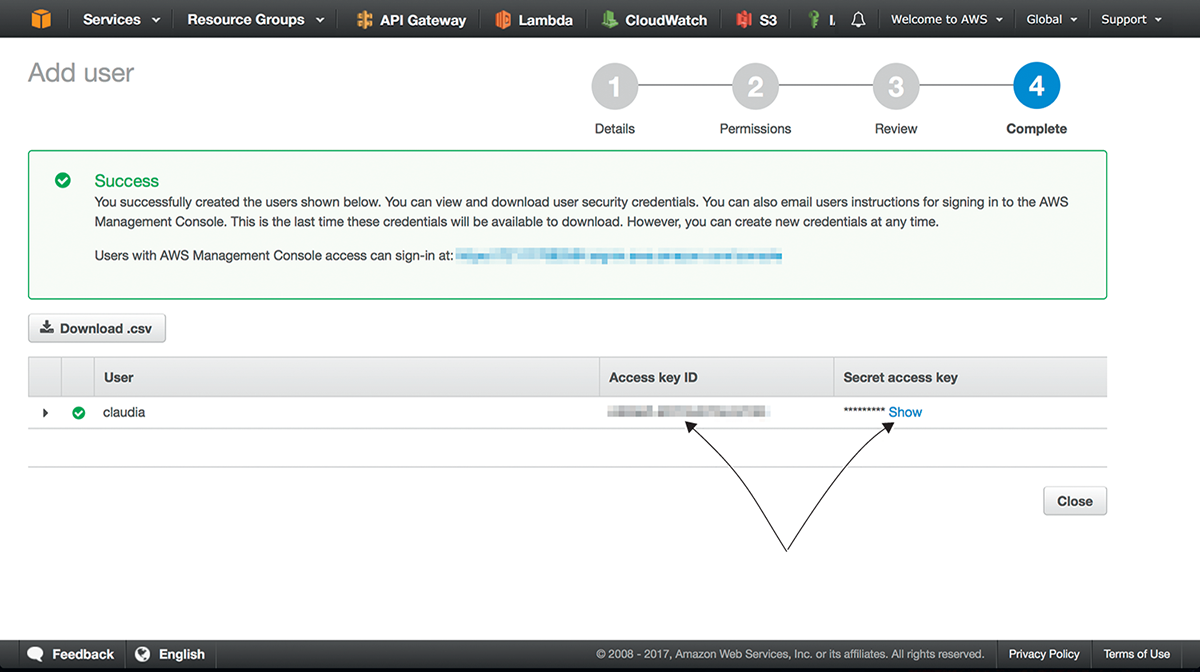
Figure A.5 Getting the keys for the user
Now that you have your access key ID and secret access key, you can go back to the previous section and set them up.
Installing Claudia API Builder
Claudia API Builder is available on NPM as a package. It doesn’t require any configuration, so to install it, save it as a dependency in your Node.js project by running the following command:
npm install claudia-api-builder --save
The version we used for the examples in this book is 4.0.0.
Installing Claudia Bot Builder
Similar to the API Builder, Claudia Bot Builder is a regular NPM package that doesn’t require any special configuration. To install it and save it as a dependency of your project, run the following command:
npm install claudia-bot-builder --save
The version we used for the examples in this book is 4.0.0.
Installing the AWS CLI
The AWS Command Line Interface (CLI) is a unified tool to manage your AWS services. This book uses the AWS CLI for many things, including creating roles and permissions and accessing the DynamoDB tables.
To install the AWS CLI on Windows, visit https://aws.amazon.com/cli/ and download the Windows installer.
If you are a Mac or Linux user, you need to have Python version 2.6.5 or later, with pip. With Python, you can run the following command to install the AWS CLI:
pip install awscli
For more information about the AWS CLI, visit https://aws.amazon.com/cli/.
To confirm that the command works, run aws --version.
The version we used for the examples in this book is
aws-cli/1.11.138 Python/2.7.10 Darwin/16.7.0 botocore/1.6.5