
2
Building your first serverless API
This chapter covers
- Creating and deploying an API using Claudia
- How Claudia deploys an API to AWS
- How API Gateway works
The main goal of this chapter for you is to build your first serverless API with Claudia and deploy it to AWS Lambda and API Gateway. You’ll also see the differences between a traditional and a serverless application structure and gain a better grasp of Claudia as you learn what Claudia is doing under the hood. To get the most from this chapter, you should understand the basic concepts of serverless described in chapter 1.
2.1 Assembling pizza ingredients: building the API
Your Aunt Maria is happy and grateful that you are going to help her get back on her feet. She even made you her famous pepperoni pizza! (Try not to be hungry at this moment!)
Aunt Maria already has a website, so you will build a back-end application—more precisely, an API—to enable her customers to preview and order pizzas. The API will be responsible for serving pizza and order information, as well as handling pizza orders. Later, Aunt Maria would also like to add a mobile application, which would consume your API services.
To start gently, the first API endpoints will handle some simple business logic and return static JSON objects. You can see the broad overview of your initial application structure in figure 2.1. The figure also shows the crude HTTP requests flow through your API.

Figure 2.1 A broad overview of the Pizza API you will build in this chapter
Here is the list of features we cover for the initial API:
- Listing all pizzas
- Retrieving the pizza orders
- Creating a pizza order
- Updating a pizza order
- Canceling a pizza order
These features are all small and simple; therefore, you will implement them in a single Lambda function.
Even though you might feel that you should separate each feature into a separate function, for now it’s simplest to put everything in the same Lambda, because the functions are tightly coupled. If you were to do inventory tracking as well, you would create that as a separate function from the start.
Each of the listed features will need to have a separate route to the corresponding handler within your function. You can implement the routing yourself, but Claudia has a tool to help you with that task: Claudia API Builder.
Claudia API Builder is an API tool that helps you handle all your incoming API Gateway requests and responses, as well as their configuration, context, and parameters, and enables you to have internal routing within your Lambda function. It has an Express-like endpoint syntax, so if you are familiar with Express, Claudia API Builder will be easy to use.

Figure 2.2 A visual representation of the AWS Lambda function that handles pizza and order processing
Figure 2.2 shows a more detailed overview of how to route and handle the pizza and order features within your Lambda function by using Claudia API Builder. The figure shows that upon receiving requests from API Gateway, Claudia API Builder will redirect the requests to your defined routes and their corresponding handlers.
2.1.1 Which pizza can I GET?
As the first method of your Pizza API you will create a GET pizza service that lists all available pizzas. To do so, you will need to fulfill these prerequisites:
- Own an AWS account and properly set up the AWS credentials file
- Install Node.js and its package manager, NPM
- Install Claudia from NPM as a global dependency
If you’re not familiar with these steps or are not sure whether you have completed them, jump to appendix A, which guides you through each setup process.
Now that you’re fully set up, you can start by creating an empty folder for your first serverless application. You can name your project folder as you like, but in this book the application folder’s name is pizza-api. After you’ve created it, open your terminal, navigate to your new folder, and initialize the Node.js application. After your app is initialized, install the claudia-api-builder module from NPM as a package dependency, as explained in appendix A.
The next step is to create your application’s entry point. Create a file named api.js inside your pizza-api folder, and open it with your favorite code editor.
To create an API route, you need an instance of Claudia API Builder, as it is a class and not a utility function. At the beginning of your api.js file, require and instantiate claudia-api-builder.
Now you’re able to use Claudia API Builder’s built-in router. To implement the GET /pizzas route, you need to use the get method of your Claudia API Builder instance. The get method receives two arguments: a route and a handler function. As the route parameter, pass the string /pizzas, and as the handler, pass an anonymous function.
The Claudia API Builder anonymous handler function has one major difference compared with Express.js. In Express.js, you have both the response and the request as callback function arguments, but Claudia API Builder’s callback function has only the request. To send back the response, you just return the result.
Your GET /pizzas route should show a list of pizzas, so for now, you will return a static array of pizzas from Aunt Maria’s pizzeria: Capricciosa, Quattro Formaggi, Napoletana, and Margherita.
Finally, you need to export your API instance, which Claudia API Builder is fitting into your Lambda function as middleware.
At this point, your code should look like the following listing.
Listing 2.1 The GET /pizzas handler of your Pizza API
'use strict'
const Api = require('claudia-api-builder')    ①
const api = new Api()    ②

api.get('/pizzas', () => {    ③
  return [    ④
    'Capricciosa',
    'Quattro Formaggi',
    'Napoletana',
    'Margherita'
  ]
})

module.exports = api    ⑤
That’s all it takes to make a simple serverless function. Before popping a champagne bottle in celebration, however, you should deploy your code to your Lambda function. To do so, jump back to your terminal and unleash the power of Claudia.
Because one of Claudia’s main goals is single-command deployment, deploying your API takes just a simple claudia create command. This command requires only two options: the AWS region where you want your API to be deployed, and your application’s entry point. The options are passed as flags, so to deploy your API, just execute the claudia create command with --region and --api-module flags, as shown in listing 2.2. The intricacies of the claudia create command are explained in more detail in section 2.2.
Listing 2.2 Deploying an API to AWS Lambda and API Gateway using Claudia
claudia create     ①
  --region eu-central-1     ②
  --api-module api    ③
For your region, choose the closest one to your users to minimize latency. The closest region to Aunt Maria’s pizzeria is in Frankfurt, Germany, and it’s called eu-central-1. You can see all the available regions in the official AWS documentation: http://docs.aws.amazon.com/general/latest/gr/rande.html#lambda_region.
Your api.js file is your API’s entry point. Claudia automatically appends the .js extension, so just type api as your application’s entry point.
After a minute or so, Claudia will successfully deploy your API. You’ll see a response similar to listing 2.3. The command response has useful information about your Lambda function and your API, such as the base URL of your API, the Lambda function’s name, and the region.
Listing 2.3 The claudia create command response
{
  "lambda": {    ①
    "role": "pizza-api-executor",
    "name": "pizza-api",
    "region": "eu-central-1"
  },
  "api": {    ②
    "id": "g8fhlgccof",
    "module": "api",
    "url": "https://whpcvzntil.execute-api.eu-central-1.amazonaws.com/latest"    ③
  }
}
During the deployment, Claudia created a claudia.json file in the root of your project along with some similar information, but without your base API URL. This file is for Claudia to relate your code to a certain Lambda function and API Gateway instance. The file is intended for Claudia only; don’t change it by hand.
Now it’s time to “taste” your API. You can try it directly from your favorite browser. Just visit the base URL from your claudia create response, remembering to append your route to the base URL. It should look similar to https://whpcvzntil.execute-api.eu-central-1.amazonaws.com/latest/pizzas. When you open your modified base URL link in your browser, you should see the following:
["Capricciosa","Quattro Formaggi","Napoletana","Margherita"]
Congratulations—you just built a serverless API with Claudia! If this was your first time, you should be proud of yourself, and this is a good time to pause.
2.1.2 Structuring your API
Before rushing to add more features, you should always try to spend a few minutes rethinking your API structure and organization. Adding all the route processors directly into the main file makes it difficult to understand and maintain, so you should ideally split handlers from routing/wiring. Smaller code files are easier to understand and work with than with one monster file.

Figure 2.3 The file structure of the Pizza API project
Considering application organization, at the time of this writing there aren’t any specific best practices. Also, Claudia gives you complete freedom on that topic. For your Pizza API, because the part for handling pizzas and orders isn’t going to be huge, you can move all route handlers to a separate folder and keep only the routes within your api.js file. After that, because the pizza list should have more pizza attributes than just pizza names, you should move it to a separate file. You can even go a step further and create a folder for the data, as you did for the pizza list we mentioned earlier. After you apply these recommendations, your code structure should look similar to figure 2.3.
The first modification is moving the list of pizzas to a separate file and extending the list with additional information, such as pizza IDs and ingredients. To do so, create a folder in the root of your Pizza API project, and name it data. Then create a file in your new folder, and name it pizzas.json. Add the content from the following listing to the new file.
Listing 2.4 JSON containing the pizza info
[    ①
  {    ②
    "id": 1,
    "name": "Capricciosa",
    "ingredients": [
      "tomato sauce", "mozzarella", "mushrooms", "ham", "olives"
    ]
  },
  {    ②
    "id": 2,
    "name": "Quattro Formaggi",
    "ingredients": [
      "tomato sauce", "mozzarella", "parmesan cheese", "blue cheese", "goat cheese"
    ]
  },
  {    ②
    "id": 3,
    "name": "Napoletana",
    "ingredients": [
      "tomato sauce", "anchovies", "olives", "capers"
    ]
  },
  {    ②
    "id": 4,
    "name": "Margherita",
    "ingredients": [
      "tomato sauce", "mozzarella"
    ]
  }
]
Your next step is to move the getPizzas handler to a separate file. Create a folder called handlers in your project root, and create a get-pizzas.js file inside it.
In your new get-pizzas.js file will be the getPizzas handler, which returns the list of pizzas from listing 2.4. First, you need to import the pizza list from the JSON file you created. Second, you need to create a getPizzas handler function and export it so that you can require it from your entry file. Then, instead of just returning the pizza list, go a step further and return just one pizza if a pizza ID was passed as a parameter to your getPizzas handler. To return just one pizza, you can use the Array.find method, which searches for a pizza by the pizza ID from your pizza list. If it finds a pizza, return it as a handler result. If there aren’t any pizzas with that ID, have your application throw an error.
The updated code of your new pizza handler should look similar to the next listing.
Listing 2.5 Your getPizzas handler with a pizza ID filter in a separate file
const pizzas = require('../data/pizzas.json')    ①

function getPizzas(pizzaId) {    ②
  if (!pizzaId)    ③
    return pizzas

  const pizza = pizzas.find((pizza) => {    ④
    return pizza.id == pizzaId    ⑤
  })

  if (pizza)
    return pizza

  throw new Error('The pizza you requested was not found')    ⑥
}

module.exports = getPizzas    ⑦
You should also remove the previous getPizzas handler code from your API entry point file, api.js. Delete everything between importing Claudia API Builder and the end, where you’re exporting your Claudia API Builder instance.
After the line where you’re importing Claudia API Builder, import the new get-pizzas handler from your handlers folder:
const getPizzas = require('./handlers/get-pizzas')
Next you should add the route for getting the pizza list, but this time, you’ll use the get-pizzas handler you created for the route handling. You should import the file at the beginning of your api.js entry file. If you remember, your get-pizzas handler can also filter pizzas by ID, so you should add another route that returns a single pizza. Write that route so that it accepts a GET request for the /pizzas/{id} url. The /{id} part is the dynamic route parameter that tells your handler which pizza ID the user requested. Like Express.js, Claudia API Builder supports dynamic route parameters, but it uses a different syntax, which is why it has /{id} instead of /:id. The dynamic path parameters are available in the request.pathParams object. Finally, if your handler hasn’t found the pizza you wanted, return a 404 error:
api.get('/pizzas/{id}', (request) => {
  return getPizzas(request.pathParams.id)
}, {
  error: 404
})
By default, API Gateway returns HTTP status 200 for all requests. Claudia API Builder helps you by setting some sane defaults, such as status 500 for errors, so your client application can handle request errors in promise catch blocks.
To customize the error status, you can pass a third parameter to the api.get function. For example, in your get /pizza/{id} function handler, besides the path and your handler function, you can pass an object with custom headers and statuses. To set the status error to 404, pass an object with the error: 404 value in it.
You can see how your fully updated api.js file should look in the following listing.
Listing 2.6 The updated api.js
'use strict'
const Api = require('claudia-api-builder')
const api = new Api()
const getPizzas = require('./handlers/get-pizzas')    ①

api.get('/', () => 'Welcome to Pizza API')    ②

api.get('/pizzas', () => {    ③
  return getPizzas()
})

api.get('/pizzas/{id}', (request) => {    ④
  return getPizzas(request.pathParams.id)
}, {
  error: 404    ⑤
})

module.exports = api
Now deploy your API again. To update your existing Lambda function along with its API Gateway routes, run the Claudia update command from your terminal:
claudia update
After a minute or so, you should see a response similar to the one in listing 2.7. After processing the command and redeploying your application, Claudia will print out some useful information about your Lambda function and your API in the terminal. That information includes the function name, Node.js runtime, timeout, function memory size, and base URL of your API.
Listing 2.7 The printed information after running the claudia update command
{
  "FunctionName": "pizza-api",    ①
  "Runtime": "nodejs6.10",    ②
  "Timeout": 3,    ③
  "MemorySize": 128,    ④
  "Version": "2",    ⑤
  "url": "https://whpcvzntil.execute-api.eu-central-1.amazonaws.com/chapter2_2",    ⑥
  "LastModified": "2017-07-15T14:48:56.540+0000",
  "CodeSha256": "0qhstkwwkQ4aEFSXhxV/zdiiS1JUIbwyKOpBup35l9M=",
  // Additional metadata
}
If you open this route link again from your browser (which should look similar to https://whpcvzntil.execute-api.eu-central-1.amazonaws.com/chapter2_2/pizzas), you see the array of all pizza objects from your data/pizza.js file.
When you open the other route link (something similar to https://whpcvzntil.execute-api.eu-central-1.amazonaws.com/chapter2_2/pizzas/1), you see only the first pizza. This response should look something like this:
{"id":1,"name":"Capricciosa","ingredients":["tomato sauce","mozzarella","mushrooms","ham","olives"]}
To test whether your API is working as expected, you should also try to get a pizza that doesn’t exist. Visit your API URL with a nonexistent pizza ID, such as this one: https://whpcvzntil.execute-api.eu-central-1.amazonaws.com/chapter2_2/pizzas/42. In this case, the response should look similar to this:
{"errorMessage" : "The pizza you requested wasn't found"}
Congratulations—your Pizza API is now capable of showing a list of pizzas to Aunt Maria’s customers! This will make your Aunt Maria happy, but your API is not done yet. You need to implement the core feature of the API: creating a pizza order.
2.1.3 POSTing an order
Being able to create a pizza order via your API is important to Aunt Maria. Even though she is not as technically proficient as you are, she’s aware that it will speed up pizza ordering and help her to quickly serve all the customers from her whole neighborhood, or even the whole town.
To implement pizza order creation, you need to have a “create pizza order” route and a “create an order” handler, which means that you will need to create a new file in the handlers folder in your Pizza API project. As always, try to create simple and readable filenames. In this case, a good name for your handler file would be create-order.js.
First, create the new handler file, and open it in your favorite code editor. Next, create the createOrder function, and export it at the end of the file. Your handler function needs to accept some order data or an order object. At this moment, this order object should have only two attributes: the ID of the pizza a customer ordered and the customer address where the pizza should be delivered.
As a first step, check whether those two values have been passed within the order object. If not, throw an error.
The following part should implement storing the order to the database, but at the moment, you will just return an empty object if the order object is valid. You could store the object in a file, but a Lambda function can be deployed on multiple containers, and you have no control over that, so it’s important not to rely on the local state. In the next chapter, you will learn how to connect your serverless function to a database and actually save an order.
Your create-order.js file should look like the one in the next listing.
Listing 2.8 Creating a pizza order handler
function createOrder(order) {    ①
  if (!order || !order.pizzaId || !order.address)    ②
    throw new Error('To order pizza please provide pizza type and address where pizza should be delivered')

  return {}    ③
}

module.exports = createOrder    ④
Now that you have the handler for creating an order, it’s time to create a route—but this one should accept POST requests. To do that, you’ll need to go back to your api.js file. Like api.get, Claudia API Builder has an api.post method that receives three parameters: path, handler function, and options.
For the route path, you should write /orders, as your app is creating a new order. As the route handler function, import the create-order.js file you just made in your handlers folder. Finally, for the options parameter, pass customized statuses for both success and error: 201 and 400, respectively. Use the success attribute to add a custom status for success.
The POST request body is automatically parsed for you and available in the request.body attribute, which means that you don’t need to use any additional middleware to parse the received data, such as the Express.js body_parser.
After you add the new route, your api.js file should look like the following listing.
Listing 2.9 Main API file updated with the new routes
'use strict'
const Api = require('claudia-api-builder')
const api = new Api()
const getPizzas = require('./handlers/get-pizzas')
const createOrder = require('./handlers/create-order')    ①

api.get('/', () => 'Welcome to Pizza API')

api.get('/pizzas', () => {
  return getPizzas()
})

api.get('/pizzas/{id}', (request) => {
  return getPizzas(request.pathParams.id)
}, {
  error: 404
})

api.post('/orders', (request) => {    ②
  return createOrder(request.body)
}, {
  success: 201,    ③
  error: 400    ④
})

module.exports = api
Again, deploy the API by running the claudia update command.
Trying out a POST request can be a bit trickier than testing a GET. You can’t test it by opening the route URL in the browser. Hence, for the POST routes, you should use one of the free HTTP testing tools, such as curl or Postman.
You are going to test your POST /orders endpoint by using a curl command. In this command, you’ll send an empty request body so you can check the validation error. Besides the POST body, you need to specify the method, provide a header to tell your API you are sending a JSON request, and specify the full URL you want to send the request to.
You can see the command format in the following listing. This command has an empty body so you can test the error response.
Listing 2.10 curl command for testing POST /orders route (error response)
curl -i     ①
  -H "Content-Type: application/json"     ②
  -X POST     ③
  -d '{}' https://whpcvzntil.execute-api.eu-central-1.amazonaws.com/chapter2_3/orders    ④
After you run the curl command from listing 2.10 in your terminal, the response should look like this, with a few additional headers:
HTTP/1.1 400 Bad Request
Content-Type: application/json
Content-Length: 104
Date: Mon, 25 Sep 2017 06:53:36 GMT
{"errorMessage":"To order pizza please provide pizza type and address where pizza should be delivered"}
Now that you’ve verified the returned error when no order data is passed, you should also test a successful response. To do so, run a similar curl command from your terminal; change only the request body, as now it needs to contain a pizza ID and an address. The following listing shows the updated curl command. This command has a valid body so you can test the successful response.
Listing 2.11 curl command for testing the POST /orders route (successful response)
curl -i
  -H "Content-Type: application/json"
  -X POST
  -d '{"pizzaId":1,"address":"221B Baker Street"}'     ①
  https://whpcvzntil.execute-api.eu-central-1.amazonaws.com/chapter2_3/orders
This command returns the following:
HTTP/1.1 201 Created
Content-Type: application/json
Content-Length: 2
Date: Mon, 25 Sep 2017 06:53:36 GMT
{}
This confirms that your API works correctly.
Now that you’ve learned the serverless API basics, it’s time to take a look at what Claudia did when you ran the claudia create command.
2.2 How Claudia deploys your API
The previous examples demonstrated one of the main ideas of Claudia: single-command application deployment. There is no magic behind the tool, so every command can be explained easily.

Figure 2.4 The claudia create process
Figure 2.4 represents the flow of events that happened when you ran the claudia create command. This simplified diagram is focused on the most important parts of the process for easier understanding. Also, some of the events described in this flow can be skipped or modified if you provide some flags with the create command. For example, Claudia can skip the first step and copy your code with all the local dependencies if you provide the flag --use-local-dependencies. For the full list of options, see https://github.com/claudiajs/claudia/blob/master/docs/create.md.
When you run the claudia create command, the first thing that Claudia does is zip your code without the dependencies and hidden files, using the npm pack command. Then it creates a copy of your project in a temporary folder in your system. This action ensures a clean and reproducible release, always starting from a well-known point and preventing problems caused by potential local dependencies. During this step, Claudia ignores your node_modules folder and all files ignored by Git or NPM. It also installs your production and optional dependencies using the npm install --production command.
Because the Lambda function requires the code with all its dependencies to be uploaded as a zip file, Claudia installs all production and optional NPM dependencies before compressing your project into a zip file.
Also, because debugging Lambda functions isn’t straightforward, as you will see in chapter 5, Claudia also verifies that your project doesn’t have any obvious issues, such as typos or your application invoking an undefined module. Take this step with a grain of salt, because it will do just a shallow validation. If you have a typo or an undefined function or module invocation inside the function or handler body, this step won’t catch it.
As the next step, Claudia creates a zip file with your code with all the dependencies installed in the first step.
The last three steps in figure 2.4 aren’t executed sequentially, but in parallel.
When the zip file is created, Claudia invokes the AWS API to create your Lambda function and uploads the archive. The interaction with the AWS platform is done through the AWS SDK module for Node.js. Before the code is uploaded, Claudia creates a new IAM user and assigns to the IAM user certain permissions to allow it to interact with AWS Lambda and API Gateway.
After your Lambda function is fully set up, Claudia sets up an API Gateway instance to it, defines all the routes, and sets their required permissions.
The claudia update command flow is almost identical to that of the claudia create command, but without some steps that have already been completed, such as role creation and permissions setup.
If you want to dive even deeper into Claudia and its commands, you can see its source code here: https://github.com/claudiajs/claudia.
Now that you know how Claudia works under the hood, the last piece of the API puzzle is understanding how API Gateway does the routing for your Pizza API.
2.3 Traffic control: How API Gateway works
In chapter 1 you learned that users can’t interact with AWS Lambda outside of the AWS platform unless a trigger wakes up the function. One of Lambda’s most important triggers is API Gateway.
As you can see in figure 2.5, API Gateway acts like a router or a traffic controller. It accepts HTTP requests (such as Pizza API requests from your web or mobile application), parses them to a common format, and routes them to one of your connected AWS services.
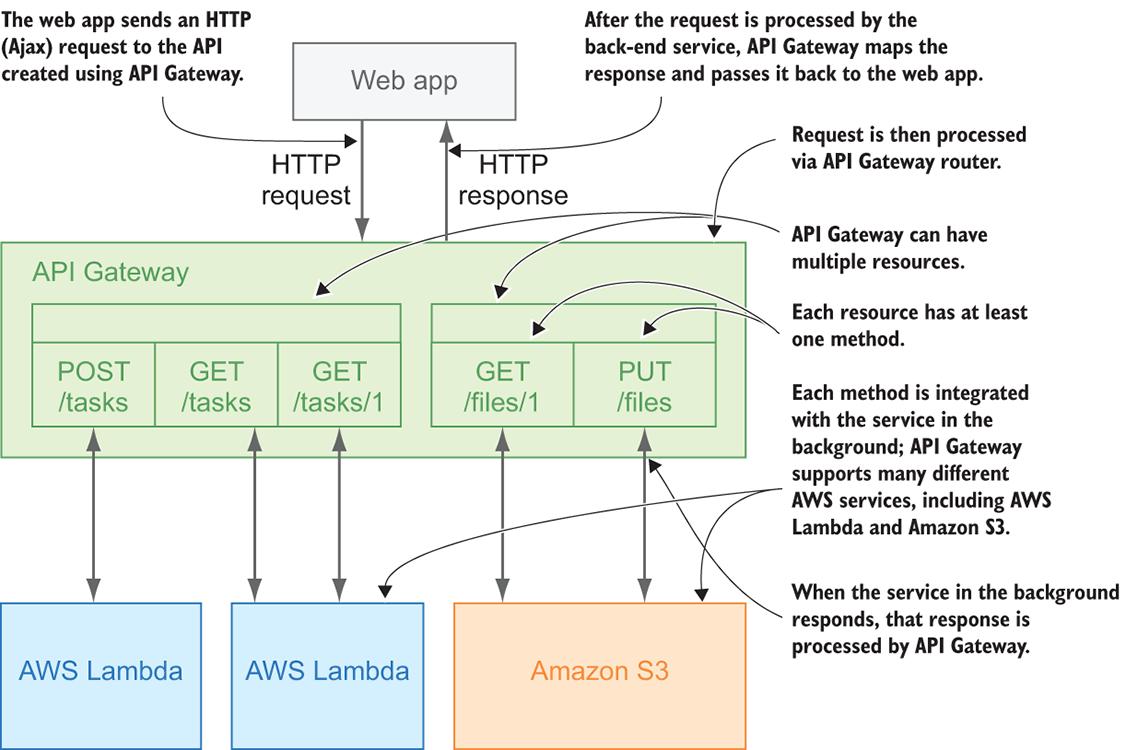
Figure 2.5 API Gateway routes requests to your AWS services.
API Gateway can be integrated with many AWS services, including AWS Lambda and Amazon S3. Each API on API Gateway can be connected to multiple services. For example, certain routes can invoke Lambda functions, whereas others can interact with some other service.
API Gateway offers another approach to HTTP request routing, called a proxy router. Instead of creating each route, a proxy router sends all requests to a single AWS Lambda function. This approach can be useful when you are creating a small API or when you want to speed up your deployment, because creating and updating multiple routes on API Gateway can take a few minutes, depending on your internet connection speed and the number of routes.
2.4 When a serverless API is not the solution
Even though we’ve just scratched the surface, you can already see how easy it is to build serverless APIs with Claudia.js and Claudia API Builder. Serverless APIs can be powerful and incredibly scalable, but in certain situations traditional APIs are a much better solution, such as the following:
- When request time and latency are critical. You can’t guarantee minimal latency with serverless applications.
- When you need to guarantee a certain level of availability. In most cases, AWS will provide a pretty good level of availability, but sometimes that’s not enough.
- When your application requires intensive and complex computing.
- When your API requires compliance with a specific standard. AWS Lambda and API Gateway might not be flexible enough.
2.5 Taste it!
After going through each chapter, have a “do it yourself” session. Most of the chapters give you a certain task, and you should try to implement it yourself. We provide a few useful hints, and the solutions are in the next section.
2.5.1 Exercise
In this chapter, you implemented the GET /pizzas and POST /orders API routes. To make your API more useful, there are two routes left: PUT /orders and DELETE /orders.
For the first exercise, do the following:
- Create a handler for updating a pizza order, and add an API route for it.
- Create a handler for deleting a pizza order, and add an API route for it.
In case you need some hints, here are a few:
- To add a
PUTroute, use theapi.putmethod provided by Claudia API Builder. - To add a
DELETEroute, use theapi.deletemethod provided by Claudia API Builder. - Both methods accept three arguments: a route path, a handler function, and an options object.
- Both paths require a dynamic parameter: an order ID.
- The
updateOrderhandler also requires a body with the new order details. - Because you don’t have the database yet, just return an empty object or a simple text message as a response.
When you finish the exercise, the file structure of your Pizza API should look like the one in figure 2.6.
If this exercise is too easy for you, and you want an additional challenge, try to add an API route for listing the pizza orders. There’s no solution for this challenge in the next section, but that handler exists in the source code of Pizza API included with this book, so feel free to check the source and compare the solutions.
2.5.2 Solution
We hope you managed to finish the exercise on your own. Here are our solutions, so you can compare.
The first part of the exercise was to create a handler to update an order. To begin, you needed to create a file in your handlers folder, and name it update-order.js. In the file, you needed to create and export an updateOrder function that accepts an ID and the updated order details. The function should throw an error if the order ID or the updated order details object is not provided, or return a success message if successful. The code should look like the following listing.

Figure 2.6 The updated file and folder structure of the Pizza API project
Listing 2.12 Updating an order handler
function updateOrder(id, updates) {    ①
  if (!id || !updates)    ②
    throw new Error('Order ID and updates object are required for updating the order')

  return {    ③
    message: `Order ${id} was successfully updated`
  }
}

module.exports = updateOrder    ④
After you created the updateOrder function, you should have done the same for the handler to delete an order. First, you needed to create the delete-order.js file in your handlers folder. Then you should have created an exported deleteOrder function in the file. That function should accept an order ID. If the order ID isn’t passed, the handler should throw an error; otherwise, it should return an empty object. The code should look like the following listing.
Listing 2.13 Deleting an order handler
function deleteOrder(id) {    ①
  if (!id)    ②
    throw new Error('Order ID is required for deleting the order')

  return {}    ③
}

module.exports = deleteOrder    ④
Now, with the handlers implemented, your next step is to import them to api.js and create routes for updating and deleting the orders.
To update an order, use the api.put method, and use the /orders/{id} URL as the path; then set the handler function and the options with 400 as the status code for errors. You can’t just pass the handler function you created in the previous step because it doesn’t accept the full request object; instead, pass an anonymous function that invokes the updateOrder handler with an order ID from the received request body. The DELETE /orders route is the same except for two differences: it uses the api.delete method, and it doesn’t pass the request body to the deleteOrder handler function.
After this step, your api.js file should look like the following listing.
Listing 2.14 The Pizza API with PUT /orders and DELETE /orders routes
'use strict'
const Api = require('claudia-api-builder')
const api = new Api()
const getPizzas = require('./handlers/get-pizzas')
const createOrder = require('./handlers/create-order')
const updateOrder = require('./handlers/update-order')    ①
const deleteOrder = require('./handlers/delete-order')    ②

// Define routes
api.get('/', () => 'Welcome to Pizza API')

api.get('/pizzas', () => {
  return getPizzas()
})
api.get('/pizzas/{id}', (request) => {
  return getPizzas(request.pathParams.id)
}, {
  error: 404
})

api.post('/orders', (request) => {
  return createOrder(request.body)
}, {
  success: 201,
  error: 400
})
api.put('/orders/{id}', (request) => {    ③
  return updateOrder(request.pathParams.id, request.body)
}, {
  error: 400    ④
})
api.delete('/orders/{id}', (request) => {    ⑤
  return deleteOrder(request.pathParams.id)
}, {
  error: 400    ④
})

module.exports = api
As always, open your terminal, navigate to your pizza-api folder, and run the claudia update command from it to update your Lambda function and API Gateway definition.
When Claudia updates your Pizza API, you can use the curl commands from listings 2.15 and 2.16 to test your new API endpoints. These commands are almost the same as the command you used for the POST request, with the following differences:
- The HTTP method is different: You use
PUTfor updating andDELETEfor deleting the order. - Updating the order needs to pass the body with the updates.
- Deleting the order doesn’t require the request body.
These commands each have a valid body and should return a successful response.
Listing 2.15 curl command for testing PUT /orders/{id} route
curl -i
  -H "Content-Type: application/json"
  -X PUT     ①
  -d '{"pizzaId":2}'     ②
  https://whpcvzntil.execute-api.eu-central-1.amazonaws.com/chapter2_4/orders/42    ③
Listing 2.16 curl command for testing DELETE /orders/{id} route
curl -i
  -H "Content-Type: application/json"
  -X DELETE     ①
  https://whpcvzntil.execute-api.eu-central-1.amazonaws.com/chapter2_4/orders/42    ②
When you execute the commands in your terminal, they return the responses {"message":"Order 42 was successfully updated"} and {}, respectively, both with status 200.
Summary
- Claudia enables you to deploy your API to API Gateway and AWS Lambda in a single command.
- Updating your API takes a single Claudia command, too.
- A serverless API on AWS Lambda doesn’t require any specific folder structure or organization.
- API Gateway acts as a router and can invoke various services.
- If you want to bundle more routes into a single AWS Lambda function, you need internal routing.
- Claudia API Builder has a router identical to the routers in other popular Node.js web API libraries.
- Serverless APIs are powerful, but they are not a silver bullet, so depending on your case, a traditional API might work better.