
04
Hello TV!
Implementing the Hello TV! Program
Before jumping into the Samsung SmartTV functions and APIs, let's make a simple “Hello TV!” application to briefly cover the whole application development process from creating a new project to publishing it.
Creating a New Project
Creating a New Project
The first step of developing a Samsung SmartTV application is creating a project. Necessary components can be created in the new project, and then necessary source code can be entered into the components. A project can be created in the included Eclipse IDE. See the following steps for the details.
Select the “Create Samsung SmartTV JavaScript App Project” submenu from the “Samsung SmartTV SDK” top menu of the Eclipse.
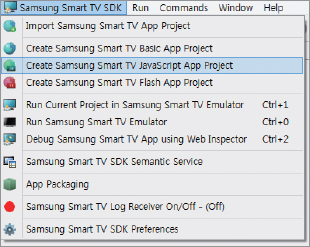
Select the menu to open the next window, where the project name, path, and application resolution can be entered.

Click the “Finish” button to finish creating a new project step. The newly created project includes an “app” folder that contains a JavaScript file and a CSS file, “icon” folder that contains the application's icon, and an “images” folder to store image files used in the project. Index.html file, widget.info (holds resolution information) file, and config.xml (holds application's configuration information) files are stored in the root folder. The config.xml file will be discussed in depth later. See Figure 4-3 for an actual project structure.

Runtime Configuration
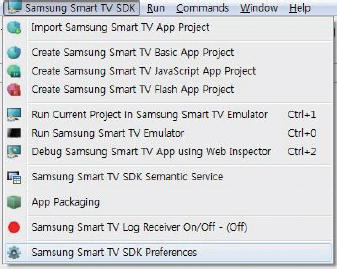
Before testing to see if the first project will run, you need to set a path for an Emulator to run the application. Select the “Samsung SmartTV SDK Preferences” submenu from the “Samsung SmartTV SDK” top menu of the Eclipse.
Select the “Emulator” tab and configure the Emulator version for the Eclipse project. This function allows testing an application in various TV models. In addition, the “Emulator Font” option allows customizing display text font for the Emulator. Configure SDK's installation path at the “SDK Install Path” option. Normally, the correct path is already entered as the default, but manual configuration is necessary in some systems.

Next to the “Emulator” tab is the “Server” tab, which was explained in the previous chapter. This needs to be set up only once after installing the SDK, and it will not be covered in this chapter.
Executing the Project
An Emulator is needed to test a project. Select the project in the left pane's “Project Explorer,” and click the “Run Current Project in Samsung SmartTV Emulator” submenu in the “Samsung SmartTV SDK” top menu of the Eclipse.

The Emulator will then run the project. Note that there are two options, the “Run Current Project in Samsung SmartTV Emulator” and “Run Samsung SmartTV Emulator” submenus under the “Samsung SmartTV SDK” top menu. The first one runs the currently selected source code, and the latter opens up on its own. The latter option requires manual selection of a project to execute it.

config.xml
The config.xml file is automatically generated when a new project is created and holds the application's meta information, including environment, type, icon, and version. See below for its structure.
  <?xml version=“1.0” encoding=“UTF-8”?>
  <widget>
      <cpname itemtype=“string”></cpname>
      <cplogo itemtype=“string”></cplogo>
      <cpauthjs itemtype=“string”></cpauthjs>
      <ThumbIcon itemtype=“string”>icon/sampleIcon_106_87.png</ThumbIcon>
      <BigThumbIcon itemtype=“string”>icon/sampleIcon_115_95.png</BigThumbIcon>
      <ListIcon itemtype=“string”>icon/sampleIcon_85_70.png</ListIcon>
      <BigListIcon itemtype=“string”>icon/sampleIcon_95_78.png</BigListIcon>
      <category itemtype=“string”></category>
      <autoUpdate itemtype=“boolean”>n</autoUpdate>
      <ver itemtype=“string”>0.100</ver>
      <mgrver itemtype=“string”></mgrver>
      <fullwidget itemtype=“boolean”>y</fullwidget>
      <type itemtype=“string”>user</type>
      <srcctl itemtype=“boolean”>y</srcctl>
      <ticker itemtype=“boolean”>n</ticker>
      <childlock itemtype=“boolean”>n</childlock>
      <videomute itemtype=“boolean”>n</videomute>
      <dcont itemtype=“boolean”>y</dcont>
      <widgetname itemtype=“string”>HelloTV</widgetname>
      <description itemtype=“string”>Description of application</description>
      <width itemtype=“string”>1280</width>
      <height itemtype=“string”>720</height>
      <author itemtype=“group”>
          <name itemtype=“string”>Handstudio Co., Ltd.</name>
          <email itemtype=“string”>[email protected]</email>
          <link itemtype=“string”>http://handstudio.net</link>
          <organization itemtype=“string”>handstudio Co., Ltd.</organization>
      </author>
  </widget>
It is not necessary to review every line of the preceding example code. But important items are described in the following table.

The config.xml file defines an application's type. The previously mentioned application manager obtains an application version and execution information through this config.xml file. Note that an error in the config.xml file may cause the application to fail. Consult the SDF to obtain descriptions for items not described in the preceding table.
Implementing the Hello TV! Program
Entire Source Code
Let's put the detailed API information aside and look at how an actual application is implemented. This simple “Hello TV!” project will be used to briefly explain how required HTML, JavaScript, and CSS files are implemented with the actual source code. The “Hello TV!” is an application that displays text information based on remote control directional keys input. The entire source code of the “Hello TV!” project is displayed below.
index.html
  <!DOCTYPE html>
  <html>
      <head>
          <meta http-equiv=“Content-Type” content=“text/html; charset=utf-8”>
          <title>HelloTV</title>


          <!-- TODO : Common API -->
            <script type=“text/javascript” language=“javascript” src=“$MANAGER_
  WIDGET/Common/API/Widget.js”></script>
            <script type=“text/javascript” language=“javascript” src=“$MANAGER_
  WIDGET/Common/API/TVKeyValue.js”></script>


          <!-- TODO : Javascript code -->
            <script language=“javascript” type=“text/javascript” src=“app/
  javascript/Main.js”></script>


          <!-- TODO : Style sheets code -->
            <link rel=“stylesheet” href=“app/stylesheets/Main.css” type=“text/
  css”>
      </head>


      <body onload=“Main.onLoad();” onunload=“Main.onUnload();”>
          <!-- Dummy anchor as focus for key events -->
          <a href=“javascript:void(0);” id=“anchor” onkeydown=“Main.keyDown();”></
  a>
          <!-- TODO: your code here -->
          <label id=“hello”>HelloTV</label>
      </body>
</html>
Main.js
var widgetAPI = new Common.API.Widget(); // Create a Common Module API.
var tvKey = new Common.API.TVKeyValue();  // Initialize a tvKey object that
holds all remote control events.
var Main ={};


Main.onLoad = function(){
    this.enableKeys();
    widgetAPI.sendReadyEvent();
};


Main.onUnload = function(){
};


Main.enableKeys = function(){
    document.getElementById(“anchor”).focus(); // Give focus to an anchor.
};


Main.keyDown = function(){
    var keyCode = event.keyCode; // Receive the key value if a remote control
event is sensed.


     switch(keyCode){ // Declare an event to execute based on the received
remote control key value.
        case tvKey.KEY_RETURN:
               widgetAPI.sendReturnEvent(); // Send “return” message to the
application manager. The application is ended and control is returned to the
Smart Hub.


            break;
        case tvKey.KEY_LEFT:
             document.getElementById(“hello”).innerHTML = “LEFT”; // Set the
Element with id “hello” to “LEFT”
            break;
        case tvKey.KEY_RIGHT:
             document.getElementById(“hello”).innerHTML = “RIGHT”; // Set the
Element with id “hello” to “RIGHT”
            break;
        case tvKey.KEY_UP:
            break;
        case tvKey.KEY_DOWN:
            break;
        case tvKey.KEY_ENTER:
            break;
        default:
            alert(“Unhandled key”);
            break;
    }
};
Main.css
* {
    padding: 0;
    margin: 0;
    border: 0;
}


body {
    width: 1280px;
    height: 720px;
    background-color: #FFF;
}


#hello {
    font-size: 250px;
}
A SmartTV application's index.html file is loaded first by the App Engine, similar to when a website is loaded by a web browser. Therefore, a SmartTV application's index.html also needs to declare the necessary JavaScript and CSS files, as shown below.
index.html
<script language=“javascript” type=“text/javascript” src=“app/javascript/Main.
js”></script>
<link rel=“stylesheet” href=“app/stylesheets/Main.css” type=“text/css”>
Preparation to Run an Application
The sendReadyEvent() function is used to send a “ready” message from the Application Manager to run the application. This function also initializes necessary plug-ins and the Common Module API.
var widgetAPI = new Common.API.Widget(); // Create a Common Module API.
widgetAPI.sendReadyEvent();   // Send “ready” message to the Application
Manager.
The Application Manager
The Application Manager provides the Common Module API that configures the application to the TV environment. This module includes functions that install, run, and delete a Samsung SmartTV application, as well as the SSO (Single Sign-On) application account information transferring module. It also senses and recognizes remote control events, and manages files created by the File API.
Loading the Initialization
After an application is started, an internal browser loads the index.html file. To call the sendReadEvent() function shown above, and load the actual application, a handler must be registered to call the function. The HTML onload handler is registered to the body tag for this purpose.
<body onload=“Main.onLoad();”>
Handling Remote Key Events
To handle remote control key events, load the TVKeyValue JavaScript library in the Common Module API, as shown below.
index.html
<script type=“text/javascript” language=“javascript” src=“$MANAGER_WIDGET/
Common/API/TVKeyValue.js”></script>
The TVKeyValue library is loaded to call remote control event handling functions of the Common Module API. The API's Common.API.TVKeyValue object is used to initialize the tvKey object that includes all remote control event members, as shown below.
Main.js
// Create an Instance of Common Module API.
var tvKey = new Common.API.TVKeyValue()
Create an anchor element to handle a remote control event as shown next. This anchor includes the onKeyDown handler. Please see chapter 5, Focus, for detailed information how the element receives focus.
The next step will implement the Main.keyDown() function, which is registered as the onKeyDown handler for the above “anchor.” “anchor” is a dummy anchor created to receive remote control key events while it has the focus. Main.keyDown receives the event.keyCode parameter and uses a switch statement to compare it with tvKey values and execute the proper reaction.
Main.js
// Called by onload handler of body element.
Main.onload = function(){
    Main.enableKeys();
};


// Focuses on anchor element with id “anchor”
Main.enableKeys = function() {
    document.getElementById(“anchor”).focus();
};


// Event handler for an anchor element.
Main.keyDown = function(){
    var keyCode = event.keyCode;


    switch(keyCode){
        case tvKey.KEY_RETURN:
            widgetAPI.sendReturnEvent();
            break;
        case tvKey.KEY_LEFT:
            document.getElementById(“hello”).innerHTML = “LEFT”;
            break;
        case tvKey.KEY_RIGHT:
            document.getElementById(“hello”).innerHTML = “RIGHT”;
            break;
        case tvKey.KEY_UP:
            break;
        case tvKey.KEY_DOWN:
            break;
        case tvKey.KEY_ENTER:
            break;
        default:
            alert(“Unhandled key”);
            break;
    }
};
When the application is executed, the Main.onload function is first called by the Main.onload handler. Then the Main.onload function gives focus to the anchor using the Main.enableKeys function.
Closing an Application
Follow these steps to close an application:
- Remote control back key or Exit key is pressed.
- The sendExitEvent function or sendReturnEvent function is called to send the event to the Application Manager, which transfers control back to the broadcasted program screen or the Smart Hub.
- The sendExitEvent and sendReturnEvent may be called by a Common Module API member object, Widget.
Running Hello TV!
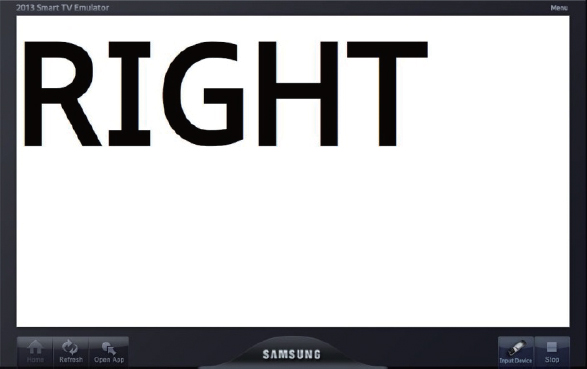
See below for the “Hello TV!” application running on the Emulator.

Press the Left directional key on the virtual remote controller of the Emulator to see the text changing into “LEFT.”

Now, press the Right directional key to see the text change again.
Installing Hello TV! on a TV
Now let's install the user-created application on a Samsung SmartTV to test and debug it in a real environment. The Emulator and an actual SmartTV environment have some differences in system environment and engine implementation. It is best to always test an application on a real TV before publishing it.
Application Packaging
Simple checking and testing of an application can be done on the Emulator without packaging. But an application needs to be packaged to be published or tested on a SmartTV. See the following steps on how the packaging is done.
01. Select the project to package on the Project Explorer.

02. Select the “App Packaging” submenu on the “Samsung SmartTV SDK” top menu of the Eclipse.
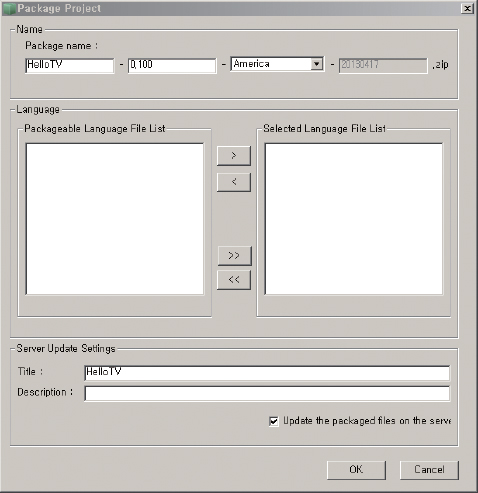
03. Enter necessary information for the App Packaging.
The App Packaging window has the following options:
- Name: Enter the application name, version, and country where the application will be used. Enter the project name, then the <ver> tag value from the config.xml file will be entered as the default. This value is used for filenames of the package.
- Language: Used for an application that supports multiple languages.
- Server Update Settings: Check the “Update the packaged files on the server” box to upload the package to the server. Enter the title and description. These values will be shown when installing the application. The description can be skipped.

04. Confirm the Packaging Completion pop-up message.
When the packaging is complete, a message with the installation file path will be shown. The packaging file is created in the <SDK Installation Path>Package folder, and the same file will be copied into the <Apache Installation Path>Widget if the web server update box is checked. The information file for the copied package is saved in the <Apache Installation Path>widgetlist.xml file.
Application Publishing Information
Once the application packaging is complete, it can be installed on a SmartTV using the IP address of the server. The SmartTV reads the widgetlist.xml from the Apache web server and obtains application package file location and other meta information.
widgetlist.xml
<?xml version=“1.0” encoding=“UTF-8” standalone=“no”?>
<rsp stat=“ok”>
    <list>
        <widget id=“HelloTV”>
            <title>HelloTV</title>
            <compression size=“2711” type=“zip” />
            <description />
            <download>http://192.168.0.6/Widget/HelloTV_0.100_
America_20130211.zip</download>
        </widget>
    </list>
</rsp>
The widgetlist.xml has an application title and description entered by the user during the packaging process, as well as package file size and path. Users can package and upload multiple applications to a SmartTV at the same time. The completed packaging information on the widgetlist.xml is not deleted and only updated during repackaging. Therefore, unused application information needs to be manually deleted from the widgetlist.xml file, unfortunately, using a text editor.
Summary
Before discussing the Samsung SmartTV functions and APIs, a simple project was demonstrated to show an entire application development cycle, including project creation, implementation, execution, and publication. Note that not-yet-covered scene and focus were used. But do not worry about them. Instead, try to understand the rough development cycle. Scene and focus will be discussed in detail in later chapters.