
12
Hands Frame Application 2 – Advanced Version
Virtual Remote Controller Using the Convergence
The Hands Frame basic version was a simple reference application. The upgraded advance version will have additional IME and Convergence capabilities. There are many advanced SmartTV functions other than the IME and Convergence. But these two are the most important functions making a polished application.
This chapter will show adding a login capability that uses the IME to display user input data, and SmartTV – mobile device communication capability using the Convergence.
Login
A standard web service takes ID/password input to access a database to authenticate user login. However, this chapter will simply use the IME to receive an ID input and display it.
Input Tag
An <input> element (for login form) is placed in the Hands Frame's header pane and receives user input data from the IME. An <input> element can receive the focus, as an anchor element does.

To upgrade the Hands Frame basic version, add an <input> element in the index.html file to load the IME module.
<div id=“header”>
     <div class=“login”> ID : <input type=“text” id=“login_form”
maxlength=“5” onkeydown=“Main.login.keyDown();” /></div>
</div>
While an <input> element receives the focus as an <anchor> element does, it also needs different styles to indicate the focused status. See the following example.
#header .login {
    position: absolute;
    top: 20px;
    left: 750px;
    color: #fff;
}


#header .login #login_form {
    height: 25px;
}


#header .login.focus #login_form{
    border: 6px solid #c409d2;
}
Next, make the <input> element as Main's member property for easier access, and add a KeyDown handler function to enable it to process remote control key events. The following source code is built on the previous Hands Frame basic version.
var Main = {
      category : {
           elem : jQuery(‘#category’),
           li    : jQuery(‘#category’).find(‘ul > li’),
           anchor : jQuery(‘#anchor_category’),
      },
      content : {
           elem : jQuery(‘#content’),
           div : jQuery(‘#content > div’),
           anchor : jQuery(‘#anchor_content’)
      },
      player : {
           anchor : jQuery(‘#anchor_player’)
      },
      info : {
           elem : jQuery(‘#scene_info’),
           anchor : jQuery(‘#anchor_info’)
      },
      login : {
           elem : jQuery(‘#header > .login’),
           form : jQuery(‘#login_form’)
      }
};


// Declare an IME object
var oIME = null;


// Shows login status
var login_flag = false;


Main.login.keyDown = function(){
      var keyCode = event.keyCode;


      switch(keyCode)
      {
          case tvKey.KEY_RETURN:
               widgetAPI.sendReturnEvent();
               break;
          case tvKey.KEY_DOWN:
               break;
          case tvKey.KEY_ENTER:
               break;
          default:
               break;
      }
};
The next source shows implementation of pressing the up directional key on the category pane to focus the <input> element. Observe how the Main.category. keyDown function handles the up directional key event.
Main.category.keyDown = function()
{
      var keyCode = event.keyCode;


      switch(keyCode)
      {
           case tvKey.KEY_RETURN:
                widgetAPI.sendReturnEvent();
                break;
           case tvKey.KEY_LEFT:
                break;
           case tvKey.KEY_RIGHT:
                Main.content.anchor.focus();
                Main.category.elem.removeClass(‘focus’);
                Main.content.elem.addClass(‘focus’);
                Main.content.div.eq(index).find(‘li’).eq(content_index).
addClass(‘focus’);
                focused_comp = ‘content’;
                break;
           case tvKey.KEY_UP:
                if(index == 0){
                     if(!login_flag){
                          Main.login.form.focus();
                          Main.category.elem.removeClass(‘focus’);
                          Main.login.elem.addClass(‘focus’);
                     }
                }else{
                     Main.category.li.eq(index).removeClass(‘focus’);
                     Main.category.li.eq(--index).addClass(‘focus’);
                     Main.loadContent();
                }
                break;
           case tvKey.KEY_DOWN:
                if(index < Main.category.li.size() - 1){
                     Main.category.li.eq(index).removeClass(‘focus’);
                     Main.category.li.eq(++index).addClass(‘focus’);


                     Main.loadContent();
                }
                break;
           case tvKey.KEY_INFO :
               Main.info.elem.show();
               Main.info.anchor.focus();
               break;
           default:
               alert(“Unhandled key”);
               break;
      }
};
Category index value 0 means that the focus is already on the top category item. There are no more list items to move the focus up. The program scenario requires moving the focus up to the input element. While not implemented yet, the code will first check the login_flag variable to see if a user is already in to handle an exception, and then will focus the element. Also, the code uses iQuery's addClass() and removeClass() functions to apply the previously defined styles on the element.
Also, see below for giving the focus back to the category anchor if the down directional key is pressed while the <input> element is focused.
Main.login.keyDown = function(){
     var keyCode = event.keyCode;

     switch(keyCode)
     {

         case tvKey.KEY_RETURN:
              widgetAPI.sendReturnEvent();
              break;
         case tvKey.KEY_DOWN:
              Main.category.anchor.focus();
              Main.login.elem.removeClass(‘focus’);
              Main.category.elem.addClass(‘focus’);
              break;
         case tvKey.KEY_ENTER:
              break;
         default:
              break;
     }
};
A case statement is used for the down directional key to move the focus back to the category anchor. Since the <input> element only needs the down directional key and Return key, other keys are not handled. Note that there are no separate case statements for them.
IME Module
Once the focus scenario is implemented using the <input> element, the next step will connect the IME module, as was explained in chapter 10, IME. The following libraries need to be declared in the index.html file to use the IME module.
<script type=“text/javascript” src=“$MANAGER_WIDGET/Common/API/Plugin.js”></
script>
<!-- IME Module -->
     <script type=“text/javascript” language=‘javascript’ src=“$MANAGER_
WIDGET/Common/IME_XT9/ime.js”></script>
     <script type=“text/javascript” language=‘javascript’ src=“$MANAGER_
WIDGET/Common/IME_XT9/inputCommon/ime_input.js”></script>
The following function calls the IME module.
var focusIME = function() {
    oIME = new IMEShell_Common();
    oIME.inputboxID = “login_form”;
    oIME.onKeyPressFunc = function(nKeyCode) {
     switch(nKeyCode)
     {
         case tvKey.KEY_RETURN:
                  break;
         case tvKey.KEY_EXIT:
              break;
         case tvKey.KEY_ENTER:
              return false;
              break;
     }
    };


    Main.login.form.focus();
    oIME.onShow();
};
See the end part of the focusIME functions that call the onShow() function of the IME object to confirm it.
As mentioned earlier, the Enter key calls the IME module in the following remote key event handling function.
Main.login.keyDown = function(){
     var keyCode = event.keyCode;


     switch(keyCode)
     {
         case tvKey.KEY_RETURN:
              event.preventDefault();
              widgetAPI.sendReturnEvent();
              break;
         case tvKey.KEY_DOWN:
              Main.category.anchor.focus();
              Main.login.elem.removeClass(‘focus’);
              Main.category.elem.addClass(‘focus’);
              break;
         case tvKey.KEY_ENTER:
              focusIME();
              break;
         default:
              break;
     }
};
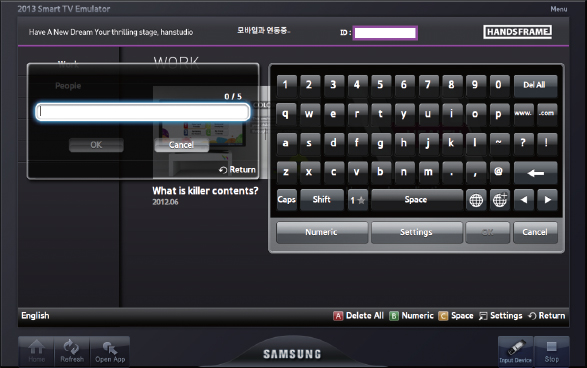
Pressing the Enter key within the input element calls the IME module, and displays the next screen. Note that an XT9 keyboard can be called instead of the QWERTY keyboard shown in the figure.
The following function displays data received by the IME module on the <input> element. It clears the element, displays the new input data, and finally moves the focus back to the category anchor to prevent losing the focus. See the following implementation.
var form_submit = function(){
     Main.login.elem.empty();
     Main.login.elem.text(‘Welcome ! ’+Main.login.form.val() + ‘.’);
     login_flag = true; // Boolean value that shows if a user is already
logged in
     Main.category.anchor.focus();
     Main.login.elem.removeClass(‘focus’);
     Main.category.elem.addClass(‘focus’);
};
The function needs to be inserted in the previous focusIME() function's Enter key case statement.
case tvKey.KEY_ENTER:
     form_submit();
     return false;
     break;
Note that the preceding simple demonstration may lack some necessary functions. Make sure to see the complete Hands Frame application source code in the addendum.
Virtual Remote Controller Using the Convergence
The second advanced feature is the trendy mobile Convergence capability. While a service application needs more complex and difficult connectivity, this chapter will demonstrate a simple function that controls text messages on the TV application using a mobile device.
The text message to be displayed in the Hands Frame application is “Connecting to a mobile device…” as shown below.
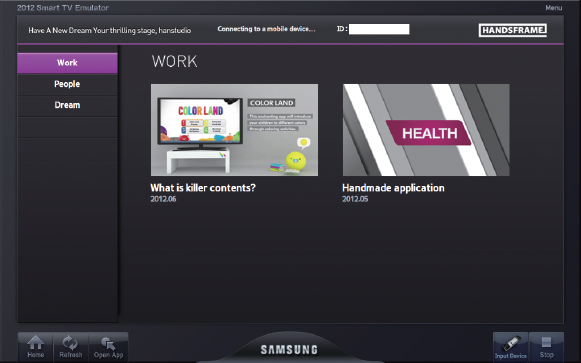
SmartTV Convergence
Use the following element in index.html to display the status message.
<div id=“convergence_help”>Connecting to a mobile device…</div>
While the screen shows a connecting message, the message was actually just a show event request by a mobile device. Its initial status is hidden by the next style.
The webapis.js file needs to be included in the index.html file to use the Convergence feature.
<script type=“text/javascript” language=“javascript” src=“$MANAGER_WIDGET/
Common/webapi/1.0/webapis.js”></script>
API and callback functions used in the example are already covered in chapter 11, The Convergence and AllShare Framework. Let's move to the actual implementation. Implement the Convergence in the Main.js file that controls the screen layers.
var Convergence = {
    api: window.webapis.customdevice || {},
    aDevice: [],
    init: function() {
        this.api.registerManagerCallback(Convergence.registerManager);
        this.api.getCustomDevices(Convergence.getCustomDevices);
    },
    registerManager: function(oManagerEvent) {
        var _this = Convergence;
        switch(oManagerEvent.eventType) {
            case _this.api.MGR_EVENT_DEV_CONNECT:
                _this.api.getCustomDevices(Convergence.getCustomDevices);
                break;
            case _this.api.MGR_EVENT_DEV_DISCONNECT:
                _this.api.getCustomDevices(Convergence.getCustomDevices);
                break;
            default:
                break;
        }
    },

    getCustomDevices: function(aDevice) {
        var _this = Convergence;
        _this.aDevice = aDevice;


        for(var i = 0; i < aDevice.length; i++) {
            var sID = aDevice[i].getUniqueID();
            aDevice[i].registerDeviceCallback(function(oDeviceInfo) {
                _this.registerDevice(sID, oDeviceInfo);
            });
        }
    },
    registerDevice: function(sID, oDeviceInfo) {
       var mobileKeyEvent = jQuery.parseJSON(oDeviceInfo.data.message1);
       handleMobileEvent(mobileKeyEvent.msg);
    },
    sendMessage: function(oDevice, sMessage) {
        return oDevice.sendMessage(sMessage);
    },
    broadcastMessage: function(sMessage) {
        return this.aDevice[0] && this.aDevice[0].broadcastMessage(sMessage);
    },
    uploadFile: function(sName) {
        // sName: image file name
        var sUrl = ‘http://127.0.0.1/ws/app/’ + curWidget.id + ‘/file/’ +
sName;
        return ‘<img src=“‘ + sUrl + ’”/>’;
    }
};
Convergence.init();
The preceding registerDevice callback function will be called when a mobile device requests the event. This function's oDeviceInfor object parameter contains the mobile's event information, which includes message objects for Show and Hide.
The internally called handleMobileEvent function reads the message and shows or hides the UI component, as implemented below.
// Process the requested event
var handleMobileEvent = function(event){
      switch(event) {
          case ‘msg_show’ :
               $(‘#convergence_help’).show();
               break;
          case ‘msg_hide’ :
               $(‘#convergence_help’).hide();
               break;
      }
};
The source code shows that msg_show and msg_hide messages are used to call the Show or Hide event. The two events messages also need to be declared in the mobile device.
Mobile Convergence
The required Android version Hands Frame application needs the following components
- A utility class for the Convergence connectivity
- An activity class
- XML layout
The utility class holds necessary TV connection information, including IP, port, and application ID. It handles connection and disconnection functions. The activity class is the main source file that defines the TV requesting events and application behaviors. The XML layout defines user interface for the events with Show and Hide buttons. See the source code in the addendum.

Summary
This chapter added two advanced features of the Samsung SmartTV application—the IME module and the Convergence—to upgrade the Hands Frame application basic version. A production app project would have a more complex implementation, but a simplified version was used to explain the concept. The finished Hands Frame advanced version includes an IME-based login function and a Convergence feature that displays and hides a status message using a mobile connection.