Chapter 12
Getting into the Gallery
In This Chapter
![]() Putting pictures into albums
Putting pictures into albums
![]() Tagging people in pictures
Tagging people in pictures
![]() Editing videos
Editing videos
You youngsters out there have grown up with the concept of digital photos, which are held in digital files that are automatically organized by date and time and can easily labelled with a title that can be searched for. Add to that the ability to embed a photo’s latitude and longitude as measured by the built-in GPS unit in your tablet, and you can also find a photo by searching for the place where it was taken.
It sure beats a box stuffed with hundreds of precious, irreplaceable family photographs of events long forgotten in places that have faded from memory and sometimes of people no longer recognizable.
Your Samsung Galaxy Tab S2 NOOK has features that help you organize, label, and share your photos and videos. It all comes together in a place called the Gallery.
Visiting Your Picture Gallery
Like the smart little computer it is, your Samsung Galaxy Tab S2 NOOK is available anytime you need help, never takes a coffee break, and doesn’t care if you stomp your feet and whistle as you browse the collection. And you can (and should) make as many copies as possible of digital photos and videos to protect against loss or failure of the hardware.
 The Gallery app not only stores photos or videos you’ve taken using the NOOK cameras, but also any images you download from the Internet or email or transfer from a computer. The folder also holds any screen captures (pictures of what’s onscreen) you’ve made; see Chapter 15 for those instructions.
Visit the Gallery from the Home screen. Tap the Apps panel and tap Gallery. Or even quicker, tap the Gallery app icon in the lower part of the Home screen. If you’ve taken photos using one of the built-in cameras, a direct link to Gallery shows the most recent image.
Going to the Gallery in this fashion brings up a screen showing all your image folders, including pictures you took on the tablet, screen captures), and pictures or videos you’ve downloaded to the tablet from other sources such as from a desktop, laptop, or smartphone. See Figure 12-1.

Figure 12-1: A full, unsorted display of some of the photos in my Gallery.
 If you’re using one of the built-in cameras of your Tab S2 NOOK, you can jump to the Gallery by tapping the preview box that appears in one of the corners of the camera screen. The images shown in the preview are only those you photographed using your NOOK; you get to other images in the Gallery.
 Your Tab S2 NOOK can only create and display certain file types. For still images taken with the camera, files use the JPG (pronounced by techies as jay-peg) format, a technology that squashes the size of the file with little or no loss of quality. Camera images are stored in the DCIM/Camera folder. Screenshots use a file format called PNG (pronounced ping) which also squashes files without losing quality; they’re stored in a folder cleverly named Screenshots.
You can transfer files from another device that are in a different format, but you get an error message when you try to see them (or they may appear damaged). Here’s a way around: Convert incompatible file formats using a photo- or video-editing program on your PC or Mac before transferring them to your Tab S2 NOOK.
I sometimes use a tablet as a storage place for extra copies of important files I take with me when I travel. In that instance, it doesn’t matter whether the tablet can display the incompatible format (including TIFF or RAW camera files); all I need to do in an emergency is get to a PC or laptop and upload the files to a computer that can handle them.
Viewing images
You want to see what pictures you have? Images are displayed in order of when you took them.
- Tap a folder to open it and check its contents.
- Tap an image to view it full screen.
- Scroll left or right with your finger to view the previous or next image.
Zooming in or out
You can enlarge most images onscreen to take a closer look. You can zoom two ways:
- Double-tap anywhere on the screen to zoom in. Double-tap again to zoom out to normal view.
- Touch two fingers on an image and then spread them apart to zoom in. Bring the two fingers toward each other (pinch) to zoom out or reduce the size to normal.
Editing images
Your Samsung Galaxy Tab S2 NOOK comes with a built-in basic image editor. Here’s how to use it:
-
While viewing an image, tap the screen once.
The image options appear.
-
Tap Edit to view editing tools.
See Figure 12-2.
- Tap a tool to use it, following the onscreen instructions.

Figure 12-2: Tap for tools, including Auto Adjust, Rotate, and Crop.
You can rotate an image from horizontal to vertical or the other way around, adjust brightness, saturation (the intensity of colors), and crop images. The Auto Adjust button may fix certain problems.
There are more than a few more capable photo-editing apps available through the Google Play store and elsewhere. Some work with full-scale editors on desktop or laptop computers.
You can always send your pictures by email or transfer them by Wi-Fi Direct or over a USB cable to a desktop or laptop computer and open them in a photo editor there. At the professional end of the scale, programs like Adobe Photoshop or Adobe Lightroom or Apple’s Aperture work with files created on your NOOK tablet. So too will basic programs that are part of the Windows or Apple operating systems.
Deleting images
Film is all but gone, and taking pictures is all but free. But you don’t need (or want) to hold on to every last image you record.
To delete an image from within the Gallery, follow along:
- Tap a folder or category to open it.
- Tap More, then tap Edit.
- Tap one or more items to select them.
-
Tap the Trash icon.
Or, while you’re viewing an individual image, tap the Trash icon.
Putting All Your Pictures in One Basket
If you’re the sort who likes to neatly separate all your pictures or videos into folders that you name, that’s fine. But you can also tell the Tab S2 NOOK tablet to do a bit of sorting: The most basic way is to show folders by date or by alphabetic order.
The tablet comes with some preset albums. Think of them as folders. And certain others are automatically created by programs looking for a place to store material. For example, if you download an image using email or from the Internet, a folder called Downloads is created and automatically used. Similarly, the first time you capture a screenshot of something displayed on the screen, a Screenshots folder is created and used for storage.
But you can easily
- Create your own album while you’re in the Gallery on the tablet. See Figure 12-3.
- Add a folder (which is treated as an album) while using a PC or laptop computer to work in the files on your tablet.

Figure 12-3: You can assign images to one or more albums, which makes it easier to organize photos for slideshows or send to a printer or photo service.
I explain how to create folders and transfer files using a computer connected by the USB cable in Chapter 5.
Sorting your pictures
You can examine photos, videos, and other images in ways that Marian the Librarian could never have imagined. Sort to your heart’s content:
-
From the main Gallery screen, tap Albums.
A submenu opens.
- Choose how you want your pictures sorted:
- All. You got this, right?
- Albums. Show the names and the first image in each album.
- Time. The oldest are at the top and most recent are at the bottom. You can scroll through all the pictures by touching and sliding anywhere on the screen. Tap a single picture to see it full screen. Tap the Back icon to return to the display of images by time.
- Locations. If you turn on your tablet’s Location feature, every photo and video you shoot will use the built-in GPS to figure out where it was taken. (I discuss this in more detail in Chapter 11.) And then, using certain apps, you can tell the tablet: “Show me only the pictures taken on Nantucket Island.” See Figure 12-4.
-
Favorites. If you declare an image to be a favorite (tap the Menu icon in the upper right and then tap Favorite), selecting this method means only your favorites will show up.
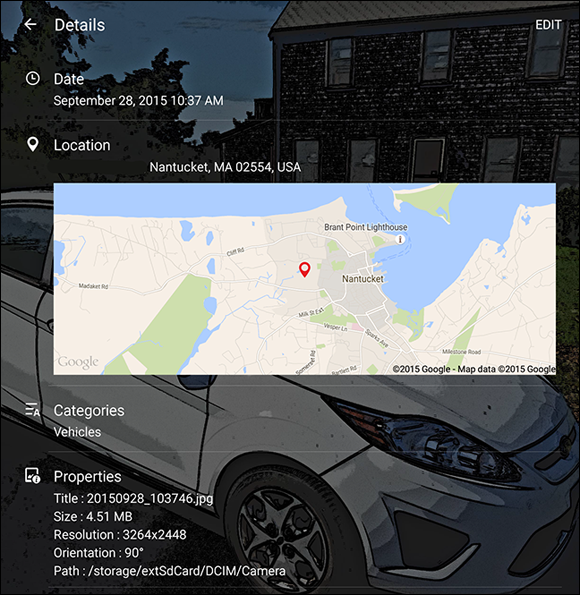
Figure 12-4: I took a photo of my car (adding the Cartoon Effect for kicks) with the Location sensor turned on. When I checked the details, the tablet presented a map showing where the car was parked.
Moving pictures into albums
To move a photo to an album from the Gallery app, do this:
- From any Home screen, tap the Apps icon and then Gallery.
- Choose Album View.
- Tap a folder with images.
-
Press and hold an image to select it.
A checkmark appears in the upper-left corner of the thumbnail.
-
Tap the checkmark on any other image you want to move to an album.
See Figure 12-5.
- Tap More, and then tap Copy to Album or Move to Album.
- Choose Copy to place a copy of the picture in the new location and leave the original where it is.
- Choose Move to relocate the picture to an album.

Figure 12-5: Select one or more images by placing a checkmark in the box for its thumbnail and then tapping Copy or Move.
Putting Your Images to Work
Your images can be shared, emailed, put in a slideshow, electronically framed, renamed, printed, or used as the portrait on a new $100 bill. Just kidding about that last option, unless you happen to have your own tropical island nation and a printing press. And if so, why haven’t you invited me to visit?
![]() From the Gallery app, tap an image and then tap the Menu icon (shown here). Now choose an option:
From the Gallery app, tap an image and then tap the Menu icon (shown here). Now choose an option:
- Slideshow: Start an automated presentation that goes through every photo in the current folder. You can make the show even more dramatic if you add transition effects and music. You can say for how long you want each picture on the screen.
- Details: You get the nitty gritty: filename and its format, the date and time the photo was taken, and which folder it’s stored in. If GPS was on, you can see the location, resolution, file size, and whether the camera was held upright or on its side. In certain situations, the tablet can even determine that the subject of the image falls under a particular category, like people, vehicles, or nature.
- Favorite: You can tag an image as one of your faves. It won’t rename or move the file, but any time you tap the Favorites folder, you’ll see only those images upon which you have bestowed this particular honor.
- Set As: You can use a picture as the wallpaper, or background, on your tablet’s Home or Lock screen, or both. You can put a picture of a person with that person’s contact information, too. In Figure 12-6, I’ve selected an image of sea fog hanging over a glacier in Prins Christian Sound in Greenland as the wallpaper to sit behind my Home screen.

Figure 12-6: You can choose any image in your Gallery to serve as wallpaper behind the Home screen, the Lock screen, or both.
Searching for an Image
The Tab S2 NOOK lets you look for an image based on any part of its filename, the date it was taken, its category, and other attributes. In Figure 12-7 I’m asking the NOOK to find an image that includes the word sinai.

Figure 12-7: I entered the word sinai in the search bar and located this photo I’d taken of a forlorn Egyptian army post in the Sinai Desert. Your results may differ.
Sharing Your Images
No NOOK tablet is an island, which is a good thing if you want to quickly share your photos with your friends and the world at large. You can send photos several ways, including posting them on social networks and by sending them as email attachments.
In Chapter 5, I explain how to move your photos from your tablet to a desktop or laptop computer; from there you can use fully capable photo-editing software and share them other ways.
From the Gallery you can share by email, Gmail, Bluetooth, or Wi-Fi Direct. To share an image directly from the Gallery, follow the steps. You must, of course, have an active Wi-Fi connection to share files.
- From any Home page, tap the Apps icon and then Gallery.
- Tap a folder or category to open it.
- Tap More and then tap Share.
- Select a folder and open it.
-
Tap images, and then tap Share.
See Figure 12-8.
- Select a communication service and then follow the onscreen instructions to share the image by Wi-Fi or Bluetooth.

Figure 12-8: You can share or provide a link to any of your images using built-in communication services and most apps you add to your tablet.
You can share images right from the Camera app. When you’re reviewing a photo, tap the > icon and choose Share.
Playing Your Videos
Your Gallery also holds videos you’ve recorded using the built-in cameras of the NOOK. You can put video files into folders or categories just like you do still images. Share them by sending them as email or over a wireless or wired connection. Bear in mind, though, that video files can be quite large; the longer in length, the bigger the file.
Here’s how to play a video from the Gallery:
- From any Home screen, tap the Apps icon and then tap the Gallery icon.
- Tap a folder or category to open it.
- Tap a video to prepare it for playback.
-
Tap the Play icon.
To stop playback, tap the Stop icon.
Shearing Videos
The Galaxy Tab S2 NOOK has a basic video editor. You can buy something with a little more oomph as an app from the app stores on your tablet.
If you save the video under a different name from its original, you can keep the full file. This way you can carve up a video into several shorter clips.
To use the tablet’s built-in editor, do this:
- From any Home screen, tap the Apps icon and then tap the Gallery icon.
- Select a video for playback.
- Tap the screen once to display the editing options.
-
Tap Editor and then tap the Trim (scissors) icon.
Below your video’s large opening scene, you’ll see a kind of storyboard of your full video.
- Drag the start bracket to where you want your edited video to begin.
- Drag the end bracket to where the video should stop.
-
Tap Export to save the video.
You can modify the name of the file to save the original and create a second, edited version. You can also reduce the screen resolution of the video to make the file smaller.
If you reduce the screen resolution of a video, it will affect its appearance — not for the better — if you play back the video on a larger screen than the NOOK tablet. On the other hand, if you’re planning on sending the file to a device with a smaller screen, like a smartphone, reducing the resolution should have no adverse effects and will save quite a lot of file size.