Hour 11. Using Images in Your Web Site
In Hour 10, “Creating Images for Use on the Web,” you learned how to find and create digital images for use in your web site. This hour shows you how easy it is to place those images in your web site. In this hour you’ll learn the HTML for placing and describing images in your site, how to align images, and how to use images as links or “maps” to other content.
Placing Images on a Web Page
To put an image on a web page, first move the image file into the same folder as the HTML file or in a directory named Images for easy organization.
Note
It doesn’t matter to the web server, web browser, or end user just where you put your images, as long as you know where they are and as long as you use the correct paths in your HTML code.
Insert the following HTML tag at the point in the text where you want the image to appear. Use the name of your image file instead of myimage.gif:
![]()
If your image file were in the images directory below the document root, you would use:
![]()
Both the src and the alt attributes of the <img /> tag are required in XHTML web pages. The src attribute identifies the image file and the alt attribute allows you to specify descriptive text about the image, the latter of which is intended to serve as an alternative to the image in the event that a user is unable to view the image. You’ll read more on the alt attribute later, in the section “Describing Images with Text.”
Note
The <img /> tag also supports a title attribute that is used to describe an image. Unlike the alt attribute, the title attribute is truly intended to provide an image description with the assumption that the image is visible. The alt attribute serves a more important purpose, and is put into play primarily when an image cannot be displayed, such as when a blind user is “viewing” a page using supplementary screen reading software. The alt attribute is required but it’s a good idea to provide both alt and title attributes if you want to ensure that your images are all well-described.
As an example of how to use the <img /> tag, Listing 11.1 inserts an image at the top of the page, before a paragraph of text. Whenever a web browser displays the HTML file in Listing 11.1, it automatically retrieves and displays the image file as shown in Figure 11.1.
Listing 11.1 Using the <img /> Tag to Place Images on a Web Page

Figure 11.1 When a web browser displays the HTML code shown in Listing 11.1, it renders the hd.jpg image.

Note
Theoretically, you can include an image from any web site within your own pages. In those cases, the image is retrieved from the other page’s web server whenever your page is displayed. You could do this, but you shouldn’t! Not only is it bad manners, because you are using the other person’s bandwidth for your own personal gain, it also can make your pages display more slowly. You also have no way of controlling when the image might be changed or deleted.
If you are granted permission to republish an image from another web page, always transfer a copy of that image to your computer and use a local file reference, such as <img src="myimage.jpg" /> instead of <img src="http://www.otherserver.com/theirimage.jpg" />. This advice is not applicable, however, when you host your images—such as photographs—at a service specifically meant as an image repository, such as Flickr (http://www.flickr.com/). Services like Flickr provide you with a URL for each image, and each URL includes Flickr’s domain in the address.
If you guessed that img stands for image, you’re right. And src stands for source, which is a reference to the location of the image file. As discussed earlier in the book, an image is always stored in a file separate from the text, even though it appears to be part of the same page when viewed in a browser.
Just as with the <a href> tag used for hyperlinks, you can specify any complete Internet address in the src attribute of the <img /> tag. Alternatively, if an image is located in the same folder as the HTML file, you can specify just the filename. You can also use relative addresses, such as /images/birdy.jpg or ../smiley.gif.
Describing Images with Text
Each <img /> tag in Listing 11.1 includes a short text message, such as alt="Half Dome". The alt stands for alternate text, which is the message that appears in place of the image itself if it does not load. An image might not load if its address is incorrect, if the user has turned off automatic image downloading in her web browser preferences, or if the Internet connection is very slow and the data has yet to transfer. Figure 11.2 shows an example of alt text used in place of an image.
Figure 11.2 Users will see alt messages when images do not appear.

Even when graphics have fully loaded and are visible in the web browser, the alt message typically appears in a little box (known as a tool tip) whenever the mouse pointer passes over an image. The alt message also helps any user who is visually impaired (or is using a voice-based interface to read the web page).
You must include a suitable alt attribute in every <img /> tag on your web pages, keeping in mind the variety of situations in which people might see that message. A very brief description of the image is usually best, but web page authors sometimes put short advertising messages or subtle humor in their alt messages; too much humor and not enough information is frowned upon, however. For small or unimportant images, it’s tempting to omit the alt message altogether, but it is a required attribute of the <img /> tag. This doesn’t mean your page won’t display properly, but it does mean you’ll be in violation of the latest XHTML standards. I recommend assigning an empty text message to alt if you absolutely don’t need it (alt=""), which is sometimes the case with small or decorative images.
The title attribute is not required by the <img /> tag, but it functions similarly to the alt attribute; in fact, the title attribute supersedes the alt attribute for tool tips if both attributes are present. Knowing this, the best approach for describing images via text is to use both the alt attribute and the title attribute to provide relevant notation or helpful hints about the image that you think might be useful when viewed as a tool tip or via screen reader software.
Specifying Image Height and Width
Because text moves over the Internet much faster than graphics, most web browsers display the text on a page before they display images. This gives users something to read while they’re waiting to see the pictures, which makes the whole page seem to load faster.
You can make sure that everything on your page appears as quickly as possible and in the right places by explicitly stating each image’s height and width. That way, a web browser can immediately and accurately make room for each image as it lays out the page and while it waits for the images to finish transferring.
For each image you want to include in your site, you can use your graphics program to determine its exact height and width in pixels. You might also be able to find these image properties by using system tools. For example, in Windows, you can see an image’s height and width by right-clicking on the image, selecting Properties, and then selecting Details. Once you know the height and width of an image, you can include its dimensions in the <img /> tag, like this:
![]()
Tip
The height and width specified for an image don’t have to match the image’s actual height and width. A web browser will try to squish or stretch the image to display whatever size you specify. However, this is generally a bad idea because browsers aren’t particularly good at resizing images. If you want an image to display smaller, you’re definitely better off resizing it in an image editor.
Aligning Images
Just as you can align text on a page, you can align images on the page using special attributes. Not only can you align images horizontally, you also can align them vertically with respect to text and other images that surround them.
Horizontal Image Alignment
As discussed in Hour 5, “Working with Text Blocks and Lists,” you can use <div style="text-align:center">, <div style="text-align:right">, and <div style="text-align:left"> to align an element to the center, to the right margin, or to the left margin. These style settings affect both text and images and can be used within the <p> tag as well.
Like text, images are normally lined up with the left margin unless a style="text-align:center" or style="text-align:right" setting indicates that they should be centered or right-justified. In other words, left is the default value of the text-align style property.
You can also wrap text around images by using the float style property directly within the <img /> tag.
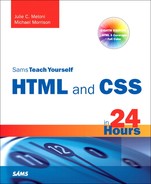
In Listing 11.2, <img style="float:left" /> aligns the first image to the left and wraps text around the right side of it, as you might expect. Similarly, <img style="float:right" /> aligns the second image to the right and wraps text around the left side of it. Figure 11.3 shows how these images align on a web page. There is no concept of floating an image to the center because there would be no way to determine how to wrap text on each side of it.
Listing 11.2 Using text-align Styles to Align Images on a Web Page
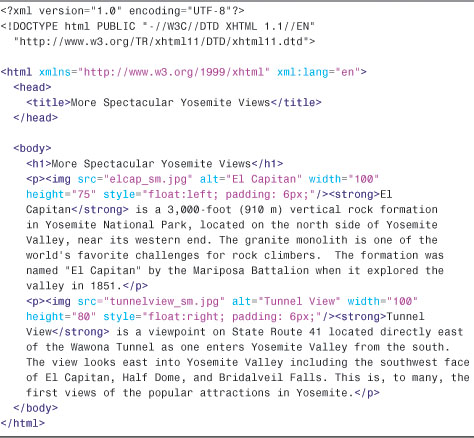
Figure 11.3 Showing the image alignment from Listing 11.2.

Note
The float style property is actually more powerful than described here and, in fact, applies to more than just images. You can use the float style property creatively to arrive at some interesting page layouts, as you’ll learn later in the book.
Note
Notice the addition of padding in the style attribute for both <img/> tags used in Listing 11.2. This padding provides some “breathing room” between the image and the text—6 pixels on all four sides of the image. You will learn more about padding in Hour 13.
Vertical Image Alignment
Sometimes, you might want to insert a small image in the middle of a line of text; or you might like to put a single line of text next to an image as a caption. In either case, it would be handy to have some control over how the text and images line up vertically. Should the bottom of the image line up with the bottom of the letters, or should the text and images all be arranged so that their middles line up? You can choose between these and several other options:
• To line up the top of an image with the top of the tallest image or letter on the same line, use <img style="vertical-align:text-top" />.
Note
The vertical-align style property also supports values of top and bottom, which can be used to align images with the overall top or bottom of a line of elements regardless of any text on the line.
• To line up the bottom of an image with the bottom of the text, use <img style="vertical-align:text-bottom" />.
• To line up the middle of an image with the overall vertical center of everything on the line, use <img style="vertical-align:middle" />.
• To line up the bottom of an image with the baseline of the text, use <img style="vertical-align:baseline" />.
All four of these options are used in Listing 11.3 and displayed in Figure 11.4. Four thumbnail images are now listed vertically down the page, along with descriptive text next to each image. Various settings for the vertical-align style property are used to align each image and its relevant text.
Listing 11.3 Using vertical-align Styles to Align Text with Images
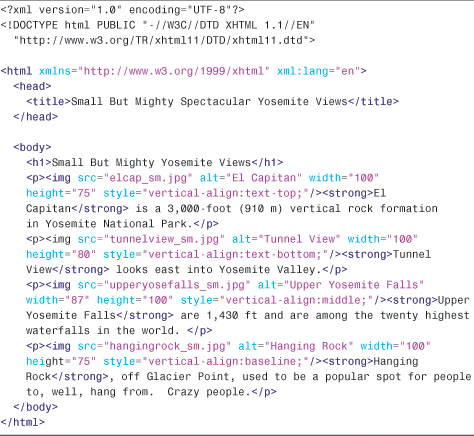
Figure 11.4 Showing the vertical image alignment options used in Listing 11.3.

Tip
If you don’t include any align attribute in an <img /> tag, the bottom of the image will line up with the baseline of any text next to it. That means you never actually have to type style="vertical-align:baseline" because it is assumed by default. However, if you specify a margin for an image and intend for the alignment to be a bit more exacting with the text, you might want to explicitly set the vertical-align attribute to text-bottom. Take a look at the last image shown in Figure 11.4 to see an example of the text appearing slightly below the image due to the image margin—this is a result of the baseline setting for vertical-align.
Turning Images into Links
You probably noticed in Figure 11.1 that the image on the page is quite large, which fine in this particular example but isn’t ideal when you’re trying to present multiple images. It makes more sense in this case to create smaller image thumbnails that link to larger versions of each image. Then you can arrange the thumbnails on the page so that visitors can easily see all the content, even if they see only a smaller version of the actual (larger) image. Thumbnails are one of the many ways you can use image links to spice up your pages.
To turn any image into a clickable link to another page or image, you can use the <a href> tag that you used previously to make text links. Listing 11.4 contains the code for a modification of Listing 11.2—which already used thumbnails—to provide links to larger versions of the images. To ensure that the user knows to click the thumbnails, the image and some helper text is enclosed in a <div>, as shown in Figure 11.5.
Listing 11.4 Using Tumbnails for Effective Image Links


Figure 11.5 Using thumbnails as links improves the layout of a page that uses large images.

The code in Listing 11.4 uses additional styles that will be explained in more detail in Hours 14 and 15, but you should be able to figure out the basics:
• The <a> tags link these particular images to larger versions, which in this case are stored on an external server (at Flickr).
• The <div> tags, and their styles, are used to align those sets of graphics and caption text (and also include some padding).
Unless instructed otherwise, web browsers display a colored rectangle around the edge of each image link. Like text links, the rectangle usually appears blue for links that haven’t been visited recently or purple for links that have been visited recently—unless you specify different colored links in your style sheet. Because you seldom, if ever, want this unsightly line around your linked images, you should usually include style="border:none" in any <img /> tag within a link. In this instance, the border:none style is made part of the style sheet entry for the img element because we use the same styles twice.
When you click one of the thumbnail images on the sample page shown, the link is opened in the browser, as shown in Figure 11.6.
Figure 11.6 Clicking a linked thumbnail image opens the target of the link.

Using Background Images
As you learned in the previous hour, you can use background images to act as a sort of “wallpaper” in a container element, so that the text or other images appear on top of this underlying design.
The basic style properties that work together to create a background are:
• background-color: specifies the background color of the element. While not image-related, it is part of the set of background-related properties.
• background-image: specifies the image to use as the background of the element using the following syntax: url('imagename.gif').
• background-repeat: specifies how the image should repeat, both horizontally and vertically. By default (without specifying anything), background images will repeat both horizontally and vertically. Other options are: repeat (same as default), repeat-x (horizontal), repeat-y (vertical), and no-repeat (only one appearance of the graphic).
• background-position: specifies where the image should be initially placed relative to its container. Options include: top-left, top-center, top-right, center-left, center-center, center-right, bottom-left, bottom-center, bottom-right, and specific pixel and percentage placements.
When specifying a background image, you can put all of these specifications together into one property, like so:
![]()
In the previous style sheet entry, the body element of the web page will be white and include a graphic named imagename.gif on the top right. Another use for the background property is the creation of custom bullets for your unordered lists. To use images as bullets, first define the style for the <ul> tag as follows:

Next, change the declaration for the <li> tag to:
![]()
Make sure that mybullet.gif (or whatever you name your graphic) is on the web server and accessible; in that case, all unordered list items will show your custom image rather than the standard filled disc bullet.
We will return to the specific use of background properties in later lessons when using CSS for overall page layouts.
Using Imagemaps
Sometimes you might want to use an image as navigation, but beyond the simple button-based or link-based navigation that you often see in web sites. For example, perhaps you have a web site with medical information and you want to show an image of the human body that links to pages that provide information about various body parts. Or you have a web site that provides a world map users can click to access information about countries. You can divide an image into regions that link to different documents, depending on where users click within that image. This is called an imagemap, and any image can be made into an imagemap.
Why Imagemaps Aren’t Always Necessary
The first thing you should know about imagemaps is that you probably won’t need to use them except in very special cases. It’s almost always easier and more efficient to use several ordinary images that are placed directly next to one another and provide a separate link for each image.
For example, see Figure 11.7. This is a web page that shows 12 different corporate logos; this example is a common type of web page in the business world, one in which you give a little free advertisement to your partners. You could present these logos as one large image and create an imagemap that provides links to each of the 12 companies. Users could click each logo in the image to visit each company’s site. Or you could display the images on the page as in this example, and use 12 separate images—one for each company—with each image including a link to that particular company.
Figure 11.7 Web page with 12 different logos; this could be presented as a single imagemap or divided into 12 separate pieces.

An imagemap is the best choice for an image that has numerous parts, is oddly arranged, or the design of the image itself might be too complicated to divide into separate images. Figure 11.8 shows an image that is best suited as an imagemap.
Figure 11.8 An image that wouldn’t take well to being sliced up—better make it an imagemap.
Mapping Regions Within an Image
To create any type of imagemap, you need to figure out the numerical pixel coordinates of each region within the image that you want to turn into a clickable link. These clickable links are also known as areas. Your graphics program might provide you with an easy way to find these coordinates. Or you might want to use a standalone imagemapping tool such as Mapedit (http://www.boutell.com/mapedit/) or the online imagemap maker at http://www.image-maps.com/. In addition to helping you map the coordinates, these tools also provide the HTML code necessary to make the maps work.
Using an image mapping tool is often as simple as using your mouse to draw a rectangle (or a custom shape) around the area you wish to be a link. Figure 11.9 shows the result of one of these rectangular selections as well as the interface for adding the URL and the title or alternate text for this link. Several pieces of information are necessary to creating the HTML for your imagemap: coordinates, target URL, title of link, and alternative text for the link.
Figure 11.9 Using an imagemapping tool to create linked areas of a single graphic.

Creating the HTML for an Imagemap
If you use an imagemap generator, you will already have the HTML necessary for creating the imagemap. However, it is a good idea to understand the parts of the code so that you can check it for accuracy. The following HTML code is required to start any imagemap:
![]()
Keep in mind that you can use whatever name you want for the name of the <map> tag, although it helps if you make it as descriptive as possible. Next, you’ll need an <area /> tag for each region of the image. Following is an example of a single <area /> tag that is used in the mapping-a-map imagemap example:

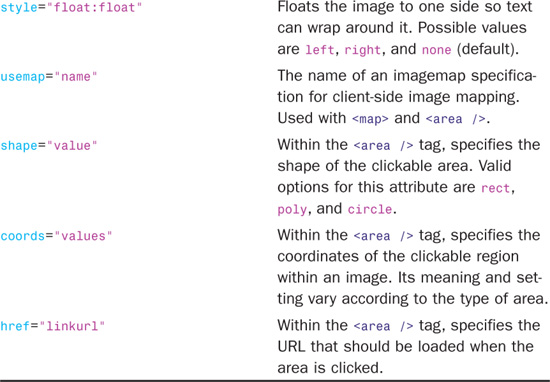
This <area /> tag has five attributes, which you will use with every area you describe in an imagemap:
• shape indicates whether the region is a rectangle (shape="rect"), a circle (shape="circle"), or an irregular polygon (shape="poly").
• coords gives the exact pixel coordinates for the region. For rectangles, give the x,y coordinates of the upper-left corner followed by the x,y coordinates of the lower-right corner. For circles, give the x,y center point followed by the radius in pixels. For polygons, list the x,y coordinates of all the corners in a connect-the-dots order.
• href specifies the page to which the region links. You can use any address or filename that you would use in an ordinary <a href> link tag.
• alt allows you to provide a piece of text that is associated with the shape. Most browsers (Firefox excluded) display this text in a small box when a user hovers his mouse over the shape. This text adds a subtle but important visual cue to users who might not otherwise realize that they are looking at an imagemap. Firefox correctly uses the title attribute in addition to the alt attribute to provide a visual cue, which is why, as noted previously in this hour, you should use both attributes.
Each distinct clickable region in an imagemap must be described as a single area, which means a typical imagemap consists of a list of areas. After coding the <area /> tags, you are done defining the imagemap, so wrap things up with a closing </map> tag.
The last step in creating an imagemap is wiring it to the actual map image. The map image is placed on the page using an ordinary <img /> tag. However, there is an extra usemap attribute that is coded like this:
![]()
When specifying the value of the usemap attribute, use the name you put in the id of the <map> tag (and don’t forget the # symbol). Also include the style attribute to specify the height and width of the image and to turn off the border around the imagemap, which you might or might not elect to keep in imagemaps of your own.
Listing 11.5 shows the complete code for a sample web page containing the map graphic, its imagemap and a few mapped areas.
Listing 11.5 Defining the Regions of an Imagemap with <map> and <area /> Tags

Note
If you’re a stickler for details, you might have noticed—check out the first few lines of code—that this web page is coded as an XHTML 1.0 document, as opposed to the XHTML 1.1 used with most of the other examples in the book. This is done because some browsers (Internet Explorer, for one) are lagging in their support of a single XHTML 1.1 change in how imagemaps are used. This change is specific to the usemap attribute, which in XHTML 1.1 doesn’t require the # symbol in front of the map name. In fact, the # symbol isn’t allowed at all in XHTML 1.1. The # symbol is, however, allowed in XHTML 1.0, so to satisfy current web browsers and still provide you with a valid web page, this particular example uses XHTML 1.0.
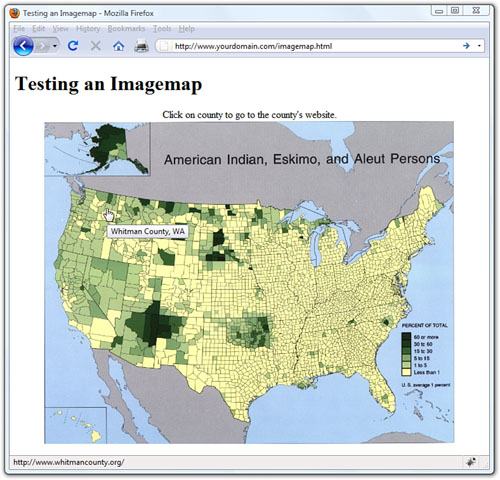
Figure 11.10 shows the imagemap in action. Notice in the bottom of your browser window that your browser (in this example, Firefox) displays the link address for whatever area the mouse is hovering over. Additionally, when you hover the mouse over an area, the alt or title text for that area—in this example, Whitman County—is displayed on the imagemap.
Figure 11.10 The imagemap defined in Listing 11.5 as it displays on the web page.
Note
There is a method of producing mapped images that relies solely on CSS and not the HTML <map> tag. You will learn more about this in Hour 16, “Using CSS to Do More With Lists.”
Summary
This hour has shown you how to use the <img /> tag to place images on your web pages. You learned how to include a short text message that appears in place of the image as it loads and also appears whenever users move the mouse pointer over the image. You also learned how to control the horizontal and vertical alignment of each image and how to wrap text around the left or right of an image.
You also learned how to use images as links—either by using the <a> tag around the images or by creating imagemaps. You also learned a little bit about how to use images in the background of container elements.
Table 11.1 summarizes the attributes of the <img /> tag covered in this hour, along with relevant style properties.
Table 11.1 HTML Tags and Attributes Covered in Hour 11

Q&A
Q How long can I make a message that I put after alt= in an <img /> tag?
A Theoretically, as long as you want. For practicality, you should keep the message short enough that it fits in a smaller space than the image itself. For big images, 10 words might be fine; in some cases, I’ve even seen web page authors include a small paragraph of text. For small images, a single word is best.
Q I used the <img /> tag just as you advised, but when I view the page, all I see is a little box with an × or some shapes in it. What’s wrong?
A The broken image icon you’re seeing can mean one of two things: Either the web browser couldn’t find the image file or the image isn’t saved in a format the browser recognizes. To solve these problems, first check to make sure that the image is where it is supposed to be. If it is, then open the image in your graphics editor and save it again as a GIF, JPG, or PNG format.
Q What happens if I overlap areas on an imagemap?
A You are allowed to overlap areas on an imagemap. Just keep in mind that when determining which link to follow, one area will have precedence over the other area. Precedence is assigned according to which areas are listed first in the imagemap. For example, the first area in the map has precedence over the second area, which means that a click in the overlapping portion of the areas will link to the first area. If you have an area within an imagemap that doesn’t link to anything (known as a “dead” area), you can use this overlap trick to deliberately prevent this area from linking to anything. To do this, just place the dead area before other areas so that the dead area overlaps them, and then set its href attribute to “”.
Workshop
The workshop contains quiz questions and activities to help you solidify your understanding of the material covered. Try to answer all questions before looking at the “Answers” section that follows.
Quiz
1. How would you insert an elephant.jpg image file at the very top of a web page?
2. How would you make the word Elephant display whenever the actual elephant.jpg image couldn’t be displayed by a web browser?
3. You want to create an imagemap of a 200×200-pixel image named quarters.gif. When viewers click the upper-left quarter of the image, you want them to get a page named topleft.html. When they click the upper-right quarter, you want them to get topright.html. Clicking the lower-left quarter should bring up bottomleft.html, and the lower-right panel should lead to bottomright.html. What HTML would you use to implement this as an imagemap?
Answers
1. Copy the image file into the same directory folder as the HTML text file. Immediately after the <body> tag in the HTML text file, type <p><img src="elephant.jpg" alt="" /></p>.
![]()
3. Create the following imagemap:

Exercises
• Practicing any of the image placement methods in this lesson will go a long way toward helping you determine the role that images can, and will, play in the web sites you design. Using a few sample images, practice using the float style to place images and text in relation to one another. Remember the possible values for float are left, right, and none (default).
• Image alignment is also an important aspect of good visual web design. Using a few sample images, practice using the vertical-align style to place images and text in relation to one another. Remember the possible values for image-align are text-top, top, text-bottom, bottom, middle, and baseline.