
Chapter 4
Retrieving Records
Introduction
A database is only useful if you can get records out of it. While there are many ways to get data from the database, the place to begin is the SELECT statement, which is the key to retrieving records. Then we will build on this statement to concatenate columns and create alternate names for columns. Finally, we will show how to get subsets of the database and sort the output.
Definitions
Alias — An alternate name for a table or column.
AS — Used to assign an alternate name to a column or table.
ASC — Used to sort column values in ascending order.
Clause — A segment of an SQL statement that assists in the selection and manipulation of data.
Concatenation — Merging values or columns together.
DESC — Used to sort column values in descending order.
DISTINCT — Used to display unique values in a column.
DISTINCTROW — Used to exclude records based on the entire duplicate records, not just duplicate fields.
ORDER BY — Used to sort retrieved records in descending or ascending order.
Query — A question or command posed to the database.
Query Design view — Enables you to create queries by selecting table and column names and specifying conditions on the data you want to retrieve.
Result set — Records retrieved from the database.
SELECT statement — Used to retrieve records from the database.
TOP — Used to display records that fall at the top or bottom of a range that is specified by an ORDER BY clause.
TOP PERCENT — Used to display a percentage of records that fall at the top or bottom of a range that is specified by an ORDER BY clause.
The SELECT Statement
The SELECT statement is used to retrieve records from the database. Records retrieved from the database are often referred to as a result set. Every SELECT statement contains the SELECT keyword and the FROM keyword. Let’s begin by opening up the most basic query in the query grid.
In Access 2007, click Create from the menu running across the top of the screen. Next, click the Query Design button near the top-right side of the screen. This will cause the Show Table dialog box to appear. Select the table named TableOne and click the Add button, then click Close to close this dialog box.
In the grid below, select the Field1 field from the drop-down menu in the Table category. Refer to Figure 4-1.

Figure 4-1. Query Design view
Now, switch to SQL view, as shown in Figure 4-2.
To switch to SQL view, use the View button and select SQL View. (Click the down arrow located on the View button to find the SQL View option.)

Figure 4-2. SQL view
Note that the derived SQL statement consists of two parts. First there is the SELECT part followed by the field we selected, then the FROM part showing which table was used for the select.
Look at the following syntax for the SELECT statement:
SELECT Columnname(s) FROM TableName(s);
The SELECT keyword is used by SQL to specify what data is desired from a table. The FROM keyword tells SQL what table the columns come from.
Note: When you view SQL script generated by Microsoft Access, the table name is shown with the column name. For example, in Figure 4-2 you see the following:
SELECT TableOne.Field1
This technique is commonly referred to as qualification. To qualify a column, you must specify the table name (TableOne) and type a period, followed by the name of the column (Field1).
Qualification is normally used when you are querying more than one table; therefore we will not use this technique unless we are querying multiple tables.
In this chapter, we will keep it simple by having every SELECT statement include one table after the FROM keyword. Later, in Chapter 8, we will expand on this concept and show how to query multiple tables.
A few syntax rules are important to remember. When you create a SELECT statement, every column name specified after the SELECT keyword must be separated by a comma. Additionally, when you specify more than one table after the FROM keyword, all table names must also be separated by a comma.
Take a look at Example 1.
Example 1

Figure 4-3. Toys table
Say you want to display the values stored in the ToyName and Price columns from the original Toys table in Figure 4-3. Type the following script:
SELECT ToyName, Price
FROM Toys;
This script uses the SELECT keyword to specify the ToyName and Price columns from the Toys table. The FROM keyword is used to specify the name of the table (Toys) from which to retrieve records. The closing semicolon tells the DBMS where the query ends. Take a look at Figure 4-4, which shows the results from the query.

Figure 4-4. Results (output)
Example 1 illustrates how to display two columns from a table. You can display single, multiple, or all columns from a table. The order in which you place the column names after the SELECT keyword determines the order in which they will be displayed in the output or result set. Take a look at Example 2, which shows how to display every column from a table.
Example 2
Say you want to display every column from the Toys table in Figure 4-3. In Access Query Design view, you open up a query and move the first field line, the “*” (or Toys.* line), down to the query grid. Refer to Figure 4-5.
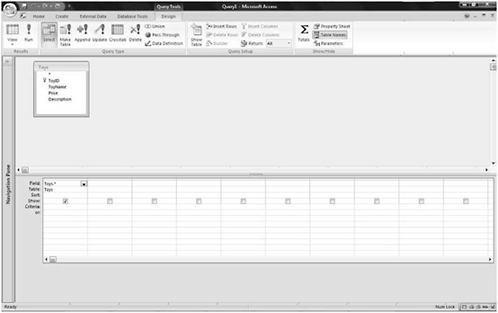
Figure 4-5. Query Design view
Shifting over to SQL view produces a corresponding SQL statement, as shown in Figure 4-6.

Figure 4-6. SQL view
Look at the following script:
SELECT *
FROM Toys;
This script combines an asterisk (*) with the SELECT keyword, which tells the DBMS to select every column from a table. The FROM keyword specifies the name of the table from which to retrieve records. Look at the results in Figure 4-7.

Figure 4-7. Results (output)
Note: Make sure you specify column names as they appear in the table. The space character is a delimiter character to SQL. Quite often an SQL statement will return an error because you have included a space in a column name. You think the two words are a single name, but SQL thinks otherwise. You can get around this ambiguity by surrounding the column name in brackets ([ ]).
Note: Access does not perform any simplifying when it builds its SQL statements. Note in the example above that Access defines the field as table.field even though there is only one table and the table name is superfluous. Access SQL does a lot of this. For most of our examples we will be abbreviating the SQL statements. Both versions are processed the same way. (To try this, take out the table name from the SQL view, then convert it back to Design view. The same query will be presented. Unfortunately, if you now convert it back to SQL view you get the table name back.)
Another interesting point is that if you have the same field name in two tables that are used in a query (we will be getting to this soon) you must specify the table name. Otherwise Access gives you an error message.
The ORDER BY Clause
Clauses are segments of an SQL statement that assist in the selection and manipulation of data. The ORDER BY clause is often used in the SELECT statement to sort retrieved records in descending or ascending order. To demonstrate its use, open our first query in Query Design view, select the Sort row for our field, and select Ascending. Refer to Figure 4-7.

Figure 4-8. Query Design view
Then view the results in SQL view (Figure 4-9).

Figure 4-9. SQL view
Take a look at the following syntax for the ORDER BY clause:
ORDER BY ColumnName ASC | DESC
Note that the name of the column to sort is specified after the ORDER BY keywords. The sort order (either ASC or DESC) follows the column name. The ASC keyword means ascending order and the DESC keyword means descending order. Example 3 shows how to sort column values in descending order.
Sorting in Descending Order
Example 3
Say you want to sort the ToyName column in the Toys table in descending order. Look at the following script:
SELECT *
FROM Toys
ORDER BY ToyName DESC;
This script specifies the ToyName column after the ORDER BY keywords. The DESC keyword is specified after the column name and causes the DBMS to sort the values in the ToyName column in descending order. Look at the results in Figure 4-10.
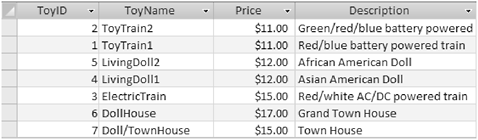
Figure 4-10. Results (output)
Sorting in Ascending Order
Although the ASC keyword is used to sort values in ascending order, it is rarely implemented because the ORDER BY clause defaults to ascending order when no sort order is specified. The following example sorts the ToyName column in ascending order even though the ASC keyword is not specified.
Example 4
The following script sorts the ToyName column in ascending order.
SELECT *
FROM Toys
ORDER BY ToyName;
This script specifies the ToyName column after the ORDER BY keywords, causing the DBMS to sort the ToyName column in ascending order. Look at the results in Figure 4-11.

Figure 4-11. Results (output)
The following script is equivalent to Example 4:
SELECT *
FROM Toys
ORDER BY ToyName ASC;
Sorting Multiple Columns
The ORDER BY clause can also be used to sort multiple columns. Take a look at Example 5.
Example 5

Figure 4-12. Employees table
Suppose you want to query the Employees table in Figure 4-12 to display each employee’s last name sorted in ascending order. Additionally, you want to display first names sorted in ascending order within each duplicate last name. Take a look at the following script:
SELECT Lastname, Firstname
FROM Employees
ORDER BY Lastname, Firstname;
This script displays the Lastname and Firstname columns sorted in ascending order. The ORDER BY clause sorts the Lastname column in ascending order. Next, for all duplicate last names, the first names in the Firstname column are sorted in ascending order. Look at the results in Figure 4-13. The Lastname column shows one duplicate last name (Coney). The first names (Rosa, Willie) are sorted in ascending order within each duplicate last name.

Figure 4-13. Results (output)
In a nutshell, the ORDER BY clause is processed from left to right with parameters separated by commas. So, in Example 5 if you needed to sort by zip code in descending order, then by last name, then by first name, and finally by descending address, the ORDER BY clause would read as follows:
ORDER BY Zipcode DESC, Lastname, Firstname, Address DESC
Simple!
Example 6
This example sorts two columns in the Toys table in two different directions (ASC, DESC). Look at the following script:
SELECT *
FROM Toys

ORDER BY Price ASC,
Description DESC;
The preceding script sorts the Price column in ascending order and the Description column in descending order. The prices in the Price column are in ascending order and for every duplicate price the descriptions are sorted in descending order. Take a look at the results in Figure 4-14.

Figure 4-14. Results (output)
Sorting Using Numbers
Numbers are often used in the ORDER BY clause as a shortcut. Instead of typing the names of columns in the ORDER BY clause, you can use numbers to indicate either the placement of a column in a table or the placement of a column name after the SELECT keyword. Example 7 demonstrates this.
Example 7
Suppose you want to sort the third and second columns in the Employees table in Figure 4-12.
Take a look at the following script:
SELECT *
FROM Employees
ORDER BY 3, 2;
The preceding script uses numbers in the ORDER BY clause to sort the third and second columns in the Employees table. The number three (3) represents the Lastname column and the number two (2) represents the Firstname column in the Employees table. Note that the columns are numbered from left to right beginning with 1. Look at the results in Figure 4-15.

Figure 4-15. Results (output)
Although the Firstname column is displayed before the Lastname column, the Firstname column is sorted within each duplicate Lastname.
Numbers in the ORDER BY clause can also be used to indicate the placement of a column name after the SELECT keyword. The following example sorts columns based on the order in which they appear after the SELECT keyword.
Example 8
This example uses numbers to sort columns that are specified after the SELECT keyword. Look at the following script:
SELECT Lastname, Firstname, PhoneNumber
FROM Employees
ORDER BY 1, 2;
This script uses the ORDER BY clause to sort the Lastname and Firstname columns specified after the SELECT statement. Look at the results in Figure 4-16.

Figure 4-16. Results (output)
Handling Duplicate Values
When tables contain duplicate column values, the DISTINCT and DISTINCTROW keywords are used to single out specific values among the duplicate values.
The DISTINCT Keyword
The DISTINCT keyword is used to display unique values in a column. In SQL, the DISTINCT keyword is used directly in the SELECT statement. Take a look at Example 9, which shows how to use the DISTINCT keyword.
Example 9
Suppose you want to display the unique prices stored in the Price column in the Toys table in Figure 4-3. Take a look at the following script:
SELECT DISTINCT Price
FROM Toys;
This script places the DISTINCT keyword before the Price column. This causes the DBMS to display only the unique values in the Price column. Figure 4-17 shows the unique values in the Price column.

Figure 4-17. Results (output)
The DISTINCTROW Keyword
The DISTINCTROW keyword is used in queries that include more than one table in the FROM clause. It is used to exclude records based on the entire duplicate records, not just duplicate fields. Queries that contain more than one table in the FROM clause are referred to as joins. Joins enable you to use a single SELECT statement to query two or more tables simultaneously. You will learn more about joins and the DISTINCTROW keyword in Chapter 8.
Note: Many people confuse the DISTINCT and DISTINCTROW keywords. Both result in unique records, but DISTINCT returns those records that are unique for just the fields referenced. DISTINCTROW returns all unique records for the underlying table and includes all fields for uniqueness even if they are not requested. So if there are two records that are identical except for a non-selected field, DISTINCT will return one record and DISTINCTROW will return two records.
Handling Duplicate Subsets of the Entire Result Collection
Often when you have large recordsets that take a long time to collect, you only want a sample of the records. Two keywords are used to reduce the number of records retrieved from a query: TOP and TOP PERCENT.
The TOP Keyword
The TOP keyword is used to display records that fall at the top or bottom of a range that is specified by an ORDER BY clause. Take a look at Example 10.
Example 10

Figure 4-18. Manufacturers table
Suppose you want to display the three company names with the highest postal code from the Manufacturers table in Figure 4-18. Look at the following script:
SELECT TOP 3 CompanyName, PostalCode
FROM Manufacturers
ORDER BY PostalCode DESC;
The preceding script uses the TOP keyword in combination with the number three (3) to display only the top three results from the range of values specified in the ORDER BY clause.
The SELECT statement instructs the DBMS to display the CompanyName and PostalCode columns from the Manufacturers table. The ORDER BY clause sorts the PostalCode column in descending order, and the TOP 3 specification in the SELECT statement displays only the top three records from the ORDER BY clause. Take a look at the results in Figure 4-19. Only three records are displayed.

Figure 4-19. Results (output)
The TOP keyword with a value can be added to a query in Design mode by placing a value in the Top Values property for the query.
As a side note, if you use the TOP keyword without the specification of an ORDER BY clause, the TOP keyword will base its selection of records on the order in which records appear in the table. Additionally, if there are fields with duplicate values, then Microsoft Access will display all duplicate values. For example, if duplicate values exist and you specify to receive TOP (n), you will receive the number of records you specified, plus any duplicates that exist. The TOP keyword is extremely useful when processing large sets of records. If you are interested in just getting the general idea of a query, it is far quicker to grab just a few records than it is to process all the records.
The following example demonstrates using the TOP keyword to display the bottom records.
Example 11
Suppose you want to display the three company names with the lowest postal code from the Manufacturers table in Figure 4-18. Look at the following script:
SELECT TOP 3 CompanyName, PostalCode
FROM Manufacturers
ORDER BY PostalCode;
In the preceding script, the ORDER BY clause sorts the Postal-Code column in ascending order, and the TOP 3 specification displays only the top three records from the ORDER BY clause. Look at Figure 4-20.

Figure 4-20. Results (output)
Note: The TOP keyword is used to display records that fall at the top or bottom of a range that is specified by an ORDER BY clause. When you combine the TOP and ORDER BY keywords to return a specific number of items, duplicate items affect the total number of records that you return. In Examples 10 and 11, if the third and fourth postal codes were the same, the query would return four records. The TOP keyword doesn’t choose between equal values.
The TOP PERCENT Keywords
The TOP PERCENT keywords are used to display a percentage of records that fall at the top or bottom of a range that is specified by an ORDER BY clause. Take a look at Example 12.
Example 12
Suppose you want to display the top 50 percent of company names from the Manufacturers table in Figure 4-18 based on the order of the total number of names. Look at the following script:
SELECT TOP 50 PERCENT CompanyName
FROM Manufacturers
ORDER BY CompanyName;
The preceding script uses the ORDER BY clause to sort the CompanyName column in ascending order. The TOP 50 PERCENT specification displays only the top 50 percent of records from the ORDER BY clause based on count. The results in Figure 4-21 display the top 50 percent of company names from the ORDER BY clause.

Figure 4-21. Results (output)
Example 13
Suppose you want to display the bottom 50 percent of company names from the Manufacturers table in Figure 4-18 based on the order of the total number of names.
SELECT TOP 50 PERCENT CompanyName
FROM Manufacturers
ORDER BY CompanyName DESC;
The preceding script uses the ORDER BY clause to sort the CompanyName column in descending order. The TOP 50 PERCENT specification displays only the top 50 percent of records from the ORDER BY clause based on count. Take a look at the results in Figure 4-22.

Figure 4-22. Results (output)
Note: The TOP PERCENT keywords are used to display a percentage of records that fall at the top or bottom of a range that is specified by an ORDER BY clause. When you combine the TOP PERCENT and ORDER BY keywords to return a percentage of records, duplicate items affect the total number of records that you return.
Note: If your goal is to achieve an idea of the records wanted by quickly sampling a subset of the records, you defeat your goal if you request an ORDER BY or a PERCENT. The query will have to go through all the records before it can return the desired subset.
Creating an Alias
An alias is an alternate name for a table or column. Aliases are created using the AS keyword. Take a look at Example 14, which implements the creation of two aliases.
Example 14

Figure 4-23. Committee2 table
Suppose you want to display the names, addresses, and phone numbers from the Committee2 table in Figure 4-23. Additionally, you want to create alternate column names for the Address and PhoneNumber columns. Look at the following script:
SELECT Firstname, Lastname, Address AS HomeAddress, PhoneNumber
       AS HomePhone
FROM Committee2;
The preceding script uses the AS keyword to create two alternate column names (HomeAddress and HomePhone). Look at the results in Figure 4-24.

Figure 4-24. Results (output)
Create an Alias that Contains a Space
Example 15
Suppose you want to recreate the query in Example 14, but this time you want to include a blank space in the aliases you created in the example. Look at the following script:
SELECT Firstname, Lastname, Address AS [Home Address],
       PhoneNumber AS [Home Phone]
FROM Committee2;
This script uses the AS keyword to create two alternate column names. This example is similar to Example 14, but each alias (Home Address, Home Phone) contains a blank space. The brackets are used to enclose an alias name that contains a blank space. Look at the results in Figure 4-25.

Figure 4-25. Results (output)
The most common reason for using aliases in queries is to avoid confusion between identical field names in two or more tables or to shorten the length of field names when the underlying table has very long, descriptive field names. When you have a field name like “Gross percentages for monthly commissions” that is used in numerous places in the query, it is tempting to just alias the field as “GC”!
Note: The AS keyword does not physically change column names in a table. It is specifically used to display results under an alternate column name. Additionally, if you do not create an alias for concatenated columns or values, Microsoft Access automatically generates a column name as an alias.
Concatenation
The SQL language also enables you to merge values or columns under alternate column names. Merging values or columns is commonly referred to as concatenation. Concatenation is performed in Microsoft Access using the ampersand (&) or the plus sign (+). Either symbol can be used to perform concatenation; the main difference between them is how they handle NULL fields. When you use the ampersand (&), if one of the fields is NULL it is replaced by an empty string. When using the plus sign (+), if one of the fields is NULL the result of the concatenation is NULL. This is very useful when you want to include values in the concatenation. Take a look at Example 16.
Concatenate Multiple Fields and Characters
Example 16
Say you want to concatenate the names and area codes in the Committee2 table in Figure 4-24. You want to insert a comma between the last name and first name and insert a space on either side of a slash character between the names and the area codes. You additionally want to display the concatenated columns under an alternate name. Look at the following script:
SELECT Lastname & ',' + ' ' + Firstname & ' / ' + Areacode AS
       NamesAndAreacodes
FROM Committee2;
This script uses the ampersand (&) to merge the Lastname column with a comma and the Firstname column with one space and a slash. The plus sign (+) is used to merge an empty string with the Lastname column and a comma, and to merge the slash and space with the Areacode column. The AS keyword is used to create an alias (NamesAndAreacodes). Look at the results in Figure 4-26.
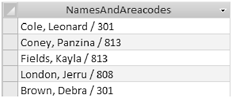
Figure 4-26. Results (output)
Concatenate Multiple Fields from Multiple Tables
Example 17
Suppose you want to concatenate fields from the Manufacturers table (Figure 4-18) and the Toys table (Figure 4-3). Take a look at the following script:
SELECT Toys.ToyID& ', ' &Toys.ToyName& ' '
&Manufacturers.CompanyName AS Manufacturer

FROM Toys, Manufacturers

WHERE Toys.ToyID = Manufacturers.ToyID;
This query contains an advanced query called a join. Joins are used to query multiple tables in one SELECT statement. You will learn about joins further down the road in Chapter 8. We included this query to demonstrate how to concatenate fields from multiple tables.
Notice that the ampersand (&) is used to merge the ToyID and ToyName columns from the Toys table. The ampersand (&) is also used to merge the CompanyName column from the Manufacturers table with the ToyName column in the Toys table.
The FROM keyword specifies the tables (Toys, Manufacturers) from which to retrieve data.
There WHERE clause shows the relationship (ToyID) between the Toys and Manufacturers table. The Toys and Manufacturers tables are related through the ToyID column since the ToyID column is a primary key in the Toys table and a foreign key in the Manufacturers table. Look at the results in Figure 4-27.

Figure 4-27. Results (output)
Summary
In this chapter, you learned how to retrieve records from a database. You learned how to create a SELECT statement, concatenate columns, and create alternate names for columns. You also learned how to use the TOP, TOP PERCENT, DISTINCT, DISTINCTROW, and ORDER BY keywords.
Quiz 4
1. What two keywords must be used in the SELECT statement?
2. Records retrieved from the database are often referred to as what?
3. True or False. The TOP keyword is used to display records that fall in the middle of a range specified by an ORDER BY clause.
4. True or False. The AS keyword is used to create an alias.
5. True or False. The DISTINCT keyword is used to display the duplicate values in a column.
Project 4
Use the Committee2 table in Figure 4-23 to create a query that displays the following output:

Figure 4-28