
Chapter 3
Creating Tables and Inserting Records
Introduction
In this chapter, you will learn how to create a table and insert records into a table. You will learn about data types, field sizes, and constraints. You will also learn how to update and delete records in a table. Read the definitions for this chapter before you begin.
Definitions
ALTER TABLE — Keywords that are used to modify columns and constraints in an existing table.
Constraints — Used to restrict values that can be inserted into a field and to establish referential integrity.
CREATE TABLE — Keywords that are used to instruct the database to create a new table.
Data type — Specifies the type of data a column can store.
DELETE statement — Used to remove records from a table.
Field — Equivalent to a column.
Field size — Specifies the maximum number of characters that a field can hold.
INSERT statement — Used to add records to a table.
NULL — Used to indicate no value.
SELECT statement — Used to retrieve records from the database.
UPDATE statement — Used to update records in a table.
The Data Definition Language Component
In Chapter 2, you learned that the SQL language is broken up into three components: Data Definition Language, Data Manipulation Language, and Data Control Language. Recall that the Data Definition Language (DDL) component is used to create tables and establish relationships among tables, and the Data Manipulation Language (DML) component is used to manage the database by performing such operations as retrieving, updating, deleting, and navigating through data. The Data Control Language (DCL) component is used to provide security to data in a database. The commands within each of these components are as follows:
Table 3-1
DDL | DML | DCL |
CREATE TABLE DROP TABLE ALTER TABLE CREATE INDEX | INSERT INTO SELECT INTO UPDATE DELETE SELECT UNION TRANSFORM PARAMETER | ALTER DATABASE CREATE GROUP DROP GROUP CREATE USER ALTER USER DROP USER ADD USER GRANT PRIVILEGE REVOKE PRIVILEGE |
Note: The DCL commands can only be executed in the Visual Basic environment of Microsoft Access. An error message will be returned if used through the Access SQL view user interface. Visual Basic is the host language for the Jet DBMS, which handles the translation of database queries into Access SQL.
In this chapter, we will focus on the implementation of the CREATE TABLE, ALTER TABLE, INSERT INTO, SELECT INTO, UPDATE, and DELETE statements. Let’s begin by learning how to create a table.
Enable a Blocked Query in Microsoft Access
Before we begin to create and populate tables with records, let’s ensure that your database is not in Disabled mode. Disabled mode is a security feature designed to block specific types of SQL queries.
Microsoft Access 2007 defaults to Disabled mode when you open a database that is not saved in a trusted location or if you chose not to trust the database. When Microsoft Access is in Disabled mode you will not be able to run action, append, update, delete, or make-table queries.
To disable Disabled mode, look for messages similar to the following in the Access status bar:
![]() This action or event has been blocked by Disabled mode.
This action or event has been blocked by Disabled mode.
![]() Certain content in this database has been disabled.
Certain content in this database has been disabled.
Take a look at Figure 3-1, which shows one of the above messages in the Access status bar.

Figure 3-1. Microsoft Access in Disabled mode
To enable blocked content, click Options on the Access status bar. The Microsoft Office Security Options dialog box will appear. Click Enable this content, and then click OK.
Note: If you don’t see a security message on the Access status bar, click the Database Tools tab, and in the Show/Hide group, click Message Bar.
CREATE TABLE Syntax
CREATE TABLE Tablename
(
Columnname Datatype Field Size, [NULL | NOT NULL]
     [optional constraints]
);
To create a table, you must define a table name, column names, data types, and field sizes. In the preceding syntax, the CREATE TABLE keywords are used to instruct the database to create a new table and must be followed by the name of the table. The CREATE TABLE syntax also requires opening and closing parentheses. The open parenthesis follows the name of the table and the close parenthesis is located at the end of the CREATE TABLE script. The closing semicolon tells Microsoft Access where the query ends. The closing semicolon is optional in Access, although getting into the habit of using it will be helpful when you start building complex SQL statements consisting of multiple declarations. The following SQL script creates a table named Toys:
CREATE TABLE Toys
(
);
While this is a good example of a table, there is a critical element missing. A table is not useful unless it has fields to hold data, so let’s add a few fields to the SQL script.
CREATE TABLE Toys
(
ToyID INTEGER,
ToyName CHAR (30),

Price MONEY,
Description CHAR (40)
);
Notice that in the preceding script, the SQL keywords are typed in all caps. While SQL script is not case sensitive, it is accepted practice to capitalize keywords. Keywords in all caps stand out better and make your SQL script more readable. We highly recommend the capitalization of keywords.
Another widely implemented practice that is not required in SQL programming is to format the code. SQL commands execute without errors if placed on the same line, but again your SQL script is much easier to read and, more important, to debug when you break it up into several lines.
Note: When you create table and column names that contain spaces, enclose the names in brackets ([ ]). For example, the following script creates a table named Furniture with column names that contain spaces:
CREATE TABLE Furniture
(
[Furniture ID] INTEGER,
[Furniture Name] CHAR (30),
[Furniture Price] MONEY
);
Data Types
When you create column names for a table, each column must contain a data type. A data type specifies the type of data a column can store. For example, if you create a column that can only store numbers, you must assign it a specific data type that will only allow numbers to be stored in the column. SQL view supports a variety of different data types. Tables 3-2 and 3-3 list data types used in Microsoft Access.
Table 3-2. Common Microsoft Access data types
Data Type | Description |
Numeric: | |
DECIMAL | An exact numeric data type that holds values from –10^28–1 to 10^28–1. |
FLOAT | Stores double-precision floating-point values. |
INTEGER | Also called INT. Stores long integers from –2,147,483,648 to 2,147,483,647. |
REAL | Stores single-precision floating-point values. |
SMALLINT | Stores integers from –32,768 to 32,767. |
TINYINT | Stores integers from 0 to 255. |
String: | |
CHAR | A fixed-length data type that stores a combination of text and numbers up to 255 characters. |
TEXT | A variable-length data type that stores a combination of text and numbers up to 255 characters. The length is determined by the Field size property. The string can contain any ASCII characters including letters, numbers, special characters, and nonprinting characters. |
Miscellaneous: | |
BINARY | Enables you to store any type of data in a field. No transformation of the data is made in this type of field. |
BIT | Used to store one of two types of values. For example, true/false, yes/no, or on/off. |
COUNTER | Stores a long integer value that automatically increments whenever a new record is inserted. |
DATETIME | Stores date and time values for the years 100 to 9999. |
IMAGE | Used to store Object Linking and Embedding (OLE) objects. For example, pictures, audio, and video. |
MONEY | Stores currency values and numeric data used in mathematical calculations. |
UNIQUEIDENTIFIER | A unique identification number used with remote procedure calls. |
Table 3-3. Additional Microsoft Access data types
Data Type | Description |
Currency | Used for monetary calculations. |
Memo | Variable-length text field from 1 to 65,536 characters in length. |
Number | Numerical data that can be used in all forms of calculations except those dealing with money. The Field size property determines the number of bytes that are used to store the number and, subsequently, the number range. |
OLE Object | Any linked or embedded object including such things like images, Excel spreadsheets, Word documents, or virtually anything else. |
Yes/No | Boolean values, which have only two states like yes/no, true/false, or on/off. |
Note: Some data types do not require a field size.
Looking at the list of above data types the astute reader will ask “How does this list of data types compare to the standard Access data types that appear when building a table manually?” The answer is Microsoft has a very elegant solution to the different types — a list of synonyms (Table 3-4). In other words, when you manually build a table you are actually using the data types listed above, but you are using the old Access naming conventions.
Table 3-4. Microsoft Access data types and synonyms
ANSI SQL Data Type | Microsoft Access SQL Data Type | Synonym |
BIT, BIT VARYING | BINARY | VARBINARY, BINARY VARYING, BIT VARYING |
Not supported | BIT | BOOLEAN, LOGICAL, LOGICAL1, YESNO |
Not supported | TINYINT | INTEGER1, BYTE |
Not supported | COUNTER | AUTOINCREMENT |
Not supported | MONEY | CURRENCY |
DATE, TIME, TIMESTAMP | DATETIME | DATE, TIME |
Not supported | UNIQUEIDENTIFIER | GUID |
DECIMAL | DECIMAL | NUMERIC, DEC |
REAL | REAL | SINGLE, FLOAT4, IEEESINGLE |
DOUBLE PRECISION, FLOAT | FLOAT | DOUBLE, FLOAT8, IEEEDOUBLE, NUMBER |
SMALLINT | SMALLINT | SHORT, INTEGER2 |
INTEGER | INTEGER | LONG, INT, INTEGER4 |
INTERVAL | Not supported |
|
Not supported | IMAGE | LONGBINARY, GENERAL, OLEOBJECT |
Not supported | TEXT | LONGTEXT, LONGCHAR, MEMO, NOTE, NTEXT |
CHARACTER, CHARACTER VARYING, NATIONAL CHARACTER, NATIONAL CHARACTER VARYING | CHAR | TEXT(n), ALPHANUMERIC, CHARACTER, STRING, VARCHAR, CHARACTER VARYING, NCHAR, NATIONAL CHARACTER, NATIONAL CHAR, NATIONAL CHARACTER VARYING, NATIONAL CHAR VARYING |
Example 1
In this example, we’ll create a table that demonstrates three data types described above. The following SQL script creates a table named TableOne with three columns (Field1, Field2, and Field3). Each column specifies a different data type (COUNTER, TEXT, and CURRENCY).
CREATE TABLE TableOne
(
Field1 COUNTER (4),
Field2 TEXT,
Field3 CURRENCY
);
In this SQL script, the Field1 column contains a COUNTER data type. The COUNTER data type stores a long integer value that automatically increments whenever a new record is inserted. Notice the number 4 is defined immediately following the COUNTER data type. This number causes the Field1 column to default to 4 and increment thereafter. If you do not specify a number with the COUNTER data type, the column will begin incrementing with the number 1.
The Field2 column contains a TEXT data type. The TEXT data type is a variable-length data type that stores a combination of text and numbers up to 255 characters.
Constraints
Constraints enable you to further control how data is entered into a table and are used to restrict values that can be inserted into a field and to establish referential integrity. Recall that referential integrity is a system of rules used to ensure that relationships between records in related tables are valid. Table 3-5 explains the constraints available in Microsoft Access.
Table 3-5. Microsoft Access constraints
Constraint | Description |
NULL/NOT NULL | Used to indicate if a field can be left blank when records are entered into a table. |
PRIMARY KEY | Used to uniquely identify every record in a table. |
FOREIGN KEY | Used to link records of a table to the records of another table. |
UNIQUE | Used to ensure that every value in a column is different. |
CHECK | Used to set criterion for the data entered into a column. |
Now take a look at the following examples, which implement the constraints described in Table 3-5.
Example 2
Say you want to alter the Toys table script created earlier in the chapter. You want to add constraints that will ensure that every Toy ID is unique and that the ToyID, ToyName, and Price columns always contain values when new records are entered into the Toys table. Look at the following script:
CREATE TABLE Toys
(
ToyID INTEGER CONSTRAINT ToyPk PRIMARY KEY,
ToyName CHAR (30) NOT NULL,
Price MONEY NOT NULL,
Description CHAR (40) NULL
);
This script creates a new table named Toys with four columns (ToyID, ToyName, Price, and Description). A primary key constraint is defined for the ToyID column and the NOT NULL constraint is defined for the ToyName and Price columns. The Description column contains a NULL constraint. Following is an explanation of the NULL/NOT NULL and primary key constraints.
NULL/NOT NULL Constraint
The NULL/NOT NULL constraints are used to indicate whether or not a field can be left blank when records are entered into a table. You can also specify whether or not specific columns for a table may be left blank when a user enters a new record. NULL means no value. When NULL is specified in the creation of a table, it indicates that a field can be left blank when records are entered into a table. NOT NULL indicates that a field cannot be left blank when records are entered into a table.
In the Toys table script, the NOT NULL constraint is used to ensure that the ToyName and Price columns are not left blank when data is entered into the Toys table. The NULL keyword is specified for the Description column, which means this column can be left blank when entering records.
Note: In Microsoft Access, when you do not state NULL or NOT NULL during the creation of a column, it is automatically set to NULL.
PRIMARY KEY Constraint
The PRIMARY KEY constraint is used to uniquely identify every record in a table. The specification of a primary key ensures that there are no duplicate values in a column. Additionally, primary key fields are stored in ascending order and default to NOT NULL.
In the Create Toys script, the ToyID column contains a PRIMARY KEY constraint. The CONSTRAINT and PRIMARY KEY keywords are used to define the primary key. The name of the constraint (ToyPk) follows the CONSTRAINT keyword. Primary keys can also be defined using only the PRIMARY KEY keywords; however, this method does not enable you to assign a name to your primary key constraint. Assigning a name to your PRIMARY KEY constraint is vital because it makes it easier for you to update the constraint if necessary.
To view the new Toys table, type the following script:
SELECT *
FROM Toys;
This script uses a SELECT statement to retrieve records from a table. The SELECT keyword combined with an asterisk (*) instruct Microsoft Access to retrieve all the columns from a table. The FROM keyword instructs Microsoft Access to retrieve the records from the Toys table. You will learn more about the SELECT statement in Chapter 4.
Figure 3-2 shows the Toys table created from the Create Toys script.
Figure 3-2. Toys table
Example 3
Say you want to link the Toys table in Example 2 to a new table named Manufacturers. Additionally, you want to ensure that all phone numbers entered into the PhoneNumber column in the Manufacturers table are unique and that all updates and deletions made to the Manufacturers table affect corresponding records in the Toys table. Take a look at the following script:
CREATE TABLE Manufacturers
(
ManufacturerID INTEGER CONSTRAINT ManfID PRIMARY KEY,
ToyID INTEGER NOT NULL,
CompanyName CHAR (50) NOT NULL,
Address CHAR (50) NOT NULL,
City CHAR (20) NOT NULL,
State CHAR (2) NOT NULL,
PostalCode CHAR (5) NOT NULL,
AreaCode CHAR (3) NOT NULL,
PhoneNumber CHAR (8) NOT NULL UNIQUE,
CONSTRAINT ToyFk FOREIGN KEY (ToyID) REFERENCES Toys (ToyID)
ON UPDATE CASCADE
ON DELETE CASCADE
);
Note: Make sure you have created the Toys table in Example 2 before you create the Manufacturers table since it contains the foreign key reference to the Toy table.
The preceding SQL script creates a table named Manufacturers with nine columns (ManufacturerID, ToyID, CompanyName, Address, City, State, PostalCode, AreaCode, PhoneNumber). A PRIMARY KEY constraint is defined for the ManufacturerID column, and the NOT NULL constraint is defined for all other columns. The PhoneNumber column contains a UNIQUE constraint and the ToyID column contains a FOREIGN KEY constraint. Following is an explanation of the ON UPDATE CASCADE and ON DELETE CASCADE keywords and the UNIQUE and FOREIGN KEY constraints used in Example 3.
FOREIGN KEY Constraint
The FOREIGN KEY constraint is used to link records of one table to the records of another. When you define a FOREIGN KEY constraint on a column, a column with the same name must exist as a primary key in another table. This enforces referential integrity since a foreign key value in one table cannot exist if it does not already exist as a primary key in another table. In the Create Manufacturers script, the foreign key column (ToyID) links the Manufacturers table to the Toys table. The CONSTRAINT, FOREIGN KEY, and REFERENCES keywords are used to define the foreign key. Although the ToyID column is defined near the top of the script, the definition of the ToyID foreign key can be placed at the end of the script. The name of the constraint (ToyFk) follows the CONSTRAINT keyword, and the name of the foreign key column (ToyID) follows FOREIGN KEY. The name of the linked table (Toys) and the primary key column (ToyID) from the linked table are defined after the REFERENCES keyword.
The ON UPDATE CASCADE and ON DELETE CASCADE keywords can be used with the FOREIGN KEY constraint to ensure that cascading updates and deletions occur. Cascading updates and deletions ensure referential integrity. For example, if you delete a manufacturer from the Manufacturers table, the manufacturer’s product in the Toys table is deleted automatically.
The following script shows the specification of the FOREIGN KEY constraint from the Manufacturers table:
CONSTRAINT ToyFk FOREIGN KEY (ToyID) REFERENCES Toys (ToyID)
ON UPDATE CASCADE
ON DELETE CASCADE
Note: The ON UPDATE CASCADE and ON DELETE CASCADE keywords can only be used in SQL-92. If you use one of these keywords in earlier Access SQL versions, it will return an error message.
UNIQUE Constraint
The PhoneNumber column in the Manufacturers table contains a UNIQUE constraint. The UNIQUE constraint is used to ensure that every value in a column is different. The UNIQUE constraint is very similar to the PRIMARY KEY constraint; however, the UNIQUE constraint can be defined for more than one field in a table, and a column defined as unique does not automatically default to NOT NULL. A table can only have one primary key.
To view the Manufacturers table, type the following script:
SELECT *
FROM Manufacturers;
Figure 3-3 shows the Manufacturers table created from the Create Manufacturers script.
Figure 3-3. Manufacturers table
Adding Constraints to Existing Tables
Constraints can also be added to tables that have already been created. To add a constraint to an existing table you must use the ALTER TABLE statement. This statement is used to add or delete columns and constraints in an existing table. Following is the basic syntax to alter an existing table:
ALTER TABLE Tablename
ADD COLUMN ColumnName ColumnType (Size) ColumnConstraint |
DROP COLUMN ColumnName |
ADD CONSTRAINT ColumnConstraint |
DROP CONSTRAINT ColumnConstraint;
In this chapter, the ALTER TABLE statement is used to add and delete constraints to existing tables. In Chapter 11, you will learn how to use the ALTER TABLE statement to add a new column to a table and to delete a column from a table. Take a look at Example 4, which shows how to add the UNIQUE constraint to an existing table.
Example 4
Say you want to add a UNIQUE constraint to the ToyName column in the Toys table. Look at the following script:
ALTER TABLE Toys
ADD CONSTRAINT ToyNameUnique UNIQUE (ToyName);
This SQL script uses the ALTER TABLE statement to add the UNIQUE constraint to the ToyName column in the Toys table. The ALTER TABLE keywords are used to specify the table name (Toys). The ADD CONSTRAINT keywords are used to specify the constraint name (ToyNameUnique), the type of constraint (UNIQUE), and the name of the column (ToyName) to add the constraint to.
To delete the UNIQUE constraint from the ToyName column in the Toys table, simply type the following:
ALTER TABLE Toys
DROP CONSTRAINT ToyNameUnique;
In the script, the ALTER TABLE keywords are used to specify the table name (Toys), and the DROP CONSTRAINT keywords are used to specify the name of the constraint to delete (ToyNameUnique).
Example 5
Suppose you want to add a CHECK constraint that ensures that all prices entered into the Toys table are greater than 3. Look at the following script:
ALTER TABLE Toys
ADD CONSTRAINT CheckAmount
CHECK (Price > 3);
This script uses a CHECK constraint to ensure that all numbers entered into the Price column are greater than 3 (CHECK (Price > 3)). The name of the constraint (CheckAmount) is specified after the CONSTRAINT keyword.
Note: The UNIQUE constraint can only be used in SQL-92. If you use it in earlier Access SQL versions, it will return an error message.
To delete the CHECK constraint, type the following:
ALTER TABLE Toys
DROP CONSTRAINT CheckAmount;
Constraint Syntax
In Microsoft Access, the ALTER TABLE statement can be used to add any of the constraints discussed in this chapter to an existing table. The following shows the SQL syntax to add PRIMARY KEY, FOREIGN KEY, and NOT NULL constraints to an existing table:
ALTER TABLE Tablename
ADD CONSTRAINT ConstraintName PRIMARY KEY (ColumnName);

ALTER TABLE Tablename
ADD CONSTRAINT ConstraintName FOREIGN KEY (ColumnName)
REFERENCES LinkedTableName (PrimaryKey);
In the FOREIGN KEY constraint syntax, the table name and primary key column from the linked table are defined after the REFERENCES keyword.
ALTER TABLE Tablename
ALTER COLUMN ColumnName Datatype (Field size) NOT NULL;
The syntax to add the NOT NULL constraint to an existing table is slightly different from other constraints. To add a NOT NULL constraint to an existing table you use the ALTER COLUMN keywords, which are used to specify the column name, data type, field size, and the NOT NULL keywords.
Inserting Records
After you create a table, you can insert records into it using INSERT statements. Each INSERT statement inserts a single record into a table. Look at the following syntax for the INSERT statement:
INSERT INTO Tablename [(ColumnNames, ...)]
VALUES (values, ...);
Each INSERT statement contains the INSERT INTO and VALUES keywords. The INSERT INTO keywords are used to specify the table name and the column names to insert values into. The VALUES keyword is used to specify the values to insert into a table. Take a look at Example 6, which inserts five rows into the Toys table.
Example 6
This example inserts five records into the Toys table created earlier in the chapter.
INSERT INTO Toys (ToyID, ToyName, Price, Description)
VALUES (1, 'ToyTrain1', 11.00, 'Red/blue battery powered train'),

INSERT INTO Toys (ToyID, ToyName, Price, Description)
VALUES (2, 'ToyTrain2', 11.00, 'Green/red/blue battery powered
train'),

INSERT INTO Toys (ToyID, ToyName, Price, Description)
VALUES (3, 'ElectricTrain', 15.00, 'Red/white AC/DC powered train'),

INSERT INTO Toys (ToyID, ToyName, Price, Description)
VALUES (4, 'LivingDoll1', 12.00, 'Asian American Doll'),

INSERT INTO Toys (ToyID, ToyName, Price, Description)
VALUES (5, 'LivingDoll2', 12.00, 'African American Doll'),
The preceding INSERT statements insert five records into the Toys table. Since each INSERT statement contains a closing semicolon, it is easy to see where each statement begins and ends. Each INSERT statement inserts one record with four values.
As a side note, each time you execute an INSERT statement, Microsoft Access verifies the insertion of the new record by displaying a message/question that says:
“You are about to append 1 row (s). Once you click yes, you can’t use the undo command to reverse the changes. Are you sure you want to append the selected rows?”
This feature can be turned off under Access options | Advanced | Confirm Action Queries, but for now leave it on as it will verify the actions taking place.
Each time you insert a new record, be sure to click Yes to this message.
Notice the INSERT statements that contain character strings enclosed in quotes. Whenever a table contains a column data type that accepts character strings, all character string values pertaining to the column must be enclosed in quotes. Since the ToyName and Description columns contain data types that accept character strings, the character string values in the INSERT statements are enclosed in quotes.
Type the following script to view the populated Toys table:
SELECT *
FROM Toys;
Figure 3-4 shows the populated Toys table.

Figure 3-4. Populated Toys table
Inserting Data without Specifying Column Names
INSERT statements can also be executed without the specification of column names. To execute an INSERT statement without typing the column names, specify the values in the same order that the columns appear in the table. Look at Example 7, which inserts an additional record into the Toys table.
Example 7
Say you want to insert a complete record into the Toys table but you do not want to type the column names. Look at the following script:
INSERT INTO Toys
VALUES (6, 'DollHouse', 17.00, 'Grand Town House'),
The preceding script inserts one record containing four values into the Toys table. Because the values are typed in the same order in which the columns appear in the table, it is not necessary to type the column names.
As a side note, if you want to insert values into specific columns only, specify only the column names you want to insert values into. Next, specify values in the same order as they appear in your INSERT statement.
Figure 3-5 shows the addition of the new record in the Toys table.

Figure 3-5. Toys table showing six records
Inserting NULL Values
Example 8
Say you want to insert a record with a missing value. Take a look at the following script:
INSERT INTO Toys
VALUES (7, 'Doll/TownHouse', 15.00, NULL);
This script inserts one record containing three values into the Toys table. It inserts NULL for a missing value. Recall that NULL means no value. Figure 3-6 shows the Toys table after the insertion of the record containing the NULL value.
As a side note, you cannot insert NULL into columns that contain a NOT NULL constraint.

Figure 3-6. Toys table containing a NULL value
Copying Records from One Table to an Existing Table
Example 9
Sometimes it is necessary to populate a table with records from an existing table. Say, for example, you need to create a test table and you want to use data that is already stored in another table. Take a look at the following scripts. The first one creates a new table named ToysTest and the second one copies the records from the Toys table to the ToysTest table.
CREATE TABLE ToysTest
(
ToyID CHAR (7) CONSTRAINT ToyPk PRIMARY KEY,
ToyName CHAR (30) NOT NULL,
Price MONEY NOT NULL,
Description CHAR (40) NULL
);
This script creates a table named ToysTest. The ToysTest table contains the same data types and field sizes as the Toys table. The following script copies the records from the Toys table into the ToysTest table:
INSERT INTO ToysTest (ToyID, ToyName, Price, Description)
SELECT ToyID, ToyName, Price, Description
FROM Toys;
This script uses the INSERT INTO keywords to specify the table name and column names to insert records into. The SELECT and FROM keywords are used to specify the column names and table name from which to retrieve the records to insert. The SELECT keyword is used to specify the column names from the Toys table and the FROM keyword is used to specify the Toys table.
As a side note, the ToysTest and Toys tables do not have to have the same column names, but they do have to have similar data types and field sizes. Figure 3-7 shows the populated ToysTest table.

Figure 3-7. Populated ToysTest table
Copying Records from One Table to a New Table Simultaneously
Example 10
Say you want to create a new table and copy records from another table into your new table at the same time. Take a look at the following script:
SELECT ToyID, ToyName, Price, Description
INTO Toys2
FROM Toys;
This script creates a new table named Toys2 and copies the records from the Toys table into the new Toys2 table. It uses the SELECT and FROM keywords to specify the table name (Toys) and column names (ToyID, ToyName, Price, and Description) from which to retrieve the records to insert. The INTO keyword is used to create a table named Toys2 and to insert the records retrieved from the table (Toys) specified after the FROM keyword. Figure 3-8 shows the populated Toys2 table.

Figure 3-8. Populated Toys2 table
Updating Records
The UPDATE statement is used to update records in a table. You can use this statement to change single or multiple records in a table. Look at the following syntax for updating a table:
UPDATE Tablename
SET ColumnName = Value
WHERE Condition;
Update a Record with a Text Value
Example 11
Say you want to add a value to one of the records in the Toys table. Look at the following script:
UPDATE Toys
SET Description = ‘Town House’
WHERE ToyID = 7;
The preceding script inserts a value into one of the records stored in the Toys table. It uses the UPDATE keyword to specify the table (Toys) to update. The SET keyword is used to specify the column (Description) to update and the value (Town House) to insert into the column. The WHERE keyword is used to set conditions on retrieved data. It is commonly referred to as the WHERE clause. You will learn more about clauses and the WHERE clause in Chapter 5. In this example, the WHERE keyword is used to specify value 7 in the ToyID column. Figure 3-9 shows the Toys table containing the new value.

Figure 3-9. Updated Toys table
Update a Record with a New Calculated Value
Example 12
In this example we will increase the price for an item in the Toys table. We will increase the price by 5 dollars:
UPDATE Toys
SET Price = Price + 5
WHERE ToyID = 7;
The preceding script uses the UPDATE keyword to specify the table (Toys) to update. The SET keyword is used to specify the column (Price) to update and is set equal to the Price plus 5 dollars (Price + 5). The WHERE keyword is used to set conditions on retrieved data. In this example, the WHERE keyword is used to specify value 7 in the ToyID column. It tells Microsoft Access to update the record containing a ToyID of 7. Figure 3-10 shows the Toys table containing the new value.
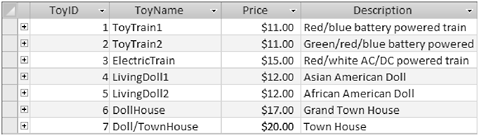
Figure 3-10. Updated Toys table
Update Multiple Columns
Example 13
Say you want to update the ToyName and Description columns in the Toys table. Look at the following script:
UPDATE Toys
SET ToyName = 'ElectronicBlackTrain',
Description = 'Red/white electric powered train'
WHERE ToyID = 3;
The preceding script uses the UPDATE keyword to specify the table (Toys) to update. The SET keyword is used to specify two columns (ToyName, Description) to update. The WHERE keyword is used to specify value 3 in the ToyID column. It tells Microsoft Access to update the record containing a ToyID of 3. Figure 3-11 shows the Toys table containing the new value.

Figure 3-11. Updated Toys table
Note: To update multiple columns, each column must contain the same WHERE clause value.
Update a Column that Contains a Date
Example 14

Figure 3-12. Sales table
Suppose you want to update a column that contains a date. Take a look at the following script:
UPDATE Sales
SET DateSold = '04/03/2008'
WHERE SalesID = 1;
The preceding script uses the UPDATE keyword to specify the table (Sales) to update. The SET keyword is used to specify the column (DateSold) to update. The WHERE keyword is used to specify value 1 in the SalesID column. It tells Microsoft Access to update the record containing a SalesID of 1. Figure 3-13 shows the updated Sales table.

Figure 3-13. Updated Sales table
Deleting Records
The DELETE statement is used to remove records from a table. Look at the following delete syntax:
DELETE FROM Tablename
WHERE Condition
Example 15 shows how to delete a record from the Toys2 table.
Example 15
This example shows how to remove one record from the Toys2 table.
DELETE FROM Toys2
WHERE ToyID = 7;
The preceding script uses the DELETE and FROM keywords to specify the table (Toys2) from which to remove records. This WHERE clause is used to specify value 7 in the ToyID column. Figure 3-14 shows the Toys2 table without record 7.

Figure 3-14. Toys2 table
To delete all the records from the Toys2 table, type the following:
DELETE * FROM Toys2;
Summary
In this chapter, you learned how to create a table and how to populate a table with records. You learned about data types, field sizes, and constraints. You also learned how to update and delete records in a table.
Quiz 3
1. True or False. NOT NULL means no value.
2. True or False. A data type specifies the maximum number of characters that a cell in a column can hold.
3. What constraint is used to link the records of one table to the records of another table?
4. True or False. The WHERE keyword is used to insert a record into a table.
5. True or False. The UPDATE statement is used to update table names.