
Chapter 8
Creating Table Joins and Unions
Introduction
In this chapter, you will learn how to retrieve records from multiple tables using table joins and unions. You will also learn how to create table aliases, perform qualification, create a Cartesian product, and implement the DISTINCTROW keyword.
Definitions
Cartesian product — Result produced when each row in one table is multiplied by the total number of rows in another table.
INNER JOIN — Used to instruct the DBMS to combine matching values from two tables.
LEFT JOIN — Selects every record from the table specified to the left of the LEFT JOIN keywords.
ON — Used to specify a condition.
Qualification — Used to match a column with a specific table.
RIGHT JOIN — Selects every record from the table specified to the right of the RIGHT JOIN keywords.
Self join — Used to join a table to itself.
UNION — Used to combine records from two queries while excluding duplicate records.
UNION ALL — Used to combine records from two queries while including duplicate records.
Table Joins — An Overview
Table joins provide one of the most powerful features in the SQL query language. A join enables you to use a single SELECT statement to query two or more tables simultaneously. There are three main types of joins used in Access SQL: inner join, self join, and outer join.
Qualification
In our previous examples, when we have changed from Design view to SQL view, Access has placed the table name into the SQL statement. We have taken the liberty of removing the table qualification since with only one table it is not required, but when a query contains more than one table, it is no longer optional. While it is the practice in some cases for each column in a database to have a unique name (often by adding an abbreviation of the name of the table to each field name), it is not unusual to have fields in multiple tables with the same name. Commonly, the primary key of the first table shares the same name as the foreign key of the secondary table. This is almost to be expected if you think about it, since the fields of the two tables contain the same type of information. For this reason you must specify which table a column refers to so that Microsoft Access knows exactly which table a column belongs to. To accomplish this you must use a technique called qualification. As might be expected based on what we have removed from our previous Access converted SQL queries, to qualify a table you must enter the name of the table followed by a period and the name of the column. The rules for qualification are as follows:
![]() In the actual join, the field names must be fully qualified.
In the actual join, the field names must be fully qualified.
![]() Where there is no possible ambiguity on the source of a field name, that field does not need to be qualified elsewhere in the SQL statement, although it can be.
Where there is no possible ambiguity on the source of a field name, that field does not need to be qualified elsewhere in the SQL statement, although it can be.
![]() If there is a possibility of ambiguity (i.e., if the field name occurs in multiple tables even if it is not used in the query), the field must be qualified.
If there is a possibility of ambiguity (i.e., if the field name occurs in multiple tables even if it is not used in the query), the field must be qualified.
Take a look at the following syntax for qualification:
Tablename.Columnname
Qualification is demonstrated in all of the examples throughout this chapter.
Inner Join
Inner joins, also referred to as equi-joins, are the most basic type of join and match column values that are common between tables. In other words, you are matching every instance of a value in one field of the first table to every instance of that value in the second table. To create an inner join in Access Design mode you add both tables to the query grid, then connect the field of the first table to the matching field in the second table. In SQL you create an inner join using the INNER JOIN and ON keywords. The INNER JOIN keywords are used to instruct the DBMS to combine matching values from two tables. The ON keyword is used to specify a condition. Additionally you must specify the column names to retrieve, the tables to retrieve records from, and the relationships between tables (specifying primary keys and foreign keys).
Example 1

Figure 8-1. Customers table

Figure 8-2. Transactions table
Suppose you want to query the Customers table in Figure 8-1 and the Transactions table in Figure 8-2 to retrieve the customer’s ID, last name, each product the customer purchased, and the dates the purchases were made. Using our usual Design view, we would build the query as follows in Figure 8-3:

Figure 8-3. Query Design view
Changing to SQL view (Figure 8-4) produces the following SQL statement. Note the INNER JOIN keywords combining the two tables, Customers and Transactions, and the ON keyword showing which fields of the two tables are to be linked.

Figure 8-4. SQL view
The preceding script specifies four columns (Customers.CustomerID, Customers.Lastname, Transactions.ProductID, and Transactions.DateSold) to retrieve data from the Customers and Transactions tables specified in the FROM clause. Notice that each column retrieved is qualified. The INNER JOIN keywords in the FROM clause are used to instruct Microsoft Access to combine matching values from the Customers and Transactions tables. The condition, as well as the relationship between the Customers and Transactions tables, is specified after the ON keyword. The Customers and Transactions tables are related through the CustomerID column. The CustomerID column is a primary key in the Customers table and a foreign key in the Transactions table. The ON keyword sets a condition to retrieve only the records that contain a customer ID in the Customers table that is equal to a customer ID in the Transactions table. Notice that the customer IDs are qualified. The ORDER BY clause sorts the results by the Customers.CustomerID column. Look at the results in Figure 8-5.

Figure 8-5. Results (output)
Note: You can also perform the preceding inner join by omitting the INNER JOIN and ON keywords and using a WHERE clause, as shown in the following query:
SELECT Customers.Lastname, Customers.Firstname,
Transactions.ProductID, Transactions.DateSold
FROM Customers, Transactions
WHERE Customers.CustomerID = Transactions.CustomerID
ORDER BY Lastname;
The preceding query is similar to the query shown in Figure 8-4. It retrieves the customer’s first and last name, each product the customer purchased, and the dates purchases were made. It uses a WHERE clause instead of the INNER JOIN and ON keywords. If you choose to use the INNER JOIN keywords, you must use the ON keyword. You cannot use the INNER JOIN keywords with the WHERE clause.
Note: Most Access programmers would not think about representing the query in this fashion since it goes against every method of teaching how to build Access queries. Converting the above SQL back to Design view produces the following query:

Figure 8-6. Query Design view
There are very few Access programmers who think of queries like this but as we will show, it is an extremely useful tool!
Using the DISTINCTROW Keyword
The DISTINCTROW keyword is used to exclude records based on the entire duplicate records, not just duplicate fields. It is very similar to the DISTINCT keyword discussed in Chapter 4, but DISTINCTROW is based on entire rows, not just individual fields.
The DISTINCTROW keyword is used in queries that include more than one table in the FROM clause, as do joins. It only retrieves unique values when you retrieve columns from some but not all of the tables specified in the FROM clause. Take a look at Example 2.
Example 2
Suppose you want to alter the query in Example 1 to include only the names of customers who made purchases. Look at the following script:
SELECT DISTINCTROW Customers.Lastname, Customers.Firstname
FROM Customers INNER JOIN Transactions
ON Customers.CustomerID = Transactions.CustomerID
ORDER BY Lastname;
The preceding script implements an inner join that joins the Customers table to the Transactions table. Since the query retrieves columns from one table and not both tables in the FROM clause, the DISTINCTROW keyword displays the unique first and last names of customers who have a customer ID in the Customers table equal to a customer ID in the Transactions table. Remember, the DISTINCTROW keyword only retrieves unique values when you retrieve columns from some but not all of the tables specified in the FROM clause.
Self Join
The second type of join is the self join. Self joins enable you to join a table to itself. They are useful when you want to find records that have values in common with other rows in the same table. In Figure 8-7, we have modified the Employees table to represent an instance when self joins might be used. Each employee has a supervisor who is in turn an employee of the company. Rather than have a separate table of supervisors, it is easier to normalize the information and just provide a field in each employee’s record that points to that employee’s supervisor.

Figure 8-7. Modified Employees table
In the query grid this would be represented by dragging the Employees table to the query grid twice, then linking the two tables together and mentally tracking which instance of the table is used for the main employee information and which instance is used for the supervisor information (Figure 8-8).

Figure 8-8
In SQL, in order to join a table to itself you must use table aliases. Table aliases are created just like column aliases. By creating table aliases, Microsoft Access perceives the table being joined to itself as an additional separate table. This can be seen in the following script:
SELECT Employees.firstName, Employees.lastName,
       Employees_1.firstName AS managerFirstName,
       Employees_1.lastName AS managerLastName
FROM Employees INNER JOIN Employees AS Employees_1
ON Employees.reportsTo = Employees_1.ID;
When run, the result is that the person an individual reports to can be viewed as a name (Figure 8-9).

Figure 8-9
Table aliases are also used as a shortcut for typing entire table names. Example 3 shows a self join containing table aliases.
Example 3

Figure 8-10. Customers table
Suppose you want to query the Customers table in Figure 8-10 to retrieve the names and IDs of customers who live in the same state as the state for customer ID 2. Look at the following script:
SELECT C1.Lastname, C1.Firstname, C1.CustomerID, C1.State
FROM Customers AS C1, Customers AS C2
WHERE C1.State = C2.State
AND C2.CustomerID = 2;
This script creates two table aliases (C1, C2) for the Customers table in the FROM clause. The table aliases are used throughout the query to represent two separate Customers tables. Every instance of a table alias represents a table. The WHERE clause is used to set a condition to retrieve only the records that contain a state in the C1 table that is equal to the state in the C2 table, and each state must be equal to the state for customer ID 2 in the C2 table. Figure 8-9 shows the results of the query.

Figure 8-11. Results (output)
Nested Join
SQL also enables you to create nested joins. Look at the following example, which joins three tables.
Example 4

Figure 8-12. Products table

Figure 8-13. Customers table

Figure 8-14. Transactions table
Suppose you want to query the tables in Figures 8-12, 8-13, and 8-14 to retrieve each customer’s first and last name along with the products purchased and complete sales information from the Transactions table. Using the query grid in Figure 8-15, this is a simple operation.
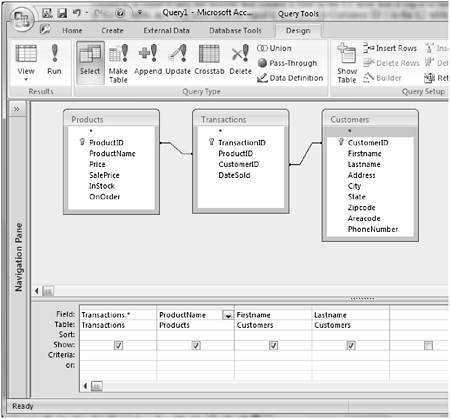
Figure 8-15. Query Design view
Converting to SQL view (Figure 8-16) produces the SQL equivalent:

Figure 8-16. SQL view
Look at the following script:
SELECT T.*, P.ProductName, C.Firstname, C.Lastname
FROM Products AS P INNER JOIN
(Customers AS C INNER JOIN Transactions AS T
ON C.CustomerID = T.CustomerID)
ON P.ProductID = T.ProductID;
This script uses an INNER JOIN to join three tables. The script contains a nested join (Customers AS C INNER JOIN Transactions AS T ON C.CustomerID = T.CustomerID) enclosed in parentheses, with aliasing of the table names for convenience. The nested join is performed first. Next, the results of the nested join are used to join to the Products table. Figure 8-17 shows the results from the query.

Figure 8-17. Results (output)
Note: You may have produced a slightly different SQL query like the following (Figure 8-18) if you tried to duplicate the example:

Figure 8-18. SQL view
This is a result of the order in which the tables were added to the query grid. Equi-join query operations are associative in nature (recall your first year of algebra; it doesn’t matter if you add A+(B+C) or (A+B)+C, the result will be the same). So it doesn’t matter which tables you operate on first — the results will be identical.
The following script shows another method for writing the query:
SELECT T.*, P.ProductName, C.Firstname, C.Lastname
FROM Products AS P, Customers AS C, Transactions AS T
WHERE C.CustomerID = T.CustomerID AND
P.ProductID = T.ProductID;
This script simply lists all the tables in the FROM clause and then shows the relationship and condition in a WHERE clause. I prefer this method since it is simpler to compose.
Outer Joins
Outer joins are used to retrieve all records from multiple tables even if there is no matching record in the joined table. In other words, the results of an outer join will be the resulting recordset of an inner join plus those records that do not have a corresponding record in the second table. There are two types of outer joins used in Access SQL: the right outer join and the left outer join. The keywords are abbreviated as RIGHT JOIN and LEFT JOIN respectively.
Right Outer Join
A right outer join selects every record from the table specified to the right of the RIGHT JOIN keywords. Take a look at Example 5.
Example 5

Figure 8-19. Customers2 table

Figure 8-20. Transactions table
Suppose you want to query the Customers2 table shown in Figure 8-19 and the Transactions table shown in Figure 8-20 to display customers and information about their purchases. Additionally, you want to display customers on the mailing list who have not yet made any purchases.
Using Access Design view, this would be represented by the query shown in Figure 8-22.
Note: You modify the type of join by highlighting the join, clicking on the join line, right-clicking, selecting Join Properties, then specifying the join type in the Join Properties dialog (Figure 8-21).

Figure 8-21. Join Properties dialog
After clicking on the OK button, the outer join is represented by the arrow joining the two tables, as shown in Figure 8-22.

Figure 8-22. Query Design view
Converting to SQL view (Figure 8-23) shows the SQL query:

Figure 8-23. SQL view
Putting in our usual aliases and ordering by the customer ID produces the following script:
SELECT C.CustomerID, C.Lastname, T.ProductID, T.DateSold
FROM Transactions AS T RIGHT JOIN Customers2 AS C
ON C.CustomerID = T.CustomerID
ORDER BY C.CustomerID;
The preceding script uses the RIGHT JOIN keywords in the FROM clause to instruct Microsoft Access to display all the records in the table (Customers2) specified to the right of the RIGHT JOIN keywords. Although the ON keyword specifies a condition to retrieve the customer IDs from the Customers2 table that are equal to a customer ID in the Transactions table, the RIGHT JOIN keywords cause the DBMS to display all the records from the Customers2 table, including those records that do not match with any customer ID in the Transactions table. Look at the results in Figure 8-24. Notice the customer IDs and names with no product IDs or dates. These customers have not made any purchases yet.

Figure 8-24. Results (output)
Note: A term commonly used when dealing with joins is Cartesian product. A Cartesian product exists when you create a join without the specification of a relationship between tables. A Cartesian product causes each row in one table to be multiplied by the total number of rows in another table. This is rarely the result sought after when creating a join. Be careful to always specify the relationship between joined tables.
Left Outer Join
A left outer join works much like a right outer join except it selects every record from the table specified to the left of the LEFT JOIN keywords. Take a look at Example 6.
Example 6
Suppose you want to query the Customers2 table shown in Figure 8-19 and the Transactions table shown in Figure 8-20 to display customers and information about their purchases. Additionally, you want to display customers on the mailing list who have not yet made any purchases. This is exactly what we did in Example 5, but this time we’ll use LEFT JOIN instead of RIGHT JOIN. Look at the following script:
SELECT C.CustomerID, C.Lastname, T.ProductID, T.DateSold
FROM Customers2 AS C LEFT JOIN Transactions AS T
ON C.CustomerID = T.CustomerID
ORDER BY C.CustomerID;
The preceding script is equivalent to the script in Example 5. The LEFT JOIN keywords in the FROM clause are used to instruct Microsoft Access to display all the records in the table (Customers2) specified to the left of the LEFT JOIN keywords. Look at the results in Figure 8-25. As you can see, the results are the same as the results for Example 5.

Figure 8-25. Results (output)
What does this look like in the Access query grid? Using the simplified version of the SQL query, we type the text into the SQL view as shown in Figure 8-26:

Figure 8-26. SQL view
Then we convert this to Design view (Figure 8-27) and, surprise, we get the same query that we started with in the section on right joins. Access is somewhat arbitrary in that no matter how the tables are entered into the query grid, it will try to interpret the operation as a right join. In this respect, if you want more control of your joins, you will find that it is easier to do them in SQL view. Several times I have wondered what exactly was being done by my Access queries. The answers became apparent when the query was converted to SQL.

Figure 8-27. Query Design view
Create a Join that Contains an Aggregate Function
In Chapter 7, you learned how to create queries that contain aggregate functions. Now let’s use an aggregate function while joining two tables. Take a look at Example 7.
Example 7

Figure 8-28. Customers table

Figure 8-29. Transactions table
Suppose you want to retrieve the customer names and the total number of transactions per customer. Look at the following script:
SELECT FirstName, LastName, COUNT (Transactions.CustomerID) AS
TotalTransactions
FROM Customers, Transactions
WHERE Transactions.CustomerID = Customers.CustomerID
GROUP BY FirstName, LastName;
The preceding script uses an aggregate (COUNT ()) function after the SELECT keyword. The FROM clause specifies two tables (Customers, Transactions). The WHERE clause shows the relationship between the Customers and the Transactions tables.
Whenever you use an aggregate function in a query, you also must use the GROUP BY clause. Recall from Chapter 7, all column names retrieved from the database (specified after the SELECT keyword) must be present in the GROUP BY clause. Take a look at the results in Figure 8-30.

Figure 8-30. Results (output)
UNION and UNION ALL Keywords
Access has three types of queries that cannot be performed with the standard query grid: pass-through, data definition, and union. The most common of these is the union query, which has two variations: standard UNION and UNION ALL.
UNION
The UNION keyword is used to combine records from two queries while excluding duplicate records. Take a look at Example 8.
Example 8

Figure 8-31. Committee1 table

Figure 8-32. Committee2 table
Figures 8-31 and 8-32 show two committees that the employees of a company belong to. Some employees belong to one committee and some belong to both committees. Suppose you want to display the last name and first name of employees who belong to at least one committee without displaying duplicate names of the employees who belong to both committees. In older versions of Access you had to do this through a two-step process. First you would create a blank query. Next, while focus was on the query you would select from the Query menu SQL Specific and Union. This process is simplified a bit in Access 2007. Now you just select the Design tab, then select Union to create a union query template (Figure 8-33).
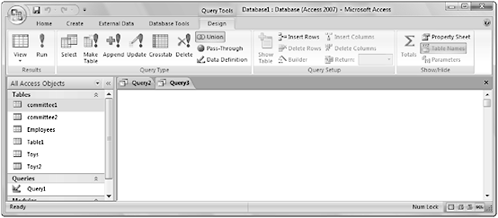
Figure 8-33
Look at the following script:
SELECT Lastname, Firstname
FROM Committee1
UNION
SELECT Lastname, Firstname
FROM Committee2;
Visually you can see that the union query is a combination of two queries. The first selects records from the first table and the second selects records from the second table. We have found it convenient to create the two component queries individually in temporary queries in Design view, convert the Design views to SQL views, highlight and copy the entire blocks of text, then paste them into the union query. The union query is then completed by adding the word UNION between the two copied queries and deleting the “;” terminator in the first query.
This procedure is shown in the following three figures.

Figure 8-34

Figure 8-35
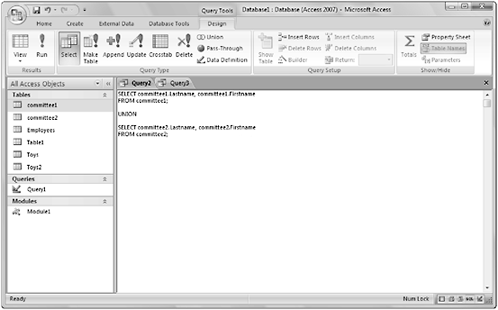
Figure 8-36
While this case is quite simple and can be typed in directly, using the cut and paste method is often easier (and less likely to produce errors) if you have complicated component queries.
The preceding script uses the UNION keyword to exclude duplicate records from the results of two queries. The first query retrieves the Lastname and Firstname columns from the Committee1 table. The second query retrieves the Lastname and Firstname columns from the Committee2 table. The placement of the UNION keyword between the two queries causes only unique records to be displayed. Look at the results in Figure 8-37.

Figure 8-37. Results (output)
Note: When you compare two tables, both tables must have the same number of fields, but the fields do not have to be the same data type.
UNION ALL
The UNION ALL keywords are used to combine records from two queries while including duplicate records. Take a look at Example 9.
Example 9
Suppose you want to display the last names and first names of the employees who belong to a committee, including duplicate names of people belonging to two committees. Look at the following script:
SELECT Lastname, Firstname
FROM Committee1
UNION ALL
SELECT Lastname, Firstname
FROM Committee2
ORDER BY Lastname, Firstname;
The preceding script uses the UNION ALL keywords to include duplicate records from the results of two queries. The first query retrieves the Lastname and Firstname columns from the Committee1 table. The second query retrieves the Lastname and Firstname columns from the Committee2 table. The placement of the UNION ALL keywords between the two queries causes all records from both queries to be displayed, including duplicate records. The ORDER BY clause sorts the Lastname and Firstname columns in ascending order. As you can see in Figure 8-38, Debra Brown and Kayla Fields belong to both Committee1 and Committee2.

Figure 8-38. Results (output)
Union all queries are processed the same way as union queries by Access. The only difference is that you use the UNION ALL keyword instead of the UNION keyword.
Note: It is possible to create a union query by beginning with a standard select query, going into SQL view, and adding the UNION keyword and the second select query information. Access is smart enough to know that the query is no longer a select query but a union query. If the query is saved and reloaded or run, it will be marked as a union query from that point on and will not support Design view.
Summary
In this chapter, you learned how to retrieve records from multiple tables using table joins and unions. You also learned how to create table aliases, perform qualification, create a Cartesian product, and use the DISTINCTROW keyword.
Quiz 8
1. True or False. A join enables you to use a single SELECT statement to query two or more tables simultaneously.
2. True or False. The following shows the correct syntax to qualify a table and column name: Tablename,Columnname.
3. True or False. Table aliases are created just like column aliases.
4. True or False. The UNION ALL keyword is used to combine records from two queries while excluding duplicate records.
5. True or False. A left outer join is used to select every record from the table specified to the left of the LEFT JOIN keywords.
Project 8
Use the Products table in Figure 8-12 and the Transactions table in Figure 8-14 to create an outer join that will display product IDs with customer IDs and purchase dates for customers who purchased a product (product ID). Additionally, display product IDs of products that have not been purchased yet.