Virtual machines (VMs) are the core of all infrastructure-as-a-service (IaaS) deployments. A VM in Azure is similar to a VM premises using a hypervisor. The main difference is that Microsoft maintains the hypervisor and its related infrastructure in Azure. A VM also means that whether you choose to have Microsoft manage selected administration tasks, such as backups, or you perform those tasks yourself, it is still an operating system (Windows Server or a distribution of Linux) and installation of SQL Server that needs to be administered, maintained, patched, made available, and so on.
This chapter will help you understand why you should consider IaaS and covers how to approach choosing the right virtual hardware for a VM with SQL Server in Azure.
The benefits of deploying SQL Server using IaaS
Besides IaaS, there is another deployment method for SQL Server: platform-as-a-service (PaaS). Azure SQL Database, or Azure SQL Managed Instance, is PaaS. With PaaS, there is no operating system (OS) or SQL Server instance you need to manage, which includes things such as patching. All of that is done for you. Where that does not work for some is that you may need control over the OS and/or SQL Server choices (version or edition) due to standards, licensing, or other requirements. PaaS provides a more packaged solution that fits the needs of many without needing a dedicated OS and SQL Server instance.
Since IaaS is just a VM with an OS, you can deploy whatever supported combination of OS and SQL Server you desire. One principal difference between IaaS and PaaS is that any automatic administration you would want done by Microsoft is opt-in, whereas PaaS is done for you and you have limited configuration choices. One important reason why many choose IaaS is the ability to make choices you could not otherwise make with something like Azure SQL Database.
That choice extends to being able to use other Azure services, such as Azure Backup1, Azure Security Center2, Advanced Data Security for SQL on Azure VM3, including vulnerability assessment and Advanced Threat Protection, Azure Site Recovery4, and the SQL Server on Azure Virtual Machines resource provider (covered in a later section). This means that you can take advantage of the best of what Azure has to offer for IaaS-based SQL Server deployments.
IaaS facilitates installations of SQL Server in cloud-first environments, "lift and shift" scenarios where you have a requirement to deploy the same version/architecture as on-premises but are migrating to Azure, and, more importantly, hybrid scenarios where IaaS VMs become an extension of on-premises.
For example, you may still be primarily on-premises for most SQL Server installations right now. However, you want to start moving toward using Azure and also have a need for more robust disaster recovery. If you currently use Always On availability groups, one or more IaaS-based replicas could be added to Azure (along with any other required infrastructure, such as Active Directory Domain Services) to extend the existing architecture up to the cloud. Refer to this Microsoft documentation5 to read more about the new high availability and disaster recovery benefits for SQL Server.
All standard SQL Server deployment scenarios apply in IaaS as they do on-premises if you are implementing physical servers or VMs. Most considerations for deploying SQL Server properly on-premises are the same, with slight variations due to Azure, some of which are documented in this chapter and others throughout this book. The rest of this chapter will focus on how to choose a VM and approach things such as sizing.
There is one other benefit associated with choosing Azure for your IaaS SQL Server platform: Microsoft will continue to provide Windows Server 2008 and 2008 R2 as well as SQL Server 2008 and 2008 R2 extended security updates if you still require those versions and need to migrate those workloads to VMs in Azure.
Deployment choices for IaaS
This section will cover the different ways in which you can deploy a VM in Azure, along with considerations and best practices that are applicable no matter which method is used, as well as briefly talk about licensing SQL Server in Azure.
Deployment methods
There are three options for deploying a VM in Azure for use with SQL Server:
- Choose a pre-built template, also known as an image, with SQL Server already installed.
- Choose a template with the OS but without SQL Server installed, which will be done after the VM is built.
- Build a custom image using a virtual hard drive and upload it to Azure.
No matter which of the three deployment methods you choose, you can deploy using Cloud Shell (Bash or PowerShell)6, also known as the Azure command-line interface (CLI), Azure portal7, Azure Resource Manager templates8 that are written in JSON, and the Azure PowerShell module9. Builds can be automated and incorporated into DevOps processes, which is often a best practice in many environments.
The remainder of this section will describe each of these methods in further detail.
Using an image with SQL Server installed
Microsoft provides images in Azure that have SQL Server already installed. Using one may save time and effort and provide a level of confidence in the overall configuration. The OS, versions, and editions of SQL Server available can be seen by querying Azure or looking in Azure Marketplace using the Azure portal. One example query using the Azure CLI that shows all Ubuntu images in the East US 2 region with SQL Server Enterprise Edition, as of the time of writing of this chapter, is as follows:
az vm image list --location eastus2 --offer Ubuntu --publisher SQLServer --sku enterprise --all --output table
The results are shown in Figure 2.1. A similar query could be executed for Windows Server or any other distribution of Linux or edition of SQL Server:

Figure 2.1: Ubuntu 16.04 images preconfigured with SQL Server
Note
There are multiple versions of SQL Server for a given major release such as SQL Server 2019 (15.0.x). Each corresponds to the build number of SQL Server. If your company has a requirement for a specific build of SQL Server and it matches one of these images, you can use it. If not, then you will need to utilize the second or the third method mentioned previously, either by deploying a VM without SQL Server pre-installed or by creating an image from scratch.
When using the Azure portal, the Azure Marketplace defaults to using the latest image version. This means that for older versions, such as the ones shown in Figure 2.1, you would need to use another method, such as PowerShell or CLI, to deploy that image.
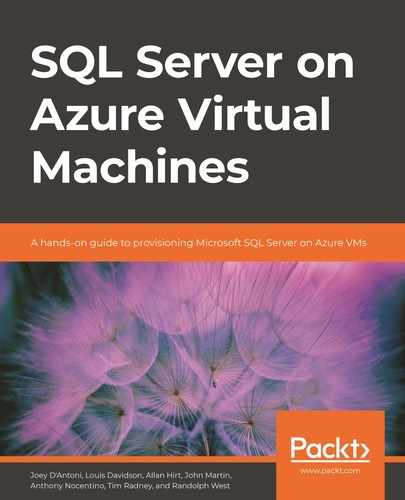
The easiest way to find an image is to search for it in the Azure Marketplace in the Azure portal. For example, you can search for SQL Windows 2019 and filter further as desired, as shown in Figure 2.2. Note the limited choices as compared to Figure 2.1. In some cases, the image available will be a specific version and/or edition of SQL Server with an OS, while on other occasions, it will be a major version of SQL Server with an OS:
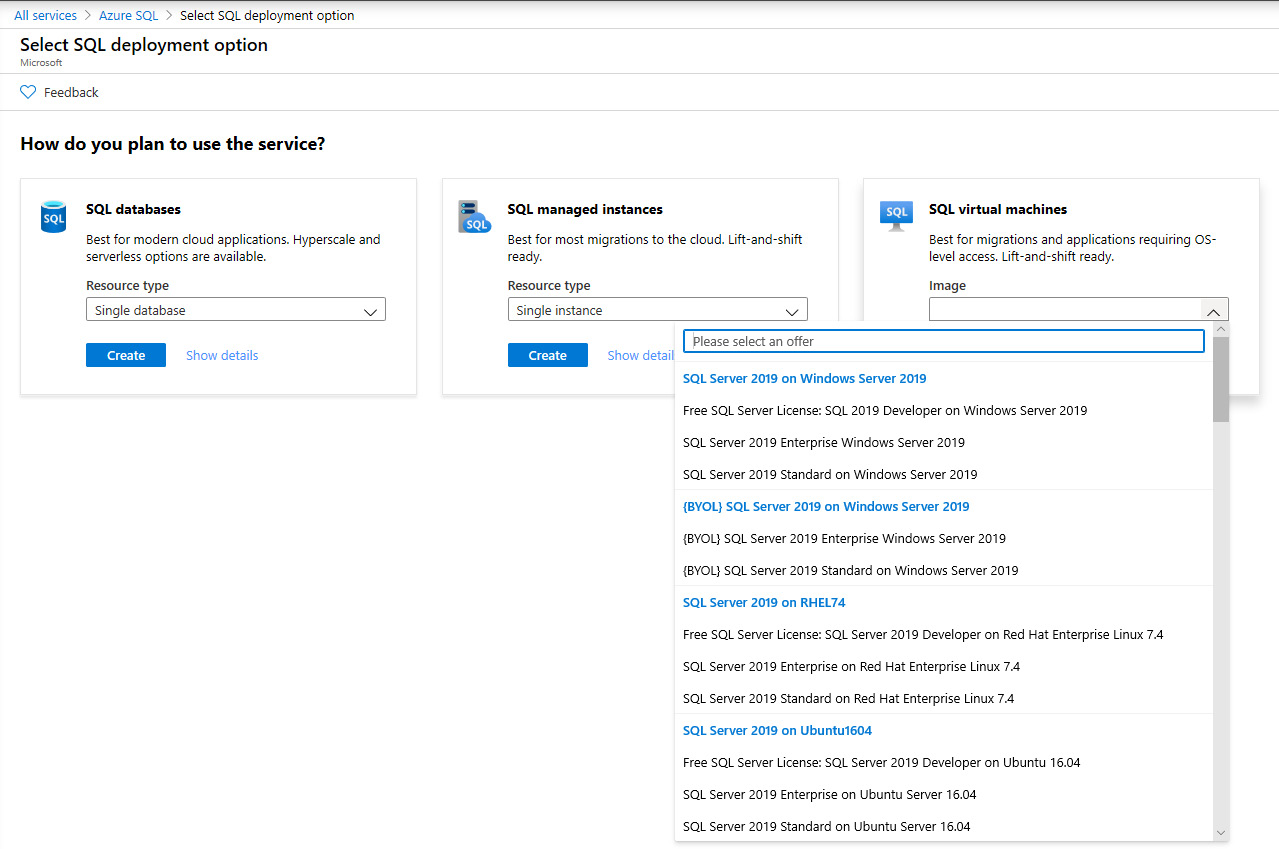
Figure 2.2: Windows Server 2019-based SQL Server images in the Azure Marketplace
Depending on the image selected, you may also have to specify the edition of SQL Server as shown in Figure 2.3:

Figure 2.3: Choosing an edition of SQL Server
The Azure portal allows you to configure a VM's settings manually when you click Create. You will be walked through a wizard via a series of panes where you configure storage, networking, and, for Windows Server-based configurations, aspects of SQL Server itself. Most IT organizations will choose this if using the Azure portal or automate.
You also have the option to Start with a pre-set configuration, as shown in Figure 2.3. An example of what that would look like can be seen in Figure 2.4. You still need to go through the rest of the configuration process, but what you would need to alter is much less. Full documentation can be found in the topics Provision a Linux SQL Server virtual machine in the Azure Portal10 and How to provision a Windows SQL Server virtual machine in the Azure portal11.
Figure 2.4: Choosing defaults
One difference to note is that, unlike a Windows Server-based SQL Server Azure VM image, there are fewer SQL Server options available during configuration. With Linux, you can only choose the core aspects of the VM. Anything related to SQL Server, such as changing default data paths, is configured inside the VM once deployed. More information on the differences compared with Windows Server can be seen in the upcoming section, SQL Server on Azure Virtual Machines resource provider.
For Linux, the image with SQL Server pre-installed contains the Database Engine, SSIS, and the command-line tools (sqlcmd and bcp). The end user license agreement (EULA) is already accepted. SQL Server Agent is not enabled. SQL Server Agent along with any other SQL Server features must be configured12. You will also need to reset the sa password, which is set during configuration and not published, and, if desired, add the tools to your default path.
This means, for Linux-based images, that you need to do some configuration after the VM is built, but not as much as if you had to install SQL Server yourself using an image with just the Linux distribution that is described in the next section.
Windows Server-based images with Developer, Enterprise, and Standard Editions come with many SQL Server options pre-installed: The Database Engine (including replication and R services, full-text search, and Data Quality Services), Analysis Services, and Master Data Services. If you want to change the configuration, the full installation media can be found on the local system drive. An example would be if you are not using Analysis Services; you can simply uninstall it.
Even if you plan on uninstalling SQL Server for reasons such as needing to configure an Always On Failover Cluster Instance (FCI), if you are using pay-as-you-go licensing (refer to the upcoming section on licensing for more information), using an image with SQL Server already installed gets you not only set up but also gets you the license(s) required.
If the Marketplace images with SQL Server do not suit your needs, consider an image with just an OS or build your own.
Using an image without SQL Server installed
Instead of using a template with the OS and SQL Server already installed, you can choose one that has the desired OS only. Choosing an image with just the distribution of Linux is similar to what was described in the previous section.
There are a few reasons why you may choose to install SQL Server yourself. Three example scenarios are listed here:
- An image has something desired, such as the high availability add-on in RHEL needed for both FCIs and AGs already installed.
- A pre-built template with your desired version of SQL Server does not exist for the target OS, which has an image. For example, as of the time of writing this chapter, no RHEL 8 template is pre-built with SQL Server 2019. Another example would be if your corporate standard was a specific version or a build of Linux such as RHEL 7.5, which is supported for SQL Server but there is no pre-built image.
- Your company has other specific requirements or challenges for a build that are not met by any existing image, but a base OS provides a starting point. An example would be SQL Server 2019 running on Windows Server 2016.
Figure 2.5 shows an example of selected RHEL images available in East US 2 that are only an OS or a special variant:

Figure 2.5: Selected RHEL images
Once the VM with the chosen OS is built from the image, install SQL Server using the instructions found in the topic Installation guidance for SQL Server on Linux13 or SQL Server installation guide14 (for Windows Server-based VMs) and configure the instance of SQL Server to how you need it.
If a base OS image will not work, you still have one choice: create your own.
Creating your own image
To configure a custom hard drive image for use in Azure, follow the documentation linked below for each of the OSes supported by SQL Server:
Generic information that applies to the three Linux distributions for creating a custom hard drive can be found in the documentation topic, Information for Non-Endorsed Distributions19.
Similar to the previous section, you must also install and configure SQL Server in the OS.
SQL Server on Azure Virtual Machines resource provider
The SQL Server on Azure Virtual Machines resource provider is one way in which Microsoft makes deploying in Azure easier for administrators. This feature is only available for Windows Server-based VMs and can even be enabled if you deployed SQL Server yourself and did not use a Marketplace image pre-installed with SQL Server. To see how to perform this task, consult the following documentation: Register a SQL Server VM in Azure with the SQL VM resource provider20.
The resource provider allows you to configure certain aspects of SQL Server, but, more importantly, also tasks such as backups that Microsoft can do for you instead of you having to configure it all inside the VM. An example is shown in Figure 2.6:

Figure 2.6: Backups in the SQL Server resource provider
Other things that you can configure include security and patching. For patching, Microsoft will only apply updates marked as important, such as security updates. You will still have to apply things such as SQL Server Cumulative Updates, but you can specify the day, time, and maintenance window duration for applying important updates.
Common Azure VM deployment considerations for SQL Server
Last, but not least, there are some common considerations and best practices when deploying IaaS VMs in Azure for SQL Server, whether they are Linux- or Windows Server-based.
It is not recommended to assign a public IP address unless necessary as this exposes the server directly to the internet. VMs should be created on virtual networks that are private and accessible by authorized personnel. If connecting via on-premises to Azure, the assumption is that Express Route or a private VPN will be used so that the VM will be seen as if it was on-premises.
- If needed, open ports for accessing the VM, such as RDP (3389) or SSH (22).
- For most implementations of SQL Server, use a single virtual network interface card (vNIC), which is the default configuration. One vNIC is not a single point of failure as the underlying Azure network infrastructure is highly redundant and there are means such as Availability Sets and Availability Zones to ensure that VMs themselves will not be single points of failure.
- The VM relies on core elements of infrastructure such as DNS, to work properly. Even in a hybrid solution that would span on-premises and Azure, ensure that those key elements exist both on-premises and in the cloud.
Licensing SQL Server in Azure
Last, but not least, a major consideration for how you deploy in Azure relates to cost. All VMs deployed in Azure must be properly licensed even if what is inside is technically free. There are two aspects of licensing that must be accounted for: the OS and SQL Server.
Your choice of supported Linux distribution for SQL Server will dictate whether you need a paid license. For example, RHEL does require a license. All of the options are documented at the Red Hat on Microsoft Azure21 page on Red Hat's website. Consult the Red Hat Linux Enterprise Server section at that link. Windows Server always needs to be licensed.
When it comes to SQL Server editions, Standard, Enterprise, and Web editions always require a license. SQL Server Developer and Express are technically free, but do have a license, and there may be restrictions regarding use. For example, Developer edition cannot be used for production workloads.
There are two models for licensing SQL Server in Azure: bring your own license (BYOL), or pay for the license as part of the cost of the VM, known as pay-as-you-go. For pre-built images with SQL Server, both options are often feasible. As of the time of writing this chapter, BYOL images are only an option for Windows Server-based SQL Server images.
If you are migrating to Azure or have unused licenses and also have Software Assurance, the Azure Hybrid Benefit for SQL Server allows you to use existing on-premises licensing and apply it to an IaaS VM. This can potentially reduce the cost of an IaaS VM.
There is a new Azure-specific licensing benefit introduced with SQL Server 2019 if you have Software Assurance: the ability to run a VM that has a standby server for disaster recovery. For example, if you have an on-premises Always On availability group and want to add an asynchronous replica in Azure, it is now free. This could represent a significant cost saving and can even be seen in the Azure portal, as shown in Figure 2.7:

Figure 2.7: Licensing info from the Azure portal for a Windows Server-based VM
Full licensing information for SQL Server can be found on the Microsoft websites for on-premises pricing22 and SQL IaaS pricing23, as it will factor into the VM hardware choice and its cost since each SQL Server VM is usually licensed per virtual processor. More on choosing a VM size is covered in the next section.
Azure VM hardware options
VMs have a virtualized processor, memory, and storage. Processor and memory factor into the VM type and its choice of size. Storage is influenced by the VM type and size, but has its own parameters. This section will introduce the basics of VM types, sizes, and storage. Performance will be touched upon as this is a crucial element of configuring a VM and will be discussed further in Chapter 5, Performance.
VM types and sizes
This section will contain information about the different types and sizes of IaaS VMs available in Azure.
VM types and series
VMs in Azure come in different types and sizes. Within each major VM type, the size maps to what is known as a series, such as D, E, and G. Each series has different sizes with different specifications. The following table lists the different VM types and their purpose:
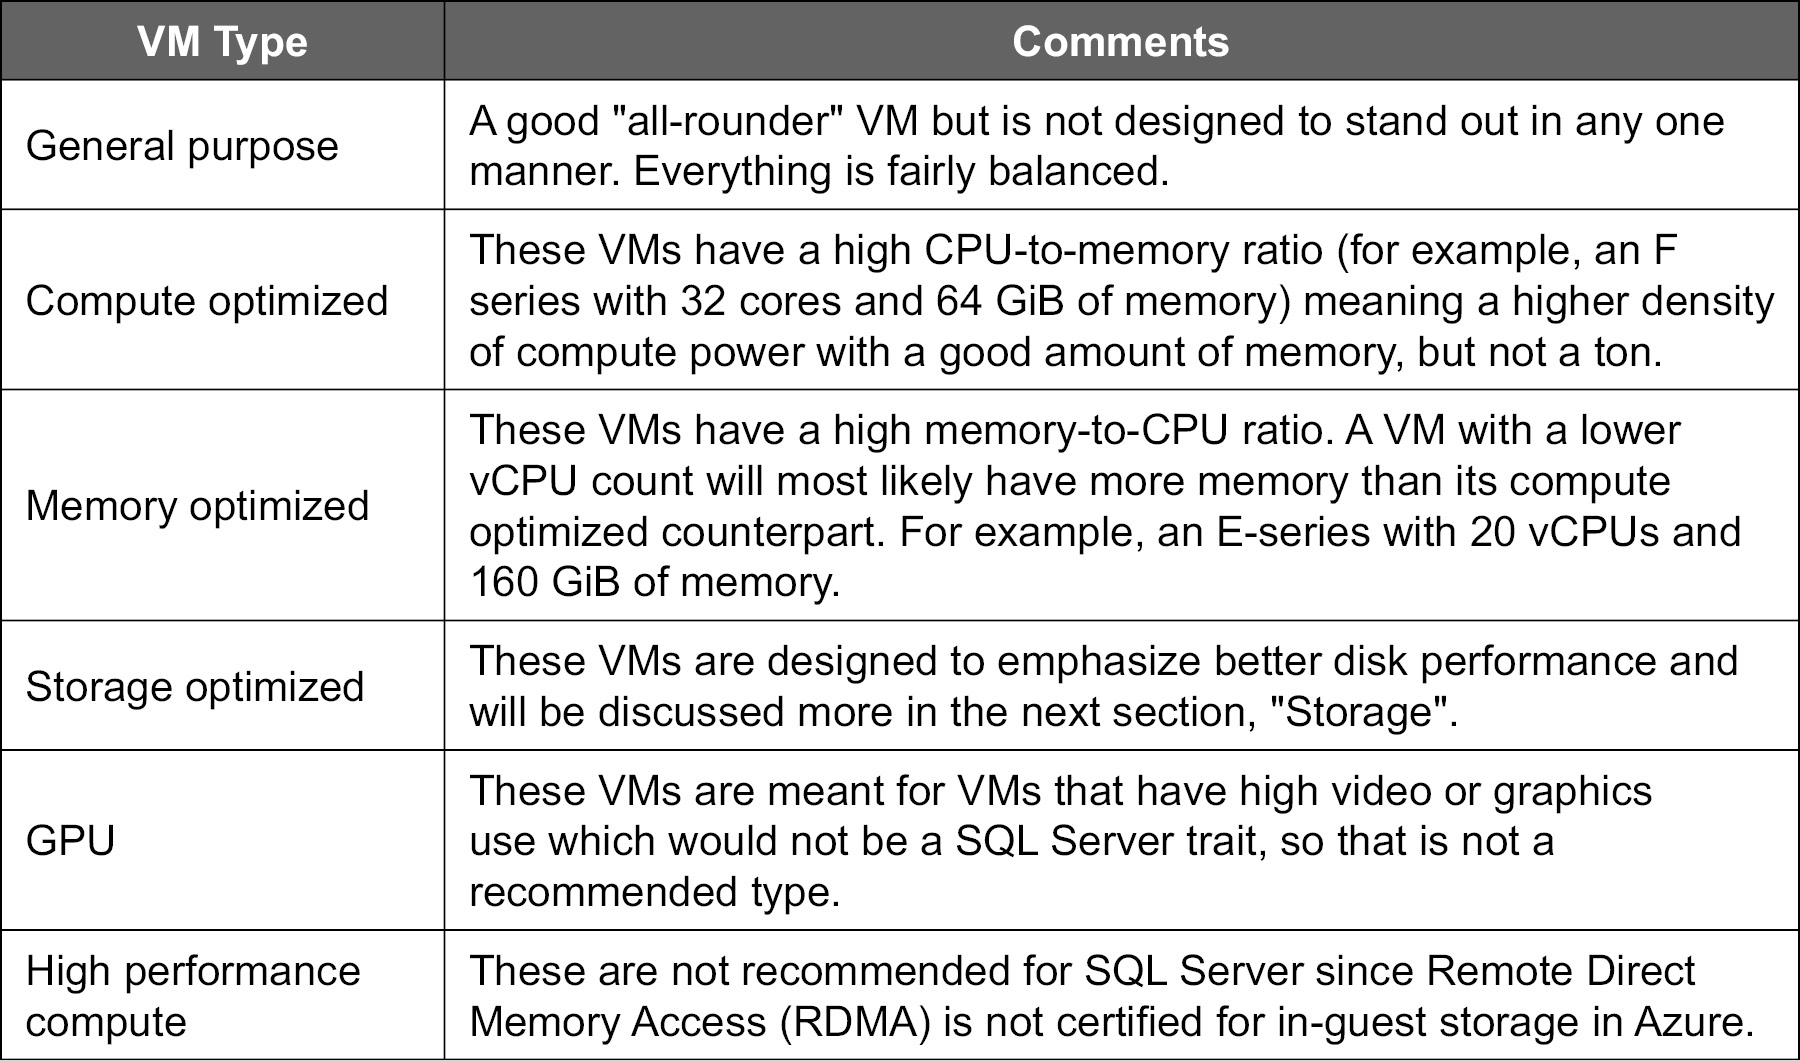
Figure 2.8: Different VM types with their recommended usage
VM resources can be reserved and guaranteed by paying for a reserved instance. There is also the option to use dedicated hosts for the VMs, which would isolate performance further. Spot VMs allow you to use capacity in Azure, but if Azure needs those resources, the VM can be evicted. For that reason, a Spot VM is not recommended for permanent production SQL Server workloads. More information on Spot VMs can be found in the documentation in the Use Spot VMs in Azure24 section.
VM size
Within each VM type category, there will be multiple VM sizes available, each with different capacities and limitations. Some VMs may not be available due to regional restrictions, subscription policies and constraints, quotas, and suchlike. The region(s) and VM sizes that you will be able to use may also depend on your company's standards as well as any policies they may put in place that could restrict how, what, and where things are done.
Note
Consult Microsoft Docs25 to learn more about the details of the different VM types, the sizes currently available, the types of processors used for each, and their limitations.
How to choose a VM for SQL Server
Choosing a VM type and size depends on the database workload. This means that you need to know about the application and/or database profiles. Do you currently use a lot of CPU but not as much memory? Do you use more memory but not as much CPU? Do you pound your disks a lot on-premises and need a certain amount of guaranteed IOPS? A mixture of the above? These are the types of questions you will need to answer in order to pick the right type and size. The best way to know is to profile, baseline, and benchmark your application's workload to understand how it is using SQL Server and the underlying server.
Furthermore, a specific VM size will limit the amount of resources and the limitations are a hard cap. Once you hit it, that limitation cannot be upped with that VM size. To increase a limitation, the VM will need to be resized to a larger VM with minimal downtime.
Consider this example: as of the time of writing this chapter, there is a memory-optimized type VM size of Standard_E20s_v3/Standard_E20as_v4 that has 20 vCPUs, 160 GiB of memory, and up to eight virtual network cards with up to 8,000 Mbps speed. Storage aspects will be discussed in the next section.
A VM's number of vCPUs is static. Unlike using a hypervisor on-premises, what you select is what you get. If you need 17 vCPUs, the current minimum size for a memory-optimized VM that could be used would be the Standard_E20s_v3/Standard_E20as_v4. A Standard_E16s_v3/Standard_E16as_v4 has 16 vCPUs; it cannot be configured to have more. Read the descriptions in the link in the earlier side note for descriptions on the underlying CPUs, their speeds, manufacturers, and so on in order to make a correct determination of which type and size of VM to use. For example, while the Ev3 VMs are based on Intel processors, Eav4 VMs feature the AMD EPYC(TM) 7452 processor.
The same is true for memory. If you require 256 GiB of memory for a memory-optimized VM but only need 17 vCPUs, you must step up to the Standard_E32s_v3/Standard_E32as_v4, which has 32 vCPUs and the amount of memory required. You cannot add memory to an E20s/E20as. And if you require 2,000 GiB of memory but you only need 64 vCPUs, the Standard_Ea96s_v4 VM with 96 vCPUs would provide you with the right amount of memory. In both scenarios, to get more memory, a bigger VM must be selected.
The VM of choice must also account for the network throughput required. If you are planning on implementing a feature such as an availability groups for a busy database, you should know how much throughput you will need to ensure that the network will not become a bottleneck.
VMs can be resized to be bigger or smaller; however, downtime will be incurred. Plan accordingly.
Storage
This section will cover storage concepts for IaaS.
Disk types
There are five types of disks that a VM can use:
- Standard HDD
- Standard SSD
- Premium SSD
- Ultra Disk
- Temporary storage
Detailed information about the different types of disks and their limitations can be found in the documentation topic What disk types are available in Azure?26, but their names are self-explanatory.
For SQL Server production workloads, Standard HDD and Standard SSD are generally not recommended. While they are less expensive, they often do not provide enough performance for demanding applications. Most SQL Server workloads will perform well on properly configured VMs using Premium SSD or Ultra Disk. Premium SSD also has a feature called Azure blob cache, which can improve performance. How it works is detailed in the blog post Azure Premium Storage, now generally available 27. Ultra Disk is the fastest and most expensive storage, but may not be available in all regions or for all VM sizes. In addition, it may have to be enabled for the subscription. A sample message is shown in Figure 2.9, where there is some sort of restriction for Ultra Disk:

Figure 2.9: Ultra Disk not available for use
Sometimes, in order to attain the performance needed, multiple disks need to be configured and then, inside the VM, grouped together with Storage Spaces (Windows Server) or using the Linux tools to create a single logical volume from two physical disks presented.
Disk capacity
Disk types are one piece of the storage puzzle. The other is size, or capacity. Each disk type has different sizes of disks to choose from. For example, as of the time of writing this chapter, Premium SSDs have sizes with names such as P30 and P40. Each one has different maximum specifications. For example, a P30 disk today has a maximum size of 1,024 GiB and a P40 2,048 GiB.
If your database size and projected growth exceeds the smaller size, but is less than the next one, you will need to purchase the larger size. This means that if your database is over a terabyte in size (a P30), but less than two (a P40), you will need to consider a P40 if you wish to configure a single disk. There are other ways to achieve capacity greater than a terabyte that will be described in the following sections.
Storage performance
Storage performance is different, but a completely related concept. Part of choosing the right disk configuration is understanding your performance requirements. Also similar to VMs and deciding what type, series, and size to choose for the right processor and memory, you must choose your disk configuration based on the performance required because the limits are rigid. The preceding link documents accurate guidelines for the performance you can expect from each type of disk in certain categories.
Not all parameters are documented for the different disk types. For example, a disk rated at a specific speed will deliver up to that for whatever kind of I/O was tested, but it may not work well with your workload. Always test to ensure that you are getting the performance required before going into production with your workload.
Consider this example: as of the time of writing this chapter, a single P30 can sustain up to 5,000 IOPS at 200 MiB/sec, and the larger P40 disk, 7,500 IOPS at 250 MiB/sec. If you have a database that requires half a terabyte of space but needs 15,000 IOPS or a sustained 450 MiB/sec, you are possibly looking at the equivalent of a P60 if using a single disk or configuring multiple smaller disks (either to look like one disk or spreading the database across those disks).
There is a second and equally important aspect that gates storage performance: the VM type and size. Each VM is rated for storage throughput. A disk with higher throughput ratings can be attached to a VM that has lower throughput, but the storage will only run as fast as allowed by the VM type and size.
Assume that you are using a Standard_E20s_v3 VM. For storage, it can have a maximum of 32 data disks, 320 GiB of temporary SSD storage (which has a ceiling of 40,000 IOPS/320 MBps of throughput with 400 GiB of cache), and a maximum of 32,000 IOPS/480 MBps of throughput for the VM outside of temporary storage.
If your current production workload needs nearly a gigabyte per second of throughput, the E20s will not do it. Assuming you want to stick with an E-series VM, you would be looking at a size of E48s or E64s. The limit of 480 MBps for the E20s is hard; the VM will never achieve more. Looking at the choice of disk, a single P60 would come in at half the amount of IOPS that an E20s VM could achieve. The VM would not let it achieve more than that figure of 480 MBps. This means that the single P60, rated at 500 MBps, could never hit that. You could use two P80 disks to achieve 40,000 IOPS, but would still be capped at a maximum throughput of 480 MBps, even though each P80 disk is rated at 900 MiB/sec. Choosing a VM hardware is about making trade-offs and compromises. Similar considerations would apply to the EAs VM series, even if the throughput information you can find in the documentation will be different.
Another restriction is that certain VM sizes cannot use premium disk types, which also may factor into what VM you use. If you're using the Azure Marketplace, you will see a message similar to the one in Figure 2.10:

Figure 2.10: Error message when trying to use Premium SSD
If you are using a Windows Server-based Marketplace image pre-installed with SQL Server, you can select the type of workload and get some assistance optimizing the storage configuration, as shown in Figure 2.11:

Figure 2.11: Storage configuration pane in the Azure portal
Note that what has been discussed previously is also seen at the bottom in the warning where you may not get the throughput needed and the limitation of the number of disks. Another good aspect to being able to configure this at the time of provisioning the VM is that you can enforce standards for things such as drive letters and data and transaction log file folders.
Ephemeral storage and SQL Server data and transaction log files
Each VM has temporary, also known as ephemeral, storage. Anything configured on this storage is lost if the VM is shut down or rebooted. Therefore, it is not recommended for SQL Server data or transaction log files for application or user databases.
The only potential use for ephemeral storage is TempDB. TempDB is recreated every time SQL Server is restarted, so by the nature of its design, what is in it is not permanent.
There is one caveat if you choose to use this storage for TempDB: the size of the ephemeral disk is fixed and can never be expanded. The only way to make it bigger is to choose a different VM size. That also means that performance cannot be greater than what the VM allows for that disk without resizing. If you know that your TempDB usage meets size and performance requirements, you can consider ephemeral storage since it generally performs better for some things, including 8 KB writes.
Storage-optimized VMs use local non-volatile memory express (NVMe) storage that is ephemeral. If the VM is rebooted, anything configured on the temporary disk is lost. This means that storage-optimized VMs as they are configured as of the time of writing this chapter are not recommended for SQL Server use.
Summary
Choosing a VM type, size, and its associated virtual hardware is no different to planning and deploying a physical server or VM on-premises. You have to account for CPU, memory, networking, and storage. While this chapter covered the basics of deploying an IaaS-based VM for SQL Server in Azure, there are many more considerations, such as availability and security, that must also be considered as part of an overall solution. Subsequent chapters will discuss those topics and more.
Chapter links
- https://bit.ly/2ZFMfx7
- https://bit.ly/3d4oiDw
- https://bit.ly/3gkCUkc
- https://bit.ly/2X1burV
- https://bit.ly/2LXSYdK
- https://bit.ly/2TB4sHY
- https://bit.ly/2A4dsP6
- https://bit.ly/2zi0ai5
- https://bit.ly/2zi0hdv
- https://bit.ly/36rGrIE
- https://bit.ly/3d1Xyn4
- https://bit.ly/2ZBerkK
- https://bit.ly/2Xuj0dI
- https://bit.ly/2TDBFTh
- https://bit.ly/2A4evyw
- https://bit.ly/2XpdV6s
- https://bit.ly/3ei9MZ2
- https://bit.ly/2LXkA2p
- https://bit.ly/2WXTFde
- https://bit.ly/3bXoIKx
- https://red.ht/2A8ItRQ
- https://bit.ly/2yuFhj5
- https://bit.ly/3eeClq7
- https://bit.ly/2ZBghlE
- https://bit.ly/2LTjvJ7
- https://bit.ly/3ekIpNZ
- https://bit.ly/2LVFCOZ