In the previous chapters, we covered the core elements of running Microsoft SQL Server in Azure VMs. Now that we understand how to provision and configure our VMs, we will move our on-premises workloads to the cloud.
Moving on-premises workloads directly to Azure can be daunting. However, by making use of Azure Virtual Machines (VMs), we can fully realize the potential of cloud-based agility and versatility without needing to re-engineer our applications. This approach also helps us when we face challenges such as refreshing aging hardware or upgrading to supported SQL Server versions. What historically could have taken months to plan and execute with high up-front spending, can now be handled without the initial expense in a much shorter timeline.
We have two main options for handling the migration process to Azure VMs. We can tune the workload ahead of moving it to the cloud, which can prove to be cost-efficient but will take longer to realize the value. Or, we can move the workload and then tune it. The latter approach allows us to make use of cloud capabilities and new SQL Server features such as Query Store, which accelerates our workload tuning.
Achieving benefits of the cloud such as increased agility and scale is possible by lifting and shifting workloads to Azure VMs or cloud modernization to an Azure SQL Managed Instance. The exact target will be dependent upon the workload and its dependencies as to which is the best fit initially. In addition to the benefits mentioned already, there are several additional benefits regarding high availability and disaster recovery, which can be leveraged simply by using the Azure cloud.
In this chapter, we will look at some of the tools and techniques available for lifting and shifting our workloads in the most time-efficient and cost-effective manner. This chapter will be divided into three main parts:
- Migration tools and best workload migration practices
- Application considerations
- Moving to the Power BI service from Power BI Report Server
The most important element of any migration is to effectively identify and locate data/workload that needs to be migrated. In the past, this had to be done manually, but now there is a great array of tools that we can make use of to achieve this.
Migration tools and best practices
There are many ways to get your SQL Server workload from on-premises to Azure VMs, but which one should you choose?
In this section, we will look at the best practices to follow as well as tools available to us in order to successfully migrate on-premises workloads to Azure VMs. Let's begin by looking at best practices.
Best practices
When migrating workloads to the cloud there are a few key factors that need to be considered in order to achieve success. These are:
- Understanding the scope of what is impacted by the migration.
- Identifying the current performance levels.
- Timelines for migration activities.
By understanding these key requirements, we are then able to plan and implement the migration of workloads.
Not having a full picture of what needs to be included in a workload migration is one of the most common hurdles that we need to overcome. This is the foundation to successfully accomplish all of the migration activities. If we do not get this right, it is akin to building a skyscraper on sand.
Defining migration scope
There are three main elements to this scoping exercise:
- Identifying systems that are to be migrated and the ones that are not to be migrated.
- Technical analysis of the components within the system.
- Speaking with the consumers of the system to understand their needs.
First and foremost, we need to understand and identify the servers and databases that we will be moving. Are the databases currently co-hosted with other databases on the same server or are they hosted on a dedicated server? Understanding this will help us get the information that we need to prepare the target server.
Once we understand which systems are in scope, we need to analyze the source system(s). Identifying both instance- and database-scoped configurations and objects is key. Everything ranging from linked servers, credentials, and logins, to SQL Agent jobs will need to be assessed to identify whether they need to be migrated or replaced on the new platform.
Finally, by speaking with the consumers at this time, we can understand the perceptions around the current performance and availability requirements. The availability requirements help us define the migration process for the database(s) that need to be moved.
Identifying current performance
An age-old problem with migrating workloads from one system to another is the dreaded "It's not performing like it used to" statement from the consumers. The best way to tackle this is to ensure that you have solid benchmarks and performance details for comparing workloads post-migration.
Note
When looking to understand SQL Server performance, you should really base your monitoring and analysis on the Waits and Queues methodology as seen in this Microsoft whitepaper1.
By using the Waits and Queues approach we can rapidly identify the key performance counters we need to track. In the queues category, we can capture counters that fall into three key pillars. Underpinning these is the foundation of what we can think of as "general" counters, which we can use to track workload throughput.
Figure 6.1 highlights some of the key performance metrics (queues) that we need to consider when understanding our SQL Server workloads.

Figure 6.1: Key performance metrics
Note
It should be noted that Page Life Expectancy (PLE) on its own is not a key performance indicator for your workload. It is important to understand the size of the buffer pool and how much of your I/O sub-system capability is being consumed to maintain the PLE number to dictate what is appropriate and what is not.
When these key performance metrics are combined with server-level wait statistics collection, it will give us a good idea of whether there are any pain points. Additionally, this capture will act as a performance baseline that we will use to validate the new system's performance.
Migration timeline
Defining a timeline for migration activities is vital but it needs to be realistic. You may come across a number of situations where the timelines have been set with unrealistic goals. This results in us needing to cut corners and delivering an inferior customer experience. Key factors that we should consider when setting migration timelines are:
- System complexity.
- Platform and application validation.
- Volume of data to be migrated.
- Acceptable downtime for the business.
These four elements will help us create an estimated timeline for a successful migration process. Within these phases, it is important to identify where we can run parallel tasks as well as to make use of automation for repeatable tasks.
Automation is key when performing migration activities. Everything ranging from the initial analysis to platform validation, and ultimately the migration itself, allows us to perform consistent and repeatable database migrations.
Migration and analysis tools
Microsoft provides several great tools for helping us move on-premises workloads to the cloud. They range from ones that help us identify blockers through to those that move our databases. The tools that we are going to look at here are:
- Microsoft Assessment and Planning (MAP) Toolkit2
- Data Migration Assistant (DMA)3
- Database Migration Service (DMS)4
In addition to these, there are also some key community-based open-source tools that we can use to speed up the process and automate the migration of workloads, including:
The tools listed above fall into two categories: analysis and migration. Some of them can perform or facilitate both such as the Data Migration Assistant (DMA) or dbatools, but that is not the primary purpose.
One of the most common challenges we will face with any migration is not understanding the requirements of our workloads. There is a common misconception that because we are moving from on-premises servers/VMs to cloud-hosted VMs, we don't need to do our homework. Although the operating system and SQL Server that we have been running on-premises are the same, the underlying platform and the overall operating model is radically different.
MAP Toolkit
Our first port of call is to start with gathering key information about our existing environment. The quickest and easiest way to perform this is with the MAP Toolkit from Microsoft. It is a free tool that can discover and analyze SQL Server systems. This has the advantage of letting us scan one or more servers and discover a lot of detail around the SQL Server elements that are installed on our source systems.
Figure 6.2 shows how the MAP Toolkit can help us identify the installed components on the source servers. This will help us understand whether we can simply lift and shift to the cloud or need to augment with additional services such as Azure Data Factory or Power BI.

Figure 6.2: MAP database analysis
Using MAP database analysis, we can capture details for the configuration of the server and databases by generating reports from the MAP Toolkit. This information then allows us to define the configuration of the target systems.
Data Migration Assistant (DMA)
The DMA takes our analysis to a deeper level and starts assessing whether we have any blockers. It also allows us to view any recommendations that we might want to address ahead of moving our database.
DMA is designed to perform an analysis of many different combinations. We are going to start with SQL Server as the source and target SQL Server on Azure VMs. The process for configuring DMA to assess databases and servers can be seen in Figure 6.3.
Note
While having a high degree of parity, SQL Server 2019 on Linux does not have all the same features as the Windows version. If we are targeting SQL Server on Linux, the DMA helps us spot any potential incompatibilities without us needing to review the documentation manually.
There is a logical flow to using DMA for analysis, which will give us a clear and concise report about any potential blockers. Before we run the analysis, we need to understand what we want to know and where we are going from and to. We can then get into the specifics of which tests we want to run as well as the specific versions of SQL Server. One of the useful features in the DMA is it's ability to load in workload trace files for the database(s) we are analyzing. And we would encourage you to do this to get a better picture of what is going on. Once all of this is complete, you can run the analysis and then review the report.
Note
It is possible to automate the use of DMA with command-line arguments. More details can be found here7.

Figure 6.3: DMA analysis steps for the SQL Server VM target
The subsequent DMA report highlights legacy T-SQL syntax and other incompatibilities, deprecated and discontinued features, and recommendations for feature usage in the target version. For example, it can identify potential objects where dynamic data masking or Always Encrypted column-level encryption features could be beneficial based on the object names.
While DMA has a primary role in analysis, it can also perform basic database migrations. However, for a richer and more robust migration experience, we would suggest using Azure Database Migration Service.
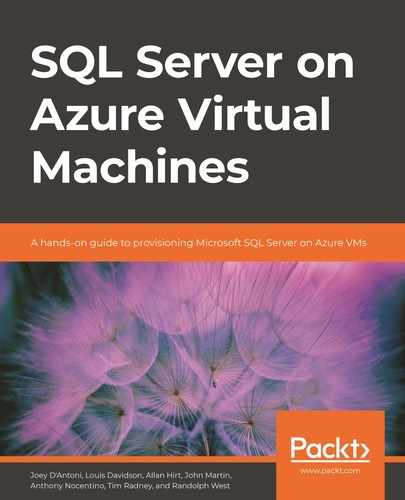
WorkloadTools
The final piece of the puzzle to successfully plan moving workloads to Azure is the workload analysis.
Here, we would recommend you look at an open-source tool called WorkloadTools. This tool can capture, analyze, and replay workloads. This capability means that we can ensure that a migrated workload will behave in the expected way once it has been moved to Azure.
By using WorkloadTools, we can mirror production workloads in an Azure VM. This allows us to demonstrate that the new system will meet the performance requirements, while at the same time allaying any fears that you might have about the new platform.
Figure 6.4 illustrates the high-level architecture to configure the WorkloadTools system to collect, replay, and compare workload details. The first step is to capture the workload metrics from the source system to be migrated. This is replayed to a test copy of the database on the target infrastructure configuration. The second step is to collect the performance metrics from the replayed workload. Both activities store their performance data in a central database in different schemas. This facilitates step 3, which is where we review and compare the metrics from the two captures to ensure that we have a comparable level of performance. If not, we can then reconfigure the target system and rerun our tests and captures.
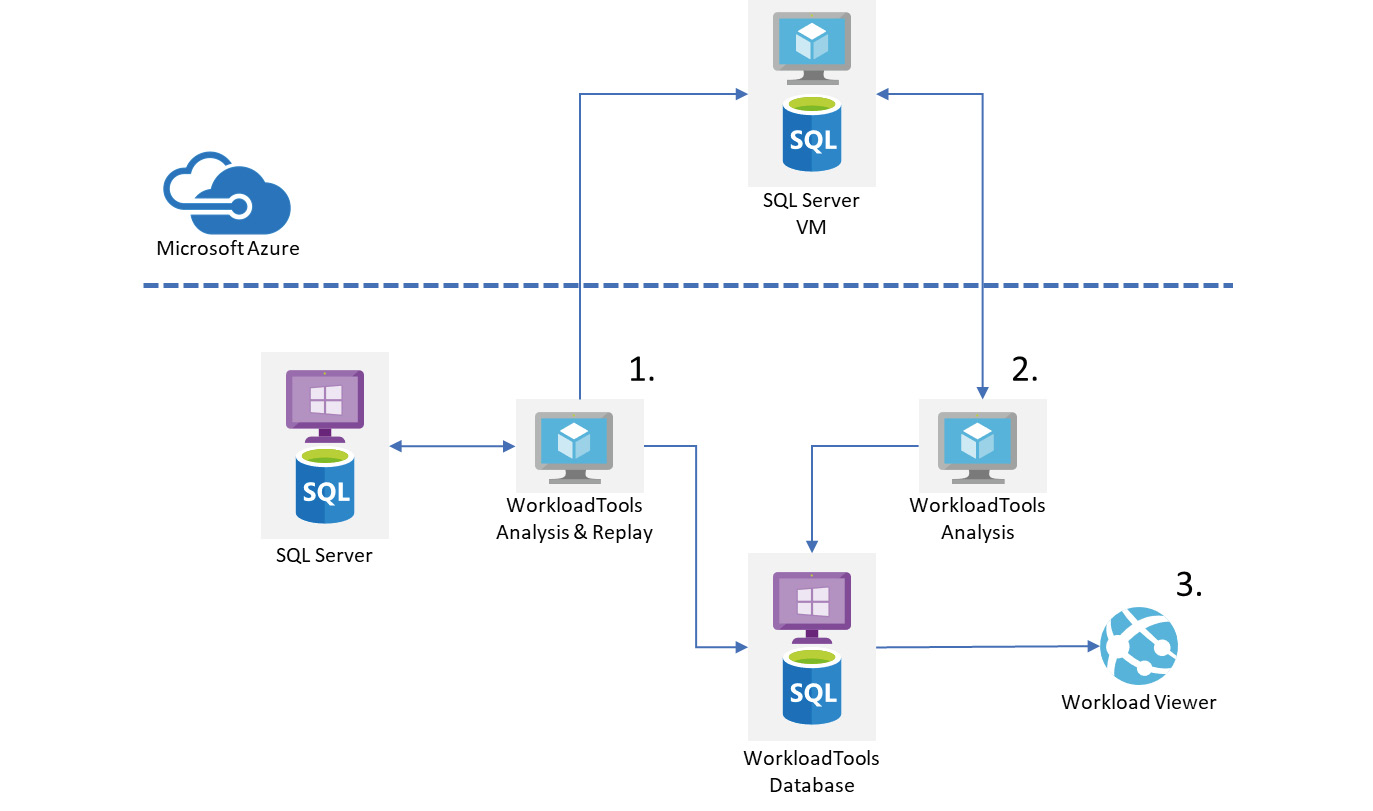
Figure 6.4: WorkloadTools architecture
Once we have finished our analysis, we can move the database and its workload. We can also then reuse these tools to perform continued troubleshooting and workload analysis through the lifetime of the system. By storing the data each time, we can track improvements or regressions over time.
SQL Server is a highly versatile and adaptable database engine with a mature tooling ecosystem. This means that we have a number of different ways to move databases to the cloud.
One of the most common methods for migrating databases between SQL Server systems is to perform a backup and restore. However, depending on the size of the database, this can range from a very short time to many hours for multi-terabyte databases. We can look at options such as log shipping, transactional replication, or availability groups to perform the migration with less downtime. But these will depend on a number of external factors that could complicate matters. We will look at how to migrate databases by manually taking a backup and restoring it to the target. We will also see how to automate this with log shipping and then touch on Database Migration Service (DMS) and DMA to migrate databases. But first, we need to get the prerequisites moved at the server level.
Key analysis points
Once we have completed our analysis phase, we will be in a position to move forward to the migration planning. However, in order to plan effectively, we need to have collated our analysis data so that it is able to inform the following key decision points:

Figure 6.5: Key decision points for migration planning
Once we have these key data points, we can build out an information pack, which we will be able to refer back to during our migration.
When reviewing the output from this analysis phase, we need to do so with a cloud mindset. This means that whereas historically we would buy and provision servers with lots of headroom to grow, instead now, we want to run our servers hot. The ability to easily scale up our servers without needing to first put physical resources in place is one of the great capabilities of cloud-based VMs. For example, we should review our CPU resource usage; if it is 40% with spikes to 60% on-premises then when we move to the cloud, we can look to pick a machine with less compute that results in us running at 60% with spikes to 80%. This will help us get a better ROI on the cloud infrastructure we deploy.
Another area that many people neglect to review properly is the maintenance window activity. Database consistency checking, index and statistics maintenance, and backups are all still applicable in the cloud. Ensuring that you have the appropriate resources in place to perform these activities in the time windows available is important.
dbatools—migrating instance-level objects
While moving the database takes much of our focus, a key prerequisite is that instance-scoped objects are migrated first. If we do not move our logins, credentials, linked servers, Agent Jobs, etc., then we will not have a successful migration as there are database dependencies on many of these. There are many ways to perform these tasks—from custom T-SQL to SSIS and even bespoke SMO application code. However, we would recommend using the dbatools community PowerShell module for these activities.
Within dbatools there are several commands that are dedicated to the migration of SQL Server objects. What this means is that we can write PowerShell scripts to perform these migration activities with the added benefit of then leveraging automation technologies to execute them.
The key migration commands that we should look at understanding and using are:
Copy-DbaAgentAlert
Copy-DbaAgentJobCategory
Copy-DbaAgentJob
Copy-DbaAgentOperator
Copy-DbaAgentProxy
Copy-DbaCredential
Copy-DbaLogin
Copy-DbaCustomError
Copy-DbaDbMail
Copy-DbaLinkedServer
Copy-DbaXESession
Copy-DbaSpConfigure
Copy-DbaAgentSchedule
There is also the Start-DbaMigration command within the PowerShell module. This will perform many of the key activities to move instance-scoped items, including all the items listed above, as well as moving the database, and more. Details about this command can be found here8.
Note
It is important to remember to consider whether there are third-party backup agents etc. that you will need to install on the new servers. For example, if you are using a third-party backup solution, you might need a new agent and configuration to maintain your database maintenance routines.
One of the key areas that sits outside of the database that is migrated is the backup of database assets. Within Azure VMs there are all of the existing options related to built-in backup and restore capability. However, by moving to Azure VMs it is possible to consider additional capabilities in this space. There are two key options that are available to us:
- Backup to URL
- Azure Backup
Backup to URL is a feature of SQL Server that is part of the built-in backup and restore capabilities. It is relatively seamless to switch from this built-in backup to SMB file sharing to target an Azure Blob storage account. By making use of this we can remove the management of backup locations on Windows file shares or local storage volumes. Additionally, because of the locality of the backup target, the performance considerations around networking that we would have had on-premises are largely mitigated.
Azure Backup for Azure VMs with SQL Server provides a centralized management and reporting pane for your backup infrastructure. This is a native capability within the Azure platform and has a specific SQL Server agent that can be deployed. The data itself is then backed up and stored in Azure Recovery Services vaults.
In my experience, the choice of which to use depends largely on support team models and the larger infrastructure. If the database servers are the only ones being deployed to the cloud at this time, then Backup to URL is my preference as it is still firmly in the realm of the DBA to set up and manage. If there is a larger infrastructure deployment where other IaaS VMs are in play, then I would use Azure Backup as it then provides a single-pane-of-glass view on all backup activity in enterprise deployments on Azure.
Both of these options provide an additional level of protection for SQL Server backups in ransomware scenarios. By having them isolated in another storage platform, it means that in the event that your infrastructure is compromised, you'll be safe in the knowledge that you'll be able to recover.
Migrating databases to the cloud
Now that we understand our workloads, the dependencies, and have all the prerequisite work completed, it is time for us to do the heavy lifting. Now we will look at how we can move our databases to our Azure VMs.
Backup and restore
As of SQL Server 2012 SP1 CU2, it is possible to back up directly from SQL Server to Azure Blob storage. This greatly simplifies the process of migrating databases from SQL Server on-premises systems to those based in the cloud. By using Blob storage, we can remove the need to extend our network to Azure by using secure transfers via the public storage endpoints.
This can be achieved by following the steps shown in Figure 6.6:

Figure 6.6: Backup and restore procedure in PowerShell
Once we have the Azure storage in place, we can follow the migration process shown in Figure 6.7 to move the databases:

Figure 6.7: Database migration process via backup and restore
Note
It is important to remember when restoring these databases that if the path on the target system is different from the source, you will need to use the MOVE clause in your restore statement and set the file paths that are to be used in the new environment.
Log shipping
Building on the backup and restore methodology, we largely automate the process by leveraging log shipping. It has several additional benefits, which we will cover in this section.
When we want to minimize downtime, we can make use of the log shipping feature in SQL Server to get the source and destination databases aligned. This allows us to minimize the downtime for switching between systems as the final log transfer should be small and quick. All that remains then is to re-point the applications to the new databases.
Log shipping is a tried and tested technique for moving databases between servers and is familiar to many database professionals. This approach also has the benefit of being able to seed multiple availability group replicas ready for migrating to a high-availability configuration.
However, it should be noted that to configure log shipping from on-premises SQL Server systems to Azure VMs, the network will need to be stretched to Azure. This can be done via a service such as ExpressRoute or a site-to-site VPN. By doing this, we are then able to easily make backups locally on-premises before copying them to Azure and restoring them in our VM.

Figure 6.8: Log shipping to Azure topology
As we can see here in Figure 6.8, log shipping is a logical extension and an automated form of backup and restore, which was discussed earlier. It is important to understand how to tune databases for performance by using the built-in backup and restore features of SQL Server, from adjusting the number of backup files, all the way through to the BUFFERCOUNT and MAXTRANSFERSIZE options.
Note
Refer to this documentation for more information on the backup9 and restore10 commands.
At this point, we have now understood our workloads, fulfilled prerequisites, and migrated our databases to the cloud. Now we need to think about some of the external factors and considerations around what uses these databases.
Using DMS and DMA to migrate databases
Up until now, we have looked at how to perform the migration of databases manually or with built-in SQL Server capabilities. However, there are other options available in the form of DMA, which we covered earlier, and the Azure DMS.
DMS is a multi-faceted Azure service that can be used to migrate databases from multiple sources to SQL Server in Azure. This service will largely automate and coordinate the migration of database assets from on-premises to the cloud, providing a central migration project dashboard that we can reference. Creating and configuring a migration project is achieved via the Azure portal or PowerShell using the AZ module. This latter ability means we can easily template a migration project, allowing us to perform migrations at a large scale from on-premises to Azure in the event that we have many servers and databases to migrate.

Figure 6.9: DMS migration to Azure VM
When we are moving databases from on-premises to Azure VMs we need to configure some prerequisites within the environment to facilitate this. Notably, these include:
- An on-premises file share that SQL Server can send backup files to. This is an SMB share on port 445.
- An Active Directory (AD) domain account with permissions to access the share so that DMS can read the data.
DMS will help us automate the migration of databases from one SQL Server system to another by managing the backup and restore process. This is fine when we have one or two SQL servers to move; however, it really comes into its own when managing large-scale migrations effectively. The single pane of glass showing us progress and status is invaluable in coordinating the migration effort.
Note
At the time of writing, SQL Server 2019 in an IaaS VM is not a supported target for DMS. However, this is where DMA can step in and help us achieve our objective.
Previously, we used DMA as an analysis tool to look for blockers in our migration planning. It is also capable of helping us migrate databases from one server to another. Instead of performing an assessment, we create a migration project and specify our source and destination. As before, it is possible to use the command line to automate this process, so again, we can look to start moving larger volumes of databases and the data within them.
Application considerations
While moving the database elements to the cloud, it is important for us to not forget the application layer. For any cloud migration, it is important to consider application details such as its location and its sensitivity to latency. Building hybrid environments where the application remains on-premises while the database is hosted in an Azure VM is entirely plausible. However, if the application cannot handle the increased latency to the database, then you should really consider moving the application into the cloud. By doing so you can eliminate a large portion of the latency.
Beyond that, we need to really understand the way that the application authenticates to the SQL Server database. By lifting and shifting to an Azure VM we can avoid the need to re-engineer an application to support Azure AD for PaaS systems. If we are looking to include SQL Server on Linux as part of our migration, there are some additional steps we need to perform to configure the Linux VM to use AD authentication. This will then allow the users to connect using AD authentication.
Note
Here, you can find the key steps to configure AD authentication11. This covers all the steps you need to enable the use of AD user accounts to access database resources.
One big advantage of migrating workloads from traditional on-premises systems to Azure VMs is the ability to scale up and down as needed. By tracking the seasonality in the workloads and usage of our applications, we can plan resource utilization. For example, if we have a financial services system, we can scale the system up for key events like the end of the tax year and later scale it down as required. Likewise, for retail platforms, it is possible to scale up for Black Friday, Christmas, etc. and then scale down during quieter periods.
This increased agility and adaptability provided by cloud platforms ensures that customer needs are met.
Another key element that commonly gets overlooked at the application level is updating the connection drivers used by the application to connect to SQL Server. Over the last few years, Microsoft has resurrected the OLE DB driver, expanded the ODBC driver, and deprecated the SQL Server native client12. To support the latest features of high availability and security, we should look to update the connection drivers on the application servers. This also has a benefit in many situations for performance and the stability of the workload placed on the new version of SQL Server.
Congratulations—we have now migrated our application workloads to Azure by lifting and shifting them to IaaS VMs. Hopefully, you can now see that this is not the monster that many make it out to be. Yes, there are pitfalls, but with a clear method and process in place these can be avoided, and a successful migration can be achieved. The only outstanding element that we have not discussed is our reporting capabilities options. In the next section, we will look at the evolution of reporting services and how Power BI fits into the grand scheme of things.
Reporting in the cloud—Power BI
Historically, reporting in SQL Server on-premises has been handled by SQL Server Reporting Services. Over time it has had only minor increments in capability and enhancements. More recently it has been broken out of the main product as a separate download. This has been in tandem with the introduction and rapid expansion in the capability of Power BI Report Server, which is the next generation of on-premises reporting capability.
When making the decision about whether to install Reporting Services (SSRS) or Power BI Report Server (PBIRS), or to leverage the Power BI cloud service, it is important to understand the pros and cons of each option. While the Power BI service provides out-of-the-box high availability, huge scalability, and easy access for developers and information consumers, it does come with the downside of ceding control of feature and product update schedules to Microsoft. Contrast this with the VM IaaS deployment, where we have a lot more control over the configuration of the operating system and components that are installed. But this comes with the overhead of us needing to ensure that we get the IaaS design right for the deployment of services in availability zones or groups. We are also responsible for configuring the high availability and disaster recovery pieces of the infrastructure to achieve the uptime SLAs for IaaS VMs.
It is important to remember that the decision here should be primarily driven by which one best meets the requirements of the service we need to deliver. It is very common for technical teams to fall back on what they know and pick a technology out of comfort. Once the requirements are established and evaluated, the key driver becomes supportability. Putting a system in place where we have minimized our support overhead will put the long-term stability of the solution in a much better place.
PBIRS has several of the capabilities of the cloud-borne Power BI service but at the same time lacks the richness of its bigger sibling. One of the key drawbacks is that it is a software service that needs to be installed and managed within environments. On the other hand, the Power BI cloud services act as a SaaS/PaaS model. This means that we do not have to worry about updates and upgrades throughout the product lifecycle.
Figure 6.10 illustrates a basic PBIRS deployment scenario. We have the report server on-premises and it can connect to local and cloud-based relational engines.
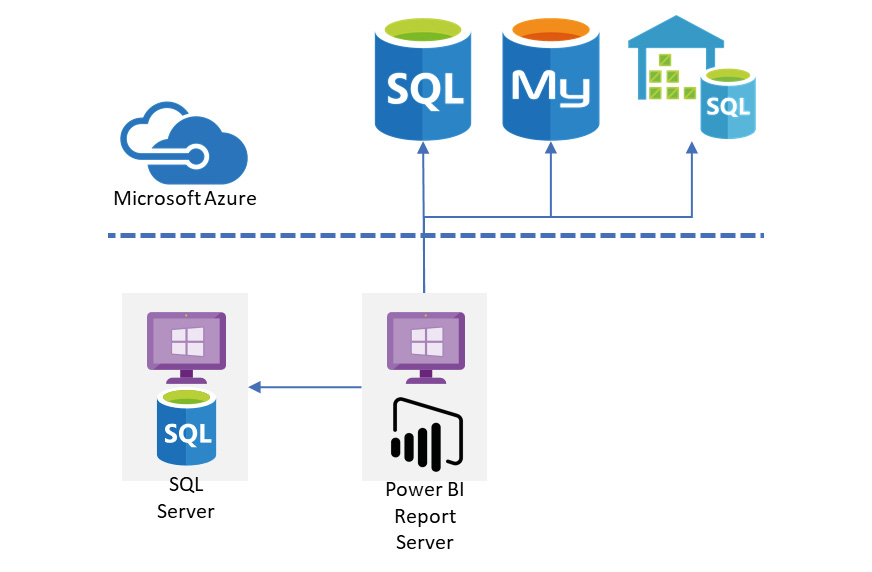
Figure 6.10: Power BI Report Server on-premises
When we contrast this with the cloud deployment model, we can clearly observe the increase in scalability and capability. This is illustrated in Figure 6.10. Here we can leverage the capabilities of Power BI to connect to a multitude of services beyond relational engines, including web services and APIs for many common cloud applications. Here's a complete list13 of data sources that Power BI supports for datasets. We can also deploy Power BI gateways close to our data sources if we are operating them on-premises for hybrid scenarios or in multi-cloud environments.

Figure 6.11: Power BI Cloud service deployment
When we make the jump from on-premises or IaaS hosted PBIRS to the PaaS Power BI service, the whole way we think about and manage the platform will change—moving from hierarchical folder structures with prescribed permission sets to workspaces. These workspaces can be managed or personal, with users able to collaborate and share content easily. As such, when moving to the PaaS-based solution, putting the effort in to get the governance in place early on is very important.
After we have made the decision to move to the Power BI service, we need to think about what types of reports our users consume. Do we simply lift the paginated reporting from PBIRS and place it in the service in workspaces that mimic our folder structures? Or, do we look to realize the capabilities available and leverage more dynamic and diverse dashboarding and reporting capabilities? The former is more akin to the lift and shift approach from earlier when we looked at the database elements. If we want to take the latter option, we can lift and shift the native reports (.pbix file) deployed on-premises to the cloud service. But to realize the true capabilities and value for our users, we will need to look at re-working some of the reports and dashboards. However, this can be done incrementally so, while not ideal, there are no blockers preventing us from rapidly using the Power BI service.
As with the migration of SQL Server databases, which we covered earlier, there are other supporting artifacts that we need to migrate too. These include, but are not limited to, email subscriptions, custom visualizations, security configurations, and bookmarks. Depending on the complexity of your deployments, the volume and scale of these elements will vary.
Other key elements that we need to consider during the deployment and utilization of the Power BI service are:
- Security and integration with Azure AD.
- Pro versus premium tiers.
- Monitoring and managing the Power BI service.
- Licensing and user management.
By combining all these elements and migrating our on-premises PBIRS to cloud services, we can build and manage a comprehensive analytics platform based in the cloud.
There are several Microsoft whitepapers14 covering planning, deployment, and the management of Power BI. These will help you plan and execute a successful deployment and migration to Power BI from on-premises systems. This content is invaluable in creating strong governance and an operating model to ensure data security and availability for our users.
ETL in the cloud
While our reporting platforms can connect to most data sources and allow us to perform operational reporting on OLTP platforms, when it comes to strategic reporting it is very common for us to need to report from a centralized repository of data that brings many sources into one place. On-premises the tool of choice is SQL Server Integration Services (SSIS). In the cloud we have a couple of other options available to us.
The shortest route to getting our ETL working in Azure is to deploy SSIS to an Azure VM and then deploy the SSIS project to this server. This mirrors our on-premises configurations and requires a very limited re-work of SSIS projects.
However, by moving our workloads to Azure, we also get the option of Azure Data Factory (ADF) to run our ETL workloads. There are two options here: one being to rewrite our SSIS ETL processes as ADF pipelines and the other being to host our SSIS packages in Azure and execute them through the Azure SSIS integration runtime15.
This latter option allows us to build a hybrid ETL solution where we can leverage our existing on-premises SSIS projects with very little change, as well as allowing the use of ADF for new development and controlled migration to the PaaS ADF service.
We have the ability to take a complete on-premises data platform ecosystem and run it in Azure IaaS VMs. Alternatively, with the Power BI service and ADF, we have the ability to migrate our data stores and at the same time leverage the PaaS capabilities of Azure to streamline our operations.
Summary
As we worked through this chapter, we had a look at how we can accelerate our adoption of cloud data platforms with SQL Server and Power BI. Microsoft recommends that the fastest way to realize the value of SQL Server in Azure is to lift and shift. This has many benefits from a familiarity perspective, meaning the removal of many barriers.
We looked at how to prepare for and then execute a migration to SQL Server on Azure VMs, highlighting several great free tools that are available to ensure a successful migration. Here's a step-by-step guide on how to migrate from on-premises SQL Server to SQL Server on Azure VMs16.
But this is only the beginning. Once we have got our databases into Azure, we can then look to take the next steps and move from an IaaS solution to PaaS. Many of the tools and techniques we have covered here still apply. There are more considerations on the application front, especially around authentication. But making the step to move to Azure SQL Managed Instance or Azure SQL Database is much smaller once we are there.
In the next chapter, we will be looking at how to use SQL Server in Azure VMs for building hybrid data platforms, looking at some of the key considerations of data replication, availability, and disaster recovery scenarios.
Chapter links
- https://bit.ly/36uDXcF
- https://bit.ly/2ZzTqXu
- https://bit.ly/2AdSLjF
- https://bit.ly/2X1ZJkT
- https://bit.ly/2TBpsyE
- https://bit.ly/2zlUtzJ
- https://bit.ly/3gpoLSP
- https://bit.ly/2TG9Zgz
- https://bit.ly/2X3uMg0
- https://bit.ly/2ZDzh2S
- https://bit.ly/3eirDPl
- https://bit.ly/2AWXSoN
- https://bit.ly/2B2sGVn
- https://bit.ly/3d7OcWQ
- https://bit.ly/3bXZtYh
- https://bit.ly/2LXJM93