
Chapter 16: Setting Up a CI/CD Pipeline and Image Registry
This chapter covers Continuous Integration/Continuous Delivery (CI/CD) pipelines and how they work with Rancher to deploy applications in standardized and controlled processes, including how injecting secrets such as database credentials into a deployment allows the application to use them without giving application teams access to the raw credentials. Then, this chapter covers how to set up and configure Harbor as a Docker image repository, including how to configure Harbor as a pull-through cache to work around the Docker Hub pull limits. And finally, we'll look at how to integrate Harbor as a private registry in place of the Docker defaults.
In this chapter, we're going to cover the following main topics:
- What is a CI/CD pipeline?
- Rules for architecting a solution
- How to deploy Drone and its runners in Kubernetes with Rancher
- Injecting secrets into a pipeline
- What is an image repository, and rules for architecting a solution
- How to deploy Harbor in Kubernetes
- Integrating a private registry into Kubernetes
What is a CI/CD pipeline?
CI refers to a coding philosophy and practices that encourage developers to frequently commit code to version control systems in software development. The goal is your applications and environment are defined as code commonly called Infrastructure as Code (IaC) or Platform as Code (PaC). As applications move from traditional monolithic architecture to more cloud-native microservice architecture, building, packaging, and testing applications become more complex. CI addresses this issue by focusing on being consistent and automated. This is done by moving these steps into a software framework such as Drone, which we'll be covering in this chapter.
Of course, CI is only the first half of the solution, with the other half being CD. The idea is that once an application has been compiled, tested, and packaged, we need a way to publish the application and its changes to our environments in a consistent and repeatable fashion. Because Kubernetes uses a desired state-driven technology, we only need to modify the desired configuration if we want to change something about our cluster. Kubernetes takes care of making the current state match the desired state. We covered how this process works back in Chapter 2, Rancher and Kubernetes High-Level Architecture. CD takes advantage of Kubernetes by allowing an application developer to define their application as a YAML file or Helm chart. We can deploy to our cluster in a repeatable way.
Of course, it's common to put both parts (CI/CD) together into what we call a pipeline, and the best way I have found to walk through a pipeline from start to finish is shown here.

Figure 16.1 – Example CI/CD pipeline
These are the high-level steps for most CI/CD pipelines with a description of each step:
Step 1 (Dev Team): The process starts with a developer checking the code for the repo (GitHub, GitLab, Git server) and making a change to the code, that is, fixing a bug, adding a feature, and so on. At this point, the developer might run the application locally to test their changes. But when developers are ready, they'll commit their changes to the repo.
Step 2 (Git Commit): In this step, a developer would generally create a branch for their new feature or bug fix. Depending on the setup, the developer might fork the repository and push their changes into the fork instead of the main repository. But the critical part of understanding this step is that the Git commit is the only way to make changes to your code, application, deployment, and infrastructure.
Step 3 (Git Repo): Once the Git commit has been pushed into the repository, the repository takes over. The first step is to validate that the developer has permission to push changes into the repository. For example, they might have permission to commit changes to the feature branch but not to the main/master branch. Then, typically, the next step would be to create a Pull Request (PR), which initiates a request to merge the changes from one branch/fork into another. For example, you might create a PR to merge your feature into the main branch. It's common at this point for the CI/CD software to come into the picture. For example, you are using GitHub and Drone. Once you create a PR request, GitHub will send an HTTP request, called a webhook, to your Drone server, which initiates the next step.
Step 4 (Build): This step is where stuff starts happening. We will continue the Drone example where the Drone server has received a webhook from GitHub, which includes some details about the change to the repo. For example, it consists of the repo name, branch, commit hash, and commit message. But it is important to note that it doesn't include the code.
Note
If you would like to see what is included in the webhook payload, please see GitHub's official documentation at https://docs.github.com/en/developers/webhooks-and-events/webhooks/webhook-events-and-payloads.
The process might change depending on your pipeline software, but in general, the first step is to clone the code repository into a temporary location. This is why your pipeline server needs access to your code repository. The second step is to load the pipeline configuration file for Drone, which is .drone.yml. This file stores the steps that will be used during the build process. An example might be pulling down any dependencies and running some commands to compile your binaries. It is important to note that most pipeline software includes prebuilt plugins/modules for compiling common languages such as Go, npm, C++, and so on. For Drone, you can find a list at https://plugins.drone.io, but one of the nice things about modern pipeline software such as Drone and GitHub Actions is they use containers for these plugins/modules, so making your custom steps can be a straightforward process.
You may ask, where does this build step run? The answer to that question depends on the software and where it's hosted. For example, this whole process might be in a cloud using something such as GitHub Actions, or if you are using self-hosted Drone, it'll be running on your own computer. These are typically called runners because they run your code. For the example we will cover later in this chapter, we will deploy Drone's runners in a Kubernetes cluster where it will create temporary pods for each build with sidecars for each step.
Step 5 (Test): So far, we have the application built, but we need to test it and verify whether it's working as planned. This step can be as simple as being compiled at the end of testing, or it can be as complex as deploying to a test cluster, then simulating end users using the application, and everything in-between. This step depends on your application and programming language. For example, Go has built-in testing for writing tests directly into the application. Like a LAMP (Linux, Apache, MySQL, and PHP) stack, applications might need a couple of different components, including a database, to start. At the same time, there's the question of how easily you can test your application. For example, do you already have scripts to test logging in, running a report, making a test sale, and more? If you do, then in this step, you'll want to create a process to run these tests. The idea is that you want to verify that whatever changes are part of this commit will not disrupt production.
Step 6 (Publish): Once all our testing is done and we're ready to start spinning up our application in our Kubernetes cluster(s), we need to make the container images that we just created available to our clusters. We do this by publishing them to a Docker registry of some kind. Of course, there are several different solutions to this problem, some of which we'll be covering later in this chapter. But the key thing to understand here is we need a location to publish images, whether that is Docker Hub, a simple private registry, or a more enterprise solution such as Harbor.
This step is pretty straightforward for Drone and most CI/CD software, mainly tagging the image(s) with a version/build number, then running the docker push image… command to your registry of choice. As part of publishing the images to our registry, it's common to do security scans looking for known vulnerabilities. For example, you might want to block all images that include software versions that are vulnerable to the Log4j (CVE-2021-44228) issue with most CI/CD software using a tool such as Clair, which handles this process and will alert or block images depending on the number of CVEs found and their severity.
Step 7 (Deploy): Once everything is ready, the fun part of deploying the application to our Kubernetes clusters comes into the picture. This step mainly is to create/prepare our deployment files, which could be as simple as a YAML file or as complex as a Helm chart, or even a mix of both. We will not dive too deep into Helm charts in this chapter, as we'll cover that topic in the next chapter. This process mainly includes updating the image tags in our deployment file for the newly created images.
At this point, our CI/CD starts the process of publishing our application to the cluster. This can, of course, be as simple as running the kubectl apply -f deploy.yaml command or can be as complicated as deploying a public Helm chart for the database, that is, helm install mysql, then verifying that the database is up and ready before running a Kubernetes job (a single-use pod that only runs once) to create the database, and finally loading our data from an S3 bucket. Then, eventually, we run kubectl apply to spin up our application and run some test commands to verify everything is working as expected. The essential item to understand about this step is that this step is how we give our developers access to our production Kubernetes cluster in a safe and controlled manner without giving them direct access to the cluster.
At this point, the pipeline is done, and we will start all over again for the next feature or bug fix. The big idea is that pipelines are designed to make this process repeatable and controllable, allowing developers to move fast but not break our clusters. In the next section, we will dive into creating a CI/CD solution, followed by an installation.
Rules for architecting a solution
Now that we understand what CI/CD is, we will go over designing a solution, including the pros and cons of standard designs. It is important to note that each environment/application is unique and will require tuning for the best experience.
Before designing a solution, you should be able to answer the following questions:
- Does your application team already have a CI/CD solution that supports Kubernetes?
- Will a single team use this CI/CD solution, or will multiple teams share it?
- How many pipelines/builds do you think will be created?
- What kind of deployment schedules do your developers follow?
- Will they be making changes at any time, or will it be in big patches, that is, every Friday is build day?
- How important is speed to the pipeline process? Is it okay if a pipeline takes an hour or should it run in minutes?
- Will you be using a self-hosted or Software as a service (SaaS) offering?
- What software stack will you be deploying (Go, LAMP, Node.js, DotNet, and so on)?
- What kind of tools/packages will you need to build your applications?
- Do your build tools require special licensing?
- What CPU architecture and OS family do you need to build on (Linux, Windows, AMD64, ARM)?
- Is your code private or public?
- Will the build processes and output need to be publicly accessible (most open source projects do)?
- Will only internal employees create commits and publish them or is this a public project so outside users might be triggering builds?
- What is your budget for both software and hardware?
Once we have answers to many of these questions, we can evaluate solutions.
Drone
Drone is a Go-based application that performs all actions that are done within containers. Thus, it is a perfect fit for platforms such as Kubernetes, where launching containers is a breeze. Drone uses a server for management and orchestration, with runners handling the creation of containers for build tasks.
- Free for open source projects.
- Verified good integration with GitHub, Bitbucket, and GitLab.
- The Drone server and its runners are lightweight and can be deployed on low-end hardware such as a Raspberry Pi.
- Pipelines as code, meaning your pipeline becomes part of your application development. There is no need to change your pipeline configurations outside your source control.
- Both internal and external secret management via Vault, KMS, and third parties.
- Easy to use as the UI is easy to understand.
- All plugins are containers meaning if you want to write your own, just create a Docker image to do whichever task you want.
- The cloud and on-premise software are the same, so migration between the two is effortless.
- Scalability is built-in because all the builds run as containers that can easily be scaled out thanks to Kubernetes.
- Drone was built to be on the public internet because many open source projects use Drone. Because of this and the fact that Drone is based on containers, it is safe and normal to have a Drone server publicly exposed, allowing better transparency with the public.
- The Drone CLI has built-in support for local builds, which allows you to trigger a build locally on your machine without connecting to the Drone server. Because every task is a container, the Drone CLI just makes the same API calls to Docker as the runner would.
The cons are as follows:
- Build caching is not a thing with Drone. Because every build is a new container/pod, items from the previous builds are not available, meaning if you need to download a set of dependencies to run your build, you'll be downloading the same dependencies every time. Plugins such as drone-cache can help with this, but they are not the most reliable solutions and can force you to limit how you run builds.
- It suffers from the big empty box problem because Drone is built to support almost any language/application stack. Everything is empty when you first get started with little to no framework guiding you. Some examples can be found in the Drone documentation, but you'll mostly be starting from zero.
- Drone has a reasonably active community but is still a newcomer to the CI/CD market, being created in 2014, but finding people with administrator knowledge can be difficult.
- There are no authentication providers outside your repository, meaning you can't point it to your Active Directory, LDAP, or SAML provider for authentication.
- Having a public Drone server instance is normal...but safety is relative. There are settings that can be used to restrict access to a specific GitHub organization, and also settings on access to secrets so that they can't be stolen by a malicious user via a rogue repository. These settings aren't configured out of the box.
- Drone has code maintenance issues as it takes quite a bit of patching and custom plugins to support specific workloads. For example, the default Kubernetes plugin is minimal, with users needing to create their custom plugins, such as https://github.com/SupportTools/kube-builder. There is even a community fork of Drone called Woodpecker to address these issues.
- There is no High Availability (HA) for the Drone server as the server uses an in-memory queue system. The Drone server will rely on Kubernetes to provide HA, that is, restarting and rescheduling a failed pod. As of writing, an HA feature is currently in beta, details of which can be found at https://docs.drone.io/server/ha/overview/.
Typically, I recommend Drone for cloud and Kubernetes native applications built with containers in mind from the start and a team that wants a GitOps workflow, as with open source projects that need public access.
Jenkins
Jenkins is a Java-based CI/CD tool that is built around automating the running of scripts and is sometimes called an automation platform that can support CI/CD.
- It has a deep history in DevOps and the CI/CD marketplace as it is the oldest tool in this list. It was created in 2011 under Oracle before being forked in 2014 to become Jenkins.
- Because of the history of Jenkins, it has become the default when it comes to CI/CD, meaning a lot of software, plugins, and workflows are built around Jenkins first and then are adapted to other CI/CD tools.
- Jenkins has an extensive list of plugins (1,000+ at the time of writing) ranging from integrations into Nagios for monitoring, to Puppet for configuration management, to hooks into Jira for issue tracking.
- Because Jenkins is written in Java, it is portable, meaning the server can run on Windows or Linux, depending on your requirements.
- Jenkins has excellent plugins for test automation, such as TestComplete Support, which can simulate user actions such as opening a web page, running a desktop application, and so on. It is important to note that this is a third-party plugin.
- Jenkins has built-in support for some enterprise authentication providers, such as Active Directory, LDAP, SAML, and others.
- Jenkins has built-in HA support using an active-standby setup.
- Enterprise/paid plugins typically come with excellent documentation and support.
The cons are as follows:
- Jenkins is built to be an enterprise product, meaning it assumes that it will have administrators to care for and feed it, that is, someone to kill stuck jobs, monitor resources, restart it when it gets stuck, and so on.
- Community/free plugins typically come with little to no documentation and no option for paid support.
- Jenkins has runners for Kubernetes to allow you to run tasks as pods in your cluster, but setting up and using this kind of runner can be challenging and requires the use of details that can be found at https://plugins.jenkins.io/kubernetes/.
- Jenkins does have local builds, but you are running a local copy of the Jenkins server, meaning you have to go through all the work of setting it up and match your local configuration with your real Jenkins server.
- There's no SaaS/cloud-hosted option, meaning you'll need to install and manage the Jenkins server.
- The UI is clunky, not very user-friendly, and looks like a Java application from 10 years ago.
Typically, I recommend Jenkins for two reasons. The first reason is that it's already deployed and used in the customer's environment. This is because switching between pipelines can require a large amount of work, with the process being that you need to start over. The second reason is enterprise plugin support. Writing your own plugins can take time and resources that are better spent elsewhere. So, it's common for enterprise customers just to buy commercial plugins that work out of the box.
Note
Rancher did have its own pipeline solution called Rancher Pipelines, but as of Rancher v2.5, this feature has been deprecated and replaced by Fleet. Rancher Pipelines was built on top of Jenkins but integrated into Rancher. You can still enable it using the steps at https://rancher.com/docs/rancher/v2.6/en/pipelines/example-repos/, but it is highly recommended not to use it.
GitHub Actions
GitHub Actions was launched back in 2018 as a workflow automation tool that can also do CI/CD. It shares the core item of all tasks being containers like Drone does, but with the big difference that it's a cloud solution sold as an add-on to your GitHub subscription.
- It's easy to use for GitHub users as their repositories are just built into the platform, which just needs to be enabled.
- You can use self-hosted runners to work around costs by providing your own hardware details, which can be found at https://docs.github.com/en/actions/hosting-your-own-runners/about-self-hosted-runners.
- Nearly unlimited scale – as a cloud-based solution, you can run as many parallel builds as possible without needing to spin up additional servers/nodes, depending on your GitHub subscription, details of which can be found at https://docs.github.com/en/billing/managing-billing-for-github-actions/about-billing-for-github-actions.
- Tight integration with GitHub events allows you to customize your pipelines based on the type of event. For example, you might run one workflow to create a new issue and another one to create a pull request.
- Built-in caching for the GitHub repo means that if you have a large repository with lots of changes, you can assume that the clone will take little to no time. This is because everything is being done inside the GitHub network.
- GitHub has a marketplace for Actions, meaning it's effortless to add plugins to your workflow. For example, if you need a K3s cluster to test, just go to https://github.com/marketplace/actions/setup-k3d-k3s and click the Use the latest version button, then copy and paste the text into your flow.
- Actions are sold by the minute. For example, if your task runs for 5 mins, you are billed for 5 mins of usage. GitHub does provide some amount of free usage depending on your subscription and repository type (private versus public).
- GitHub Actions has been a popular target for hackers and crypto miners to steal resources for public projects. For example, if you run a build on every pull request, what is to stop someone from running a bitcoin miner as part of the workflow? This, in turn, runs up your bill and has cost users thousands of dollars. You can read more about these kinds of attacks at https://www.bleepingcomputer.com/news/security/github-actions-being-actively-abused-to-mine-cryptocurrency-on-github-servers/.
- GitHub has a lot of the same cons as Drone when it comes to commercial plugins, called Actions, as it simply hasn't been around for a long time.
- GitHub Actions mainly runs in the cloud, so accessing on-premise resources such as databases, servers, and Kubernetes clusters can be difficult without publishing them on the internet. You can work around this using local runners.
- Running builds locally on your laptop is limited to third-party tools such as https://github.com/nektos/act.
- Limited build environments again, because GitHub hosts the VMs for you. You can only choose the OS and versions they tell you. For example, ARM is not available without self-hosted runners. You can find the current list of supported environments at https://github.com/actions/virtual-environments.
Typically, I recommend GitHub Actions for small one-off projects that need a simple build script; just run the make command. Doing higher-level testing such as user simulation gets very difficult.
Rancher does have a product called Fleet that kind of fits into this space as it is a CD-only tool and does not do CI. You can't do a Docker build, application testing, or anything like that as part of Fleet. It's only designed to push changes to your environment. Of course, you can use Fleet as part of publishing your applications to clusters. Still, it is not recommended as Fleet doesn't have a rollback or failback feature, meaning if you push out a change and it breaks your application, you need to update your Git repo and push out a new change.
For the rest of this chapter, we will assume that you have chosen Drone for your CI/CD pipeline, but most of these steps can easily be translated for other tools.
How to deploy Drone and its runners in Kubernetes with Rancher
This section will break the process into three parts: deploying the Drone server, standing up a Kubernetes runner, and connecting a pipeline to an external Rancher cluster.
Prerequisites
The following are the items that you'll need to have set up before starting to install Drone and its runners:
- A Kubernetes cluster with permissions to create cluster-level resources (cluster admin is preferred)
- Persistent storage (please see Chapter 11, Bringing Storage to Kubernetes Using Longhorn, for more details)
- A hostname for publishing the Drone web UI
- A publicly signed SSL certificate (internally or self-signed certs can cause issues)
- Permissions in GitHub to create an OAuth application
- A publicly accessible URL from GitHub (for example, https://drone.example.com)
- kubectl and Helm access to the cluster where the Drone server will be installed.
Installation steps
In this section, we'll cover installing PostgreSQL before installing Drone. Then, finally, we'll install the runner.
PostgreSQL
The Drone server needs a backend database to store its settings, configuration, and so on. For this, we'll be using PostgreSQL as it's the only supported database for self-hosted deployments. You can skip this step and use an externally managed database such as Amazon RDS for PostgreSQL if you so choose.
To install PostgreSQL, you need to run the following commands:
- The first command is to create a namespace.
- It is then followed by a helm command to add the bitnami repo.
- Then, finally, we run the helm install command to deploy the PostgreSQL server with additional options to set the username and password.
Here's the result:

Figure 16.2 – PostgreSQL install steps
You can find the complete commands at https://github.com/PacktPublishing/Rancher-Deep-Dive/tree/main/ch16/drone/postgresql/install_commands.md. You can also find a full breakdown of the Helm chart options at https://github.com/bitnami/charts/tree/master/bitnami/postgresql/.
Note
We are setting the password to drone for this example. This should be set to something more secure.
The Drone server
In this section, we will install the Drone server. But before installing Drone, you should follow the steps located at https://docs.drone.io/server/provider/github/ to create your OAuth2 app on GitHub. To install the Drone server, you need to follow these steps:
- We create a new namespace and add the Drone helm repo using the commands listed in Figure 16.3.
- We then create the SSL secret for the RPC secret which is used by Drone and its runners for authentication.
- Next, we make an RPC secret, which is used to authenticate runners.
- Finally, we use the helm install command with a number of settings.
The first section defines the ingress settings followed by storage, then we set up the database connection string. Then, the final section is for integrating into GitHub for our authentication.
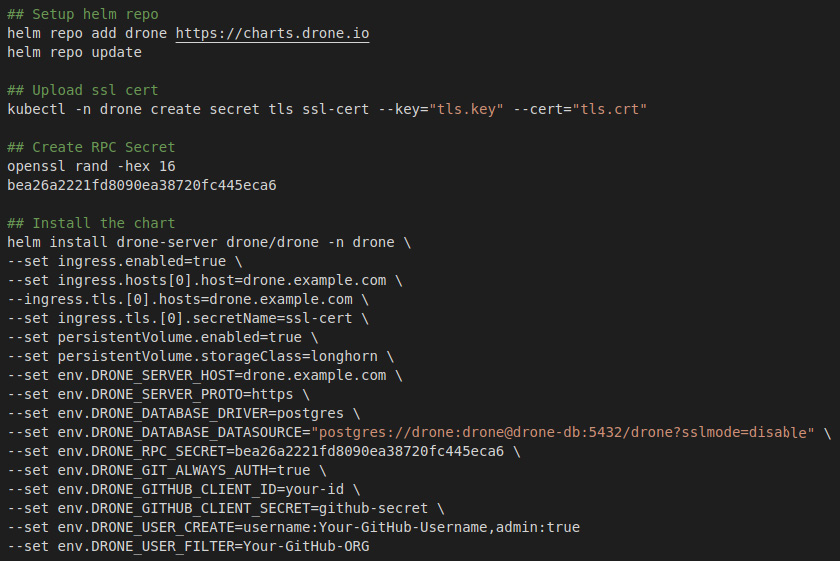
Figure 16.3 – Drone server install steps
You can find the full commands at https://github.com/PacktPublishing/Rancher-Deep-Dive/tree/main/ch16/drone/server/install_commands.md. You can also find a full breakdown of the Helm chart options at https://github.com/drone/charts/blob/master/charts/drone/.
At this point, you should be able to log in to your Drone server by visiting the web UI.
The Drone Kubernetes runner
In this section, we will install the Drone Kubernetes runner. This can be installed on the same cluster as the Drone server if you so choose. Also, in the following example, we'll be using the default namespace for running our temporary pods. You can customize this if you so desire.
To install the runner, you need to run the following steps:
- Create a new namespace.
- Add the drone helm repo.
- Then, finally, install drone-runner.
It is important to note that we are pointing this runner to our Drone server and using the RPC secret to authenticate.
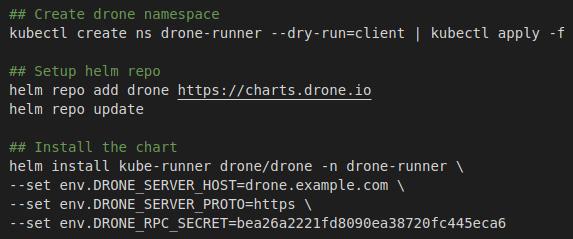
Figure 16.4 – Drone runner installation steps
You can find the full commands at https://github.com/PacktPublishing/Rancher-Deep-Dive/tree/main/ch16/drone/runner/install_commands.md. You can also find a full breakdown of the Helm chart options at https://github.com/drone/charts/tree/master/charts/drone-runner-kube.
At this point, you should be able to run builds in your Drone server. In the next section, we'll connect Drone to our Kubernetes cluster so we can deploy our apps.
Connecting to Rancher
In this section, we will create a service account in another Kubernetes cluster to add it as a secret to the Drone server. In this command, we create a service account, assign it cluster-admin permissions, and finally grab the token for this account.

Figure 16.5 – Create a Drone service account
You can find the full commands at https://github.com/PacktPublishing/Rancher-Deep-Dive/tree/main/ch16/drone/external-cluster/rbac.md.
Next, we need to grab the cluster server URL by logging into the Rancher UI, browsing the cluster in question, and clicking the Download KubeConfig button. You should get a file that looks like the following example. We need the server value, which in this example is https://rancher.example.com/k8s/clusters/c-m-abcdefgj.

Figure 16.6 – KubeConfig example
Now, we can add the credentials as a secret so it can be consumed by a pipeline, which we'll cover in the next section.
Injecting secrets into a pipeline
In this section, we are going to cover adding a secret to a pipeline. In this example, we will use the Kubernetes credentials that we created in the last section.
We will start by browsing a repository and clicking the Activate repository button. Then we need to go to the Settings tab and select Secrets from the side menu.

Figure 16.7 – Creating a secret wizard
We are going to create the following secrets and their values. It is important to note that if you are using a public repository, someone could access your secret if you check the Allow Pull Requests box.
Important Note
Once a secret has been added to Drone, it can never be retrieved again. So, it is recommended that you have a copy stored somewhere outside Drone such as a password manager.

Figure 16.8 – Example secrets
Now that we have created our secrets, we can use them in a pipeline. The essential item in the example is the from_secret command, which ties the secret's value to a setting for the plugin, which is an environment variable inside the container. This pipeline uses the default Docker plugin to run the Docker build, then uses a custom plugin I created called supporttools/kube-builder for running kubectl and Helm commands. You must run the bash /usr/local/bin/init-kubectl command first as it handles setting up the kubeconfig file inside the container.

Figure 16.9 – Example pipeline
At this point, we have a pipeline up and running and should be able to build and deploy our applications. In the next section, we will dive into setting up a private image repository for storing our Docker images outside Docker Hub.
What an image repository is and the rules for architecting a solution
One of the critical things with containerization is the concept of images. An image is a read-only file that contains all the files, libraries, and executables that make up a container. Once you create a container image, you need to store it someplace where it will be available to download from your Kubernetes nodes. This place is called a registry, container registry, or image repository. For this chapter, we are going to call it an image repository. There are, of course, three main types of image repositories: Docker Hub, third-party, and self-hosted.
But before designing a solution, you should be able to answer the following questions:
- Will this be an air-gapped environment, that is, do all images have to come from a registry we control?
- Are all your images public, or will you be using a private repo?
- What is your budget for both software and hardware?
- Will multiple data centers/sites need access to your registry?
- Do you have any security/regulatory requirements for keeping data in a location, that is, on-premise only, in your country, and so on?
- Are you planning on scanning images and limiting what images are allowed in your environment?
Once we have answers to most of these questions, we can evaluate solutions.
Docker Hub
This is the official/default image repository for most Kubernetes distributions, including Rancher. Because it is the default, most deployments, open source projects, and software vendors use Docker Hub.
The pros are as follows:
- It's the default and accessible for public images, with you only needing to pay for private images.
- Trust: Pulling an image from a random third-party image repository can throw up red flags for an open source project as there is no telling who is hosting it. Are they injecting malicious software into the images? Docker Hub addresses this issue by doing security scans of all public images, including flagging images that contain viruses and other malicious code. It is important to note that this system is not perfect and does not catch everything.
- Speed: Docker Hub, of course, is the largest image repository, and it uses Cloudflare as its CDN along with AWS to provide the backend S3 storage. Pulling images from Docker Hub is very fast, with the limiting factor almost always being on your end, unless you are rate limited by Docker Hub. You can find out by querying their API details, which can be found at https://www.docker.com/blog/checking-your-current-docker-pull-rate-limits-and-status/.
- Data redundancy / availablity: Again, the images are stored in AWS S3 with Amazon's official documentation stating that S3 object durability is 99.999999999 (11 nines) for a year. So, the chance of losing your images due to data loss is almost zero.
- Security requirements: Some organizations require that all source code and data stay on-premises. Docker Hub accounts have been attacked and private images have been leaked before.
- Docker images are stored as plain text and are not encrypted in Docker Hub, meaning someone with access to the repository would be able to download an image and extract data/source code from it. This includes Docker Hub itself as it does scans of images uploaded to its sites. An example is the Log4js issue where Docker Hub triggered a scan of all images hosted on its site. Details of which can be found at https://docs.docker.com/security/#log4j-2-cve-2021-44228.
- Pull limits: Docker Hub added rate limits to images in November 2021, details of which can be found in their official documentation located at https://docs.docker.com/docker-hub/download-rate-limit/. You can, of course, buy a Docker Hub subscription, which has no limits for your clusters. You can also read about this change in my Kubernetes Master Class – Docker Hub Limits: Addressing the Amount of Pull Requests in Rancher, which can be found at https://github.com/mattmattox/Kubernetes-Master-Class/tree/main/docker-hub-limits.
I usually recommend using Docker Hub for all public projects and paying a few dollars per month to host private images unless you store sensitive data inside your images or have a limited internet connection.
Image repositories managed by third parties
These platforms act as a central point of access for your own container images, making it easier to store, manage, and secure them without the operational hassle of running your own registry on-premises. Several third-party registry offerings support Docker images, including Amazon ECR, Azure Container Registry, and Google Container Registry.
The pros are as follows:
- Control: These image repositories are customarily hosted inside your current cloud environment – that is, AWS, Azure, GCP – and because of this, you have control over the data.
- Managed service: Because the cloud provider manages all these image repositories, you don't have to upgrade them, patch them, or back them up. You can get just let them handle it for you.
- Pricing: Most of the cloud providers charge little to nothing for traffic going to and from the image repository. And storage costs usually are just passed through to the S3/object storage storing the data.
The cons are as follows:
- Not cost-effective for public images: Because most cloud providers charge extra for traffic being egressed (going out to the public internet), hosting a public image can become very expensive.
- Authentication: Most cloud providers use their own authentication sources to control access to the image repository. This causes problems as Docker is built around basic authentication (a static username and password), and services such as AWS ECR only provide a good password for 6 hours. This means that you need to use a tool such as https://github.com/SupportTools/ecr-helper to handle updating that password on schedule.
I usually only recommend using a third-party image repository with hosted Kubernetes clusters where you need to store private images but don't want to manage the service. For example, if you deploy an EKS cluster on Amazon, you should use ECR.
Self-hosted repo
An organization may prefer to host container images on their own on-premises infrastructure for various reasons, including security, compliance concerns, or low-latency requirements.
The pros are as follows:
- Control: You are in complete control because you are hosting the images. You can choose to have everything open to the world or all images locked down and everything in-between.
- Bandwidth: Because the images are hosted in your data center, your nodes no longer need to reach out to the public internet to pull images. For example, if you have a 100-node cluster, each node needs to pull down a 1 GB image. You need to download 100 GB of data through your internet connection versus downloading that data for a local server.
- Security: Using tools such as Harbor, we can integrate image scanning into our registry and set up rules such as blocking the uploading of images with too many high/critical vulnerabilities.
- Required in air-gap environments: Private image repositories are required in air-gapped environments that cannot pull images for external image repositories.
The cons are as follows:
- Management: Because you are now hosting the registry, you are directly responsible for securing, patching, and upgrading tasks of that software.
- Changes to your deployments: Most deployments assume that you'll use Docker Hub as your image repository. So, you'll need to copy the images from the public repository into your private registry.
I normally only recommend self-hosted repositories in air-gapped environments and in cases where pulling large amounts of data over the internet can be an issue, that is, low-speed internet or large numbers of nodes sharing a connection.
At this point, you should be able to pick which image repository works best for your environment. In the following sections, we will assume that you'll be going with the self-hosted option.
How to deploy Harbor in Kubernetes
In this section, we will install Harbor in our Kubernetes cluster. It is important to note that this will only be a basic setup as Harbor can be installed in several different ways.
The following are the prerequisites:
- A Kubernetes cluster with permissions to create cluster-level resources (cluster admin is preferred)
- Persistent storage (please see Chapter 11, Bringing Storage to Kubernetes Using Longhorn, for more details)
- Two hostnames for publishing the main Harbor URL and the notary service
- A publicly signed SSL certificate (internally or self-signed certificates can cause issues)
- kubectl and Helm access to the cluster where the Drone server will be installed
To install Harbor, we are going to run the following commands:
- First, add the Harbor helm repo.
- Next, create the Harbor namespace.
- Then, upload the ssl certificate secret for the ingress.
- Then, finally, we run helm install for the Harbor chart.
It is important to note that this includes some settings: the first part is to set up the ingress and the second half is to set up the storage class, which is Longhorn.
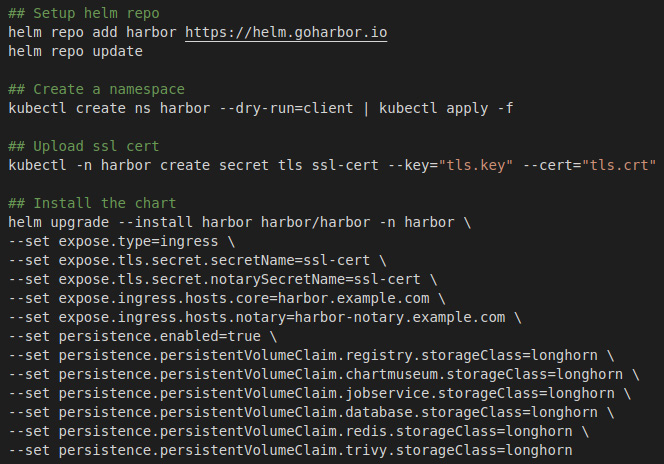
Figure 16.10 – Harbor install commands
You can find the full commands at https://github.com/PacktPublishing/Rancher-Deep-Dive/tree/main/ch16/harbor/server/install_commands.md. You can also find a full breakdown of the Helm chart options at https://github.com/goharbor/harbor-helm.
At this point, you should have Harbor up and running and be ready to start uploading images and use them in your environment. In the next section, we will configure Kubernetes to use a private registry.
Integrating a private registry into a Kubernetes cluster
Now that you have your own private registry, you now need to add it to your Rancher and Kubernetes clusters so you can start consuming it.
For this section, we will assume that you are using Harbor as your private registry, which will be an air-gapped setup, meaning our nodes cannot pull images from the public internet. We need to do three things for this task:
- Collect/publish images
- Set the Rancher global registry
- Update RKE/RKE2
Collect/publish images
For this part, we need to collect all the images we will need for Rancher and its clusters. Luckily, Rancher supports an install type called air-gapped and has created a script published as part of the Rancher release that takes care of this process. You can find the details of this process in Rancher's documentation located at https://rancher.com/docs/rancher/v2.6/en/installation/other-installation-methods/air-gap/populate-private-registry/.
But the short answer is Rancher has a file called rancher-images.txt, which contains a list of the images that Rancher might need. Rancher then has a script called rancher-save-images.sh, which will walk through that list, pulling down all the images using a workstation/server with internet access. It will output a tar file that can be physically copied to an air-gapped server. The last step is to run rancher-load-images.sh, which takes all those images and pushes them to your private registry.
This list is updated as part of every Rancher release, and this process should be run every time you are going to upgrade Rancher to grab the new/updated images. Also, some customers have a server/workstation that sits between the internet and the air-gapped environment and have chosen to modify this process to do both steps on the same server. They do this by editing rancher-save-images.sh and commenting on the last line, docker save. This skips the creation of the tar file. Then, in rancher-load-images.sh, they remove docker load as the images are already on the server.
Note
It is recommended that you keep the same registry structure, that is, docker.io/rancher/rancher should become registry.example.com/rancher/rancher. It is also recommended that the Rancher repos be set to public, which means that anyone can pull them without authenticating. This makes the process easier and replicates Docker Hub for these images.
Rancher global registry
Now that we have all our images, we need to point Rancher to the private registry. For this process, we need to follow the steps located at https://rancher.com/docs/rancher/v2.6/en/admin-settings/config-private-registry/. The basic idea is to go to the Rancher UI's Global Settings tab, edit system-default-registry, and update the value to your private registry. Suppose you have a private registry that needs credentials to pull images from the rancher repos. You would need to take additional steps by adding the credentials to each cluster.
Update RKE/RKE2
Now that you have Rancher using the new private registry, you now need to tell RKE and RKE2 to use that registry too. For RKE, it's as simple as updating the cluster.yaml file to include the private_registries section and running rke up. You can find the details of this change at https://rancher.com/docs/rke/latest/en/config-options/private-registries/. RKE2 is the same but with some additional settings if you need them. You can find details at https://docs.rke2.io/install/containerd_registry_configuration/.
Note
For both RKE and RKE2 clusters, this can be set up after the cluster has already been created, but it is highly recommended that you test this process in a lab/sandbox cluster as you might run into issues with firewall rules, missing images, misconfigured deployments, and so on, which can break your cluster. So, we want to test this process and make sure it's rock-solid before applying it to a production cluster.
At this point, we should have our clusters pulling images from our registry instead of from Docker Hub. We also went over how to force redirect all images at the host level and how to force a registry change at a deployment level as well.
Summary
This chapter went over what CI/CD is and how it works. We then dove into designing and installing Drone to become our CI/CD system. We then shifted gears and covered the topic of image repositories and the different types. At which point, we designed and installed Harbor to become our private registry. Finally, we closed out this chapter by covering how to configure Rancher, RKE, and RKE2 to consume this new private registry.
In the next chapter, we will build upon what we learned in this chapter to bring our deployment to the next level with Helm charts.