
Chapter 5: Deploying Rancher on a Hosted Kubernetes Cluster
One of the great things about Rancher is it can be deployed on any certified Kubernetes cluster. This means that Rancher can be installed on a hosted Kubernetes cluster such as Google Kubernetes Engine (GKE), Amazon Elastic Container Service (EKS) for Kubernetes, Azure Kubernetes Service (AKS), or Digital Ocean's Kubernetes Service (DOKS). This can simplify management on Rancher, but there are some limitations with hosted Kuberenetes solutions. We will then cover the rules for designing the hosted Kubernetes cluster along with some standard designs. At which point, we'll install Rancher on the cluster using the Helm tool to install the Rancher server workload on the cluster. Finally, we'll cover how to back up Rancher with a hosted Kubernetes cluster.
In this chapter, we're going to cover the following main topics:
- Understanding hosted Kubernetes clusters
- Requirements and limitations
- Rules for architecting a solution
- Creating a hosted Kubernetes cluster
- Installing and upgrading Rancher
- Rancher-Backup-Operator
Let's dive in!
Understanding hosted Kubernetes clusters
One of the questions that always comes up when deploying a Kubernetes cluster in the cloud is not just about using a hosted Kubernetes cluster, but what a hosted Kubernetes cluster is. In short, it's a cluster that is deployed and managed by an outside party. Usually, this kind of cluster is provided as a service by a cloud provider such as Amazon's AWS, Google's GCP, Microsoft's Azure, and so on. This kind of service is sometimes called Kubernetes as a Service (KaaS) because these types of clusters are provided as a service. As a consumer, there are some limitations with a hosted Kubernetes cluster versus one you build yourself:
- Control: When using a hosted Kubernetes cluster, you are an end user. You do not have complete control of the cluster. Tasks such as upgrading Kubernetes to a newer version are something your provider handles for you. Usually, this is triggered by you going into the cloud provider's dashboard and selecting a more recent Kubernetes version. Still, most cloud providers have the option to force an upgrade without your input. For example, in early 2020, EKS started to deprecate Kubernetes v1.14 with official support ending by 11/2020. As soon as the end-of-support date passed, Amazon began to upgrade clusters automatically, and there was little to nothing you could do to stop the upgrade. If the upgrade broke your application, there was no going back and no downgrading. Your only option was to fix your application. Google and Azure have the same process in place, with their argument being the cluster endpoints are on the public internet (in most cases) so keeping up to date with security patches is a must.
- Access: With a hosted Kubernetes cluster, you'll get access to the Kube API endpoint for tools such as kubectl, Helm, and even Rancher. But in most cases, you will not get access to the Kubernetes node itself. So, you can't just SSH into the node and install software such as monitoring agents and backup software. Plus, even if the cloud provider gives you SSH access to the nodes, it's typically only to the worker nodes for troubleshooting issues. Their support team will not support any customizations you make to the nodes. Also, you shouldn't be making any changes in the first place because cloud providers can and do replace nodes as needed with little to no notification beforehand.
Note
All major cloud providers allow you to set up a preferred maintenance window, but they can do emergency maintenance outside that window if needed.
This is generally for tasks such as replacing a failed node or applying a critical security fix.
- Customization: With most hosted Kubernetes clusters, the cloud provider defines items such as etcd, kube-apiserver, and kubelet. So, for example, if your application is hitting the Kube API endpoint, creating a high number of requests, with a self-hosted Kubernetes cluster, you can just increase the CPU and memory available to kube-apiserver. With a hosted Kubernetes cluster, there is no option to change that because the cloud provider owns that service. The same goes for customizing security settings such as etcd encryption. With a self-hosted Kubernetes cluster, you can set up the encryption however you like. With a hosted Kubernetes cluster, you are limited to whatever they provide. For example, EKS supports etcd encryption using AWS Key Management Service (KMS). But with AKS, Azure turns on encryption by default but gives you no way to change or force rotate the key. And with other cloud providers such as DigitalOcean, they don't have etcd encryption at all.
Note
The preceding statement is valid as of writing, but Azure has stated this is on the roadmap, so this might change in the future.
- Backups: The cloud provider owns the etcd services and does not provide access to etcd to you. So, you have no way of taking an etcd backup. This means, if you have a catastrophic failure and lose the cluster, you have no way to restore the cluster without redeploying all your applications quickly, or you'll need to use a third-party tool such as Velero to take a YAML backup of all your Kubernetes objects. And for applications like Rancher that store their data as Kubernetes objects, the data must be backed up. This was the main reason that Rancher didn't support hosted clusters because Rancher has no way to be downgraded besides doing an etcd restore. Rancher v2.5 addressed this by creating the Rancher Backup Operator tool, which walks through all the Kubernetes objects that Rancher uses, exports them as JSON files, and packages them up into a tarball file, then pushes it to a backup location.
Now that we understand what a hosted Kubernetes cluster is, next, we're going to go into the requirements and limitations of some of the most popular cloud providers.
Requirements and limitations
In this section, we'll be discussing the basic requirements of Rancher on various clusters along with their limitations and design considerations.
Amazon EKS
The basic requirements for Amazon EKS are as follows::
- Rancher requires at least two worker nodes in the cluster, but three nodes are highly recommended.
- Each worker node should have at least two cores with 4 GB of memory.
- Rancher requires a network load balancer for accessing the Rancher console.
- Once the EKS cluster has been created, you'll need to follow the procedure located at https://docs.aws.amazon.com/eks/latest/userguide/create-kubeconfig.html to generate a kubeconfig file for accessing the cluster.
- Rancher requires EKS to have nginx-ingress-controller installed on the cluster. Please follow the steps located at https://rancher.com/docs/rancher/v2.5/en/installation/install-rancher-on-k8s/amazon-eks/#5-install-an-ingress for more details.
- The inbound port 443/TCP should open for all downstream nodes, clusters, and end users that need Rancher UI/API access.
Note
Port 80 will redirect end users to the HTTPS URL. So, port 80 is not required but is recommended for the convenience of end users.
The design limitations and considerations are as follows:
- The cluster should span across three availability zones.
- EKS, by default, uses the DNS servers that are defined in the VPC. If you need to access on-premise resources via DNS, you should follow the procedure located at https://docs.aws.amazon.com/vpc/latest/userguide/vpc-dns.html.
- Suppose you are blocking outbound internet access for the cluster. In that case, you will need to provide a private registry for the images if you plan to use Amazon Elastic Container Registry (ECR) for this role. You'll need to configure the IAM permissions for the cluster using the procedure located at https://docs.aws.amazon.com/AmazonECR/latest/userguide/ECR_on_EKS.html.
- You can use node auto-scaling groups, but the scaling up and down of the cluster can cause disruptions to the Rancher UI and cause cluster operations to fail for a short period of time, including the loss of access to the downstream cluster via the Rancher API.
- If you use AWS Certificate Manager, you should pick a certificate that auto-renews with the same root CA This is because Rancher will need the checksum of the root CA for the agents. So, changing the root CA does require a good amount of work, which we will cover in a later chapter.
- The Rancher server does have ARM64 based images. So, you could use ARM64 nodes in the cluster, but you might still require an AMD64 node for other services and containers such as Prometheus, which currently doesn't have ARM64 support.
- EKS does not automatically recover from kubelet failures and can require user intervention.
- EKS limits the number of pods per node based on the size of the node. Please see Amazon's documentation, located at https://github.com/awslabs/amazon-eks-ami/blob/master/files/eni-max-pods.txt, for more details.
Google's GKE
The basic requirements for GKE are as follows:
- Rancher requires at least two worker nodes in the cluster, but three nodes are highly recommended.
- Each worker node should have at least two cores with 4 GB of memory.
- Rancher requires a network load balancer for accessing the Rancher console.
- Once the GKE cluster has been created, you'll need to follow the procedure located at https://cloud.google.com/kubernetes-engine/docs/how-to/cluster-access-for-kubectl to generate a kubeconfig file for accessing the cluster.
- Rancher requires GKE to have nginx-ingress-controller installed on the cluster. Please see the steps located at https://rancher.com/docs/rancher/v2.5/en/installation/install-rancher-on-k8s/gke/#5-install-an-ingress for more details.
- The inbound port 443/TCP should open for all downstream nodes, clusters, and end users that need Rancher UI/API access. Note: port 80 will redirect end users to the HTTPS URL. So, it is not required but is recommended for convenience.
The design limitations and considerations are as follows:
- The cluster should span three availability zones.
- You cannot customize your server configuration. You must use one of the two server types they offer: Container OS or Ubuntu. You don't get to pick the Kubernetes versions or kernel versions.
- Cluster add-on services such as Kube-DNS and ip-masq-agent are very limited when it comes to their configurability.
- GKE currently has no support for ARM64.
Azure's AKS
The basic requirements for AKS are as follows:
- Rancher requires at least two worker nodes in the cluster, but three nodes are highly recommended.
- Each worker node should have at least two cores with 4 GB of memory.
- Rancher requires a network load balancer for accessing the Rancher console.
- Once the AKS cluster has been created, you'll need to follow the procedure located at https://cloud.google.com/kubernetes-engine/docs/how-to/cluster-access-for-kubectl to generate a kubeconfig file for accessing the cluster.
- Rancher requires AKS to have nginx-ingress-controller installed on the cluster. Please see the steps located at https://rancher.com/docs/rancher/v2.5/en/installation/install-rancher-on-k8s/gke/#5-install-an-ingress for more details.
- The inbound port 443/TCP should open for all downstream nodes, clusters, and end users that need Rancher UI/API access. Note: port 80 will redirect end users to the HTTPS URL. So, it is not required but is recommended for convenience.
The design limitations and considerations are as follows:
- The cluster should span three availability zones.
- AKS is relatively new compared to EKS and GKE, so many features are still not General Availability (GA).
- The only choices for the operating system are Ubuntu and Windows Server.
Note
The Rancher server does not work on Windows nodes.
- Node upgrades are not automated like GKE and require manual work to be applied.
- AKS does not automatically recover from kubelet failures and can require user intervention.
- AKS currently has no support for ARM64.
We now understand the limitations of running Rancher on a hosted Kubernetes cluster. Next, we'll be using this and a set of rules and examples to help us design a solution using the major cloud providers.
Rules for architecting a solution
In this section, we'll cover some standard designs and the pros and cons of each. It is important to note that each environment is unique and will require tuning for the best performance and experience. It's also important to note that all CPU, memory, and storage sizes are recommended starting points and may need to be increased or decreased based on the number of nodes and clusters to be managed by Rancher.
Before designing a solution, you should be able to answer the following questions:
- Will you be separating non-production and production clusters into their own Rancher environments?
- For a hybrid cloud environment, will you be separating clusters by their provider? For example, will you deploy one instance of Rancher server for all AWS clusters and another instance of Rancher server for all on-prem clusters?
- Will you require both public and private IP addresses for your Kubernetes nodes?
- Will you be hosting any additional applications on the Rancher cluster? If so, what are the CPU, memory, and storage requirements?
- Do you require site-to-site replication between regions?
- How many nodes and clusters are you planning on supporting?
Note
Rancher's official server sizing guide can be found at https://rancher.com/docs/rancher/v2.5/en/installation/requirements/#rke-and-hosted-kubernetes.
Amazon EKS
In this section, we're going to cover some of the major cluster designs for EKS clusters.
EKS small clusters
In this design, we will be deploying the smallest EKS cluster that can still run Rancher. Note that this design is only for testing or lab environments and is not recommended for production deployments and can only handle a couple of clusters with a dozen or so nodes each.

Figure 5.1 – EKS small cluster with two worker nodes
The pros are as follows:
- Node-level redundancy; you can lose a worker without an outage to Rancher.
- No required downtime during EKS patching and upgrades. Please see https://docs.aws.amazon.com/eks/latest/userguide/update-managed-node-group.html for more details.
The cons are as follows:
- If you are running additional applications such as Prometheus or Grafana, the nodes can run out of resources.
- Only N+1 of resource availability, so during maintenance tasks, you cannot suffer a failure of a node without loss of service.
Note
During node group upgrades, Amazon will add a new node before removing the old one.
- You do need to customize the Rancher install to only use one replica instead of the default three.
The node sizing requirements are as follows:
EKS using a typical cluster size with Availability Zone redundancy
In this design, we will expand upon the EKS small design by adding a worker, giving us three worker nodes. We'll also leverage AWS's Availability Zone (AZ) redundancy by having a worker node in one of three AZs. By doing this, the cluster can handle the failure of an AZ without impacting Rancher. We will also increase the size of the worker nodes to manage up to 300 clusters with 3,000 nodes.
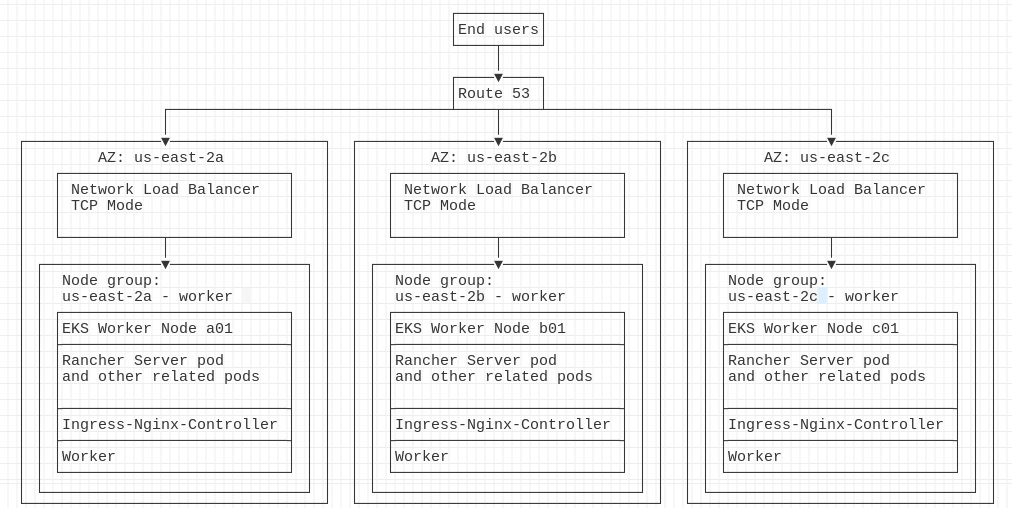
Figure 5.2 – EKS standard with three worker nodes and AZ redundancy
The pros are as follows:
- Node-level redundancy: You can lose a worker without an outage in Rancher.
- AZ redundancy: You can lose a whole AZ without an outage in Rancher; this also includes at the load balancer level.
- No required downtime during EKS patching and upgrades. Please see https://docs.aws.amazon.com/eks/latest/userguide/update-managed-node-group.html for more details.
- N+2 of availability: During maintenance tasks, you can suffer a failure of a node without loss of service.
The cons are as follows:
- Additional cost for the additional worker node.
- Additional complexity during setup because each AZ has its node group.
- Additional complexity with the NLB because it must have an interface in each AZ.
- Additional complexity during an upgrade as each node group needs to upgrade on its own.
The node sizing requirements are as follows
Google's GKE
In this section, we're going to cover some of the major cluster designs for GKE clusters.
GKE small clusters
In this design, we will be deploying the smallest GKE cluster that can still run Rancher. Note that this design is only for testing or lab environments, is not recommended for production deployments, and can only handle a couple of clusters with a dozen or so nodes each.

Figure 5.3 – GKE small cluster with two worker nodes
The pros are as follows:
- Node-level redundancy: You can lose a worker without an outage in Rancher.
- No required downtime during GKE patching and upgrades. Please see https://cloud.google.com/kubernetes-engine/docs/concepts/cluster-upgrades for more details.
The cons are as follows:
- If you are running additional applications such as Prometheus or Grafana, the nodes can run out of resources.
- Only N+1 of availability, so during maintenance tasks, you cannot suffer the failure of a node without loss of service.
Note
During cluster upgrades, Google will add a new node before removing the old one.
- Using GCP's cluster upgrade autopilot, it can get stuck terminating the Rancher server pods. If the maintenance window is too small, the upgrade will be paused, leaving the cluster in a partially upgraded state. I recommend a maintenance window of at least 4 hours.
- You do need to customize the Rancher install to only use one replica instead of the default three.
The node sizing requirements are as follows:
GKE using a typical cluster size with AZ redundancy
In this design, we will expand upon the GKE small design by adding a worker, giving us three worker nodes. We'll also leverage GCP's zone redundancy by having a worker node in one of three zones. By doing this, the cluster can handle the failure of an AZ without impacting Rancher. We will also increase the size of the worker nodes to manage up to 300 clusters with 3,000 nodes.

Figure 5.4 – GKE standard with three worker nodes and zone redundancy
The pros are as follows:
- Node-level redundancy: You can lose a worker without an outage in Rancher.
- Zone redundancy: You can lose a whole AZ without an outage in Rancher; this also includes at the load balancer level.
- No required downtime during GKE patching and upgrades. Please see https://cloud.google.com/kubernetes-engine/docs/concepts/cluster-upgrades for more details.
- N+2 of availability: During maintenance tasks, you can suffer a failure of a node without loss of service.
- No additional complexity during an upgrade as autopilot will take care of the upgrades for you.
The cons are as follows:
- Additional cost for the additional worker node.
- Additional complexity during setup because each zone has its node pool.
The node sizing requirements are as follows:
Azure's AKS
In this section, we're going to cover some of the major cluster designs for AKS clusters.
AKS small clusters
In this design, we will be deploying the smallest AKE cluster that can still run Rancher. AKS is a little special in the fact that it support clusters with only one node. As mentioned earlier, this design is only for testing or lab environments, is not recommended for production deployments, and can only handle a couple of clusters with a dozen or so nodes each. It is important to note that AKS does support Windows node pools, but Rancher must run on a Linux node.

Figure 5.5 – AKS single-node cluster
The pros are as follows:
- Lower costs as you are only paying for a single node.
- Azure does support node surges during an upgrade, which is where Azure will provide a new node to the cluster before cordoning and draining the old node.
The cons are as follows:
- You cannot suffer a failure of a node without loss of service.
Note
During cluster upgrades, Azure will add a new node before removing the old one.
- If you are running additional applications such as Prometheus or Grafana, the node can run out of resources.
- If the node drain fails, Azure will stop the upgrade without rolling back.
- You do need to customize the Rancher install to only use one replica instead of the default three.
The node sizing requirements are as follows:
AKS using a typical cluster size with zone redundancy
In this design, we will expand upon the AKS single-node design by adding two workers, giving us three worker nodes. We'll also leverage Azure's zone redundancy by having a worker node in one of three zones. By doing this, the cluster can handle the failure of an AZ without impacting Rancher. We will also increase the size of the worker nodes to manage up to 300 clusters with 3,000 nodes.

Figure 5.6 – AKS standard cluster with three nodes
The pros are as follows:
- Node-level redundancy: You can lose a worker without an outage in Rancher.
- Zone redundancy: You can lose a whole zone without an outage in Rancher; this also includes the load balancer level.
- No required downtime during AKS patching and upgrades. Please see https://docs.microsoft.com/en-us/azure/aks/upgrade-cluster for more details.
- N+2 of availability: During maintenance tasks, you can suffer a failure of a node without loss of service.
The cons are as follows:
- Additional cost for the additional worker node.
- Additional complexity during setup because each zone has its node pool.
- Zone availability support is limited to only some regions. Please see https://docs.microsoft.com/en-us/azure/aks/availability-zones#limitations-and-region-availability for more details.
- If you are using Azure Disk Storage, volumes cannot be attached across zones. Please see https://docs.microsoft.com/en-us/azure/aks/availability-zones#azure-disks-limitations for more details.
The node sizing requirements are as follows:
Now that we have a design for our cluster, in the next section, we'll be covering the steps for creating each of the major cluster types.
Creating a hosted Kubernetes cluster
In this section, we are going to walk through the commands for creating each of the hosted Kubernetes clusters.
Amazon EKS
This section will cover creating an EKS cluster with an ingress by using command-line tools.
Note
The following steps are general guidelines. Please refer to https://aws-quickstart.github.io/quickstart-eks-rancher/ for more details.
Prerequisites
You should already have an AWS account with admin permissions along with a VPC and subnets created.
The following tools should be installed on your workstation:
- AWS CLI v2: Please refer to https://docs.aws.amazon.com/cli/latest/userguide/install-cliv2.html for more details.
- eksctl: Please refer to https://docs.aws.amazon.com/eks/latest/userguide/eksctl.html for more information.
- kubectl: Please refer to https://docs.aws.amazon.com/eks/latest/userguide/install-kubectl.html for more information.
- Helm: Please refer to https://helm.sh/docs/intro/install/ for more information.
Creating the cluster
- Run the aws configure command and enter your access and secret keys. This will provide you with access to the AWS account.
- Run the following command to create the EKS cluster:
eksctl create cluster --name rancher-server --version 1.21 --without-nodegroup
Note
In this example, we'll be making a standard three-node cluster with one node in each AZ.
- Run the following command to add the first node pool to the cluster:
eksctl create nodegroup --cluster=rancher-server --name=rancher-us-west-2a --region=us-west-2 --zones=us-west-2a --nodes 1 --nodes-min 1 --nodes-max 2
This will create the node pool in us-west-2a.
- Run the following command to add the second node pool to the cluster:
eksctl create nodegroup --cluster=rancher-server --name=rancher-us-west-2b --region=us-west-2 --zones=us-west-2b --nodes 1 --nodes-min 1 --nodes-max 2
This will create the node pool in us-west-2b.
- Run the following command to add the third node pool to the cluster:
eksctl create nodegroup --cluster=rancher-server --name=rancher-us-west-2c --region=us-west-2 --zones=us-west-2c --nodes 1 --nodes-min 1 --nodes-max 2
This will create the node pool in us-west-2c.
- To verify the cluster, run the following command:
eksctl get cluster
Note
It might take 5 to 10 mins for the cluster to come online.
- Next, install nginx-ingress-controller using the following commands:
helm repo add ingress-nginx https://kubernetes.github.io/ingress-nginx
helm repo update
helm upgrade --install
ingress-nginx ingress-nginx/ingress-nginx
--namespace ingress-nginx
--set controller.service.type=LoadBalancer
--version 3.12.0
--create-namespace
Creating the load balancer
If you are just testing, you can run the kubectl get service ingress-nginx-controller -n ingress-nginx command to capture the external DNS record. Then you can create a CNAME DNS record to point to this record.
Note
This should not be used for production environments.
For creating the frontend load balancer, please see https://docs.aws.amazon.com/Route53/latest/DeveloperGuide/routing-to-elb-load-balancer.html for more details.
At this point, the cluster is ready for Rancher to be installed. We'll cover this step in the next section.
Google's GKE
This section will cover creating a GKE cluster with an ingress by using command-line tools.
Note
The following steps are general guidelines. Please refer to https://cloud.google.com/kubernetes-engine/docs/quickstart for more details.
Prerequisites
You should already have a GCP account with admin permissions. This section will use Cloud Shell, which has most of the tools already installed.
Setting up Cloud Shell
- Go to the upper-right corner of the GCP console and click the Terminal button.
- Run the gcloud components install kubectl command to install the kubectl client in your GCP terminal.
- Run the gcloud init command to configure the permissions.
Creating the cluster
- To create a node in each zone, run this command:
gcloud container clusters create rancher-server --zone us-central1-a --node-locations us-central1-a,us-central1-b,us-central1-c --num-nodes=3
- Grab the kubeconfig file using the following command:
gcloud container clusters get-credentials rancher-server
It might take 5 to 10 mins for the cluster to come online.
- Install nginx-ingress-controller using the following commands:
helm repo add ingress-nginx https://kubernetes.github.io/ingress-nginx
helm repo update
helm upgrade --install
ingress-nginx ingress-nginx/ingress-nginx
--namespace ingress-nginx
--set controller.service.type=LoadBalancer
--version 3.12.0
--create-namespace
Creating the load balancer
If you are just testing, you can run the kubectl get service ingress-nginx-controller -n ingress-nginx command to capture the external IP. Then you can create a DNS record to point to this IP.
Note
This should not be used for production environments.
For creating the frontend load balancer, please see https://cloud.google.com/kubernetes-engine/docs/concepts/ingress for more details.
At this point, the cluster is ready for Rancher to be installed. We'll cover this step in the next section.
Azure's AKS
This section will cover creating an AKS cluster with an ingress by using command-line tools.
Note
The following steps are general guidelines. Please refer to https://docs.microsoft.com/en-us/azure/aks/kubernetes-walkthrough-portal for more details.
Prerequisites
You should already have an Azure account with admin permissions.
The following tools should be installed on your workstation:
- The Azure CLI: Please refer to https://docs.microsoft.com/en-us/cli/azure/ for more details.
- kubectl: Please refer to https://kubernetes.io/docs/tasks/tools/#kubectl for more information.
- Helm: Please refer to https://helm.sh/docs/intro/install/ for more information.
Logging in to Azure
Run the az login command. This command is used to log in to Azure.
Note
You might need to log in to a web browser if you are using two-factor authentication (2FA).
Creating the cluster
- Run the following command to create a resource group:
az group create --name rancher-server --location eastus
- Next, run the following command to create the cluster:
az aks create --resource-group rancher-server --name rancher-server --kubernetes-version 1.22.0 --node-count 3 --node-vm-size Standard_D2_v3
- Grab the kubeconfig file using the following command:
az aks get-credentials --resource-group rancher-server --name rancher-server
It might take 5 to 10 mins for the cluster to come online.
- Install nginx-ingress-controller using the following commands:
helm repo add ingress-nginx https://kubernetes.github.io/ingress-nginx
helm repo update
helm upgrade --install
ingress-nginx ingress-nginx/ingress-nginx
--namespace ingress-nginx
--set controller.service.type=LoadBalancer
--version 3.12.0
--create-namespace
Creating the load balancer
If you are just testing, you can run the kubectl get service ingress-nginx-controller -n ingress-nginx command to capture the external IP. Then you can create a DNS record to point to this IP.
Note
This should not be used for production environments.
For creating the frontend load balancer, please see https://docs.microsoft.com/en-us/azure/aks/load-balancer-standard for more details.
At this point, the cluster is ready for Rancher to be installed. We'll cover this step in the next section.
Installing and upgrading Rancher
In this section, we are going to cover installing and upgrading Rancher on a hosted cluster. This process is very similar to installing Rancher on an RKE cluster but with the difference being the need for Rancher Backup Operator, which we will cover in the next section.
Installing Rancher
- Run the following command to add the Helm Chart repository:
helm repo add rancher-latest https://releases.rancher.com/server-charts/latest
- Run the kubectl create namespace cattle-system command to create the namespace for Rancher.
Note
The namespace name should always be cattle-system and cannot be changed without breaking Rancher.
- We are now going to install Rancher. In this case, we'll be deploying Rancher with three pods, and we'll be using the load balancers to handle SSL certificates:
helm upgrade --install rancher rancher-latest/rancher
--namespace cattle-system
--set hostname=rancher.example.com
--set ingress.tls.source=external
--set replicas=3
--version 2.6.2
Please see https://rancher.com/docs/rancher/v2.5/en/installation/install-rancher-on-k8s/#install-the-rancher-helm-chart for more details and options for installing Rancher.
Upgrading Rancher
Before starting an upgrade, you should do a backup using the backup steps mentioned in the next section:
- Run the helm repo update command to pull down the latest Helm Charts.
- To grab your current values, run the following command:
helm get values rancher -n cattle-system
Note
If you saved your install command, you could reuse it as it has the upgrade --install flag, which tells the Helm CLI to upgrade the deployment if it exists. If the deployment is missing, install it. The only thing you need to change is the version flag.
Please see https://rancher.com/docs/rancher/v2.5/en/installation/install-rancher-on-k8s/upgrades/ for more details and options for upgrading Rancher.
At this point, we have Rancher up and running. In the next section, we'll be going into some common tasks such as backing up Rancher using the Rancher Backup Operator.
Rancher-Backup-Operator
Because we don't have access to the etcd database with hosted Kubernetes clusters, we need to back up Rancher data differently. This is where the Rancher-Backup-Operator comes into the picture. This tool provides the ability to back up and restore Rancher's data on any Kubernetes cluster. It accepts a list of resources that need to be backed up for a particular application. It then gathers these resources by querying the Kubernetes API server, packages them to create a tarball file, and pushes it to the configured backup storage location. Since it gathers resources by querying the API server, it can back up applications from any type of Kubernetes cluster.
Installation
Let's look at the steps to install this tool:
- Run the following command to add the Helm Chart repository:
helm repo add rancher-charts https://raw.githubusercontent.com/rancher/charts/release-v2.5/
- Run the helm repo update command to pull down the latest charts.
- To install the CRDs needed by Rancher-Backup-Operator, run the following command:
helm install --wait --create-namespace -n cattle-resources-system rancher-backup-crd rancher-charts/rancher-backup-crd
- Finally, install the application using this command:
helm install --wait -n cattle-resources-system rancher-backup rancher-charts/rancher-backup
Creating a backup
To configure the backup schedule, encryption, and storage location, please see the documentation located at https://rancher.com/docs/rancher/v2.5/en/backups/configuration/backup-config/.
Take a one-time backup – before doing maintenance tasks such as upgrading Rancher, you should take a backup:
- Create a file called backup.yaml with the following content:
apiVersion: resources.cattle.io/v1
kind: Backup
metadata:
name: pre-rancher-upgrade
spec:
resourceSetName: rancher-resource-set
- Run the kubectl apply -f backup.yaml command to back up the Rancher data.
You can find additional examples at https://github.com/rancher/backup-restore-operator/tree/master/examples.
Summary
In this chapter, we learned about hosted Kubernetes clusters such as EKS, GKE, and AKS, including the requirements and limitations of each. We then covered the rules of architecting each type of cluster, including some example designs and the pros and cons of each solution. We finally went into detail about the steps for creating each type of cluster using the design we made earlier. We ended the chapter by installing and configuring the Rancher server and Rancher Backup Operator. At this point, you should have Rancher up and ready to start deploying downstream clusters for your application workloads.
The next chapter will cover creating a managed RKE cluster using Rancher IE, a downstream cluster. We will cover how Rancher creates these clusters and what the limitations are.