
Chapter 12
Using the QuickBooks Budget and Planning Tools
In this chapter:
• Budgeting in QuickBooks
• Creating your budget
• Making reports with your budgeted information
• Projecting cash flow
A budget is a tool for tracking your business’s progress against your plans. A well-prepared budget can also help you decide when it’s best to make a major purchase, hire additional staff, or draw money out of your business account. The ability to project profitability and cash flow by using actual data and then applying “what if” scenarios helps you decide whether you can increase or decrease expenses and prices. This chapter shows you how to make the budgeting and planning tools built into QuickBooks work for you.
How QuickBooks Handles Budgets
Before you begin creating a budget, you need to know how QuickBooks manages budgets and the processes connected to them. This section presents an overview of the QuickBooks budget features so you can understand them and keep them in mind when you create your budgets. Profit & Loss budgets can be created from scratch or by using the actual figures from the previous year.
![]()
Types of Budgets
QuickBooks offers several types of budgets:
• Budgets based on your Balance Sheet accounts
• Profit & Loss budgets based on your income and expense accounts
• Profit & Loss budgets based on income and expense accounts and a customer or job
• Profit & Loss budgets based on income and expense accounts and a class
![]()
Budget Data Is Saved Automatically
In QuickBooks, once you begin creating a budget, the data you record is stored in the budget window and reappears whenever you open that window. You create a budget by choosing Company | Planning & Budgeting | Set Up Budgets.
You can create only one of each type of budget for the same year. For example, if you create a Profit & Loss budget, enter and record some figures, and then decide to start all over by launching the Create New Budget wizard, you can’t create a new Profit & Loss budget for the same year. Instead of creating a new budget, the wizard displays the data you already configured. You have no way of telling QuickBooks, “Okay, save that one; I’m going to do another one with different figures.” You can change the figures, but the changes replace the original figures. You’re editing a budget; you’re not creating a new budget document.
Creating Multiple Budgets
Once you’ve created your first budget, regardless of type, the next time you select Company | Planning & Budgeting | Set Up Budgets, the budget window opens with the last budget you created. If the budget is a Profit & Loss or Balance Sheet budget, you cannot create a second budget of the same type for the same year. However, you can create a budget of a different type, such as Profit & Loss with Customer:Job or Profit & Loss with Class. To do so, click the Create New Budget button in the budget window and go through the wizard to select different criteria (Customer:Job or Class).
After you’ve created a Customer:Job budget or a Class budget, you can create another budget using a different customer or job or a different class (or using different accounts for the same customer, job, or class). See the sections “CustomerJob Budgets” and “Class Budgets” for instructions on creating multiple budgets of those types.
Deleting a Budget
QuickBooks lets you delete a budget. This means if you want to create multiple budgets of the same type (perhaps you feel better if you have a “Plan B” budget), you have a workaround to the “no two budgets of the same type” rule. Export the original budget to Microsoft Excel, and then delete the original budget and start the process again. To delete a budget, choose Edit | Delete Budget from the QuickBooks menu bar while the budget window is open.
![]()
Understanding the Budget Window
Before you start entering figures, you need to learn how to manage your work using the buttons on the budget window shown in Figure 12-1:
• Clear Deletes all figures in the budget window. You can’t use this button to clear a row or column.
• Save Records the current figures and leaves the window open so you can continue to work.
• OK Records the current figures and closes the window.
• Cancel Closes the window without offering to record the figures.
• Create New Budget Starts the budget process anew, opening the Create New Budget wizard. If you’ve entered any data, QuickBooks asks if you want to record your budget before closing the window. If you record your data (or have previously recorded your data with the Save button), when you start anew, the budget window opens with the same recorded data, and you can change the figures.
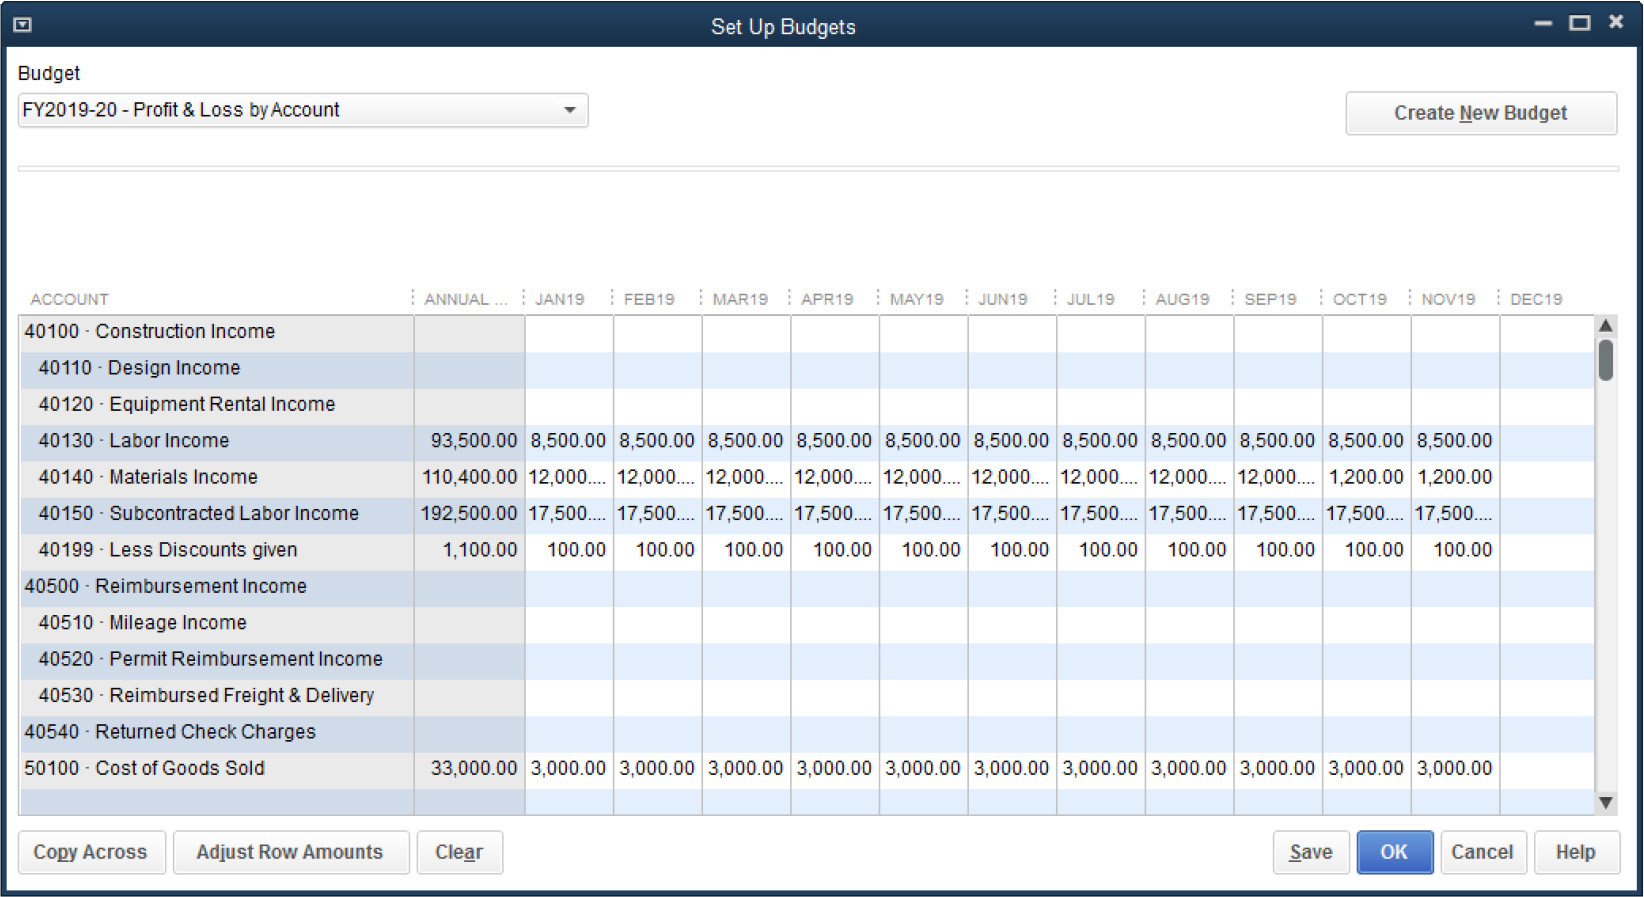
FIGURE 12-1 The Budget window offers several helpful buttons.
See “Enter Budget Amounts” in this chapter to learn about the other budget window buttons.
![]()
Tasks to Perform Before You Start Your Budget
Before you create a budget, check the following details:
• Make sure the accounts you need exist; adding accounts while you’re working in a budget doesn’t work properly because you won’t see the accounts unless you close and reopen the budget.
• The first month of the budget must be the same as the first month of your fiscal year.
• All the accounts you want to include in the budget must be active; inactive accounts aren’t available in the budget window.
Profit & Loss Budgets
The most common and useful budget you can create is a Profit & Loss budget, which helps you plan for future income and expenses.
1. Choose Company | Planning & Budgeting | Set Up Budgets. If this is the first budget you’re creating, the Create New Budget wizard opens to walk you through the process. If you’ve already created a budget, the Set Up Budgets window appears with your existing budget loaded. Click Create New Budget to launch the Create New Budget wizard.
2. Enter the year for which you’re creating the budget and select the Profit And Loss option.

3. Click Next and select No Additional Criteria for this budget. Customer and class budgets are covered later in this chapter.
4. Click Next. You’ll see an option to create a budget from scratch or from the figures from last year’s activities. In this case, select the option to create a budget from scratch.
5. Click Finish to open the budget window, where all your income and expense accounts are displayed.
![]()
Enter Budget Amounts
To create budget figures for an account, select the account and then click in the column of the first month for which you want to budget. Enter the budget figure, press TAB to move to the next month, and enter the appropriate amount. Repeat until all the months for this account have your budget figures. As you enter each monthly amount and press TAB, QuickBooks automatically calculates and displays the annual total for the account.
QuickBooks provides the following shortcuts to save you from some of the more repetitive tasks when entering budget figures.
Copy Numbers Across
To copy a monthly figure from the current month (the month where your cursor is) to all the following months, enter the figure and then click the Copy Across button. The numbers are copied to all the rest of the months of the year. The Copy Across button is also the only way to clear a row. Delete the figure in the first month (or enter a zero) and click Copy Across. The entire row is now blank (or filled with zeros).
Automatically Increase or Decrease Monthly Figures
After you’ve entered figures into all the months on an account’s row, you can raise or lower monthly figures automatically. For example, you may want to raise an income account by an amount or a percentage starting in a certain month because you expect to sign a new customer or a new contract. Select the first month that needs the adjustment, and click the Adjust Row Amounts button to open the Adjust Row Amounts dialog.
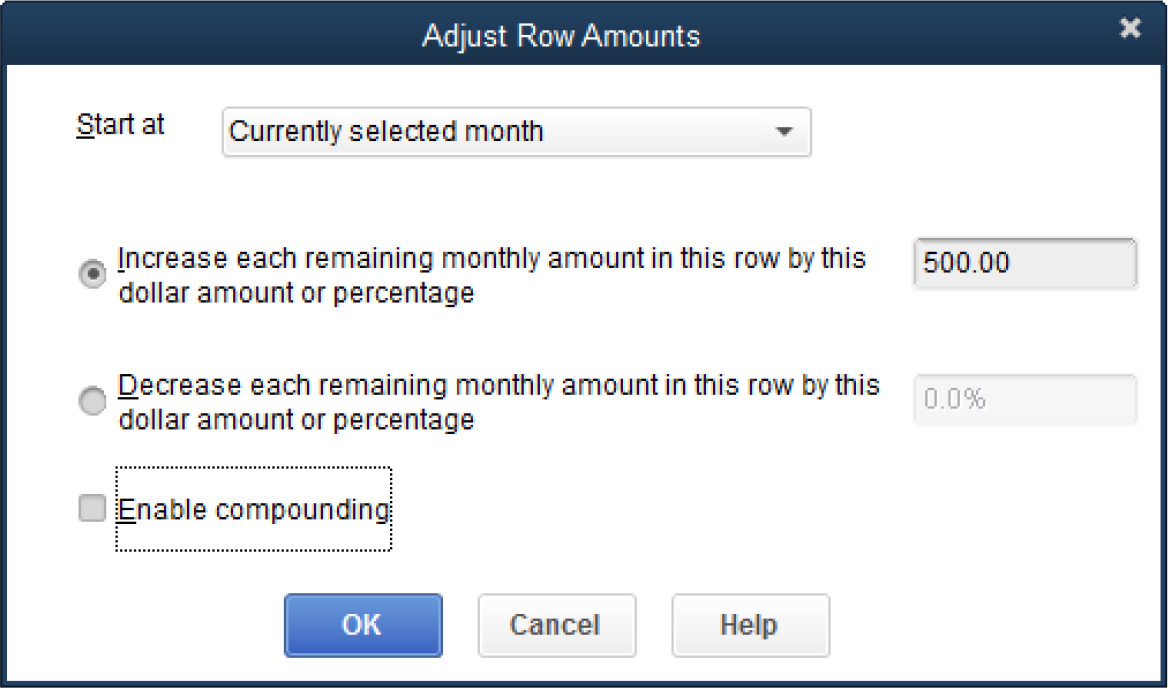
Choose 1st Month or Currently Selected Month as the starting point for the calculations. You can choose 1st Month no matter where your cursor is on the account’s row. You must click in the column for the appropriate month if you want to choose Currently Selected Month; however, you can click the first month to make that the currently selected month.
To increase or decrease the amount in the selected month and all the following months by a specific amount, enter the amount. To increase or decrease the amount in the selected month and all columns to the right by a percentage, enter the percentage rate and the percentage sign.
If you select Currently Selected Month, the Adjust Row Amounts dialog adds an option named Enable Compounding. When you enable compounding, the calculations for each month are increased or decreased based on a formula starting with the currently selected month and taking into consideration the resulting change in the previous month. QuickBooks calculates a compounded increase (or decrease) using a dollar amount or percentage.
![]()
Creating a Budget from Last Year’s Data
If you used QuickBooks last year, you can create a budget based on last year’s figures. To use last year’s real data as the basis of your budget:
1. Open the Create New Budget wizard by choosing Company | Planning & Budgeting | Set Up Budgets. When the Create New Budget wizard opens, enter the year for which you’re creating the budget and select the Profit And Loss budget option. Click Next.
2. Select any additional criteria, such as a customer, job, or class. Click Next.
3. Select the option to create the budget from the previous year’s actual data, and click Finish.
The budget window opens with last year’s actual data used for the budget figures. For each account that had activity, the ending monthly balances appear in the appropriate month. You can change any figures you wish using the procedures and shortcuts described earlier.
![]()
Customer:Job Budgets
If you have a customer or a job that warrants it, you can create a Profit & Loss budget to track the financials for that customer or job against a budget. CustomerJob budget reports aren’t accurate unless you’re faithful about assigning every appropriate revenue or expense transaction to the customer or job.
To create your first budget for a customer or a job:
1. Choose Company | Planning & Budgeting | Set Up Budgets. If you already created another budget of a different type (Profit & Loss or Class), the budget window opens with the last budget you created. Click the Create New Budget button in the budget window to launch the Create New Budget wizard. If this is your first-ever budget, the Create New Budget wizard appears automatically.
2. Select the year for your budget, and choose Profit And Loss as the type. Click Next.
3. Select the option CustomerJob. Click Next.
4. In the next window, specify whether you want to create the budget from scratch or from last year’s data. Click Finish.
In the Set Up Budgets window, select the CustomerJob for this budget from the drop-down list. Enter budget figures using the following guidelines:
• The expenses you track depend on the scope of the job. For example, you may only want to budget the cost of outside contractors or supplies so if prices rise, you can have a conversation with the customer about overruns.
• Enter a monthly budget figure for each account or for each month the project exists, or enter a total budget figure in the first month. The last option lets you compare accumulated data for expenses against the total budgeted figure by creating modified reports, where you change the report date to reflect the elapsed time for the project and filter the report for this job only.
• If the project is lengthy, you may budget some accounts for some months and other accounts for other months. For example, if you have a project that involves purchases of goods followed by installation of those goods or training for the customer’s employees, you might choose to budget the purchases for the first few months and then the cost of the installation or training (either by tracking payroll or outside contractors) for the months in which those activities occur.
• If you want to track payroll costs against a job, use the QuickBooks Time and Billing features.
![]()
Class Budgets
If you use class tracking to track branch offices, company divisions, or company departments, you can link your budget to any class to create very useful class budgets. If you look at your class-based reports and find yourself asking, “Aren’t those expenses higher than they should be?” or “Why is one class less profitable than the other classes?” you might want to budget each month to get a handle on where and when expenses got out of hand. If you ask, “Is this department contributing the income I expected?” include income accounts in your budget. You can use income accounts in class budgets to provide incentives to your employees, perhaps a bonus to a manager if the reality is better than the budget.
To create a class-based budget, use the steps described earlier to create a budget and choose Class in the Additional Profit And Loss Budget Criteria window. When the budget window opens, a Current Class field appears. Select the class for which you’re creating a budget from the drop-down list. Then begin entering data.
![]()
Balance Sheet Budgets
A Balance Sheet budget can be challenging to build because it’s difficult to predict the amounts for most Balance Sheet accounts—with the exception of fixed assets and loans. In fact, the transactions that affect fixed assets and loans are usually planned and therefore don’t need budget-to-reality comparisons to allow you to keep an eye on them.
If you still feel you need to create a Balance Sheet budget, choose Company | Planning & Budgeting | Set Up Budgets. If this is your first budget, the Create New Budget wizard opens. Otherwise, when an existing budget appears, click the Create New Budget button. When the Create New Budget wizard opens, select the year for which you want to create the budget and select the Balance Sheet option. Then click Next, and because the next window has no options, there’s nothing for you to do except click Finish. The budget window opens, listing all of your Balance Sheet accounts, and you can enter the budget figures.
Budget Reports
QuickBooks provides a number of budget reports to see how you’re doing. To get to the reports, choose Reports | Budgets from the menu bar, and then select one of the following reports:
• Budget Overview
• Budget vs. Actual
• Profit & Loss Budget Performance
• Budget vs. Actual Graph
![]()
Budget Overview
This report shows the accounts you budgeted and the amounts you budgeted for each month. Accounts not included in the budget do not display. If you created multiple budgets, select the one you want to view from the drop-down list and click Next. In the next window, select a report layout (the options differ, depending on the type of budget). Click Next, and then click Finish. The Overview report type produces the display you’d see if the window you use to create a budget had a button labeled Print The Budget.
This report includes inactive accounts if you input figures for that account when you prepared the budget and later made the account inactive. This can be confusing if you print this report as the “official” budget for your company.
If you use subaccounts in your budget but only want to see parent account budget totals, click the Collapse button at the top of the report window. The button name changes to Expand, and clicking it puts the subaccount lines back into the display.
To condense the numbers, use the Columns drop-down list to select a different interval. The default is Month, but you can choose another interval and QuickBooks will calculate the figures to fit. For example, you might want to select Quarter to see four columns of three-month subtotals and a Total column.
If you want to tweak the budget or play “what if” games by experimenting with different numbers, click the Excel button to send the report to Microsoft Excel.
CustomerJob Budget Overview
If you created budgets for customers or jobs, select <FYxxxx> Profit & Loss By Account And CustomerJob in the first window and click Next. Select a report layout from the drop-down list (as you select each option from the list, QuickBooks displays a diagram of the layout). The name of each layout is a hint about the way it displays in the report. The first word represents the rows, and the word after “by” represents the columns. So, for Customer:Job By Month, Customers:Jobs are shown in rows and months are displayed as columns.
The following choices are available:
• Account By Month Lists each account you used in the budget and displays the total budget amounts for all customer budgets you created for each month that has data. No budget information for individual customers appears.
• Account By Customer:Job Lists each account you used in the budget and displays the fiscal year total for that account for each customer (each customer has its own column).
• Customer:Job By Month Displays a row for each customer that has a budget and a column for each month. The budget totals for all accounts—individual accounts are not displayed—appear under each month. Under each customer’s row is a row for each job that has a budget.
Class Budget Overview
If you created a Class budget, select Profit & Loss By Account And Class in the first window and click Next. Select a report layout from the drop-down list. You have the following choices:
• Account By Month Lists each account you used in the budget and displays the total budget amounts for all Class budgets you created for each month that has data. No budget information for individual classes appears.
• Account By Class Lists each account you used in the budget and displays the yearly total for that account for each class (each class has its own column).
• Class By Month Displays a row for each class that has a budget and a column for each month. The total budget (not broken down by account) appears for each month.
Balance Sheet Budget Overview
If you created a Balance Sheet budget, select <FYxxxx> Balance Sheet By Account for the budget in the first window, and then click Next. QuickBooks displays a graphical representation of the report’s layout (it’s a monthly layout similar to the layout for the Profit & Loss budget). Click Finish to see the report.
![]()
Budget vs. Actual
This report’s name says it all—it shows you how your real numbers compare to your budget figures. For a standard Profit & Loss budget, the report displays the following data for each month of your budget for each account:
• Amount posted
• Amount budgeted
• Difference in percentage
The choices for the budget type are the same as the Budget Overview report, so you can see account totals, customer totals, or class totals to match the budgets you’ve created. When the report opens, only the accounts you used in your budget show budget figures.
You can also use the options in the Modify Report window to make the following changes:
• Change the report dates.
• Change the calculations from accrual to cash to remove any unpaid invoices and bills so that only actual income and expenses are reported.
Memorize the report so you don’t have to make the same modifications next time you want to view a comparison report. Click the Memorize button at the top of the report window and then give the report a meaningful name. Only the formatting changes you make are memorized, not the data. Every time you open the report, it displays current data. To view the report after you memorize it, choose Reports | Memorized Reports from the QuickBooks menu bar.
![]()
Profit & Loss Budget Performance
This report is similar to the Budget vs. Actual report, but it’s based on the current month and the year to date. For that time period, the report displays your actual income and expenses compared to what you budgeted. By default, the date range is the current month, but you can change that to see last month’s figures or the figures for any previous month. This report is available for all types and can be modified to customize the display.
![]()
Budget vs. Actual Graph
This report just opens; you have no choices to select first. All the choices are in the graph that displays in the form of buttons across the top of the report window. Click the type of report you want to see.
Work with Budget Data Outside of QuickBooks
If you need to manipulate your budget data or have report formatting needs beyond what QuickBooks offers, you can export this data to Excel or to a delimited text file. Exporting to Excel can be useful for creating customized budget reports using your QuickBooks data, while exporting to a text file gives you the option to make changes to your budget data that can be imported back into QuickBooks.
![]()
Exporting a Budget Report to Excel
Although you can export any budget report to Excel, many use the Profit & Loss Budget Overview report for this purpose. Choose Reports | Budgets | Budget Overview. Select the desired Profit & Loss report and click Next. Select a report layout, click Next, and then click Finish.
With the report open, click the Excel button at the top of the report window. From here, you can choose to create a new worksheet or update an existing worksheet. Select Create New Worksheet if this is the first budget you’re exporting. If you’re exporting multiple budgets in this manner, you can select an existing workbook and create separate worksheets for each budget.
![]()
Exporting Budgets to Delimited Text Files
When you export budgets to a delimited text file (QuickBooks adds the file extension .iif to the exported file), you can’t select specific budgets to export—it’s all or nothing. To export your budget data:
1. Choose File | Utilities | Export | Lists To IIF Files from the QuickBooks menu bar.
2. When the Export dialog opens, it displays all the QuickBooks lists. Select the item named Budgets and click OK.
3. Another Export dialog opens. Select a folder in which to save this exported file, or leave it in your QuickBooks folder (the default location).
4. Give the exported list a filename (for example, QBBudgets). QuickBooks will automatically add the extension .iif to the filename.
5. Click Save. QuickBooks displays a message telling you that your data has been exported successfully.
6. Click OK.
Open the file using Excel (or any spreadsheet program). Note that the file shows a row of budget data for every year that you’ve created one in QuickBooks. If you only want to work on the figures for one year, you have to delete the unwanted rows. The budget year is indicated by the date found in the STARTDATE column. Updating the date in the STARTDATE column will create a budget for the year you’ve entered when the file is imported back into QuickBooks. Be sure that any changes you make to the file while it is open in Excel are saved in the original text (.iif) format if you plan on importing your changes back into your QuickBooks file.
![]()
Importing Budgets Back into QuickBooks
The only practical reason you’d import budgets back into QuickBooks is to copy a budget to another year to use as the basis for another year’s budget. While you can also edit the actual budget figures you’ve exported to an .iif file, it’s easier to work directly in the QuickBooks budget window. To play “what if” games or to sort the budget differently, it’s easier to work in Excel or some other spreadsheet program.
Before you can import the file, you must save it as a delimited text file, choosing Tab as the delimiter. You must also change the filename extension to .iif. Then follow these steps to bring the budget into QuickBooks:
1. Choose File | Utilities | Import | IIF Files from the menu bar to open the Import dialog.
2. Locate and double-click the file you saved.
3. When QuickBooks displays a message telling you the import was successful, click OK.
You can view the imported budgets in any budget report or in the budget window. QuickBooks checks the dates and changes the budget’s name to reflect the dates. When you select a budget report or choose a budget to edit in the budget window, the available budgets include both the budgets you created in QuickBooks (FY2018, for example) and the budgets you imported after changing the date (FY2019).
Project Cash Flow
The Cash Flow Projector is a tool you can use to build a report that projects your cash flows using your own criteria. This tool uses data in your company file and then lets you remove and add accounts and even adjust figures. These features make it easier to achieve the projection parameters and results you need.
The Cash Flow Projector is rather powerful if you understand the accounting terminology and principles of determining cash flows. You can design specific cash flow scenarios, which might be useful in planning for an expansion or other major business event. This section gives you an overview.
To ensure accuracy, make sure you’ve entered all transactions, including memorized transactions, into your QuickBooks company file. Then launch the Cash Flow Projector by choosing Company | Planning & Budgeting | Cash Flow Projector. The program operates like a wizard, and the opening window (see Figure 12-2) welcomes you and offers links to information you should read before you begin. Each ensuing wizard window has a button labeled Preview Projection. Click it to see your results so far.
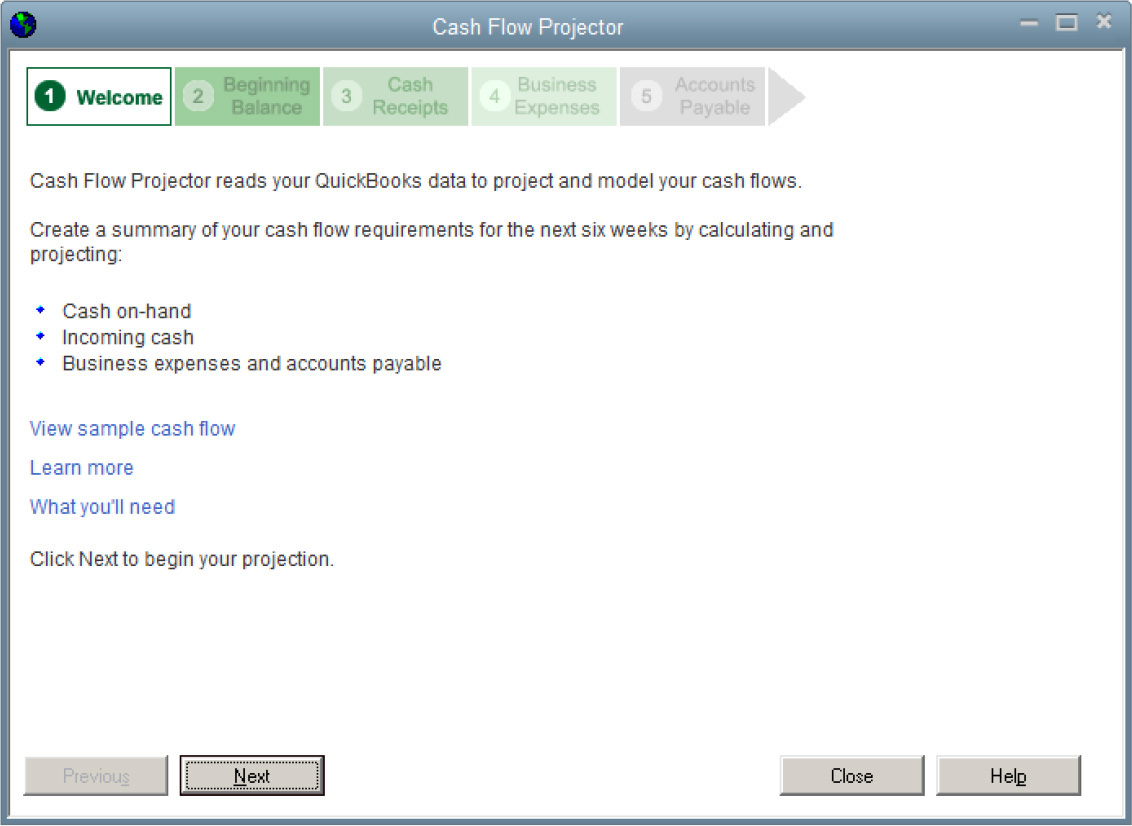
FIGURE 12-2 Use the links to familiarize yourself with the information the wizard needs.
Click Next to display the Beginning Balance window, and select the cash accounts you want to include in your projection. The software calculates a beginning balance by adding together the balances of all the accounts you select. You can adjust that calculated balance to change the beginning balance of the cash flow projection. This is useful if you know that the current balance of any account contains an amount that you don’t want included in the projection, such as an income item that is earmarked for spending today or tomorrow and therefore shouldn’t be counted.
Click Next to move to the Cash Receipts window. You must select a projection method from the drop-down list, shown here. If you don’t understand the terminology in the list, discuss it with your accountant. One of the choices is I Want To Project Cash Receipts Manually, which is useful if your accountant has some particular method in mind or if you don’t have A/R totals to guide you because you run a retail business.

The next two wizard windows look similar, but they deal with expenses, starting with expenses that are not accounts-payable expenses (expenses for which you write direct checks instead of entering bills and any unique expenses that qualify as “onetime-only”), and moving on to accounts-payable expenses, including recurring bills you’ve entered into your system. In both windows, you can enter specific expenses or adjusted total expenses.
This brief discussion gives you a basic understanding of the ways you can use this tool for your business. If you think you’d benefit from generating a variety of cash flow scenarios, introduce this tool to your accountant so together you can see all the ways it can be applied to suit your business needs.