
A. Client Data Review
Introduction: Features and Benefits
Available with QuickBooks Accountant 2012 is the Client Data Review (CDR) feature, shown in Figure A.1. Accessing CDR tools and features is easier than ever with the new, customizable Accountant’s Center. CDR is a collection of tools and reports used primarily by accounting professionals to streamline the many tasks involved in reviewing, troubleshooting, and correcting a client’s QuickBooks data.
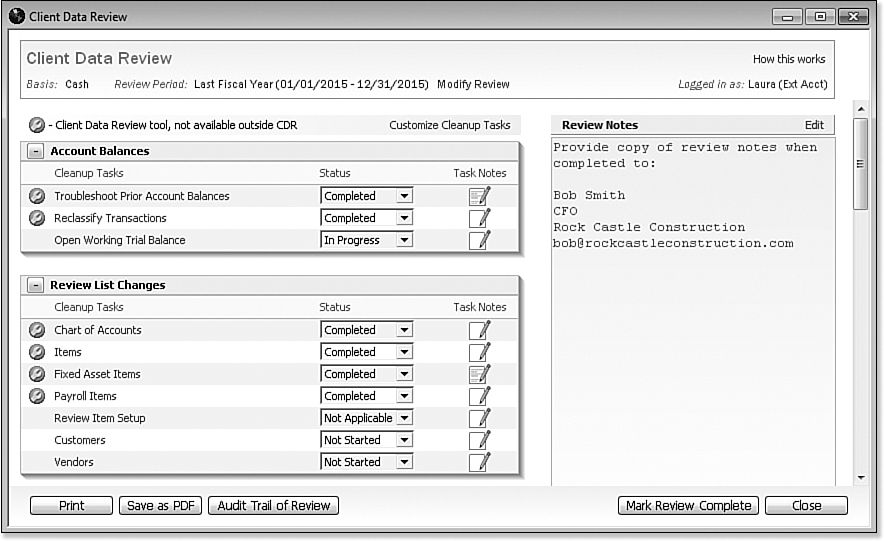
Figure A.1. Client Data Review (CDR) is helpful for finding and fixing your client’s QuickBooks data entry errors.
The CDR feature is available with QuickBooks Accountant 2012 and QuickBooks Enterprise Solutions Accountant 12.0. The CDR feature is not available for use with QuickBooks Online or QuickBooks for Mac.
With QuickBooks Accountant software, all of the features of CDR will work with a QuickBooks Accountant’s Copy of your client’s file. See Chapter 16, “Sharing Data with Your Accountant.”
CDR can be used when working with a client’s Accountant’s Copy file type (.QBX file extension). Some feature limitations apply when working in an Accountant’s Copy file-sharing type. Refer to Chapter 16 for more details on the benefits of working with this file type.
Typically, a best practice workflow using CDR tools is as follows:
1. Review with the client open Accounts Receivable, Accounts Payable, and other balances for which the client has current information.
2. Review your client’s data file using the CDR-specific tasks and reports.
3. Make data corrections using CDR tools and set a QuickBooks closing date.
4. If completing a formal review, click Mark Review Complete, letting CDR “store” your period reviewed balances. (The client cannot change these reviewed balances!)
5. Click Save as PDF to save the details of the review.
6. Print the details from the Client Data Review dialog box, Save the details as a PDF. You can also print an Audit Trail of Review, listing those transactions that were added or modified.
7. Begin your next review and let QuickBooks detail for you any and all changes to balances, transactions, and lists since your last completed review!
Your steps might differ slightly if you are working in a client’s Accountants Copy file type. For more information on sharing data with your accountant using the Accountant’s Copy, see Chapter 16.
There are specific tasks and reports that are available only with CDR. These tasks are indicated with the CDR icon. For example, see the icon next to the Troubleshoot Prior Account Balances task, as shown in Figure A.1. Other tasks listed without the icon indicate a feature or report that is available within and outside of the CDR functionality.
In QuickBooks 2012, CDR features can be used when QuickBooks is in multi-user mode. This means other users in the QuickBooks file can continue with their daily tasks while the accounting professional uses the CDR tools or features to review or make changes to the client’s file.
However, only one user can access Client Data Review at a time.
CDR offers robust tracking of the changes your client makes to the data between your reviews. CDR also offers the following:
• Powerful time-saving tools for finding and fixing client entry errors: Reclassify Transactions, Write-Off Invoices, Fix Incorrectly Recorded Sales Tax, Inventory Troubleshooting, Identify Changes to Lists, Troubleshoot Beginning Balance Differences, Match Unapplied Vendor and Customer Credits, and Clear Up Undeposited Funds.
• Troubleshooting beginning balances “saves” the previously reviewed debit and credit balances; the tool then compares this stored balance to the same prior-dated balances in QuickBooks as of today. Your previously reviewed and stored QuickBooks balances cannot be modified by the client!
• QuickBooks suggests an adjusting journal entry to make so your prior-period reviewed balances agree with the current QuickBooks data for that period. You remain in control, deciding if you want to modify the detail in the journal entry.
• Identify what chart of accounts balances differ and the amount of the difference when compared to your prior period of reviewed financials.
• Track changes to the items lists, such as additions, name changes, and even tracking accounts or list items that were merged.
• Track changes made to list items, accounts assigned, or for payroll items when a change to a payroll tax rate is made.
• Working with the Open Windows dialog box? CDR displays in the Open Windows dialog box enabling you to move efficiently between activities in QuickBooks and the CDR activities.
• Conveniently work on CDR in QuickBooks and modify or add transactions as normal with an immediate refresh of the data in your review.
• Access the CDR while working in a client’s Accountant’s Copy file-sharing format. All CDR tools and features work with an Accountant’s Copy. There are other restrictions when working with an Accountant’s Copy and these are detailed in Chapter 16.
If you are an accounting professional and want to work most efficiently with your client’s file, use QuickBooks Accountant 2012 or QuickBooks Enterprise Solutions Accountant 12.0.
As an accounting professional, would you like to “try” CDR even if you don’t have the Accountant’s edition of QuickBooks? Simply have your client create a user for you in her file and assign the External Accountant user type. For more information, see “Creating an External Accountant User Type,” p. 538.
When you log into the client’s Pro or Premier 2012 or Enterprise 12.0 data file as an External Accountant user, you will have access to the Accountant Center (which either opens automatically or you can access it from the Company menu). Although this Accountant Center is not customizable, you will have limited access to some of the features found only in QuickBooks Accountant software and selected CDR tools including:
• Create a Working Trial Balance
• Reclassify Transactions
• Fix Unapplied Payments and Credits
• Write Off Invoices
In addition, your Accountant Center provides easy access to other common QuickBooks tasks, memorized reports, reconciliation details, and updates especially for the accounting professional.
Accessing Client Data Review Tools and Features
New for QuickBooks Accountant 2012, accounting professionals can access common CDR tools and features in the software multiple ways including:
• Accountant Center—New for QuickBooks 2012, can be customized to include the tools you use most with your client’s files
• Accountant Menu—Individual CDR tools and features without starting a review
• Accountant Menu—Launching a review with CDR
Before beginning to use CDR, determine if you need to do a formal review or just efficiently work on troubleshooting and fixing client data entry errors.
You can use many of the CDR tools without opening a review. The date range that will default when using CDR tools is your last fiscal year. However, with most of the tools you can change the date range manually if needed.
Most of the CDR tools or reports can be accessed from the Accountant menu or Accountant Center without starting a review. If your client has engaged you simply to clean up data entry errors, then you might not need to open a review to complete these common tasks:
• Reclassify Transactions
• Fix Unapplied Customer and Vendor Credits
• Clear Up Undeposited Funds Account
• Write Off Invoices
• Fix Incorrectly Recorded Sales Tax
• Compare Balance Sheet and Inventory Valuation
• Troubleshoot Inventory
• Find Incorrectly Paid Payroll Liabilities
However, if part of your engagement with the client includes using the following CDR tools (detailed later in this chapter), you will need to “Start Review” formally using CDR:
• Troubleshoot Prior Account Balances
• Review List Changes
If your client sends you an Accountant’s Copy file for her data, you will be able to access the features available with CDR. The benefit of using the Accountant’s Copy file is that your client can continue her day-to-day operations while you make changes to her data. The file is then sent back to the client to import your changes.
Chapter 16 discusses the benefits of using the Accountant’s Copy file, a preferred data-sharing method if you need to use the CDR while your client continues day-to-day work in the file.
If your client sends you a QuickBooks 2012 backup file (.QBB extension) or portable company file (.QBM file extension), both of these files when restored will enable you to use the CDR, but your changes will not be able to be merged into the client’s data file.
Customizing the New Accountant Center
For the accounting professional a great benefit of using the Accountant versions of QuickBooks 2012 or Enterprise 12.0 is the new Accountant Center as displayed in Figure A.2. The Accountant Center offers easy access to Client Data Review tools and other accountant features.
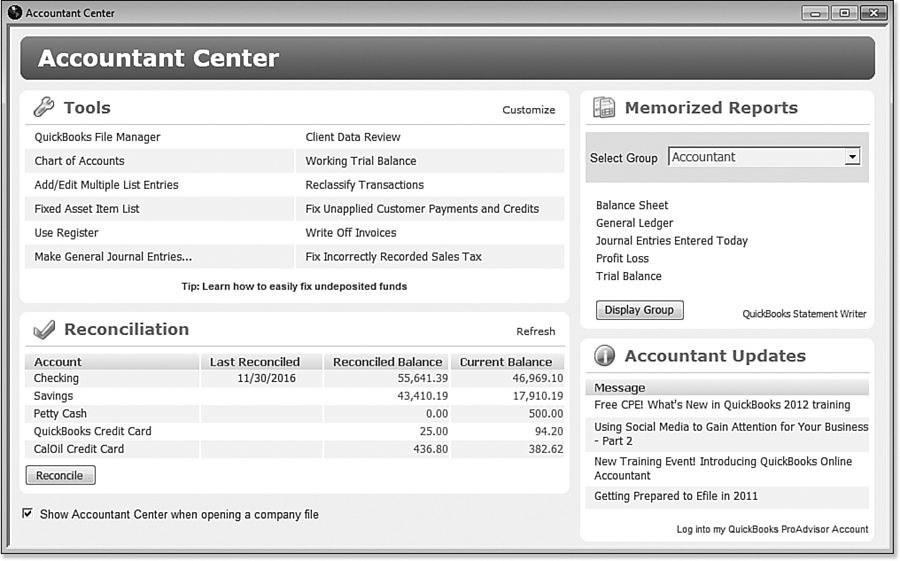
Figure A.2. Customize the Accountant Center to include those tools and features you use most when working with your client’s data.
The Accountant Center can also be accessed from a client’s 2012 Pro or Premier (non-accountant) and Enterprise 12.0 file when you, the accounting professional, log into the file as an External Accountant user.
By default a preference is set to have the Accountant Center open automatically. The Accountant Center can also be accessed from the Accountant menu. In a non-accountant edition of QuickBooks, you can log in as the External Accountant user type and access the Accountant Center from the Company menu.
You only need to customize the Accountant Center once, and your customized view will display with each unique client file opened with your Accountant 2012 software. However, a shortcut won’t appear on the Accountant Center if the feature it points to is not enabled in a particular client’s file.
If you are using QuickBooks Accountant 2012 or Enterprise Accountant 12.0, practice customizing the Accountant Center with these instructions.
Customize the Accountant Center
Open the Accountant Center from the Accountant menu to customize the Tools section:
1. From the menu bar, select Accountant, Accountant Center.
2. Click the Customize link in the Tools panel of the Accountant Center. The Customize Your List of Tools dialog box displays. See Figure A.3.
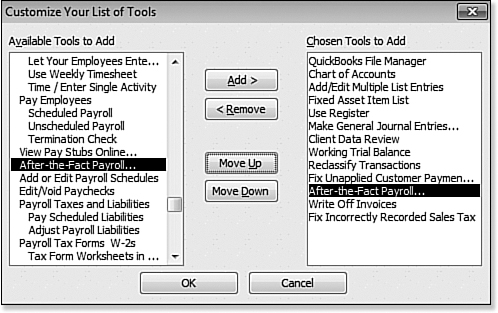
Figure A.3. Customize the New Accountant Center to include those tools you use most often.
3. From the Available Tools To Add list, select an action you want to add to the Chosen Tools to Add section and click the Add button.
4. Rearrange the order of the selected tools by selecting one in the Chosen Tools to Add list and then clicking the Move Up or Move Down button.
5. Optionally, to remove a tool, click the tool in the Chosen Tools to Add and then click the Remove button.
6. Click OK to close the Customize Your List of Tools dialog box and your changes will now be displayed in your very own Accountant Center.
The Accountant Center also provides easy access to Memorized Report Groups. You can learn about working with reporting in QuickBooks in Chapter 14, “Reporting in QuickBooks.”
For accounting professionals, create your own memorized report group and access it from the Accountant Center when working with each client’s file.
The Reconciliation panel includes timely information about your client’s last reconciliation date—reconciled balance and current balance for all bank and credit card type accounts. Click Refresh to reflect recent changes to the client’s data. More information about working with banking activities is included in Chapter 13, “Working with Bank and Credit Card Accounts.”
The Accountant’s Update section helps accounting professionals stay informed with important alerts, development tips, and links to training opportunities.
Customizing the Client Data Review Center
You can customize the list of displayed clean-up tasks in CDR. However, the changes you make to the list of displayed CDR tasks affects only the QuickBooks file currently opened. Additionally, some CDR tasks will display only if the related feature in QuickBooks is enabled (Sales Tax, for example).
To gain access to the customizing feature, you need to launch the CDR. To do so, follow these steps:
1. From the menu bar, select Accountant, Client Data Review, Client Data Review. You can also launch CDR from the QuickBooks icon bar if you are using QuickBooks Accountant 2012 or Enterprise Solutions Accountant 12.0.
2. If this is your first review for this client, the Client Data Review—Start Review dialog box displays, as shown in Figure A.4. From this dialog box, select the default Review Date Range shown, or select a date range from the following options in the drop-down list:
• Last Fiscal Year (your default fiscal year is defined in the QuickBooks Company, Company Information menu)
• Last Fiscal Quarter
• Last Month
• Custom (you will choose the From and To dates)
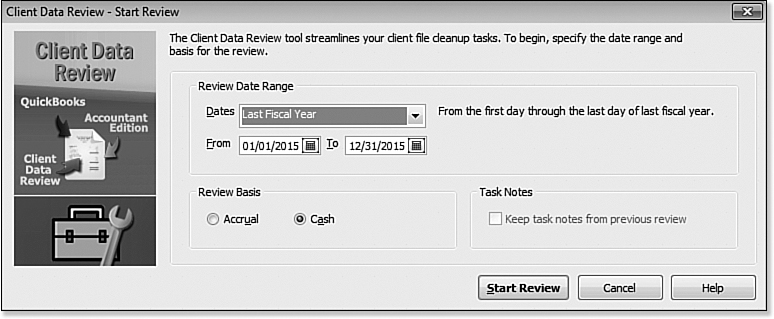
Figure A.4. After launching the CDR for the first time, you will select your review period and reporting basis.
3. Select the appropriate Review Basis—Accrual or Cash. This basis defaults from the preference setting in the QuickBooks file for reports.
4. Optionally, click to select to have Task Notes from previous reviews follow to the new review.
5. Click Start Review and the Client Data Review tasks display as previously shown in Figure A.1.
Modifying the Review Date and Basis
The Basis shown in the CDR defaulted from the QuickBooks data file preferences when the CDR was first launched, or the basis was manually selected on the Client Data Review—Start Review or Modify Review dialog box.
If after beginning a review, you need to change either the review period or basis, simply click the Modify Review link in the CDR, top center, to be returned to the dialog box (refer to Figure A.1).
If you find you need to change your default reporting basis after opening a review, you can do so on the Reports and Graphs tab of the Preferences dialog box (select Edit, Preferences from the menu bar). You will need to be logged in as the Admin or External Accountant user in single-user mode to change the global preference for reporting basis.
Customize Cleanup Tasks
You might have some clients who do not need a review of some of the task groups in their QuickBooks data. For example, you are working in a client’s file who does not have to track or pay sales tax.
With CDR, you can remove those tasks that are not needed for the specifically open client file. The changes made in one client’s file will not be made to another client’s file CDR tasks.
With Client Data Review open, follow these steps to remove the sales tax task group (or any of the other tasks) from the CDR:
1. Click the Customize Cleanup Tasks link in the center of the CDR dialog box (refer to Figure A.1).
The Client Data Review—Customize dialog box displays as shown in Figure A.5.
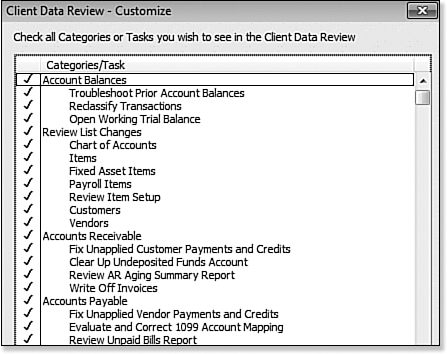
Figure A.5. Customize the tasks that are displayed for the currently opened client file.
2. Place your mouse pointer on any list item and click once to unselect that specific task or group of tasks. Clicking again will reselect the list item.
3. Click the Restore Defaults button to return to the original settings.
4. Click Help to open the help topic specific for CDR.
5. Click Save Changes or Cancel if you do not want to make the changes.
You have successfully changed the lists of tasks that displays for this client’s data file only.
If the desired Categories/Task is not displayed in the Client Data Review—Customize dialog box, it is because for the currently opened QuickBooks file that feature is not currently enabled.
Minimize or Expand Task Groups
You might not want to remove a task completely, but instead you want to minimize it.
With Client Data Review open, follow these steps:
1. Click the (−) before a task group name to minimize the task group details.
2. Click the (+) before a task group name to maximize the task group details.
In the example shown in Figure A.6, you will select the (−) before the Review List Changes task group header. The result, as shown in Figure A.7, is to minimize a task. The Hide and Show Task state for each task group on the CDR is company file-dependent. The changes you make in one company file will not be made in other QuickBooks client files.
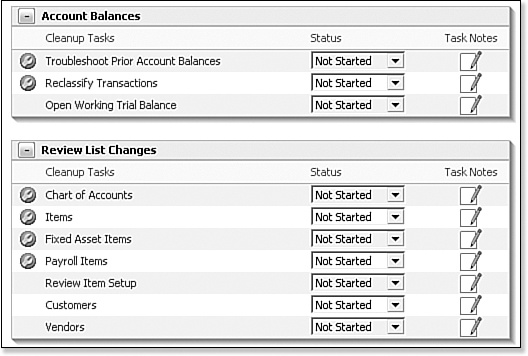
Figure A.6. View before minimizing the Review List Changes task.

Figure A.7. View after minimizing the Review List Changes task.
Assigning Status and Notes to Review Tasks
To help in managing the review of a client’s file, you have an associated status you can optionally assign to each task. This feature is useful for your own reference or if several accounting professionals are reviewing the same file.
To assign a new status or change an existing status, click the Status drop-down list and choose from one of the available choices:
• Not Started (which is the default status assigned to all tasks when a review is started)
• In Progress
• Completed
• Not Applicable
Optionally, you can record a note about a particular task. Click the task note icon to the right of a task. The Task Notes dialog box will display where you can document specific review notes for that task (see Figure A.8). These notes are included in the CDR notes when Save as PDF is selected.

Figure A.8. Conveniently store task notes as you review the file.
When you return to a CDR in progress, or if you share the review with other accounting professionals at your firm, each individual can see the progress of a particular task in review.
After customizing the CDR to show or hide specific task groups, you should take one more precaution.
Before beginning the review and making changes to a client’s file, make sure you are logged in with as an External Accountant type user. This will ensure your changes can be tracked separately from those made by the client and will also give you complete access to the Admin activities available in the CDR. For more information, read the “Creating an External Accountant User” section later in this chapter.
To see the currently logged in user, look to the top-right corner of the CDR. CDR identifies the username and whether she is an External Accountant as displayed in Figure A.1.
You are now ready to begin the review process. The following sections provide more details about the unique features and results you can expect when reviewing and correcting your client’s data file using this innovative feature. You will never want to do a review the “old fashioned” way again!
Account Balances
Although you do not have to do the review task groups in any particular order, I do recommend you begin with the Account Balances task group. A reliable client data file review depends on accurate balance sheet reporting, which includes financial numbers from prior periods.
If a closing date was not set previously, or if the user was granted access to adding, modifying, or deleting prior year transactions, your ending balances that QuickBooks reports now might be different from those you used to prepare financials or tax return documents. Setting a closing date and password can help control changes to prior period transactions. More information about setting a closing date can be found in Chapter 16.
 Troubleshoot Prior Account Balances
The first task included in Account Balances Review, Troubleshoot Prior Account Balances, displays the trial balance in debit and credit format, as shown in Figure A.9.
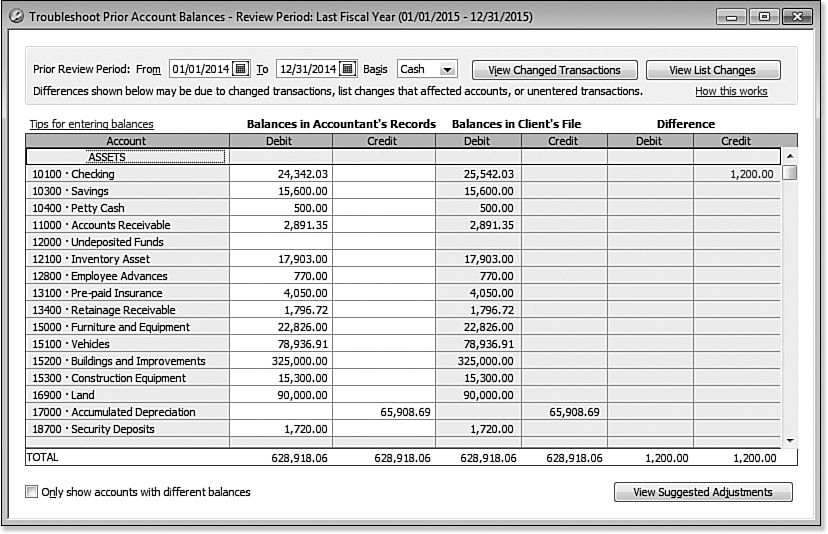
Figure A.9. Use Troubleshoot Prior Account Balances to correct any changes to prior period balances efficiently.
The Troubleshoot Account Balances tool displays these columns:
• Accounts—grouped by account type:
• Assets
• Liabilities
• Equity
• Income
• Cost of Goods Sold
• Expenses
• Other Income
• Other Expense
• Balances in Accountant’s Records—debit and credit columns
• Balances in Client’s File—debit and credit columns
• Difference—debit and credit columns
The primary purpose of this task is to provide a window where QuickBooks can compare the prior year’s ending balances (as you used to prepare financials, tax returns, or monthly and quarterly reviews) with what QuickBooks currently shows for that same prior date range.
Your work will be complete in this window when there are no amounts left in the difference columns—indicating that the Balances in Accountant’s Records agree with the Balances in Client’s File for that same prior period date.
Entering Balances in Accountant’s Records
If this is your first time using CDR with your client’s data, you will need to enter the Balances in Accountant’s Records columns in debit and credit spreadsheet format. You have two options for completing this task:
• Select Yes to the message that displays when you begin your first CDR of this file. CDR will now copy the columns of data from the Balances in Client’s File to the Balances in Accountant’s Records columns. Simply change any of the values copied to agree with your prior financials. If you select No to this message, a Copy Balances button is available on the top left for you to click to complete the task automatically.
• Or, manually enter the amounts in the Balances in Accountant’s Records columns to agree with your last reported financials or filed tax return.
This is the only time you will be required to enter the balances. For future reviews, QuickBooks will populate the Balances in Accountant’s Records columns with the reviewed balances as recorded when you selected the Mark Review as Complete at the bottom-right of the CDR Center.
The Troubleshoot Prior Account Balances task compares these prior balances to the current balances QuickBooks has for each account for the same prior date range. QuickBooks is determining for you which accounts have a discrepancy from the last review! Spend less time on clean-up tasks with CDR.
Any reported balance differences might have been less likely to occur if a closing date and password had been entered in your client’s data file.
In Figure A.9 a difference is shown for the account Checking (and there is also a difference for the account Rent, not shown). The next section will detail how these CDR-dependent tasks will help you locate these differences.
When working with the Troubleshoot Prior Account Balances task, if a chart of account was marked as inactive in QuickBooks but has a balance in the account as of the date range in the review, the CDR will include that account listing.
Select the Only Show Accounts with Different Balances checkbox if you want to view fewer rows of detail in the Troubleshoot Prior Account Balances task in CDR.
View Changed Transactions
If this is your first time using the CDR for a client’s data file, QuickBooks will not be able to detail the specific changed transactions in the Differences columns. However, after you Mark Review as Complete for the first CDR, QuickBooks will begin tracking specific changed transactions from that time forward.
To determine what transactions dated on or before your last completed review date have been modified, double-click any amount displayed in the Differences column. A transaction listing report is displayed as shown in Figure A.10. The report identifies for you the specific transactions dated on or before the end of the last review period that have been added, modified, or deleted.

Figure A.10. Using CDR can help you easily identify changes to transactions that affect the beginning balances.
If you double-clicked a difference amount on a specific line, the resulting report is filtered for transactions modified after your last review. You can limit what you see on the report by selecting the Customize Report button on the displayed report. You can filter for Entered/Last Modified dates to see only those transactions that were changed after you finished your review.
This one feature alone is why accountants should use QuickBooks Accountant 2012. Think of all the time you will save on future reviews of your client’s data! Indeed, who will want to do a review the “old-fashioned” way?
Select the Only Show Accounts with Different Balances checkbox if you want to view fewer rows of detail in the Troubleshoot Prior Account Balances task in CDR.
View Suggested Adjustments
When QuickBooks detects any difference between the Balances in Accountant’s Records and the Balances in Client’s file, CDR suggests an adjusting journal entry for you to review.
To have QuickBooks assist in the preparation of this adjusting journal entry, follow these steps:
1. If there are differences detected, click the View Suggested Adjustments button. QuickBooks opens the Make General Journal Entries dialog box marked as an adjusting entry and dated as of the last date of the period under review (see Figure A.11). If your debits and credits are equal in the Review Last Balances columns, this journal entry should also have debits equal to credits for any differences that were detected.
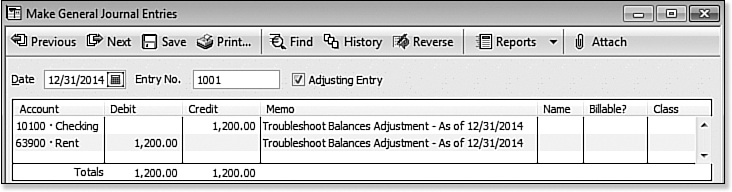
Figure A.11. QuickBooks prepares an adjusting journal entry to agree with your reviewed balances for the prior period.
2. If you are working in an Accountant’s Copy file, you might also get a notice that any changes made to shaded fields in the journal entry will transfer back to the client. Select OK to close this message.
You will not be able to save the journal entry unless the totals of the debits and credits are equal.
3. Click OK to close the message about automatically numbering your journal entries.
4. Click Save & Close to close the Make General Journal Entries dialog box.
5. Click View Suggested Reversing Entries if after these adjustments are made you need to reverse them; it is useful if the client corrected the error in a future accounting period. Or, click the Don’t Reverse button to close the Reversing Entries dialog box.
6. Click the X in the top-right corner to close the Troubleshoot Prior Account Balances dialog box.
The Troubleshoot Prior Account Balances task is complete when there are no amounts in the Differences column. Optionally, enter a task note for the Troubleshooting Prior Account Balances task to document your work or note other necessary actions.
When the Mark Review Complete button is selected on the CDR dialog box, CDR will take the Balances in Client’s File columns and transfer them to the Balances in Accountant’s Records columns in the Troubleshoot Prior Account Balances dialog box. The Balances in Accountant’s Records amounts will not change when clients add, modify, or delete transactions dated in your completed review period.
If you selected View Suggested Adjustments and you had adjustments to an Accounts Receivable and Accounts Payable account, you will receive a warning message that you cannot adjust accounts receivable and accounts payable in the same journal entry. Instructions are given to remove one of the lines and the corresponding balancing line and enter it in a separate journal entry.
Reclassify Transactions
How often have you reviewed your client’s QuickBooks data to see multiple transactions posted to the incorrect general ledger account? As an accountant, you will probably not want to spend the time needed to correct each individual transaction. A preferred method might be to create a journal entry transaction, which in effect “reclassifies” the amount out of the incorrect account and into the correct account.
With CDR in QuickBooks Accountant 2012 or Enterprise Solutions Accountant 12.0, there is the Reclassify Transactions feature. For 2012, you can access this tool from the Accountant Center, Accountant menu, or from an opened review using CDR.
From the Accounts panel on the left side of the Reclassify Transactions dialog box, you can:
• Accept or change the defaulted date range. These dates control the transactions that will display for reclassifying.
• Accept or change the defaulted Basis. This basis defaults from the setting found on the Company Information dialog box (select Company, Company Information from the menu bar).
• From the View drop-down list, choose to view Expense, Profit & Loss, or Balance Sheet accounts.
After selecting a chart of account listing on the left in the Accounts panel, you can filter the transactions displayed on the right in the Transactions panel with these options:
• From the Name drop-down list, leave the default of All which is all active list items. Or, select a specific list item from Customers, Employees, Vendor, or Other Names list.
When you select “Include Inactive Names” from the Name drop-down list in the Reclassify Transactions task, you will not affect the transactions displayed. Instead, the list will now include any inactive list items for you to select from.
If you select an inactive name from the list, you will get a message from QuickBooks asking if you would like to use it once, make it active, or cancel.
More information about working with lists can be found in Chapter 4, “Understanding QuickBooks Lists.”
• From the Show Transactions drop-down list, the default of Non-Item-Based (can be reclassified) is selected. Other options include Item-Based (can only change the class) or All to show all transactions.
After reviewing the detailed transactions, you might find that a certain vendor had all transactions assigned to the wrong expense account. As an example, in Figure A.12 vendor Cal Gas & Electric had the transactions assigned to the Utilities:Water expense account. This was a mistake made on each of the checks all year. The proper account should have been the Utilities:Gas and Electric expense account.
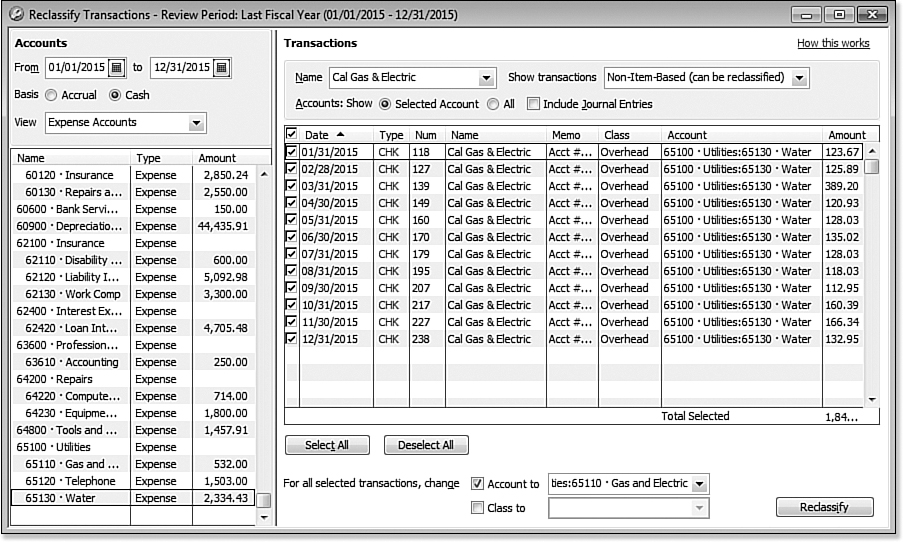
Figure A.12. Use the Reclassify Transactions dialog box to correct the account assigned to multiple transactions.
Prior to using CDR, accounting professionals would have created a journal entry reducing expenses recorded to the Utilities:Water account and increasing expenses for Utilities:Gas and Electric account. With this CDR feature, reclassifying the transactions is made easy by following these steps:
1. With the Reclassify Transactions dialog box displayed as shown in Figure A.12, select a date range for which you want to review and possibly reclassify transactions.
2. Accept the default Basis or change if needed.
3. From the View drop-down list, select the account types you want to review for reclassification.
With a chart of accounts item selected in the Accounts panel on the left, you will see displayed to the right transactions assigned to that account for the date range and basis selected.
4. Optionally, from the Name drop-down list, select a specific vendor, customer, employee, or other name for which you want to filter the displayed transactions.
5. The Show Transactions drop-down list, will default to display only those transactions you can reclassify with this feature. Optionally, select to show Item-Based transactions. For item-based transactions, you can only reclassify the Class assigned. Or, select All to see both.
6. Optionally, select the Include Journal Entries checkbox.
7. If in step 5 you selected a specific name from the drop-down list, you might want to select in the Accounts: Show All. CDR will display all transactions for the Name selected for All accounts (not just the account selected on the left).
Only non–item-based transactions can be reclassified with the CDR tool. If you need to edit the account assigned on item-based transactions, you will need to edit the individual item in the original transaction. For more information about working with QuickBooks Items, refer to Chapter 4.
8. As you make changes to the filters in Reclassify Transactions, the displayed transactions refresh automatically.
9. Optionally, choose Select All or Deselect All when choosing which transactions to reclassify.
10. For all selected transactions, select the proper general ledger account from the Account To drop-down list and optionally assign a new Class if desired.
11. Review your selections and click the Reclassify button. The window will refresh displaying the changes made to the transactions.
12. Continue reviewing all of the accounts until your review is complete.
13. Press the Escape key on your keyboard or click the X on the top right of the Reclassify Transactions dialog box when you are ready to close.
Open Working Trial Balance
The Working Trial Balance is a tool that has been available for years in the Premier Accountant and Enterprise Solutions Accountant versions of QuickBooks.
The Working Trial Balance, as shown in Figure A.13, displays the following details:
• Account
• Beginning Balance
• Transactions (for the selected date range)
• Adjustments (total of adjusting journal entries)
• Ending Balance
• Workpaper Reference (where you can record specific notes)

Figure A.13. Use the Working Trial Balance to make and review adjustments to the client’s file in preparation for tax filings.
The Working Trial Balance provides a window to manage changes to a client’s ending balances. You normally use this tool after you have matched the prior year balances in the Troubleshoot Prior Account Balances task with your records and you need to review and correct the next accounting period.
Click the Make Adjustments button to create an adjusting journal entry and watch the net impact to your client’s Net Income with each saved journal entry change. When you are finished, click the Print button to prepare a report of your work.
Review List Changes
The Review List Changes feature is available only with your QuickBooks Accountant software and is only available when you launch a review using the Client Data Review feature. The type of changes tracked are specific to each task as detailed in the next several sections. Remember, if a task has the CDR icon in front of it, it indicates that the task can only be accessed using your QuickBooks Accountant software. If any other tasks are listed, they simply link to the respective menu in QuickBooks for that activity.
Chart of Accounts
Reviewing the Chart of Accounts, correcting setup errors, making an account inactive, and merging like accounts were covered in detail in Chapter 4. When a CDR is marked as Completed, these list changes are also marked with an “R” for reviewed so that in future reviews, you can conveniently hide those changes.
Click the Chart of Accounts task in the Review List Changes task group. QuickBooks displays the Review List Changes dialog box as shown in Figure A.14.

Figure A.14. Easily track your client’s changes to the chart of accounts.
The Chart of Accounts tab on the Review List Changes dialog box tracks the following types of changes:
• Added—Account Name and Account Type
• Changed—Marked Inactive, Name or Account Number changed, Account Type changed, Parent:Subaccount relationship changed, or Tax-Line Mapping changed
• Deleted—Account Name and Account Type
• Merged—Original Account Name, Destination Account Name, and Account Type
For changes your client has made that you want to indicate as “Reviewed,” click the Mark All as Reviewed button. Changes you make to the lists while logged in as the new External Accountant user are automatically marked as reviewed.
The tabs at the top enable easy access to the remaining tracked list changes. Press the Escape key on your keyboard or click the X on the top right of the Review List Changes dialog box when you have completed this task.
Items
Chapter 4 details methods to find and troubleshoot item setup errors. This feature tracks changes made to items. When the review is completed, an “R” is placed next to each line item change to indicate it has been reviewed. In future Client Data Reviews, you can conveniently hide these previously reviewed changes.
Click the Items task in the Review List Changes task group. QuickBooks displays the Review List Changes dialog box, as shown in Figure A.15.
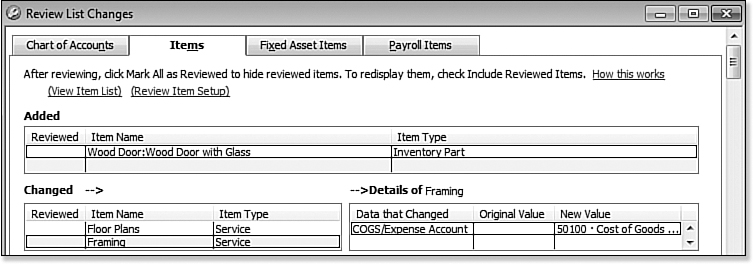
Figure A.15. Items affect accounting and reviewing changes to these will help in a client’s file review.
The Items tab on the Review List Changes dialog box tracks the following:
• Added—Item Name and Item Type
• Changed—Displays the data that Changed with Original Value and New Value
• Deleted—Item Name and Item Type
• Merged—Original Item Name, Destination Item Name, and Item Type
When the Mark All as Reviewed button is selected, CDR feature will place an “R” in the Reviewed column for each item list change your client made. Changes you make to the list while logged in as the External Accountant user are automatically marked as reviewed.
Tabs at the top enable easy access to the remaining tracked list changes. Press the Escape key on your keyboard or click the X on the top right of the Review List Changes dialog box when you have completed this task.
Fixed Asset Items
The business owner using QuickBooks can create a Fixed Asset item type from the Fixed Asset Item List (select Lists, Fixed Asset Item List from the menu bar). Then when a purchase is made for the asset the respective Fixed Asset item can be recorded on a purchase order, or on the Items tab of the Enter Bills dialog box or the Write Checks dialog box. This tab tracks changes made to the list of fixed assets.
Click the Fixed Asset Items task in the Review List Changes task group. QuickBooks displays the Review List Changes dialog box, as shown in Figure A.16.
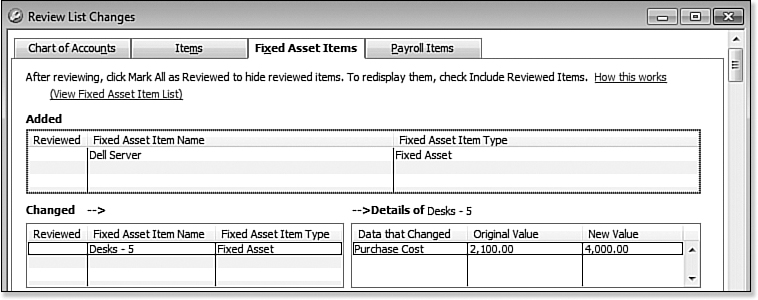
Figure A.16. Easily track additions, deletions, and changes to the client’s Fixed Assets.
The Fixed Asset Items tab on the Review List Changes dialog box tracks the following fixed assets:
• Added—Fixed Asset Item Name and Fixed Asset Item Type
• Changed—Displays the data that Changed with Original Value and New Value
• Deleted—Fixed Asset Item Name and Fixed Asset Item Type
When the Mark All as Reviewed button is selected, the Client Data Review will place an “R” in the Reviewed column for each fixed asset item list change your client made. If you are logged into the file as an External Accountant user type, as you make list changes, they are automatically marked as Reviewed.
Tabs along the top of the Review List Changes dialog box enable easy access to the remaining tracked list changes. Press the Escape key on your keyboard or click the X on the top right of the Review List Changes dialog box when you have completed this task.
Payroll Items
Reviewing the purpose of Payroll Items was covered in detail in Chapter 11, “Setting Up Payroll.” Details were also provided in Chapter 12, “Managing Payroll” to correct payroll setup errors. This feature tracks changes made to payroll items. When the review is completed, an “R” is placed next to each payroll item change to indicate that it has been reviewed. In future client data reviews, you can conveniently hide these.
This task will only display in a file that has the payroll preference enabled.
Click the Payroll Items task in the Review List Changes task group. QuickBooks displays the Review List Changes dialog box, as shown in Figure A.17.
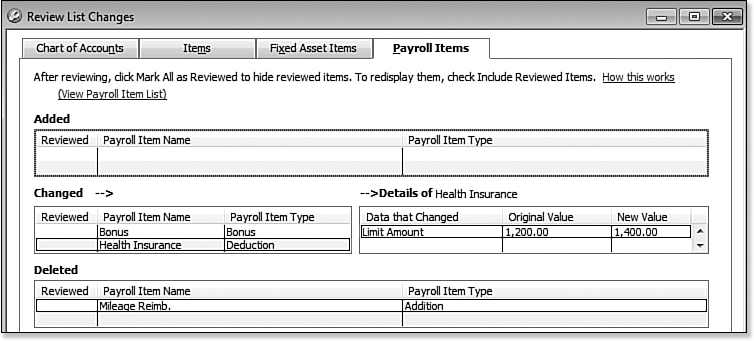
Figure A.17. See the changes the client made to payroll items throughout the year.
The Payroll Items tab on the Review List Changes dialog box tracks the following payroll items:
• Added—Payroll Item Name and Payroll Item Type
• Changed—Displays the data that Changed with Original Value and New Value
• Deleted—Payroll Item Name and Payroll Item Type
• Merged—Original Payroll Item Name, Destination Payroll Item Name, and Payroll Item Type
When the Mark All as Reviewed button is selected, the CDR will place an “R” in the Reviewed column for each item list change your client made. If you are logged into the file as an External Accountant user type, as you make list changes, they are automatically marked as Reviewed.
Tabs at the top enable easy access to the remaining tracked list changes. Press the Escape key on your keyboard or click the X on the top right to close the Review list Changes dialog box when you have completed this task.
Review Item Setup
Click the Review Item Setup in the Review List Changes task group. The Add/Edit Multiple List Entries dialog box displays.
From this dialog box, you can make changes to selected item types. More detail about working with the Add/Edit Multiple List Entries feature was included in Chapters 4 and 5.
Customers
In Figure A.18, note that the Customers task in the Review List Changes pane does not have a Client Data Review icon in front of the name, indicating that CDR is simply linking you back to the original Customer Center.

Figure A.18. Tasks without the CDR icon provide quick access to the same menu in QuickBooks.
Refer to Chapter 9 for more details on how to use the Customer Center to gather information and easily find specific transactions.
Vendors
The Vendors task in the Review List Changes task group also does not have a CDR icon in front of the name, indicating that CDR is simply linking you back to the original Vendor Center.
Refer to Chapter 7, “Setting Up Vendors,” for more details on how to use the Vendor Center to gather information and easily find specific transactions.
Accounts Receivable
Reviewing with your client her open Accounts Receivable is an important part of a successful review of a client’s file. When there are errors in Accounts Receivable, the balance sheet and income statement accounts could be misstated.
A complete review of Accounts Receivable, including the proper process to use in QuickBooks for potentially avoiding the corrections detailed in this section, can be found in Chapter 9, “Setting Up Customers” and Chapter 10, “Managing Customers.”
The tasks listed in the Accounts Receivable task group of the CDR will help you easily correct client mistakes made when the client recorded a customer payment or completed a deposit, but did not properly complete the transaction.
Recent versions of QuickBooks help discourage this error with messaging that warns the user not to use a Make Deposits transaction to record a customer payment. When recording a customer payment without assigning the payment to an open invoice, QuickBooks will provide a message that a credit will be left in the customer’s account.
You might want to review the AR Aging Summary report first and then begin the process of using the CDR tools. Properly reviewing your client’s data will help you make the most informed decisions about the corrections that might be needed.
Fix Unapplied Customer Payments and Credits
If your client entered a customer payment, but did not apply the payment to an invoice, this tool will help simplify the task of assigning the unapplied payment to the proper invoice.
Review the Open Invoices report (select Reports, Customers & Receivables, Open Invoices from the menu bar) before beginning to make corrections. This is especially important if you have more than one Accounts Receivable account in your chart of accounts.
To fix unapplied payments and credits, follow these steps:
1. If you are completing these changes as part of a dated review, from the menu bar, select Accountant, Client Data Review and launch Client Data Review. You will then select the Fix Unapplied Customer Payments and Credits task in the Accounts Receivable group.
2. If you are not completing these changes as part of a dated review, from the menu bar, select Accountant, Client Data Review and launch the Fix Unapplied Customer Payments and Credits task.
3. If you have more than one Accounts Receivable account, review the details for each by selecting the appropriate Accounts.
4. Select any of the customers on the list, as shown in Figure A.19. With a customer selected on the left, the Invoices and Charges tab will display any unapplied payments and credits (left side) and open invoices (right side) for that specific customer.

Figure A.19. Assign unapplied customer payments or credits to an open customer invoice.
5. On the Invoices and Charges tab, place a checkmark next to the payment or credit on the left pane and checkmark next to the associated open invoice on the right pane to which you want to apply the payment.
6. If you would like to only apply part of the credit or payment, enter the partial amount in the Amt to Apply column.
7. Click the Apply button to assign the payments or credits selected on the left to the selected open invoices on the right. The items are then grayed out to indicate that you have already assigned them.
8. Optionally, click the Auto Apply All button to apply all of the unapplied payments and credits to the invoices on the right.
9. Click Save to begin working on another customer record or Save & Close to complete the task.
Cash basis reporting taxpayers should proceed with caution when using this tool. In cash basis reporting, the date of the Receive Payments transaction is the date that revenue is recorded. If a customer payment was dated in the prior filed tax year and was not applied to the customer’s open invoice, the income from the invoice would not have been included in cash basis reporting.
When you use CDR to assign the payment to the open invoice, QuickBooks will report the revenue associated with that invoice as of the date of the customer payment. This transaction will affect prior year cash basis financials.
This correction will change prior period financials. The CDR does not recognize the controls associated with setting a closing date. Additionally, QuickBooks does not provide any warnings that you are modifying a transaction dated on or before the closing date.
Recent editions of QuickBooks make recording unapplied credits and payments less likely to occur due to the many warnings that are provided when the transactions are entered.
Clear Up Undeposited Funds Account
Have you ever worked with a client’s data file that had an incorrect undeposited funds balance? Did your client create a separate deposit transaction without assigning the receive payment to the deposit?
The undeposited funds account is a current asset type on the Balance Sheet. Like using a safe to store checks prior to taking them to the bank. Customer payments are recorded in QuickBooks increasing the amount in Undeposited Funds on the Balance Sheet. Later the checks are gathered and as a single deposit to the bank account (more details are provided in Chapter 9).
The Clear Up Undeposited Funds Account task can help you assign those undeposited funds to the deposit transaction that was created incorrectly.
Recent releases of QuickBooks make this error less likely to occur with the many warnings that are provided when the transactions are entered.
It is important to know that this feature will work when any of the following conditions apply:
• Receive Payments transaction was recorded and assigned to the Undeposited Funds account without including the payment in a Make Deposits transaction.
• Make Deposits transaction was recorded, the Received From column included the Customer or Customer:Job name, and the Account From column has an account assigned, which is typically an income account. See Figure A.20.

Figure A.20. Example of a customer payment recorded improperly on the Make Deposits transaction.
• If the Make Deposits transaction did not include a name in the Received From column, CDR will report that deposit transaction in the Clear Up Undeposited Funds Account CDR task assigned to a customer named “No Name in Deposit.”
To clear up the Undeposited Funds account, follow these steps:
1. If you are completing these changes as part of a dated review, from the menu bar, select Accountant, Client Data Review and launch Client Data Review. You will then select the Clear Up Undeposited Funds task in the Accounts Receivable group.
2. If you are not completing these changes as part of a dated review, from the menu bar, select Accountant, Client Data Review and launch the Clear Up Undeposited Funds task.
3. The Show Deposits From field defaults to the review period selected when you started a client data review, or if you did not start a formal review the dates default to your last fiscal year. If needed, change the selected dates and click Refresh to display the changes.
4. The Payers pane on the left will display any customers with transactions meeting the criteria listed above. With a customer selected, review the payment transaction types on the right.
5. With a customer selected, place a checkmark next to the DEP transaction and also to the PMT transaction on the right with which you want to associate the payment as shown in Figure A.21.

Figure A.21. Associate the customer payment in Clear Up Undeposited Funds Account to the incorrectly recorded Make Deposits transaction.
6. Click the Apply button to assign. The list items are grayed out, indicating they have been applied to each other.
7. Click Save to begin correcting records for the next customer or Save & Close to complete the task.
You are now ready to move on with your review or continue with additional clean-up tasks. I recommend reviewing the AR Summary Report first to get a general idea of the types of corrections you might need to make with the remaining accounts receivable CDR tasks.
Need to return to the original transaction in QuickBooks during your review? Simply double-click the selected transaction.
Reviewing the AR Aging Summary Report
Check the AR Aging Summary Report before fixing transactions. An individual transaction can be deceiving if you don’t see its relationship with other related transactions.
When you select the Review AR Aging Summary Report link, QuickBooks opens the same titled report.
What exactly are you looking for on the aging report? You might be looking for customer credits that are aged and have not been applied to current open customer invoices. Or, perhaps as explained later in Chapter 10, you might want to remove an open balance from a customer’s invoice.
I suggest you use the Open Invoices report instead of the Aging reports. The Open Invoices report shows the transactions listed separately instead of in summary form. The Open Invoices Report is not part of the CDR tool set. It is, however, a regularly used QuickBooks report. Because the Open Invoices Report shows the current A/R status, if you are reviewing it for a previous date, you will need to modify the report to show the open balances as of that prior date. To do this, follow these steps:
1. From the menu bar, select Reports, Customers & Receivables, Open Invoices. This report includes all open invoices, credits, and payments for your customers as of today’s computer system date.
2. Review the report with today’s date first. This will help you identify what corrections you might want to make using the tasks defined in this section. Reviewing it with today’s date will also show if the correction you might have needed on a previous date has already been entered.
3. If you are reviewing for some date in the past, you can adjust the report to that date by clicking Customize Report at the top-left corner of the report window.
4. From the Display tab, click the Advanced button. In the Open Balance/Aging pane of the Advanced Options dialog box, change the selection to the Report Date option (see Figure A.22). This modification to the report enables you to see each customer’s balance detail (see Figure A.23) as of the report date.

Figure A.22. The Open Invoices report, when modified, can be compared to the totals on your Balance Sheet report for some time in the past.
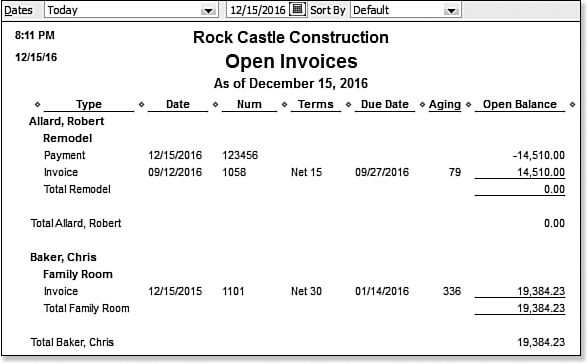
Figure A.23. The Open Invoices report easily shows unpaid balances and any unapplied customer credits or payments.
If you do not modify this report as instructed here, QuickBooks will display the date you selected on the report, but will also reduce the balances owed for payments made after the report date.
Write Off Invoices
Often, as accounting professionals, we need to adjust our client’s Accounts Receivable balances. Perhaps there were several small unpaid finance charge invoices, or over the year our client’s customers paid their invoices short of what was due.
Creating a customer credit memo and assigning the credit memo to the original open invoice was time-consuming for the accounting professional. Often a journal entry was created, correcting the accounts receivable balance on the Balance Sheet but leaving the QuickBooks user with extra line details in the A/R Aging Summary or Detail reports.
The Write Off Invoices feature shown in Figure A.24 is one convenient window where you can write off balances, review the suggested transaction, and print the details for your customer.

Figure A.24. Using CDR’s Write Off Invoices makes removing open A/R uncollected balances easy!
To write off invoices, follow these steps:
1. If Client Data Review isn’t already open, select Accountant, Accountant Center from the menu bar.
2. Select the Write Off Invoices task in the Accounts Receivable task group.
3. If presented with the warning that one or more customers in the list have available credits, click OK to close the message. Make sure you have done a thorough review of your client’s Open Invoices reports as previously recommended.
4. From the Age drop-down list, select between showing receivables aged over 120 days, aged over 180 days, Review Period, or a custom date.
5. Optionally, enter an amount in the Balances Due Less Than box to limit the transactions that are displayed, which is particularly useful when writing off small balances only.
6. Select a To Date.
7. From the Transaction Type drop-down list, select All Charges, Invoices, Finance Charges, or Statement Charges.
8. Click Refresh if changing the filters.
9. Place a checkmark next to each transaction for which you want to write off the open balance. Optionally, click the Select All button or Deselect All button at the bottom of the screen to simplify the process.
10. From the drop-down lists, select the Write-Off Account and Write-Off Date. Optionally, select a Class.
11. Click the Preview & Write-Off button. CDR displays the Confirm Write-Off dialog box as shown in Figure A.25.
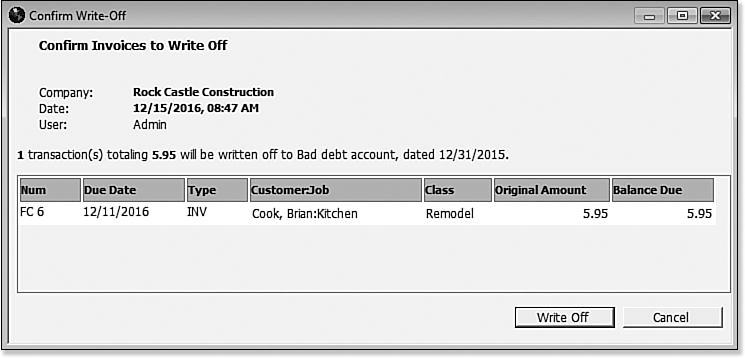
Figure A.25. You stay in control of the write-off, confirming the balances to be removed.
Earlier in this chapter, I recommended you review the AR Aging Summary report before using the Accounts Receivable CDR tools. However, even if you do not review the report, the Write Off Invoices dialog box will show the word “CREDITS” in the Avail Credit/Pmt column if the customer with the open invoice balance also has unapplied credits.
Click the CREDITS link to open the Fix Unapplied Customer Payments and Credits dialog box. Here you can apply the payment to the open invoice as instructed previously.
It might be more appropriate to assign the available credit rather than to write off the open balance.
12. Click Write Off when you are done reviewing the invoices or click Cancel.
13. CDR returns you to the Write Off Invoices dialog box. Press the Escape key on your keyboard to view the Write-Off Completed details.
14. Click Save as PDF to print for your records.
You are now complete with the Accounts Receivable tasks. There are many QuickBooks preferences that will guide your clients as they manage undeposited funds and accounts receivable transactions. Review Chapters 9 and 10 for more details and other Accounts Receivable troubleshooting suggestions.
Accounts Payable
A complete review of Accounts Payable, including the proper process to use in QuickBooks, which potentially avoids the corrections detailed in this section, can be found in Chapter 7.
The tasks listed in the Accounts Payable section of the CDR feature can help you easily correct client mistakes made when the client has created a vendor credit or bill payment and did not assign it to the open vendor bill.
The Review Unpaid Bills Report is listed last in the Accounts Payable task group. I recommend reviewing this report as well as other reports prior to making corrections with the CDR. Properly reviewing your data will help you make the most informed decision on the corrections that might be needed.
Item receipts do not display in the CDR tools, but these transaction types are included in your client’s open Accounts Payable balances. Review the Unpaid Vendor Bills report (select Reports, Vendors & Payables from the menu bar) for any aged item receipts.
Chapter 6 offers more specific details for correcting aged item receipts.
Fix Unapplied Vendor Payments and Credits
Chapter 7 detailed the proper accounts payable process, which is to use the Pay Bills dialog box to pay vendor bills. Some QuickBooks users might have used the Enter Bills transaction type and later paid that vendor bill using the Write Checks transaction instead of properly using the Pay Bills dialog box.
To fix unapplied vendor payments and credits, follow these steps:
1. If you are completing these changes as part of a dated review, from the menu bar, select Accountant, Client Data Review and launch Client Data Review. You will then select the Fix Unapplied Vendor Payments and Credits task in the Accounts Payable group.
2. If you are not completing these changes as part of a dated review, from the menu bar, select Accountant, Client Data Review and launch the Fix Unapplied Vendor Payments and Credits task.
3. The Vendors tab on the top left and the Bills tab on the right will be selected by default. Select any of the vendors on the list to the left. The Bills pane will display all unapplied vendor credits for the vendor selected on the left. The right of the Bills pane will display any open vendor bills for that specifically selected vendor.
If any of the checks listed in the left side of the Bills detail have an (*) asterisk in front of the word CHK this indicates that the expense is marked as billable to the customer. CDR will warn you that when you assign the check to an open vendor bill the expense will no longer be marked as billable.
More details about working with billable expenses are included in Chapter 9, in the section titled “Time and Expense Invoicing.”
4. Place a checkmark next to the credit on the left and the open vendor bill on the right to which you want to apply the payment (see Figure A.26).
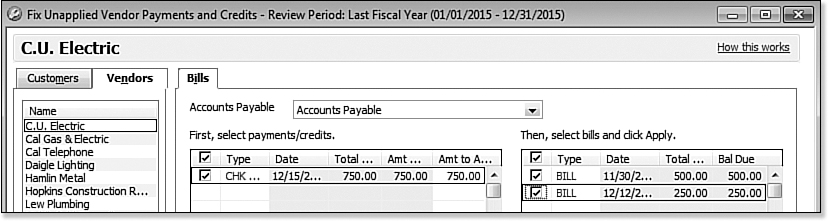
Figure A.26. Using CDR to assign a check written to a vendor with open bills saves time!
5. Click the Apply button to assign that specific vendor credit form with that specific vendor bill. The items selected will be grayed out, indicating that you have assigned them properly.
6. You must click Save to begin correcting transactions for another vendor or Save and Close to complete the task.
Evaluate and Correct 1099 Account Mapping
Setting up your vendors for proper 1099 status is important. However, be assured that if after reviewing this information you determine the original setup was incorrect, any changes made here will correct prior- and future-dated reports and forms.
When you select the link in the Accounts Payable task group for Evaluate and Correct 1099 Mapping, the Preferences dialog box for 1099s is displayed.
In the preference setting for Tax:1099, you can click the Yes button to select the Do You File option to let QuickBooks know you will be providing 1099 forms to your vendors at the end of the year. A new QuickBooks file will default with the preference set to Yes for filing 1099-MISC forms.
If this is your first time setting up 1099s in your file, click the link next to “if you’re ready to prepare...” and the QuickBooks 1099 Wizard displays as shown in Figure A.27.

Figure A.27. Improved for QuickBooks 2012 is the QuickBooks 1099 Wizard.
More detailed information about setting up your 1099s in QuickBooks is included in Chapter 7.
Reviewing the Unpaid Bills Report
One of the first tasks you should do with your client is review the Unpaid Bills Report, primarily because the client will know best if the bills that are open are still due and payable to the vendor.
What exactly are you looking for on the aging report? You might be looking for vendor credits that are aged and have not been applied to current open vendor bills. Or, as Chapters 7 and 8 documented, you might see several aged item receipts for vendors you know your client has paid.
Use the information collected from this report to help determine the corrections that should be made with the tasks listed in the Accounts Payable task group of the CDR.
Sales Tax
This CDR feature not only identifies errors with using the incorrect payment form, but also fixes the transaction automatically for you!
More information about properly setting up and using sales tax is included in Chapter 9.
Before beginning the tasks listed in this section, you should review the client’s settings (preferences) for sales tax as shown in Figure A.28. Additionally, the Sales Tax task group will not display in the CDR if the Sales Tax feature has not been enabled.
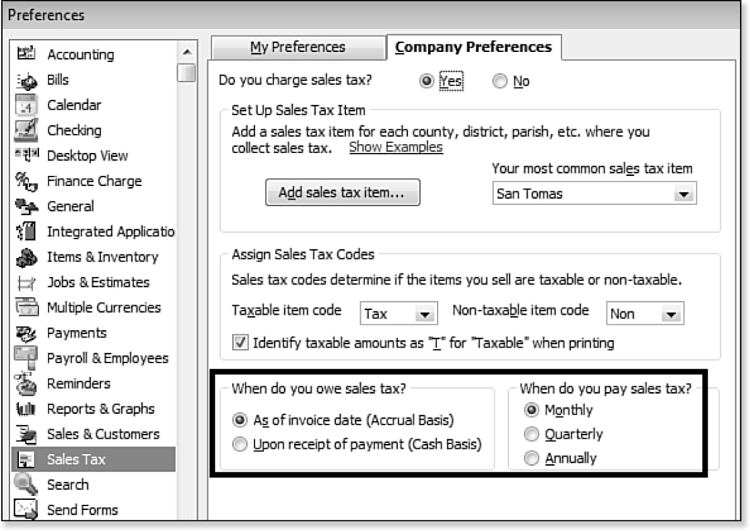
Figure A.28. Review Sales Tax preferences before making any corrections.
After reviewing and correcting your client’s sales tax preference settings, you are prepared to begin the following CDR tasks.
Fix Incorrectly Recorded Sales Tax
QuickBooks uses a special Pay Sales Tax dialog box (as shown in Figure A.29) to record the sales tax liability payments properly. When payments are made using other transaction types, such as Write Checks, Pay Bills, or Make General Journal Entries, the Pay Sales Tax dialog box might not reflect the payments accurately.
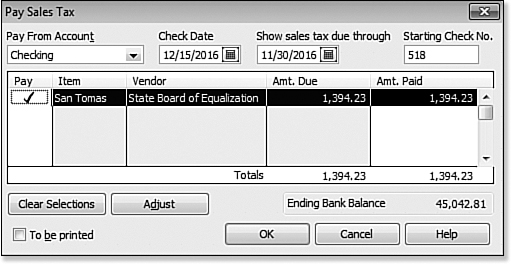
Figure A.29. Create properly paid sales tax in this dialog box.
The Fix Incorrectly Recorded Sales Tax task will help you identify and correct the transaction when a client paid her sales tax liability outside of the Pay Sales Tax dialog box. Figure A.30 shows the negative line entry that will be included in the Pay Sales Tax dialog box when a Write Checks transaction was created, assigned to the sales tax payable liability account, and payable to the sales tax vendor. Properly recorded sales tax payments will have a transaction type of TAXPMT in the checkbook register.

Figure A.30. Pay Sales Tax dialog box when an improperly recorded sales tax payment was made.
What exactly is this tool fixing? The tool will identify and fix non sales-tax-payable type transactions used to pay sales tax liability using Void and Replace functionality.
The tool will identify any Write Checks transactions where the payee is the same as an assigned payee for any sales tax item.
This tool will not identify any vendor bills, vendor bill payment checks, or journal entries recording payment for the Sales Tax Liability.
If this is your first incorrectly recorded sales tax transaction fix, you might want to change the “to” date to include today’s date. This ensures you are seeing all sales tax payable transactions that were improperly recorded using the wrong–transaction in QuickBooks.
This might be a good time to review with your client the vendor names associated with different types of tax payments. Some states might have the same vendor name for multiple agency tax payments.
Suggest to your client that she use a unique vendor name for each different type of tax being paid. This will avoid CDR possibly correcting a non-sales tax type of payment made to vendor.
To fix incorrectly recorded sales tax, follow these steps:
1. If you are completing these changes as part of a dated review, from the menu bar, select Accountant, Client Data Review and launch Client Data Review. You will then select the Fix Incorrectly Recorded Sales Tax task in the Sales Tax group.
2. If you are not completing these changes as part of a dated review, from the menu bar, select Accountant, Client Data Review and launch the Fix Incorrectly Recorded Sales Tax task as shown in Figure A.31.

Figure A.31. Automatically find and fix incorrectly recorded sales tax payment transactions.
3. Double-click any transaction to see the originally created non-sales tax payment form to make sure it should be changed to a Sales Tax Payment. Make note of the check number or check date.
If your client has multiple lines recorded on her sales tax payable checks, such as including an additional fee for late payment penalty or other adjustment lines, you might want to use the link for making a manual Sales Tax Adjustment.
The Fix Incorrectly Recorded Sales Tax tool assumes all lines of the incorrect transaction belong in the Sales Tax Payable account.
4. Place a checkmark in each transaction to be fixed. Optionally, use the Select All button or Deselect All button to streamline the process.
5. Click Void & Replace (no shown in Figure A.31). CDR then creates a new Sales Tax Payment transaction and voids the original Write Checks transaction or Make General Journal Entries transaction.
6. Click Proceed to the Fix Sales Tax message that displays to continue with the change, or click Cancel to return to the CDR tool.
7. Click OK to close the message indicating that the transaction(s) have been fixed.
8. Click the X in the top-right corner to return to the CDR Center.
9. Return to your checkbook register (icon on the Home page) and look for the check number or date (or both) to view the original transaction voided and the new transaction created as a Sales Tax Payment type.
With the Void and Replace functionality included in the Fix Incorrectly Recorded Sales Tax tool, you can rest assured that if your original transaction was marked as cleared in a bank reconciliation, the newly created Sales Tax Payment transaction will also be marked as cleared.
Adjust Sales Tax Payable
If the Fix Incorrectly Recorded Sales Tax tool was not used to correct the client’s sales tax records, you might instead want to use this manual Adjust Sales Tax Payable link.
In addition to reviewing fixing transactions, I recommend you review the Sales Tax Liability reports and your Balance Sheet balance for Sales Tax Payable before and after making corrections to your sales tax payable balances in QuickBooks.
When comparing these reports and the Pay Sales Tax dialog box, make sure each report is using the same basis—Accrual or Cash—and is prepared with the same reporting date. More information on working with the sales tax payable reports in QuickBooks can be found in Chapter 10.
Compare the following reports to each other for sales tax payable balances:
• Balance Sheet—Sales Tax Payable balance. Select Reports, Company & Financial, Balance Sheet Standard from the menu bar. Optionally, click the Modify button to change the report basis and date.
• Sales Tax Liability Report—Sales Tax Payable as of <date> column total. Select Vendors, Sales Tax, Sales Tax Liability from the menu bar.
• Pay Sales Tax—Amt. Due column total. Select Vendors, Sales Tax, Pay Sales Tax from the menu bar.
The end result of a properly made sales tax correcting entries or adjustment is that the totals listed in the above mentioned reports agree with each other.
To adjust sales tax payable, follow these steps:
1. If you are completing these changes as part of a dated review, from the menu bar, select Accountant, Client Data Review and launch Client Data Review. You will then select the Adjust Sales Tax Payable task in the Sales Tax group.
2. If you are not completing these changes as part of a dated review, from the menu bar, select Vendors, Sales Tax, Adjust Sales Tax Due.
The Sales Tax Payable dialog displays as shown in Figure A.32.

Figure A.32. Use the Sales Tax Adjustment dialog box to adjust QuickBooks Sales Tax Payable properly.
3. Select the Adjustment Date.
4. Type in an Entry No if desired.
5. Select your Sales Tax Vendor from the drop-down list. Make sure the vendor selected is the same vendor assigned to your sales tax items.
6. Select the Adjustment Account from the drop-down list.
7. In the Adjustment pane, select the Increase Sales Tax By or Decrease the Sales Tax By option button. Enter an amount for the adjustment.
8. Enter a Memo or select the default memo.
9. Click OK to save the transaction.
QuickBooks will create a Make General Journal Entries transaction with a decrease (debit) or increase (credit) to the Sales Tax Payable account with the resulting debit or credit in the account that was selected in step 6.
The adjustments created remain unapplied in the Pay Sales Tax dialog box until you assign them to your next Sales Tax Payment.
Manage Sales Tax
Click the Manage Sales Tax task to properly set up and work with Sales Tax in your QuickBooks data file. Manage Sales Tax is also available from a shortcut on the Home page. For more information, see Chapters 9 and 10.
Pay Sales Tax
Click the Pay Sales Tax task to pay your sales tax properly in QuickBooks. For more information, see Chapter 9.
Sales Tax Preferences
Click the Sales Tax Preferences task to define sales tax-specific preferences affecting your QuickBooks data file. For more information, see Chapter 9.
Inventory
For the accounting professional, inventory is commonly one area of QuickBooks that is the least understood. Often when working with a client’s file with inventory tracking, I will see a journal entry used to adjust inventory. Although this does make the adjustment to the inventory account balance on the Balance Sheet report, it does not reflect the adjustment in the Inventory Valuation Summary or Detail report.
Why is it that a journal entry shouldn’t be used to adjust inventory? Consider that the inventory value on a balance sheet is the quantity of an item multiplied by a cost. When you create a journal entry, you can enter an amount for the adjustment, but you cannot associate it with an actual inventory item.
The following sections detail several inventory troubleshooting tools.
Review Inventory Setup
Chapter 6, “Managing Inventory,” discusses several topics about the proper processes needed when your clients track inventory in their business.
When you click the Review Inventory Setup link in the CDR Inventory pane, the Add/Edit Multiple List Entries dialog box opens. From here, you can easily add or edit individual or multiple inventory or non-inventory items on the inventory list, as well as other lists.
The Review Inventory Setup is not a CDR-dependent task, but the link in the CDR center makes it easy to correct your client’s inventory items.
Compare Balance Sheet and Inventory Valuation
This Compare Balance Sheet and Inventory Valuation CDR task is an inventory troubleshooting tool that will help you “diagnose” transaction errors involving the inventory asset account. In Chapter 6, you were introduced to the importance of comparing your client’s Inventory Asset on the Balance Sheet report to the asset total on the Inventory Valuation Summary report.
When transactions are recorded to the inventory asset account without assigning an inventory item (such as a Make General Journal Entries transaction, or on the Expenses tab of a Write Checks transaction or an Enter Bills transaction by assigning the inventory asset account), the Inventory Valuation Summary report will no longer match the value of the Inventory Asset on the Balance Sheet report.
Another result of improperly recording inventory transactions is the potential for a misstatement of the value of the Cost of Goods Sold, or the cost of the inventory sold to a customer which would affect job costing reports.
To compare the balance sheet and inventory valuation, follow these steps:
1. From the menu bar, select Accountant, Client Data Review and launch Client Data Review.
2. Select the Compare Balance Sheet and Inventory Valuation task in the Inventory group.
3. The CDR tool displays the Inventory Asset account balance from the Balance Sheet for the selected As of date. Optionally, click the Balance Sheet link to review the report.
4. The CDR tool displays the total asset value from the Inventory Valuation Summary report for the selected As of date. Optionally, click the Inventory Valuation Summary link to review the report.
A warning message is displayed (See Figure A.33) if there is a difference between the asset value reported on the two reports.
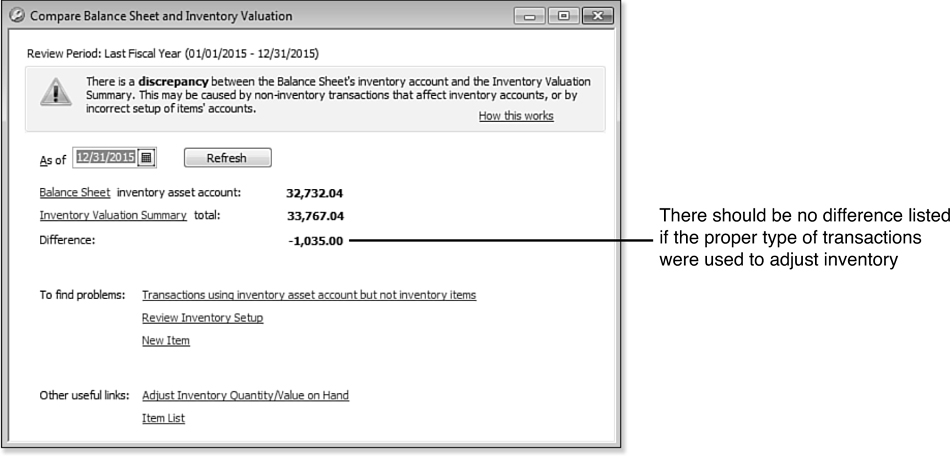
Figure A.33. Comparing Balance Sheet and Inventory Valuation is useful when troubleshooting inventory asset discrepancies.
5. Optionally, click the Transactions Using Inventory Asset Account But Not Inventory Items link, and the report in Figure A.34 displays. The report displays transactions that affect the Inventory Asset balance on the Balance Sheet, but are not properly affecting an inventory item.
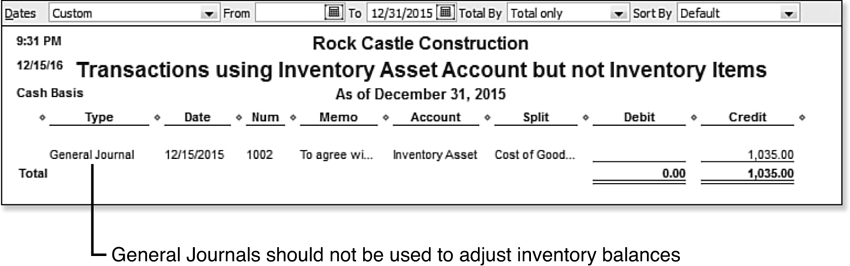
Figure A.34. CDR makes it easy to locate transactions that are affecting the Inventory Asset but not using the proper form.
6. Optionally, click Review Inventory Setup to open Add/Edit Multiple List Entries.
7. Optionally, click New Item to create a new inventory item.
8. Optionally, click Adjust Inventory Quantity/Value on Hand to properly adjust inventory.
9. Optionally, click Item List to modify an item.
10. To close, press the Escape key on your keyboard or click the X in the top-right corner.
If you find these types of errors in your accounting for inventory, you will instead want to create an inventory adjustment to replace them with. QuickBooks will continue to report a difference between the reports if journal entries are recorded to the Inventory Asset account.
Troubleshoot Inventory
Chapter 6 provides useful content on troubleshooting issues surrounding inventory. One of the issues discussed in that chapter is the effect on the company’s financials when inventory goes negative.
Negative inventory is caused when QuickBooks has recorded a higher quantity of inventory sold than is available to sell. This process might seem acceptable for some clients if they are waiting on back-ordered product but want to collect the payment from the customer in advance. Chapter 5 details better methods for handling back orders and other issues, which can result in negative inventory values and the misstated financials that can result.
Also, Chapter 6 explained that if an inventory item is marked as “inactive” the resulting inventory value will not appear on the Inventory Valuation Summary report. If a client truly has inventory in stock, although she is not selling it, the Inventory Valuation Summary report would be misstated.
With the Troubleshoot Inventory feature (see Figure A.35) in QuickBooks Accountant, many of the reports and processes that had to be reviewed for diagnosing inventory valuation errors can be replaced by using the new Troubleshoot Inventory CDR task. In fact, this tool is so valuable in detecting errors such as negative inventory and finding inactive items with a quantity on hand (to name just a couple), that as accounting professionals we should encourage our clients to upgrade to QuickBooks 2012.

Figure A.35. Easily identify inventory with a negative quantity, and help your client better manage her inventory processes.
All users in QuickBooks Premier and QuickBooks Enterprise Solutions 2012 have a new Inventory Center, which offers the ability to list any items that have negative inventory.
To review your client’s inventory using the Troubleshoot Inventory CDR task, follow these steps:
1. If you are completing these changes as part of a dated review, from the menu bar, select Accountant, Client Data Review and launch Client Data Review. You will then select the Troubleshoot Inventory task in the Inventory group.
2. If you are not completing these changes as part of a dated review, from the menu bar, select Accountant, Client Data Review and launch the Troubleshoot Inventory task.
3. From the Show Items drop-down list, select Filtered By, All, or All Active. This will help to display specific data for your review of your client’s inventory.
4. Place a checkmark in any combination or all of the following:
• Qty Bought/Built = 0
• Qty Sold/Used = 0
• Negative Quantity
• Inactive Items with Qty on Hand
• % Markup less than <enter the %>
5. The default date range is the same as the selected Review Period. Optionally, you can change the dates.
6. Click Refresh if you are changing the filters or dates to show current data.
7. Optionally, click Columns to Display to modify the content that is displayed.
Inventory items that match your selected filter criteria are displayed. The column End Qty displays the number of units in stock as of the To date selected. Next to the End Qty column a green circle symbol displays if there is no negative inventory. A yellow caution symbol displays if inventory items have a negative inventory quantity.
8. Select the option for Alert to show if there is negative inventory As of the “to” Date or Any Time in Date Range.
9. Optionally, place a checkmark in the box in front of any inventory item and then click the Make Selected Items Inactive button to mark the inventory item as inactive.
10. Optionally, click the Adjust Inventory Quantity/Value on Hand to adjust the ending inventory balances to the client’s physical inventory counted totals. More information is provided in the next section.
If your review using the CDR tools and features has identified inventory errors, you will want to read Chapter 6, in which you will find sections on troubleshooting inventory in QuickBooks.
Adjust Inventory Quantity/Value on Hand
Before you perform this task, you need to know what the actual ending quantity and value for each inventory item is currently. This is determined by completing a physical inventory count. Without this important step, you might make an adjustment that might not be supported by the actual count. To create a list used by the warehouse personnel to count inventory, select Vendors, Inventory Activities, Physical Inventory Worksheet from the menu bar.
Quantity Inventory Adjustment
The most common type of inventory adjustment is the Quantity Inventory Adjustment.
The Adjust Quantity/Value on Hand is not a CDR tool, but is accessible from the Vendors, Inventory Activities menu or from an opened Client Data Review. Optionally, if you use this feature often, you can also add this to your Accountant Center.
More details about properly using the Quantity Inventory Adjustment transaction can be found in Chapter 6.
The next section discusses a different type of inventory adjustment called a value adjustment.
Value Inventory Adjustment
When deciding whether to use a Quantity on Hand or Value Adjustment only, be sure of the net result you want to obtain. A value adjustment will not change the quantity on hand, but it will assign a new average cost by dividing the units in inventory by the new value.
Timing is important when doing a valuation adjustment. Value adjustments, if appropriate, should be carefully considered for their impact on the company’s resulting financials.
The value inventory adjustment is a less common type of inventory adjustment. The Adjust Quantity/Value on Hand is not a CDR tool, but is accessible from the Vendors, Inventory Activities menu or from an opened CDR. Optionally, if you use this feature often, you can also add this to your Accountant Center.
Payroll
To have QuickBooks automatically calculate payroll, you or your client will need to purchase a payroll subscription from Intuit. When payroll is not prepared properly, many of the QuickBooks payroll transactions and calculations will not work correctly or at all.
![]() For more detailed information on the payroll subscriptions offered as well as details of the proper payroll process, see Chapter 11, “Setting Up Payroll.”
For more detailed information on the payroll subscriptions offered as well as details of the proper payroll process, see Chapter 11, “Setting Up Payroll.”
The CDR tasks for payroll will help you find payroll errors and set defaults in your client’s file, which will help to avoid future mistakes.
Your ability as the accountant to make changes in a client’s payroll setup as well as adjust payroll transactions is only possible when:
• You are working in a client’s working data file (.QBW file extension). You cannot make changes to payroll transactions when working in an Accountant’s Copy file copy.
• You are working onsite or remotely logged into the client’s file (via the Internet) and your client has a current paid payroll subscription. The payroll features available will be limited by the payroll subscription the client owns.
• You are working with the client’s file at your place of business and you have a paid payroll subscription from Intuit. Accounting professionals providing payroll services for their clients will benefit from using the QuickBooks Enhanced Payroll for Accountants subscription. See Chapter 11 for more details.
Find Incorrectly Paid Payroll Liabilities
Details about the proper methods to prepare payroll and how to pay the accrued liabilities are provided in Chapter 11. Some QuickBooks users might choose to use the Write Checks transaction when preparing their payroll liability payments. Incorrectly prepared payments will adjust the balance sheet balances, but will not be reflected accurately in the Payroll Center. However, over the last several years, payroll liability payment errors are less likely to occur due to improved error messaging that encourages the QuickBooks user to prepare these liability payments properly.
This CDR task delivers another timesaving tool—helping the accounting professional easily and quickly find payroll liability payments that were recorded incorrectly.
When you select the menu or link in CDR to Find Incorrectly Paid Payroll Liabilities (Payroll group), QuickBooks prepares a report titled Payroll Liabilities Paid by Regular Check. See Figure A.36, which displays the results in true debit and credit format for each item found. This report will find a Write Checks transaction that was payable to a payroll item vendor.
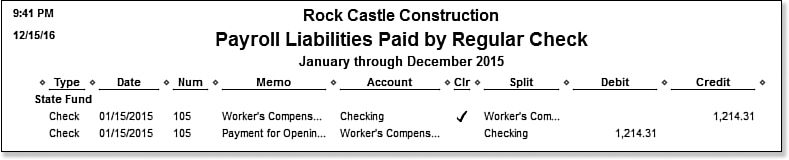
Figure A.36. This CDR report will find incorrectly paid payroll liability payment transaction types.
Use the details from this report to determine to which account your client has recorded these payroll liability payments. Did she record them to the payroll liabilities account or did she select an expense account by mistake? More details about troubleshooting payroll can be found in Chapter 12.
After you determine what account the original entries were posted to, you can complete a Payroll Liability Adjustment by following these steps:
1. From the menu bar, select Employees, Payroll Taxes and Liabilities, Adjust Payroll Liabilities to open the Liability Adjustment dialog box shown in Figure A.37.
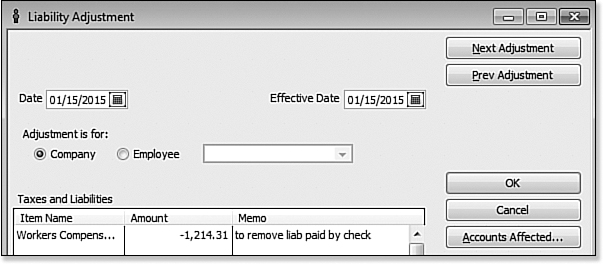
Figure A.37. Correct payroll liabilities paid incorrectly with a Liability Adjustment.
2. Enter the Date and Effective Date. Both should be dated in the quarter you want to effect the change.
3. Select Company for the adjustment. You would not select Employee here because the amounts calculated and paid were correct, just the type of transaction used to make the payment is incorrect.
4. Optionally, assign a Class if your business tracks different profit centers.
5. Click the Accounts Affected button. When determining which option button to select in the Affect Accounts? dialog box, take these suggestions into consideration:
• Do Not Affect Accounts—select if the original transaction was assigned to the correct payroll liability account on the balance sheet.
• Affect Liability and Expense Accounts—select if the original transaction was assigned to the expense account that is assigned to the payroll item used.
• Select Affect Liability and Expense Accounts—select if the original transaction was assigned to any other account other than those stated earlier. You will want to review your financials after making this adjustment and might need to create an adjusting journal entry to correct the balance in the account that was originally used.
6. Click OK.
7. QuickBooks might open another dialog box with the default account that is going to be affected. You can specify the account used on the original tax payment transaction being corrected.
8. Click OK to save the transaction.
9. Review the balances in the affected accounts to make sure the adjusting transactions have been entered correctly.
You can check this and other details of your client’s payroll setup by completing the Run Payroll Checkup as discussed in Chapter 11.
Review Payroll Liabilities
Conveniently, from within CDR you have access to the Employee Center: Payroll Center. From the displayed dialog box, you can view multiple month calendars; your upcoming scheduled payroll processing dates; due dates and amounts for paying your payroll liabilities in a timely fashion; and even links to processing the quarterly and annual forms for federal filings and most state filings.
![]() To learn more about using the Payroll Center, read Chapter 11.
To learn more about using the Payroll Center, read Chapter 11.
Review Employee Default Settings
QuickBooks CDR provides easy access to another feature that has been well hidden! Reviewing employee defaults will help your client process payroll with fewer mistakes, making future payroll reviews less time consuming.
![]() You can learn more about setting these employee defaults in Chapter 11.
You can learn more about setting these employee defaults in Chapter 11.
Enter After-the-Fact Payroll
No longer is entering after-the-fact payroll time consuming! From within CDR, the accounting professional has access to this important feature. You or your client must have an active payroll subscription. If you or your client does not have an active payroll subscription, the After-the-Fact Payroll task will not display in the Payroll task group. Keep this in mind if you are working at the client’s site or remotely logged into the client’s data file.
Payroll entered through the After-the-Fact Payroll processing will also be included in all of the federal and state forms QuickBooks payroll subscriptions prepare.
Bank Reconciliation
There are many ways to troubleshoot bank reconciliation issues with your client’s data. With QuickBooks Accountant 2012 you have access to the Accountant Center (see Figure A.2), which displays timely information about your client’s bank and credit card reconciliations.
![]() Learn more about completing and troubleshooting your client’s bank reconciliations in Chapter 13.
Learn more about completing and troubleshooting your client’s bank reconciliations in Chapter 13.
Reconcile Accounts
You can use the Reconcile Accounts link in the Bank Reconciliation task group of the CDR feature to troubleshoot or complete your client’s monthly bank reconciliation. If you are working with a client’s Accountants, Copy file, you will be able to reconcile the bank account and these reconciliations will be incorporated into your client’s data.
![]() More details about this topic can be found in Chapter 16, “Sharing Data with Your Accountant.”
More details about this topic can be found in Chapter 16, “Sharing Data with Your Accountant.”
In my years of working with clients QuickBooks files, the bank reconciliation is the task I most frequently see not completed at all, or not done correctly, yet it is one of the most important tasks for viewing trusted financials. The CDR feature helps you, the accountant, work with your client’s data file when reviewing or completing the bank reconciliation.
Locate Discrepancies in Bank Reconciliation
After reviewing the client’s previous bank reconciliations, you might determine that the beginning balance, which was once correct, is no longer correct. Perhaps your client modified, voided, or deleted a previously cleared transaction.
The Locate Discrepancies in Bank Reconciliation report will help you to easily find these. The report is added to the CDR, Bank Reconciliation group:
1. From the menu bar, select Accountant, Client Data Review and launch the Client Data Review feature.
2. In the Bank Reconciliation group, select the Locate Discrepancies in Bank Reconciliation task.
3. The Previous Reconciliation Discrepancy report displays. For each transaction on this report, you will see the modified date, reconciled amount, type of change (amount added or deleted), and the financial effect of the change (see Figure A.38) grouped by bank statement date.

Figure A.38. View details of previously cleared transactions that have been modified or deleted.
You can add the username to the report details to help in identifying who made the change to the transaction:
1. From the open Previous Reconciliation Discrepancy report, click Customize Report.
2. On the Display tab, place a checkmark on Last Modified By in the Columns box.
3. Click OK.
After reviewing the Previous Reconciliation Discrepancy report, you can prepare the Voided/Deleted report to help determine how to correct the transaction(s). To prepare this report, select Reports, Accountant & Taxes, Voided/Deleted Transactions Summary (or Detail) from the menu bar.
The Voided/Deleted report will not track discrepancies caused by changing the bank account associated with a transaction or changing a transaction amount. However, now with the Client Data Review, Review List Changes task will track changes made from adding, deleting, or even merging charts of accounts and other list items in QuickBooks.
Troubleshoot your beginning balance differences with the Previous Reconciliation Discrepancy report before completing the next month’s reconciliation. Doing so is important because QuickBooks removes all details from the discrepancy report when you complete a new reconciliation. This is due to QuickBooks determining that you have solved the issue or you would not have completed the next month’s bank reconciliation.
Reviewing Missing Checks
The Missing Checks report is useful when reviewing the accuracy of your client’s bank account data. This report can help you determine whether any check transactions are missing or duplicated.
The Review Missing Checks link is conveniently included in the Bank Reconciliation cleanup tasks. In the Specify Account dialog box select the appropriate bank account from the drop-down list.
The resulting Missing Checks report shows all transactions that are withdrawals from (that is, credits to) the bank account and that have a reference number. Transaction types include check, bill payment, sales tax payment, liability payment, paycheck, and general journal entry type transactions, presented in order by their reference number (see Figure A.39).

Figure A.39. The Missing Checks report can help you determine whether you need to enter any missing transactions before you reconcile.
You will look for any breaks in the detail with a ***Missing or ***Duplicate warning.
Miscellaneous
This section of the CDR can be one of the most useful to you because it shows you how to set preferences to make your client’s work more accurate and how to set a closing date, which will prevent or discourage a user from making changes to your reviewed data. If you are working with a client’s Accountant’s Copy, you will be able to set the Closing Date and optional Closing Date Password, which will be incorporated into the client’s file.
Setting the Closing Date and Password
QuickBooks offers flexibility for accounting professionals who want to protect prior period data and those who need or want to make changes to prior period accounting records.
What exactly is a “closed” accounting period? Well, a business can decide to close a month when a task such as a bank reconciliation is done or a sales tax return is filed, or a business can simply close once a year when the data is finalized for tax preparation. Because QuickBooks does not require you to close the books, it is a decision of the accounting professional and business owner (see Chapter 16).
The option of setting a closing date and password makes it easy to protect prior period transactions from unwanted modifications. With additional user-specific security settings, the business owner and accountant can also manage who has the privilege to make changes to transactions dated on or before a specific closing date.
Step One—Setting the Date and Assigning the Password
The first step in controlling changes to closed accounting periods is to set a closing date and optionally (although recommended) a closing date password the user must provide when adding, deleting, or modifying a transaction dated on or before the closing date.
Another important reason for setting a closing date is to track additions, modifications, or deletions to transactions dated on or before a closing date. The Closing Date Exceptions report will not track these changes when a closing date is not set.
To set the closing date and optionally a password (different from the Admin or External Accountant password) from an open Client Data Review, follow these steps:
1. Click the Set Closing Date and Password link in the Miscellaneous group of the CDR center. The Accounting—Company Preferences tab of the Preferences dialog box opens.
2. Click the Set Date/Password button. The Set Closing Date and Password dialog box displays.
3. Optionally, select the following checkbox: Exclude Estimates, Sales Orders, and Purchase Orders from Closing Date Restrictions. These transactions are non-posting and changes made will not affect your financials.
4. Enter a closing date and optional password. Consider using your phone number as the password or “Call Accountant” to encourage your client to call you before making changes to closed period transactions.
5. Click OK to close the Set Closing Date and Password dialog box.
6. If the No Password Entered warning displays, select Yes to add or edit users or No to close the warning.
7. Click OK to close the Preferences dialog box.
Setting a closing date is only step one. Next, you must set user-specific privileges for users to whom you want to allow access to adding, deleting, or modifying a transaction dated on or before the closing date.
Step Two—Setting User-Specific Security
To be certain the closing date control is managed properly, review all users for their specific rights to change transactions up to and including a closing date. To view the following menu, you need to be logged into the file as the Admin user (External Accountant user type does not have the capability to create new users or change permissions for existing users):
1. From the menu bar, select Company, Set Up Users and Passwords, Set Up Users. The User List dialog box opens.
2. To view a user’s existing security privileges (other than the Admin or External Accountant user) from the User List dialog box, select the user and click the View User button. You will be able to view in summary form the security settings for that user, as shown in Figure A.40.
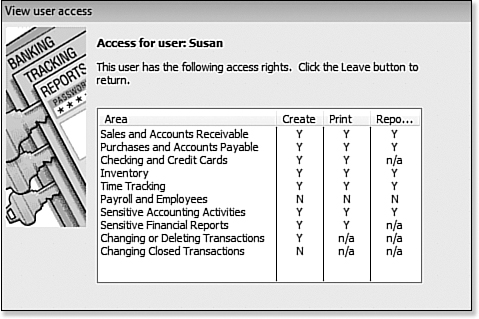
Figure A.40. Review in summary form the user’s security privileges.
3. Any user who should not have rights to changing closed period transactions should have an “N” placed in the last setting of Changing Closed Transactions.
4. If after reviewing a user’s existing security privileges, you need to edit the setting referenced earlier, click Leave to close the View User Access dialog box.
5. QuickBooks returns you to the User List dialog box. Select the username and click the Edit User button.
6. On the Change User Password and Access dialog box, optionally modify the username or password. Click Next to continue.
7. The User Access dialog box for the specific user displays. Choose Selected Areas and click Next to continue through each of the security selections until you reach the selections on Page 9 of the dialog box as shown in Figure A.41.

Figure A.41. With QuickBooks you set controls not to allow users to change transactions on or before a set closing date.
With the ease of doing client reviews, and now the security of knowing your hard work is documented and protected with a closing date, your future reviews should take even less time to complete, giving you more time to help your client with important management decisions!
Review QuickBooks Preferences
Don’t forget during your review to manage properly the many useful preferences that will help you and your client work more efficiently and accurately in the QuickBooks data file.
QuickBooks offers two types of preferences:
• My Preferences—Choices selected on this tab are being defined only for the currently logged-in user. If you are setting preferences for your client, you should log in with her username, and then set the My Preferences. These settings can be changed while in a multi-user environment (when others are in the date file).
• Company Preferences—Preferences set on these tabs are global for all users in the QuickBooks data file. Often, these preferences can be set only when you are in single-user mode, meaning other users cannot be working in the file when you set Company Preferences. Both the Admin and the new External Accountant type user can modify Company Preferences.
There are preferences specific for accounting you will want to review. As the trusted accounting professional for your client, you will benefit by reviewing each of the available preferences, including:
• Accounting
• Bills
• Calendar
• Checking
• Desktop View
• Finance Charge
• General
• Integrated Applications
• Items & Inventory
• Jobs & Estimates
• Multiple Currencies
• Payments
• Payroll & Employees
• Reminders
• Reports & Graphs
• Sales & Customers
• Sales Tax
• Search
• Service Connection
• Spelling
• Tax: 1099
• Time and Expenses
Of the preferences, those that can enhance the accounting accuracy of a QuickBooks file are discussed in more depth in the related chapter. For example, the Sales & Customer preferences that improve the client’s accuracy in QuickBooks are detailed in Chapter 9.
With a password set and preferences reviewed, your next review of your client’s data should take even less time using the CDR.
Finishing a Client Data Review
You can leave a CDR open for as long as it takes you to finish. When you close out of a task, your work is saved. Additionally, as you are working, you can conveniently select a QuickBooks menu outside of the Client Data Review and CDR will refresh automatically, including transactions created and modified.
Optionally, as you work through the many tasks, you can record an overall note for the review or individual notes assigned to specific tasks.
Saving the Review as a PDF
You can print the details of your CDR to paper or save as a PDF file. The information included with this document is shown in Figure A.42:
• Company Name
• Review Period (Last Fiscal Year, Quarter, Month, or Custom)
• Date Printed
• Dates included in this review
• Basis: Accrual or Cash
• Client Data Review Notes
• Cleanup Tasks and subtasks
• Status
• Task note
• Filename and path where the report is stored if prepared in PDF format

Figure A.42. Print or Save to PDF the details of the review for your paper files.
Marking Review Complete
When you have completed all tasks in the CDR and you select the Mark Review Complete button, QuickBooks will:
• Provide the option to set a closing date and password.
• Change the Prior Review Period Dates in the Troubleshoot Account Balances task.
• In the Troubleshoot Account Balances tasks, transfer your final reviewed balances to the Last Review Balances column. (These amounts will not change even if a customer makes a change to a transaction dated in that review period!)
• Provide the option to carry over task notes to the next review.
Specific to the Troubleshoot Account Balances task, you do not have to Mark the Review as Complete for each review. However, your ending balances will be recorded only in the Last Review Balances column when you mark the review as completed. Marking a review as completed still gives you the option to reopen a previously closed review.
Reopening a Client Data Review
After marking a review as complete and before you start the next review, you will have the option to reopen the previously marked completed review as shown in Figure A.43. After you start a new review, you will no longer have the option to reopen the previously completed review.
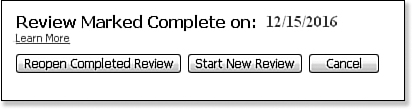
Figure A.43. Before starting a new review, you will have the option to open a previously closed review.
Reporting on Review Activity
Also available on the CDR Center is a link to the Audit Trail of Review report (see Figure A.44). You can use this report to detail the transactions you have added, modified, or deleted during your review. The Audit Trail report will not report on changes made to list items.
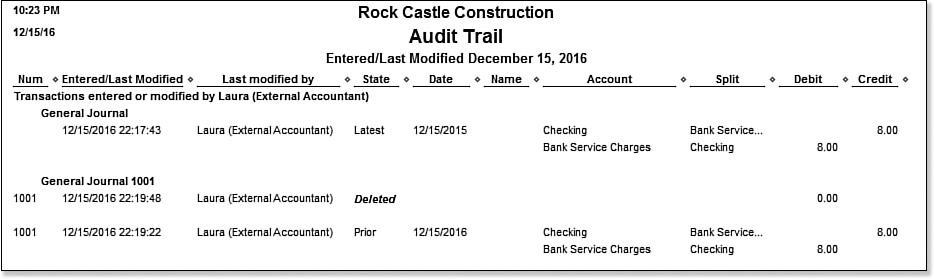
Figure A.44. The QuickBooks Audit Trail report helps identify what changes were made to transactions and by which user.
Additionally, if you used the new External Accountant type of login access, you were given all the rights of the Admin user (except adding or modifying users and viewing sensitive customer credit card information) and you can see your changes separate from the Admin or other users on this report.
The Audit Trail report provides details of additions and changes made to transactions, grouping the changes by username. The detail on this report shows the prior versions of the transaction and the latest version of the transaction, if it was edited. The Audit Trail report defaults to changes made as of today’s date. This filter date can be modified for your needs.
The audit trail report can be lengthy to review. However, if as an accountant you try to track down specific user activity with transactions, this can be a useful report to review because the changes are grouped by username.
If you find undesired transaction changes, consider setting a closing date password and setting specific user security privileges as detailed earlier in this chapter.
Creating an External Accountant User
Setting up a QuickBooks user for each person who enters data provides a level of control over the sensitive data to be viewed by this user and gives access to specific areas in QuickBooks. For additional control, a user-specific password can also be assigned.
When you create a new user (or edit an existing user) in QuickBooks, you can assign that user as an External Accountant.
As an accounting professional using the CDR, you will want to request that your client create a username for you and assign the new External Accountant Type. If you then log into the client file with this new user type, you will benefit from:
• Complete Admin access, except you cannot create or edit users, or view sensitive customer credit card numbers.
• Reports such as the Audit Trail can be filtered in Excel for a specific username, enabling you to see your transactions separate from the client’s transactions.
• Client Data Review distinguishes in the dialog box if your login is the new External Accountant type (see Figure A.1).
• Access to the Accountant Center, plus limited accountant and CDR tools when logging into a client’s QuickBooks Pro, Premier, or Enterprise 2012 non-accountant edition file.
If you are reviewing your client’s data using the Accountant’s Copy file type or if you are not given the Admin login, this new External Accountant will have to be created before your client creates the Accountant’s Copy or has you review her data file.
To create an External Accountant, follow these steps:
1. Open the QuickBooks data file using the Admin user (the default user QuickBooks creates with a new QuickBooks file) and enter the appropriate password if one was created.
2. From the menu bar, select Company, Set Up Users and Passwords, Set Up Users.
3. Enter the Admin user password if one was originally assigned. Click OK.
The User List dialog box opens; it lists the current users set up for this file.
4. Click the Add User button to create a new user, or select an existing username and click the Edit User button.
5. The Set up (or Change) User Password and Access dialog box opens.
6. In the User Name field, type the name you want the user to be identified by in the file.
7. In the Password field, enter an optional password, and in the Confirm Password field, retype the password for accuracy.
8. Optionally, click the box to Add This User to My QuickBooks License. (See the explain link for more details.)
9. Click Next. You might receive a No Password Entered message, click Yes or No to creating a password. If you select Yes, you will be taken back to step 7. Optionally, select Do Not Display This Message in the Future.
10. The Access for User:<username> dialog box opens.
11. Select the option for External Accountant, as shown in Figure A.45.

Figure A.45. Ask your client to create an External Accountant type user for your login.
12. Click Next.
13. QuickBooks provides a warning message, confirming that you want to give this new user access to all areas of QuickBooks except customer credit card numbers. Select Yes to assign the new External Accountant type privileges to this new or existing user.
14. The Access for User:<username> dialog box opens. The message restates that the new External Accountant user will have access to all areas of QuickBooks except sensitive customer credit card data. Click Finish to complete the process.