
10. Managing Customers
Accounts Receivable Reporting
You have learned how to use some of the most common customer-related transactions and carry out important customer-related activities in your QuickBooks data file.
There are a wide variety of reports available for documenting sales, customer balances, and other useful management reporting. Details on working with QuickBooks reports are included in Chapter 14, “Reporting in QuickBooks,” including accessing a wide variety of customer-related reports from the following menus:
• Reports, Report Center; select the Customers & Receivables or Sales reports from the Standard tab.
• Company, Company Snapshot; select the Payments or Customer tab.
The next several sections in this chapter will help you review and troubleshoot your own data for accuracy. Following are some of the more common reports used to identify whether or not your Accounts Receivable information is correct.
Reviewing A/R Aging Summary and Detail Reports
Preparing your customer invoices and recording the customer’s payments are important to the accuracy of your financials. There are several reports that summarize the status of unpaid or unapplied customer transactions included in your Accounts Receivable balance on the Balance Sheet report.
You can prepare these reports with your own data, or review the report details using the sample data discussed in Chapter 1, “Getting Started with Quickbooks.”
From the menu bar, select Reports, Customers & Receivables, and then select one of the following from the submenu:
• A/R Aging Summary—Report groups open customer transactions by job into a series of aged date ranges (see Figure 10.1). Use this report for a quick view of those customers who have older unpaid balances.

Figure 10.1. Use the A/R Aging Summary report to identify which customers have overdue balances.
• A/R Aging Detail—The report shown in Figure 10.2 provides a single line of detail for all open customer transactions, grouped by aging period.

Figure 10.2. The A/R Aging Detail report groups aged customer transactions by overdue date status.
Use these reports to identify those customers who are in need of collection efforts and use the tools discussed in the section of this chapter titled “Using the Collections Center.”
Reviewing the Open Invoices Report
Unlike the A/R Aging Summary report, the Open Invoices report is useful because it shows individual lines for each open transaction grouped by customer and job. This report is a “perpetual” report, meaning it will show open invoices as of today’s date and not some fixed time in the past unless you modify the reports as detailed here.
To modify an Open Invoices report so you can compare it to your Balance Sheet report for some specific date in the past, follow these steps:
1. From the menu bar, select Reports, Customers & Receivables, Open Invoices. This report includes all payments made by your customer as of today’s computer system date.
2. If you are creating this report for some date in the past, click the Customize Report button and then click the Advanced button on the Display tab of the Modify Report dialog box.
3. In the Open Balance/Aging box of the Advanced Options dialog box, select the Report Date option (see Figure 10.3). This modification to the report enables you to see each invoice balance detail as of the prior report date. If you do not modify this report, QuickBooks displays the prior date on the report, but also reduces the balances owed for payments made after the report date.
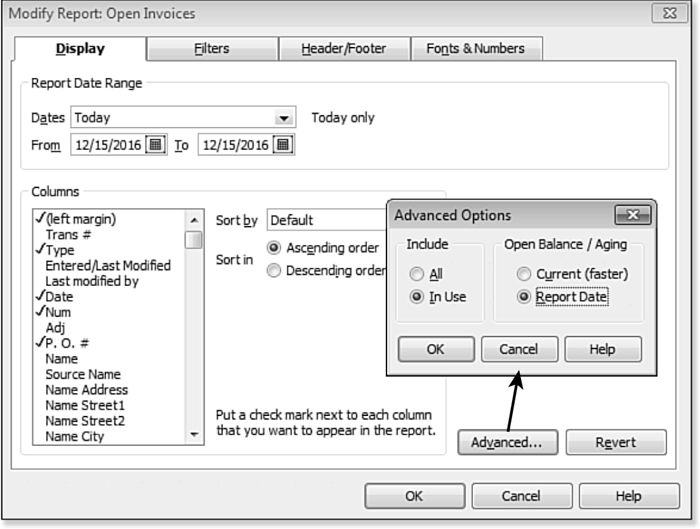
Figure 10.3. The Open Invoices report, when modified, can be compared to the totals on your Balance Sheet report for a previous date.
4. On the Open Invoices report (see Figure 10.4), view details of all open balances and any unapplied credits grouped by customer and job.
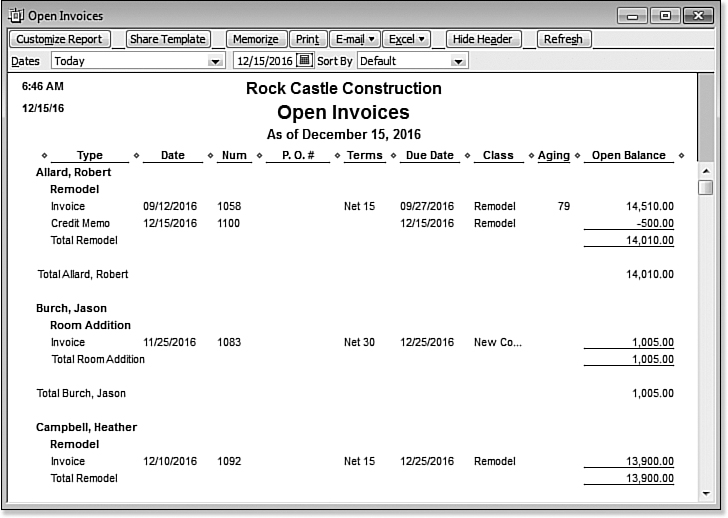
Figure 10.4. Unlike the Aging Summary report, the Open Invoices report groups open or unapplied transactions by customer or job rather than by aging date.
Reconciling Balance Sheet Accounts Receivable Amount to A/R Aging Summary Total
With QuickBooks, you don’t have to worry that the Balance Sheet report and the Accounts Receivable Aging Summary report match because any transaction posting to the Accounts Receivable account must have a customer assigned. You want to make sure you always create your Balance Sheet with the Accrual Basis because the A/R Aging Summary report provides details only on an Accrual Basis:
To prepare the reports needed for this comparison, follow these steps:
1. From the menu bar, select Reports, Company & Financial, Balance Sheet Standard. The selected report is displayed. For the date, select the As of Date you want to compare to.
To compare your Balance Sheet report with the A/R Aging Summary report, you must create your Balance Sheet in accrual basis. If your reporting preference default is for cash basis, you can change it temporarily to accrual basis in the active report. Just click the Customize Report button at the top of the report and select Accrual as the reporting basis.
2. In the Balance Sheet report that displays, note the balance in your Accounts Receivable account (see Figure 10.5).

Figure 10.5. Use your Balance Sheet report (accrual basis) to reconcile your Accounts Receivable report.
3. From the menu bar, select Reports, Customers & Receivables, A/R Aging Summary, making sure the field shows the same date as the date selected in step 1. The image shown in Figure 10.6 has been “collapsed” to make viewing the information easier. To expand to see more detail, click the Expand button at the top of the report.

Figure 10.6. A/R Aging Summary report collapsed for reviewing report totals.
The balance from the Balance Sheet report should match the total on the A/R Aging Summary. If it does not, the cause might be a “broken” transaction link. You can detect these types of issues by selecting File, Utilities, Verify Data from the menu bar; additional details are provided in Chapter 17, “Managing Your Quickbooks Database.”
Viewing the Accounts Receivable Balance on a Cash Basis Balance Sheet
The nature of Cash Basis reporting implies you would not see an Accounts Receivable balance on your Balance Sheet. In short, cash basis accounting doesn’t recognize revenue until you deposit the funds.
What should you do if you see an Accounts Receivable balance on a Cash Basis Balance Sheet? Any of the following can be the cause:
• A/R transactions have items posting to other Balance Sheet accounts.
• Inventory items on an invoice or credit memo (inventory management should be reported in Accrual Basis reporting).
• Transfers between Balance Sheet accounts.
• Unapplied Accounts Receivable customer payments.
• Customer payments applied to future-dated Accounts Receivable invoices.
• Preferences that contradict each other. (This situation can happen if you select Cash Basis on your Summary Reports, but Accrual Basis as your Sales Tax preference.)
• Data corruption (select File, Utilities, Verify Data from the menu bar to check for data corruption).
Accounts Receivable Balances on Cash Basis Balance Sheet
To determine why an Accounts Receivable balance displays on a Cash Basis Balance Sheet, follow these steps:
1. From the menu bar, select Reports, Company & Financial, Balance Sheet Standard report as displayed in Figure 10.7.

Figure 10.7. The Cash Basis Balance Sheet shows an Accounts Receivable balance.
2. Click the Customize Report button.
3. The Modify Report dialog box opens, with the Display tab selected. Select Cash for the report basis.
4. Click OK.
5. Double-click the Accounts Receivable amount in question. The Transaction by Account report is created.
6. Click the Customize Report button. The Modify Report dialog box opens, with the Display tab selected.
7. For the Report Date Range, remove the From date and leave the To date.
8. Click the Advanced button, and from the Open Balance / Aging box, select Report Date.
9. Click the Filters tab.
10. In the Choose Filters box, scroll down to select Paid Status and select the Open option.
11. Click OK.
Look for transactions that fall into any of the categories described previously. Figure 10.8 shows an item was used on Invoice No. 1090 that debited another Balance Sheet account named Retainage. Any item used on a customer invoice that is mapped to another Balance Sheet account (including inventory) will display on a Cash Basis Balance Sheet report.

Figure 10.8. This modified report identifies the individual transactions that are included in the Accounts Receivable amount showing on a Cash Basis Balance Sheet.
Now that you have been reviewing your customers open and aged balances, you will appreciate the tools available in your QuickBooks software to help you with critical collection tasks.
Using the Collections Center
If your business sends invoices to customers for payment, you have offered the customer terms of payment. Those terms might be Net 30 or Net 60 and might include discounts if early payment is received.
Using the A/R Aging Summary, Detail or Open Invoices reports will help you to identify customers who are late in paying. Other useful reports included in the Reports, Customers & Receivables menu that assist with collections analysis include:
• Customer Balance Summary
• Customer Balance Detail
• Collections Report
• Average Days to Pay Summary
• Average Days to Pay
The QuickBooks Collections Center as shown in Figure 10.9 provides a place for you to record notes about your collection efforts and prepare reminder notices for clients with overdue and almost due balances.

Figure 10.9. Click the Note icon to document your collection activities.
1. On the Home page, click the Customers button.
2. The Customer Center opens, with the Customers & Jobs tab selected. From the top of the Customer Center, click the Collections Center button.
3. The Collections Center opens, with the Overdue tab selected. Click any column header to sort by that column.
4. Click the Notes/Warnings icon next to any open item and QuickBooks will populate the date and time and you can add your collection notes. Click Save. These notes become part of the customer or job notes record and can be viewed from the Customer Center. After the note is saved, hover your mouse over the Notes/Warnings icon and QuickBooks displays the contents without opening the note.
5. Click the Select and Send Email link.
6. Place a checkmark next to each overdue invoice you want to send a collection notice to. Select all or deselect all using the checkmark in front of the Customer Name column header.
7. To the right, modify the template text that will be included in the email communication. Add the From, Cc:, and Bcc: email addresses. You can set your default text for these communications on the Send Forms—Company Preferences tab of the Preferences dialog box.
QuickBooks will use the email provider you designated on the Send Forms—My Preferences tab of the Preferences dialog box.
8. Repeat steps 4–7 for customers with open invoices listed on the Almost Due tab.
9. Click the X in the top right to close the Collections Center.
The notes assigned to the overdue invoice will also track the day and time an email was sent.
Even with your best efforts, sometimes you are just not able to collect the money that is owed to you. For these instances, you will want to accurately write off the balance to your Bad Debt expense account. Review the “Removing an Open Balance from a Customer Invoice” section for details.
Generating the Missing Customer Invoices Report
Most companies establish some control over the process of creating customer invoices. One control, if invoices are created manually in the field and later entered into QuickBooks, is to maintain a numeric invoicing pattern. Usually each invoice is one number larger than the prior invoice. This method of invoice record keeping can be an important process to have if your company is ever audited and you are required to provide a list of all invoices.
To see whether your data has any missing numbers in the invoicing sequence, follow these steps:
1. From the menu bar, select Reports, Banking, Missing Checks.
2. In the Missing Checks dialog box, select Accounts Receivable from the Specify Account drop-down list, and click OK to generate the report (see Figure 10.10).

Figure 10.10. Create a report that lists all your customer invoices by invoice number.
3. Rename the report by choosing Customize Report, clicking the Header/Footer tab, and typing a new title for the Report Title field, such as Invoice List.
4. Click OK to display the newly renamed report.
This customized report makes the process of identifying missing or duplicated invoice numbers easy (see Figure 10.11). Use this information to determine whether you need better company practices to avoid this situation.
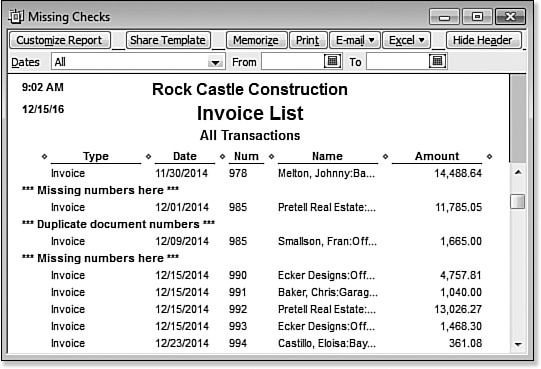
Figure 10.11. This modified report shows a list of all missing or duplicated invoice numbers.
The customized Missing Invoices report filter omits credit memos. With the customized report displayed, you can add credit memos to the transactions reported. Click the Customize Report button and select the Filters tab. In the Choose Filter box, select Transaction Type. From the Transaction Type drop-down list, select Multiple Transaction types including invoice, credit memo, and others you want included.
Sales Tax Payable Reports
I recommend you review these reports each time you prepare to pay your sales and use tax to the taxing authority. Properly “reconciling” these reports to each other helps minimize any chance that your QuickBooks data will not support what you filed on your sales tax return.
Reviewing Customer Lists for Tax Code and Tax Item Assigned
Check your customers’ taxable status often. This task is quite easy to do and helps prevent the costly mistakes caused by not charging sales tax or charging the incorrect rate.
1. From the menu bar, select Reports, List, Customer Phone List.
2. Click the Customize Report button on the top left of the report.
3. In the Modify Report dialog box that opens, place a checkmark in the Columns box next to items you want to review for the list, including Sales Tax Code and Tax Item, and include the Resale Num if you track this number for your wholesale customers.
4. Optionally, select Sales Tax Code from the Sort By drop-down list.
5. Optionally, click the Header/Footer tab to change the report title. Click OK.
When you make a change to a customer’s assigned tax code or tax item or to the tax code assigned to a product or service you sell on your item list, QuickBooks will not correct or modify prior saved transactions. New transactions will show the change in the sales tax status or rate.
From this list, shown in Figure 10.12, double-click any line item detail to open the Edit Customer dialog box and make needed changes.

Figure 10.12. Prepare this report often to review the accuracy of the sales tax codes and items assigned to your customers.
Reviewing the Item List for Tax Code Assigned
Another review that I recommend you do periodically is to look at the list of services and products you sell and determine whether the proper tax code has been assigned (see Figure 10.13).
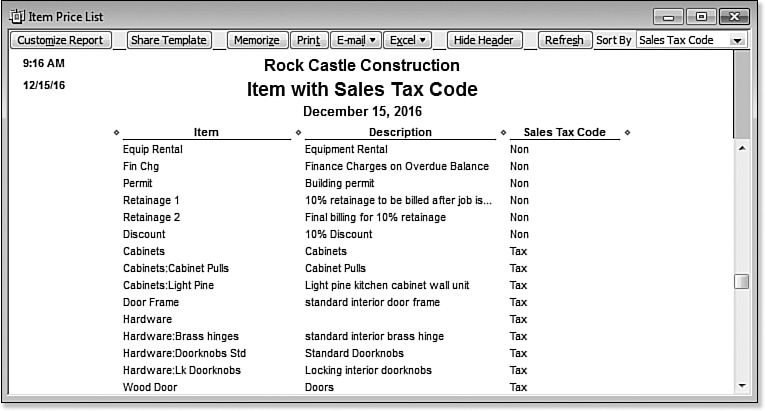
Figure 10.13. Prepare a report of the sales tax codes assigned to your items.
To review the Item Price List report, follow these steps:
1. From the menu bar, select Reports, List, Item Price List.
2. Click the Customize Report button at the top left of the report.
3. In the Columns box of the Modify Report dialog box, remove checkmarks from those data fields you do not want displayed on this report. Place a checkmark next to date fields you want to review for the list, including Sales Tax Code.
4. Optionally, select Sales Tax Code from the Sort By drop-down list.
5. Optionally, click the Header/Footer tab to change the report title. Click OK.
Reconciling Total Sales to Total Income
The term reconciling (also known as proofing) refers to the need to compare two related numbers from two different reports. The importance of this task cannot be overstated. If your company is selected to have a sales tax audit, one of the first numbers the auditor will want to determine is the total sales you reported on your tax returns for the time period being audited.
When comparing these two reports, it is imperative you know the basis you have selected for your sales tax.
![]() For more information, see “Setting Up Sales Tax,” p. 274.
For more information, see “Setting Up Sales Tax,” p. 274.
To compare your total sales on the Sales Tax Liability report to your total income on the Profit & Loss report using the same basis as your sales tax preference, follow these steps:
1. From the menu bar, select Reports, Vendors & Payables, Sales Tax Liability.
2. Make a note of the date range and total sales on this report, as shown in Figure 10.14.

Figure 10.14. Compare total sales on the Sales Tax Liability report to total income on the Profit & Loss report.
3. From the menu bar, select Reports, Company & Financial, Profit & Loss Standard.
4. Select the same date range used for your Sales Tax Liability report in step 1.
5. Verify the same basis is used on this report that was used on the Sales Tax Liability report. If necessary, click Customize Report to change.
6. Compare total income (see Figure 10.15) to the total sales from the Sales Tax Liability report. Note: You might have to deduct any non-sales income on your Profit & Loss Total Income amounts.

Figure 10.15. Compare the total income on the Profit & Loss report to the total sales on the Sales Tax Liability report.
If your totals on these two reports do not match, review the instructions included in the “Correcting Sales Tax Errors” section of this chapter.
Reconciling Sales Tax Liability to Balance Sheet Sales Tax Payable
Another important comparison to make is between the amount reported for Sales Tax Payable on the Balance Sheet report and the Sales Tax Payable total on the Sales Tax Liability report. Carefully check that you are using the same Cash or Accrual Basis for each report when completing this review.
If you created your own Sales Tax Payable account, you might not be able to correctly compare the two reports. QuickBooks creates a Sales Tax Payable account automatically.
To compare the Balance Sheet Sales Tax Payable account balance with the Sales Tax Payable total on the Sales Tax Liability report, follow these steps:
1. From the menu bar, select Reports, Company & Financial, Balance Sheet Standard (see Figure 10.16).
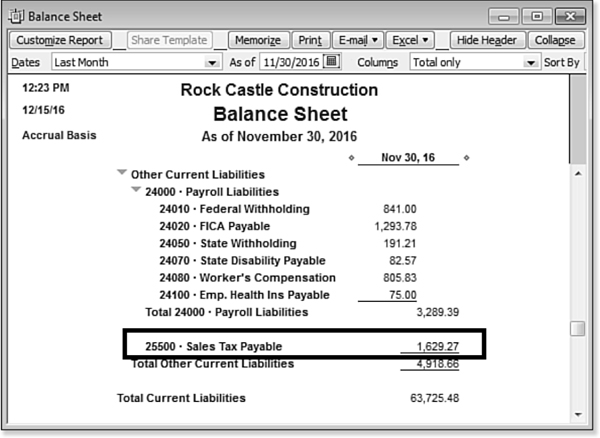
Figure 10.16. Balance Sheet Sales Tax Payable amount should agree with your Sales Tax Liability report.
2. On the report, select the As of Date you are comparing to (this date must be the same ending date you will use when you prepare your Sales Tax Liability report in the next step).
3. From the menu bar, select Reports, Vendors & Payables, Sales Tax Liability. See Figure 10.17. QuickBooks defaults the date range depending on your sales tax preference setting.

Figure 10.17. The total sales tax liability payable should agree with your Balance Sheet Sales Tax payable.
Each month before preparing your sales tax return, compare the total of these two reports. Later in this chapter, you will learn about methods you can use to troubleshoot these totals when they do not match.
When a Check or Bill Was Used to Pay Sales Tax
A common mistake when recording payment of the sales tax payable is to use a Write Checks or Enter Bills transaction. If these types of transactions are used and the Sales Tax Payable account is assigned on the form, QuickBooks reduces the Sales Tax Payable amount on the Balance Sheet, but does not make the same adjustment in the Pay Sales Tax dialog box. Instead this type of transaction will be included in the Pay Sales Tax dialog box as a negative Amt. Due.
To find the transaction(s) that might be the cause of not being able to compare your Balance Sheet Sales Tax Payable amount to your Sales Tax Liability report amount to be paid, follow these steps:
1. On the Home page, click the Vendors button to open the Vendor Center.
2. Select your sales tax vendor from the Vendors list.
3. From the Show drop-down list, select Checks (or Bills), making sure you are looking in the appropriate date range.
If you have found checks or bills, this could be one of the reasons your two reports do not agree with each other. The correct sales tax payment transaction is named TAXPMT when viewing transactions in your bank register. The following section details how to properly record the payment of the collected sales tax in your QuickBooks data.
Paying Sales Tax
Now that you have your sales tax correctly set up and you have reviewed your sales tax payable reports, you need to know how to properly pay your sales tax.
Paying Sales Tax Without an Adjustment
As mentioned earlier, when you collect sales tax, you are acting as an agent for the state. Most often, you will pay the state or city taxing authority the same amount that you collected from your customers. Sometimes the state might allow you to discount the sales tax due for prompt payment or charge a penalty for paying late. Each of these situations is discussed in detail in this section.
Paying Sales Tax Without an Adjustment
To practice paying sales tax without an adjustment, open the sample data file as instructed in Chapter 1. Use these instructions when creating your own sales tax payments—selecting accounts and dates that are correct for your needs:
1. From the menu bar, select Vendors, Sales Tax, Pay Sales Tax. The Pay Sales Tax dialog box displays (see Figure 10.18).
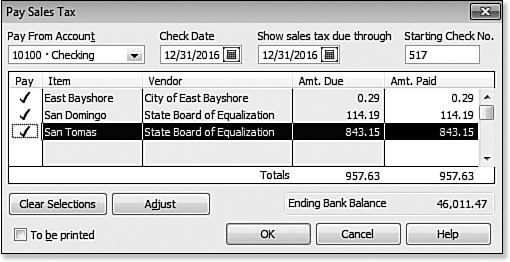
Figure 10.18. Use this transaction type to properly remit your sales tax payable amount.
2. For this exercise, in the Pay From Account field leave selected the Checking account.
3. In the date field, select December 31, 2016.
4. In the Show Sales Tax Due field, select December 31, 2016. This date should default to your preference setting. If the date is not the date you want to pay through, you can override it here.
5. Leave the Starting Check No. unchanged.
6. Place a checkmark in the Pay column on the left for the individual items you want to pay. QuickBooks creates or prints a separate check transaction for each line item with a different vendor.
7. Verify that the Amt. Paid column is in agreement with your Sales Tax Liability report for the same period.
8. Click OK; QuickBooks creates a transaction with the TAXPMT type viewable from your checkbook register, as shown in Figure 10.19.

Figure 10.19. Sales Tax Payment transactions displayed in a checkbook register.
You can set a user-specific default account for paying the sales tax liability from. From the menu bar select Edit, Preferences and choose the Checking, My Preferences tab.
Paying Sales Tax with an Adjustment
There are many reasons why your Sales Tax Payable doesn’t agree with the amount the agency is expecting you to pay, including the following:
• Discount offered for early payment
• Penalty or fee assessed for late payment
• Credit received for overpayment on a prior period’s sales tax return
• State sales tax holiday or rate reduction
• Rounding errors
If any of these apply to your business, follow these steps:
1. Perform steps 1–5 listed in the preceding section (“Paying Sales Tax Without an Adjustment”) making sure to select the proper accounts and dates for your specific needs.
2. In the Pay Sales Tax dialog box, click Adjust to open the Sales Tax Adjustment dialog box, as shown in Figure 10.20.
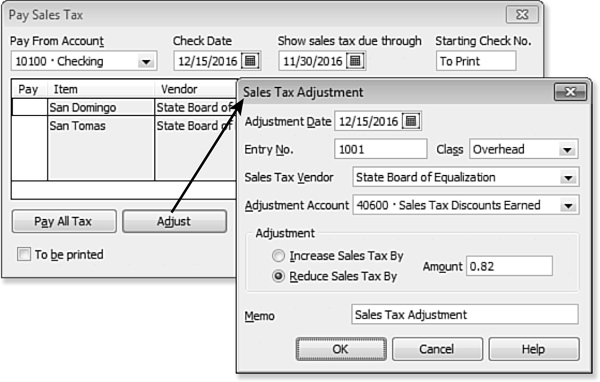
Figure 10.20. Use the Sales Tax Adjustment dialog box to increase or decrease your sales tax payment.
If you select the items to be paid first, and then select the Adjust button recording the discount or increase, QuickBooks will provide a warning that your previously selected checkmarks will be removed and you will need to select the line items again, including the new adjustment to be included with the payment.
3. Select the appropriate Adjustment Date. This date should be on or before the Show Sales Tax Through date.
4. Enter an Entry No. or QuickBooks will default a number if that preference is set.
5. Select the Sales Tax Vendor for which you are decreasing or increasing your payment.
6. Select from your chart of accounts the Adjustment Account. Ask your accountant what he prefers; the account might be either of the following:
• Other Income, if you are recording a discount for early payment.
• Expense, if you are recording a penalty or fine.
7. Select the option to Increase Sales Tax By or Reduce Sales Tax By and enter the appropriate dollar amount.
8. In the Memo section, enter a description for your reports or accept the default description.
9. Click OK to record the sales tax adjustment.
10. Click OK to close the warning message when recording a sales tax adjustment.
11. QuickBooks now shows the Pay Sales Tax dialog box with an additional line showing the adjustment. This example shows a reduction in sales tax due (see Figure 10.21).

Figure 10.21. When preparing your sales tax payment select the sales tax lines and the adjustment line.
QuickBooks creates a general journal entry when the sales tax adjustment is recorded.
Correcting Accounts Receivable Errors
After reviewing your accounts receivable reports, you might have identified some data entry errors. Before you can fix these, you need to determine the best method to correct the errors. When deciding which method is best, you should ask yourself the following:
• Are the errors in an accounting year that I have already filed a tax return for?—If yes, then adjusting these transactions by dating the modifying entry in the current tax year and not modifying the original transaction is best. Some methods listed in this section will not enable you to select a date different from the original transaction date.
• Are the errors significant in the dollar amount, collectively or individually?—If yes, you should obtain the advice of your accountant before making any adjustments so changes that will affect your tax status are carefully considered.
• Am I going to fix detail or summary information?—In other words, are you going to fix individual invoices or correct a group of customer invoices with one adjusting transaction?
• Am I modifying an invoice with sales tax recorded on the invoice?—If yes, refer to the “Correcting Sales Tax Errors” section in this chapter for a detailed discussion on adjusting invoices with sales tax. These corrections should only be made with transactions dated in the current accounting month.
Removing an Open Balance from a Customer Invoice
There are several reasons you might have open balances on your Accounts Receivable invoices. There are also several methods to correct overstated or understated balances, each with its own effect on your company’s financials.
If you are an accounting professional and you are using QuickBooks Accountant 2012 or QuickBooks Enterprise Solutions Accountant 12.0 software, you will want to review Appendix A, “Client Data Review.”
Included in the Client Data Review (CDR) used by accountants, are useful tools that streamline applying open customer payments and credits to open customer invoices and simplify writing off small open balances in batch.
The following sections are methods you can use to remove open customer balances with your QuickBooks Pro, Premier, or Enterprise software.
Writing Off a Customer Balance by Modifying the Original Customer Receive Payments Transaction
This method of modifying the original customer payment to write off a customer balance records the change as of the date of the Receive Payments transaction and permits a write-off amount equal to the underpayment amount. You can write off the amount at the time you first record the payment or at a later date.
On the Home page, click the Customers button and select the appropriate customer. From the Show drop-down list, select Payments and Credits or just Received Payments and any other date criteria you want to use, as shown in Chapter 9, Figure 9.9.
Double-click the selected customer payment to open it. In the example shown in Figure 10.22, the customer paid $510.00 less than the amount due. Write off this amount by selecting Write Off The Extra Amount option on the lower left of the Receive Payments dialog box. When you select Save & Close, QuickBooks then prompts you for an account to assign for the write-off amount.
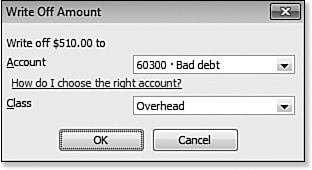
Figure 10.22. When you select to write off an amount due, QuickBooks requires you assign the amount to an account and optionally to a class.
Recording a Discount to Remove a Customer Balance
Another way to remove an open customer balance is to record a discount. This method records the change as of the date of the Receive Payments transaction. A discount can be recorded initially when the customer’s short payment is recorded, or on a later date by creating a new payment without placing any dollars in the Amount field and choosing the Discounts & Credits option. However, the discount amount cannot be in excess of the amount due.
If the amount due is an insignificant amount, you might not want to take the time to collect it. The easiest method of dealing with it would be to write off the remaining amount on the date the payment is recorded. If you do not write off the remaining amount, QuickBooks will warn you of the underpayment.
The difference between a write-off and discount is the placement on the Profit & Loss statement. A write-off is used when the debt has gone bad and cannot be collected and is often an expense type. In contrast, the discount is used when you decide to reduce the sale price and this account is typically an income type.
To record a discount, click the Discount & Credits button on the Receive Payments dialog box. Similar to the Write Off Amount dialog box, you will be asked to identify an account to post the amount to (see Figure 10.23).

Figure 10.23. Assign the account and other details when recording a customer discount.
Recording a Credit Memo to Remove a Balance Due
The most accurate method for removing a balance due is to record a credit memo, because it creates a good audit trail. You can date the credit in a period you want to reduce the appropriate income account and, if applicable, sales tax due.
![]() For more detailed instructions on working with customer credit memos, see “Recording and Applying a Customer Credit Memo,” p. 315
For more detailed instructions on working with customer credit memos, see “Recording and Applying a Customer Credit Memo,” p. 315
Recording a Journal Entry to Remove (or Increase) a Customer Balance
Another way to remove or increase a customer balance is to record a journal entry. This type of transaction is often created by the company’s accountant when adjusting Accounts Receivable.
If you are going to record a journal entry adjustment, you need to keep in mind the following:
• Only one customer is allowed per journal entry.
• If the general journal entry has other noncustomer-related adjustments, the first line of the journal entry should remain blank.
• The date of the general journal entry is the date the transaction will impact your financials for Accrual or Cash Basis.
• If you print cash basis reports, make sure the income account is not recorded on the first line of the journal entry.
• You can enter and apply one lump sum to multiple open customer invoices.
Did you know that if you use a customer on the first line of a journal entry, every other adjustment made—even noncustomer adjustments—will display on the Profit & Loss by Job report for that customer? This situation is due to the first line of any journal entry being a source line and causing a relationship with transactions below the first line.
To avoid this problem, always leave the first account line of a journal entry blank, as shown in Figure 10.24. Including a memo on the first line is acceptable.
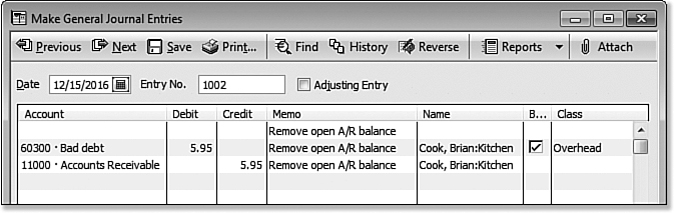
Figure 10.24. Journal entries that adjust accounts receivable balances should then be applied against a customer’s open invoice(s).
To record a journal entry adjustment to a customer balance, follow these steps:
1. From the menu bar, select Company, Make General Journal Entries.
2. In the Make General Journal Entries dialog box, record a debit to increase Accounts Receivable or credit to reduce Accounts Receivable (refer to Figure 10.24). Be sure to assign the customer name to each line (except the first line, see the previous Caution) so a Profit & Loss by Job report will show the adjustment.
3. Assign the General Journal Entry to the appropriate customer invoice. From the menu bar, select Customers, Customer Center.
4. Select the correct customer from the list on the left, and in the Show drop-down list, select Invoices. Double-click the appropriate invoice list item.
5. The Create Invoices dialog box opens. Select Apply Credits. QuickBooks then provides a list of available credits to choose from (see Figure 10.25).
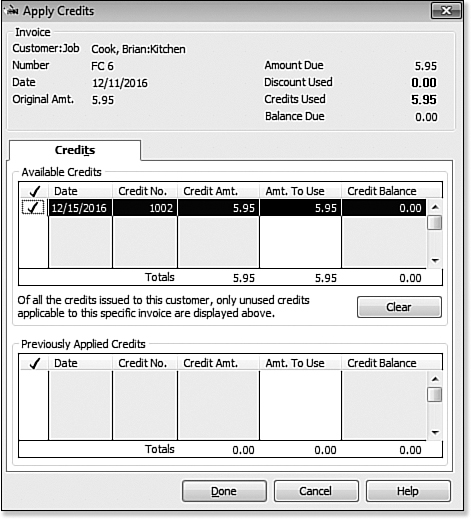
Figure 10.25. Applying an open credit to an open customer invoice balance.
6. On the Apply Credits dialog box that opens, select the appropriate credits by placing a checkmark next to the credit. Click Done to assign the credit(s) to the customer invoice.
7. Click Save & Close.
Correcting Customer Payments
Applying the customer’s payments exactly as the customer intended is important. If you apply the customer’s payment to an invoice of your own choosing, communicating any discrepancies with open invoice balances can be more confusing than necessary.
However, many times your customer does not provide you with the correct invoice number and you might apply his payment to an incorrect invoice. QuickBooks makes changing how you applied the payment to an invoice easy.
Fixing Unapplied Customer Payments and Credits
When reviewing your Open Invoices report, you might also notice there are unapplied payments included in the report (see Figure 10.26). This would happen when the payment was recorded and the QuickBooks user did not assign the payment to any open invoice.
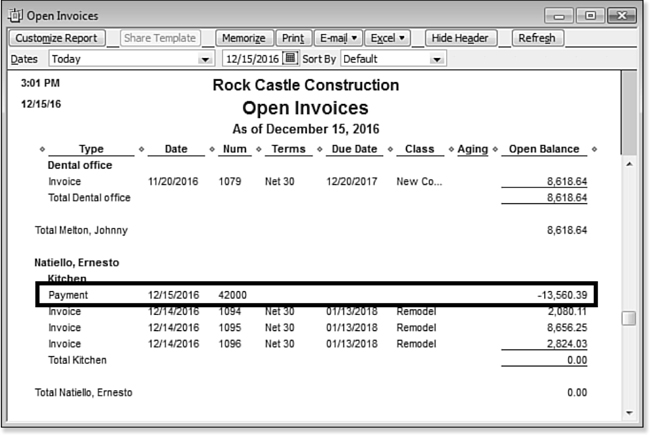
Figure 10.26. Unapplied Receive Payments transactions will show on the Open Invoices report as a credit for that customer.
To correct this, click the Payment transaction listed on the report, and add the checkmarks to the invoice(s) being paid. This transaction change will affect prior year financials in Cash Basis reporting, so be sure to notify your accounting professional of the change.
Fixing a Payment Applied to the Wrong Invoice Number
If, after you compare your customer’s records with yours, you find you have applied the payment to the wrong invoice, follow these steps to unapply the payment and then reapply to the correct invoice:
1. From the menu bar, select Customers, Customer Center.
2. On the list on the left, select the appropriate customer.
3. In the pane to the right of the customer list, select Payments and Credits from the Show drop-down list.
4. Optionally, select specific payment methods or select a specific date range from the appropriate drop-down list. QuickBooks will list all received payment transactions for this customer.
5. Double-click the payment that was misapplied.
6. The Receive Payments dialog box opens. Remove the checkmark from one invoice and place it next to the correct invoice. Be careful that the amount of the payment total does not change. Click Save & Close.
Fixing Payment Applied to the Wrong Customer or Job
From the Customer Center, find the appropriate customer, filter for Received Payments, and locate the payment in question as instructed in previous sections.
Determine whether the payment has already been included on a deposit by clicking History in the receive payments screen. If you attempt to change the customer name on the payment screen, QuickBooks warns you that the payment first needs to be deleted from the deposit.
If the payment has been included on a deposit, follow these steps to correct the customer or job assigned. You will temporarily remove the amount from a deposit and then add back in the corrected payment.
To reassign a payment received to another customer or job, follow these steps:
1. From the Receive Payments dialog box for the payment assigned to the incorrect customer or job, click History as shown in Figure 10.27.
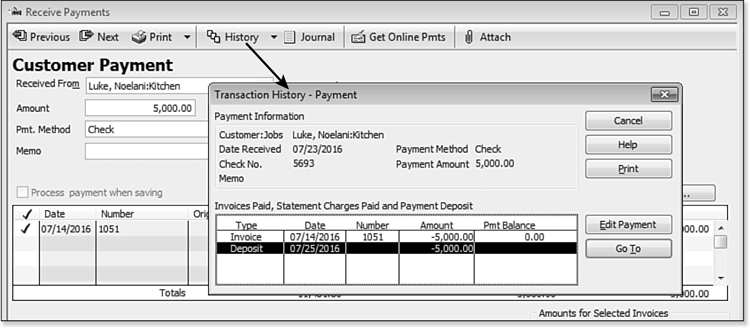
Figure 10.27. To reassign a recorded payment to a different customer or job you first have to remove the payment from the deposit.
2. From the Transaction History—Payment dialog box, select the deposit and click Go To. The deposit opens.
3. Record on paper the total deposit amount and date. You will need this information later in step 8.
4. If multiple payments are on the deposit, go to step 5. If the payment amount being corrected is the only deposit line item, then go to step 9.
5. Highlight the line item to be removed, as shown in Figure 10.28, and press Ctrl+Delete on your keyboard. Click OK to the Delete warning message. Then click Save & Close. This step removes the line item from the deposit. QuickBooks will also warn you if the item has previously been cleared.
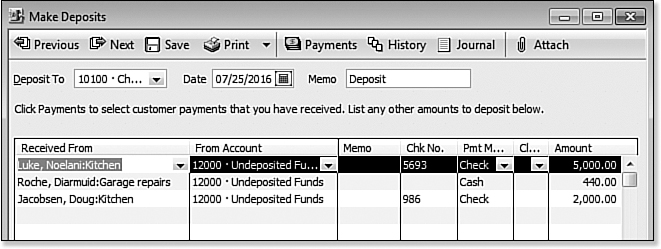
Figure 10.28. To remove an entire line, use Ctrl+Delete on your keyboard.
If you follow these steps carefully, you will restore your deposit to the correct amount and you will not have any reconciliation differences.
6. Locate the customer payment that was in error and change the Customer or Job assigned.
7. Return to the bank register and locate the deposit. Double-click the deposit. With the deposit open, select Payments at the top and place a checkmark next to the payment with the corrected Customer or Job (see Figure 10.29). Click OK to add the payment to the deposit.
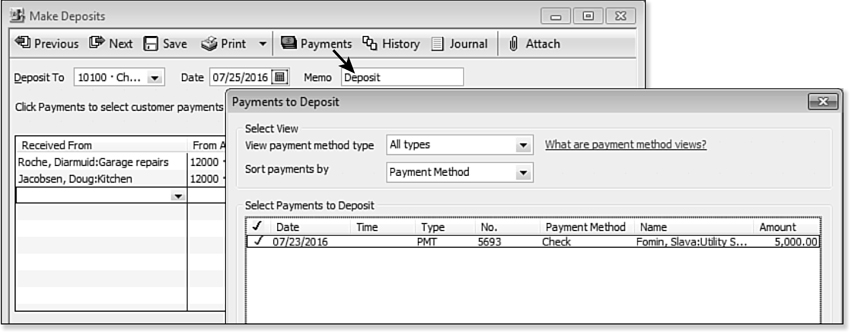
Figure 10.29. With the original deposit open, click the Payments icon to add back the corrected payment.
8. Verify that the total of the deposit agrees with the original amount you recorded on paper. When this transaction is saved with the same original amount, your bank reconciliation will not show a discrepancy. The process is now complete (see Figure 10.30).

Figure 10.30. The corrected payment has been added to the original deposit, preserving the cleared bank status of the original deposit.
9. If the payment you are correcting is the only deposit line item, select Customers, Receive Payments from the menu bar and record the information for the correct customer or job. Then, follow steps 7 and 8 to assign your newly created payment to the existing deposit. Next, delete the incorrect line item and save the deposit.
10. From the Customer Center, locate the incorrect payment and void or delete it.
When a Credit Memo Is Applied to the Wrong Customer Invoice
It often happens that you create a credit memo and apply it to a specific invoice. Then, when you communicate with the customer, you find out he or she applied it to a different invoice. When you are making those credit and collections calls, the discrepancy can end up costing you critical time in getting paid on invoices that you show as open. If in the end the total due from the customer remains the same, I find it easier to agree with the customer’s records when applying credit memos.
Without agreeing with the customer, your collections process would be delayed as both parties sort out what remains unpaid. This process will temporarily have you reassign the credit memo to another customer.
The steps that follow will help you reassign the credit memo to the correct invoice, or at least the same invoice your customer assigned it to:
1. From the Customer Center, locate the customer who had the credit memo applied to the wrong invoice. If you are not sure, click the Customer Center’s Transactions tab and select Credit Memos from the list of available transaction types. You can filter for Open or All Credit Memos as well as transaction dates to narrow your search.
2. To reassign the incorrectly assigned credit memo to another invoice, open the credit memo and temporarily change the Customer or Job name to any other customer or job name.
3. Make a note of the new customer assigned to the changed credit memo. Click Save at the top of the Create Credit Memos/Refunds dialog box.
4. QuickBooks warns that the transaction is connected to other transactions and changing it will remove them. Click Yes to close the message.
5. With the open credit displayed showing a Remaining Credit balance assigned to the temporary customer, click the Customer:Job drop-down list and select the correct Customer or Customer:Job.
6. QuickBooks might display a warning about switching between customers with sales tax or prices levels. Click OK to close the message.
7. Click Save at the top of the Create Credit Memos/Refunds dialog box. Click Yes to changing the transaction. The remaining credit amount displays in the dialog box.
8. Click the Use Credit To icon at the top right of the Create Credit Memos/Refunds dialog box and select Apply to invoice.
9. The Apply Credit dialog box opens. Place a checkmark next to the appropriate credit amounts. QuickBooks will, by default, select the invoice with an exact match. You can override this selection by unchecking the default and apply the credit as needed.
10. Select Done. Click Save & Close.
When Deposits Were Made Incorrectly
Four steps are basic to Accounts Receivable management:
1. Create a quote using an estimate or sales order (optional).
2. Prepare an invoice, sales receipt, or statement charge.
3. Receive the customer payment into an Undeposited Funds account.
4. Record the deposit into your bank account.
This section details how to correct your QuickBooks data when the receive payments step was skipped in recording deposits to the bank account.
How can you know when this situation happens? You need to do a little troubleshooting first to identify the problem:
• Do you have open invoices for customers who you know have paid you?
• Is your bank account balance reconciled and correct?
• Does Income on your Profit & Loss Report appear to be too high?
If you answered yes to these questions, you need to determine just how the deposits in the bank account register were recorded.
Viewing Deposits in the Bank Register
To determine how deposits were made to the bank account, view the deposits in your bank register. To open a bank register, select Banking, Use Register from the menu bar and select the appropriate bank account.
The two deposits dated 12/15/16 (see Figure 10.31) were each individually recorded to the account by assigning checking on the receive payment form. This would be acceptable if the individual checks were on different deposit tickets taken to your bank and if the date of the receive payment was also the same date as the deposit. Often these are not the normal conditions and having the payment recorded to the Undeposited Funds would be the best process.

Figure 10.31. The checkbook register indicates the record type for each deposit.
In the checkbook register view, the account shown represents the account from which the transaction originated. You might see Accounts Receivable, an income account or you will see “-Split-,” which indicates that there are several lines of detail for this single transaction. To view the “-Split-” detail, just double-click the transaction itself to open the originating QuickBooks transaction.
By contrast, look at the deposit dated 12/14/2016 for $2,000.00 in Figure 10.31. The account shown is Undeposited Funds, which is the account where the transaction originated.
To summarize, look for a “pattern” of how deposits were made to your QuickBooks data. The examples here show two types of deposits: those that were recorded to the checking account and others that first went through the Undeposited Funds account. You might have others in your data where the account shown is your income account. This type of transaction is discussed in the next section, “Viewing the Deposit Detail Report.”
You will also be looking to see which transactions have been cleared in the bank reconciliation and which deposits remain uncleared. Chapter 13, “Working with Bank and Credit Card Accounts,” discusses the bank reconciliation topic. In fact, it would be best if the reconciliation task were completed before you begin fixing your deposit details. Why? If you see an uncleared deposit, it would help you identify your potential errors in the Undeposited Funds account.
Viewing the Deposit Detail Report
Use this report to review how deposits were recorded to the bank account in QuickBooks and identify deposits that did follow the recommended process of being recorded first to the Undeposited Funds account.
To open the Deposit Detail report, follow these steps:
1. From the menu bar, select Reports, Banking, Deposit Detail.
2. Click the Customize Report button at the top of the report.
3. Click the Filters tab. In the Choose Filter box, the Account filter is already selected. From the drop-down list, select your bank account or use the default of all bank accounts. Click OK to prepare the report.
In Figure 10.32, the deposit for $2,000.00 was recorded using the recommended process of automatically assigning the payment to the Undeposited Funds account. The other payments did not follow this same process and details for correcting these are provided in the next sections.
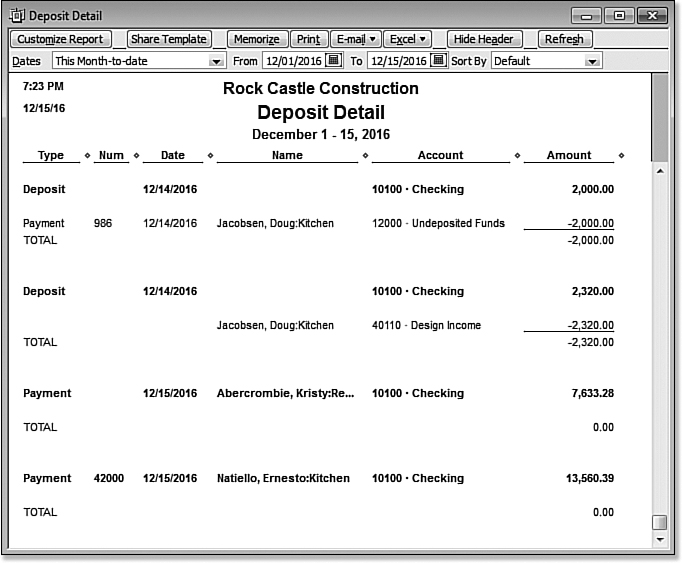
Figure 10.32. The Deposit Detail report also indicates the record type of each deposit.
Creating a Payment Transaction List Detail Report
Do you find the Deposit Detail report too lengthy and difficult to read? You can create a report that shows the detail in a list form and provides a total of the column detail using these steps:
1. From the menu bar, select Reports, Custom Reports, Transaction Detail. The report opens with the Display tab selected.
2. Select the Report Date Range you want to view, as well as the columns you want to see on the report.
3. From the Filters tab, in the Choose Filter box, select Account and choose a specific bank account.
4. Set an additional filter for Multiple Transaction Types, including the deposit, payment, and journal (although less likely a journal was used).
5. Click OK to close the Transaction Type filter and OK to display the report with the selected transactions.
Now you can view in a list format all payments that were recorded to the Checking account (see Figure 10.33).
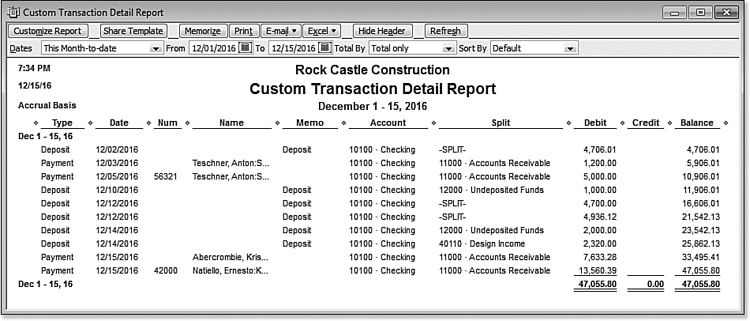
Figure 10.33. Use a filtered custom transaction detail report for a simple view of all deposits into the bank account.
Assigning the Make Deposits Transaction to the Open Customer Invoice
Did your research reveal Make Deposits transactions recorded directly to an income account instead of using the Receive Payments transaction? For the business owner, assigning the deposits to the customer invoice is a two-step process. If you have the time to correct individual transactions, this method retains your bank reconciliation and identifies the payment with the customer’s open invoice. Be prepared for a bit of tedious work. You need to have a good record of which deposit was paying for which customer invoice. Remember, these steps are to correct transactions that have been recorded incorrectly.
To manually correct recorded Make Deposits follow these steps:
1. From the menu bar, select Banking, Use Register.
2. The Use Register dialog box opens. Select the bank account to which the deposit was made.
3. Locate the deposit in the checkbook register and double-click it to open the Make Deposits transaction. Change the account assigned in the From Account column from Income to Accounts Receivable. The effect of this step is to “credit” Accounts Receivable (see Figure 10.34). Click Save & Close.
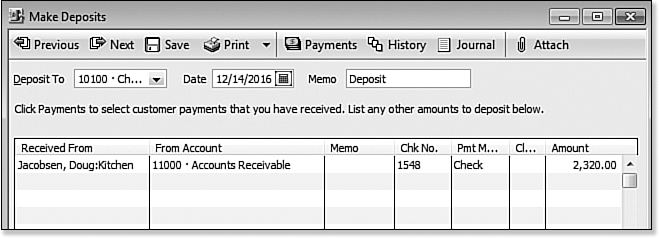
Figure 10.34. Changing the From Account on a deposit to Accounts Receivable will create a credit for the customer listed in the Received From column.
4. From the menu bar, select Reports, Customers & Receivables, Open Invoices, and double-click the invoice.
5. Click the Apply Credits button and select the credit that pertains to this invoice.
6. Click Done to close the Apply Credits dialog box. Click Save & Close.
I like using the Open Invoices report because I can see both the credit and open invoices grouped by customer or job.
You have now corrected the deposit and assigned the amount to the open customer invoice, all without changing your bank reconciliation status of the item. This process works well, but can be tedious if you have many transactions with this type of error.
Grouping Deposited Items to Agree with Bank Deposit
Unless you take each and every check or cash payment from your customers to the bank on a separate bank deposit ticket, your customer payments should be grouped together with the total matching your bank deposit slip.
If you group your customer payments together on the same deposit transaction and match the total deposited to your bank deposit ticket, your bank reconciliation will be much easier to complete each month.
You should not attempt this method if you have reconciled your bank account in QuickBooks. Also, if you are correcting years of unreconciled transactions, this method might just be too tedious.
The easiest place to see the problem is in your bank account register. From the menu bar, select Banking, Use Register, and select the appropriate bank account.
As shown in Figure 10.31, assume the deposit total per the bank statement was $21,193.67, but in the checkbook register, you recorded two individual deposits.
This situation was caused by choosing Checking as the Deposit To account when receiving the customer’s payment (see Figure 10.35). The preferred method would have been to select Undeposited Funds and group them together on one deposit transaction.
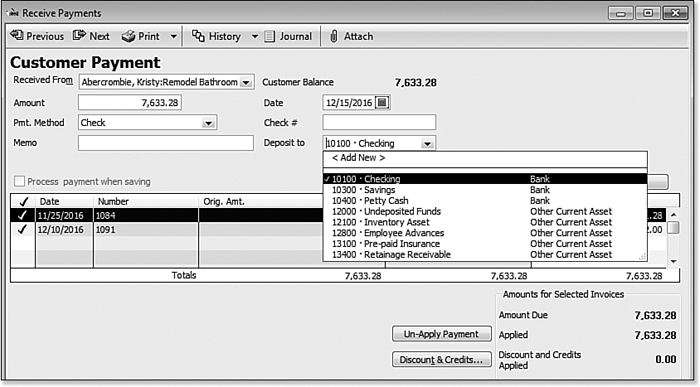
Figure 10.35. This customer payment won’t be grouped with other customer finds on the same bank deposit ticket.
To correct these errors (be aware, it is a time-intensive process) if you have many months or years of transactions follow these steps:
1. From the displayed Receive Payments transaction that was originally deposited directly to the bank account, select the Deposit To drop-down list and choose Undeposited Funds.
2. From the menu bar, select Banking, Make Deposits. QuickBooks displays a list of all the payments received, but not yet included in a deposit (included in the Undeposited Funds balance sheet account balance).
3. Click to place a checkmark next to the grouped payments, and verify the total deposit agrees with your bank deposit.
4. Click OK. The make deposit now agrees with the actual bank deposit recorded by the bank.
Eliminating the Print Queue for Customer Invoices Marked to Print
At the bottom left of each customer invoice is the option to select the invoice to be printed. QuickBooks remembers the setting from the last stored invoice, which can sometimes hinder your own company process.
If you find that you have many invoices selected to print and you don’t intend to print them, try this easy solution:
1. Place one or two sheets of paper in your printer. From the menu bar, select File, Print Forms, Invoices. The Select Invoices to Print dialog box displays the invoices that are marked to be printed (see Figure 10.36).
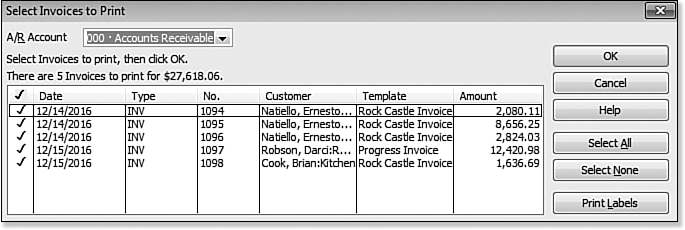
Figure 10.36. View the invoices selected to print.
2. The checkmark next to the invoice tells QuickBooks you want to print the invoice on paper. Click OK to send the forms to the printer.
3. After a couple of invoices print, a message displays showing a list of the forms that did not print. Because you don’t want to print them, click OK and each transaction will be marked in QuickBooks as if it were printed. You might also need to cancel the print job at your printer. Another option is to print the invoices to a PDF printer (file).
Correcting Sales Tax Errors
Sales tax errors can be a bit tricky to fix, so make sure you answer the following questions:
• Have you made a backup of your data?
• Have taxes or financials been prepared using the current data in its current state? If yes, then you need to be concerned about the dates and types of the corrections you make.
• If the QuickBooks sales tax due is incorrect, have you determined outside QuickBooks how much was or is due?
Print your sales tax reports before you begin to make corrections to your data file. Then, when your corrections are complete, print the same reports to be sure you achieved the desired end result. Of course, keep good paper documentation of why you did what you did in case you are subject to a sales tax audit.
When a Check or Bill Was Used to Pay the Sales Tax
In newer versions of QuickBooks, the error of using a check or bill to pay sales tax should happen less often. QuickBooks provides messages to users attempting to pay their sales tax vendors incorrectly.
When you pay a vendor and assign the Sales Tax Payable account (created by QuickBooks) on a check or bill, QuickBooks provides the warning shown in Figure 10.37.

Figure 10.37. You are warned when using a check to record a sales tax payment.
When you locate a sales tax payment made by check (or bill), first determine whether the check has been included in the bank reconciliation. If it has not, void the check and re-create the check per the instructions in the section titled “Paying Sales Tax.”
If the check has already been included in the bank reconciliation, use the following method to assign the check or bill to the line items in the Pay Sales Tax dialog box:
1. From the menu bar, select Vendors, Vendor Center. Select the vendor whom sales tax payments are made to.
2. From the Show drop-down list to the right, double-click the check or bill to open the Write Checks dialog box or Enter Bills dialog box.
3. Assign the Sales Tax Payable liability account in the Account column of the Expenses tab.
4. In the Customer:Job column, select the Sales Tax Vendor from the list of vendors (make sure it is a vendor and not an “other name” list item).
5. Click Save & Close to close the check (or bill).
6. From the menu bar, select Vendors, Sales Tax, Pay Sales Tax. The corrected transaction will display if it is dated on or prior to the Show Sales Tax Due Through date.
7. When you are ready to pay your next period’s sales tax, place a checkmark next to each sales tax line item, including the line item with the correction to associate the check or bill payment with the sales tax due (see Figure 10.38). If the net total amount is zero, select each of the items the next period you pay your sales tax.
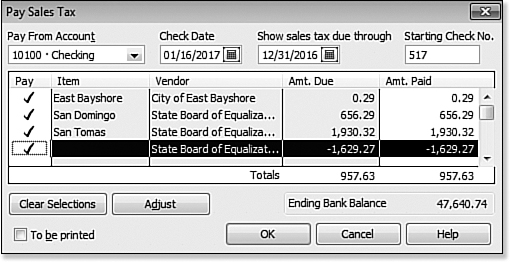
Figure 10.38. Include the corrected check (or bill) with your next period sales tax payment.
If the net Amt. Due is zero, place a checkmark next to each item and QuickBooks will associate your check or bill payment with the related sales tax due. When you return to the Pay Sales Tax dialog box the amount previously showing as unpaid will no longer be there. If the Amt. Due does not agree with your records, you might need to create a sales tax adjustment before making your next sales tax payment.
If you are an accounting professional working with QuickBooks Accountant 2012 software, review Appendix A “Client Data Review.” CDR includes a tool that will help you efficiently correct sales tax payments that were recording using the incorrect payment transaction type.
When the Sales Tax Liability Report Shows Past Sales Tax Due
If your collected sales tax amount and the amount showing payable on the Sales Tax Liability report do not match, as shown in Figure 10.39, it is because there are sales taxes collected prior to the current report’s Show Sales Tax Through date that remain unpaid. Perhaps the payments were incorrectly paid using a check or bill, in which case you should correct these errors following the instructions provided in the previous section.
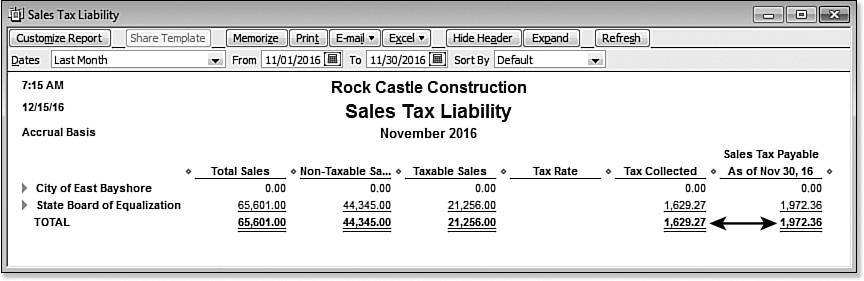
Figure 10.39. When the tax collected and the sales tax payable do not match, prior sales taxes have not been properly remitted.
To verify the totals and to make the needed corrections, follow these steps:
1. From the menu bar, select Vendors, Sales Tax, Sales Tax Liability.
2. From the Dates drop-down list, select This Month-to-Date.
3. If the Tax Collected and Sales Tax Payable totals agree with each other for today’s date, your sales tax payment made previously was given the wrong Show Sales Tax Through date. To fix this error, you can void and reissue the payment or know that the QuickBooks report prepared for a future date should reflect the payment accurately.
4. If the two totals do not match, verify that the tax collected for the current period is correct. You can verify this amount by reviewing the invoices you have issued for the month.
5. Verify that the tax collected for the prior period was correct.
6. Determine to what account(s) your sales tax payments were incorrectly recorded. The previously made payments would cause these accounts to be overstated.
In the correcting entry in example in Figure 10.40, your research found that a Sales Tax Expense type account was used when recording a sales tax payment in error.

Figure 10.40. Journal entries can correct sales tax payable errors.
7. From the menu bar, select Company, Make General Journal Entries to create a correcting entry.
8. Date the entry in the period you are correcting.
9. Give the entry a number, or let QuickBooks automatically number it if that is a preference you have set.
10. Leave the first line of the general journal blank.
11. On the second line in the Account column, select the Sales Tax Payable liability account.
12. Enter a debit amount if you are decreasing your sales tax payable amount. Enter a credit amount if you are increasing your sales tax payable amount.
13. On the third line, select the account that was discovered to be overstated or understated in your review (see step 6).
14. Enter the same amount from line 2 in the opposite column (debit or credit) from the previous line. Verify that your debits are equal to your credits.
15. Click Save & Close to close the general journal.
You will now be able to select this line item with other sales tax lines for future tax payments, similarly to what was shown in Figure 10.38.
You might opt for this method to fix many months’ errors with one journal entry and then have in place better controls for future sales tax management.
When Total Sales Does Not Equal Total Income
One of the important comparisons to make is the Sales Tax Liability total sales with the Profit & Loss Standard total income. Both of these reports were discussed in the section “Reconciling Total Sales to Total Income.” Before comparing the reports, be sure to create both using the same accounting basis: accrual or cash. The default basis for the sales tax report comes from the Sales Tax Preference discussed earlier in this chapter. With the report displayed, you can click the Customize Report button to change the basis being used for that report.
What can cause your total sales on your Sales Tax Liability report not to match your total income on your Profit & Loss report? Some of the reasons might be the following:
• Different accounting basis between reports—Your Sales Tax Liability report basis is in conflict with your Profit & Loss reporting basis. The basis of the report is by default printed on the top left of the report. Both reports must be either Accrual Basis or both must be Cash Basis before comparing.
• Non-sales type transactions recorded to income accounts—A method to locate these transactions is to double-click the total income amount on your Profit & Loss report. Doing so opens the Transaction Detail by Account report. At the top right of the report, select Sort By and choose Type. Within each income account group, QuickBooks will sort the transactions by transaction type. Review the report for non-sales transaction types such as General Journal or Bill (to name a couple). If you find an expense transaction in this report, often the cause is from using items on expense transactions, when the item record only has an assigned income account. More details on properly setting up items can be found in Chapter 4, “Understanding QuickBooks Lists.”
• Using items on sales forms that are assigned to a non-income account—As an example, a company that collects customer deposits might be using an item that is assigned to a current liability account. Total sales on the Sales Tax Liability report would include this amount, but the Profit & Loss would not.
• Income recorded as a result of vendor discounts—If you have set up an income account for your vendor discounts in your bills preferences setting, you will need to deduct this amount from your total revenue when you compare the two totals. If you are using an income account, create a separate income account for these discounts so that you can easily identify them.
The first two previous bullet points can be corrected by changing the reporting basis or correcting the original item record (select Lists, Item List from the menu bar) to include both an income and an expense account.
The last two bullet points are less likely to be changed in your process. You might instead need to prepare specific reports to proof your totals, making sure that when you file your sales tax return you are using the correct information.
In the following exercise, we will use the sample data to see how these reports can help you reconcile these differences.
Reconciling Financials and Sales Tax Reports
To practice reconciling (proofing) the Profit & Loss total income to the sales tax payable on the Sales Tax Liability report, open the sample data file as instructed in Chapter 1. Your totals might differ from those shown in the figures here, but the process remains the same:
1. From the Reports menu, open these two reports:
• Company & Financial, Profit & Loss Standard—from the Dates drop-down list, select Last Month.
• Vendors & Payables, Sales Tax Liability—by default, the Last Month is selected in the Dates field.
2. Notice in this exercise that the Total Sales from the Sales Tax Liability report and Total Income from the Profit & Loss report (on the right in Figure 10.41) do not match. The difference between the two amounts in this example is $2,174.50.

Figure 10.41. When comparing two reports, select Window, Tile Vertically.
3. Next, select Reports, Sales, Sales by Item Summary from the menu bar. From the Dates drop-down list, select Last Month.
4. Click Customize Report and remove the checkmarks for COGS, Ave. COGS, Gross Margin, and Gross Margin % because we do not need this information for our analysis. Click OK.
5. To make this report easier to read, you might consider selecting the Collapse button at the top right of the open report.
6. What exactly are you looking for? Because this report shows all items sold on customer sales forms during the same month being “reconciled” you are looking for items that do not map to ordinary income accounts. In Figure 10.42, our difference is easy to spot: The Retainage 1 item was used on sales transactions during the month. A review of the item record shows the account assigned is a Balance Sheet account (see Figure 10.43).
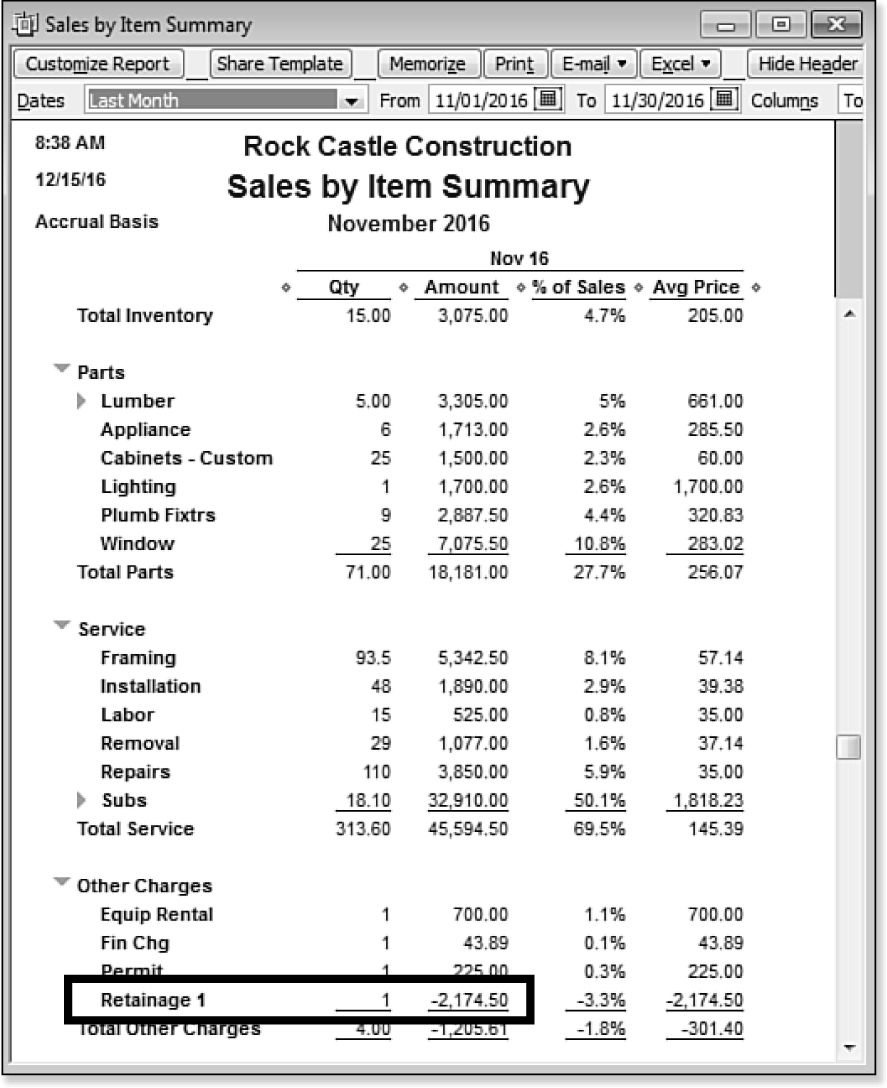
Figure 10.42. Report differences might arise when items with non-income accounts assigned are included on sales transactions.
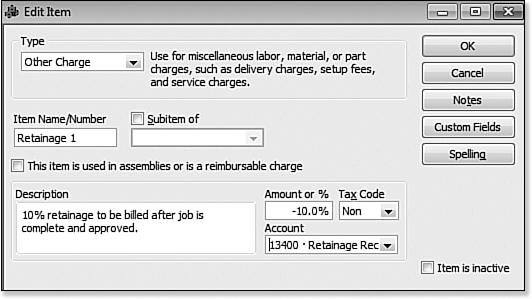
Figure 10.43. When reviewing differences, review the account assigned to items sold during the period.
Because you want to compare the totals, try this: From the menu bar, select Window, Tile Vertically. Both reports will be displayed side-by-side as shown in Figure 10.41 if these are the only currently open windows.
Now that you have identified the difference, what exactly does it mean? If your state requires you report total sales as income earned on your sales tax reports, in this example the proper amount to report would come from your Profit & Loss report. Your company’s results might differ and might be more difficult to identify.
Instead, you might want to try customizing the Sales Tax Liability report. Click the Customize Report button, select the Filters tab on the Modify Report dialog box, and select All Ordinary Income Accounts from the Accounts drop-down list. From here, review the amount displayed in the Total Sales Column. If this amount now agrees with your Profit & Loss report, you can be sure there are items on invoices that are mapped to non-ordinary income accounts.
Correcting Undeposited Funds Account Errors
Did you make it through the review of each of the referenced reports in the earlier sections of this chapter? You don’t want to jump into fixing transactions that affect accounts receivable without due diligence in researching what the correct balance should be. Without the review and troubleshooting time, you might hastily delete, void, or modify a transaction only to compound the problem.
This section details specific steps for correcting the errors you might find. It was important to first discover why the error was made and then fix it so you can avoid the same error on future transactions.
Reviewing the Balance in the Undeposited Funds Account
Before you can begin to agree or disagree with your Undeposited Funds account balance, it is best to review your QuickBooks data, concentrating on certain reports that will help you simplify the review process.
This section provides instructions on creating specific reports you can use for this task.
Before you troubleshoot your Undeposited Funds Detail, reconcile your bank account. Identify what transactions have cleared your bank and which transactions have been recorded in QuickBooks but did not clear your bank in a timely manner.
For more information, see “Reconciling the Bank or Credit Card Account,” p. 458.
Creating an Undeposited Funds Detail Report
The first report I create for a client is a custom report titled “Undeposited Funds Detail.” This is not a ready-made report in QuickBooks, but it is easy to create, as you will see.
This report is fundamental because you cannot troubleshoot a total balance for the undeposited funds you see on a balance sheet report without knowing the detail behind the numbers. If you print the register for the account, too much data will display, making it difficult to identify what is not deposited.
How do transactions get to this account? When you select the Undeposited Funds account as the deposit-to account (or you set the preference to have QuickBooks automatically do this), QuickBooks increases the balance in the Undeposited Funds account. Then, when you complete a make deposit, QuickBooks reduces the Undeposited Funds account balance, and behind the scenes, it marks the original increase and the new decrease as cleared. Table 10.1 shows the relationship of these transactions to your accounting.
Table 10.1. Transaction Effect on Undeposited Funds Account

Before we dig too deep, let’s see if you agree with the detail of the Undeposited Funds balance in your QuickBooks data. You also might want to memorize this report for the convenience of reviewing the detail often, avoiding any data entry errors this section might help you uncover.
To create this Undeposited Funds Detail report, follow these easy steps:
For the date range field, type an “a” without the quote marks to make the date range default to All.
1. From the menu bar, select Reports, Custom Reports, Transaction Detail. The Modify Report dialog box opens.
2. Display the date range as All.
3. For Total by, select Payment Method from the bottom of the list.
4. For Columns, select those you want to view on the report.
5. Click the Filters tab. In the Choose Filter box, select Account, and choose the account named Undeposited Funds from the drop-down list.
6. Also from the Filters tab, select Cleared and click the No button.
7. Click the Header/Footer tab. Change the report title to Undeposited Funds Detail. Click OK.
The modified custom report you named Undeposited Funds Detail will always show the present state of the transaction, which means when a payment is received and is included on a Make Deposits transaction the report for a prior date will no longer show that item as undeposited. Behind the scenes, QuickBooks is marking the transaction as “cleared” as of the transaction date; therefore, you cannot get a historical snapshot with this report.
This report provides the details of the amounts that are included in the Undeposited Funds account balance. You might want to include preparing this report at the end of each month for your records. Following are other reports you might also find useful when reviewing the balance in your Undeposited Funds account.
Creating a General Ledger Report of the Undeposited Funds Account
You can review a General Ledger report of the Undeposited Funds account balance that will agree with the ending balance on your Balance Sheet report, but without quite a bit of manual work, you cannot identify each individual transaction that makes up the Undeposited Funds account for a specific prior period. Why? Because each time you deposit a receive payment, QuickBooks marks the original dated line item as cleared. This is why we first create a custom report to see if the current (today’s date) detail is correct.
If you review your balances monthly, you need to print out the Undeposited Funds Detail report you created earlier in this chapter, on the last day of your accounting month. Save this report in your paper file for future reference because you cannot go back to a historical date and get the same information.
If you take credit cards as payments from your customers, I recommend you not complete the “Make Deposits” task until you view a bank statement showing the funds deposited into your bank account. This does not mean waiting a month for the statement to arrive, because most financial institutions now offer online account access to your account statements.
For those clients, particularly retail businesses, where there is often a large volume of customer receipts in any day, I recommend reviewing the modified report as part of the month, quarter, or year-end process. Notice whether any old dated transactions are on the list. If you find none, you can assume the Balance Sheet balance in Undeposited Funds as of the prior period date is probably correct.
To generate a General Ledger report, follow these steps:
1. From the menu bar, select Reports, Accountant & Taxes, General Ledger.
2. Select Customize Report from the report screen.
3. In the Modify dialog box that opens, enter an appropriate Report Date Range.
4. From the Columns box, select the columns you want to see. (You might want to include Clr for seeing the cleared status of transactions.)
5. Click the Advanced button and select to Include In Use. This will streamline the data that results on the report.
6. Click the Filters tab, choose to filter for Account, and select the Undeposited Funds account from the drop-down list.
7. Click OK.
You can use this General Ledger report to see details for the Undeposited Funds account and to verify if the running balance in this report agrees with your Balance Sheet report. However, you still cannot use this report to identify which Receive Payments transaction was not deposited as of the report date because QuickBooks does not capture the information with an “as of” date.
Removing Old Dated Payments in the Undeposited Funds Account
Did your review of the data uncover old dated payment transactions still in the Undeposited Funds account? If yes, use the following method to remove these payments without editing or modifying each transaction.
This method of correcting makes the following assumptions:
• Your bank account is reconciled before making these changes.
• You have reviewed and corrected your Accounts Receivable Aging reports.
• You have identified which payment amounts are still showing in the Undeposited Funds account, and these are the same amounts that have already been deposited to your bank register by some other method.
• You have identified the specific chart of accounts (typically income accounts) to which the deposits were originally incorrectly recorded.
This method enables you to remove the unwanted balance in your Undeposited Funds account with just a few keystrokes. To remove old payments in the Undeposited Funds account, follow these steps:
1. If the funds that remain in your Undeposited Funds account are from more than one year ago, you first should identify the total amount that was incorrectly deposited for each year. See the sidebar titled “Creating a Payment Transaction List Detail Report,” in this chapter. Filter the report for the specific date range.
2. Now start the process of “removing” these identified Undeposited Funds items by selecting Banking, Make Deposits from the menu bar.
3. In the Payments to Deposit dialog box, select all the payments for deposit with dates in the date range you are correcting by placing a checkmark next to the payment items (see Figure 10.44). Click OK.
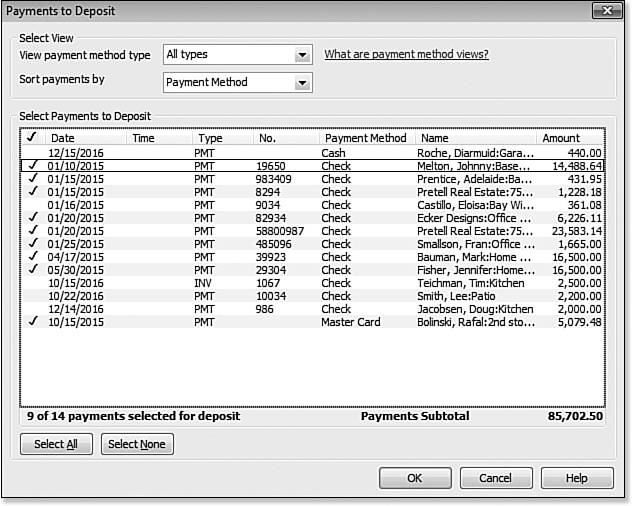
Figure 10.44. The older payments in Undeposited Funds were posted to the cash account by some other method.
The Make Deposits dialog box opens with each of the previously selected payments included on a new make deposit.
4. On the next available line, enter the account to which the incorrect deposits were originally recorded. In this example, you discovered that the Construction Income account was overstated by the incorrectly recorded deposits. The effect of this new transaction is to decrease (debit) the Construction Income account and decrease (credit) the Undeposited Funds account without any effect on the checking account, as shown in Figure 10.45.

Figure 10.45. Enter a line with a negative amount recorded to the account that was previously overstated.
5. Make sure to reconcile this net -0- deposit in your next bank reconciliation.
The date you give the Make Deposits transaction is the date the impact will be recorded in your financials. You have several important considerations to take into account when selecting the appropriate date:
• Are the corrections for a prior year?
• Has the tax return been prepared using current financial information from QuickBooks for that prior period?
• Has another adjustment to the books been done to correct the issue?
If you answered yes to any of these, you should contact your accountant and ask her advice on the date this transaction should have.
You should now be able to review the Undeposited Funds Detail report and agree that the items listed on this report as of today’s date are those you have not yet physically taken to your bank to be deposited or the credit card vendors have not yet credited to your bank.
Unique Customer Transactions
This chapter has provided ways you can review and troubleshoot your data, and provided instructions on how to fix many of the common Accounts Receivable errors.
This section of the chapter shares some ways to handle unique transactions—the type of transaction you might come across but just are not sure how to enter.
Recording Your Accountant’s Year-End Adjusting Journal Entry to Accounts Receivable
Often, adjustments at tax time might include adjustments to your Accounts Receivable account. This transaction is typically created by your accountant using a general journal transaction. What can make the entry more difficult for you is when no customer(s) are identified with the adjustment.
You can request a breakdown by customer of the adjustments made to the Accounts Receivable account. If that is not available, and you need to enter the adjustment, you might want to consider using the following method:
1. From the Customer Center, create a fictitious customer name—something such as Accountant YE Adj.
2. Use this customer to apply the line item to the make journal entry. Remember that this is a temporary fix and the balance for the fictitious customer will display on your Open Invoices report.
Later, when you are able to collect from the actual customer(s) who make up the adjustment, you can enter a reversing entry to the fictitious customer and new entries to the correct customers.
When a Customer Is Also a Vendor
Often, I am asked how to handle a transaction when you are selling your company’s product or service, but instead of getting paid, you are trading it for the products or services of your customer.
To keep track of the revenue and costs in this bartering arrangement, follow these steps:
1. From the menu bar, select Lists, Chart of Accounts to open the Chart of Accounts dialog box.
You can add new customers by selecting the Customer Center from the QuickBooks Home page.
However, QuickBooks does not let you use the same name on the customer list as the vendor list. A little trick can help with this; when naming the new “fictitious” customer, enter a “- C” after the name. This naming convention will not display on invoices, but when selecting this name from lists, it will bring to your attention that you are using the “customer” list item.
2. Click the Account button. Select New and create an account named Barter Account as a bank account type following the instructions on the screen. Click Save & Close.
3. From the menu bar, select Customers, Create Invoices. Select the new customer you created (your vendor is now added to the customer list). Enter the information as if you were selling your products or services to this customer. Click Save & Close.
4. From the menu bar, select Customers, Receive Payments. Select the new customer you created and record the amount of the payment, placing a checkmark next to the appropriate “fictitious” invoice.
If your default preference is set to have all customer payments go to Undeposited Funds account, you will need to change that preference temporarily.
From the menu bar, select Edit, Preferences and choose the Payments preference. Remove the checkmark in the Use Undeposited Funds as a Default Deposit to Account.
5. Select the new Barter Account as the Deposit To account and click Save & Close to finish the revenue part of the transaction.
6. From the menu bar, select Banking, Make Deposits to open the Payments to Deposit dialog box. Place a checkmark next to the fictitious transaction, and click OK to advance to the Make Deposits dialog box.
7. In the Make Deposits dialog box, select the Barter Account as the Deposit To account and select the date you want this transaction recorded. Click Save & Close when done.
You have recorded the “potential” revenue side as well as the “fictitious” payment of the invoice of the barter agreement. Now you need to record the expense side of the transaction.
I recommend that the transactions going in and out of the barter account are equal in value; if not, you will need to make an adjustment in the register. (Select Banking, User Register from the menu bar.) Select the Barter Account and increase or decrease the amount to an income or expense account as determined by the amount left in the account.
To record the expense with a check, follow these steps:
1. Create a vendor list item for your customer who is also a vendor. I append the name with a – V so when I select the name, I will know I am using the Vendor list item and not the Customer list item.
2. To create an expense transaction, select Banking, Write Checks from the menu bar.
3. Select the Barter Account as the checking account.
4. For the check or reference number, use any number or alphanumeric characters you want.
5. For the payee, use the newly created vendor list item (a vendor record for your customer).
6. Record to the normal expense account an amount as if you were purchasing the goods or services with a check.
7. Click Save & Close. If paying by check, the process is complete. If you recorded a vendor bill, continue with the following steps.
8. To pay the bill, select Vendors, Pay Bills from the menu bar.
9. Place a checkmark next to the appropriate bill that has been paid by providing the vendor with your product or services.
10. In the Payment Method box, select the choice to assign check number because we don’t expect to print a check to give to the vendor.
11. In the Payment Account box, select the newly created Barter Account as the payment account.
12. Click Pay Selected Bills to open the Assign Check Numbers dialog box. Assign a fictitious check number of your choosing. You can even put the term “Barter” in for the check number. Click OK and QuickBooks displays a payment summary. Select Done.
When this process is finished, your Barter Account should have a zero balance as indicated earlier in this section. You might even want to perform a bank reconciliation of the Barter Account to clear both equal sides of the transaction.
Recording a Customer’s Bounced Check
If you have ever had a customer’s payment check bounce, you know how important correct accounting is. When a check is bounced, often your banking institution automatically debits your bank balance and might also charge an extra service fee.
So just how do you record these transactions and also increase the balance your customer now owes you? Follow these steps:
1. To create a bounced check item, select Lists, Item List from the menu bar. Click the Item button and select New. If necessary, select OK to dismiss the New Feature message.
2. The New Item dialog box displays. Select an Other Charge item type. In both the Number/Name field and Description field, type Bounced Check.
3. Leave the Amount field blank; assign Non as the Tax Code. For the Account, select the bank account that was deducted for the returned check (see Figure 10.46).
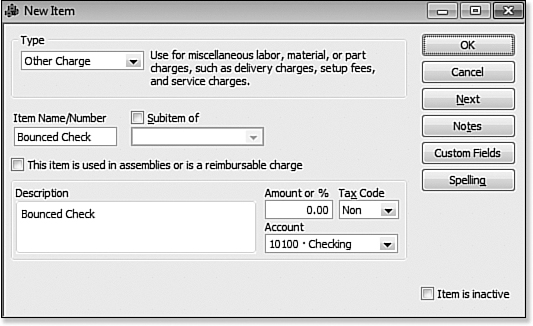
Figure 10.46. This item will be used to record the deduction to your bank account for the bounced check amount.
4. Using the preceding steps, create an additional Other Charge item type to be used to invoice the customer for the bank fee you incurred. Name the item Bad Chk Chg.
5. Leave the Amount blank, set the Tax Code as Non, and for the Account, select an income account, such as Returned Check Charges.
6. From the menu bar, select Customers, Create Invoices, and in the dialog box that displays, select the customer with the bounced check. On the first line of the invoice, use the Bounced Check item and assign the amount of the bounced check. On the second line of the invoice, use the Bad Chk Chg item and assign the amount of the fee your bank charged you (see Figure 10.47). Click Save & Close.

Figure 10.47. Create an invoice to collect the NSF funds and recover the bank fee from the customer.
The impact is to increase Accounts Receivable (debit), increase Income for the bank fee (credit), and decrease your bank account (credit). The reduction in the bank account is to record the fact that the bank deducted the amount from your account.
When you reconcile your bank account, be sure to enter the service fee charged.
Although this method provides a process to charge your customer again for the returned check as well as the bank fee, it does have one side effect you might want to consider. When you create a Balance Sheet on a cash basis, you might see this amount in Accounts Receivable.
Tracking Customer Deposits in QuickBooks
Do you require your customers to pay a deposit in advance of the product shipping or the service being provided? You might want to track these in one of two ways:
• As a credit to Accounts Receivable for the specific customer
• As a credit to an Other Current Liability account
You might want to ask your company accountant which method is preferred. Using the first method is often easier and takes fewer steps. The second method of using a current liability account reports the pre-payment in the proper category on the business’ balance sheet.
If you are choosing the first method listed you would create a receive payment when your customer pays and not assign the payment to an invoice. In effect, this debits (increases) your Undeposited Funds account or bank account and credits (reduces) accounts receivable.
If you choose to use the second method, follow these steps:
1. If needed, start the process to create a Customer Deposits account by selecting Lists, Chart of Accounts from the menu bar.
2. Click the Account button at the bottom of the screen and select New.
3. In the Add New Account dialog box that opens, from the Other Account Types drop-down list, select the Other Current Liability type account and follow the remaining steps on the screen.
4. Next, you will create an item to be used on invoices for this pre-payment. From the menu bar, select Lists, Item Lists.
5. Click the Item button on the bottom of the list and select New.
6. From the New Item type drop-down list, select Other Charge.
7. In the Item Name/Number field, type a name such as Customer Deposits. Enter an optional description and select the Customer Deposits other current liability account from the Account drop-down list.
8. Prepare your invoice to the customer for the amount of the pre-payment you are requiring. When the customer pays, record the Receive Payments transaction.
9. When the project is completed and you are ready to recognize the revenue associated with the sale, create your invoice using the item(s) that were sold to the customer. On the next available line of your invoice use the Customer Deposit item, only this time enter a negative amount.
QuickBooks will then record the revenue in the period the sale was complete, and the final invoice will be reduced by the amount of the deposit previously paid.
Using the method described here does have a tradeoff. If you are a cash basis taxpayer, you would not expect to see a balance in your Accounts Receivable account when the Balance Sheet report is prepared on a cash basis. However, when you use this method, you will see an Accounts Receivable balance on a cash basis Balance Sheet report. One of the causes of this is that QuickBooks reports an Accounts Receivable balance on a cash basis Balance Sheet report when items are used that map to other Balance Sheet accounts.
Unique Sales Tax Transactions
Over the years, I have come across some unique sales tax transaction tracking needs. This section addresses several that you might find useful if your state has similar guidelines.
As always, because you are acting as the “agent” for the state in collecting sales tax from your customers, you should take the time to research the sales tax regulations for each state where you do business.
The state you sell in might require you to collect and track multiple sales tax rates depending on where the customer is located. If you have a customer with different tax rate locations, you need to create a customer for each tax location if you want QuickBooks to automatically collect the correct tax amount because QuickBooks tracks the sales tax rate to the customer and not to the job.
When Your State Imposes a Maximum Sales Tax
I have encountered having to track a state-imposed maximum sales tax a few times. If your state imposes a maximum sales tax for a certain type of sale, I recommend the following method:
1. From the menu bar, select Lists, Item List. (If the New Feature dialog box displays, click OK.) From the Item drop-down list, select New to create a new list item. The New Item dialog box displays.
2. If you do not have a subtotal item on your list, select Subtotal from the Type drop-down list.
3. To create the invoice to your customer, select Customers, Create Invoices from the menu bar.
4. Enter the taxable items on the invoice, making sure the Tax column has “Tax” listed.
5. Enter a subtotal item—you might even want to type in the description that this amount is subject to sales tax.
6. Enter the next sale item that is normally taxed. If you have met a threshold defined by your state, select Non in the Tax column. See Figure 10.48.

Figure 10.48. Adding a subtotal and adjusting the Tax column helps when your state has a threshold for sales tax charges on a single invoice.
QuickBooks will now record the total sales (in this example) of $6,000.00, but it shows only $5,000 in the Taxable Sales column of the Sales Tax Liability report, as shown in Figure 10.49.

Figure 10.49. QuickBooks records the taxable revenue amount from the non-taxable sale amount.
Multiple Sales Tax Rates on One Invoice
In particular, if your business sells retail items, liquor, and food all on one sales form, chances are each item type is subject to a unique sales tax rate. Follow these steps for creating the subtotal item and 0% sales tax item. Assign this 0% named “See Above” sales tax item to your customer.
Next, create your customer’s invoice as detailed in the previous section, following these additional steps:
1. Create these items:
• Subtotal Item—Using the steps outlined in the previous section.
• Sales Tax Item—Use the name See Above and the same, See Above, for the description. Tax Rate will be 0.0%. Tax Agency should be your most common Tax Agency vendor.
• Sales Tax Items—Representing the tax jurisdictions you are required to collect and report on. Name them clearly so your customer can identify them.
2. Enter the line item(s) subject to one tax rate.
3. Enter a subtotal line.
4. Enter the appropriate sales tax item.
5. Enter additional invoice lines, each with a subtotal and appropriate sales tax items.
QuickBooks will collect and report on the correct amount of sales tax charged for the different item types being sold.
To further clarify this point, the example shown in Figure 10.50 does not track sales by customer, but just a retail summary for the day’s sales. The example also shows how to charge multiple sales tax rates on a single invoice by placing a subtotal after each group of sales and then placing the correct sales tax rate after the subtotal.

Figure 10.50. Creating an invoice with multiple sales tax rates charged.
If you would like more information on this, you can press the F1 key on your keyboard to open QuickBooks Help. Click the Search tab and on the top search bar, type “sales summaries,” and follow the link for more information on this topic.
Issuing Credit Memos When Sales Tax Should Not Have Been Charged
Issuing customer credit memos is necessary for correct reporting when you file your sales tax on accrual basis (sales tax payment liability accrued as of the date of the customer invoice) and not required when you report sales tax liability on cash basis (sales tax payment liability not accrued until the date of customer’s payment). However, I still recommend having controls in place, which limit the ability to modify an invoice from a prior month.
After you have filed your sales tax return with your state, you should not adjust any invoices or sales tax payments recorded on or before your file-through date. If you do, QuickBooks recalculates the taxable sales, non-taxable sales, and amount owed, and your return as filed with the state will no longer agree with your QuickBooks data.
Instead of adjusting a customer’s invoice, consider using the QuickBooks customer credit memos/refund. For example, suppose you charged sales tax to a non-taxable customer by mistake. Let’s also assume you have filed your accrual basis sales tax return for the month of that invoice, overstating taxable sales.
Creating a credit memo reduces taxable sales, increases non-taxable sales, and credits the customer’s invoice for the sales tax amount, all within the current sales tax month.
Follow the same steps outlined in the section in Chapter 9 titled, “Recording and Applying a Customer Credit Memo” earlier in this chapter for creating a credit memo from the original customer invoice. You will want to be sure you date the credit memo in the current month you have not yet filed your state sales tax reports for. The credit memo will then reduce your sales tax you owe for the current period.
In Chapter 16, “Sharing QuickBooks Data with Your Accountant,” I discuss setting a closing date for your data. I recommend this same control be placed in your file after preparing your monthly or quarterly sales tax returns for your state.