
15. Reviewing Your Data
Importance of Reviewing Your Data
This book would not be complete without a few pages of instructions about what reports you should review for your business. These reports are not the only reports you will find useful in QuickBooks, but they are important for you to review in your file periodically.
These reports are only a subset of the many reports in QuickBooks, but are typically used by accounting professionals to verify the accuracy of your data.
Reviewing the Balance Sheet
Did you know that the report a business owner is least likely to look at is also one of the most important? To the business owner, the Balance Sheet report shows the balance of assets (what the business owns), liabilities (what the business owes others), and equity (what was put into the business or taken out of the business). Because these numbers are important, a business owner should first review this report.
This section details specific reports to use when reviewing your data. Each report is prepared in accrual basis unless otherwise mentioned. Begin by creating a Balance Sheet report of your data; this is the primary report we use for review.
From the menu bar, select Reports, Company & Financial, Balance Sheet Standard.
Leave the report with today’s date. You are going to first review your data with today’s date before using any other date. In the following instructions, if a different date is needed, it will be noted in the step-by-step details. Verify that the top left of the report shows Accrual Basis. If not, click the Customize Report button on the report, and select Accrual Basis from the Report Basis options.
Figure 15.1 shows a sample data Balance Sheet Standard report.
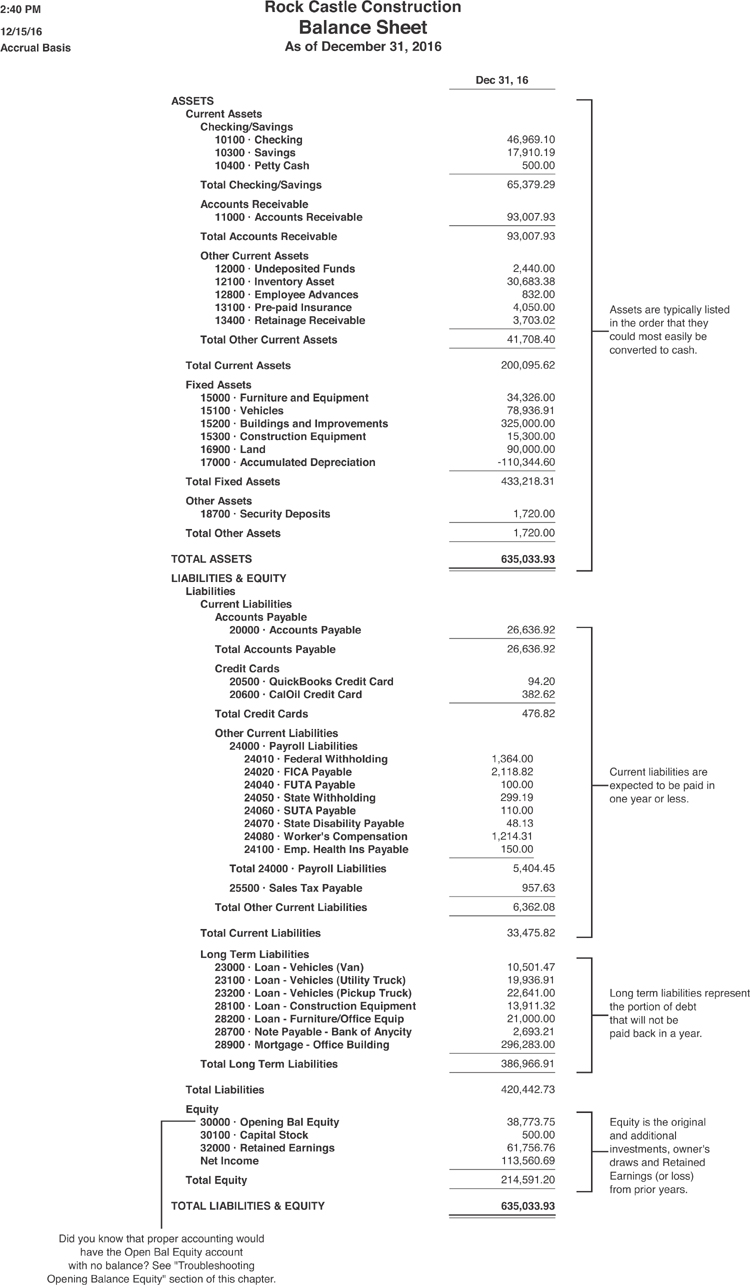
Figure 15.1. Review your Balance Sheet first, as in this example.
Account Types
Reviewing the account types assigned requires some basic knowledge of accounting. If as a business owner you are unsure, this review provides the perfect opportunity for your accountant to take a quick look at how your accounts are set up.
Review the names given to accounts. Do you see account names in the wrong place on the Balance Sheet? For example, does an Auto Loan account show up in the current asset section of the Balance Sheet?
Follow these steps if you need to edit an account type. From the menu bar, select Lists, Chart of Accounts.
Select the account in question with one click. From the Account drop-down menu, select Edit. On the Edit Account dialog box (see Figure 15.2), you can select the drop-down menu for Account Type to change the currently assigned account type.

Figure 15.2. The Edit or New Account dialog box is where you assign the account type for proper placement of financial reports.
Prior Year Balances
You should provide a copy of your Balance Sheet dated as of the last day of your prior tax year (or fiscal year) to your accountant and request that she verify that the balances agree with her accounting records used to prepare your tax return. This is one of the most important steps to take in your review because Balance Sheet numbers are cumulative over the years you are in business.
![]() For more information, see “Accrual Versus Cash Basis Reporting,” p. 59.
For more information, see “Accrual Versus Cash Basis Reporting,” p. 59.
You can also create a two-year balance sheet to provide to your accounting professional:
From the menu bar, select Reports, Company & Financial, Balance Sheet Prev Year Comparison (see report displayed in Figure 15.3). If necessary, click the Customize Report button to change the Report Basis.

Figure 15.3. The Balance Sheet Prev Year Comparison report is a useful report to give your accounting professional at tax time.
You might want to provide the Balance Sheet Prev Year Comparison report to your accountant using both Accrual and Cash Basis reporting. To change the basis of the report, click the Customize Report button and select the desired Report Basis on the Display tab.
Bank Account Balance(s)
Compare your reconciled bank account balances on the Balance Sheet report to the statement your bank sends you. Modify the date of the Balance Sheet to be the same as the ending statement date on your bank statement. Your QuickBooks Balance Sheet balance for your bank account should be equal to the bank’s ending statement balance plus or minus any uncleared deposits or checks/withdrawals dated on or before the statement ending date.
At tax time, provide your last month’s bank statement and QuickBooks bank reconciliation report to your accounting professional.
Accounts Receivable
The Accounts Receivable balance on your Balance Sheet report should agree with the A/R Aging Summary Report total, as shown in Figure 15.4.
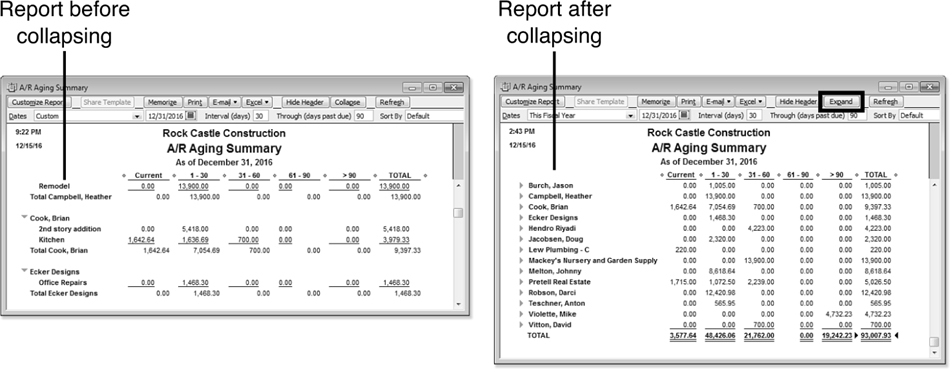
Figure 15.4. Use Expand or Collapse at the top of the report to change the level of detail displayed.
To create the A/R Aging Summary report, choose Reports, Customers & Receivables, A/R Aging Summary or A/R Aging Detail from the menu bar. Click Collapse on the top of the report to minimize (remove from view) the line detail, making the report easier to view at a glance. The total should match the Accounts Receivable balance on the Balance Sheet report, as shown in Figure 15.1.

Figure 15.5. The amount of funds shown on this report should agree with the amount of funds you have not yet taken to the bank.
Undeposited Funds
The Undeposited Funds amount should agree with funds not yet deposited into your bank account, as shown in the custom report displayed in Figure 15.5 (use today’s date on your Balance Sheet report).
Create the following custom report to review the Undeposited Funds detail sorted by payment method:
1. From the menu bar, select Reports, Custom Reports, Transaction Detail. The Modify Report dialog box opens.
2. In the Report Date Range box, select All (type an “a” without the quotation marks and the date range defaults to All).
3. In the Columns box, select those data fields you want to view on the report and select Payment Method in the Total By drop-down menu.
4. Click the Filters tab; Account is already highlighted in the Choose Filter box. Choose Undeposited Funds from the Account drop-down menu to the right.
5. Also in the Choose Filter box, scroll down to select Cleared; on the right, choose Cleared No.
6. Optionally, click the Header/Footer tab and change the report title to Undeposited Funds. Click OK to view the report.
Inventory
The Inventory balance on the Balance Sheet report (refer to Figure 15.1) should agree with the Inventory Valuation Summary Asset Value report total, as shown in Figure 15.6. The ending dates of both reports need to be the same.

Figure 15.6. The total of the Asset Value column should agree with the Inventory balance on the Balance Sheet report.
To create the Inventory Valuation Summary report, select Reports, Inventory, Inventory Valuation Summary from the menu bar. More details about working with inventory reporting can be found in Chapter 6, “Managing Inventory.”
Other Current Assets
The Other Current Asset accounts can differ widely by company. If you have employee advances, make sure your records agree with employees’ records. For any other accounts in the Other Current Assets category, look to documentation outside QuickBooks to verify the reported balances.
Need an easy report to sort the detail in these Other Current Asset accounts by a list name? In this example, I created a detail report of the Employee Advances account sorted and subtotaled by payee, as shown in Figure 15.7. You can create this same report for any of your accounts, sorting in a way that improves the detail for your review.
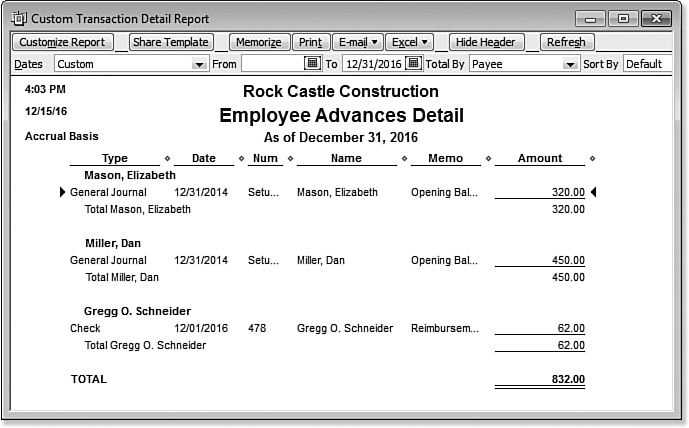
Figure 15.7. You can create a custom report to review balances in an Employee Advances account or any other asset account.
To create a detail report of your Other Current Asset accounts (in addition to other types of accounts), follow these steps:
1. From the menu bar, select Reports, Custom Reports, Transaction Detail. The Modify Report dialog box displays.
2. On the Date Range drop-down menu, select All.
3. In the Columns box, select the specific data you would like to see in the report.
4. Also in the Columns box, select Payee from the Total By drop-down menu.
6. The Choose Filter box already has selected the Account filter. On the right, from the Account drop-down menu, select the Employee Advances account (or select the specific account for which you want to see detail).
7. Optionally, click the Header/Footer tab and provide a unique report title. Click OK to create the modified report.
Reconciling accounts like these can be useful. An example might be when an employee pays back the loan. Complete a reconciliation for this account, marking each transaction for this employee as “cleared.”
You can then filter the report for “uncleared” only, limiting the amount of information that is displayed.
Verify the balances reported here with either the employees or outside source documents.
Fixed Assets
Fixed assets are those purchases that have a long-term life and for tax purposes cannot be expensed all at once but instead must be depreciated over the expected life of the asset.
Accountants can advise businesses on how to classify assets. If the account balances have changed from year to year, you might want to review what transactions were posted to make sure they are fixed asset purchases and not expenses that should be reported on the Profit & Loss report.
If you have properly recorded a fixed asset purchase to this account category, provide your accountant with the purchase receipt and any supporting purchase documents for their depreciation schedule records.
If you see a change in the totals from one year to the next, you can review the individual transactions in the account register by clicking Banking, Use Register, and selecting the account you want to review. Figure 15.8 shows the register for Fixed Assets—Furniture Equipment. If a transaction was incorrectly posted here, you can edit the transaction by double-clicking the line detail and correcting the assigned account category.
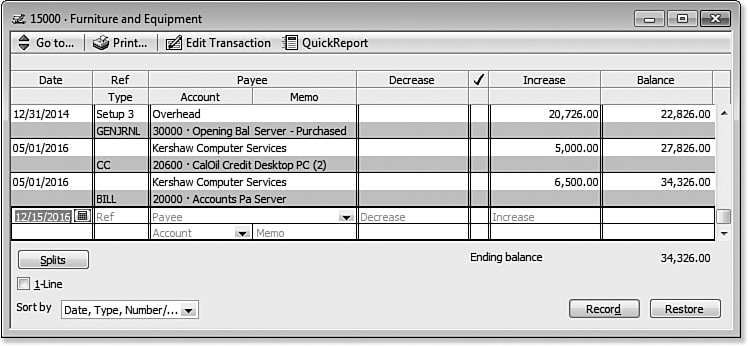
Figure 15.8. Use registers for certain accounts to see the transactions that affect the balances.
Accounts Payable
The Accounts Payable balance on the Balance Sheet report should agree with the A/P Aging Summary report total, as shown in Figure 15.9.

Figure 15.9. The A/P Aging Summary report total should agree with your Balance Sheet, Accounts Payable balance.
To create the A/P Aging Summary or Detail report, from the menu bar, select Reports, Vendors & Payables, A/P Aging Summary or Detail. For more information, see Chapter 8 “Managing Vendors.”
Credit Cards
Your Credit Card account balance should reconcile with those balances from your credit card statement(s). You might have to adjust your Balance Sheet report date to match your credit card vendor’s statement date. Or you could request that your credit card company provide you with a statement cut-off at the end of a month.
For more information on working with reconciliation tasks, see Chapter 13 “Working with Bank and Credit Card Accounts.”
Payroll Liabilities
The Payroll Liabilities balance on the Balance Sheet report should agree with your Payroll Liability Balances report total. Be careful with the dates here. If you have unpaid back payroll taxes, you might want to select a date range of All for this report. See Figure 15.10.

Figure 15.10. The Payroll Liability Balances report total should agree with the same total on the Balance Sheet report.
To create the Payroll Liability Balances report, select Reports, Employees & Payroll, Payroll Liability Balances from the menu bar. Totals on this report should match your Balance Sheet report for the Payroll Liabilities account.
Sales Tax Payable
The Sales Tax Payable balance on the Balance Sheet report should agree with the Sales Tax Liability report balance. You might need to change the Sales Tax Payable report date to match that of your Balance Sheet.
To create the Sales Tax Liability report, select Reports, Vendors & Payables, Sales Tax Liability from the menu bar.
Make sure the To Date matches that of the Balance Sheet report date. The total, shown in Figure 15.11, should match the Sales Tax Payable total on your Balance Sheet report.

Figure 15.11. The Sales Tax Liability report total should match the Sales Tax Payable balance on your Balance Sheet report.
If you have set up your Sales Tax preference as Cash Basis, you cannot compare this balance to an Accrual Basis Balance Sheet report.
Other Current Liabilities and Long-Term Liabilities
Any other accounts you might have in the Other Current Liabilities and Long-Term Liabilities account types should be compared with outside documents from your lending institutions.
Reconcile these accounts like you do your bank account to verify that your balances agree with the lending institution’s records.
If you have an account called Opening Balance Equity with a balance, this account should have a zero balance after the data file setup is completed. For more information, see “Closing Opening Balance Equity to Retained Earnings,” p. 513.
Equity
Equity accounts differ for each company. These account balances should be reviewed by your accountant and might have tax adjustments made to them at year-end or tax time.
The reports discussed in this chapter do not make up an exhaustive, end-all list for reviewing your Balance Sheet, but they are a great start to reviewing your own data or your client’s data.
Reviewing the Profit & Loss Report
My experience over the years has been that business owners do not look at the Balance Sheet report very often if at all. However, nearly every business owner I have worked with has reviewed the Profit & Loss Standard report for their business. The reason might be that the Profit & Loss report is easier to interpret than the Balance Sheet report.
Even with the simple organization (money in, money out) of the Profit & Loss report, a careful review is prudent for the business owner who wants to track how well the business is doing financially. To create a Profit & Loss Standard report, select Reports, Company & Financial, Profit & Loss Summary (or Profit & Loss Detail) from the menu bar.
There are two methods for reviewing your Profit & Loss:
• Cash Basis—Income is recognized when received. Expenses are recognized when paid.
• Accrual Basis—Income is recognized as of the date of the invoice. Expenses are recognized as of the date of the vendor bill, paycheck, and so on.
Cash basis reporting’s primary focus is how much money is in the bank, and secondly are the bills paid. Additionally, many companies file their annual tax return using cash basis reports. There is nothing wrong with looking at reports prepared with cash basis accounting. However, I encourage all of my clients to consider reviewing the Profit & Loss Standard report in accrual basis.
Accrual basis, although more complex, provides so much more information about the business:
• Matching Principle—Revenue (customer invoice) is recorded in the same accounting period as the expenses (vendor bills, paychecks, and so on.) associated with services or products sold on the customer’s invoice.
• Seasonal Variations—Track how your business performs financially; for example, by comparing the same month across multiple years.
• Tracking Receivables and Payables—This information helps with both short-term and long-term forecast planning.
With QuickBooks, you can easily change the report from cash to accrual basis by clicking the Customize Report button and manually selecting Cash or Accrual Basis on the Display tab of the Modify Report dialog box.
When reviewing the details of your Profit & Loss Detail report, you might want to look for these types of transactions:
• Monthly charges, such as rent, utility, equipment lease expenses, or other recurring expenses. Verify that the correct number of these charges is recorded, such as 12 monthly payments for rent.
• Credit card expenses reported to the proper expense accounts.
• Non-payroll payments to owners, which normally are recorded to draw or equity type accounts.
• Purchase of equipment with a significant cost, which should have been recorded to an asset account.
• Principle loan payments for vehicles or equipment; these should have been recorded to liability accounts.
A business owner who takes the time to review the Profit & Loss Detail report can feel more confident that business decisions founded on financials are as accurate as possible.
Other Reviews
You have completed the basic Balance Sheet and Profit & Loss Report reviews. These are very important and you are well on your way to being more confident about the information. There are, however, other equally important reviews that I have detailed in this section.
Tracking Changes to Closed Accounting Periods
Did you know that you can “lock” your QuickBooks data and prevent users from making changes to prior accounting periods? This process is what we accountants call a “soft close.” This means that at any time if you do need to add or modify a transaction in a prior period, the Admin user (or someone with security rights) can return and “unlock” the accounting period.
To have QuickBooks track information for the Closing Date Exception report, you first had to set a closing date and optionally set specific users’ access to adding or modifying transactions on or before this date.
If you have compared your own or your clients’ data to prior year financials or tax returns and the ending balances prior to the closing date have changed, you should view the Closing Date Exception report to see exactly who made the change and what specific transactions were affected. For more information on working with client’s files see Chapter 16, “Sharing QuickBooks Data with Your Accountant.”
Exceptions, additions, and changes are not tracked unless a closing date has been set for a QuickBooks file.
To create the Closing Date Exception report (see Figure 15.12), select Reports, Accountant & Taxes, Closing Date Exception from the menu bar. If you have not set a closing date, a warning prompt will display.

Figure 15.12. Review the Closing Date Exception report for changes made to transactions dated on or before a closing date.
This report enables you to identify changes that were made to transactions dated on or before the closing date. For modified transactions, the report details both the latest version of a transaction and the prior version (as of the closing date). If your QuickBooks access rights allow you to change closed period transactions, you can then re-create the original transaction or change the date of added transactions so you can once again agree with the ending balance from the previously closed period.
The Audit Trail report is available in all desktop versions of QuickBooks. To create the Audit Trail report shown in Figure 15.13, select Reports, Accountant & Taxes, Audit Trail from the menu bar.
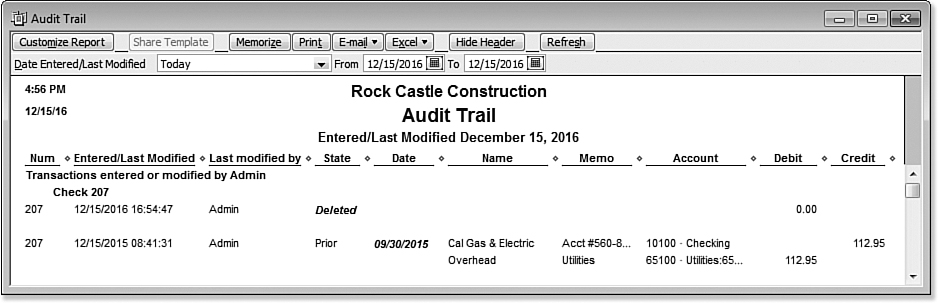
Figure 15.13. The QuickBooks Audit Trail report helps to identify what changes were made to transactions and by which user.
Using the Audit Trail Report
The Audit Trail report provides details of additions and changes made to transactions, grouping the changes by username. The detail on this report shows the prior and latest version of the transaction, if it was edited. You can filter the report to show a specific date range to narrow the amount of detail.
For accounting professionals, see Appendix A, “Client Data Review” for details on using the Troubleshoot Beginning Balances feature in QuickBooks Accountant.
If you find undesired transaction changes, consider setting a closing date password and setting specific user security privileges.
![]() For more information, see “Set a Closing Date,” p. 533.
For more information, see “Set a Closing Date,” p. 533.
Using the Credit Card Audit Trail Report
QuickBooks users can stay in compliance with credit card industry security requirements by enabling security around who can view, add, or edit your customer’s credit card numbers.
Individual users can be included or excluded from accessing customer’s sensitive credit card information. Also, for the company accountant, there is a user type called External Accountant. When this type is assigned to your accountant, she cannot view these sensitive customer credit card numbers.
Additionally, when enabled, you can track which user viewed, edited, added, or removed a customer’s credit card number with the Credit Card Audit Trail report.
To use this feature correctly, follow these three basic steps:
1. Enable the customer credit card protection feature.
2. Select which users are given security rights to view the credit card numbers and which users are not given this privilege.
3. View the new Credit Card Audit Trail report to track viewing, editing, adding, and deleting activity with your customer’s credit cards.
The first step to viewing details on the Credit Card Audit Trail report is to enable Customer Credit Card Protection in QuickBooks. To do so, follow these steps:
1. Log in to the data file as the Admin user. From the menu bar, select Company, Customer Credit Card Protection.
2. Click the Enable button to open the Customer Credit Card Protection Setup dialog box. Type a complex password. The new complex password must be seven characters, including one number and one uppercase character. For example, coMp1ex is a complex password. This password is now required when the Admin user logs in.
3. You are also required to choose a Challenge Question from the drop-down menu and provide an answer to a question. This question will be used to reset your password if you forget it. Click OK.
4. A message box opens letting you know the next steps and that you will be reminded in 90 days to change the password. Click OK.
5. QuickBooks notifies you that you have enabled Customer Credit Card Protection and details how to allow access by user to the credit card numbers (see step 6). Click OK. You are now returned to QuickBooks logged in as the Admin user.
6. To select which employees have access to view the full credit card numbers, or add or change customer credit card numbers, select Company, Set Up Users and Passwords from the menu bar, and select the Set Up Users option.
7. The QuickBooks login dialog box opens and requires you to enter the Admin password to gain access to user security settings. Click OK to open the User List dialog box.
8. Select a username and click the Edit button. Optionally, edit the username or password, or click Next to accept these fields as they are.
9. The Access window for the specific user opens. Choose the Selected Areas of QuickBooks option. Click Next.
10. The Sales and Accounts Receivable access options display. Choose either Full Access or Selective Access; either of these choices combined with a checkmark in the View Complete Credit Card Numbers box (as shown in Figure 15.14) enables the user to view and add, delete, or modify the credit card number. If no checkmark is placed, the user sees only the last four digits of the customer’s credit card when recording transactions that use this sensitive information.

Figure 15.14. User-specific access to viewing complete customer credit card numbers.
11. Click Finish if this is the only setting you want to modify or click Next to advance through additional security settings.
You have now properly enabled the customer credit card protection and granted or removed user access to these confidential credit card numbers.
When creating a login user for your accountant, select the user type “External Accountant.” By default, this user type cannot view your customers’ stored sensitive credit card numbers.
With this feature enabled, your data file is now tracking critical user activity about your customer’s credit card numbers. Track when the credit card security was enabled, and track when a user entered a credit card number, modified a credit card, or even viewed the credit card audit trail report (see Figure 15.15).
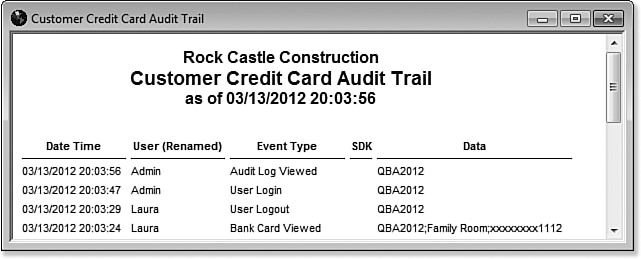
Figure 15.15. The Customer Credit Card Audit Trail report cannot be modified, filtered, or purged.
This Customer Credit Card Audit Trail report is always tracking customer credit card activity as long as the feature remains enabled. This report can only be viewed by logging into the file as the Admin user. The report cannot be filtered or modified in any way.
If you want to disable this setting, you must first log in to the data file as the Admin user, enter the complex password that was created when you enabled the protection, and select Company, Customer Credit Card Protection, and select the Disable Protection button. Click Yes to accept that your customer’s credit card number viewing, editing, and deleting activity by QuickBooks users is no longer being tracked for audit purposes.
Reporting on Voided/Deleted Transactions
QuickBooks offers flexibility for handling changes to transactions. If you grant users rights to create transactions, they also have rights to void and delete transactions. Don’t worry—you can view these voided transaction changes in the Voided/Deleted Transactions Summary (see Figure 15.16) or Voided/Deleted Transactions Detail reports.

Figure 15.16. The QuickBooks Voided/Deleted Transactions Summary report quickly identifies which transactions were either voided or deleted, making troubleshooting easy!
To create the Voided/Deleted Transactions Summary report, select Reports, Accountant & Taxes, Voided/Deleted Transactions Summary (or Voided/Deleted Transactions Detail) from the menu bar.
Use this report to view transactions before and after the change, and to identify which user made the change.
Viewing the Transactions List by Date Report
Although the title of Transaction List by Date report doesn’t indicate as much “power” as the other reports discussed in this chapter, I use this report most often when reviewing a data file.
If you are new to QuickBooks, you will soon learn that the date you enter for each transaction is important. The year you assign to the transaction is the year QuickBooks reports the transaction in your financials. For example, if you record a transaction with the year 2061 instead of 2016, this date would cause your financials not to show the effect until year 2061.
To create the Transaction List by Date report, shown in Figure 15.17, from the menu bar, select Reports, Accountant & Taxes, Transaction List by Date. From the Dates drop-down menu, select All dates.

Figure 15.17. The QuickBooks Transaction List by Date report can be used to identify whether any incorrectly dated transactions exist.
You can use this report to see both the oldest dated transaction (when the file was started) and the furthest dated transaction (to identify whether date errors have been made). Then, as with all other QuickBooks reports, double-click a specific transaction to change the date if needed.
Fortunately, QuickBooks preferences help avoid transaction dating errors by enabling you to set a warning for date ranges.
To open the date warning preference, follow these steps:
1. Log into the QuickBooks data file as the Admin or External Accountant user.
2. From the menu bar, select Edit, Preferences. In the Preferences dialog box, choose the Accounting preference on the left.
3. Click the Company Preferences tab.
4. Type in the user-defined date warning range you want to work with for past-dated transactions and future-dated transactions. QuickBooks sets the default warnings at 90 days in the past and 30 days in the future. An attempt to enter transactions dated before or after this date range prompts QuickBooks to give the user a warning message, as shown in Figure 15.18.
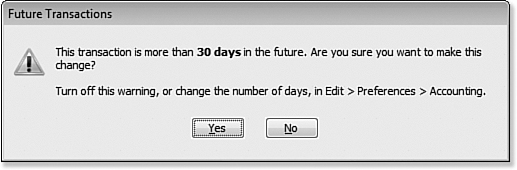
Figure 15.18. Set the Date Warning preference so users will be warned when dating a transaction outside an acceptable date range.
Be cautious when making changes to the dates, especially if the year in question has already had a tax return prepared on the existing information.
Troubleshooting Open Balance Equity Account
QuickBooks automatically records the following transactions to the Opening Balance Equity account:
• Your ending bank statement balance transaction when you created a new bank account in the Express Start setup
• Opening balances for other Balance Sheet report accounts created in the Add New Account dialog box
• Inventory total value balances entered in the New Item dialog box
• Bank reconciliation adjustments for older versions of QuickBooks
Other common transactions that a user might assign to this account include:
• Accrual basis opening accounts payable transactions as of the start date
• Accrual basis opening accounts receivable transactions as of the start date
• Uncleared bank checks or deposits (accrual or cash basis) as of the start date
Closing Opening Balance Equity into Retained Earnings
The Opening Balance Equity account should have a zero balance when a file setup is complete and done correctly. When I refer to a completely and correctly set up QuickBooks file, I assume the following:
• You are not converting your data from Quicken, Peachtree, Small Business Accounting, or Office Accounting. Each of these products has an automated conversion tool available free from Intuit, which eliminates the need to do startup transactions if you convert the data and not just lists.
While Intuit offers certain ready-made tools to convert other software to QuickBooks, some may not convert the data as expected. It would be prudent of you to verify the information is correct after the conversion.
• Your company did not have any transactions prior to the first use of QuickBooks. In this case, you simply enter typical QuickBooks transactions after your QuickBooks start date with no need for unusual startup type entries.
• Your company did have transactions prior to the first use of QuickBooks. You have chosen to enter these transactions one-by-one as regular transactions. You will not need to record any transactions to the Opening Balance Equity account.
• Your company did have transactions prior to the first use of QuickBooks, but there are so many it is not feasible to recreate them in QuickBooks. Instead you follow the directions in Chapter 3, “Setting Up a QuickBooks Data File for Accrual or Cash Basis Reporting” p. 63.
• You have entered each of your unpaid customer invoices, unpaid vendor bills, and uncleared bank transactions and dated them prior to your QuickBooks start date.
• You have entered and dated your trial balance one day before your QuickBooks start date. (You might need to request the trial balance numbers from your accountant if you are not converting from some other financial software that provides you with a trial balance.)
• When you create a Trial Balance report in QuickBooks dated one day before your QuickBooks start date, it agrees with your accountant’s trial balance or with the trial balance from your prior financial software with the exception that you have a balance in the Opening Balance Equity account.
If you answered yes to each of these assumptions, I would expect that your Opening Balance Equity account is equal to the Retained Earnings balance from your accountant’s financials or from your prior software. If it doesn’t agree, you need to continue to review the data to determine what the errors are. If it does agree, you are prepared to make the final entry in your start-up process.
Leave the first line of any Make General Journal Entries transaction blank because QuickBooks uses this line as the source line. Any list item in the name column on the first line (source line) of a general journal entries transaction will also be associated in reports with the other lines of the same general journal entries form. For more information about working with multiple line journal entries, see the caution on page 341 of Chapter 10.
To create this closing entry using a General Journal Entries transaction, follow these steps:
1. From the menu bar, select Company, Make General Journal Entries.
2. Enter a Date (it should be one day before your QuickBooks start date).
3. Type an Entry No.
4. Leaving line 1 of the transaction blank, on line 2 of the Make General Journal Entries transaction (using the example as shown in Figure 15.19), decrease (debit) Opening Balance Equity by $38,773.75 and increase (credit) Retained Earnings by the same amount. This action “closes” Opening Balance Equity to Retained Earnings. Click Save & Close.

Figure 15.19. Use a Make General Journal Entries transaction to close Opening Bal Equity to Retained Earnings.
5. Click OK to the QuickBooks warning that displays; QuickBooks saves the transaction. The warning advises that you are posting to a Retained Earnings account and that QuickBooks has a special purpose for this account. It is appropriate to post this entry to Retained Earnings. This warning is a result of a preference setting you can access from the menu bar by selecting Edit, Preferences, Accounting. Select the Company Preferences tab and choose the option to enable the warning. (You must be logged in as Admin or External Accountant user and in single-user mode to access this preference.)
When the transaction is saved, create the Balance Sheet Standard report as explained earlier in this chapter and verify that your ending numbers are accurate; that is, that they match your accountant’s or your prior software trial balance for the same period. Figure 15.20 now shows the proper Retained Earnings balance, and you no longer have a balance in Opening Balance Equity.
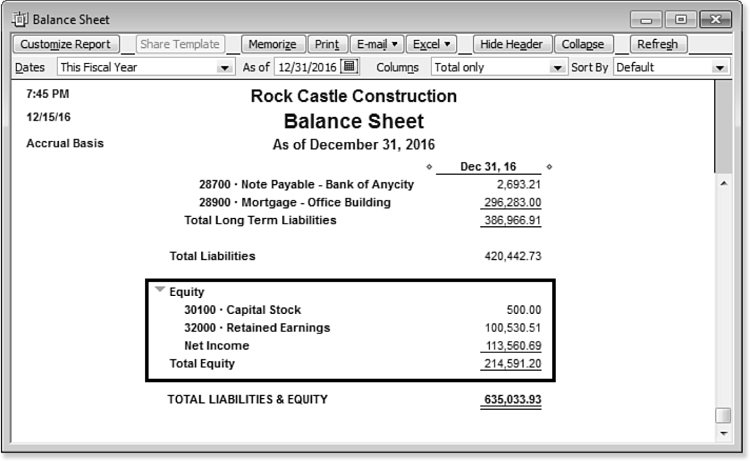
Figure 15.20. The Balance Sheet viewed after “closing” Opening Balance Equity to Retained Earnings.