
Now that we have some more tools with which to work, let's enhance our WDTU application. This time our goal is to implement functionality to allow the Program Manager to plan the Playlist schedules for Radio Shows. The process, from the user's point of view, will be essentially as follows:
- Call up the Playlist document page which displays Header, Details, and Factbox workspaces.
- Enter the Playlist Header, using the Radio Show table data.
- Enter Playlist Lines, using the Resource table DJ data, the Radio Show table for News, Weather, or Sports shows, and the Item table for Music, PSAs, and Advertisements.
- The Factbox will display the Required program element fields from Radio Show/Playlist Header. These will include News (Yes or No), Weather (Yes or No), Sports (Yes or No), Number of required PSAs, and Advertisements.
- The Factbox will also track each of the five possible required elements.
Since this development effort is an exercise to learn more about developing NAV applications, we also have some specific NAV C/AL components we want to use so we can learn more about them. Among those are the following:
- Create a CASE statement as well as a multipart IF statement for contrast
- Add code to the
OnValidatetrigger of fields in a table - Implement a lookup into a related table to access the needed data
- Cause FlowFields to be processed for display
- Implement a FactBox (to display Radio Show requirements for News, Sports, Weather, PSAs, and Ads)
- Create a new function, passing a parameter in and getting results passed back
As with any application enhancement, there will be a number of auxiliary tasks we'll have to accomplish to get the job done. These include adding some new fields to one or more tables. Not surprisingly, adding new data fields often leads to adding the new fields to one or more pages for maintenance or display. We'll have to create some test data in order to test our modifications. It's not unusual in the course of an enhancement to also find that other changes are needed to support the new functionality.
Because we want the NAV tables to be the core of the design and to host as much of the processing as makes sense, we will start our enhancement work with table modifications.
The first table modification is to add the data fields to the Playlist Header to support the definition and tracking of various program segment requirements. In the Radio Show table, each show has requirements defined for specific numbers of PSAs and Advertisements, and for the presence of News, Sports, and Weather spots. The Playlist Header needs this requirements information stored along with the associated counts for this show instance for PSAs and Ads. We are going to obtain the News, Sports, and Weather line counts by means of a function call.

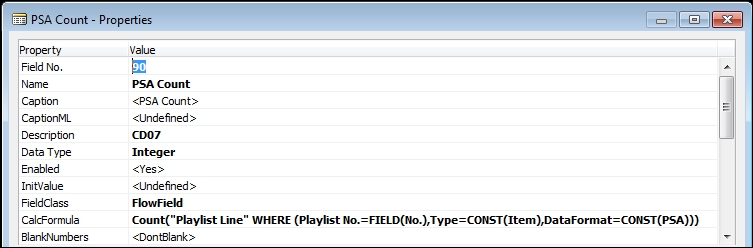
Since the Playlist Line includes an Option field which identifies the PSA and Advertisement records, we use a FlowField to calculate the counts for each of those line types. We construct the FlowField definition starting in the Properties form of the field.
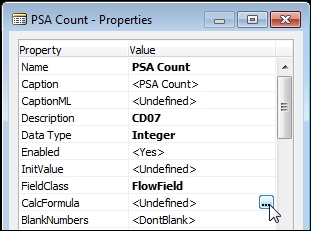
When we click on the CalcFormula line ellipsis, the Calculation Formula screen appears, as shown in the following screenshot:
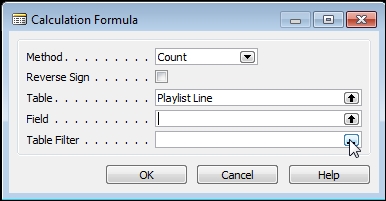
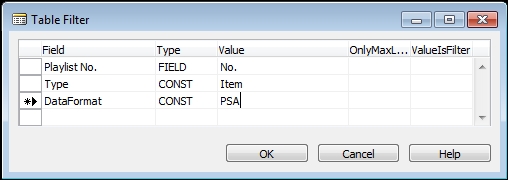
In this case, the Method we want to use is Count. Then, when we click on the Table Filter ellipsis, we will have the opportunity to enter the components defining the filters that should be applied to the Playlist Line to isolate the records that we want to count.
When we complete the Table Filter definition and click on the OK button, we will return to the Calculation Formula screen with the Table Filter field filled in (if we just click on Esc, the data we entered will not be saved).
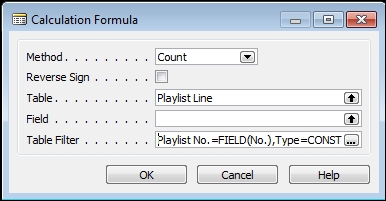
Again, click on the OK button to return to the Properties screen.
Go through the same sequence for the Ad Count field.
The only change we now want to make to the Playlist Line table now is to be sure the Duration field is not editable. We do this so that the Start Time and End Time scheduling defines Duration rather than the other way around. Making the Duration field non-editable is done by simply setting the field's Editable property to No, as shown in the following screenshot:

We need Validation logic for both our Playlist tables, Header and Line.
The Playlist Header data fields are:
- No.: The ID number for this instance of a radio show; user defined
- Radio Show No.: Chosen from the Radio Show table
- Description: Displayed via a FlowField from the Radio Show table
- Posting Date: This show's scheduled broadcast date
- Start Time: This show's scheduled broadcast start time
- End Time: This show's scheduled broadcast end time
- Duration: The length of the show; displayed via a FlowField from the Radio Show table
- PSAs Required and Ads Required: How many PSAs and Ads are planned during the show; copied from the Radio Show table, but editable by the user
- News Required, Sports Required, and Weather Required: Whether or not each of these program segments are required during the show; copied from the Radio Show table, but editable by the user
When the user chooses the Radio Show to be scheduled, we want the five different feature requirements fields in the Playlist Header to be filled in.
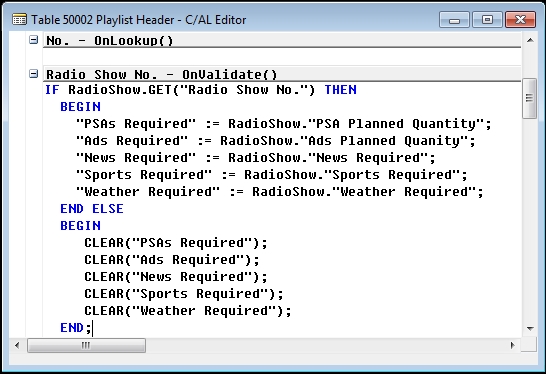
Even though the Radio Show No. was entered in the data field, our validation code needs to read the Radio Show record (here, defined as the Global variable RadioShow). Once we have read the Radio Show record, we can assign all five show feature requirements fields from the Radio Show record into the Playlist Header record.
Then, because two fields in the Playlist Header record are Lookup FlowFields, we need to Update the page after the entry of the Radio Show No. value The Update is done via a CurrPage.UPDATE command, as shown in the following image:

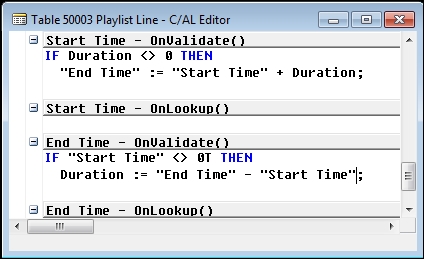
The next Validation we need is to calculate the show's End Time as soon as the Start Time has been entered. The calculation is simple—add the length of the show to the Start Time. Because we have defined the Duration field in the Playlist Header to be a Lookup reference to the source field in the Radio Show record, to calculate with that field would require using a CALCFIELDS function first, so, instead, we'll obtain the show length from the Radio Show record.

Now we see that we have one of those situations we sometimes encounter when developing a modification. It might have been better to have the Playlist Header Duration field as a Normal data field rather than a FlowField. If this is the only place where we will use Duration from the Playlist Header for calculation or assignment, then the current design is fine. Otherwise, perhaps we should change the Duration field to be a Normal field and assign Run Time from Radio Show to it at the same time the several requirements fields are assigned. At this point though, for the purposes of our WDTU scenario, we will stick with what we already have.
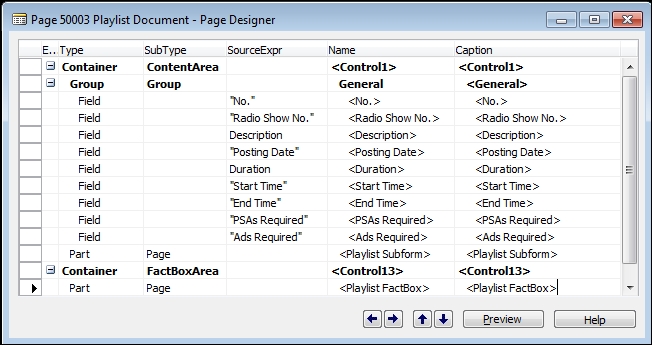
In Chapter 2, Tables, a homework assignment was to create Page 50003 Playlist Document. We should have used the Page Wizard to create that page, giving us something like this following screenshot:

Another necessary part of a Document page is the Subform (someday to be known as a Subpage) page. Our Subform page can be created using the Page Wizard to create a ListPart based on Table 50003 Playlist Line. After we Finish the Wizard, we'll save and compile the page as 50004 Playlist Subform. The result will look like the following image:

To make the Document work the way we are used to having NAV Document forms work, we need to set some properties for this new page. See the bolded properties circled in the following image:

We have set the DelayedInsert, MultipleNewLines, and AutoSplitKey properties to Yes. These settings will allow the Playlist Lines to not be saved until the primary key fields are all entered (DelayedInsert), will support simple sequential entry of data lines (MultipleNewLines), and will support the easy insertion of new entries between two existing lines (AutoSplitKey).
Finally, we need to connect our new Playlist Subform Listpart Page 50004 to the Playlist Document Page 50003 to give us a basic, complete Document page. All we need to do to accomplish that is add a new Part line to Page 50003 with as is shown in the following:
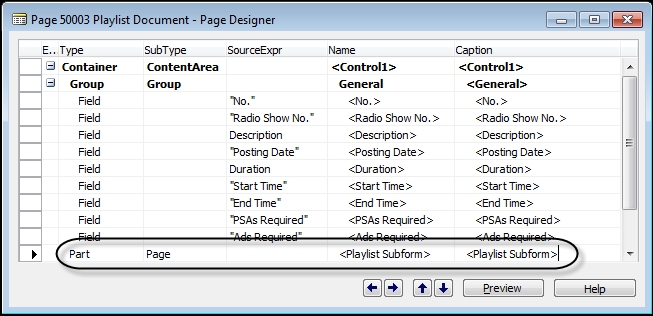
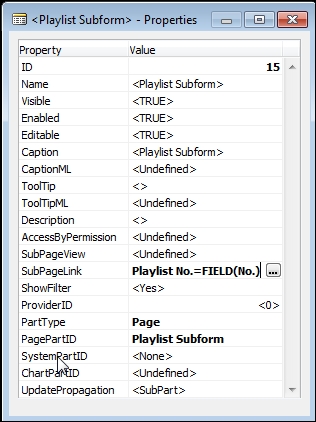
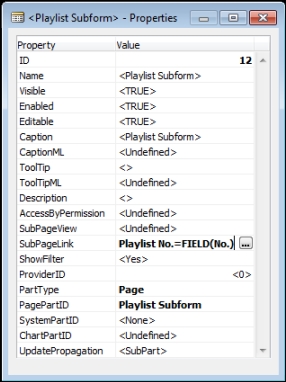
Entering the PagePartID in the Part line properties (as shown in the following image) will populate the Name and Caption fields (as shown in the preceding image).

Note that the highlighted property, UpdatePropagation, in the preceding image. This property can be set to either SubPart (the default) or Both. This controls how the parent and child page are updated when a change is made to the data displayed by the child page (the SubPart). If the property value is SubPart, only the child page information display is updated. If the property value is Both, both the child and parent page displays are updated. This is useful when data in the SubPage is updated and the change affects data displayed in the parent page.
The last step in this phase of our development is to set the Page Part property SubPageLink to automatically filter the contents of the Subform page to only be the lines that are children of the parent record showing in the card-like portion of the Document page (at the top) of the page ).
The Playlist Line data fields are:
- Playlist No.: The automatically assigned link to the No. field in the parent Playlist record (the automatic assignment is based on the Playlist Subform page properties, which we'll take care of when working on the Playlist pages)
- Line No.: An automatically assigned number (based on page properties); the rightmost field in the Playlist Line primary key
- Type: A user selected option defining if this entry is a Resource (such as an announcer), a Show (such as a News show), or an Item (such as a recording to play on the air)
- No.: The ID number of the selected entry in its parent table
- DataFormat: Information from the Item table for a show or recording
- Description: Assigned from the parent table, but can be edited by the user
- Duration, Start Time, and End Time: Information about a show or recording indicating its length and its position within the schedule of this Radio Show
The source of contents of the No., DataFormat, Description, and time related fields of the record depend on the Type field. If the Type is Resource, the fields are filled in from the Resource table; for Item, from the Item table; and for Show, from the Radio Show table. To support this, our OnValidate code looks at the Type entry and uses a CASE statement to choose which set of actions to take.
First, we will build the basic CASE statement, as shown in the following image, and compile it. That way we make sure we've got all the components of the structure in place and only need to fill in the logic for each of the option choices.

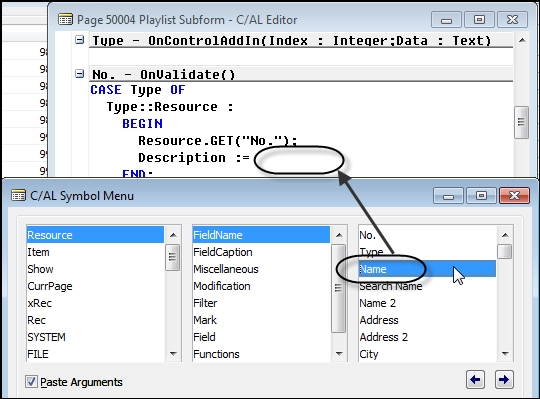
Next we must add a Global Variable for each of the tables from which we are going to pull data: Resource, Item, and Radio Show. That done, using the C/AL Symbol Menu makes it much easier to find the correct field names for each of the variables we want to select to assign to the Playlist Line record fields.

Once the C/AL Symbol Menu is displayed, we first select the source object or variable in the left column. In this case, that's the Resource table. Then select the subcategory in the middle column. We want a list of the fields in the Resource table, so we select FieldName. Then, in the third column, a list of Resource FieldNames is displayed. We select Name to assign to the Playlist Line Description field. When we double-click on the desired FieldName, it will be inserted at the point of focus in the C/AL Editor.
When we are all done constructing the CASE Statement, it should look like the following screenshot:

The last set of OnValidate code we need to add is to calculate End Time from the supplied Start Time and Duration (or Start Time from the End Time and Duration).
Obviously, the design could be expanded to have the Duration value be user editable along with an appropriate change in the C/AL logic. After our initial work on the Playlist functionality is completed, making that change would be a good exercise for you as would be the addition of "housekeeping" commands to clear out fields that are not used by the assigned record Type (such as clearing the DataFormat field for a Show record).
For this application, we want our FactBox to display information relating to the specific Radio Show we are scheduling. The information to be displayed includes the five show segment requirements and the status of fulfillment (counts) of those requirements by the data entered to date. The requirements come from Playlist Header fields: PSAs Required, Ads Required, News Required, Sports Required, and Weather Required. The counts come from summing up data in the Playline Line records for a show. We can use the Playlist Header fields PSA Count and Ad Count for those two counts. These counts can be obtained through the FlowField property definitions we defined earlier for these two fields.
For the other three counts, we must read through the Playlist Lines and total up each of the counts. To accomplish that, we'll create a Function which we can call from the FactBox page. Since our new function is local to the Playlist Header and Playlist Lines tables, we will define the function in the Playlist Header (table 50002).
The first step in defining the function is to enter its name in to the Functions tab of the Globals screen for the object. Open the object, Table 50002, by clicking Table | Design, then View | C/AL Globals, and then click the Functions tab. Enter the name of the new function, access its Properties (through the Properties icon or Shift + F4) and set the Local property to No so the function can be called from the Factbox Page.

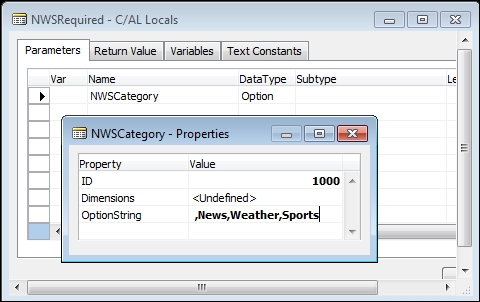
Then, after clicking on the Locals button and viewing the Parameters tab, we can enter the parameters we want to pass to the function. In this case, we want the parameter to be passed by value, not by reference, so we do not check the Var checkbox on the Parameter line. For more information about parameter passing, look at Help sections C/AL Function Calls and How to: Add a Function to a Codeunit, as well as the Create a Function section in Chapter 6, Introduction to C/SIDE and C/AL. The name of the Parameter is local to the function.
Since we want a single function that will serve to count Playlist Lines that are News, Weather, or Sports, the parameter we pass in will be an Option code of News, Weather, or Sports. The Option Subtype sequence must be the same as those in the field Type in the table Playlist Lines, otherwise we will have Options mismatching.
The return value we want back from this function is an Integer count. Again, the variable name is local.

The logic of our counting process is described in the following pseudocode:
- Filter the Playlist Line table for the Radio Show we are scheduling and for the segment entries (Playlist Line) that represent shows.
- Look up the Radio Show record for each of those records.
- Using the data from the Radio Show record, look up the Radio Show Type code.
- In the Radio Show Type record, use the News, Weather, and Sports fields to determine which Playlist Line counter should be incremented.
Based on this logic, we must have Local Variables defined for the three tables Playlist Line, Radio Show and Radio Show Type. The following image shows those Local Variables:

Translating our pseudocode into executable C/AL, our function looks like the following:

In the process of writing this code, we notice another design flaw. We defined the type of Radio Show with a code which allows users to enter their choice of text strings. We just wrote some code that depends on the contents of that text string being specific values. A better design would have been to have the critical field be an Option data type so we could depend on the choices are members of a predefined set. However, the Code field is our Primary Key field and we probably shouldn't use an Option field as the Primary Key. We will continue with our example with the design as is, but you should consider how to improve it. Making that improvement would be excellent practice with C/AL.
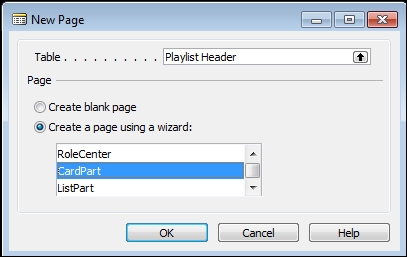
All the hard work is now done. We just have to define a Factbox page and add it to the Playlist page. We can create a Factbox page using the New Page Wizard to define a CardPart.
Our Factbox will contain the fields from the Playlist Header that relate to two of the five required show segments, the PSA Count and Ad Count fields.

Once we exit the Page Wizard into the Page Designer, we will have a page layout that looks like the following image:

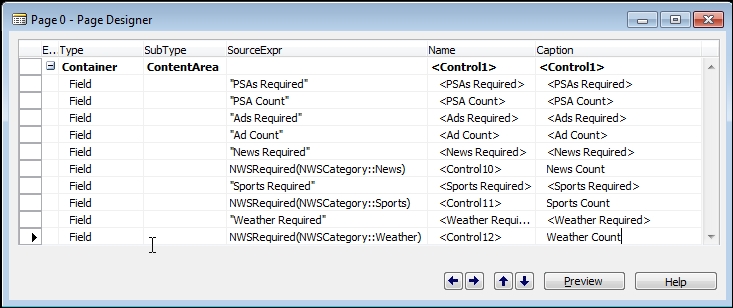
At this point we need to put in place the logic to take advantage of the NWSRequired function that we created earlier. That function is designed to return the count of the segment type identified in the calling parameter. Since a line on a page can be an expression, we can simply code the function calls right on the page lines, with an appropriate caption defined, as we can see in the following image. The only other task has been to define a Global variable, NWSCategory, which is defined as an Option with the choices of News, Weather, and Sports. This variable is used for the calling parameter. We intersperse the Count lines for a consistent appearance on the Page.
We save the new FactBox page as Page 50010, named Playlist FactBox.
One final development step is required. We must connect the new FactBox CardPart to the Playlist Document. All that is required is to define the FactBox Area and add our FactBox as an element in that area.
Properties for the Playlist Subform Pagepart are as shown in the following screenshot:
Properties for the FactBox Pagepart are as shown in the following image:

Multiple FactBoxes can be part of a primary page. If we look at Page 21 – Customer Card, we will see a FactBox Area with eight FactBoxes, of which two are System Parts.
The end result of our development effort is shown when we Run Page 50000 – Playlist with some sample test data (which we entered by Running the various tables).
