
Chapter 19
Unit Testing
What's in this chapter?
- Learning the common concepts and benefits of unit testing
- Creating a unit test using the Visual Studio unit testing framework
- Executing, managing, and viewing the results of unit tests
- Using Microsoft Fakes
- Retrieving and installing test adapters
Wrox.com Code Downloads for this Chapter
The wrox.com code downloads for this chapter are found at www.wrox.com/go/proalm3ed on the Download Code tab. The files are in the Chapter 19 download folder and individually named as shown throughout this chapter.
Programmatic unit testing involves writing code to verify a system at a lower and more granular level than with other types of testing. It is used by programmers for programmers, and is quickly becoming standard practice at many organizations. All editions of Visual Studio include unit testing features that are fully integrated with the IDE and with other features (such as reporting and source control). Developers no longer need to rely on third-party utilities (such as NUnit) to perform their unit testing, although they still have the option to use them and, in fact, can integrate them into Visual Studio using the test adapter framework.
This chapter describes the concepts behind unit testing, why it is important, and how to create effective unit test suites. You learn about the syntax of writing unit tests, and you see how to work with Visual Studio's integrated features for executing and analyzing those tests. The discussion then goes into more detail about the classes available to you when writing your unit tests, including the core Assert
You find out how Visual Studio enables the generation of unit tests from existing code, as well as the generation of member structures when writing unit tests. And you delve into Microsoft Fakes, a technology in Visual Studio 2013 that enables you to shim and stub your code for easier testing. Finally, you take a brief look at the test adapter framework in Visual Studio 2013 and how you can use that framework to utilize third-party testing frameworks in your testing process.
Unit Testing Concepts
You've likely encountered a number of traditional forms of testing. Your quality assurance staff may run automated or manual tests to validate behavior and appearance. Load tests may be run to establish that performance metrics are acceptable. Your product group might run user acceptance tests to validate that systems do what the customers expect. Unit testing takes another view. Unit tests are written to ensure that code performs as the programmer expects.
Unit tests are generally focused at a lower level than other testing, establishing that underlying features work as expected. For example, an acceptance test might walk a user through an entire purchase. A unit test might verify that a ShoppingCart
Unit testing is an example of white box testing, where knowledge of internal structures is used to identify the best ways to test the system. This is a complementary approach to black box testing, where the focus is not on implementation details but rather on overall functionality compared to specifications. You should leverage both approaches to effectively test your applications.
Unit testing as a concept has been around for decades. However, in recent times, the process of performing unit tests by writing code to execute those tests has become popular. This form of programmatic unit testing is now what many people refer to as a “unit test” — and sometimes people use the term “unit test” to cover all forms of testing conducted using the programmatic unit testing frameworks, even if those tests are actually not tests of the unit of code, but are actually full integration tests.
Benefits of Unit Testing
A common reaction to unit testing is to resist the approach because the tests seemingly make more work for a developer. However, unit testing offers many benefits that may not be obvious at first.
The act of writing tests often uncovers design or implementation problems. The unit tests serve as the first users of your system, and they frequently identify design issues or functionality that is lacking. The act of thinking about tests causes the developer to question the requirements of the application, and, therefore, seek clarification from the business very early in the lifecycle of the software development project. This makes things easy and inexpensive to rectify as the clarification is received.
After a unit test is written, it serves as a form of living documentation for the use of the target system. Other developers can look to an assembly's unit tests to see example calls into various classes and members. An important benefit of unit tests for framework APIs is that the tests introduce a dependency at compile time, making it trivial to determine if any code changes have affected the contract represented by the API.
Perhaps one of the most important benefits is that a well-written test suite provides the original developer with the freedom to pass the system off to other developers for maintenance and further enhancement, knowing that their intentions of how the code would be used are fully covered by tests. Should those developers introduce a bug in the original functionality, there is a strong likelihood that those unit tests can detect that failure and help diagnose the issue. In addition, because there is a full set of unit tests making up the regression tests, it is a simple task for the maintenance team to introduce a new test that demonstrates the bug first, and then confirm that it is correctly fixed by the code modification. Meanwhile, the original developer can focus on current tasks.
It takes the typical developer time and practice to become comfortable with unit testing. After a developer has saved enough time by using unit tests, he latches on to them as an indispensable part of the development process.
Unit testing does require more explicit coding, but this cost will be recovered, and typically exceeded, when you spend much less time debugging your application. In addition, some of this cost is typically already hidden in the form of a test console or Windows-based applications that a developer might have previously used as a test harness. Unlike these informal testing applications, which are frequently discarded after initial verification, unit tests become a permanent part of the project, and ideally run each time a change is made to help ensure that the system still functions as expected. Tests are stored in source control as part of the same solution with the code they verify and are maintained along with the code under test, making it easier to keep them synchronized.
It is difficult to overstate the importance of comprehensive unit test suites. They enable developers to hand off a system to other developers with confidence that any changes they make should not introduce undetected side effects. However, because unit testing provides only one view of a system's behavior, no amount of unit testing should ever replace integration, acceptance, and load testing.
Writing Effective Unit Tests
Because unit tests are themselves code, you are generally unlimited in the approaches you can take when writing them. However, you should follow some general guidelines:
- Always separate your unit test assemblies from the code you are testing. This separation enables you to deploy your application code without unit tests, which serve no purpose in a production environment.
- Avoid altering the code you are testing solely to allow easier unit testing. A common mistake is to open accessibility to class members to allow unit tests direct access. This compromises design, reduces encapsulation, and broadens interaction surfaces. You will see later in this chapter that Visual Studio offers features to help address this issue. However, be open minded to the idea that often what makes code easy to test in isolation makes that code more maintainable.
- Each test should verify a small slice of functionality. Do not write long sequential unit tests that verify a large number of items. Although creating focused tests results in more tests, the overall suite of tests is easier to maintain. In addition, identifying the cause of a problem is much easier when you can quickly look at a small failed unit test, immediately understand what it was testing, and know where to search for the bug.
- All tests should be autonomous and isolated. Avoid creating tests that rely on other tests to be run beforehand. Tests should be executable in any combination and in any order. To verify that your tests are correct, try changing their execution order and running them in isolation.
- Test both expected behavior (normal workflows) and error conditions (exceptions and invalid operations). This often means that you have multiple unit tests for the same method, but remember that developers always find ways to call your objects that you did not intend. Expect the unexpected, code defensively, and test to ensure that your code reacts appropriately.
The final proof of your unit testing's effectiveness is when it saves you more time during development and maintenance than you spent creating the tests. Experience has shown that you will realize this savings many times over.
Third-Party Tools
Unit testing is not a new concept. Before Visual Studio introduced integrated unit testing, developers needed to rely on third-party frameworks. The de facto standard for .NET unit testing has been an Open Source package called NUnit. NUnit has its roots as a .NET port of the Java-based JUnit unit testing framework. JUnit is itself a member of the extended xUnit family.
There are many similarities between NUnit and the unit testing framework in Visual Studio. The structure and syntax of tests and the execution architecture are conveniently similar. If you have existing suites of NUnit-based tests, it is generally easy to convert them for use with Visual Studio.
Visual Studio's implementation of unit testing is not merely a port of NUnit. Microsoft has added a number of features including IDE integration, code generation, new attributes, and enhancements to the Assert
Visual Studio Unit Testing
Unit testing is a feature available in all editions of Visual Studio. Unit tests can be written against all types of applications, from console applications to Windows Store apps. This section describes how to create, execute, and manage unit tests.
Unit tests are normal code, identified as unit tests through the use of attributes. Like NUnit 2.0 and later, Visual Studio uses .NET reflection to inspect assemblies to find unit tests.
You also use attributes to identify other structures used in your tests and to indicate desired behaviors.
Creating Your First Unit Test
This section takes a slower approach to creating a unit test than you will in your normal work. This gives you a chance to examine details you could miss using only the built-in features that make unit testing easier. Later in this chapter, you look at the faster approaches.
In order to have something to test, create a new C# class library project named ExtendedMathClass1.csFunctions.cs
Open Functions.cs
namespace ExtendedMath
{
    public static class Functions
    {
        public static int Fibonacci(int factor)
        {
	    if (factor < 2)
	    {
	       return (factor);
	    }
	    int x = Fibonacci(--factor);
	    int y = Fibonacci(--factor);
	    return x + y;
       }
   }
}
You are now ready to create unit tests to verify the FibonacciExtendedMathTestingUnitTest1.csExtendedMathMicrosoft.VisualStudio.QualityTools.UnitTestFramework.dll
After you have created a new test project, add a new class file (not a unit test; that file type is covered later) called FunctionsTest.csFunctionsExtendedMathUnitTestFrameworkusing
using Microsoft.VisualStudio.TestTools.UnitTesting;
Identifying Unit Test Classes
To enable Visual Studio to identify a class as potentially containing unit tests, you must assign the TestClassTestClasspublic
To indicate that the FunctionsTestTestClass
namespace ExtendedMath
{
 [TestClass]
   public class FunctionsTest
   {
   }
}
Note also that the parentheses after an attribute are optional if you are not passing parameters to the attribute. For example, [TestClass()][TestClass]
Identifying Unit Tests
Having identified the class as a container of unit tests, you're ready to add your first unit test. A unit test method must be public, nonstatic, accept no parameters, and have no return value. To differentiate unit test methods from ordinary methods, they must be decorated with the TestMethod
Add the following code inside the FunctionsTest
[TestMethod]
public void FibonacciTest()
{
}
Unit Test Success and Failure
You have the shell of a unit test, but how do you test? A unit test indicates failure to Visual Studio by throwing an exception. Any test that does not throw an exception is considered to have passed, except in the case of the ExpectedException
The unit testing framework defines the AssertAssert
Add the following code to the FibonacciTest
[TestMethod]
public void FibonacciTest()
{
 const int FACTOR = 8;
 const int EXPECTED = 21;
 int actual = ExtendedMath.Functions.Fibonacci(FACTOR);
 Assert.AreEqual(EXPECTED, actual);
}
This uses the Assert.AreEqualFibonacci
When you run these tests, you see the Test Explorer window. Success is indicated with a green check mark and failure with a red X. A special inconclusive result (described later in this chapter in the section “Using the Assert Methods”) is represented by a question mark.
To see a failing test, change the EXPECTED2122
Assert.AreEqual failed. Expected:<22>, Actual:<21>
This indicates that either the expected value is wrong, or the implementation of the Fibonacci
Managing and Running Unit Tests
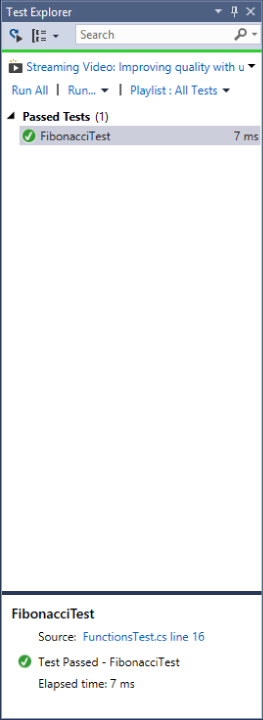
After you have created a unit test and rebuilt your project, Visual Studio automatically inspects your projects for unit tests. All unit tests that are found are displayed in the Test Explorer window, shown in Figure 19.1. This window is used for managing and running tests. From this window you have multiple options, such as running all your unit tests, running only tests that have not been run yet, and viewing unit test run results.
Running Tests Directly from Code
You also have the capability to run a unit test directly from code. To do that, open the unit test and navigate to the method. Right-click the unit test method in the code and, from the context menu, select Run Tests. The selected test method will execute.
Debugging Unit Tests
Because unit tests are simply methods with special attributes applied to them, they can be debugged just like other code.
You can set breakpoints anywhere in your code, not just in your unit tests. For example, the FibonacciTestExtendedMath.Fibonacci
However, setting program execution does not pause at your breakpoints unless you run your unit test in debugging mode. The Test Explorer window enables you to right-click a test and select Debug Selected Tests. The selected unit tests are run in debug mode, pausing execution at any enabled breakpoints and giving you a chance to evaluate and debug your unit test or implementation code as necessary.
Programming with the Unit Test Framework
This section describes in detail the attributes and methods available for creating unit tests. You can find all the classes and attributes mentioned in this section in the Microsoft.VisualStudio.TestTools.UnitTesting
Initialization and Cleanup of Unit Tests
Often, you need to configure a resource that is shared among your tests. Examples might be a database connection, a log file, or a shared object in a known default state. You might also need ways to clean up from the actions of your tests, such as closing a shared stream or rolling back a transaction.
The unit test framework offers attributes to identify such methods. They are grouped into three levels: Test, Class, and Assembly. The levels determine the scope and timing of execution for the methods they decorate. Table 19.1 describes these attributes.
Table 19.1 Unit Test Framework Attributes
| Attributes | Frequency and Scope |
|
Executed before ( |
|
Executed a single time before or after any of the tests in the current class are run |
|
Executed a single time before or after any number of tests in any of the assembly's classes are run |
Having methods with these attributes is optional, but do not define more than one of each attribute in the same context. Also, keep in mind that you cannot guarantee the order in which your unit tests will be run, and that should govern what functionality you place in each of these methods.
TestInitialize and TestCleanup Attributes
Use the TestInitializeTestCleanup
Following is an example test for a simplistic shopping cart class. It contains two tests and defines the TestInitializeTestCleanup
using Microsoft.VisualStudio.TestTools.UnitTesting;
[TestClass]
public class ShoppingCartTest
{
    private ShoppingCart cart;
 [TestInitialize]
    public void TestInitialize()
    {
        cart = new SomeClass();
        cart.Add(new Item("Test"));
    }
 [TestCleanup]
    public void TestCleanup()
    {
        // Not required - here for illustration
        cart.Dispose();
    }
    [TestMethod]
    public void TestCountAfterAdd()
    {
        int expected = cart.Count + 1;
        cart.Add(new Item("New Item"));
        Assert.AreEqual(expected, cart.Count);
    }
    [TestMethod]
    public void TestCountAfterRemove()
    {
        int expected = cart.Count - 1;
        cart.Remove(0);
        Assert.AreEqual(expected, cart.Count);
    }
}
When you run both tests, TestInitializeTestCleanupTestInitializeTestCleanup
ClassInitialize and ClassCleanup Attributes
The ClassInitializeClassCleanupTestInitializeTestCleanupTestInitializeTestCleanupTestContext
The importance of the TestContext
The following code demonstrates how you might manage a shared logging target using class-level initialization and cleanup with a logging file:
private System.IO.File logFile;[ClassInitialize]public static void ClassInitialize(TestContext context) { // Code to open the logFile object }[ClassCleanup]public static void ClassCleanup(TestContext context) { // Code to close the logFile object }
You could now reference the logFile
The following code shows the flow of execution if you run both tests again:
ClassInitialize
   TestInitialize
      TestCountAfterAdd
   TestCleanup
   TestInitialize
      TestCountAfterRemove
   TestCleanup
ClassCleanup
AssemblyInitialize and AssemblyCleanup Attributes
Where you might use ClassInitializeClassCleanupAssemblyInitializeAssemblyCleanupAssemblyInitializeTestContext
[AssemblyInitialize]public static void AssemblyInitialize(TestContext context) { // Assembly-wide initialization code }[AssemblyCleanup]public static void AssemblyCleanup(TestContext context) { // Assembly-wide cleanup code }
Consider using AssemblyInitializeAssemblyCleanup
Using the Assert Methods
The most common way to determine success in unit tests is to compare an expected result against an actual result. The Assert
Assert.AreEqual and Assert.AreNotEqual
Of the various AssertAreEqualAreNotEqualAreNotEqual
A third, optional argument can be supplied: a string that will be displayed along with your unit test results, which you can use to describe the failure. Additionally, you can supply parameters to be replaced in the string, just as the String.FormatAssertAssertAssertAssert
[TestMethod]
public void IsPrimeTest()
{
    const int FACTOR = 5;
const bool EXPECTED = true;
    bool actual = CustomMath.IsPrime(FACTOR);
Assert.AreEqual(EXPECTED, actual, “The number {0} should have been computed as
                prime, but was not.”, FACTOR);
}
Assert.AreEqualAreNotEqualstringdoubleintfloatobjectgeneric
When using these methods with two string arguments, one of the overrides allows you to optionally supply a third argument. This is a boolean, called ignoreCase
Working with floating-point numbers involves a degree of imprecision. You can supply an argument that defines a delta by which two numbers can differ yet still pass a test — for example, say you're computing square roots and decide that a “drift” of plus or minus 0.0001 is acceptable:
[TestMethod]
public void SquareRootTest()
{
    const double EXPECTED = 3.1622;
const double DELTA = 0.0001;
    double actual = CustomMath.SquareRoot(10);
Assert.AreEqual(EXPECTED, actual, DELTA, “Root not within acceptable range”);
}
Assert.AreSame and Assert.AreNotSame
AreSameAreNotSameAreEqualAreNotEqualAreSameAreSameobject.Equalsobject.ReferenceEquals
A common use for these methods is to ensure that properties return expected instances, or that collections handle references correctly. The following example adds an item to a collection and ensures that what you get back from the collection's indexer is a reference to the same item instance:
[TestMethod]
public void CollectionTest()
{
    CustomCollection cc = new CustomCollection();
    Item original = new Item("Expected");
    cc.Add(original);
    Item actual = cc[0];
Assert.AreSame(original, actual);
}
Assert.IsTrue and Assert.IsFalse
As you can probably guess, IsTrueIsFalseIsPrimeNumberTest
[TestMethod]
public void IsPrimeNumberTest()
{
    const int FACTOR = 5;
Assert.IsTrue(CustomMath.IsPrime(FACTOR), “The number {0} should have been
              computed as prime, but was not.”, FACTOR);
}
Assert.IsNull and Assert.IsNotNull
Similar to IsTrueIsFalsenullnullnull
[TestMethod]
public void CollectionTest()
{
    CustomCollection cc = new CustomCollection();
    cc.Add(new Item("Added"));
    Item item = cc[0];
Assert.IsNotNull(item);
}
Assert.IsInstanceOfType and Assert.IsNotInstanceOfType
IsInstanceOfType
[TestMethod]
public void CollectionTest()
{
    UntypedCollection untyped = new UntypedCollection();
    untyped.Add(new Item("Added"));
    untyped.Add(new Person("Rachel"));
    untyped.Add(new Item("Another"));
    object entry = untyped[1];
Assert.IsInstanceOfType(entry, typeof(Person));
}
As you can no doubt guess, IsNotInstanceOfType
Assert.Fail and Assert.Inconclusive
Use Assert.FailAssert.FailAssertFailedExceptionAssert.FailAssert
Assert.InconclusiveAssert.Inconclusive
Using the CollectionAssert class
The Microsoft.VisualStudio.TestTools.UnitTestingCollectionAssert
Table 19.2 describes the methods supported by CollectionAssert
Table 19.2 CollectionAssert Methods
| Method | Description |
|
Ensures that all elements are of an expected type |
|
Ensures that no items in the collection are |
|
Searches a collection, failing if a duplicate member is found |
|
Ensures that two collections have reference-equivalent members |
|
Ensures that two collections do not have reference-equivalent members |
|
Ensures that two collections have value-equivalent members |
|
Ensures that two collections do not have value-equivalent members |
|
Searches a collection, failing if the given object is not found |
|
Searches a collection, failing if a given object is found |
|
Ensures that the first collection has members not found in the second |
|
Ensures that all elements in the first collection are found in the second |
|
Determines whether the specified |
The following example uses some of these methods to verify various behaviors of a collection type, CustomCollection
[TestMethod]
public void CollectionTests()
{
    CustomCollection list1 = new CustomCollection();
    list1.Add("alpha");
    list1.Add("beta");
    list1.Add("delta");
    list1.Add("delta");
CollectionAssert.AllItemsAreInstancesOfType(list1, typeof(string));
CollectionAssert.AllItemsAreNotNull(list1);
    CustomCollection list2 = (CustomCollection)list1.Clone();
CollectionAssert.AreEqual(list1, list2);
CollectionAssert.AreEquivalent(list1, list2);
    CustomCollection list3 = new CustomCollection();
    list3.Add("beta");
    list3.Add("delta");
CollectionAssert.AreNotEquivalent(list3, list1);
CollectionAssert.IsSubsetOf(list3, list1);
CollectionAssert.DoesNotContain(list3, “alpha”);
CollectionAssert.AllItemsAreUnique(list3);
}
The final assertion, AllItemsAreUnique(list3)list1“delta”
Using the StringAssert Class
Similar to CollectionAssertStringAssertStringAssert
Table 19.3 StringAssert Methods
| Method | Description |
|
Searches a string for a substring and fails if not found |
|
Applies a regular expression to a string and fails if any matches are found |
|
Fails if the string does not end with a given substring |
|
Applies a regular expression to a string and fails if no matches are found |
|
Fails if the string does not begin with a given substring |
|
Determines whether the specified object instances are considered equal |
|
Determines whether the specified |
Following are some simple examples of these methods. Each of these assertions will pass:
[TestMethod]
public void TextTests()
{
    StringAssert.Contains("This is the searched text", "searched");
    StringAssert.EndsWith("String which ends with searched",
                          "ends with searched");
    StringAssert.Matches("Search this string for whitespace",
                        new System.Text.RegularExpressions.Regex(@"s+"));
    StringAssert.DoesNotMatch("Doesnotcontainwhitespace",
                             new System.Text.RegularExpressions.Regex(@"s+"));
    StringAssert.StartsWith("Starts with correct text", "Starts with");
}
MatchesDoesNotMatchSystem.Text.RegularExpressions.RegexMatchesDoesNotMatch
Expecting Exceptions
Normally, a unit test that throws an exception is considered to have failed. However, you'll often want to verify that a class behaves correctly by throwing an exception. For example, you might provide invalid arguments to a method to verify that it properly throws an exception.
The ExpectedException
The following unit test expects that an ObjectDisposedException
[TestMethod]
[ExpectedException(typeof(ObjectDisposedException))]
public void ReadAfterDispose()
{
    CustomFileReader cfr = new CustomFileReader("target.txt");
    cfr.Dispose();
    string contents = cfr.Read(); // Should throw ObjectDisposedException
}
The ExpectedExceptionMessage
For example, suppose you are calling a method that throws a FileNotFoundExceptionExpectedExceptionFileNotFoundExceptionMessage
Defining Custom Unit Test Properties
You may define custom properties for your unit tests. For example, you may want to specify the author of each test and be able to view that property from the Test List Editor.
Use the TestProperty
[TestMethod]
[TestProperty(“Author”, “Deborah”)]
public void ExampleTest()
{
   // Test logic
}
Now, when you view the properties of that test, you see a new entry, AuthorDeborah
TestContext Class
Unit tests normally have a reference to a TestContextTestContext
Several methods are especially useful to all unit tests. The first, WriteLine
Here is a simple example of a unit test that accesses the TestContext
[TestClass]
public class TestClass
{
   private TestContext testContextInstance;
   public TestContext TestContext
   {
      get { return testContextInstance; }
      set { testContextInstance = value; }
   }
   [TestMethod]
   public void TestMethod1()
   {
      TestContext.WriteLine("This is test {0}", TestContext.TestName);
   }
The AddResultFile
Finally, the BeginTimerEndTimer
Introduction to Microsoft Fakes
One of the many features people have asked for from Visual Studio is for it to ship with a mocking framework. A mocking framework enables you to provide a fake implementation of a type or object, along with logic that verifies how calls were made to the mocked object. There are several good mocking frameworks currently available in the community, including Moq, Rhino, and NMock. Although these tools have strong followings and a good reputation, there was still a need to provide a mocking framework to customers who may be unable to utilize open source or third-party tools. Hence, the Microsoft Fakes framework in Visual Studio 2013.
Developers often need to test individual components of their code in isolation from other components. Commonly, this is performed using dummy implementations of code that are not currently being tested. In reality, it can be very difficult to implement this dummy code because the actual code being tested is expecting real code on the other end. The Fakes framework helps developers create, maintain, and inject dummy implementation of components into the developer's unit test, making it quick and easy to isolate specific unit tests from the actual environment.
Currently, the Fakes framework focuses on two kinds of test fakes for .NET programming: stubs and shims.
Stubs are concrete implementations of interfaces and abstract classes that can be passed into the system being tested. A developer provides method implementations via .NET delegates or lambdas. A stub is realized by a distinct type that is generated by the Fakes framework. As such, all stubs are strongly typed. You cannot use stubs for static or non-overridable methods. Instead, you should use shims in those instances.
Shims are runtime method interceptors. They enable you to provide your own implementation for almost any method available to your code in .NET, including types and methods from the .NET base class libraries.
Choosing Between Stubs and Shims
Stub types and shim types are built on different underlying technologies. As such, they have different requirements, properties, and use cases. Table 19.4 provides a list of the different aspects to consider when choosing between a stub and a shim.
Table 19.4 Stubs versus Shims
| Aspect | Stub/Shim | Reason |
| Performance | Stub | The runtime code-rewriting used by shims introduces some performance issues at runtime. Stubs do not do this. |
| Static Methods | Shim | Stub can only influence overridable methods. They cannot be used for static, non-virtual, and sealed virtual methods. |
| Internal Types | Stub/Shim | Both stubs and shims can be used with internal types made accessible through the |
| Private Methods | Shim | Shim types can replace private methods if all the types on the method signature are visible. |
| Interfaces/Abstract Methods | Stub | Stubs implement interfaces and abstract methods that can be used for testing. Shims can't do this because they don't have method bodies. |
The general recommendation is to use stubs to isolate dependencies within your code base by hiding components behind interfaces. You should use shims to isolate third-party components that don't provide a testing API.
Using Stubs
Stubs are a part of the Fakes framework that enables you to easily isolate unit tests from the environment. You do this by generating a Fakes assembly, based on an actual target assembly. When the Fakes assembly is generated, a stub type is created for each non-sealed class and interface in the target assembly that contains virtual or abstract methods, properties, or events. The stub type provides a default implementation of each virtual member and adds a delegate property that you can customize to provide specific behavior.
For this example, you are going to make a list of books. To get started, create a new C# class library project named FakesUsingStubsClass1.csBook.csBook.csBook
public class Book
{
    public int Isbn {get;set;}
    public int ListItemId {get;set;}
    public Book (int isbn, int listItemId)
    {
        Isbn = isbn;
        ListItemId = listItemId;
    }
}
Now add the following class, BookListToStubAddBookToList
public class BookListToStub
{
    public int ListId {get;set;}
    public int CustomerId {get;set;}
    private List<Book> _books = new List<Book>();
    public ReadOnlyCollection<Book> Books {get; set;}
    private IListSave _listSave;
    public BookListToStub(int listId, int customerId, IListSave listSave)
    {
        ListId = listId;
        CustomerId = customerId;
        _listSave = listSave;
        Books = new ReadOnlyCollection<Book>(_books);
    }
    public void AddBookToList(int isbn)
    {
        var bookItemId = _listSave.SaveListItem(ListId, isbn);
        _books.Add(new Book(isbn, bookItemId));
    }
}
The saving functionality is implemented using a class called ListSaveIListSave
public interface IListSave
{
    int SaveListItem(int listId, int isbn);
}
public class ListSave : IListSave
{
    public int SaveListItem(int listId, int isbn)
    {
        throw new NotImplementedException("Forgot to add SQL Code");
    }
}
As you can see from the preceding snippet of code, the actual code to perform the save has not been implemented yet. Normally, that would make testing the save functionality difficult. Microsoft Fakes enables you to stub out the saving functionality so that you can test the rest of the code even though the saving functionality does not currently exist.
Right-click your solution and add a new C# unit test project to the solution, named FakesUsingStubs.Tests.BookListToStubTests.csFakesUsingStubsFakesUsingStubsFakesUsingStubs
- A file named
.fakes - The target assembly is scanned, and fakes (both stubs and shims) are created for the types found. These types are named
StubXShimX - These fake types are added to a new assembly created in a sub-folder called
FakeAssemblies
To complete your testing, you need to mock out the database call to isolate the logic in the AddBookToListBookListToStubTests.cs
[TestMethod]
public void AddBook_BookShouldBeAddedToList()
{
    int bookItemId = 77;
    int listId = 1;
    int customerId = 25;
    int isbn = 12345;
    //Stub IListSave
    var listSave = new Fakes.StubIListSave();
    listSave.SaveListItemInt32Int32 = (l,i) => bookItemId;
    var list = new BookListToStub(listId, customerId, listSave);
    list.AddBookToList(isbn);
    var book = list.Books[0];
    Assert.AreEqual(isbn, book.Isbn);
}
When you created the Fakes assembly, you created a stub method for the IListSavebookItemId
Using Shims
Shims are runtime method interceptors. They enable you to provide your own implementation for almost any method available to your code in .NET, including types and methods from the .NET base class libraries.
For this example, you are again going to make a list of books, but with some changes to the code. Instead of implementing an interface, you are going to implement a static class for the data access layer. To get started, created a new C# class library project named FakesUsingShimsClass1.csBook.csBook.csBook
public class Book
{
    public int Isbn {get;set;}
    public int ListItemId {get;set;}
    public Book (int isbn, int listItemId)
    {
        Isbn = isbn;
        ListItemId = listItemId;
    }
}
Now add the following class, BookListToShimAddBookToListDAL
public class BookListToShim
{
    public int ListId {get;set;}
    public int CustomerId {get;set;}
    private List<Book> _books = new List<Book>();
    public ReadOnlyCollection<Book> Books {get; set;}
    public BookListToShim(int listId, int customerId)
    {
        ListId = listId;
        CustomerId = customerId;
        Books = new ReadOnlyCollection<Book>(_books);
    }
    public void AddBookToList(int isbn)
    {
        var bookItemId = DAL.SaveListItem(ListId, isbn);
        _books.Add(new Book(isbn, bookItemId));
}
}
Create a new C# class file named DAL.cs
public static class DAL
{
    public static int SaveListItem(int listId, int isbn)
    {
        throw new NotImplementedException("Forgot to add SQL Code");
    }
}
As before, the actual code to perform the save has not been implemented yet. Microsoft Fakes allows you to shim out the saving functionality, enabling you to test the rest of the code even though the saving functionality does not currently exist.
Right-click your solution and add a new C# unit test project to the solution, named FakesUsingShims.TestsBookListToShimTests.csFakesUsingShimsFakesUsingShimsFakesUsingShims
To complete your testing, you need to mock out the database call to isolate the logic in the AddBookToListBookListToShimTests.cs
[TestMethod]
public void AddBook_BookShouldBeAddedToList()
{
    int bookItemId = 77;
    int listId = 1;
    int customerId = 25;
    int isbn = 12345;
    using (ShimsContext.Create())
    {
        Fakes.ShimDAL.SaveListItemInt32Int32 = (l,i) => bookItemId;
        var list = new BookListToShim(listId, customerId);
        list.AddBookToList(isbn);
        var book = list.Books[0];
        Assert.AreEqual(isbn, book.Isbn);
    }
}
In the test method, you create a ShimsContextSaveListItem
Using Test Adapters
The unit testing framework in Visual Studio 2013 is extensible. This allows third-party unit testing frameworks, such as NUnit or XUnit, to create test adapters for Visual Studio unit testing. Now a developer can use any testing framework that provides an adapter for unit test creation.
You can download most third-party unit testing frameworks using the Visual Studio Extension Manager inside of Visual Studio, or you can get them directly from the Visual Studio Gallery on the MSDN website.
To download a third-party test framework adapter using the Visual Studio Extension Manager, open Visual Studio and select Tools ⇒ Extensions and Updates. The Extension and Updates dialog box opens. In the dialog box, select Online ⇒ Visual Studio Gallery ⇒ Tools ⇒ Testing, as shown in Figure 19.2.
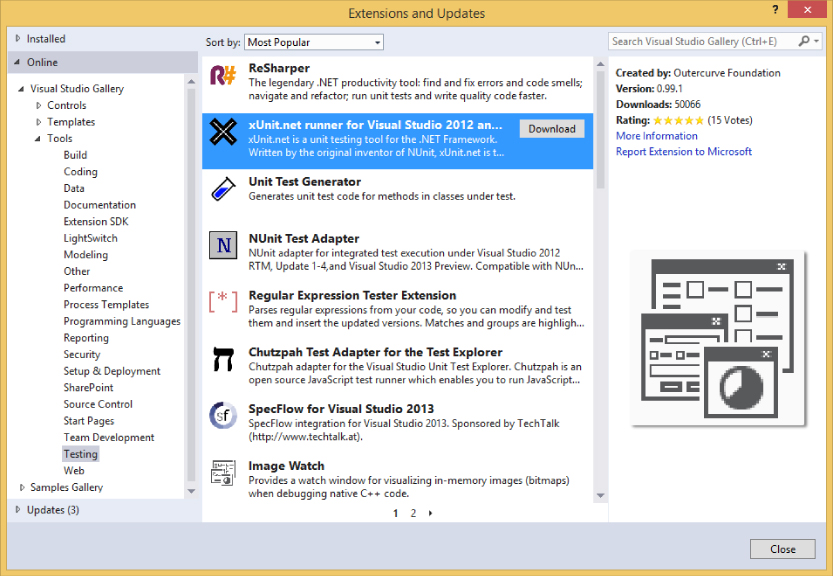
Select the Unit Test framework to install, and click the Download button. If you already have a testing framework installed, you see a green check mark instead of a download button. Clicking the Download button automatically downloads and installs the testing framework. You need to restart Visual Studio 2013 before you can start using the testing framework.
After you have restarted Visual Studio, you can start creating unit tests using the new test framework, and you can execute those unit tests inside of Visual Studio 2013.
There are a couple of limitations with using test adapters. For example, even though you can run them using the Agile Test Runner as part of the Team Foundation Build process, you can't associate the automation with a test case. This means that you can't use them as part of your test controller/agent infrastructure.
Summary
Microsoft has brought the advantages of unit testing to the developer by fully integrating features with the Visual Studio development environment. If you're new to unit testing, this chapter has provided an overview of what unit testing is, and how you can create effective unit tests. This chapter examined the creation and management of unit tests and detailed the methods and attributes available in the unit test framework. You should be familiar with attributes for identifying your tests, as well as many of the options that the Assert
You also learned about the Microsoft Fakes framework, and how you can use shims and stubs to help you test your code more effectively while isolating different systems in your environment. Finally, the chapter covered test adapters, how test adapters enable you to utilize third-party testing frameworks, and how you can install test adapters.
You should become familiar with the benefits of unit testing, keeping in mind that unit tests are not a replacement for other forms of testing, but they are a very strong supplement.
Obviously, testing is an important aspect to prove that your code is ready to be deployed into production. However, just because the code passes all the unit tests doesn't mean that it is necessarily ready to ship.
Chapter 20 examines the code analysis tools in Visual Studio 2013 that help you quickly look for common mistakes, security issues, or even violations of standards. You also find out how to use code metrics to identify parts of the systems that may prove difficult to maintain, how code cloning can help you find duplicate code to refactor in your solution, and how the new CodeLens feature provides detailed information directly in the code editor.