
Exploring project management capabilities in Team Foundation Server
Learning about Team Project
Learning how to use work items to plan your project
Understanding work items and how you can track work
Learning how to use Microsoft Project and Microsoft Excel to manage work items in Team Foundation Server
Software development is a team sport. The players in a software development team include developers, testers, business analysts, project managers, and more.
In American football, a quarterback is leader of the team on the field and has multiple tasks at hand — the most obvious being the handling of the football. A quarterback should be able to communicate clearly to his teammates the plan for the next play, call an audible depending on the opposing team's defensive formations, change routes on-the-fly if his assigned receivers are double-teamed by the opposition, and manage the game clock effectively and efficiently. This is just a sample list of a quarterback's responsibilities.
You could infer that there are similarities between the responsibilities of a quarterback and the role of a project manager in a software development team. There are clear parallels in that a project manager should communicate the task at hand clearly to the team, be able to change the project plan based on changes caused by requirement changes or resource issues, be able to reassign tasks if a particular team member is blocked, and manage the overall schedule and scope. While a quarterback's responsibilities are sometimes tested in a matter of few seconds during a particular play, thankfully it is not that dramatic in a project manager's world.
The point here is that a project manager is a key player and a leader of the software team, and has a huge impact on the success or failure of the project.
While we're on the subject of success and failure, it may be worth mentioning that a 2004 report from Standish Group estimates an overall software project success rate of 34 percent. In other words, two thirds of software projects have failed to meet the needs of the stakeholders. It is rather a gloomy assessment. A quick search on the Internet will result in several reports and research papers on the factors contributing to the failures. Could you attribute all of this project success or failure to a project manager? Not quite. Remember, software development is a team sport. So, the entire team must play their roles in successfully completing a project, with the project manager as the orchestrator.
Having the right information at the right time is critical to understanding the various aspects of the project, including schedule, scope, risks, resource issues, and so on. As the famous saying goes, "Garbage in means garbage out."
Obviously, information plays a key role here. You no doubt know that having binders full of process controls for the team to follow, and a gazillion tools/logs to capture the information, is only a deterrent, and does not help in capturing the information.
Here are some of the common tasks that are performed repeatedly by project managers:
Help define scenarios and customer requirements to map out the features of the software application, and ensure that these features provide business value within a limited budget.
Create a set of iteration plans based on milestones.
Work with team members to define and schedule development and test tasks to successfully implement each scenario.
Orchestrate work flow, facilitate communication within your development team, and manage relationships.
Continuously monitor the status of the project to avoid bottlenecks and identify possible risks.
In Visual Studio 2010 and Team Foundation Server 2010, there are capabilities/features to accomplish many of these things. Not only can you create and monitor project plans, Team Foundation Server 2010 provides a set of tools and the infrastructure to help you communicate and collaborate with other team members, automatically aggregate and collect project health metrics, and centralize all project management operations. Project managers can now choose to interact with a project on Team Foundation Server using a variety of tools, including Microsoft Excel, Microsoft Project, or Visual Studio 2010 Team Explorer. You can pick the tool you feel most comfortable with, and run with it. The same is true if you are a developer, or an architect, or a tester. You can choose one of the Visual Studio editions, or Excel, or Team Explorer to integrate with Team Foundation Server 2010.
Team Foundation Server provides a set of capabilities to aid in better planning, scheduling, managing scope, communication, reporting and analysis, and continuous process improvement. These capabilities include the following:
Team project — Stores and organizes data about the entire software development lifecycle of a project, including work items, code, tests, reports and more. It's the topic of the next section of this chapter.
Team Project Collection — A new concept introduced in Team Foundation Server 2010, this is a container for multiple team projects. See Chapter 17 for more information on team collections.
Process template — This is a set of XML files that defines the process used by a team project. This includes work item types, fields and workflow, reports, and more. See Chapter 23 for details.
Process guidance — This is a narrative guidance for the two process templates. See Chapter 23 for more on this.
Work item tracking — Work items represent requirements, tests, and bugs in Team Foundation Server. The tracking of these work items (including the state, the assignment, and information contained within) is key to managing the project. You will learn more about work items and work item tracking in Chapters 22 through 26 of the book.
Project portal/dashboards — Dashboards provide a one-stop view for team members. This includes a snapshot of work items assigned to a particular team member, reports, and more. This is explored in more detail in Chapter 24.
Microsoft Project and Microsoft Excel integration — With this integration, team members can access information in Team Foundation without having to use Visual Studio. More on this later in this chapter.
Planning workbooks — Team Foundation Server 2010 introduced two new planning workbooks to help Agile teams manage their backlogs both at the project level, and at the iteration level. See Chapter 25 for details.
Reporting — Team Foundation Server leverages the wealth of data captured throughout the lifecycle of a project, and presents it in various reports. There are sets of reports included with each of the two process templates, and you can modify existing reports, or add new reports. See Chapter 24 for more on this.
The basis for all projects in Team Foundation Server is the team project. The team project holds information about every step of the software development lifecycle in a central repository within the Team Foundation Server. This includes requirements, scheduling, source code, build, quality, and resources.
There are important differences between a team project and a Visual Studio project — in fact, some people get confused about the meaning of these project types. The Team Explorer enables you to navigate and manage all elements of your team project, including your development team, the SharePoint team portal, source code repository, work item database, documents, reports, and templates.
Not every new project in your organization will require a new team project. If the new project is part of a larger organizational effort, or you are continuing a new phase of an existing effort, then you are probably looking at joining an existing team project instead of a creating a new one. Obviously, creating a new team project means that you will have the flexibility to choose the process you want to use, customize work items based on the needs of the project, have a project portal specific to that team project, and so on. These items all have one-to-one dependency with the team project.
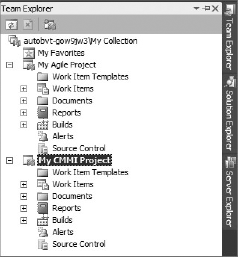
Figure 22-1 shows two team projects (MyAgileProject and MyCMMIProject) as displayed in Team Explorer.
Note
Chapter 17 provides a detailed overview of Team Explorer.
Before examining the anatomy of a team project, let's create a new team project. Here is what you need to know before you start:
The name for your team project.
The process that you are going to use with this team project.
Note
Chapter 23 provides more detail on a Visual Studio Team Foundation Server 2010 process template.
A description for the team project.
Source control needs for your project.
Portal site needs for your project.
Warning
Be sure to connect to a Team Foundation Server before creating a team project. Note that the team project name or the process template cannot be changed once the team project is created. It is important that you make these selections after careful consideration of the team's requirements for the project.
To create a new project, select File
Next, select a process template (see Figure 22-3). Team Foundation Server comes with two process templates: MSF (Microsoft Foundation) for Agile Software Development v5.0, and MSF for CMMI (Capability Maturity Model Integration) Process Improvement v5.0.


You should choose the process template that best fits your team's need. For this example, select the MSF Process for Agile Development template. You can obviously customize the template and associate artifacts along the way, but there is not an easy way to change to the process template of an existing team project. Note the link on this dialog window, which points to an online Web page with links to other available process templates. For more information on Process Templates, see Chapter 23.
The next step is to choose the site setting. If you have set up SharePoint integration with Team Foundation Server, then a portal site based on SharePoint can be created for the team project. (Refer to Chapter 17 for more on this integration.) As you can see in Figure 22-4, you can elect to create a SharePoint site. Use the Configure option to specify where you want the site to be created.

You also have the option to not create a SharePoint site. You can use the Project Portal Settings dialog shown in Figure 22-5 to change this selection. As you can see, there is an option to point to an existing Web site instead of a new portal site. You can do the same for process guidance as well. For example, you can use the same process guidance site for more than one team project.

The next step in the configuration (Figure 22-6) is to set the preliminary source control options. There are two choices:
Create an empty source control folder for your project.
Create a new branch from an existing source control tree (if, for example, you are creating a project that is derived from another).
For this example, select the option to create an empty source control folder.
Clicking Next takes you to the confirmation page. Here is one last chance to go back and change any of the information that you have specified so far. Click Finish to create your new team project. Depending on the process template you chose, a set of documents will be generated for your project.
The process may take a little while. When it is completed, several folders appear in the Team Explorer, as shown in Figure 22-7.


Your team project tree has five primary nodes:
Work Items — This includes predefined queries and custom queries to list the work items associated with your project.
Documents — This includes Process Guidance, Excel Reports, Samples and Templates, and Shared Documents to help you map out your development process.
Reports — This includes a variety of reports grouped into several folders.
Builds — This provides access to a variety of build definitions, including custom types.
Source Control — This provides easy access to your source code tree via the Source Control Explorer.
The team project becomes the gateway to every member of the project team. For those team members familiar with Visual Studio, Team Explorer and the various nodes should be familiar.
Before you can start working with a team project, you must first connect to your Team Foundation Server. Team Explorer enables you to connect to different instances of Team Foundation Server and manage the associated projects. The easiest way to connect to Team Foundation Server is by clicking Tools
Once you connect to the server, a window will appear to help you manage your server, team project collection, and team projects. Figure 22-8 shows the "Connect to Team Foundation Server" window. Notice that the team projects have checkmarks next to them. This enables you to pick the team project to which you want to attach and, hence, show in the Team Explorer.

Also, you can remove the team project from the Team Explorer by right-clicking on the team project name and clicking "Remove," or simply selecting the team project and pressing the Delete key. Note that this action does not delete the team project, but only removes it from the Team Explorer. You can add it back to the Team Explorer at a later time if you choose to.
Once you have created a project, you must be able to configure it to fit your needs. As a project manager, you want to ensure that the team members have access to the team project and associated artifacts (such as reports) that are critical to their jobs. You, as a project manager, will work with your administrator to manage the project security settings.
One of the easiest ways of organizing work items in your project is by grouping them together logically. In Team Foundation Server, you can use Iterations and Areas. Many software projects (particularly involving teams using Agile Methods) develop software in iterations. It makes sense to organize work items in iterations, rather than having teams wade through a huge pool of work items for each project.
To access the Areas and Iterations feature, right-click on your team project and then select Team Project Settings
Click on the Iterations tab and you'll notice that there are already predefined iterations in place: Iteration 1, Iteration 2, and Iteration 3, as shown in Figure 22-9. You can rename these to whatever you like.

Areas offer another way of organizing and classifying your work. Think of Areas as another word for "categories." You can define your own custom areas and assign work to them. Then, it is quite easy to filter the work by area. Areas also can be used to manage and group work by teams or sub-teams. For example, there could be sections of a project that will only be worked by a small set of team members; areas can be used to set off that work without having to expose it to the larger team.
To access the Areas options, right-click on your project and then select Team Project Settings
The team project portal is the window to a wealth of information about team projects. In Team Foundation Server, you have the option to use the team project portal based on Windows SharePoint Services (WSS), or the new Microsoft Office SharePoint Services (MOSS) based dashboards with Excel services reports. You will learn more about portals, dashboards, and reports in Chapter 24.
With the creation of your team project and associated configurations (including permissions and source control settings), you now have the necessary infrastructure to start and structure your project. As a project manager, one of your key activities is to build a project plan and continue with the planning throughout the project, as changes appear along the way. Obviously, the method or technique you use may vary depending on the methodology you use. Whether you are an Agile team doing just enough planning and continuously changing the plans as you embrace change, a team that lays out a detailed plan upfront and monitors and modifies it as change happens, or somewhere in between, the activity of planning is every bit as important. To quote Dwight D. Eisenhower, "Plans are nothing; planning is everything."
Work items are the key entities that take the form of requirements, bugs, test cases, and so on. Regardless of the tool you use, the work items are created and stored in the centralized data store of Team Foundation Server. (Chapter 19 provides more information on this.) What this means is that the team members can choose the tool they are most comfortable with, and still have access to the task lists defined as part of the work breakdown structure. For example, a project manager may opt to use Microsoft Excel to define and modify the work breakdown structure, whereas a developer or a tester may opt to use a work item form from within Visual Studio.
Note
If you rather enjoy the comfort of your Outlook application while working with Team Foundation Server work items, there are couple of third-party tools that integrate Team Foundation Server and Microsoft Outlook. Check out http://www.teamcompanion.com and http://www.personifydesign.com/products/teamlook/teamlook.aspx for these third-party tools.
Work items are the drivers behind Team Foundation Server's work management and project-tracking capabilities. In this section, you'll learn a little about work item internals, including what they are, how to create and manage work items in your projects, using work item queries, and how to create custom work item types (WITs).
Work items are the core entities in Team Foundation Server that represent requirements, bugs, issues, test cases, risks, and more. Work items capture and provide the information that powers the reports.
In Team Foundation Server, the type of work items depend on the process template you use. Each of the process templates will have a set of work items. For example, the Agile template that ships in Team Foundation Server 2010 has the following work items:
User Story
Task
Issue
Bug
Test Case
Shared Step Set
Note
For more on these work item types in the Agile template, refer to Chapter 23.
All of the work items in your project are stored in the work item database and, hence, form the basis for the reports used to gauge the progress of a project.
Table 22-1 describes some of the common fields found in work items. (Note that this is, by no means, an exhaustive list.)
Table 22.1. Common Fields Found in Work Items
NAME | DESCRIPTION |
|---|---|
ID | Uniquely identifies each work item within the work item database. |
State | Describes the status of a work item. The initial state varies by the work item type. For example, it is "Active" for a new "User Story" work item in the Agile template. |
Type | The type of work item. Depending on the process template you select, several work item types are made available within a team project, such as User Story, Bug, Test Case and so on. |
Priority | Indicates the priority order for your work items. This enables your team members to prioritize their workloads and rank work items in order of importance. |
Title | The title of the work item. Ensure that you create a descriptive title, because it is the first thing you will see when you design a Work Item Query. For example, simply writing "Bug" will not help you assess the type or importance of the bug in the system. |
Assigned To | Identifies the team member to whom the work item is assigned. You can change the value of this field when you want to reassign a work item to another team member. |
Work items can also contain durations (including a start date and finish date), descriptions, work estimates, and more. You can also associate a work item with an area and an iteration. For example, if you are doing iterative development, you want to assign work items (such as requirement, use case, story, and so on) to the corresponding iteration.
In simple terms, a work item is a collection of fields with information necessary to carry out various activities in project management, be it development or testing or issue identification. Collections of these fields are grouped into types of work items. Work items are represented in a form with the respective fields, and any associated validations and rules. For example, certain fields may be read-only, and certain other fields may only become editable based on a certain value entered in another field.
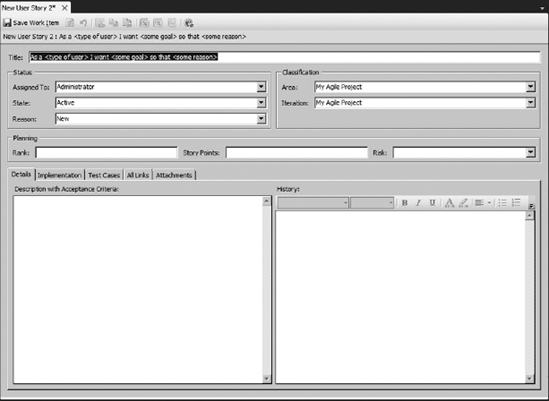
Figure 22-10 shows the work item is displayed within Visual Studio.

Earlier, you learned about areas and iterations. As you can see in Figure 22-10, work items have fields for choosing areas and iterations. You will select the appropriate values for these two fields to group work as needed.
Work item links and relationships have undergone a major facelift in this new version of Team Foundation Server. In the previous version of Team Foundation Server, work item lists were essentially a flat list with simple linking between one work item and another. This was not particularly useful when you were dealing with relationships that were more defined (such as a parent-child or predecessor-successor type relationships), nor when you were building a tiered list with grouped work items.
Enter Team Foundation Server 2010. The prayers of those wishing for hierarchical work items have been granted. Not only that; now, out-of-the-box work items support several link types, and allow you to add custom link types as well.
In Figure 22-11, you see a list of link types. This window shows a dialog to add a linked work item from an existing work item.

It is easy to add a linked work item by right-clicking on the work item you want to add a link to, and choosing whether you want to add a link to an existing work item or create a new linked work item, as shown in Figure 22-12.

Curious eyes will have also noticed the visualization of the links in Figure 22-11. This provides a quick visual preview of what the relationship looks like. For example, if you change the link type in the drop-down from "Child" to "Parent," you'll see that the visualization changes accordingly.
Let's look at some of the common work item link types, and how you can use them to effectively manage and track your project.
You will use the "Related item" link type to create a simple and straightforward relationship between one or more work items. You will typically use this to link work items of same level (such as two Requirements work items or two Features work items). Note that, by using this type, you are not creating a hierarchy. When you migrate over work items that are linked from team projects in prior versions of Team Foundation Server, these links will, by default, be made into a Related link in Team Foundation Server 2010.
These two link types bring the much-awaited hierarchical work items to Team Foundation Server. You will use these two link types to create a tiered set of work items.
For example, a user story will be completed by finishing a set of task work items. For this, you would create a user story work item and set of child task work items that are associated with the particular user story work item. Note that each work item can have only one parent, but a parent can have many child work items. Figure 22-13 shows a work item with a set of linked work items.

As you can see, the work item displays information such as the ID, Title, who it is assigned to, and so on. There are also a few tabs that are included in this work item. Note that the tabs, and any information within these tabs, vary by the work item type.
Figure 22-13 shows the details in the Implementation tab, which contains the associated work items. This user story work item contains four task work items as its child work items. If you open one of the child work items, you will see the parent work item in the Implementation tab.
In this section, you will see how to create and edit work items using Visual Studio. Later in this chapter, you will learn how to carry out these tasks using Team Foundation Server Web Access, Microsoft Office Excel, and Microsoft Office Project.
To create a new work item from within Visual Studio, go to your team project in Team Explorer. Right-click Work Items, and select Add Work Item. Choose the type of work item you want to create. You can also click the Team option in the Visual Studio menu and select Add Work Item.
If you choose to add a new "User Story" work item, fill in the New User Story form, as shown in Figure 22-14. As you see, the Title field has template text filled in for you. This is the form to define the user, the user's actions, and the goals. The new "User Story" work item will be saved in the work item store, and will be accessible to everyone on the team project.
To edit a work item, you can go to that particular work item if you know the ID; or, in Team Explorer, your can pick a query to find the work item. For example, double-click the Work Items
As soon as you select a work item in the top pane, you can edit the work item in the bottom pane. Make the changes to the selected work item, and click Save Work Item to save these changes to the work item data store.
Once the changes are saved, you will see that the History information is updated with an entry for the latest change that you made. This will include the date and time stamp for the changes that were made, the user that made the changes, and the fields that were changed, including the original value and the new value. This information is quite valuable for the entire team. As a project manager, you can monitor these changes and, if there are questions that are based on these changes, you know who to ask, because that information is captured automatically.
Now that you know how to create a work item, edit a work item, and add links to a work item, the next step is to understand how to track the work items throughout the project lifecycle. Tracking the status of the work items (and, hence, the progress of the project) is a chore that project managers do regularly.
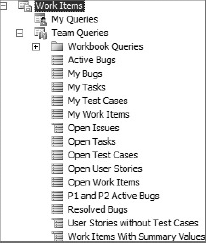
You will use the work item queries to get a view into the status of the various work items. Team projects contain a Work Items folder with two sub folders titled My Queries and Team Queries. The Team Queries folder contains several predefined work item queries that are based on the process template of the team project. Figure 22-15 shows the list of queries in a team project based on the Agile Process template.
Note
A subfolder called Workbook Queries in Team Queries is discussed in more detail in Chapter 26.
To get the results of a Work Item Query, you can simply double-click the corresponding query in the Team Explorer window.
Let's look at the Open User Stories query by right-clicking on it and selecting the Edit Query option. This will load the query editor with the split pane. The top pane will display the query itself, with the results of the query displayed in the bottom pane, as shown in Figure 22-16.
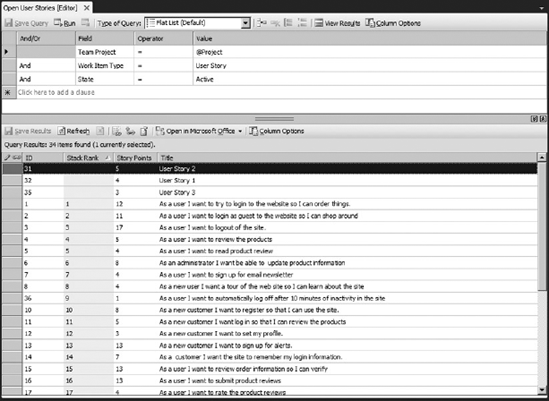
As you see in the query editor, the Open User Stories query uses three clauses to pull in work items that are User Stories from the current team project with a state that is not Closed. You could modify the clauses in the query editor to tweak the results. For example, if you want to restrict the query to pull only work items assigned to a certain team member, you could do so by adding a clause using the field Assigned To.
In Figure 22-16, you see the "Type of Query" field in the query editor. There are three types of queries:
Flat List
Work Items and Direct Links
Tree
For the Open User Stories query, this field is set to Flat List. That is the default option for work item queries. This query results in 34 items, as shown in the bottom pane in Figure 22-16. To get a list of work items linked work items, change the query type to "Work Items and Direct Links." As you see in Figure 22-17, this query now brings a total of 74 items, including 34 top-level items and 40 linked items.

You can refine this list further by using the linking filters. You could choose to return work items with any type of links (which is the result shown in Figure 22-17), or you can only return work items with specific types of link. You could also choose to return only work items that either have or don't have a specified type of link. This type of query is very helpful when you want to find a list of requirements without any test cases, user stories without any associated tasks, and so on.
To create a Work Item Query, go to the Team Explorer pane. Right-click on Work Items, and select Add Query. In the query editor, simply change the And/Or, Field, Operator, and Value fields.
Once you save a query, you will be prompted to do one of the following:
Make it visible to everyone on the team — If you choose to make it visible to everyone on your team, the query will appear in the
Team Queriesfolder in Team Explorer (and everyone on your team will be able to run it).Make it visible only to yourself — If you choose to save it for yourself, it will appear in the
My Queriesfolder in Team Explorer (and it will not be visible to the rest of your team). Personal queries are useful to organize your work items in useful views (for example, all the personal tasks that were assigned by a particular project manager).Save it as a file — If you are working on a customized process template, the Save as a File option is useful to extract queries as WIQ files.
You probably are not thinking about (or used to thinking about) Visual Studio when it comes to project planning. And that does not have to change. With Visual Studio Team Foundation Server 2010, you have at least three ways to build and manage your work breakdown structure:
Using Team Explorer within Visual Studio
Using Microsoft Office Project
Using Microsoft Office Excel
This section examines the integration between Microsoft Office Project/Office Excel and Team Foundation Server. Obviously, these are two very popular and commonly used Microsoft tools for laying out a work breakdown structure and managing the tasks throughout the lifecycle of the project.
Note
Chapter 25 provides more information on the use of Excel for managing product backlog and iteration backlog for an agile team.
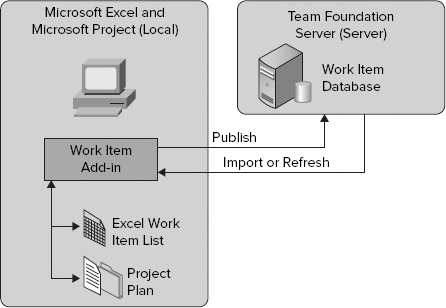
Figure 22-18 from the Team Foundation Server help documentation shows the integration between Team Foundation Server, and Microsoft Office Project and Microsoft Office Excel. As you can see, the Work Item Add-in is the key connector. You get this when you install Team Explorer or one of the Visual Studio 2010 editions on your computer.
In Microsoft Office Project, you see a team project menu item and a toolbar with team-related actions, as shown in Figure 22-19.
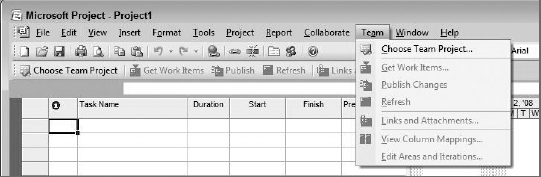
You start by connecting to a team project.
Once you connect to the team project, you create the project plan with a detailed list of requirements, schedule, resources, and so on.
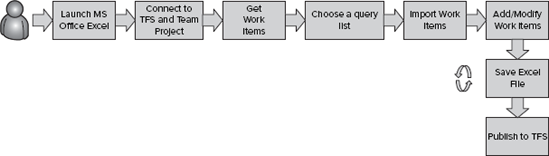
Figure 22-20 shows a pictorial representation of a flow to connect to Team Foundation Server and manage work items.

The mapping between the fields in the work item in Team Foundation Server and the fields in Microsoft Project are defined in a field mapping file, which is an XML file that is specific to a team project. It can be modified by using TFSFieldMapping utility. You will use this command-line utility to download the mapping file of your team project, make changes as necessary, and upload the file to the team project. It is important that the mappings between the fields in the Team Foundation Server Work Item database and Microsoft Project are compatible.
Let us start by attaching to an existing team project. Launch Microsoft Project and click "Choose team project" from the toolbar. In the "Connect to Team Foundation Server" window, verify that the Team Foundation Server name is correct and select a team project. Then, click OK to connect to this project.
You will notice that a few new columns show up in Project after the connection has been established. By default, Microsoft Project uses the Gantt view. In this split view of Gantt chart and task sheet, the field labels are updated to reflect the labels used in Team Foundation Server work items. In this view, read-only fields are marked, and fields with predefined values in Team Foundation Server will have a drop-down attached to them for selection. There are fields in Microsoft Project that are not stored in Team Foundation Server work items, so saving the Microsoft Project plan is a good idea.
In addition, if you have certain tasks that you are not going to track in Team Foundation Server (such as getting a contract in place, budget approval, vendor selection activities, and so on), you can still have them in the same project plan, but mark the field "Publish and Refresh" as No. This will prevent this line item from being published or overwritten during the synchronization with Team Foundation Server work items.
Obviously, as project manager, you will lay out a high-level project plan and let the team members work on filling in the details (including detailed requirements, a breakdown into development and architecture tasks, and testing-related tasks). These tasks could be entered by the business analyst, developer, architect, and testers, using the Team Explorer within Visual Studio. You can pull these work items into Microsoft Project and into your project plan by clicking on the Get Work Items option in the toolbar.
This will launch the Get Work Items dialog, as shown in Figure 22-21.
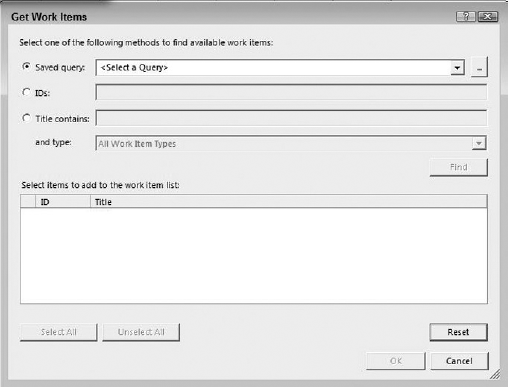
From this dialog, you have the following three ways to pull work items into Microsoft Project:
By using a saved query from within Team Foundation Server (which is a frequently used option to pull in a set of work items from Team Foundation Server)
By specifying the ID or IDs of the few work items (if you are looking to pull particular work items)
By specifying a keyword in a work item title, and the type of work item
Regardless of the option you choose, you click the Find button to locate the work items based on your selections. Then you have the choice of selecting a particular work item (or all work items) from the results window, and bringing those into Microsoft Project.
As an alternate way to get these work items into Microsoft Project, start in the Team Explorer and run the query that you are interested in. Once you get the results of this query, you will see a menu item to open the results in Microsoft Project or Microsoft Excel, or to send the query in an email to Microsoft Outlook.
Once you have the requirements and tasks in the project plan, the next step is to organize the plan with dependencies, a summary, and subtasks.
You could create summary tasks and subtasks from within Microsoft Project using the indent and outdent capabilities, or you could use the "Links and Attachments" option from the team project toolbar. Note that if you use the "Links and Attachments" option to create summary tasks and subtasks, these relationships/links are stored in the Team Foundation Server database. To see this relationship in the Microsoft Project plan, you must publish these changes and do a refresh of these work items from Team Foundation Server.
In MS Project, you can define your work breakdown structure with summary and sub tasks. After you are finished organizing the project plan, publish the work items to Team Foundation Server by clicking the Publish button in the toolbar. To avoid conflicts with changes, synchronize the project plan in Microsoft Project with Team Foundation Server on a regular basis.
In Visual Studio 2010, with the hierarchical support, the list of work items retains the parent-child relationships established in MS Project. Figure 22-22 shows the list of work items in a tree view with parent-child relationships.

Note
This linking and hierarchical capability for work items was one of the most often requested features in Team Foundation Server, and it is now available in the 2010 version.
Note
You can continue to work with your project plan offline while not connected to Team Foundation Server or a team project. Once you have completed making necessary changes, you can reconnect to Team Foundation Server and the team project, and perform a "Publish" to get the changes in. If there were any conflicts in changes, you will get validation errors that you need to take care prior to completing the publish. If you have not made any changes to the plan while you were offline, you can simply pull in the latest set of work items by reconnecting to Team Foundation Server and the team project and performing "Refresh."
There are certain operational differences between Office Project and Team Foundation. The Team Foundation Server help document captures these differences, as shown in Table 22-2.
Table 22.2. Differences Between Office Project and Team Foundation Server
COMPONENT | OFFICE PROJECT | TEAM FOUNDATION SERVER | RECOMMENDED ACTIONS |
|---|---|---|---|
Team project calendar | Maintains a team project calendar week that specifies workday length, weekends, and holidays. | Has no concept of a calendar week, so it cannot track days when work does not take place. | Use Microsoft Project to manage project schedules, and use this feature. |
Task constraints and dependencies | Allows you to specify task dependencies, dependency types, and lead and lag times that specify the scheduling relationships between tasks. | Tracks predecessor-successor dependencies as work item links for context, but it does not track dependency types, lead and lag times, or work item constraints. | Use Microsoft Project to manage and update changes to dependencies and constraints. |
Start and finish dates and tracking hours worked | Constraints applied to tasks dictate when tasks can start or when they must finish. A change made to the number of hours worked automatically recalculates remaining work and finish dates. | Stores estimated, completed, remaining work, and start and finish dates, but it does not recalculate the fields when updates are made. For example, if you use Team Explorer to increase the duration of a task, Team Foundation Server does not update the finish date. | Use Microsoft Project to manage and update changes to the start and finish dates, and to update calculated fields for completed and remaining work. |
Resource assignments | Supports allocating multiple resources to a task. | Allows only one resource to be assigned to a task. | In Microsoft Project, assign only one resource to a task. Break tasks into subtasks in order to allocate them to more than one resource. |
Changes made to tasks in Microsoft Project must be published to be seen in Team Foundation Server. | Changes made to work items in Team Foundation Server must be refreshed in Microsoft Project to be seen. | In Microsoft Project, only publish those tasks that you want to also track in Team Foundation Server. You do this by setting the Publish and Refresh field as needed. Publish and refresh the project plan frequently to avoid data conflicts. | |
[a] Source: VSTS Help Files | |||
In summary, as a project manager, you can continue to work in the familiar environment of Microsoft Project to build a project plan, schedule resources, set dependencies, publish a baseline, and track progress against the baseline. With Team Foundation Server integration, now you have opened up the plan to the entire team. The team members can add tasks, estimates, work completed, and so on, with the tool that they are accustomed to (such as Visual Studio).
This section examines the integration between Microsoft Office Excel and Team Foundation Server. Microsoft Excel is a popular tool among many project managers and team members that is used to manage tasks lists and resources. Figure 22-18 shows the integration between Team Foundation Server, and Microsoft Project and Microsoft Excel. The Work Item Add-in makes a new Team tab appear in Excel, as shown in Figure 22-23.

Figure 22-24 shows one sequence of connecting to a Team Foundation Server team project and managing work items from within Microsoft Excel.
Let's start by connecting to the team project. To do so, select the New List menu item from the Team tab. That will bring up the Connect to Team Foundation Server dialog. This is a familiar drill, so select the Team Foundation Server and the team project to connect to. Once connected to the team project, you will be presented with a New List dialog, as shown in Figure 22-25.
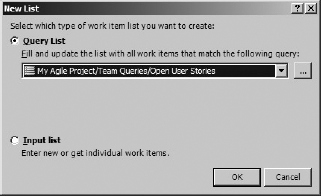
Following are the two options to choose from to build the work item list:
Query List — A query list is tied to a particular Work Item Query in Team Foundation Server. (That is, the query list will bring the results of a Work Item Query into Microsoft Excel as a list.) This could be a flat or tree list, depending on the query itself. When you refresh the query list, any changes or items that are not in Team Foundation Server will be overwritten with the results from the query.
Input List — An input list is not tied to a particular query in Team Foundation Server. You can build a plan/list by using one or more queries, and by hand-picking work items. You could also add items to this list that are not tracked in Team Foundation Server, and not have worry about losing these items when refreshing the work item list.
For now, choose the "Input list" option to build a plan using Microsoft Excel. That builds a table with a set of columns.
Obviously, what you have is an empty table. So, let's pull a list of work items into this spreadsheet. Click Get Work Items on the Team tab and select the "Open User Stories" query for the Saved Query. This will load the spreadsheet with the Open User Story work items from Team Foundation Server, as shown in Figure 22-26.
With support for hierarchical and linked work items, comes two new menu items: Add Tree Level and Add Child.
Let's use these two new menu options to understand how it works. Click Add Tree Level. This will change the list to the Tree View, add additional columns such as "Title 2" and "Title 3," and pull in any associated child work items, as shown in Figure 22-27.

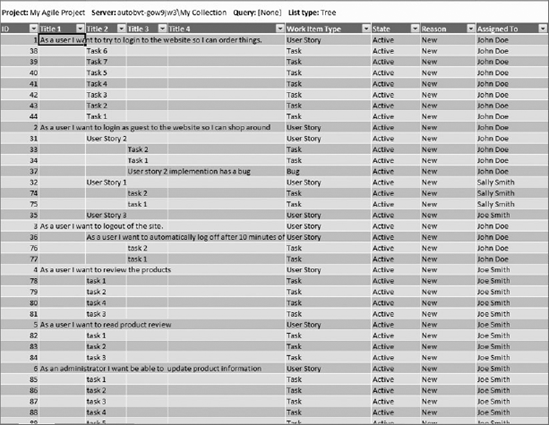
On the other hand, if you wanted to add more child items to an existing parent item, you would use the Add Child menu item. Select the row with the work item to which you want to add the child item, and click Add Child. This will insert a blank row to provide the details of this new child item.
Click Publish and this new child item with the "Parent-Child" link is now committed to the Team Foundation Server work item data store. You can verify that by running a query from within Team Explorer if you like.
Note
There are some common conditions that could result in an error when working tree lists in Microsoft Excel. See the help document, "How to: Resolve Invalid Links in an Office Excel List Tree," for more information on how to resolve these common tree list errors.
This chapter took a quick tour of some of the capabilities of Team Foundation Server to aid in managing software projects. Communication is a key element, and one that ensures a great flow of information within the team, as well as to the various stakeholders (both business and technical). Team Foundation Server not only provides the common repository to store and mine this information, but also provides integration with various tools that are commonly used by different members of a software team.
You learned how to create a team project, and to manage security and access to the team project. You learned how to use commonly used project management tools such as Microsoft Project and Microsoft Excel to create, manage, and update a project plan by leveraging the integration between these tools and Team Foundation Server.
The process you choose to follow as part of your team development is critical to the team. So is the ability to understand the metrics based on the information gathered throughout the lifecycle. Understanding the status of the project using reports, customizing or building additional reports, and the capability to have a dashboard that has the common set of data and reports that informs the team members of the current status and the task at hand, are very valuable during the course of the project. These topics will be the focus of upcoming chapters.
Chapter 23 kicks off that discussion by examining process templates.