
Learning about customizing process templates
Understanding the tools available for customization
Learning how to use Process Template Editor
Understanding how to use Process Template Manager
In Chapter 23, you learned about the Microsoft Solutions Framework (MSF) for Agile Software Development process template and MSF for Capability Maturity Model Integration (CMMI) Process Improvement process template. These two templates are available out-of-the box, along with many third-party and community templates. The process template that you choose sets the basic rules of the game for your team project.
As discussed in Chapter 23, process templates (or components of them) show up in many forms throughout the team project, including the following:
Work items (many different types) and work item tracking to define and track the work
Definitions of areas and iterations
Workflow with work item states
Portal to gather information about the project
Reports to drill down into process status
As you can see, templates are a key piece to your team project. So, it is critical that you choose the template and customize it to the state that fits your team environment. It is recommended that you use (and very likely that you will) an existing template as is or as a base for your process template.
This chapter examines the details of the process template components and the customization tools available to modify the template.
Warning
To create and modify process templates, you must have an account within the Team Foundation Administrator group on Team Foundation Server.
To create a team project, you must first select a process template. Team Foundation Server 2010 ships two process templates (MSF for Agile Software Development and MSF for CMMI Process Improvement).
You can customize a process template on an existing team project, or update the template for all new team projects. Obviously, when you make a change to the template used on an existing team project, those changes don't apply to any new team projects being created. Note that here you are modifying an instance of the process template used to create a team project. Hence, the scope is local to the project to which you are making changes.
In this section, you'll get an end-to-end overview on how to export, design, and import your own process templates.
Process Template Manager is the tool you need to manage the process template. This tool can be used primarily to customize a process template, and you can also use it to create new team projects. To edit a process template on an existing project, you will use the process template editor tool, which will be examined later in this chapter.
To access the Process Template Manager, select Team
To modify a process template, you must first download it from the Team Foundation Server to a local drive (your desktop, for example). The key tool for all upload/download operations is the Process Template Manager. The Process Template Manager is made available by installing the Team Explorer as a standalone tool or within Visual Studio. The Process Template Manager will download and get all the source files associated with the process template for editing.
Follow these steps to download a process template:
Once your files have been downloaded, they will appear as shown in Figure 26-1. All these files are part of the Process Template Definition.
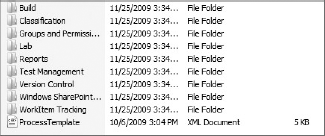
As shown in Figure 26-2, ProcessTemplate.xml contains four pieces of information about your process: the name, the description, the plug-ins required to create a project, and the XML file associated with each of the plug-ins. Plug-ins are used to extract Work Products (Word, Excel, Project, or Visual Studio documents), directories, and other important files from compressed process templates (stored as binary objects) on Team Foundation Server.

To add a unique name for your new process template, edit ProcessTemplate.xml. At the beginning of the file, you'll find two nodes:
name— This is a required element.description— The description should explain the process template in a short paragraph and distinguish it from other processes.
Simply edit the nodes as follows:
<?xml version="1.0" encoding="utf-8" ?>
<ProcessTemplate>
<metadata>

<name>My Custom Template </name>
<description>This is a modified template to meet our team's process requirement
</description>
Once you upload this file to the Team Foundation Server, the name will appear on the process template list in the Create New Project Wizard. The description will appear right below. Figure 26-3 shows how the information appears in the New Project Creation Wizard.

The next part of the XML file contains a list of the required plug-ins in your process template. You can specify whether you want to create a step in the wizard for the plug-ins. If you set the parameter to true, then you will see a wizard step as part of the team project creation wizard.
When a new team project is created in Team Foundation Server, process template plug-ins come into play. There are several plug-ins provided within Team Foundation Server that are critical to the setup and configuration of team projects. The following are the plug-ins included in the Team Foundation Server:
Classification — This specifies the initial set of areas and iteration setup as part of the team project creation process.
Work Item Tracking — This configures the team project with the different work item types, states associated with this, queries, and the initial set of work items for the team project.
Portal — This creates project portal and associated process guidance for the team project.
Version Control — This sets up the version control access and policies for the team.
Security — This configures the team project with the necessary security groups and associated permissions.
Build — This sets up the build process templates.
Lab — This runs the lab tasks.
Test Management — This sets up the default configuration for test management.
Reports — As the name suggests, this sets up the initial sets of reports associated with the process template for the team project.
For every process template in Team Foundation Server, the key file is processtemplate.xml. Figure 26-4 shows the view of this .xml file in Process Template Editor within Visual Studio. You will learn more about the Process Template Editor later in this chapter.

As you can see, processtemplate.xml triggers the various plug-ins associated with the template. The configuration also specifies the plug-ins that should have a page as part of the team project setup wizard. For example, in Figure 26-4, the Portal and Version Control plug-ins have a wizard page, and the rest of them don't.
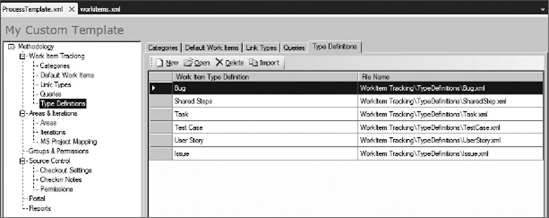
Each of the plug-ins used by the process template has an XML file associated with it. These XML files specify the set of tasks that are executed as part of team project creation. Figure 26-5 shows the partial view of the workitems.xml file that is associated with the Work Item Tracking plug-in.

As you see in Figure 26-5, one of the tasks for this plug-in is to set up the various types of work items associated with this process template — hence, the task named "WorkItemType definitions" specifying the XML files for the six different work item types to be created when this process template is used.
It is out of the scope for this chapter to cover the details of the XML files associated with the various plug-ins. Refer to the Visual Studio documentation for more information on these plug-ins and the associated XML configuration files.
A process template in Team Foundation Server is a collection of XML files. Following are the tools available for working with process template components:
Any XML editor
The
witadmincommand-line utility (for working with work item types and definitions)The Process Template Editor
You can use your favorite XML editor as a tool whether it is Notepad or Visual Studio or something else. Editing the XML directly is not the ideal choice because it is error-prone, but nevertheless it is an option (and, in some instances, a convenient one) for working with the XML files in the process template.
Let's take a look at an example of how you can add a custom work item type to your process template.
Work item types are quite important because they enable you to define what a work item will contain, as well as the workflow associated with it. For example, you can set fields, transitions, and rules to fit a new bug type or requirement. You can find all of the work item type information in the TypeDefinitions folder within the WorkItem Tracking directory. The naming conventions are quite simple. For example, a bug schema is located in a file called Bug.xml, a task schema is located in a file called Task.xml, and so forth.
To create a new work item type, you must first define it within the workitems.xml file using your XML editing tool of choice. This file contains the following parts:
Work item type definitions
Link type definitions
Categories
Queries
The work item type portion of the file looks like the following for the MSF for Agile Software Development v5.0 template:
<task
          id="WITs"
          name="WorkItemType definitions"
          plugin="Microsoft.ProjectCreationWizard.WorkItemTracking"
          completionMessage="Work item types created">
          <dependencies>
               <dependency taskId="LinkTypes" />
          </dependencies>
          <taskXml>
               <WORKITEMTYPES>
                    <WORKITEMTYPE fileName="WorkItem
                        TrackingTypeDefinitionsBug.xml"/>
                    <WORKITEMTYPE fileName="WorkItem
                        TrackingTypeDefinitionsSharedStep.xml"/>
                    <WORKITEMTYPE fileName="WorkItem
                        TrackingTypeDefinitionsTask.xml" />
                    <WORKITEMTYPE fileName="WorkItem
                        TrackingTypeDefinitionsTestCase.xml" />
                    <WORKITEMTYPE fileName="WorkItem
                        TrackingTypeDefinitionsUserStory.xml" />
                    <WORKITEMTYPE fileName="WorkItem
                        TrackingTypeDefinitionsIssue.xml" />
               </WORKITEMTYPES>
          </taskXml>
     </task>
Simply add a new work item type using the WORKITEMTYPE element to point to the specific type definition for your custom type. For example, if you were building a Time Tracking type, then you would insert the following within the WORKITEMTYPES node:
<WORKITEMTYPE fileName="WorkItem TrackingTypeDefinitionsTimeTracking.xml"/>
You must then create a file called TimeTracking.xml within your TypeDefinitions folder. You have the choice of copying the fields and layout of an existing work item and customizing it to your needs, or, if you are adventurous (not recommended), you can create a work item from scratch.
In Team Foundation Server 2005 and 2008, there were utilities named witimport, witexport, and witfields to manage work item definitions. In Team Foundation Server 2010, the team has consolidated these into one command-line utility called witadmin that can be used create, delete, import, and export types of work items, work item fields, link types, and categories.
Refer to the MSDN product documentation at http://msdn.microsoft.com/en-us/library/dd236914(VS.100).aspx for more information on this utility, including available commands and parameters.
If you have done customization of process templates either in Team Foundation Server 2005 or 2008, you are probably familiar with the Process Template Editor tool. Microsoft provides this tool as part of the power tool offering.
Note
Power tools are utilities released by the Visual Studio Team Foundation Server team outside of the product release cycle/timeframe. Check out this Web site for more information: http://msdn.microsoft.com/en-us/teamsystem/bb980963.aspx.
With Team Foundation Serve 2010, the team is updating the Process Template Editor and will be releasing this as a power tool similar to its prior release.
You must download the Team Foundation Server 2010 Power Tool available at http://msdn.microsoft.com/en-us/teamsystem/bb980963.aspx. This power tool release includes the Process Template Editor tool.
Once you install the Process Template Editor, you will see a new menu item called Process Editor in the Tools menu, as shown in Figure 26-6.

With the Process Template Editor, you can work both with the template instance on the server (you will do this to make changes to the template on an existing team project) or work with the template offline (you will do this either to verify a change or to make a change and have it available for future team projects use).
To work with a process template, select the Process Templates
When you open the processtemplate.xml file, it will bring up the Process Template Editor window, as shown in Figure 26-7. In this example, the "My Custom Template" process template has been selected for editing.

The editor on the left pane shows a tree control with the various process template components that can be configured using the editor. On the right pane, you see the details of the component chosen on the tree. By default, the right pane shows the name and description of the process template being edited, and the various plug-ins associated with this template.
Let's look at the customization options available for the various process template components from within this editor.
In the Process Template Editor, you can manage the categories in which work items belong, default work items to be created when a team project is set up, link types available as part of this process template, queries, and, most importantly, work item type definitions. Most of the editing capabilities are self-explanatory. One of the common customizations performed by many teams is either updating a work item fields/states, or adding/removing work item types as needed. Let's take a closer look at the capabilities available in Process Template Editor to edit work items.
You start by selecting the Type Definitions node in the tree on the left pane. This brings up the different work item types available in this process template in the right pane, as shown in Figure 26-8.
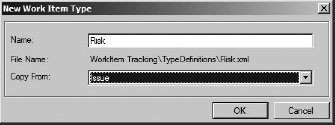
From this window, you can either create a new work item type, or edit an existing work item type. Clicking New in the menu brings up the dialog to get the process started. As shown in Figure 26-9, specify a name — in this case, "Risk" — and here you will use the Issue work item type as the base for this new work item type. It is easier to start with a copy of an existing work item than starting from scratch.
There you go. Just like that, you have created a new work item type. Now, let's open this work item type and edit the information captured by this work item type, as well as the state associated with this work item. You do that by double-clicking the work item type, which brings up the window shown in Figure 26-10.

Here you can modify the fields that are part of the Risk work item, layout of these fields, and the workflow associated with this new work item type. You can add, modify, or remove fields from the work item, update the layout based on these changes, and preview the form before committing these changes.
The workflow for the work item is shown in a visual form in Figure 26-11.

In this case, the default state for the Risk work item is Active. The work item can transition from that Active state to a Closed state or from a Closed state back to an Active state. As part of the transitions, you can see the reasons for the state change, as well as the fields that are updated based on the state change.
Once you have made the necessary changes, save the new work item type definition. Any team project that is based on this new process template will have a Risk work item type available for use.
Team Foundation Server introduces Work Item Categories to group work item types together in a common category. For example, you may have a user story work item type and a feature work item type in your project, and you can now categorize them under a "Requirement" category. In the process template editor, under the "Work Item Tracking" node, you have a node to manage the categories. As shown in Figure 26-12, in this step, you can add a new category, delete a category, or add a work item type to a particular category.

Another new node you will see under work item tracking is the capability to work with link types. You can add, modify, or delete a link type. Figure 26-13 shows the list of link types included in the MSF for CMMI Process Improvement v5.0 template. The Link Type dialog in Figure 26-13 shows the properties you can manage for the link type.

Use the "Areas and Iterations" section to specify the default set of areas and iterations available to the team project. Team members can add new areas and iterations for their team project by updating the project settings.
You will use this to change the default settings to be used when setting up a new team project. In addition, you can also review and update (as needed) the mappings between the work item fields and Microsoft Office Project fields. Refer to the product documentation on MSDN for more information on the Project field mappings.
As the name suggests, you use this section to work with groups and update the permissions associated with groups.
The Process Template Editor enables you to edit the following source control settings:
Enable or disable multiple check-outs
Default check-in notes and the order
Default security permissions
When a new team project is created, you have the option to get a portal (or a team site) set up for the team project. Figure 26-14 shows the configuration step to create a team site as part of the team project creation.

If you choose to create a team portal site, then Figure 26-15 shows the configuration information that is used to create the various document folders and associated documents.

Figure 26-16 shows the outcome of the configuration as it appears in Team Explorer under the team project.

If you would like to add a template for a requirement or risk management document to the team project, then you can add that to the "Samples and Templates" section in the portal configuration. These templates will become available to the team members as part of the team project.
The last node on the Process Template Editor is the Reports node. Process Template Editor is not the tool to edit the reports themselves. You will do that by using Report Designer. But what you can edit here is the reports included as part of the process template. Figure 26-17 shows the list of reports that are available as part of the MSF for Agile Software Development v5.0 template.
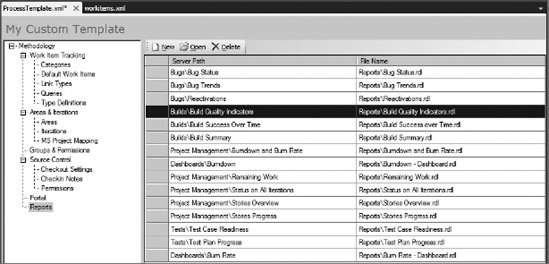
You can remove a report from this list for your custom template, or add a new one to the list, provided you have already created or have available to you the .rdl file for the report. Once you add a report to this list, that new report will become part of the default set of reports available with the custom process template.
Earlier, you learned how you can use Process Template Editor to customize process templates for use in new team projects. You can also edit work items on an existing team project by connecting to the Team Foundation Server. You do this by selecting "Open WIT from Server," as shown in Figure 26-18.

This brings up the "Connect to Team Foundation Server" dialog, as shown in Figure 26-19. Note that you must provide the project collection name to connect to the corresponding team project.

Warning
If you just provide the Team Foundation Server name, port, and the path without the project collection name, the connection will fail.
Once you connect, you will be prompted to select the work item type that you want work with, as shown in Figure 26-20.
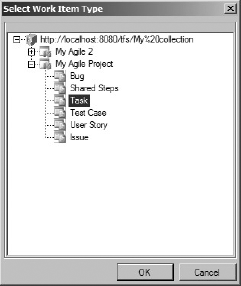
Expand the team project that you want to work with and the corresponding work item type that you want to edit. Once you click OK, the Process Template Editor appears with the work items fields, layout, and workflow information that you can edit.
You can also use Process Template Editor to export and import work item type definitions using the Import WIT and Export WIT options, as shown in Figure 26-18.
Note that the changes you make to an existing project takes effect immediately. Though fairly powerful, this type of live customization could also be error-prone. It is common practice for teams to create a separate team project where they try out the customizations before making the change on an existing team project.
Also, there is no support for version control in process templates today. There are obviously workarounds, and one of them is to save the process template files in source control, make the changes in a separate team project, and have the process template files under source control.
Once you have customized the process template to your liking, you must import it into Team Foundation Server to share it with the rest of the project team members. Follow these steps to import a custom process template into Team Foundation Server:
Select Process Template Manager by clicking Team Foundation Server Settings within the Team menu. The Process Template Manager will display all the available options.
Click the Upload button and select your process template description file (
ProcessTemplate.xml) using the Upload Process Template dialog box.As soon as you click the Open button, the process template will import into Team Foundation Server and will appear on the list of available processes. Figure 26-3 earlier in this chapter shows an uploaded process template named "My Custom Template."
Close the Process Template Manager.
There will be times when process templates are no longer needed because they have been replaced by newer versions, or they have become obsolete.
Warning
You should export a copy of the process template you want to delete as a backup before you take the steps to delete it.
To delete a process template, simply follow these steps:
Choose the Process Template Manager by selecting Team Foundation Server Settings from the Team menu. You will then see a list of all the available process templates.
Pick a process template to delete and click Delete.
Note
Note that deleting a process template will not affect team projects that were created using the template. This is because a copy of all the artifacts from the process template (documents, source code repository, permissions) has been created on the server, and the project is no longer tied to the template file. Deleting only removes this process template from being available for new team projects.
In Team Foundation Server 2010, the process guidance is now entirely available online and integrated into MSDN. In the 2008 version, the process guidance files were part of the process template, and the product development team chose to integrate the guidance and make it available online on MSDN. The guidance is also available in an offline version in the form of a wiki library.
Teams should use the wiki library to customize the guidance as needed. You will make the changes to the location of the process guidance (that is, either the wiki library or the MSDN Web site) using the project portal settings.
One of the key tenets of Team Foundation Server is the capability to adapt the process that works best for your team and use it as part of the team project workflow. Hence, the capability to customize a process template is key to incorporating changes and things that have been learned into the process template, either to an existing team project or to a process template that will serve as a base for new team projects. It is common for teams to update the work item types, fields that are captured in a particular work item, and states associated with work items.
In this chapter, you got an end-to-end look at the process template customization. You learned about the Process Template Manager, and how it can be used to download and upload process templates. You learned about the tools available to work with process templates.
It is not uncommon for teams to use XML editor to work with process template components. Even though it is not an ideal solution or tool, it is often convenient and efficient for making changes to process templates. You learned about the Process Template Editor that is available as a Team Foundation Server power tool. The Process Template Editor provides a visual tool that can be used to manipulate the underlying XML files associated with the various process template components (such as work item definitions, classifications, version control settings, and more).
Finally, you learned how Process Template Manager can be used to upload updated process templates, as well as deleting process templates. You also learned about the options available for customizing process guidance.