
Getting to know build automation
Introducing Team Foundation Build
Looking at what's new in Team Foundation Server 2010
Understanding the Team Foundation Build architecture
Working with Builds
Understanding the Team Build process
Customizing the Team Build process
This chapter examines the build automation capabilities of Team Foundation Server — what is provided out-of-the-box, how to use it, and how to customize it to suit your organizational requirements. But first let's take a quick look at build automation in general.
After version control, automating the build is the second most important thing you can do to improve the quality of your software.
Only once the parts of your application come together, can you tell if your application works and does what it is supposed to. Assembling the parts of an application is often a complex, time-consuming, and error-prone process. There are so many parts to building the application that without an automated build, the activity usually falls to one or two individuals on the team who know the secret. Without an automated build, even they sometimes get it wrong, with show-stopping consequences that are often discovered very late, making any mistakes expensive to fix.
Imagine having to recall an entire manufacturing run of a DVD because you missed an important file. Worse still, imagine accidentally including the source code for your application in a Web distribution, or leaving embarrassing test data in the application when it was deployed to production. All these things made headlines when they happened to organizations building software, yet they could have easily been avoided.
Integration of software components is the difficult part. Teams work on their features in isolation, making various assumptions about how other parts of the system function. Only once the parts are assembled together do the assumptions get tested. If you integrate early and often, these integrations get tested as soon as possible in the development process — therefore reducing the cost of fixing the inevitable issues.
It should be trivial for everyone involved in the project to run a copy of the latest build. Only then can you tell if your software works and does what it is supposed to. Only then can you tell if you are going to have your product ready on time. A regular, automated build is the heartbeat of your team.
In Visual Studio 2010, a developer is usually able to run his or her application by pressing the infamous F5 key to run the code in debug mode. This assembles the code together on the local workstation and executes it. This makes it trivial for the developer to test his or part of the code base. But what it doesn't do is ensure that the code works with all the latest changes committed by other members of the team. In addition, pressing the F5 key simply compiles the code ready for manual testing. As part of an automated build, you can also run full a suite of automated tests, giving you a high degree of confidence that no changes that have been introduced have broken something elsewhere.
Pressing the F5 key is easy for a developer. You want your automated build to make it just as easy to run your application — if not easier.
Build automation is so important to the quality of the software development process that Visual Studio Team Foundation Server 2010 provides build services as part of the core platform, as shown in Figure 21-1.
Note
Chapter 17 provides more information on the other services offered by Team Foundation Server (including version control, work item tracking, and reporting).
The build services provided by Team Foundation Server offer an enterprise-class, distributed build platform. Utilization of the build services is done inside the development environment in which the code is being created (either in Visual Studio or Eclipse). Information on the build services is tightly integrated with the version control, work item tracking, and the testing features provided by Team Foundation Server.
In addition, data obtained from the build system is fed into the Team Foundation Server data warehouse, thus allowing for the analysis of historical reports and trends. The build services provide notifications on build events using the standard Team Foundation Server eventing mechanisms, which means that email alerts can easily be sent to the team regarding build status. As part of the standard installation in Visual Studio 2010, the Build Notification Tool is installed alongside Visual Studio, which can provide the capability for additional build notifications via the application that runs in the system notification area.
Team Foundation Server provides a number of ways to trigger the build. Builds may be started by a manual request, automatically triggered by a check-in into Team Foundation Server version control, or run on a specified schedule. Team Foundation Server 2010 also introduces a new concept called gated check-ins. A gated check-in means that a developer's changes must successfully build on the build server when merged with the latest code from version control before the code is then checked in on behalf of the user.
Team Foundation Build also has a full .NET-based API. This is the same API used by the Visual Studio integration and the build notification tool. It provides you with deep integration into the build services. Combined with the build events, there is a highly extensible platform to integrate any additional systems that you can imagine.
The build services offered by Team Foundation Server have been changed significantly since the initial version in Team Foundation Server 2005.
In the first version, Team Foundation Build was based heavily on MSBuild, along with a build server machine called the build agent. All configuration of the build was done by editing files stored in version control.
In the 2008 release, build management was greatly improved with the capability to trigger builds automatically, queue builds, and manage builds. This second version introduced the Build Definition as a Team Foundation Server entity in its own right that contained various configuration data about the build (such as the build name, workspace definition, default build agent, drop location, and build trigger). The file describing how to do the build (the TFSBuild.proj file) was still based on MSBuild.
The 2010 release continues much of the work done in 2008, with some notable changes that include the following:
Windows Workflow 4.0
Gated check-ins
Private builds
Build notifications
Build controller
Properties exposed for common customizations
Integration with symbol and source server
Enhanced build deletion options
MSBuild is a great language for compiling and managing build dependencies, but has many limitations when used as the language to manage the entire build process. Because of the use of dependency trees between the MSBuild targets, if you want to work out what actually happens in an MSBuild script, you must follow the full dependency tree backward, rather than reading the code from top to bottom, like you can with a regular programming or scripting language.
Also, there is no way to conduct MSBuild targets in parallel over multiple machines and wait for the results from all those targets to finish before moving to the next step. With Windows Workflow, you have the advantages of being able to read from top to bottom (Figure 21-2), being able to parallelize work across multiple machines, and having a good visual editing experience.

MSBuild is not completely dispensed with, however. For example, when compilation is required, MSBuild is invoked by the Windows Workflow. For builds created in a Visual Studio 2008 client, or builds that existed while performing a server upgrade, the Windows Workflow process is simply a thin wrapper around the existing MSBuild file (TFSBuild.proj).
As previously discussed, having a frequent automated build is one of the most important things you can do to improve your software development process. The key is to ensure that the latest code in your repository always compiles and runs, and that it passes any associated automated tests. Once you have your working build, the team must ensure that it stays good.
For very large teams, this can be an issue. Imagine that a good developer might check something in that breaks the build once a year. If you have 500 people working on code bases, you quickly get into a situation where the build is breaking twice a day, every day. In these circumstances, configuring a build as a gated check-in may help.
A gated check-in means that, rather than checking the code in to version control, the code is submitted as a shelveset. The build server then takes the latest code, merges that with the changes contained in your shelveset, and performs the build. If the build is successful, the changes in your shelveset will be checked in automatically on your behalf by the build server.
Note
Chapter 19 provides more information on shelvesets. For more information on gated check-ins, see the discussion in "Trigger Section," later in this chapter.
To prevent the checking in of changes that would fail the build, it is a best practice to perform a get-latest before checking the code in, and then building and testing on the developers' machines to ensure that the code still works as expected. There are times, however, when developers may want to test that their changes work on the build server as well as just locally — for example, if they are checking in a change to the installer that is created as part of the build, or perhaps the developer needs a signed binary to test and the code signing certificates are only installed on the build machine.
Thankfully, private builds enable you to manually queue a build. But, at the time the build is queued, rather than building with the latest version of the source, you can build with the latest version of the source, merged with the shelveset that you create. These types of private builds sometimes also go by the name "buddy builds," especially inside Microsoft.
In this way, a private build is similar to a gated check-in, only the code is not automatically checked in as part of the build, nor is building in this manner enforced.
In Team Foundation Server 2005 and Team Foundation Server 2008, builds were performed on a single machine — the build agent. For a particular build definition, you could specify a default build agent. However, this did not allow for the build to be assigned to a pool of agents or for the build to be performed over multiple machines. This is solved in Team Foundation Server 2010 by introducing a new level of abstraction — the build controller.
Build controllers are allocated to Project Collections, and a default controller is given to a build definition. Multiple build agents can then be assigned to the build controller, and, by default, the controller will send new builds to the least-busy agent in the pool.
Previously available as a power tool in Team Foundation Server 2008, the build notification application is now included in the main product as part of the installation of the Microsoft Team Explorer. This application runs in the system notification tray, and can be configured to notify you of build events (such as passed or failed builds).
The new Windows Workflow-based build has also allowed for properties used to customize the build to be exposed in the user interface when creating a build definition or when queuing a new build. Also, additional properties have been introduced to control behavior that previously would have required extensive customization of the build process (such as custom build number formatting), as shown in Figure 21-3.

The default build process in Team Foundation Server 2010 includes a step to index source code and publish symbols to a symbol server in the organization.
A symbol server is simply a file share that is used to store the symbols for your executable binaries. Visual Studio can then be configured with details of this server. From then on, when debugging code live or using the advanced historical debugging features, Visual Studio is able to take you directly to the version of the source code from which the binary was generated, regardless of which version of the code that you have on your local system at that time. The configuration of the symbol server is performed by adding the symbol server details as a process parameter on the build configuration.
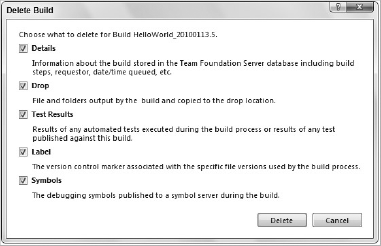
In previous versions of Team Foundation Server, when the build was deleted, all details of the build were removed, as well as the binaries, from the drop location. In Team Foundation Server 2010, you are now presented with a number of options for the data you wish to delete with the build (Figure 21-4), bringing build deletion more in line with deletion in version control.
As shown in FIGURE 21-5, several logical components are used as part of the Team Foundation Build services.
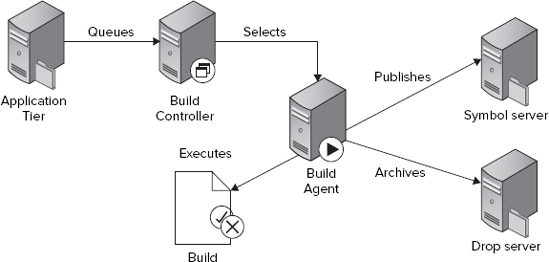
When a build is triggered, the Application tier sends a request to a server called the build controller using the Web services hosted by the build service to queue the build. The controller then downloads the build's Windows Workflow-based process and executes it. By default, this is then allocated to the next available build agent in the controller's pool of agents.
The build agent is the machine that actually executes the main portion of the build process as coded in the build's workflow — including calling MSBuild to perform the actual compilation step. It then archives the build results (that is, your executable binaries or your Web site) to a Windows file share provided as the drop location, and publishes symbols to the symbol server (if configured).
The build controller and the build agent services are provided by the Visual Studio Team Foundation Build service host installed from the Team Foundation Server installation media. IIS is not required on the build controller or build agent machines because the build service host uses the Windows Communication Framework (WCF) to host the Web services. The build controller and build agent are configured using the Team Foundation Server Administration Tool.
Note
For information on how to install and configure the Team Foundation Server Build service, see the Team Foundation Server Installation Guide. The guide is included in the install media for Team Foundation Server. However, the latest version is published at http://go.microsoft.com/fwlink/?LinkId=127730.. Microsoft continues to update the guide download to include extra guidance or any new issues that surface. Therefore, it is always worth working from the downloaded version.
After you download the installation guide, you cannot view its contents unless you right-click the .chm file, click Properties, and then click Unblock. As an alternative, you can double-click the .chm file to open the Open File-Security Warning dialog box, clear the "Always ask before opening this file" check box, and then click Open.
The build controller and build agent may live on the same machine as the Team Foundation Server Application tier. However, because a build is typically very CPU and disk I/O intensive, the build agent should at least be located on a separate server to avoid affecting the performance of the main Team Foundation Server application. If you run the build agent on the same machine as Team Foundation Server, this may cause some performance issues if certain intensive diagnostics data collectors are used as part of the build.
The actual details of the build (such as the build name, what to build, when to build it, how to build it, and what to do with the results) are all configured in the build definition. The results of individual builds are called the build details.
This section examines working with team builds in Visual Studio. Figure 21-6 shows the key windows that you will need to use.

You should already be familiar with the Team Explorer view (accessed in Visual Studio through View
Team Explorer contains a Builds node that provides you with access to all the functionality you need to interact with the build services in Team Foundation Server. Right-clicking on the Builds node in Team Explorer enables you to create a build and provides you with additional functionality that will be discussed later in this chapter. Listed under the Builds node are all the defined build definitions for that team project. Double-clicking on one of these will open the Build Explorer for that build definition.
The Build Explorer view (accessed in Visual Studio through Build
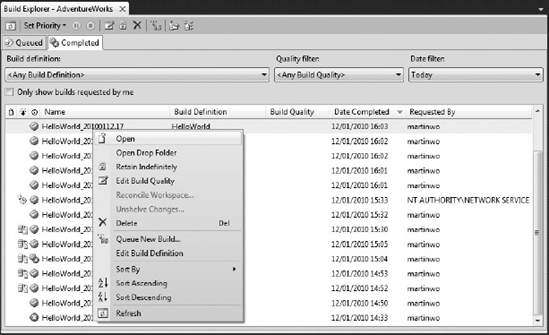
From the Queued tab of the Build Explorer (Figure 21-7), you can pause or change the priority of builds that are currently awaiting execution. You can also cancel paused builds or stop builds that are currently executing.

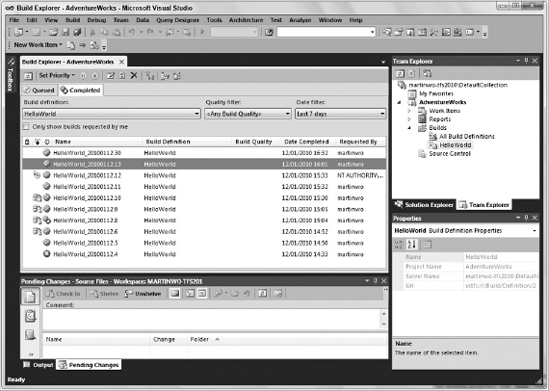
From the Completed tab of the Build Explorer (Figure 21-8), you can view the build details, delete the build details, or set the quality of the build.
The build quality is a text string allocated to particular builds to denote the quality of that particular build (that is, "Released," "Ready for Test," and so on). In addition, you may mark the build with Retain Indefinitely to exclude it from any automatic retention policies on the build definition. You also have the option to Reconcile Workspace with the build, which is useful for a gated or private build because it will remove any pending changes that you may still have that were checked in on your behalf as part of the build.
When you double-click on a build in the Build Explorer, you see a report of the build details, as shown in Figure 21-9.

While the build is executing, the build details view shows the build log, and it periodically refreshes automatically to show the latest results of the build. A small bar chart in the top left-hand corner displays the currently executing build time against previous builds, which can give you an indication of how long the build might run.
As the build progresses, more information is added to the build log. The information forms a hierarchical tree, and the duration of each completed step is displayed in the top right-hand side. For steps that create additional log files (such as calling MSBuild to perform the actual compilation of the code), you are able to click on the report to download it from the drop location and view it inside Visual Studio.
Once the build has completed, you will see the build summary view showing all the projects, compilations, tests runs, as well as any unit test results, code coverage, or test impact data. You will also see information regarding the changesets included in the build since the last successful build of that build definition, along with any work items associated with those changesets when they were checked in.
In this way, you can start to see how full requirements traceability is obtained in Team Foundation Server, from the requirement being logged as a work item through to the development task to implement the requirement, to the change in source code to implement that task, and then, finally, the build of the software that includes that check-in. All the data is passed into the Team Foundation Server data warehouse to allow historical trend analysis and reporting.
From the build details view, you are able to open the drop folder in Windows Explorer to access the outputs of your build. You may modify the build quality assigned to that build, mark it to be retained indefinitely, or delete the build and associated results.
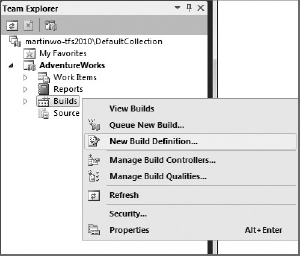
A build definition describes how, what, when, and where to perform your build. You create a new team build definition by right-clicking on the Builds node in Team Explorer, and selecting New Build Definition, as shown in Figure 21-10.
You then see a new build definition form inside Visual Studio. The form is split into two parts — a set of areas on the left-hand side that basically function like tabs, and the main area for that section on the right-hand side. You'll notice that, when you first open the dialog, a few of the sections on the right-hand side have warnings associated with them, this is completely normal. These warnings are just to highlight areas that need information before the definition can be saved.
You can save the definition by using the usual mechanisms (File
First, you must click to bring up the General section. Then you must give the build definition a name, and, optionally, a description, as shown in Figure 21-11. Note that, in current versions of Team Foundation Server, builds may not be organized into a hierarchy — but are simply listed alphabetically. Therefore, you might want to adopt a naming convention for your build definitions if you have multiple build definitions in your team project.
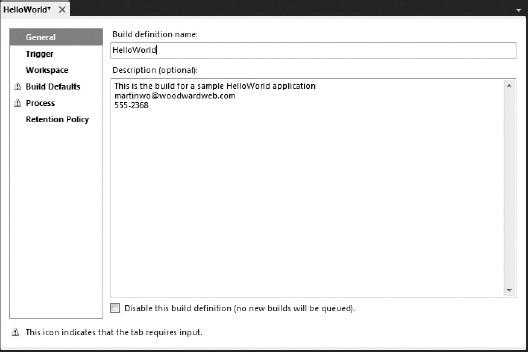
For the description of your project, you should provide a short, one-line summary of what the build is for, and contact details for the owner or "build master" for the build. The first three lines of the build description are displayed in other dialogs in Team Foundation Server before scrolling is required. Therefore, this important information should be placed at the top so that people working with the builds can see what the build is for and who to contact for questions.
Located in the Trigger section, the build trigger tells Team Foundation Server when to perform a build. As shown in Figure 21-12, there are a number of triggers available, including the following:
Manual
Continuous Integration
Rolling Builds
Gated Check-in
Schedule

When you configure a build for a Manual trigger, the build will only run when explicitly queued, by using the user interface, by using the command line (that is, tfsbuild.exe), or by using the Team Foundation Server .NET object model. Manually triggered builds were the only option available in Team Foundation Server 2005.
In Team Foundation Server, the Continuous Integration trigger is one that queues a build for every check-in performed on the areas of code that you define as related to your build. (The "Workspace" section, later in this chapter, provides more information on defining those areas.)
Check-ins to Team Foundation Server are a discrete, atomic transaction represented by a changeset. By re-building the system for every changeset, you can easily determine which change broke the build (as well as who checked in that change). The downside to this is that there are, obviously, a lot of builds performed. Therefore, it is essential that build times are kept short to ensure rapid and frequent feedback to the development team as to the status of the current code base.
Rolling Builds are similar to the Continuous Integration trigger in that a check-in will trigger a build. However, rather than building on every check-in, rolling builds will batch several check-ins together to ensure that the build server never becomes backlogged — and optionally setting a minimum time interval between which a new build may be triggered. This is the type of trigger that may be familiar to those who have experience with the Open Source build servers CruiseControl and CruiseControl .NET.
Performing rolling builds has the advantage of reducing the number of builds performed, which helps to reduce the number of builds queued at peak times (and, therefore, the time before the results of an individual developer's check-ins are known). However, it has the disadvantage of grouping changes together, therefore making it more difficult to determine the check-in responsible for the build failure. For this reason, many people stick with the Continuous Integration trigger, and instead focus efforts on increasing the speed of the build or the number of build agents available to perform the build.
A Gated Check-in trigger means that check-ins to the areas of version control covered by the build are not allowed by the server until a build has been performed and passed successfully. This means that when users attempt to check in a file, they are presented with the dialog shown in Figure 21-13.
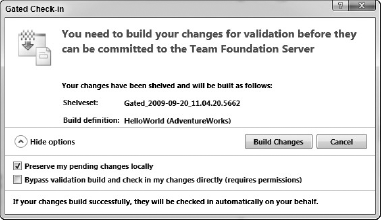
The changes are stored as a shelveset in version control. The build server takes the shelved changes and merges those changes with the latest version of code from version control before performing the build. In the event of a successful build, the changes are then checked into the build server, and the user is notified via the build notification tool in the system notification area. At this point, the user may "reconcile" his or her workspace to remove the pending changes that were committed as part of the build from the current pending changes list.
Because of the automatic merge process that is performed by the build server, it is important to realize that the actual code committed by the gated check-in may differ from the code submitted as part of the shelveset.
If you have two build definitions with overlapping workspace mappings that both have Gated Check-in triggers, the user will get to pick which one gets built to verify his or her changes at the time of check-in. In addition, even though Team Foundation Server 2010 has build agent pooling features, only one build of a gated check-in may be executed at a time to prevent conflicting merges from being submitted.
Builds may be triggered by a particular schedule — that is, a daily or nightly build. Note that a single time may be specified for each build definition for the chosen days of the week — repeated weekly. Also note that, in the case of a nightly build, the build time should be set outside of any backup or other regular maintenance jobs.
The time for a scheduled build is actually converted into the time zone for the Application tier when the build definition is saved. But this is always displayed in the time zone of the user's machine when editing the build definition in Visual Studio. For this reason, there can be some slight confusion as to the actual build time during periods where Daylight Savings Time is in operation in one of the time zones and not the other.
The Workspace section allows you to define the working folder mappings that should be used for your build. These working folder mappings not only determine where on disk the files should be located but also which files on the server are considered relevant to the build.
The default working folder mapping for a new build definition is given as mapping the root of the team project(that is,$/Adventureworks)to the sources directory represented by the environment variable ($(SourceDir)), as shown in Figure 21-14. This is almost always too broad for your build, and includes too many files, which not only slows down the build (because more files must be downloaded from version control), but also means that some check-ins to the project risk triggering a build even though they do not affect the results of the build.

Therefore, you should immediately modify the server path of the build to only include the files you need. You may also make use of cloaked working folder mappings to exclude certain subfolders or files from a working folder mapping.
Note
Chapter 19 provides more information on working with folder mappings in Team Foundation Server version control.
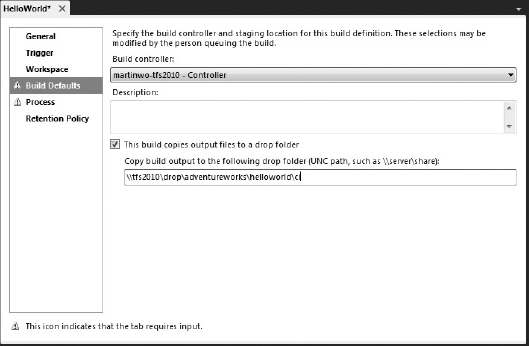
On the Build Defaults section shown in Figure 21-15, you specify which build controller you would like to use for the definition and where to copy the outputs from your build.
In Team Foundation Server 2010, build controllers and build agents are responsible for notifying the Team Foundation Server application of their existence as they are installed. If you have no build controllers available in the controller drop-down, then your Team Foundation Server administrator must install a build controller (and build agent) using the Team Foundation Server Setup media, and configure it to point to your project collection. The description field displays the description given to the build controller, and it is not editable from this dialog.
The "drop folder" location must be a Windows file share on the network to which the user running the build agent services has access. There is a limit (inherited from the .NET base class libraries) of 260 characters for the full path of all files copied to the drop folder location, so you should ensure that your server and share names are as short as possible, leaving you with the maximum space for your output. That being said, you should put your builds in directories corresponding to the build definition inside your drop folder location to help keep them organized.
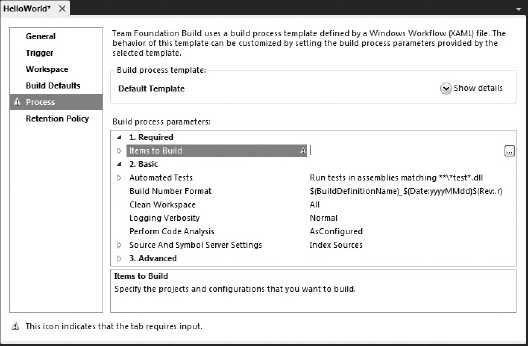
When talking to a Team Foundation Server 2010 server, you will be required to select which process should be used to perform the build. These processes are Windows Workflow 4.0-based processes. The initial list of processes are defined by the process template used, and can then be added to from the Process section. Each process has a number of easily customizable properties that are designed to be used to alter the behavior of that process. Processes with mandatory inputs are marked with a warning triangle when the build definition is created, as shown in Figure 21-16.
From this section, you may edit and customize the build process. (For more information on this, see the section "Team Build Process," later in this chapter.)
For the creation of a basic team project using the DefaultTemplate, the only property that you must initially configure is which solution or project to build. Simply click on the "Projects to Build" property and click the "..." button to add your solution or project to the list, as shown in Figure 21-17.

Once you start automating builds, you quickly end up with a lot of build results in your archive. Finding the build that you are looking for can get complicated — not to mention the disk space required to store all the build results. Team Foundation Server has automatic retention policies to help with this, as displayed in the Retention Policy section shown in Figure 21-18.

The retention policies determine, for each build result type, how many of those results you would like to keep by default. Note that, at any time, you can mark a build with the Retain Indefinitely Retention Policy from the build details context menu in the Build Explorer view. Marking a build as Retain Indefinitely means that it will be excluded from these automatic retention policies.
There are separate retention policies to control the team builds that are triggered or manually queued from the private builds of individual developers. Changing the private build retention policy affects all the developers performing private builds on that build definition — not just the developer editing the setting.
Whenever you create a new build definition, you should manually queue the build the first time to ensure that it is working as desired. The first successful build for a build definition also acts as the baseline for that build. Every build from that point on will record the changesets included since the last successful build for that definition. This information is stored in the build detail for each build, and reported into the Team Foundation Server data warehouse, thus allowing for historical trends over time.
A build can be manually invoked from the Builds node in Team Explorer by using the TFSBuild.exe command-line tool, or by using the Team Foundation Server .NET object model. Alternatively, the build might be triggered using one of the triggers defined earlier in this chapter (such as on a check-in into version control or on a specified schedule).
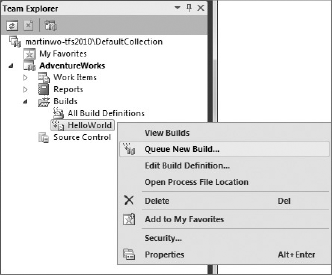
To manually queue a build in Visual Studio, right-click on the build definition in Team Explorer and select Queue New Build, as shown in Figure 21-19.
You will then be presented with the Queue Build dialog, as shown in Figure 21-20. The build definition is pre-selected in the build definition drop-down at the top of the dialog, and its description is displayed underneath.

When you manually queue a build, you have options of selecting an alternative build controller (if one is available), adjusting the priority of the build, and modifying the drop folder location to be different from the default. Based on the selected queue priority, you will also be given an indication of the current position in the queue that your build would get if it were submitted.
There is also a tab called Parameters that is new for builds queued on a Team Foundation Server 2010 server. Here you will find all the customizable properties defined for the process, allowing you to alter the value of that property for this single invocation of the build.
A new feature in Team Foundation Server 2010 is the capability to adjust what you want to build from the General tab in the Queue Build dialog (Figure 21-21). You can either build from the latest version in source control at the time that the build is submitted to the queue, or you can take the latest version and apply a specified shelveset to the build before it is performed.
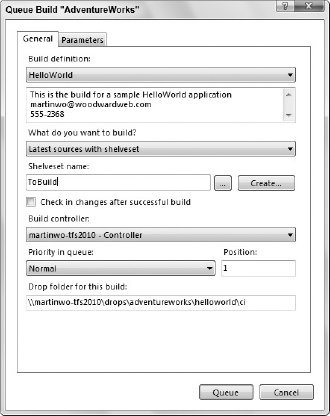
If you decide to perform a build that includes a shelveset of your changes not yet checked in to version control, this is called a private build, which can sometimes be referred to as a buddy build.
Private builds are useful when you want to check that you are including all the changes necessary to successfully perform the build on a different machine before you commit your changes to version control. Another use for them is when you may not have all the dependencies to perform that particular build definition on your local machine (such as a code signing certificate installed), but you want to test that your code functions correctly when built with those dependencies.
In many ways, a private build is similar to a gated check-in, apart from the fact that your changes are not automatically checked in to version control after a successful build.
Private builds do not follow the same build numbering mechanism defined for the regular team builds, and have separate retention policies. The build results for a private build are displayed to the developer who is invoking the private build, not to the whole team.
Team Foundation Server exposes a powerful eventing model and .NET-based API that allows for custom integrations of any imaginable application or device for notification of build results—from standard email alerts to lava lamps, confetti-filled leaf blowers, and even talking robot rabbits. However, two main notification systems are exposed to the developer out of the box— the build notification tool and email alerts.
The build notification tool used to be provided as a power tool, but now ships with the main application. As shown in Figure 21-22, it is a small application that runs in the system notification area of Windows and notifies the end user of build events via an Outlook style pop-up message in the bottom right-hand corner of the screen.
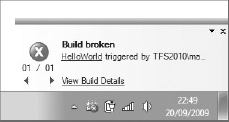
This tool can be configured to automatically start when you log in to Windows. However, it will always be run during a gated check-in process so that the developers will be aware of the status of the build containing their changes. If the build is a success, the developers will easily be able to reconcile their workspaces to remove any pending changes that were included in the gated check-in shelveset from their local workspace.
To configure the build notification tool, right-click on the icon while the tool is running and select Options. To quit the application entirely, right-click on the icon and select Exit.
Basic email alerts can be configured from the Team

In the Team Foundation Power Tools, a more flexible Alerts Editor is available as an additional Alerts node on the Team Explorer. This provides a greater degree of control over which events and what events values cause an email alert to be dispatched.
Emails can be sent to any email address, including team aliases, provided the Team Foundation Server Application tier is configured with the correct SMTP server details to send the messages. However, the email alerts belong to the user who created the alert, and that user must delete or edit the alert through the Visual Studio interface.
On the Team Foundation Server Application tier machine, the BisSubscribe.exe command is available in the Team Foundation ServerTools folder, and can be used to script the creation of project alerts for a team project.
The process controlling the end-to-end build process in Team Foundation Server is described in a Windows Workflow 4.0 XAML file. The build process templates are created as part of the project creation process, and are defined in the process template.
In the MSF Agile and MSF CMMI processes, the following build processes are included:
DefaultTemplate— This is the default template to be used for most new builds created for Team Foundation Server 2010. This is the template that is the primary focus of discussion in the remainder of this chapter.UpgradeTemplate— This is the default template for builds upgraded from Team Foundation Server 2008, or builds created using Visual Studio 2008. Basically, it performs some housekeeping, and then just wraps the call to the legacyTFSBuild.projfile for an MSBuild-based build configuration.
In addition, the LabDefaultTemplate build process template is also installed for the Lab Management functionality by the Lab section of the MSF processes.
Note
Chapter 16 provides more information on Lab Management functionality in Visual Studio 2010.
All the build process templates are stored as files in version control, allowing for quick and easy auditing of any changes to the process used to perform the build. By default, these are stored in a folder called TeambuildProcessTemplates at the root of the team project in version control, but may be located inside your team project branch structure, if that's more convenient.
The majority of the remainder of this chapter focuses on the DefaultTemplate — how it works, how to use it, and how to modify it.
The DefaultTemplate is used for most new, un-customized build definitions. The process followed is outlined at a high level in Figure 21-24, but can be explored in detail by opening the DefaultTemplate.xaml file from version control inside Visual Studio.
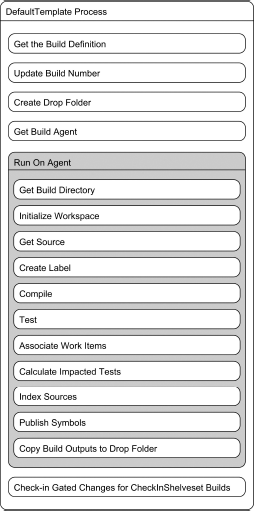
On the build controller, the build number is calculated and the drop location for the build created. Then, the build agent is calculated and the majority of the rest of the process is performed on the selected agent from the controllers build agent pool.
The working directory for the build is determined by using the build agent working directory setting as defined in the Build Agent Properties dialog. Then, the workspace is created (if required) and source downloaded from version control. The version that is downloaded is usually the changeset that represented the latest version in the project collection at the time the build was triggered. If a subsequent change has been made while the build was queued, this change is not included. The files that were downloaded are then labeled in version control with the build number.
Next, the process calls MSBuild to perform the actual compilation of the desired project files for the configuration, and then any specified automated tests are executed. Next, the build agent looks at the changesets included since the last successful build of the build definition, and records any work items that were associated with those check-ins. For work items that were marked as resolved during check-in, the Fixed-In Build field for the work item is updated with the current build number.
From the files changed since the last successful build, the build agent then calculates which tests have been affected, and records them. The source code is then indexed and linked with the symbols that are published to the symbol server (if provided). Finally, on the build agent, the output from the build is copied over to the drop folder location previously created by the controller.
The process then moves back to the controller for the final step, which, for a build with a Gated Check-in trigger, is to check in the shelveset that contained the modified files included in the build.
The build process templates are configured to make a number of parameters visible in the user interface in either the Build Definition editor or the Queue Build dialog (or both). These parameters (Figure 21-25) are provided to control the behavior of the selected build process.

When you create the build definition, you set one of these parameters, "Items to Build," to be the solution file that you want to build. However, there are many other parameters provided for you to adjust the behavior of the template. If you select one of the parameters, additional information is displayed about the parameter in the comments box at the bottom of the process parameter table.
In the default process templates, these parameters are broken down into three categories: Required, Basic, and Advanced. Some of these parameters are worth calling out in this chapter, and are examined in the following discussions. However, it is worth familiarizing yourself with all the parameters and what they do.
The default Visual Studio build configuration to use is the default build configuration for your solution. To modify the configuration, use the Configurations dialog that is available when you press the "..." button in the Configurations To Build parameter under Required, Items to Build.
By default, only messages above normal priority get included in the build log. However, you can adjust the logging priority to change the level of detail recorded. The more detailed the log, the slower the build will be performed, and the longer it will take to download build data to Visual Studio.
When diagnosing build problems, it is often useful to manually queue a build with this property set to Diagnostic. In that way, the log priority is only set for a single run of the build, rather than for all builds from that definition. The logging verbosity parameter can be found in the Basic category.
Agent Settings can be found in the Advanced category of parameters. As well as limits for how long a build can run or wait for an available build agent, the Agent Settings group of process parameters includes both the Name Filter and Tags Filter. Together, these are used to determine on which build agent the build will be executed. If multiple build agents match the agent requirements, then the agent with the least number of build agents running will execute the build.
Specifying the Name of a build agent allows you to force it to run on a particular machine. You can also adopt a naming convention for your build agents, and then use wildcards in the Name Filter to assign builds to a pool containing a subset of all the build agents for the project collection (for example, "ProjectX*" for all build agents assigned to "ProjectX").
A more flexible way you can limit which build agents are used for a build is to make use of the tagging feature for build agents. From the build agent properties dialog, you can assign tags (which are a set of text strings) to an agent to denote certain features. For example, you could use "CodeSign" if you have the project's code signing certificate installed on the machine, "Datacenter1" if it is located in your main data center, or "Ireland" if the build server is located in your remote office in Ireland. You can then filter on which tags are required for your build agent by using the Tags Filter in the Agent Requirements, and then only agents with that tag will be used.
To edit the tags on a particular agent, you can use the Team Foundation Server Administration Console on the build agent machine itself, or you can right-click on the Builds node in Visual Studio and select Build Controllers. You then select your build agent and click the Properties button. You will then be presented with the Build Agent Properties dialog shown in Figure 21-26, and, provided you have sufficient permissions, you will be able to edit the assigned tags.

By default the Clean Workspace parameter is set to All, meaning that all existing build outputs and sources for that build definition will be deleted for every build. Although this is the safest option, it is also the slowest, because all the files must be downloaded from version control, and everything re-built for every build, regardless of what has changed.
If you have a lot of source files (or some very large files in your source), then you could set the value of this parameter to Outputs. This will simply delete the build outputs every time the build is performed, and only get the files that have changed between builds from version control.
If you set the value of the parameter to None, then neither the sources nor the build outputs will be deleted at the start of a build. Only the files that have changed in version control will be downloaded each time, and only the things that have changed will be recompiled as part of the build. Because not a lot of things usually change between builds, this will normally give your builds a significant performance boost by taking much less time to complete. It is also often useful for things such as ASP.NET-based Web sites, where you might want to subsequently only publish the items that have changed to your public Web site to minimize the upgrade impact for new versions.
However, if you have customized your build process and you make any of the source files writable for some reason (for example, to modify the AssemblyInfo files to contain your version number), or if your customized build process assumes a clean output directory, then you may run into issues with altering the default value of the Clean Workspace. So, use with caution.
By default, Team Foundation Server numbers the builds in the format $(BuildDefinitionName)_$(Date:yyyyMMdd)$(Rev:.r). For example, in HelloWorld_20090927.5, the "5" is the fifth build executed for that build definition on that day. Build numbers must be unique across a team project, and this format serves as a good default. However, it is often not the format that people want.
Thankfully, in Team Foundation Server 2010, editing the build number is very easy using the Build Number Format parameter. When you edit the Build Number Format parameter, you are presented with a dialog, similar to Figure 21-27, that gives you the format string, a preview of what a build number of that format will look like when generated, and a set of macro strings that can be used in the format. Clicking on each macro will give you more information about its behavior in the command section at the bottom of the dialog.
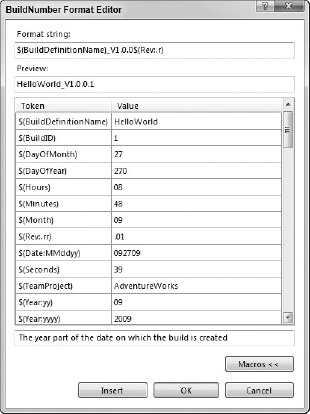
A common number format to use is $(BuildDefinitionName)_V1.0.0$(Rev:.r), where you are currently working on version 1.0.0 of the product, and the $(Rev:.r) macro translates to an incrementing number that makes the build number unique.
The DefaultTemplate in Team Foundation Server 2010 includes a step to index source code and publish symbols to a symbol server in the organization. As mentioned earlier in this chapter, a symbol server is simply a file share that is used to store the symbols for your executable binaries. Visual Studio can then be configured with details of this server. From then on, when debugging code live, or using the advanced historical debugging features, Visual Studio is able to take you directly to the version of the source code from which the binary was generated, regardless of which version of the code that you have on your local system at that time.
The configuration of the symbol server is performed by adding the UNC file path of the share to be used as the symbol sever in the "Path to Publish Symbols" process parameter under "Basic, Source and Symbol Server Settings."
In the basic category of process parameters, you are able to configure automated tests that should run as part of the build using the Automated Tests parameter. By default, a new build will run all unit tests in assemblies matching the pattern *test*.dll. This means that, if you have created some unit tests in a companion test project called HelloWorldTests, for example, then they will be run automatically.
Pressing the ". . ." button will open the Automated Tests dialog shown in Figure 21-28, where you can add additional tests to run, or edit the test configuration.
If you select the existing test configuration and click Edit, the Add/Edit Test dialog shown in Figure 21-29 will be displayed, allowing you to edit aspects of your test run. For example, you can configure it to fail the build on test failure, run a particular set of test lists, modify the test category criteria, specify which priority range of tests that you wish to run, specify the command-line arguments, or provide a test settings file to use when executing the tests.


Your Visual Studio solution can contain a number of .testsettings files to control the behavior of the test environment and to enable configuration settings (such as code coverage or the test impact analysis, as part of the test run).
If you have unit tests as part of your automated build, then it may be very useful to enable code coverage and to test impact analysis as part of the build. Code coverage tracks how much of your application code is being tested by the unit tests. Test impact analysis determines which tests were affected by the changes committed into version control as part of that build — giving your testers an idea of which tests should be revisited when testing the build.
To enable code coverage and test impact analysis, it is best to create a new test settings file specifically for your build server settings. Open the Local.testsettings file in the Solution Items. Then, change the name to Build Server and click the Save As button, to save it as something like BuildServer.testsettings.
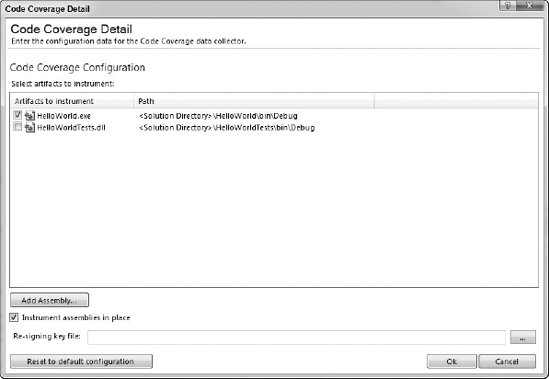
Open the build server test settings file, and, in the Data and Diagnostics section, check both the Code Coverage and Test Impact options, as shown in Figure 21-30.
With the Code Coverage option selected, click the Configure button to enable code coverage on the assemblies that make up your product (that is, not your unit tests), as shown in Figure 21-31.

Once configured, save the test settings file and check in to version control. Then edit the Test Container TestSettings File process parameter to point to the file in version control, and save the build definition.
Builds are usually performed with the latest sources from version control. However, occasionally you may want to perform a build of the source at a particular date, changeset, or label. In those circumstances, you can modify the Get Version process parameter. This is usually done as you queue the build by clicking on the Parameters tab. The value provided should be a valid version specification such as C1234 for changeset 1234, D2008-04-22T17:37 for a date/time, or LmyLabel for a label called myLabel.
While the DefaultTemplate with the pre-configured properties allows you to perform common build scenarios, it is sometimes necessary to customize the build. For example, if you wanted to parallelize parts of the build across build agents, generate documentation, or even create MSI installers and ISO disk images, you would need to customize the build process.
The remainder of this chapter discusses the basics of customizing the build process. To comprehensively cover this topic could easy take a whole book, but hopefully this will be enough to familiarize you with the techniques and allow you to get started.
Your processes are stored in version control. Therefore, to access them, you could easily just open the file from Source Control Explorer and start editing. However, customized process templates should be stored in a file with a new name so that others in your team project may create a build using the DefaultTemplate, if required. This also allows you to experiment with a build definition using your process template while the team continues to work with the DefaultTemplate.
To create a new build process template, start by editing the build definition. In the Process section of the dialog, click the New button toward the top of the screen. This brings up the New Build Process Template dialog shown in Figure 21-32.

In the dialog, select "Copy an existing XAML file" and point it at DefaultTeamplate.xaml. Select the folder in which to create the new process template and enter the new filename — in this case, let's use NewBuildProcessTemplate.xaml.
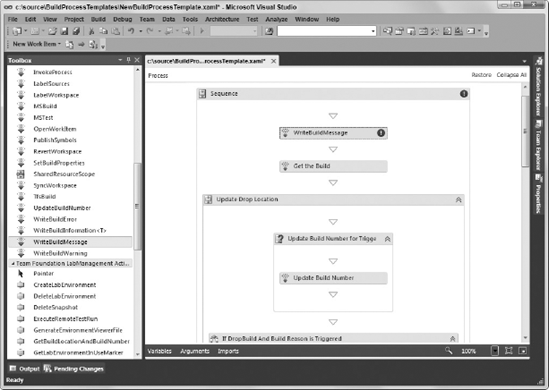
This will create the file in version control. You must save your build definition to make it use the new build process template from now on. You then perform a Get Latest on the build process template in Source Control Explorer, so that you can open the file for editing inside Visual Studio (Figure 21-33).

It is important to remember that the team build process templates are simply Windows Workflow activity XAML files — the same as if you had created your own workflow activity project in Visual Studio.
Team Foundation Server ships with a set of additional workflow activities related to the build process in the assembly Microsoft.TeamFoundation.Build.Workflow. This includes all the build-related activities called by the build process templates that ship with the product, along with several other activities that are useful when performing common build customization.
When you edit the build process, you have exactly the same design time features available as if you were editing any other workflow activity, including a full graphical designer tool.
You can drag and drop activities from the toolbox into your new build process template. To begin, let's simply add a message into the build log as part of the build.
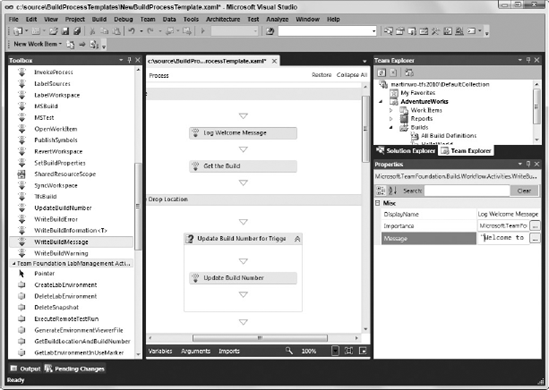
Locate the WriteBuildMessage activity in the toolbox under the Team Foundation Build Activities section and drag it over into the Overall Build Process, placing it above the "Get the Build" step, as shown in Figure 21-34.
In the properties for the build step, shown in the lower-right of Figure 21-35, change the DisplayName to Log Welcome Message. Change the Importance to Microsoft.TeamFoundation.Build.Client.BuildMessageImportance.High, and set the Message to "Welcome to my customized build process". Note the quotes in the message — you are actually entering a piece of VB.NET code that evaluates to the string required for the message.
Now, remember to save the customized process template XAML file and check it in to Team Foundation Server from the Pending Changes view. Then, queue a build using your new process template. If you look at the build log (as shown in Figure 21-36), you should see your message.
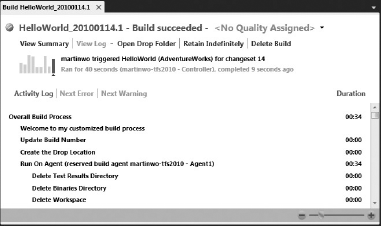
If you do not see your message, then verify the following:
That you set the importance of the message to
HighThat you checked in your template into version control
That your build definition is configured to use the process template
That you have saved your build definition
Extending the build process is now just an extension of this, but with increased complexity. Obviously, adding things to the build log alone is not particularly useful (except, perhaps, for debugging why something else is not working). Let's instead invoke a process from the build.
The remainder of this discussion about build customization looks at creating a ZIP archive of the build binaries. As part of your build process, you may want to package your binaries, or even source files, into various formats to make them convenient to distribute and deploy. Creating a ZIP archive of files is a handy method for making them easy to download.
For this particular example, let's use 7-zip, which is a popular Open Source utility for manipulating archives. Along with a Windows interface, it also includes a command-line utility, 7z.exe, that you will invoke as part of the build. You can download 7-zip from www.7-zip.org/; the software is available under the L-GPL license.
The command that you want to execute will be to create a new ZIP archive from the contents of the Binaries directory after the build has completed. It will be in the following format:
7z.exe a -bd -r -tzip output.zip -r
     c:Builds1AdventureWorksHelloWorldBinaries*
You want to create the zip archive on the build agent. Double-click on the "Run On Agent" activity at the root of the build process, then double-click on the "Try Compile, Test and Associate Changesets and Work Items" activity. This activity is where the actual compilation of your project is done by the build agent. The "Sequence in the Try" block is where that activity is done, and the "Finally" block contains the activity that copies the results of your build from the Binaries directory to the drop location. You want the "Package Binaries" activity to occur at the end of a successful build process, so double-click on the "Sequence" in the Try block to see the main compilation steps.
From the Control Flow section of the Toolbox, drag a new "If" activity to the end of your sequence. Call it "If Compilation Successful," as shown in Figure 21-37, and add the following condition:
BuildDetail.CompilationStatus =
     Microsoft.TeamFoundation.Build.Client.BuildPhaseStatus.Succeeded
You have now created an "If" block that will run when the build has had a clean compile phase. Double-click on the "If" block, and then drag a new "Sequence" over to the "Then" section of the "If" block. Call it "Package Binaries," as shown in Figure 21-38.


Double-click on the "Package Binaries" sequence. Then drag in a new InvokeProcess activity from the Team Foundation Build section of the Toolbox. Give it a display name of "Invoke 7zip."
STORING TOOLS IN VERSION CONTROL
It is considered good practice to make your builds as easily repeatable as possible, and, in general, this means avoiding the assumption that certain applications or files will be pre-installed on the build agent machines, whenever possible. Therefore, when using tools like 7-zip as part of the build, you can check those binaries into version control to allow you to run the command on the build agent without having to install it first.
You can include your tools as part of the project that you are building, or you can create a section in version control that stores all your common tools, and then add a working folder mapping as part of your build definition so that the tools are downloaded as part of the "Get of source" done at the start of running on the build agent.
In the example shown in the discussion, you have checked in 7z.exe, along with its associated files (7z.dll, Licence.txt, and copying.txt) into a folder called 7zip inside a tools folder you created as part of the project.

You are then able to reference these tools by giving a path relative to the tools directory.
In the FileName, enter a fully qualified path to find the 7-zip executable, which, in this case, is the following:
String.Format("{0}7zip7z.exe", System.IO.Path.Combine
     (SourcesDirectory, "tools"))
In the Argument section, give the command-line arguments to pass to the 7-zip command, as shown here:
String.Format("a -bd -y -tzip {0} {1}/* -r",
     Path.Combine(BinariesDirectory, "output,zip"), BinariesDirectory)
Save this template and check it in to version control. Then manually queue a build. After the build completes, you should find a zip file called output.zip in your build drop folder location containing the contents of your Binaries directory.
While this will actually execute the process for you, you are not handling error messages or logging the results of the command, which will make it difficult to debug. To log the standard output and standard errors of the process to the build log, double-click on "Invoke 7zip process." Drag a WriteBuildMessage activity into the Handle Standard Output section. Set the Message to be stdOutput. Drag a WriteBuildError activity to the "Handle Error Output" section and set the message to be errOutput.
Note
Note that, under the default logging conditions, you do not see build messages with an importance of Normal. Therefore, to view the output of the 7-zip process, you should manually queue a build and set the Logging Verbosity process parameter to Diagnostic.
If you look at the XAML that you have just created using the visual designer, the section you have edited looks something like the following:
<If Condition="[BuildDetail.CompilationStatus =
Microsoft.TeamFoundation.Build.Client.BuildPhaseStatus.Succeeded]"
DisplayName="If Compilation Successful">
<If.Then>
<Sequence DisplayName="Package Binaries">
<mtbwa:InvokeProcess
Arguments="[String.Format("a -bd -y -tzip {0} {1}/* -r",
Path.Combine(BinariesDirectory, "output.zip")
,BinariesDirectory)]"
DisplayName="Invoke 7zip"
FileName="[String.Format("{0}7zip7z.exe"
,System.IO.Path.Combine(SourcesDirectory, "tools"))]">
<mtbwa:InvokeProcess.ErrorDataReceived>
<ActivityAction x:TypeArguments="x:String">
<ActivityAction.Argument>
<DelegateInArgument x:TypeArguments="x:String" Name="errOutput" />
</ActivityAction.Argument>
<mtbwa:WriteBuildError Message="[errOutput]" />
</ActivityAction>
</mtbwa:InvokeProcess.ErrorDataReceived>
<mtbwa:InvokeProcess.OutputDataReceived>
<ActivityAction x:TypeArguments="x:String">
<ActivityAction.Argument>
<DelegateInArgument x:TypeArguments="x:String" Name="stdOutput" />
</ActivityAction.Argument>
<mtbwa:WriteBuildMessage Message="[stdOutput]"
mva:VisualBasic.Settings="Assembly references and
imported namespaces serialized as XML namespaces" />
</ActivityAction>
</mtbwa:InvokeProcess.OutputDataReceived>
</mtbwa:InvokeProcess>
</Sequence>
</If.Then>
</If>

While the visual designer is a good way of discovering and adjusting the build process, you will need to get a high degree of familiarity with the XAML that is generated. Therefore, it is worth spending a little time now reading through and understanding the XAML created, and how it matches up against what is seen in the designer.
For the most robust handling when invoking processes, you should also check the exit code of the process. For most processes, an exit code of 0 means that everything has worked, with other error codes indicating an error. To check this, create an Int32 variable in the "Package Binaries" sequence called exitCode. Set exitCode as the Result of the InvokeProcess activity. Then drag a new "Switch" block into the workflow to check the values of the exit code and log an appropriate message. The resulting XAML should look something like the following:
<If Condition="[BuildDetail.CompilationStatus =
Microsoft.TeamFoundation.Build.Client.BuildPhaseStatus.Succeeded]"
DisplayName="If Compilation Successful">
<If.Then>
<Sequence DisplayName="Package Binaries">
<Sequence.Variables>
<Variable x:TypeArguments="x:Int32" Name="exitCode" />
</Sequence.Variables>
<mtbwa:InvokeProcess
Arguments="[String.Format("a -bd -y -tzip {0} {1}/* -r",
Path.Combine(BinariesDirectory, "output.zip"),
BinariesDirectory)]"
DisplayName="Invoke 7zip"
FileName="[String.Format("{0}7zip7z.exe",
System.IO.Path.Combine(SourcesDirectory, "tools"))]"
Result="[exitCode]">
<mtbwa:InvokeProcess.ErrorDataReceived>
<ActivityAction x:TypeArguments="x:String">
<ActivityAction.Argument>
<DelegateInArgument x:TypeArguments="x:String" Name="errOutput" />
</ActivityAction.Argument>
<mtbwa:WriteBuildError Message="[errOutput]" />
</ActivityAction>
</mtbwa:InvokeProcess.ErrorDataReceived>
<mtbwa:InvokeProcess.OutputDataReceived>
<ActivityAction x:TypeArguments="x:String">
<ActivityAction.Argument>
<DelegateInArgument x:TypeArguments="x:String" Name="stdOutput" />
</ActivityAction.Argument>
<mtbwa:WriteBuildMessage
Message="[stdOutput]"
mva:VisualBasic.Settings="Assembly references and
imported namespaces serialized as XML namespaces" />
</ActivityAction>
</mtbwa:InvokeProcess.OutputDataReceived>
</mtbwa:InvokeProcess>
<Switch x:TypeArguments="x:Int32" Expression="[exitCode]">
<Switch.Default>
<mtbwa:WriteBuildError Message="[String.Format("Known exit code {0}
from 7z.exe", exitCode)]" />
</Switch.Default><mtbwa:WriteBuildMessage x:Key="0"
Importance="[Microsoft.TeamFoundation.Build.Client.
BuildMessageImportance.High]"
Message="[String.Format("Binary Archive '{0}' created.",
"output.zip")]"
mva:VisualBasic.Settings="Assembly references
and imported namespaces serialized as XML namespaces" />
<mtbwa:WriteBuildWarning x:Key="1" Message="Non fatal error occured when
running 7z.exe" />
<mtbwa:WriteBuildError x:Key="2" Message="Fatal error running 7z.exe" />
<mtbwa:WriteBuildError x:Key="7" Message="Command line error for 7z.exe" />
<mtbwa:WriteBuildError x:Key="8" Message="Not enough memory to perform
binary archive" />
<mtbwa:WriteBuildError x:Key="255" Message="Process terminated" />
</Switch>
</Sequence>
</If.Then>

When you start to customize the build process, it is good to be able to re-use your build process templates. That way, you would hard-code as little as possible into the build to allow it to be adapted for use by other build definitions in your organization.
You have full access to be able to add your own properties so that they appear in the user interface when editing the build definition or queuing a new build. To add a new property and make it appear in the user interface, you would follow two steps:
You create the process argument.
You create the metadata that is used when displaying the argument in the Team Foundation build dialogs.
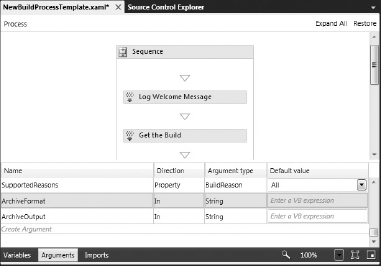
In the workflow designer, click on the Arguments section at the bottom of the designer. Scroll to the bottom of the arguments and click on the Create Argument section. Enter a name, direction ("In" for process parameters), argument type, and any default value. For this example, create two parameters — one to control the type of archive created (ArchiveFormat) and one to control the archive filename (ArchiveOutputFile), as shown in Figure 21-39.
Next, you must create the metadata used to display the arguments in the Team Foundation build dialogs. In the Arguments section, find the argument called Metadata, which is a collection of all the metadata required for the process parameters. Click on the . . . button to open the Process Parameter Metadata Editor shown in Figure 21-40.

Add new parameters for each of the process arguments. Give them a suitable Display Name and Description. Set the Category to be Package Binaries so that they show in their own section of the process parameters. Also, set the "View this parameter when" field to be "Always show the parameter" so that it displays in both the build editing and the queue build dialog.
Click OK in the Process Parameter Metadata Editor. Save the build process template and check in to version control.
Right-click on the build definition in Team Explorer and select Edit Build Definition. Go to the Process section; your process parameters should now be displayed, as shown in Figure 21-41. Set the Binary Archive Output File to be output.zip and the Binary Archive Format to be zip, and then save the build definition.

Now that you have created your process parameters, you want to make use of them. Taking the earlier example of creating a zip archive of the build binaries, let's now customize the process to make use of the new parameters.
The parameters appear in the workflow as variables that you can access. The designer has full Intellisense when writing functions, and you should see the new parameters appear when you start typing.
In the custom build template, replace occurrences where you have hard-coded the string output.zip and the archive type of zip. Also, add an "If" block into the package binaries sequence so that you only run 7-zip if an archive type has been specified — that is, an "If" block with the condition Not String.IsNullOrEmpty(ArchiveFormat) as shown in Figure 21-42.
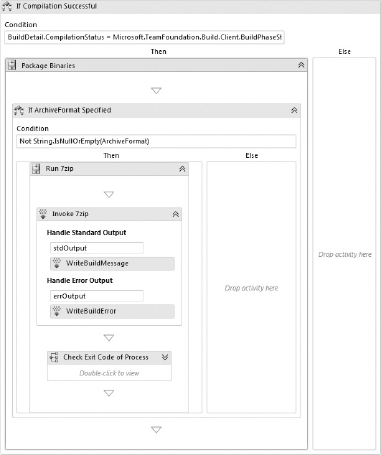
The XAML created for this step should now look like the following:
<If Condition="[BuildDetail.CompilationStatus =
Microsoft.TeamFoundation.Build.Client.BuildPhaseStatus.Succeeded]"
DisplayName="If Compilation Successful">
<If.Then>
<Sequence DisplayName="Package Binaries">
<Sequence.Variables>
<Variable x:TypeArguments="x:Int32" Name="exitCode" />
</Sequence.Variables>
<If Condition="[Not String.IsNullOrEmpty(ArchiveFormat)]"
DisplayName="If ArchiveFormat Specified">
<If.Then>
<Sequence DisplayName="Run 7zip">
<mtbwa:InvokeProcess
Arguments="[String.Format("a -bd -y -t{0} {1} {2}/* -r",
ArchiveFormat, Path.Combine(BinariesDirectory,
ArchiveOutput), BinariesDirectory)]"
DisplayName="Invoke 7zip"
FileName="[String.Format("{0}7zip7z.exe",
System.IO.Path.Combine(SourcesDirectory, "tools"))]"
Result="[exitCode]">
<mtbwa:InvokeProcess.ErrorDataReceived>
<ActivityAction x:TypeArguments="x:String">
<ActivityAction.Argument>
<DelegateInArgument x:TypeArguments="x:String" Name=
"errOutput" /></ActivityAction.Argument>
<mtbwa:WriteBuildError Message="[errOutput]" />
</ActivityAction>
</mtbwa:InvokeProcess.ErrorDataReceived>
<mtbwa:InvokeProcess.OutputDataReceived>
<ActivityAction x:TypeArguments="x:String">
<ActivityAction.Argument>
<DelegateInArgument x:TypeArguments="x:String" Name=
"stdOutput" />
</ActivityAction.Argument>
<mtbwa:WriteBuildMessage
Message="[stdOutput]"
mva:VisualBasic.Settings="Assembly references
and imported namespaces serialized as XML namespaces" />
</ActivityAction>
</mtbwa:InvokeProcess.OutputDataReceived>
</mtbwa:InvokeProcess>
<Switch x:TypeArguments="x:Int32" DisplayName="Check Exit Code of
Process" Expression="[exitCode]">
<Switch.Default>
<mtbwa:WriteBuildError Message="[String.Format("Known exit
code {0} from 7z.exe", exitCode)]" />
</Switch.Default>
<mtbwa:WriteBuildMessage x:Key="0"
Importance="[Microsoft.TeamFoundation.
Build.Client.BuildMessageImportance.High]"
Message="[String.Format("Binary Archive '{0}'
created.", "output.zip")]"
mva:VisualBasic.Settings="Assembly references
and imported namespaces serialized as XML namespaces" />
<mtbwa:WriteBuildWarning x:Key="1" Message="Non fatal error
occured when running 7z.exe" />
<mtbwa:WriteBuildError x:Key="2" Message="Fatal error
running 7z.exe" />
<mtbwa:WriteBuildError x:Key="7" Message="Command line
error for 7z.exe" />
<mtbwa:WriteBuildError x:Key="8" Message="Not enough memory to
perform binary archive" />
<mtbwa:WriteBuildError x:Key="255" Message="Process terminated" />
</Switch>
</Sequence>
</If.Then>
</If>
</Sequence>
</If.Then>

Now you have made this archive step part of a re-usable build process template. For builds that do not need binary archiving, just leave the archive file format to the default blank value. However, if you decide that you want an archive, you can set the archive type property and output file values, and then that functionality is automatically enabled.
While it is possible to edit the process template to build up increased functionality, sometimes you may want to collect common workflow activities in a custom, re-usable Workflow Activity Library. Also, sometimes you might not want to simply build activities out of other activities, but execute some of your own .NET code.
For example, when creating the zip archive file discussed previously, rather than invoking the 7-zip process, you might want to create a custom activity that uses code from an Open Source archiving library, such as SharZipLib, to perform the zip functionality without requiring the 7-zip tool to be downloaded or installed.
You can create your own Windows Workflow activity libraries in .NET 4.0, build them a compiled assembly containing your activities, and then use them in your build process. The Team Build workflow activities themselves are provided in this way.
There are four main ways to author a new activity:
Write a new
CodeActivityWrite a new
NativeActivtyCompose your custom activity in XAML
Compose your custom activity in code
The first two ways involve creating code using the Windows Workflow libraries. While not incredibly complicated, it does require some exposure and knowledge of Windows Workflow programming, and a proper treatment of this is, therefore, outside the scope of this book. However, for an example of creating a build Code Activity, see the blog post from Jim Lamb, Program Manager of the Team Foundation Build team at Microsoft on the Web at http://blogs.msdn.com/jimlamb/archive/2009/11/18/how-to-create-a-custom-workflow-activity-for-tfs-build-2010.aspx.
The next two ways involve creating a new activity from existing activities. This is the best approach to take, when possible, for a few reasons. It re-uses well-tested code. The activities created are automatically cancelable by the workflow run-time, meaning that a build created with your activity can be stopped cleanly. They can be easily tracked as they execute. And, finally, the process is comparatively easy.
A custom-composed activity is basically what you created previously when you were customizing the build process. By putting this into a Workflow Activity assembly, you are just making those activities re-usable by other build process templates as a compiled assembly.
So, let's create a custom activity. To get started, create a new Windows Workflow ActivityLibrary project in Visual Studio. Add references to Microsoft.TeamFoundation.Build.Workflow in ProgramFilesMicrosoft Visual Studio 10Common7IDEPrivateAssemblies and to Microsoft.TeamFoundation.Build.Client in ReferenceAssemblies. This will allow you to use the Team Foundation Server build activities in addition the standard Workflow 4.0 activities. To get this to build correctly, you might need to change the project's target framework to .NET Framework 4, rather than the .NET Framework Client Profile default.
You can then copy/paste the Run 7zip sequence from your earlier build process customization and refactor it to introduce some new activity arguments, as shown in Figure 21-43.

The XAML code behind the changes in the designer looks as follows:
<Activity mc:Ignorable="sap" x:Class="CustomBuildActivities.Invoke7zip"
  xmlns="http://schemas.microsoft.com/netfx/2009/xaml/activities"
  xmlns:mc="http://schemas.openxmlformats.org/markup-compatibility/2006"
  xmlns:mt="clr-namespace:Microsoft.TeamFoundation;
       assembly=Microsoft.TeamFoundation.Common"
  xmlns:mtbc="clr-namespace:Microsoft.TeamFoundation.Build.Client;
       assembly=Microsoft.TeamFoundation.Build.Client"
  xmlns:mtbw="clr-namespace:Microsoft.TeamFoundation.Build.Workflow;
assembly=Microsoft.TeamFoundation.Build.Workflow"
xmlns:mtbwa="clr-namespace:Microsoft.TeamFoundation.Build.Workflow.Activities;
assembly=Microsoft.TeamFoundation.Build.Workflow"
xmlns:mtbwt="clr-namespace:Microsoft.TeamFoundation.Build.Workflow.Tracking;
assembly=Microsoft.TeamFoundation.Build.Workflow"
xmlns:mttbb="clr-namespace:Microsoft.TeamFoundation.TestImpact.
BuildIntegration.BuildActivities;assembly=
Microsoft.TeamFoundation.TestImpact.BuildIntegration"
xmlns:mtvc="clr-namespace:Microsoft.TeamFoundation.VersionControl.Client;
assembly=Microsoft.TeamFoundation.VersionControl.Client"
xmlns:mtvc1="clr-namespace:Microsoft.TeamFoundation.VersionControl.Common;
assembly=Microsoft.TeamFoundation.VersionControl.Common"
xmlns:mv="clr-namespace:Microsoft.VisualBasic;assembly=System"
xmlns:mva="clr-namespace:Microsoft.VisualBasic.Activities;
assembly=System.Activities"
xmlns:s="clr-namespace:System;assembly=mscorlib"
xmlns:s1="clr-namespace:System;assembly=System"
xmlns:s2="clr-namespace:System;assembly=System.Core"
xmlns:s3="clr-namespace:System;assembly=System.ServiceModel"
xmlns:s4="clr-namespace:System;assembly=System.ComponentModel.Composition"
xmlns:s5="clr-namespace:System;assembly=System.Xml"
xmlns:sa="clr-namespace:System.Activities;assembly=System.Activities"
xmlns:sad="clr-namespace:System.Activities.Debugger;assembly=System.Activities"
xmlns:sap="http://schemas.microsoft.com/netfx/2009/xaml/activities/presentation"
xmlns:scg="clr-namespace:System.Collections.Generic;assembly=mscorlib"
xmlns:scg1="clr-namespace:System.Collections.Generic;assembly=System"
xmlns:scg2="clr-namespace:System.Collections.Generic;
assembly=System.ServiceModel"
xmlns:scg3="clr-namespace:System.Collections.Generic;assembly=System.Core"
xmlns:sd="clr-namespace:System.Data;assembly=System.Data"
xmlns:si="clr-namespace:System.IO;assembly=mscorlib"
xmlns:si1="clr-namespace:System.IO;assembly=System"
xmlns:si2="clr-namespace:System.IO;assembly=System.Core"
xmlns:si3="clr-namespace:System.IO;assembly=WindowsBase"
xmlns:si4="clr-namespace:System.IO;assembly=System.ServiceModel"
xmlns:sl="clr-namespace:System.Linq;assembly=System.Core"
xmlns:st="clr-namespace:System.Text;assembly=mscorlib"
xmlns:x="http://schemas.microsoft.com/winfx/2006/xaml">
<x:Members>
<x:Property Name="FileName" Type="InArgument(x:String)" />
<x:Property Name="ArchiveFormat" Type="InArgument(x:String)" />
<x:Property Name="ArchiveOutputFilePath" Type="InArgument(x:String)" />
<x:Property Name="SourceFilePath" Type="InArgument(x:String)" />
</x:Members>
<mva:VisualBasic.Settings>Assembly references and imported namespaces
for internal implementation</mva:VisualBasic.Settings>
<Sequence DisplayName="Run 7zip"
sad:XamlDebuggerXmlReader.FileName="C:code
CustomBuildActivitiesCustomBuildActivitiesInvoke7zip.xaml">
<Sequence.Variables>
<Variable x:TypeArguments="x:Int32" Name="exitCode" />
</Sequence.Variables>
<mtbwa:InvokeProcess
Arguments="[String.Format("a -bd -y -t{0} {1} {2}/* -r",ArchiveFormat, ArchiveOutputFilePath, SourceFilePath)]"
DisplayName="Invoke 7zip"
FileName="[String.Format("{0}7zip7z.exe", FileName)]"
Result="[exitCode]">
<mtbwa:InvokeProcess.ErrorDataReceived>
<ActivityAction x:TypeArguments="x:String">
<ActivityAction.Argument>
<DelegateInArgument x:TypeArguments="x:String" Name="errOutput" />
</ActivityAction.Argument>
<mtbwa:WriteBuildError Message="[errOutput]" />
</ActivityAction>
</mtbwa:InvokeProcess.ErrorDataReceived>
<mtbwa:InvokeProcess.OutputDataReceived>
<ActivityAction x:TypeArguments="x:String">
<ActivityAction.Argument>
<DelegateInArgument x:TypeArguments="x:String" Name="stdOutput" />
</ActivityAction.Argument>
<mtbwa:WriteBuildMessage
Message="[stdOutput]"
mva:VisualBasic.Settings="Assembly references and imported
namespaces serialized as XML namespaces" />
</ActivityAction>
</mtbwa:InvokeProcess.OutputDataReceived>
</mtbwa:InvokeProcess>
<Switch x:TypeArguments="x:Int32"
DisplayName="Check Exit Code of Process"
Expression="[exitCode]">
<Switch.Default>
<mtbwa:WriteBuildError Message="[String.Format("Known exit
code {0} from 7z.exe", exitCode)]" />
</Switch.Default>
<mtbwa:WriteBuildMessage x:Key="0"
Importance="[Microsoft.TeamFoundation.Build.Client.
BuildMessageImportance.High]"
Message="[String.Format("Binary Archive '{0}' created.",
"output.zip")]"
mva:VisualBasic.Settings="Assembly references and imported namespaces
serialized as XML namespaces" />
<mtbwa:WriteBuildWarning x:Key="1" Message="Non fatal error occured when
running 7z.exe" />
<mtbwa:WriteBuildError x:Key="2" Message="Fatal error running 7z.exe" />
<mtbwa:WriteBuildError x:Key="7" Message="Command line error for 7z.exe" />
<mtbwa:WriteBuildError x:Key="8" Message="Not enough memory to
perform binary archive" />
<mtbwa:WriteBuildError x:Key="255" Message="Process terminated" />
</Switch>
</Sequence>
</Activity>

As previously discussed, you could also create this in pure code. In this case, you could derive directly from System.Activities.Activity<T>. But, as you can see in Figure 21-44, CodeActivity<T> and NativeActivity<T> are provided as base classes that are used when building an activity that contains more functionality than just a composition of other activities.
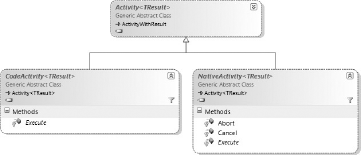
Regardless of how you create your custom activities, you must be able to configure the build controller and build agents so that they are able to locate the compiled Workflow Activity Library assemblies. To do this, you must check in the compiled assembly into a folder in version control. Then, you point the build controller to this folder by right-clicking on the Builds node in Team Explorer. Select Manage Build Controllers, select the controller, and then click Properties. You will then be presented with the Build Controller Properties dialog, shown in Figure 21-45, where you can browse version control to provide the custom assembly path.

In this chapter, you gained an understanding of the build services provided by Team Foundation Server 2010, and how they have been enhanced from previous versions.
You learned how to create build definitions, trigger builds, and view and manage build results. You also learned how the new Windows Workflow-based build process works and how to perform common customizations.
Finally, you learned how to further customize the build process yourself, using the example of creating a zip archive as part of the build process.
In Chapter 22 you will learn about the project management capabilities of Team Foundation Server. In Chapter 23, you will learn about the process templates governing the way in which work is done in Team Foundation Server for your team project, including which build process templates should be provided.