
What Is Team Foundation Server
Team Foundation Server Core Concepts
How to Access Team Foundation Server
What's New in Team Foundation Server 2010
Adopting Team Foundation Server
This chapter introduces you to Microsoft Visual Studio Team Foundation Server 2010. Here you will learn what it is for, the key concepts needed when using it, and how to connect to Team Foundation Server.
For those who are already familiar with Team Foundation Server from previous versions, the discussion in this chapter highlights areas that are new or have changed substantially. However, because understanding the legacy of a technology is always helpful, this chapter also includes some of the history of the Team Foundation Server product, which will help explain how it became what it is today. This chapter will also examine some best practices and strategies for adopting Team Foundation Server in your organization.
Later chapters will go into more depth with an examination of the architecture of the Team Foundation Server product. There you will learn about version control, including a whole chapter dedicated to branch and merge strategies. Another chapter concentrates on the Build Automation capabilities provided by Team Foundation Server, since they have been growing in functionality as the product matures, and this release has some particularly significant functionality.
Developing software is difficult, a fact that is repeatedly proven by how many projects fail. An essential factor in the success of any software development team is how well the members of the team communicate with each other and with the people who wanted the software developed in the first place.
Microsoft Visual Studio 2010 Team Foundation Server provides the core collaboration functionality for your software development teams in a very tightly integrated product. The functionality provided by Team Foundation Server includes the following:
Project management
Work item tracking (WIT)
Version control
Test case management
Build automation
Reporting
Team Foundation Server is a separate server product. Logically, Team Foundation Server is made up of the following two tiers, which can be physically deployed across one or many machines:
Application tier — The application tier primarily consists of a set of Web services with which the client machines communicate by using a highly optimized Web service-based protocol.
Data tier — The data tier is made up of a SQL Server database containing the database logic of the Team Foundation Server application, along with the data for your Team Foundation Server instance. The data stored in the database is used by Team Foundation Server's reporting functionality. All the data stored in Team Foundation Server is stored in this SQL Server database, thus making it easy to back up.
Team Foundation Server was designed with extensibility in mind. There is a comprehensive .NET API for integrating with Team Foundation Server and a set of events that allow outside tools to integrate with Team Foundation Server as first-class citizens. The same .NET programming model and event system is used by Microsoft itself in the construction of Team Foundation Server, as well as the client integrations into Visual Studio.
Let's take a look at some of the core concepts that are critical to understanding Team Foundation Server, some of which are new in the Visual Studio 2010 release. If you have been using previous versions of Team Foundation Server for a while, then you might want to skip to the section "What's New in Team Foundation Server 2010," later in this chapter.
Figure 17-1 provides an overview of the Team Foundation Server components.

The Team Foundation Application Tier is a slightly modified concept in Team Foundation Server 2010. It refers to the running Web application that is handling all requests for data from the Team Foundation Server and is, therefore, often referred to as simply the Team Foundation Server. You refer to your Team Foundation Server by name or URL (that is, tfsserver or http://tfsserver:8080/tfs) when Team Foundation Server is installed in the default virtual directory in IIS on the default port.
Because of load-balancing capabilities introduced in Team Foundation Server 2010, this server can be split across several actual servers making up a Team Foundation Server Farm. Each machine has the Team Foundation application tier components installed and pointing to the Team Foundation Server data tier.
Team Foundation Server can scale to support a very large number of active users, depending on the hardware supporting it. Therefore, for most organizations, the Team Foundation Server Instances tend to be scoped by who pays for the installation and operation of the instance.
A team project collection is another new concept in Team Foundation Server 2010. This is a container for team projects. Each server has one or many team project collections, and a project collection can have zero or more team projects.
In many ways, the team project collection can be thought of as having many of the same characteristics as older versions of Team Foundation Server. Global security groups take effect at the project collection level. Work items and changesets are all numbered with a sequential ID that is unique at the project collection level.
A team project collection has a one-to-one relationship with a database instance in SQL Server. Therefore, you can back up and restore at the project collection level. You can move project collections between Team Foundation Servers, and you can split the project collection to break up the distribution of team projects between the resulting collections. Using this process, you can move a team project into a new collection by cloning the existing project collection and then deleting the appropriate team projects from each of the cloned project collections.
Each Team Foundation Server instance has a default project collection, usually called DefaultCollection. Older clients that were created for Team Foundation Server 2008 or 2005 will only be able to see the default collection.
A team project is a collection of work items, code, tests, or builds that encompass all the separate tools that are used in the lifecycle of a software development project. A team project can contain any number of Visual Studio solutions or projects, or, indeed, projects from other development environments. A team project is usually a fairly long-running thing with multiple areas and iterations of work.
You need at least one team project to start working with Team Foundation Server. When the team project is created, the following are also created by default:
Team project Web site
Document library
Path in version control
Default work items
Stock reports
Warning
It is not possible to rename a team project once created. Also, the number of team projects in the team project collection has a performance impact on the system, so you do not want to have too many (less than 250). Therefore, you want to think carefully before creating a new team project.
It is often useful to experiment with Team Foundation Server features in a sandboxed test instance of Team Foundation Server. Many people download the Team Foundation Server Trial Virtual PC image from Microsoft for this purpose, but some organizations have enterprise-wide test instances of Team Foundation Server for people to experiment in.
The granularity that you chose for your team project has important implications for how you structure your work and when you move from one team project to another.
Team projects are intended to represent the largest unit of work in your organization. For example, in Microsoft Developer Division, the whole of the Visual Studio 2010 release lives in a single team project with Team Foundation Server as an area of that project.
A team project has a single process template, and changes made to the process template of a running team project affect that team project only. The default reports and work item queries are all scoped by team project, making it easy to track and find work for that team project as an entity.
As shown in Figure 17-2, the following are also linked to the team project that they belong to and, in general, are difficult to move between team projects:
Work Items — Each work item is attached to the team project and uses the process template assigned to it. For this reason, it is not possible to move a work item from one team project to another, although you may copy the work item between projects in the same project collection and include a link to the source work item for reference.
Document Libraries — The team project optionally refers to a project Web site based on Windows SharePoint Services (WSS). The document libraries in this Web site are linked to this project, and all the documents, projects plans, process guidance, or other non-deliverable assets contained in the document library therefore correspond to the team project.
Reports — All the reports created as part of one of the stock process templates are scoped to the team project level, making it easy to determine the progress of work inside that team project.
Builds — Each build definition is tied to a team project, as are the build controllers and build agents performing the builds.
Version Control — All items stored in version control must be stored under a team project node in the repository. All settings for version control (such as check-in policies, check-in notes, and multiple check-out support) are controlled at the team project level.
Classifications — A team project is typically broken up into areas and iterations. An area is typically a functional area of the code that may have a subset of the whole team typically working on it. For example, a particular application may be broken into tiers — the Web tier, application tier and database tier. It is common that a feature or requirement may impact all tiers of the application, but a task or bug may just affect a small area of the code. Therefore, areas are organized hierarchically so that a feature could be assigned to the whole application in the team project, but an ASP.NET form development task may be assigned to a child area. Iterations are similarly organized. For Version 1 of the application, you may split development into several phases and, in each phase, have several short iterations (or sprints). These can be organized hierarchically in the iterations section.
An important fact about software development projects is that there is no single process that is suitable for delivering all types of solutions to all types of business with all types of teams. Therefore, Team Foundation Server was designed from the ground up to be flexible in how you want your teams to work.
The process template is a set of XML files that provide the details of how you would like your process to work. Microsoft provides the following two process templates with the default installation of Team Foundation Server:
Microsoft Solutions Framework (MSF) for Agile Software Development — This is a lightweight template designed for teams following a delivery process based on Agile Software Development. User needs are tracked by "User Story" work items, as well as types for Bugs, Issues, Tasks, and Test Cases. In general, the work items have a simple state progression from active to resolved to closed. It is also an excellent starting point for people who want to customize a process to fit with their development organization.
MSF for Capability Maturity Model Integration (CMMI) Process Improvement — This is a more heavyweight template designed for teams with more heavyweight process requirements — that is, those that typically have longer lifecycles and possible governance requirements that the process template would help fulfill. Note that if your organization is striving for CMMI compliance, then you should not consider this template as your only choice, but still evaluate the possibilities offered by the MSF for Agile Software Development template among others.
In addition to the templates installed by default, many more are available to download online. If you have an existing process in your organization, it is possible to create a custom process template to match the process.
Note
To obtain information about a dditional process templates available from Microsoft and its partners, see http://go.microsoft.com/fwlink/?LinkId=80608. For information on Open Source and community-driven process templates for Team Foundation Server, see http://templex.codeplex.com.
Once you have created a team project with a process template, it is possible to modify all aspects of it while the project is in flight, including work item types, fields, states, and so on. This was another critical design decision taken by Microsoft in designing Team Foundation Server, because Microsoft recognized that the best teams are those that continually improve and adapt their processes, and that, as the project continues, more is learned about the domain, as well as the strengths and weaknesses of the team.
The following areas can be configured using a standard process template during the project creation process:
Work item tracking (WIT) — You can define the initial work item types, team project queries, and create some initial work items to provide guidance for someone creating the team project on what to do next.
Classifications — You can define the initial areas and iterations for a project. This is often useful to define the high-level aspects for the project (such as delivery phases), and to allow more detailed iterations to be created as children of the high-level phases once they are known.
SharePoint — If a SharePoint-based project Web site is to be created as part of the team project, then you can control on which site template the project will be based, what features should be activated, which document libraries are created, what folders should be in those libraries and even some template files to include.
Version control — This defines the initial security groups and permissions for the team project path in version control, what check-in notes to request, whether multiple users can check out a file at the same time, and whether users should automatically get the latest version of a file as they check out the file.
Reports — This includes the folders and reports to create in the reports site for the team project.
Groups and permissions — This includes the new Team Foundation Server security groups to create for the team project, as well as permissions to apply to each group specified.
Build — This includes the default build processes to use for new build definitions, as well as the build permissions to give to each of the groups.
Lab — This includes the default lab processes to use, as well as the lab permissions to give to each of the groups.
Test management — This includes the default test configurations, variables, settings, and resolution states.
Note
Chapter 23 provides a more in-depth look at process templates.
Work items in Team Foundation Server are things like requirements, bugs, issues, and test cases. In other words, these are the items of work that your organization needs to track to manage the delivery of a software development project.
The work item tracking system is highly extensible. You can control which fields are presented to the user, which fields are rolled up into the reporting data-warehouse, how the work item looks, what states the work item can be in, and how to transition from one state to the next.
All work items share certain common fields such as an ID, Status, and Title. As shown in Figure 17-3, they have a full history of changes recorded to every field in the work item and by whom. You can also link work items, files, Web pages or other elements in Team Foundation Server.

The work item type definitions are all configurable at the team project level. The work item types are created as part of the process template during project creation, but they can be modified as the team project is in flight. Changing the work item types in one team project does not affect those in another team project, even if they were created using the same process template.
Obtaining help in understanding how to use the particular work items in a team project is relatively simple. You simply right-click the work items node in Team Explorer, right-click the work item form itself, or click the process guidance button in the toolbar of the work item.
All data about the work item is stored in the Team Foundation Server database. Any file attachments are also stored in the database.
Note
You will learn more about work items in Chapters 22 through 26, all of which are included in Part V of this book.
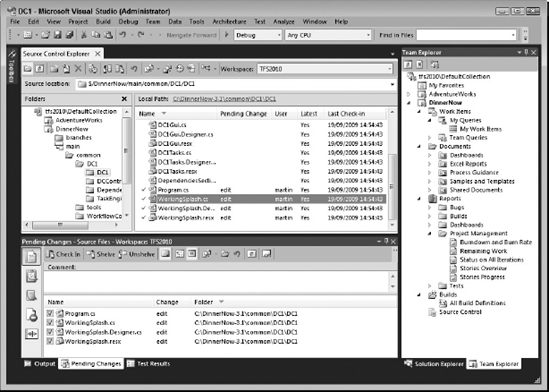
Team Foundation Server includes a full enterprise-class, centralized version control system that has been designed from the ground up to work well in environments that are spread across a wide geographical area over high latency, low-bandwidth connections.
The basic model of version control in Team Foundation Server will feel very familiar to Visual SourceSafe (VSS), Polytron Version Control System (PVCS), or Perforce users, but may take some getting used to for people used to Subversion or CVS. Files are stored in a centralized server repository in Team Foundation Server. When you want to work on a copy of those files locally, you must "Get" the files to download them from the server to your local workspace. When you have the files locally, they will all be read-only. Before you edit a file, it must be "checked out" from version control. When you check out a file, the client will contact the server to ensure that it is still available for check-out. If so, the file will be marked as writeable in your local file system. You make your changes to the file (or files), and then, when you want to commit those changes to the server, you "check in" the files to Team Foundation Server.
By default, Team Foundation Server allows multiple people to edit the same text-based files at the same time. This is particularly useful for .sln, .vbproj, and .csproj files in a Visual Studio project. When you go to check the file in to the server, if the latest version of that file is newer than the one you checked out, then you will be prompted to merge your changes with the changes made by your colleague(s). At the time of check-out, you may specify that you wish to "lock" the file so that it cannot be edited by others until you release the lock — usually by checking the file back in again. This setting can be made the default by a user with administration privileges on the team project. However, it is recommended that you allow for concurrent editing of files if your organization permits this.
When you check out a file in your workspace, you are checking out the version of the file that you have downloaded to your machine. Therefore, it is important to get into the habit of regularly doing a "Get Latest" on your project to ensure that you are working against the latest version of the code for your team. If you wish, you may set Visual Studio to automatically download the latest version of the code as it is checking out a file (the behavior more familiar to VSS users). The reason this is not the default behavior is that two files that are dependent on each other may have been checked in at the same time. However, you are only editing one of them.
The tight IDE means that if you are making changes in your code editor, then it will (by default) automatically check out files when needed, perform renames, and so on. However, if you must work outside of the IDE, then you must ensure that you check files out before editing them and manually add any new files that you create.
Note
Chapter 19 provides more in-depth information about version control.
Team Foundation Server version control contains the following features:
Atomic check-ins — Changes you make to the files are batched up into a "changeset." When you check in the files in a changeset, they are taken as a single atomic transaction. If a single file cannot be checked in (for example, because of a merge conflict), then the whole changeset it not committed. Only once the whole changeset has been successfully applied do any of the files become the latest version. This way, you can ensure the consistency of your code base.
Associate check-ins with work items — When you perform a check-in, you may associate that changeset with one or more work items. In this way, you are able to get full traceability of requirements from the initial feature desired by the user, to the tasks required to create it, to the check-ins into version control that were required to implement the feature. This information is also surfaced in the work item that you linked to, as well as being passed into the reporting system in Team Foundation Server.
Branching and merging — Team Foundation Server supports a full path space branching model. If you desire parallel development on a code base, then you can create a branch of the code in two separate places in the version control repository, and then merge changes that have been applied to one branch into the other. Substantial improvements have been made to the branch and merge support in Team Foundation Server 2010.
Note
Chapter 20 provides more information about branching and merging in Team Foundation Server.
Shelving — This includes the capability to store files on the server without committing them to the main version control repository. This is useful in a couple of different scenarios. You may want to back up changes made on your local machine to the server if you are going to be working on the files for more than a few hours or if you need to work on a different task temporarily and resume later. Another scenario is when you want to copy changes from one machine to another without checking them in (for example, to have a colleague verify your changes).
Labeling — In Team Foundation Server, you can tag a set of files at a particular version with a textual label. This is useful for indicating which files were included in a certain build or which files are ready to move to your quality assurance (QA) process. Note that, in Team Foundation Server, labels are always editable. Provided you have permission, you may add or remove files from that label at any time.
Concurrent check-outs — Also known as the Edit-Merge-Commit model, by default, multiple people may edit a file at the same time. If a file were modified while you were working on it, then you would be prompted to merge the changes with the latest version of the file.
Follow history — If you rename a file or branch it, then you are able to view the history of that file before it was renamed or branched. You can also follow the history of a file from before it was branched or merged.
Check-in policies — When performing a check-in, Team Foundation Server provides the capability for the client to run code to validate that the check-in should be allowed. This includes performing actions such as checking that the change is associated with a work item, checking that the code passes static code analysis rules, and so on. Check-in policies are also an extension point in Team Foundation Server so that you can create your own, should you wish to do so.
Check-in notes — In some organizations, it is necessary to capture metadata about a check-in (such as the code reviewer, or a reference to a third-party system). In other version control systems, this is frequently accomplished by requiring the check-in comment follow certain un-enforced conventions. Team Foundation Server provides check-in note functionality to capture this metadata. A team project administrator may add or remove check-in notes at the team project level, as well as make a particular check-in note mandatory.
Team Foundation Server proxy — Frequently, organizations have regional development centers separated from the main development offices or the data center hosting the Team Foundation Server environment. When a "Get" is performed from version control, files are downloaded to the client machine. In the remote office environment, this often means that the same files are downloaded over the wide-area network (WAN) to every client machine involved in the development. Team Foundation Server provides an optional proxy server that may be installed in these remote offices. In those scenarios, the clients may be configured to perform the download via the proxy so that the proxy may cache the downloaded files at the remote location. In that way, the majority of the developers in the remote office will be downloading files from the proxy server local to them, thus removing traffic from the WAN and improving performance.
Team Foundation Server provides a fully featured build automation server to allow you to standardize the build infrastructure for your team. Team builds are set up in the system as a build definition. You provide the build definition with information as to what you want build — that is, the folders or files in Team Foundation Server version control that contain the sources to be built, and the projects or solutions in those folders to build. You also specify through one of the following trigger controls when to perform the build:
Manual — A build must be manually queued by a person or by third-party integration code. This is useful for ad-hoc builds or builds that deploy into a particular environment after completion (such as a QA environment).
Continuous integration — This enables you to perform a build on every check-in to version control affecting the folders or files specified previously.
Rolling builds — This is similar to the continuous integration trigger. However, check-ins are grouped together so that all the changes within a defined time period (say, 30 minutes) are included in the build. This is the default style of build used by some other continuous integration build servers, such as the popular Open Source build server CruiseControl .NET.
Gated check-ins — This trigger forces the client to submit the check-in as a shelveset, rather than checking the code directly into the main code development area. The build is then performed and only if the code passes the build (along with any verification tests) will that code then be checked in. This is useful with very large development teams, but introduces an additional step to check-in, which may affect the agility of smaller teams.
Scheduled builds — This enables you to configure a time on particular days of the week that a build should be performed (such as daily or nightly builds).
You tell the build definition how to perform the build by specifying a build process to follow. In Team Foundation Server 2010, these processes are defined as a Windows Workflow 4.0 XAML file.
You provide where you would like the build to be performed (that is, the build controller machine that will execute the build Windows Workflow process file), and where you would like the results of the build to be staged for deployment. The staging location must be a Windows file share using full Universal Naming Conventions (UNCs) (that is, \servershare).
Finally, you can optionally set up a retention policy for the builds. If you are performing continuous integration-style builds or daily builds, then you can quickly consume a large amount of disk space storing the build results, including all the binaries created, deployment files, and so on. The retention policy can be set to only keep a defined number of the last builds for each type of build result (such as failed or successful builds). At any time, you may manually select a build to be excluded from this retention policy by marking the build as "Retain Indefinitely."
Note
Chapter 21 provides more information on the build automation capabilities.
There are many ways for a developer to interact with the core services in Team Foundation Server, including the following:
Visual Studio
Team Foundation Server Administration Console
Web access
Microsoft Excel
Microsoft Project
Eclipse-based development environments
Command-line tools
Third-party integrations
The following sections examine each of these, including the functionality they provide and basic usage.
Team Foundation Server functionality is installed as a standard part of the install of a Visual Studio team edition. However, you may also access Team Foundation Server from Visual Studio Standard or Professional editions by installing the Microsoft Visual Studio Team Explorer. This is available on the Team Foundation Server media in the tfc directory, or available as a separate download. You can tell if you have the Team Foundation Server integration installed into Visual Studio by going to View, and looking for Team Explorer, as shown in Figure 17-4.
Assuming that a team project has been created for you by your Team Foundation Server administrator, to connect to your Team Foundation Server, click on the Connect to Team Project button. If your desired server is not available in the Servers drop-down then, click the Servers button, and then click the Add button to connect to your Team Foundation Server. As shown in Figure 17-5, you can enter the server name or provide the full URL given to you by your Team Foundation Server administrator.

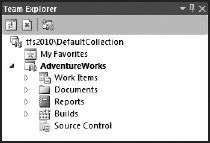
Once you have added the server, select the project collection that contains your team projects, and select the team projects that you want to work on. Your Team Explorer window will now be populated with the team projects. If you expand each project, you will see additional nodes for different elements accessible from Visual Studio (such as work items, SharePoint documents libraries, reports, and version control).
Note
If you have additional nodes for each team project, then this is probably because you have the Team Foundation Server power tools installed on your machine. This excellent set of tools is provided by the team at Microsoft to further enhance your Team Foundation Server experience. The Team Explorer, like most parts of Team Foundation Server, is extensible, so you can install extensions that take advantage of this or even create your own.
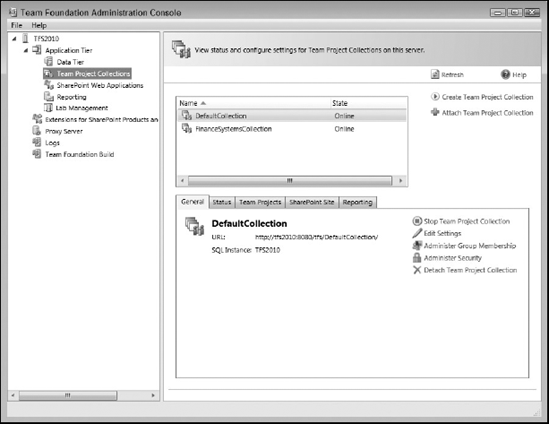
The Team Foundation Administration Console (Figure 17-6) is installed as part of the Team Foundation Server installation and is available on the application tier machines by default. It allows you to configure your application tiers, project collections and define you SharePoint Web applications, reporting services locations, as well as administer your Team Lab functionality. In addition, the proxy server and Team Foundation Build controllers can be configured from this console.
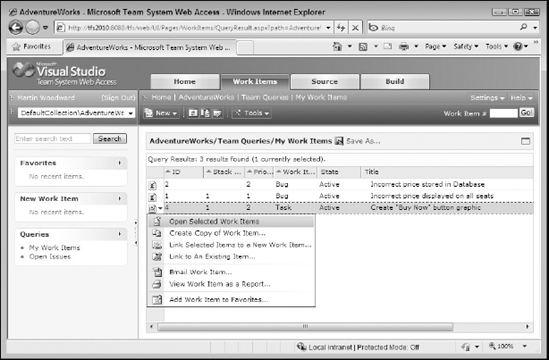
In Team Foundation Server 2010, a Web-based client to Team Foundation Server is installed by default on the application tier machine into the web subdirectory of the Team Foundation Server virtual path (that is, http://tfs2010:8080/tfs/web).
The Web client (Figure 17-7) is ideal for users who do not wish to install a dedicated Team Foundation Server client on their machines. At a high level, it offers the following functionality from the browser:
Create and edit work items and work item queries
Manage areas and iterations
Read-only access to version control
Queue and manage build definitions
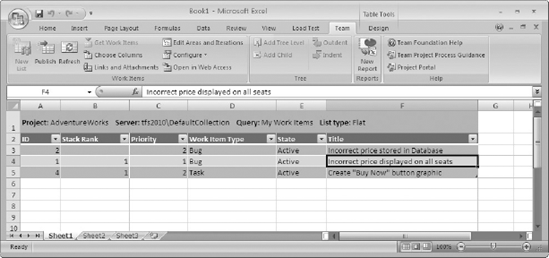
As part of the Team Explorer installation, integration into Microsoft Excel is provided by default. This allows the capability to add and edit work items directly from Excel spreadsheets, as shown in Figure 17-8.
Note
Chapter 22 describes this integration in more detail.
A new feature in Team Foundation Server 2010 is a powerful set of project planning workbooks that can be customized for your needs. By default, these workbooks are created in the Excel Reports folder (Figure 17-9) of the team document library, available via the project portal or from the Documents node in Team Explorer.

Another way that Excel can be used with Team Foundation Server is to connect to the SQL Server Reporting Services data warehouse and create custom reports. This is a great tool for mining data about your team, but also a good way of prototyping reports that you might wish to include in your project.
Note
Chapter 24 contains more information on the reporting and analysis functionality available using Excel.
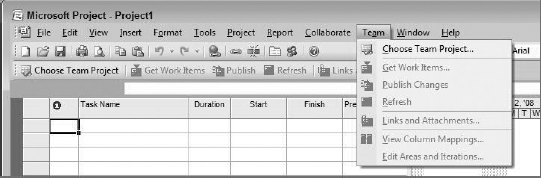
An integration is added to Microsoft Project as part of the Team Explorer installation. This provides the capability to add and edit work items directly from Microsoft Project and to view data about the progress of these work items, as shown in Figure 17-10.
Note
Chapter 22 describes this integration in more detail.
Team Foundation Server includes a set of command-line tools as part of the Team Explorer installation. The following commands-line tools are available from a Visual Studio 2010 command prompt:
tf.exe— This provides full access to Team Foundation Server version control functionality, including features in Team Foundation Server that are not exposed via the Visual Studio integration.TFSBuild.exe— This enables you to create and work with build definitions and builds.TFSDeleteProject.exe— This is a command-line tool that helps you delete a team project from a team project collection.TFSFieldMapping.exe— This is a utility used to change or customize the mappings used by the Microsoft Project integration when working with the work items in your team project.TFSLabConfig.exe— This is a command-line tool used to manage the lab services by Visual Studio Team Lab Management 2010.Note
Chapter 16 provides more information on Visual Studio Team Lab Management.
TFSSecurity.exe— This tool enables you to view or edit groups, users, and permissions in Team Foundation Server.
In addition, the following commands are installed on the application tier machine:
TFSConfig.exe— This enables you to view and edit configuration settings for Team Foundation Server.SetupWarehouse.exe— This is a tool to help you re-build the Team Foundation Server data warehouse.WitAdmin.exe— This contains tools for customizing your process template after the team project has been created.
Note
Chapter 23 provides more information about customizing your process template.
Note
For more information and full reference information on the command-line tools available for Team Foundation Server, see http://msdn.microsoft.com/en-us/library/ms253088(VS.100).aspx.
For members of the team who are using Eclipse-based IDEs (including IBM Rational Application Developer or Adobe Flex), full access to the Team Foundation Server capabilities are now available from Microsoft. The Eclipse integration was previously available via a third-party company called Teamprise, but the technology was acquired by Microsoft and made available as part of the 2010 release.
As you can see in Figure 17-11, at a high level, the Eclipse integration provides all the same functionality that a developer inside Visual Studio would utilize, including the following:
Full version control integration (check-out, check-in, history, branch, merge, label, synchronize, and so on)
Full work item tracking (create, edit work items, and work item queried)
Full team build integration (create, edit, and manage builds and build definitions)

Note
Check-in policies for the cross-platform and Eclipse clients must be separately configured inside that client. Also, the Java build extensions power tool is required to integrate with Ant or Maven 2 build processes that are common in Java environments.
Visual Studio, the Team Foundation Server Administration Console, or the command-line tools must still be used for Team Foundation Server and team project administrative functionality (such as creating team projects, managing security permissions, and so on).
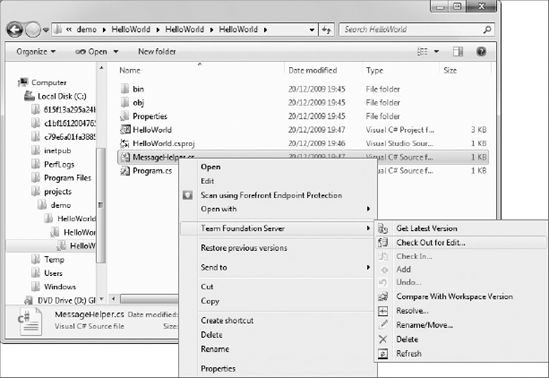
As part of the Team Foundation Server power tools, a Windows Explorer shell extension is available as an optional installation (Figure 17-12). This provides access to the basic version control functionality of Team Foundation Server from a standard Windows Explorer window and is most useful when working with Team Foundation Server version control outside of Visual Studio or Eclipse.
Team Foundation Server supports a rich and vibrant third-party eco-system. As discussed previously, the same .NET object model used by Microsoft to talk to Team Foundation Server from Visual Studio is also available for developers in third-party companies to integrate with. Integrations are available into other parts of the Microsoft Office suite (such as Word and Outlook). In addition, many development tools now integrate with Team Foundation Server using the extensibility hooks provided by Microsoft.
Team Foundation Server 2010 is the most significant release of Team Foundation Server since the launch of the product with Team Foundation Server 2005. As this book demonstrates, it is a big release with considerable new functionality and improvements across the board. While many of these features are explained throughout this book, if you have used a previous version of Team Foundation Server, then the features described in the following sections will be new to you.
The biggest change in the project management area is that work items are now hierarchical — you can have child and parent links between work items. You can also customize work item links. In addition, you can have hierarchical queries so that a tree of work item results can be displayed. Queries can be organized into sub-folders, and permissions can be assigned as to who can view and modify team queries.
There are several new work item controls both to enhance functionality in regular work items and support the new test functionality. The Excel and Project integrations have both also seen significant improvements, especially in the capability to modify the formatting and layout of data, while providing the capability to round-trip data.
There are several new Agile Development Process planning workbooks available by default, significant usability improvements to the default reports and SharePoint Web parts added to access work item information directly from the project portal. Dashboards have been introduced that can make use of additional functionality available when running the project portal on a full Microsoft Office SharePoint Server (MOSS) over and above the features available using a standard WSS site.
The most visual addition here is that branches are now treated as first-class objects in version control. A significant new UI has been added to assist management and visualization of branches. History and labeling have undergone huge changes, including the capability to view labels from the history view and the capability to view history of a merged file.
Rollback support is provided, along with the capability to share a workspace between users on the same machine.
Note
There have been significant changes in the underlying version control model employed by Team Foundation Server 2010 that are particularly noticeable when renames and merges are performed. For more information on the changes, the reasons behind the changes, and how the changes, present themselves in the UI, take a look at the blog post at http://blogs.msdn.com/mitrik/archive/2009/05/28/changing-to-slot-mode-in-tfs-2010-version-control.aspx.
The build automation system has undergone huge revisions in Team Foundation Server 2010. The first change you will notice is the new and improved build report. However, probably the most significant change is that the build is now based around Windows Workflow 4.0. You now have the capability to use build agent pooling, gated and buddy builds, and integration with source and symbol servers.
Note
Chapter 21 provides more information on builds.
The installation and general administration experience of Team Foundation Server is now drastically improved and simplified. The SharePoint and reporting services components are now optional. Team Foundation Server supports the use of network local balancing in front of Team Foundation Server application tier machines. The new project collection concept allows for collection move, archive, backup, and restore, independent of other collections running on the server.
There is a dedicated administration console in Team Foundation Server. Team Foundation Server 2010 can also now be installed on 64-bit server operating systems, and the clients all work on 64-bit client systems (including an AnyCPU-compatible .NET object model).
The value from Team Foundation Server is realized when it is utilized in a team. Therefore, ensuring a successful Team Foundation Server adoption requires cooperation from many people in your organization. The following sections should help you avoid some common pitfalls and provide you with some suggestions on where to start with what may seem like a large and daunting product.
For the team to have trust in Team Foundation Server, you must be sure that it is there when they need it and that it performs as well as possible. For organizations that depend on creating software, your version control and work item tracking repositories are critical to getting your work done. Therefore, those features should be treated on the same level as other mission-critical applications in the organization.
The Team Foundation Server infrastructure is a production environment for your company. Ideally, it should be hosted on a server with adequate resources (both physical memory and disk space). If hosted in a virtual environment, then you should ensure that the host machine has sufficient resources to handle the load of all guest machines.
When planning upgrades, configuration changes, or when performing training, you should use a test Team Foundation Server environment. For some organizations, the test requirements justify the purchase of a hardware platform equivalent to the production environment.
However, for many scenarios, simply using a virtual Team Foundation Server environment will provide a suitable environment for testing. These virtual environments are especially useful when developing a new process template, or testing work item process modifications. Microsoft provides an evaluation version of Team Foundation Server pre-configured as a virtual hard disk (VHD) file. This is frequently used as a test bed for work item modifications and new process templates.
When introducing any new tooling into a large organization, it is important that you address the key pain points first. For many companies, traceability of work through the development lifecycle is often an area that is being poorly addressed by existing tooling. For others, the version control system being used may be out-of-date and poorly performing. It is, therefore, usually the work item tracking or version control components that people first start using when adopting Team Foundation Server.
Luckily, Team Foundation Server is flexible enough that you can still get value from the product when only using one or two components of the system. Once you have adopted both version control and work item tracking, the next area to tackle to gain most benefit is likely to be Team Foundation Build. By automating your build system and increasing the frequency of integration, you reduce the amount of unknown pain that always occurs when integrating components together to form a product.
The key is to be gradually removing the unknown and unpredictable elements from the software delivery process, all the time looking for wasted effort that can be cut out.
Automating the builds not only means that the build and packaging process becomes less error-prone, it also means that the feedback loop of requirements traceability is completed. You are now able to track work from the time that it is captured, all the way through to a change to the source code of the product, and into the build that contains those changes.
After a period of time, you will have built up a repository of historical data in your Team Foundation Server data warehouse, and you can start to make use of the reporting features to predict if you will be finished when you expect (that is, if the amount of estimated work remaining on the system is reducing at the required rate). You will also be able to drill into areas that you might want to improve — for example, which parts of the code are causing the most bugs.
It is after a period of getting used to the tooling that you then want to look at your process templates and ensure that all the necessary data is being captured — but, equally, that all the work item types and transitions are required. If there are unnecessary steps, then consider removing them. If you notice problems because of a particular issue, consider modifying the process to add a safety net.
It is important to adjust the process not only to fit the team and organization, but also to ensure that you only adjust your processes when you need to, and not just because you can.
Check-in policies represent a key area where Team Foundation Server administrations have a temptation to go overboard at first. Check-in policies prevent checking in of code that doesn't meet with the requirements programmatically defined in the check-in policy. However, each policy has a performance penalty for the whole team, not only in running the policy on each check-in, but also in ensuring that the policy will pass before checking in the code.
If you notice that a problem you have is that developers are not checking in code in small iterative changes, then this is not going to be easily remedied by introducing a check-in policy — the policy alone will provide some discouragement for checking in. Therefore, check-in policies should be introduced over time and when the need is identified by the whole team.
This chapter introduced Team Foundation Server and discussed its role in bringing the team together when developing an application. You learned about some of the core concepts at the heart of Team Foundation Server, different ways to access the data in your organization's server, and what is new in the 2010 release of the product. Finally, you learned about some points that you should bear in mind when planning your Team Foundation Server deployment.
Chapter 18 digs deeper into the architecture of Team Foundation Server to learn about the components making up the product. In addition to gaining an understanding of the areas that have been radically improved in the 2010 release, you will gain insight into how the product fits together, and which configuration of Team Foundation Server will best fit the needs of your organization.