
Chapter 4
Models
—by K. Scott Allen and Jon Galloway
What's In This Chapter?
- How to model the Music Store
- What it means to scaffold
- How to edit an album
- All about model binding
WROX.COM CODE DOWNLOADS FOR THIS CHAPTER
You can find the wrox.com code downloads for this chapter at http://www.wrox.com/go/proaspnetmvc5 on the Download Code tab. The code for this chapter is contained in the file MvcMusicStore.C04.zip. This download contains the completed project for this chapter.
In the last chapter, you heard a bit about models in our discussion of strongly typed views. In this chapter, you'll learn about models in detail.
The word model in software development is overloaded to cover hundreds of different concepts. There are maturity models, design models, threat models, and process models. Sitting through a development meeting without talking about a model of one type or another is rare. Even when one scopes the term model to the context of the MVC design pattern, one can still debate the merits of having a business-oriented model object versus a view-specific model object. (You might remember this discussion from Chapter 3.)
This chapter talks about models as the objects you use to send information to the database, perform business calculations, and even render in a view. In other words, these objects represent the domain the application focuses on, and the models are the objects you want to display, save, create, update, and delete.
ASP.NET MVC 5 provides a number of tools and features to build out application features using only the definition of model objects. You can sit down and think about the problem you want to solve (like how to let a customer buy music), and write plain C# classes, such as Album, ShoppingCart, and User, to represent the primary objects involved. When you are ready, you can then use tools provided by MVC to construct the controllers and views for the standard index, create, edit, and delete scenarios for each of the model objects. The construction work is called scaffolding, but before discussing scaffolding, you need some models to work with.
MODELING THE MUSIC STORE
Let's work through an example. In this section, you'll continue with the ASP.NET MVC Music Store scenario and bring together what you've learned about controllers, views, and adding in models as the third ingredient.
Start by using the File ![]() New Project menu command to create a new ASP.NET Web Application in Visual Studio (see Figure 4.1).
New Project menu command to create a new ASP.NET Web Application in Visual Studio (see Figure 4.1).
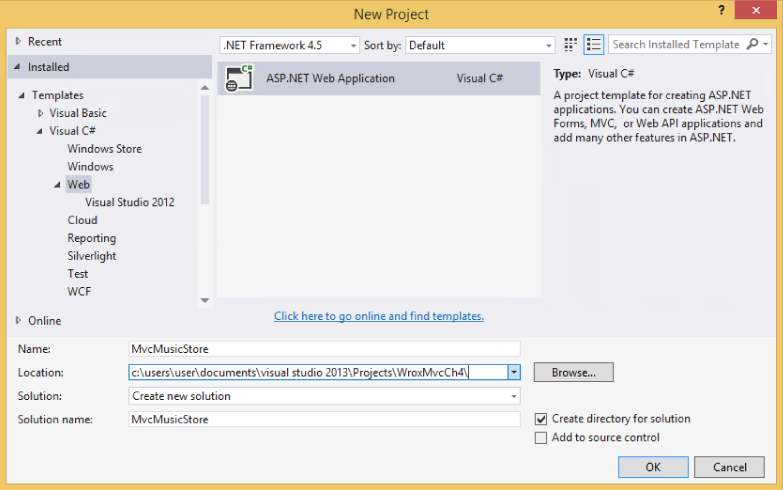
After you give the project a name, Visual Studio opens the dialog you see in Figure 4.2, and you can tell Visual Studio you want to work with the MVC project template.

The MVC template gives you everything you need to get started: a basic layout view, a default homepage with a link for a customer to log in, an initial style sheet, and a relatively empty Models folder. Two files are in your Models folder: AccountViewModels.cs and IdentityModels.cs (see Figure 4.3). Both these files are associated with user account management. Don't worry about them for now—you can look at them in more detail during the discussion about authentication and identity in Chapter 7—but it's good to know that the account management system in ASP.NET MVC runs on the same standard views, models, and controllers you'll use to build out the rest of your applications.

The Models folder is nearly empty because the project template doesn't know what domain you are working in or what problem you are trying to solve.
At this point, you might not know what problem you are trying to solve, either! You might need to talk to customers and business owners, and do some initial prototyping or test-driven development to start fleshing out a design. The ASP.NET MVC framework doesn't dictate your process or methodologies.
Eventually, you might decide the first step in building a music store is having the ability to list, create, edit, and delete music album information. To add a new Album class to the Models folder, right-click the Models folder, select Add… Class, and name the class Album. Leave the existing using and namespace statements intact and enter the properties shown in Listing 4.1 to your newly created Album class:
This class won't compile yet because the Genre and Artist classes referenced in the last two properties haven't been defined yet. That's okay; you'll get to those next.
The primary purpose of the album model is to simulate attributes of a music album, such as the title and the price. Every album also has an association with a single artist, which you'll model using a new Artist class. To do so, add a new Artist class to the Models folder and enter the properties shown in Listing 4.2:
You might notice how each Album has two properties for managing an associated artist: the Artist property and the ArtistId property. We call the Artist property a navigational property, because given an album, you can navigate to the album's associated artist using the dot operator (favoriteAlbum.Artist).
We call the ArtistId property a foreign key property, because you know a bit about how databases work, and you know artists and albums will each maintain records in two different tables. Each artist may maintain an association with multiple albums. You want to have the foreign key value for an artist embedded in the model for your album, because a foreign key relationship will exist between the table of artist records and the table of album records.
An album also has an associated genre, and every genre can maintain a list of associated albums. Create a Genre class in your Models folder and add the properties shown in Listing 4.3:
You might also notice that every property is virtual. We discuss why the properties are virtual later in this chapter. For now, these three simple class definitions are your starting models and include everything you need to scaffold out a controller and some views and even create a database.
Now that you've finished adding the code for the three model classes, you can compile your application either with the Visual Studio Build ![]() Build Solution menu item or the keyboard shortcut, Ctrl+Shift+B. Compiling your newly added model classes is important for two reasons:
Build Solution menu item or the keyboard shortcut, Ctrl+Shift+B. Compiling your newly added model classes is important for two reasons:
- It serves as a quick check to catch any simple syntax errors.
- Nearly as important, the newly added classes won't show up in the Visual Studio scaffolding dialogs in the next section until you've compiled the application. Compiling before using the scaffolding system is not just a good practice, it's required for any new or changed models to show up in the scaffolding dialogs.
SCAFFOLDING A STORE MANAGER
After creating your model classes, you're ready to create a store manager: a controller enabling you to edit album information. One option is to write the controller code by hand, as you did in Chapter 2, and then create all the necessary views for each controller action. After doing that a few times, you'll notice that it is pretty repetitive work, and you might wonder whether you can automate the process a bit. Fortunately, you can—using a process called scaffolding, as described in the next section.
What Is Scaffolding?
In the Adding a View section of Chapter 3, you saw that the Add View dialog allows you to select a template, which is then used to create view code for you. This code generation is known as scaffolding, and it can do a lot more than just create views.
Scaffolding in ASP.NET MVC can generate the boilerplate code you need for create, read, update, and delete (CRUD) functionality in an application. The scaffolding templates can examine the type definition for a model (such as the Album class you've created), and then generate a controller, the controller's associated views, and in some cases data access classes as well. The scaffolding knows how to name controllers, how to name views, what code needs to go in each component, and where to place all these pieces in the project for the application to work.
Don't expect scaffolding to build an entire application. Instead, expect scaffolding to release you from the boring work of creating files in the right locations and writing 100 percent of the application code by hand. You can tweak and edit the output of the scaffolding to make the application your own. Scaffolding runs only when you tell it to run, so you don't have to worry about a code generator overwriting the changes you make to the output files.
A variety of scaffolding templates are available in MVC 5. The scaffolding template you select controls just how far the scaffolding goes with code generation. The following sections highlight a few of the available templates.
MVC 5 Controller—Empty
The empty controller template adds a Controller-derived class to the Controllers folder with the name you specify. The only action in the controller will be an Index action with no code inside (other than the code to return a default ViewResult). This template will not create any views.
MVC 5 Controller with read/write Actions
The read/write actions template adds a controller to your project with Index, Details, Create, Edit, and Delete actions. The actions inside are not entirely empty, but they won't perform any useful work until you add your own code and create the views for each action.
Web API 2 API Controller Scaffolders
Several templates add a controller derived from the ApiController base class. You can use these templates to build a Web API for your application. Chapter 11 covers Web API in more detail.
MVC 5 Controller with Views, Using Entity Framework
This template is the template you'll use to scaffold the store controller. This template not only generates your controller with the entire suite of Index, Details, Create, Edit, and Delete actions, but also generates all the required views and the code to persist and retrieve information from a database.
For the template to generate the proper code, you have to select a model class (in this case, you use the Album class). The scaffolding examines all the properties of your model and uses the information it finds to build controllers, views, and data access code.
To generate the data access code, the scaffolding also needs the name of a data context object. You can point the scaffolding to an existing data context, or the scaffolding can create a new data context on your behalf. What is a data context? To answer that, we'll need to take a short aside to give a quick introduction to the Entity Framework.
Scaffolding and the Entity Framework
A new ASP.NET MVC 5 project automatically includes a reference to the Entity Framework (EF). EF is an object-relational mapping (ORM) framework and understands how to store .NET objects in a relational database and retrieve those same objects given a LINQ query.
EF supports database-first, model-first and code-first styles of development; the MVC scaffolders use code-first style. Code first means you can start storing and retrieving information in SQL Server without creating a database schema or opening a Visual Studio designer. Instead, you write plain C# classes and EF figures out how, and where, to store instances of those classes.
Remember how all the properties in your model objects are virtual? Virtual properties are not required, but they do give EF a hook into your plain C# classes and enable features such as an efficient change-tracking mechanism. The EF needs to know when a property value on a model changes, because it might need to issue a SQL UPDATE statement to reconcile those changes with the database.
Code First Conventions
EF, like ASP.NET MVC, follows a number of conventions to make your life easier. For example, if you want to store an object of type Album in the database, EF assumes you want to store the data in a table named Albums. If you have a property on the object named ID, EF assumes the property holds the primary key value and sets up an auto-incrementing (identity) key column in SQL Server to hold the property value.
EF also has conventions for foreign key relationships, database names, and more. These conventions replace all the mapping and configuration you historically provide to an object-relational mapping framework. The code-first approach works fantastically well when starting an application from scratch. If you need to work with an existing database, you'll probably need to provide mapping metadata (perhaps by using the EF's schema-first approach to development). If you want to learn more about EF, you can start at the Data Developer Center on MSDN (http://msdn.microsoft.com/en-us/data/ ee712907).
The DbContext Class
When you're using EF's code-first approach, the gateway to the database is a class derived from EF's DbContext class. The derived class has one or more properties of type DbSet<T>, where each T represents the type of object you want to persist. You can think of a DbSet<T> as a special, data-aware generic list that knows how to load and save data from its parent context. For example, the following class enables you to store and retrieve Album, Artist, and Genre information:
public class MusicStoreDB : DbContext
{
   public DbSet<Album> Albums { get; set; }
   public DbSet<Artist> Artists { get; set; }
   public DbSet<Genre> Genres { get; set; }
}
Using the preceding data context, you can retrieve all albums in alphabetical order using the LINQ query in the following code:
var db = new MusicStoreDB();
var allAlbums = from album in db.Albums
               orderby album.Title ascending
               select album;
Now that you know a little bit about the technology surrounding the built-in scaffolding templates, let's move ahead and see what code comes out of the scaffolding process.
Executing the Scaffolding Template
Okay! We've covered all the necessary theory, so now it's time to scaffold a controller! Just follow these steps:
- Right-click the Controllers folder and select Add
 Controller. The Add Scaffold dialog appears, as shown in Figure 4.4. The Add Scaffold dialog lists the scaffold templates described earlier.

- Select the MVC 5 Controller with views, using the Entity Framework template and click the Add button to display the corresponding Add Controller dialog.
- In the Add Controller dialog box (shown in Figure 4.5), change the controller name to
StoreManagerControllerand select Album as the Model class type, as shown in Figure 4.5. Note that the Add button is disabled because you haven't selected the Data context class—you'll do that next.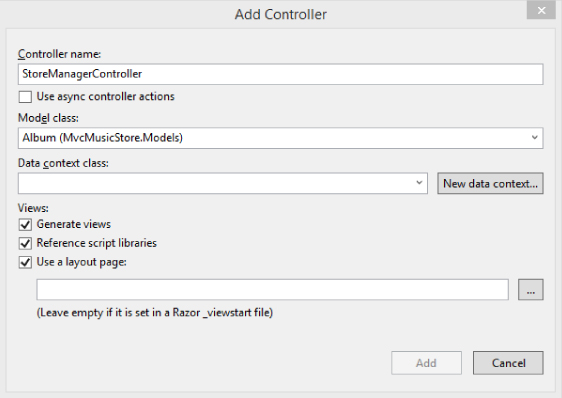
- Click the New data context button to launch the New Data Context dialog, as shown in Figure 4.6. This dialog has just one field, which allows you to enter the name of the class you'll use to access the database (including the namespace for the class).
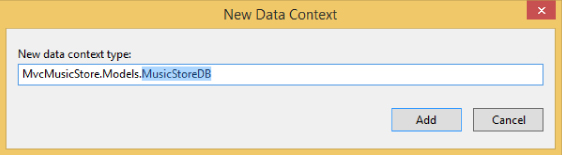
- Name your context MusicStoreDB, as shown in Figure 4.6, and click the Add button to set the context name. Because the Add Controller dialog now contains all required information, the Add button is now enabled.
- Verify that your dialog matches the example shown in Figure 4.7 and click the Add button to scaffold a
StoreManagerControllerand its associated views for theAlbumclass.
After you click the Add button, scaffolding jumps into action and adds new files to various locations in the project. Let's explore these new files before you move forward.
The Data Context
The scaffolding adds a MusicStoreDB.cs file into the Models folder of your project. The class inside the file derives from the EF's DbContext class and gives you access to album, genre, and artist information in the database. Even though you told the scaffolding only about the Album class, the scaffolding saw the related models and included them in the context, as shown in Listing 4.4.
To access a database, all you need to do is instantiate the data context class. You might be wondering what database the context will use. That question is answered later when you first run the application.
The StoreManagerController
The scaffolding template you selected also generates a StoreManagerController in the Controllers folder of the application. The controller has all the code required to select and edit album information. Look at the starting few lines of the class definition, as shown in Listing 4.5.
In this first code snippet, you can see the scaffolding adds a private field of type MusicStoreDB to the controller. The scaffolding also initializes the field with a new instance of the data context because every controller action requires database access. In the Index action, you can see the code is using the context to load all albums from the database into a list, and passing the list as the model for the default view.
Scaffolding also generates actions to create, edit, delete, and show detailed album information. You will take a closer look at the actions behind the edit functionality later in this chapter.
The Views
After the scaffolding finishes running, you'll also find a collection of views under the new Views/StoreManager folder. These views provide the UI for listing, editing, and deleting albums. You can see the list in Figure 4.8.

The Index view has all the code needed to display a table full of music albums. The model for the view is an enumerable sequence of Album objects, and as you saw in the Index action earlier, an enumerable sequence of Album objects is precisely what the Index action delivers. The view takes the model and uses a foreach loop to create HTML table rows with album information, as shown in Listing 4.6:
Notice how the scaffolding selected all the “important” fields for the customer to see. In other words, the table in the view does not display any foreign key property values (they would be meaningless to a customer), but does display the associated genre's name and the associated artist's name. The view uses the DisplayFor HTML helper for all model output (you can find out more about the DisplayFor HTML helper in the HTML helper discussion in the next chapter).
Each table row also includes links to edit, delete, and detail an album. As mentioned earlier, the scaffolded code you are looking at is just a starting point. You probably want to add, remove, and change some of the code and tweak the views to your exact specifications. But, before you make changes, you might want to run the application to see what the current views look like.
Executing the Scaffolded Code
Before you start the application running, let's address a burning question from earlier in the chapter. What database does MusicStoreDB use? You haven't created a database for the application to use or even specified a database connection.
Creating Databases with the Entity Framework
The code-first approach of EF attempts to use convention over configuration as much as possible. If you don't configure specific mappings from your models to database tables and columns, EF uses conventions to create a database schema. If you don't configure a specific database connection to use at runtime, EF creates one using a convention.
Without a specific connection configured, EF tries to connect to a LocalDB instance of SQL Server and find a database with the same name as the DbContext derived class. If EF can connect to the database server, but doesn't find a database, the framework creates the database. If you run the application after scaffolding completes, and navigate to the /StoreManager URL, you'll discover that the EF has created a database named MvcMusicStore.Models.MusicStoreDB in LocalDB. If you look at an Entity Data Model diagram of the new database, you'll see what's shown in Figure 4.9.

The EF automatically creates tables to store album, artist, and genre information. The framework uses the model's property names and data types to determine the names and data types of the table column. Notice how the framework also deduced each table's primary key column and the foreign key relationships between tables.
Using Database Initializers
An easy way to keep the database in sync with changes to your model is to allow the Entity Framework to re-create an existing database. You can tell EF to re-create the database every time an application starts, or you can tell EF to re-create the database only when it detects a change in the model. You choose one of these two strategies when calling the static SetInitializer method of EF's Database class (from the System.Data.Entity namespace).
When you call SetInitializer you need to pass in an IDatabaseInitializer object, and two are provided with the framework: DropCreateDatabaseAlways and DropCreateDatabaseIfModelChanges. You can tell by the names of the classes which strategy each class represents. Both initializers require a generic type parameter, and the parameter must be a DbContext derived class.
As an example, say you wanted to re-create the music store database every time the application starts afresh. Inside global.asax.cs, you can set an initializer during application startup:
protected void Application_Start() {
   Database.SetInitializer(
    new DropCreateDatabaseAlways<MusicStoreDB>());
   AreaRegistration.RegisterAllAreas();
   FilterConfig.RegisterGlobalFilters(GlobalFilters.Filters);
   RouteConfig.RegisterRoutes(RouteTable.Routes);
   BundleConfig.RegisterBundles(BundleTable.Bundles);
}
You might be wondering why anyone would want to re-create a database from scratch every time an application restarts. Even when the model changes, don't you want to preserve the data inside?
These questions are valid, and you'll have to remember that features in the code-first approach (like the database initializer) facilitate the iterative and fast-changing phases early in the application life cycle. Before you push your site live and take real customer data, you'll want to use migrations to keep your EF code-first models and their backing database in sync. Migrations allow you to preserve existing data in your database as you build and refine your model definitions.
In the initial phase of a project you might want to have a new database populated with some initial records, such as lookup values. You can do this by seeding the database.
Seeding a Database
For the MVC Music Store, pretend you want to start development by re-creating the database every time your application restarts. However, you want the new database to have a couple of genres, artists, and even an album available so you can work with the application without entering data to put the application into a usable state.
In this case you can derive a class from the DropCreateDatabaseAlways class and override the Seed method. The Seed method enables you to create some initial data for the application.
To see this in action, create a new MusicStoreDbInitializer class in your Models folder, inserting the Seed method shown in Listing 4.7.
Calling into the base class implementation of the Seed method saves your new objects into the database. You'll have a total of two genres (Jazz and Rock), two artists (Al Di Meola and Rush), and a single album every time your music store database is regenerated. For the new database initializer to work, you need to change the application startup code to register the initializer, as shown in Listing 4.8.
If you restart and run the application now, and navigate to the /StoreManager URL, you'll see the store manager's Index view, as shown in Figure 4.10.

Voilà! You have a running application with real functionality and with real data!
Although it might seem like a lot of work, you spent most of the chapter so far understanding the generated code and the Entity Framework. After you know what scaffolding can do for you, the actual amount of work is relatively small and requires only three steps:
- Implement your model classes.
- Scaffold your controller and views.
- Choose your database initialization strategy.
Remember, scaffolding only gives you a starting point for a particular piece of the application. You are now free to tweak and revise the code. For example, you may or may not like the links on the right side of each album row (Edit, Details, Delete). You are free to remove those links from the view. What you'll do in this chapter, however, is drill into the edit scenario to see how to update models in ASP.NET MVC.
EDITING AN ALBUM
One of the scenarios the scaffolding handles is the edit scenario for an album. This scenario begins when the user clicks the Edit link in the Index view from Figure 4.10. The Edit link sends an HTTP GET request to the web server with a URL such as /StoreManager/Edit/5 (where 5 is the ID of a specific album). You can think of the request as, “get me something to edit album #5.”
Building a Resource to Edit an Album
The default MVC routing rules deliver the HTTP GET for /StoreManager/Edit/5 to the Edit action of the StoreManager controller (shown in the following code—you don't need to type this in, because it was generated when you scaffolded the StoreManager controller):
// GET: /StoreManager/Edit/5
public ActionResult Edit(int? id)
{
    if (id == null)
    {
        return new HttpStatusCodeResult(HttpStatusCode.BadRequest);
    }
    Album album = db.Albums.Find(id);
    if (album == null)
    {
        return HttpNotFound();
    }
    ViewBag.ArtistId =
        new SelectList(db.Artists, "ArtistId", "Name", album.ArtistId);
    ViewBag.GenreId =
        new SelectList(db.Genres, "GenreId", "Name", album.GenreId);
    return View(album);
}
The Edit action has the responsibility of building a model to edit album #5. It uses the MusicStoreDB class to retrieve the album and hands the album to the view as the model. But what is the purpose of the two lines of code putting data into the ViewBag? These two lines might make more sense when you look at the page a user sees for editing an album (shown in Figure 4.11). Because you only have one album in your database, you'll browse to /StoreManager/Edit/1.

When users edit an album, you don't want them to enter freeform text for the genre and artist values. Instead, you want them to select a genre and artist that are already available from the database. The scaffolding is smart enough to realize this, too, because it understands the association between album, artist, and genre.
Instead of giving the user a textbox to type into, the scaffolding generates an edit view with a drop-down list to select an existing genre, as shown in Figure 4.12.

The following code is from the store manager's Edit view, and it is the code that builds the drop-down list for genre (shown opened with the two available genres in Figure 4.12):
<div class="col-md-10">
    @Html.DropDownList("GenreId", String.Empty)
    @Html.ValidationMessageFor(model => model.GenreId)
</div>
You look at the DropDownList helper in more detail in the next chapter, but for now picture yourself building a drop-down list from scratch. To build the list, you need to know what list items are available. An Album model object does not keep all the available genres from the database—an Album object holds only the one genre associated with itself. The two extra lines of code in the Edit action are building the lists of every possible artist and every possible genre, and storing those lists in the ViewBag for the DropDownList helper to retrieve later.
ViewBag.ArtistId =
       new SelectList(db.Artists, "ArtistId", "Name", album.ArtistId);
ViewBag.GenreId =
       new SelectList(db.Genres, "GenreId", "Name", album.GenreId);
The SelectList class that the code uses represents the data required to build a drop-down list. The first parameter to the constructor specifies the items to place in the list. The second parameter is the name of the property containing the value to use when the user selects a specific item (a key value, such as 52 or 2). The third parameter is the text to display for each item (such as “Rock” or “Rush”). Finally, the third parameter contains the value of the initially selected item.
Models and View Models Redux
Remember when the preceding chapter talked about the concept of a view-specific model? The album edit scenario is a good example, where your model object (an Album object) doesn't quite contain all the information required by the view. You need the lists of all possible genres and artists, too. Two possible solutions exist to this problem.
The scaffolding-generated code demonstrates the first option: pass the extra information along in the ViewBag structure. This solution is entirely reasonable and easy to implement, but some people want all the model data to be available through a strongly typed model object.
The strongly typed model fans will probably look at the second option: build a view-specific model to carry both the album information and the genre and artists information to a view. Such a model might use the following class definition:
public class AlbumEditViewModel
{
   public Album AlbumToEdit { get; set; }
   public SelectList Genres { get; set; }
   public SelectList Artists { get; set; }
}
Instead of putting information in ViewBag, the Edit action would need to instantiate the AlbumEditViewModel, set all the object's properties, and pass the view model to the view. One approach isn't necessarily better than the other. You have to pick the approach that works best with your personality (or your team's personality).
The Edit View
The following code isn't exactly what is inside the Edit view, but it does represent the essence of what is in the Edit view:
@using (Html.BeginForm()) {
   @Html.DropDownList("GenreId", String.Empty)
   @Html.EditorFor(model => model.Title)
   @Html.EditorFor(model => model.Price)
   <p>
       <input type="submit" value="Save" />
   </p>
}
The view includes a form with a variety of inputs for a user to enter information. Some of the inputs are drop-down lists (HTML <select> elements), and others are textbox controls (HTML <input type=˝text˝> elements). The essence of the HTML rendered by the Edit view looks like the following code:
<form action="/storemanager/Edit/8" method="post">
   <select id="GenreId" name="GenreId">
       <option value=""></option>
       <option selected="selected" value="1">Rock</option>
       <option value="2">Jazz</option>
   </select>
   <input class="text-box single-line" id="Title" name="Title"
          type="text" value="Caravan" />
   <input class="text-box single-line" id="Price" name="Price"
          type="text" value="9.99" />
   <p>
       <input type="submit" value="Save" />
   </p>
</form>
The HTML sends an HTTP POST request back to /StoreManager/Edit/1 when the user clicks the Save button on the page. The browser automatically collects all the information a user enters into the form and sends the values (and their associated names) along in the request. Notice the name attributes of the input and select elements in the HTML. The names match the property names of your Album model, and you'll see why the naming is significant shortly.
Responding to the Edit POST Request
The action accepting an HTTP POST request to edit album information also has the name Edit, but is differentiated from the previous Edit action you saw because of an HttpPost action selector attribute:
// POST: /StoreManager/Edit/5
// To protect from overposting attacks, please enable the specific
// properties you want to bind to, for more details see
// http://go.microsoft.com/fwlink/?LinkId=317598.
[HttpPost]
[ValidateAntiForgeryToken]
public ActionResult Edit
    ([Bind(Include="AlbumId,GenreId,ArtistId,Title,Price,AlbumArtUrl")]
     Album album)
{
       if (ModelState.IsValid)
       {
              db.Entry(album).State = EntityState.Modified;
              db.SaveChanges();
              return RedirectToAction("Index");
       }
       ViewBag.ArtistId =
           new SelectList(db.Artists, "ArtistId", "Name", album.ArtistId);
       ViewBag.GenreId =
           new SelectList(db.Genres, "GenreId", "Name", album.GenreId);
       return View(album);
}View(album);
}
The responsibility of this action is to accept an Album model object with all the user's edits inside, and save the object into the database. You might be wondering how the updated Album object appears as a parameter to the action. The answer to this question comes in the next section of the chapter. For now, let's focus on what is happening inside the action itself.
The Edit Happy Path
The happy path is the code you execute when the model is in a valid state and you can save the object in the database. An action can check the validity of a model object by checking the ModelState.IsValid property. You find out more about this property later in the chapter, and also in Chapter 6, where you learn how to add validation rules to a model. For now, you can think of ModelState.IsValid as a signal to ensure the user entered usable data for an album's attributes.
If the model is in a valid state, the Edit action then executes the following line of code:
db.Entry(album).State = EntityState.Modified;This line of code is telling the data context about an object whose values already live in the database (this is not a brand-new album, but an existing album), so the framework should apply the values inside to an existing album and not try to create a new album record. The next line of code invokes SaveChanges on the data context, and at this point the context formulates a SQL UPDATE command to persist the new values.
The Edit Sad Path
The sad path is the path the action takes if the model is invalid. In the sad path, the controller action needs to re-create the Edit view so the user can fix the errors he or she produced. For example, say the user enters the value “abc” for the album price. The string “abc” is not a valid decimal value, and model state will not be valid. The action rebuilds the lists for the drop-down controls and asks the Edit view to re-render. The user will see the page shown in Figure 4.13. Of course, you might catch this problem before the user's error reaches the server because ASP.NET MVC provides client-side validation by default, but we'll talk more about the client-side validation features in Chapter 8.

You are probably wondering how the error message appears. Again, Chapter 6 covers model validation in depth. For now, you want to understand how this Edit action receives an Album object with all the user's new data values inside. The process behind the magic is model binding, and model binding is a central feature of ASP.NET MVC.
MODEL BINDING
Imagine you implemented the Edit action for an HTTP POST, and you didn't know about any of the ASP.NET MVC features that can make your life easy. Because you are a professional web developer, you realize the Edit view is going to post form values to the server. If you want to retrieve those values to update an album, you might choose to pull the values directly from the request:
[HttpPost]
public ActionResult Edit()
{
   var album = new Album();
   album.Title = Request.Form["Title"];
   album.Price = Decimal.Parse(Request.Form["Price"]);
   // ... and so on ...
}
As you can imagine, code like this becomes quite tedious. I've only shown the code to set two properties; you have four or five more to go. You have to pull each property value out of the Form collection (which contains all the posted form values, by name) and move those values into Album properties. Any property that is not of type string also requires a type conversion.
Fortunately, the Edit view carefully named each form input to match with an Album property. If you remember the HTML you looked at earlier, the input for the Title value had the name Title, and the input for the Price value had the name Price. You could modify the view to use different names (such as Foo and Bar), but doing so would only make the action code more difficult to write. You would have to remember that the value for Title is in an input named “Foo”—how absurd!
If the input names match the property names, why can't you write a generic piece of code that pushes values around based on a naming convention? This is exactly what the model binding feature of ASP.NET MVC provides.
The DefaultModelBinder
Instead of digging form values out of the request, the Edit action simply takes an Album object as a parameter:
[HttpPost]
public ActionResult Edit(Album album)
{
    // ...
}
When you have an action with a parameter, the MVC runtime uses a model binder to build the parameter. You can have multiple model binders registered in the MVC runtime for different types of models, but the workhorse by default will be the DefaultModelBinder. In the case of an Album object, the default model binder inspects the album and finds all the album properties available for binding. Following the naming convention you examined earlier, the default model binder can automatically convert and move values from the request into an album object (the model binder can also create an instance of the object to populate).
In other words, when the model binder sees that an Album has a Title property, it looks for a value named “Title” in the request. Notice the model binder looks “in the request” and not “in the form collection.” The model binder uses components known as value providers to search for values in different areas of a request. The model binder can look at route data, the query string, and the form collection, and you can add custom value providers if you so desire.
Model binding isn't restricted to HTTP POST operations and complex parameters like an Album object. Model binding can also feed primitive parameters into an action, such as for the Edit action responding to an HTTP GET request:
public ActionResult Edit(int id)
{
   // ….
}
In this scenario, the model binder uses the name of the parameter (id) to look for values in the request. The routing engine is the component that finds the ID value in the URL /StoreManager/Edit/1, but it is a model binder that converts and moves the value from route data into the id parameter. You could also invoke this action using the URL /StoreManager/Edit?id=1, because the model binder will find the id parameter in the query string collection.
The model binder is a bit like a search-and-rescue dog. The runtime tells the model binder it wants a value for id, and the binder goes off and looks everywhere to find a parameter with the name id.
Explicit Model Binding
Model binding implicitly goes to work when you have an action parameter. You can also explicitly invoke model binding using the UpdateModel and TryUpdateModel methods in your controller. UpdateModel throws an exception if something goes wrong during model binding and the model is invalid. Here is what the Edit action might look like if you used UpdateModel instead of an action parameter:
       [HttpPost]
       public ActionResult Edit()
       {
           var album = new Album();
           try
           {
               UpdateModel(album);
               db.Entry(album).State = EntityState.Modified;
               db.SaveChanges();
               return RedirectToAction("Index");
           }
           catch
           {
               ViewBag.GenreId = new SelectList(db.Genres, "GenreId",
                                               "Name", album.GenreId);
               ViewBag.ArtistId = new SelectList(db.Artists, "ArtistId",
                                                 "Name", album.ArtistId);
               return View(album);
           }
       }
TryUpdateModel also invokes model binding, but doesn't throw an exception. TryUpdateModel does return a bool—a value of true if model binding succeeded and the model is valid, and a value of false if something went wrong.
[HttpPost]
public ActionResult Edit()
{
   var album = new Album();
   if (TryUpdateModel(album))
   {
       db.Entry(album).State = EntityState.Modified;
       db.SaveChanges();
       return RedirectToAction("Index");
   }
   else
   {
       ViewBag.GenreId = new SelectList(db.Genres, "GenreId",
                                        "Name", album.GenreId);
       ViewBag.ArtistId = new SelectList(db.Artists, "ArtistId",
                                        "Name", album.ArtistId);
       return View(album);
   }
}
A byproduct of model binding is model state. For every value the model binder moves into a model, it records an entry in model state. You can check model state any time after model binding occurs to see whether model binding succeeded:
[HttpPost]
public ActionResult Edit()
{
   var album = new Album();
   TryUpdateModel(album);
   if (ModelState.IsValid)
   {
       db.Entry(album).State = EntityState.Modified;
       db.SaveChanges();
       return RedirectToAction("Index");
   }
   else
   {
       ViewBag.GenreId = new SelectList(db.Genres, "GenreId",
                                        "Name", album.GenreId);
       ViewBag.ArtistId = new SelectList(db.Artists, "ArtistId",
                                        "Name", album.ArtistId);
       return View(album);
   }
}If any errors occurred during model binding, model state will contain the names of the properties that caused failures, the attempted values, and the error messages. Although model state is useful for your own debugging purposes, it's primarily used to display error messages to users indicating why their data entry failed and to show their originally entered data (instead of showing default values). In the next two chapters you will see how model state allows HTML helpers and the MVC validation features to work together with model binding.
SUMMARY
In this chapter, you saw how you can build an MVC application by focusing on model objects. You can write the definitions for your models using C# code, and then scaffold out parts of the application based on a specific model type. Out of the box, all the scaffolding works with the Entity Framework, but scaffolding is extensible and customizable, so you can have scaffolding work with a variety of technologies.
You also looked at model binding and should now understand how to capture values in a request using the model binding features instead of digging around in form collections and query strings in your controller actions. I made a brief mention of the consequences of model binding too much data in an over-posting attack, which is further discussed in Chapter 7.
At this point, however, you've only scratched the surface of understanding how model objects can drive an application. In the coming chapters you also see how models and their associated metadata can influence the output of HTML helpers and affect validation.