
Chapter 15
Extending MVC
—by Brad Wilson and David Matson
What's In This Chapter?
- Extending models
- Extending views
- Extending controllers
WROX.COM CODE DOWNLOADS FOR THIS CHAPTER
All code for this chapter is provided via NuGet, as described in the introduction at the front of this book. Throughout the chapter, NuGet code samples are clearly indicated in applicable sections. You can also visit http://www.wrox.com/go/proaspnetmvc5 for offline use.
One of the lessons underlined in Chapter 1 is about the importance of the layers in the ASP.NET framework itself. When ASP.NET 1.0 came out in 2002, most people did not differentiate the core runtime (that is, the classes in the System.Web namespace) from those of the ASP.NET Web Forms application platform (that is, the classes in the System.Web.UI namespace). The ASP.NET team built the complex abstraction of Web Forms on top of the simple abstraction of the core ASP.NET runtime.
Several newer technologies from the ASP.NET team are built on top of the core runtime, including ASP.NET MVC 5. Everything that's done by the MVC framework can be done by anybody (inside or outside of Microsoft) because it's built on these public abstractions. For the same reasons, the ASP.NET MVC framework is itself made up of several layers of abstractions. This enables developers to pick and choose the pieces of MVC they like and replace or extend the pieces they don't. With each successive version, the MVC team has opened up more of these customization points inside the framework itself.
Some developers won't ever need to know about the underlying extensibility of the platform; at best, they will use it indirectly by consuming a third-party extension to MVC. For the rest, the availability of these customization points is a critical factor in deciding how best to use MVC in their applications. This chapter is for those developers who want to get a deeper understanding of how the pieces of MVC fit together, and the places we designed those pieces to be plugged into, supplemented, or replaced.
EXTENDING MODELS
The model system in MVC 5 has several extensible pieces, including the ability to describe models with metadata, to validate models, and to influence how models are constructed from the request data. We have a sample for each of these extensibility points within the system.
Turning Request Data into Models
The process of turning request data (such as form data, query string data, or even routing information) into models is called model binding. Model binding really happens in two phases:
- Understanding where data comes from (through the use of value providers)
- Creating/updating model objects with those values (through the use of model binders)
Exposing Request Data with Value Providers
When your MVC application participates in model binding, the values that are used for the actual model binding process come from value providers. The purpose of a value provider is simply to provide access to information that is eligible for use in model binding. The MVC framework ships with several value providers, which can provide data from the following sources:
- Explicit values for child actions (
RenderAction) - Form values
- JSON data from
XMLHttpRequest - Route values
- Query string values
- Uploaded files
Value providers come from value provider factories, and the system searches for data from those value providers in their registered order (the preceding list is the order that is used by default, top first to bottom last). Developers can write their own value provider factories and value providers, and insert them into the factory list contained inside ValueProviderFactories.Factories. Developers choose to implement a value provider factory and value provider when they need to provide an additional source of data to be used during model binding.
In addition to the value provider factories included in MVC itself, the team also included several provider factories and value providers in ASP.NET MVC Futures. They include:
- Cookie value provider
- Server variable value provider
Sessionvalue providerTempDatavalue provider
Microsoft has open sourced all of MVC (including MVC Futures) at http://aspnetwebstack.codeplex.com/, which should provide a good reference to help you get started building your own value providers and factories.
Creating Models with Model Binders
The other part of extending models is model binders. They take values from the value provider system and either create new models with the data or fill in existing models with the data. The default model binder in MVC (named DefaultModelBinder, conveniently) is an extremely powerful piece of code. It's capable of performing model binding against traditional classes, collection classes, lists, arrays, and even dictionaries.
One thing the default model binder can't do well is support immutable objects—that is, objects whose initial values must be set via a constructor and cannot be changed later. The example model binder code in ∼/Areas/ModelBinder includes the source code for a model binder for the Point object from the CLR. Because the Point class is immutable, you must construct a new instance using its values:
public class PointModelBinder : IModelBinder {
    public object BindModel (ControllerContext controllerContext,
                            ModelBindingContext bindingContext) {
        var valueProvider = bindingContext.ValueProvider;
        int x = (int)valueProvider.GetValue("X").ConvertTo(typeof(int));
        int y = (int)valueProvider.GetValue("Y").ConvertTo(typeof(int));
        return new Point(x, y);
    }
}
When you create a new model binder, you need to tell the MVC framework that a new model binder exists and when to use it. You can either decorate the bound class with the [ModelBinder] attribute, or you can register the new model binder in the global list at ModelBinders.Binders.
An often-overlooked responsibility of model binders is validating the values that they're binding. The preceding example code is quite simple because it does not include any of the validation logic. The full sample does include support for validation, but it makes the example a bit more detailed. In some instances, you know the types you're model binding against, so supporting generic validation might not be necessary (because you could hard-code the validation logic directly into the model binder); for generalized model binders, you will want to consult the built-in validation system to find the user-supplied validators and ensure that the models are correct.
In the extended sample (which matches the code in the NuGet package), let's see what a more complete version of the model binder looks like, line by line. The new implementation of BindModel still looks relatively straightforward because we've moved all the retrieval, conversion, and validation logic into a helper method:
public object BindModel(ControllerContext controllerContext,
                        ModelBindingContext bindingContext) {
    if (!String.IsNullOrEmpty(bindingContext.ModelName) &&
        !bindingContext.ValueProvider.ContainsPrefix(bindingContext.ModelName))
{
        if (!bindingContext.FallbackToEmptyPrefix)
            return null;
        bindingContext = new ModelBindingContext {
            ModelMetadata = bindingContext.ModelMetadata,
            ModelState = bindingContext.ModelState,
            PropertyFilter = bindingContext.PropertyFilter,
            ValueProvider = bindingContext.ValueProvider
        };
    }
    bindingContext.ModelMetadata.Model = new Point();
    return new Point(
        Get<int>(controllerContext, bindingContext, "X"),
        Get<int>(controllerContext, bindingContext, "Y")
    );
}
We're doing two new things in this version of BindModel that you didn't see in the original:
- The block of code with the first
ifblock, which is trying to find values with the name prefix before falling back to an empty prefix. When the system starts model binding, the value inbindingContext.ModelNameis set to the name of the model parameter (in our sample controller, that'spt). We look inside the value providers and ask whether they have any subvalues that start withpt, because if they do, those are the values we want to use. With a parameter namedpt, we would prefer to use values whose names werept.Xandpt.Yinstead of justXandY. However, if we don't find any values that start withpt, we need to be able to fall back to using justXandYfor the names. - An empty instance of the
Pointobject is placed in theModelMetadata. The reason we need to do this is that most validation systems, includingDataAnnotations, expect to see an instance of the container object even if it doesn't necessarily have the actual values in it yet. Our call to theGetmethod invokes validation, so we need to give the validation system a container object of some sort, even though we know it's not the final container.
The Get method has several pieces to it. Here's the whole function, and then you'll examine the code a few lines at a time:
private TModel Get<TModel>(ControllerContext controllerContext,
                            ModelBindingContext bindingContext,
                            string name) {
    string fullName = name;
    if (!String.IsNullOrWhiteSpace(bindingContext.ModelName))
        fullName = bindingContext.ModelName + "." + name;
    ValueProviderResult valueProviderResult =
        bindingContext.ValueProvider.GetValue(fullName);
    ModelState modelState = new ModelState { Value = valueProviderResult };
    bindingContext.ModelState.Add(fullName, modelState);
    ModelMetadata metadata = bindingContext.PropertyMetadata[name];
    string attemptedValue = valueProviderResult.AttemptedValue;
    if (metadata.ConvertEmptyStringToNull
            && String.IsNullOrWhiteSpace(attemptedValue))
        attemptedValue = null;
    TModel model;
    bool invalidValue = false;
    try
    {
        model = (TModel)valueProviderResult.ConvertTo(typeof(TModel));
        metadata.Model = model;
    }
    catch (Exception)
    {
        model = default(TModel);
        metadata.Model = attemptedValue;
        invalidValue = true;
    }
    IEnumerable<ModelValidator> validators =
        ModelValidatorProviders.Providers.GetValidators(
            metadata,
            controllerContext
        );
    foreach (var validator in validators)
        foreach (var validatorResult in
validator.Validate(bindingContext.Model))
            modelState.Errors.Add(validatorResult.Message);
    if (invalidValue && modelState.Errors.Count == 0)
        modelState.Errors.Add(
            String.Format(
                "The value "{0}" is not a valid value for {1}.",
                attemptedValue,
                metadata.GetDisplayName()
            )
        );
    return model;
}
The line-by-line analysis is as follows:
- The first thing you need to do is retrieve the attempted value from the value provider, and then record the value in the model state so that the users can always see the exact value they typed, even if the value ended up being something the model cannot directly contain (for example, if a user types “abc” into a field that allows only integers):
The fully qualified name prepends the model name, in the event that you're doing deep model binding. This might happen if you decide to have a property of typestring fullName = name; if (!String.IsNullOrWhiteSpace(bindingContext.ModelName)) fullName = bindingContext.ModelName + "." + name; ValueProviderResult valueProviderResult = bindingContext.ValueProvider.GetValue(fullName); ModelState modelState = new ModelState { Value = valueProviderResult }; bindingContext.ModelState.Add(fullName, modelState);Pointinside another class (like a view model). - After you have the result from the value provider, you must get a copy of the model metadata that describes this property, and then determine what the attempted value was that the user entered:
You use the model metadata to determine whether you should convert empty strings into nulls. This behavior is generally on by default because HTML forms always post empty strings rather than nulls when the user hasn't entered any value. The validators that check for required values are generally written such that nulls fail a required check but empty strings succeed, so the developer can set a flag in the metadata to allow empty strings to be placed into the field rather than being converted to null (and thereby failing any required validation checks).ModelMetadata metadata = bindingContext.PropertyMetadata[name]; string attemptedValue = valueProviderResult.AttemptedValue; if (metadata.ConvertEmptyStringToNull && String.IsNullOrWhiteSpace(attemptedValue)) attemptedValue = null; - The next section of code attempts to convert the value into the destination type, and records if there was some kind of conversion error. Either way, you need to have a value placed into the metadata so that validation has a value to run against. If you can successfully convert the value, then you can use that; otherwise, you use the attempted value, even though you know it's not the right type.
You record whether a conversion failure occurred for later because you want to add conversion failure error messages only if no other validation failed (for example, you generally expect both required and data conversion failures for values that are required, but the required validator message is more correct, so you want to make sure it has higher priority).TModel model; bool invalidValue = false; try { model = (TModel)valueProviderResult.ConvertTo(typeof(TModel)); metadata.Model = model; } catch (Exception) { model = default(TModel); metadata.Model = attemptedValue; invalidValue = true; } - Run all the validators and record each validation failure in the errors collection of the model state:
IEnumerable<ModelValidator> validators = ModelValidatorProviders.Providers.GetValidators( metadata, controllerContext ); foreach (var validator in validators) foreach (var validatorResult in validator.Validate(bindingContext.Model)) modelState.Errors.Add(validatorResult.Message); - Record the data type conversion error, if one occurred and no other validation rules failed, and then return the value back so that it can be used for the rest of the model binding process:
if (invalidValue && modelState.Errors.Count == 0)
    modelState.Errors.Add(
        String.Format(
            "The value "{0}" is not a valid value for {1}.",
            attemptedValue,
            metadata.GetDisplayName()
        )
    );
return model;
The sample includes a simple controller and view that demonstrate the use of the model binder (which is registered in the area registration file). For this sample, the client-side validation is disabled so that you can easily see the server-side logic being run and debug into it. You should turn on client-side validation inside the view so that you can verify that the client-side validation rules remain in place and functional.
Describing Models with Metadata
The model metadata system was introduced in ASP.NET MVC 2. It helps describe meta-information about a model that is used to assist in the HTML generation and validation of models. The kinds of information exposed by the model metadata system include (but are not limited to) answers to the following questions:
- What is the type of the model?
- What is the type of the containing model, if any?
- What is the name of the property this value came from?
- Is it a simple type or a complex type?
- What is the display name?
- How do you format the value for display? For editing?
- Is the value required?
- Is the value read-only?
- What template should I use to display this type?
Out of the box, MVC supports model metadata that's expressed through attributes applied to classes and properties. These attributes are found primarily in the System.ComponentModel and System.ComponentModel.DataAnnotations namespaces.
The ComponentModel namespace has been around since .NET 1.0 and was originally designed for use in Visual Studio designers such as Web Forms and Windows Forms. The DataAnnotations classes were introduced in .NET 3.5 SP1 (along with ASP.NET Dynamic Data) and were designed primarily for use with model metadata. In .NET 4, the DataAnnotations classes were significantly enhanced, and started being used by the WCF RIA Services team as well as being ported to Silverlight 4. Despite getting their start on the ASP.NET team, they have been designed from the beginning to be agnostic of the UI presentation layer, which is why they live under System.ComponentModel rather than under System.Web.
ASP.NET MVC offers a pluggable model metadata provider system so that you can provide your own metadata source, if you would prefer not to use DataAnnotations attributes. Implementing a metadata provider means deriving a class from ModelMetadataProvider and implementing the three abstract methods:
GetMetadataForTypereturns the metadata about a whole class.GetMetadataForPropertyreturns the metadata for a single property on a class.GetMetadataForPropertiesreturns the metadata for all the properties on a class.
A derived type, AssociatedMetadataProvider, can be used by metadata providers that intend to provide metadata via attributes. It consolidates the three method calls into a single one named CreateMetadata, and passes along the list of attributes that were attached to the model and/or model properties. If you're writing a metadata provider that is decorating your models with attributes, using AssociatedMetadataProvider as the base class for your provider class is often a good idea because of the simplified API (and the automatic support for metadata “buddy classes”).
The sample code includes a fluent metadata provider example under ∼/Areas/FluentMetadata. The implementation is extensive, given how many different pieces of metadata are available to the end user, but the code is fairly simple and straightforward. Because MVC can use only a single metadata provider, the example derives from the built-in metadata provider so that the user can mix traditional metadata attributes and dynamic code-based metadata.
One distinct advantage of the sample fluent metadata provider over the built-in metadata attributes is that you can use it to describe and decorate types whose definitions you don't control. With a traditional attribute approach, the attributes must be applied to the type at the time that the type is written; with an approach like the fluent metadata provider, describing the types is done separately from the definition of the type itself, allowing you to apply rules to types you didn't write (for example, types built into the .NET Framework itself).
In the example, the metadata registration is performed inside of the area registration function:
ModelMetadataProviders.Current =
    new FluentMetadataProvider()
        .ForModel<Contact>()
            .ForProperty(m => m.FirstName)
                .DisplayName("First Name")
                .DataTypeName("string")
            .ForProperty(m => m.LastName)
                .DisplayName("Last Name")
                .DataTypeName("string")
            .ForProperty(m => m.EmailAddress)
                .DisplayName("E-mail address")
                .DataTypeName("email");
The implementation of CreateMetadata starts by getting the metadata that is derived from the annotation attributes, and then modifying those values through modifiers that are registered by the developer. The modifier methods (like the calls to DisplayName) simply record future modifications that are performed against the ModelMetadata object after it's been requested. The modifications are stored away in a dictionary inside of the fluent provider so that you can run them later in CreateMetadata, which is shown here:
protected override ModelMetadata CreateMetadata(
        IEnumerable<Attribute> attributes,
        Type containerType,
        Func<object> modelAccessor,
        Type modelType,
        string propertyName) {
    // Start with the metadata from the annotation attributes
    ModelMetadata metadata =
        base.CreateMetadata(
            attributes,
            containerType,
            modelAccessor,
            modelType,
            propertyName
        );
    // Look inside our modifier dictionary for registrations
    Tuple<Type, string> key =
        propertyName == null
            ? new Tuple<Type, string>(modelType, null)
            : new Tuple<Type, string>(containerType, propertyName);
    // Apply the modifiers to the metadata, if we found any
    List<Action<ModelMetadata>> modifierList;
    if (modifiers.TryGetValue(key, out modifierList))
        foreach (Action<ModelMetadata> modifier in modifierList)
            modifier(metadata);
    return metadata;
}
The implementation of this metadata provider is effectively just a mapping of either types to modifiers (for modifying the metadata of a class) or mappings of types + property names to modifiers (for modifying the metadata of a property). Although there are several of these modifier functions, they all follow the same basic pattern, which is to register the modification function in the dictionary of the provider so that it can be run later. Here is the implementation of DisplayName:
public MetadataRegistrar<TModel> DisplayName(string displayName)
{
    provider.Add(
        typeof(TModel),
        propertyName,
        metadata => metadata.DisplayName = displayName
    );
    return this;
}
The third parameter to the Add call is the anonymous function that acts as the modifier: Given an instance of a metadata object, it sets the DisplayName property to the display name that the developer provided. Consult the full sample for the complete code, including controller and view, which shows everything working together.
Validating Models
Model validation has been supported since ASP.NET MVC 1.0, but it wasn't until MVC 2 that the team introduced pluggable validation providers. MVC 1.0 validation was based on the IDataErrorInfo interface (though this is still functional, developers should consider it to be deprecated). Instead, developers using MVC 2 or later can use the DataAnnotations validation attributes on their model properties. In the box in .NET 3.5 SP1 are four validation attributes: [Required], [Range], [StringLength], and [RegularExpression]. A base class, ValidationAttribute, is provided for developers to write their own custom validation logic.
The CLR team added a few enhancements to the validation system in .NET 4, including the new IValidatableObject interface. ASP.NET MVC 3 added two new validators: [Compare] and [Remote]. In addition, if your MVC 4 or later project targets .NET 4.5, several new attributes exist that MVC supports in Data Annotations that match with the rules available with jQuery Validate, including [CreditCard], [EmailAddress], [FileExtensions], [MaxLength], [MinLength], [Phone], and [Url].
Chapter 6 covers writing custom validators in depth, so I won't rehash that material. Instead, the example focuses on the more advanced topic of writing validator providers. Validator providers allow the developer to introduce new sources of validation. In the box in MVC, three validator providers are installed by default:
DataAnnotationsModelValidatorProviderprovides support for validators derived fromValidationAttributeand models that implementIValidatableObject.DataErrorInfoModelValidatorProviderprovides support for classes that implement theIDataErrorInfointerface used by MVC 1.0's validation layer.ClientDataTypeModelValidatorProviderprovides client validation support for the built-in numeric data types (integers, decimals, floating-point numbers, and dates).
Implementing a validator provider means deriving from the ModelValidatorProvider base class, and implementing the single method that returns validators for a given model (represented by an instance of ModelMetadata and the ControllerContext). You register your custom model validator provider by using ModelValidatorProviders.Providers.
There is an example of a fluent model validation system present in the sample code under ∼/Areas/FluentValidation. Much like the fluent model metadata example, this is fairly extensive because it needs to provide several validation functions, but most of the code for implementing the validator provider itself is relatively straightforward and self-explanatory.
The sample includes fluent validation registration inside the area registration function:
ModelValidatorProviders.Providers.Add(
    new FluentValidationProvider()
        .ForModel<Contact>()
            .ForProperty(c => c.FirstName)
                .Required()
                .StringLength(maxLength: 15)
            .ForProperty(c => c.LastName)
                .Required(errorMessage: "You must provide the last name!")
                .StringLength(minLength: 3, maxLength: 20)
            .ForProperty(c => c.EmailAddress)
                .Required()
                .StringLength(minLength: 10)
                .EmailAddress()
);
We have implemented three different validators for this example, including both server-side and client-side validation support. The registration API looks nearly identical to the model metadata-fluent API example examined previously. Our implementation of GetValidators is based on a dictionary that maps requested types and optional property names to validator factories:
public override IEnumerable<ModelValidator> GetValidators(
        ModelMetadata metadata,
        ControllerContext context) {
    IEnumerable<ModelValidator> results = Enumerable.Empty<ModelValidator>();
    if (metadata.PropertyName != null)
        results = GetValidators(metadata,
                                context,
                                metadata.ContainerType,
                                metadata.PropertyName);
    return results.Concat(
        GetValidators(metadata,
                      context,
                      metadata.ModelType)
    );
}
Given that the MVC framework supports multiple validator providers, you do not need to derive from the existing validator provider or delegate to it. You just add your own unique validation rules as appropriate. The validators that apply to a particular property are those that are applied to the property itself as well as those that are applied to the property's type; so, for example, if you have this model:
public class Contact
{
    public string FirstName { get; set; }
    public string LastName { get; set; }
    public string EmailAddress { get; set; }
}
when the system requests validation rules for FirstName, the system provides rules that have been applied to the FirstName property itself, as well as any rules that have been applied to System.String (because that's the type FirstName is).
The implementation of the private GetValidators method used in the previous example then becomes:
private IEnumerable<ModelValidator> GetValidators(
        ModelMetadata metadata,
        ControllerContext context,
        Type type,
        string propertyName = null)
{
    var key = new Tuple<Type, string>(type, propertyName);
    List<ValidatorFactory> factories;
    if (validators.TryGetValue(key, out factories))
        foreach (var factory in factories)
            yield return factory(metadata, context);
}
This code looks up all the validator factories that have been registered with the provider. The functions you saw in registration, like Required and StringLength, are how those validator factories get registered. All those functions tend to follow the same pattern:
public ValidatorRegistrar<TModel> Required(
        string errorMessage = "{0} is required")
{
    provider.Add(
        typeof(TModel),
        propertyName,
        (metadata, context) =>
            new RequiredValidator(metadata, context, errorMessage)
    );
    return this;
}
The third parameter in the call to provider.Add is the anonymous function that acts as the validator factory. Given an input of the model metadata and the controller context, it returns an instance of a class that derives from ModelValidator.
The ModelValidator base class is the class that MVC understands and consumes for the purposes of validation. You saw the implicit use of the ModelValidator class in the previous model binder example because the model binder is ultimately responsible for running validation while it's creating and binding the objects. Our implementation of the RequiredValidator that we're using has two core responsibilities: perform the server-side validation, and return metadata about the client-side validation. Our implementation looks like this:
private class RequiredValidator : ModelValidator {
    private string errorMessage;
    public RequiredValidator(ModelMetadata metadata,
                             ControllerContext context,
                             string errorMessage) : base(metadata, context) {
        this.errorMessage = errorMessage;
    }
    private string ErrorMessage {
        get {
            return String.Format(errorMessage, Metadata.GetDisplayName());
        }
    }
    public override IEnumerable<ModelClientValidationRule> GetClientValidationRules() {
        yield return new ModelClientValidationRequiredRule(ErrorMessage);
    }
    public override IEnumerable<ModelValidationResult> Validate(object container) {
        if (Metadata.Model == null)
            yield return new ModelValidationResult { Message = ErrorMessage };
    }
}
The full example includes implementation of three validation rules (Required, StringLength, and EmailAddress), including a model, controller, and view, which shows it all working together. Client-side validation has been turned off by default so that you can verify and debug into the server-side validation. You can remove the single line of code from the view to re-enable client-side validation and see how it works.
EXTENDING VIEWS
Views are the most common type of result returned from actions. A view is generally some kind of template with code inside to customize the output based on the input (the model). ASP.NET MVC ships with two view engines installed by default: the Web Forms view engine (which has been in MVC since version 1.0) and the Razor view engine (which was introduced in MVC 3). Several third-party view engines are also available for MVC applications, including Spark, NHaml, and NVelocity.
Customizing View Engines
An entire book could be written on the subject of writing a custom view engine, and in truth, perhaps a dozen people would buy it. Writing a view engine from scratch is just not a task very many people need to do, and there is enough existing source code for functional view engines that those few users have good starting places from which to work. Instead, this section is devoted to the customization of the two existing view engines that ship with MVC.
The two view engine classes—WebFormViewEngine and RazorViewEngine—both derive from BuildManagerViewEngine, which itself derives from VirtualPathProviderViewEngine. Both the build manager and virtual path providers are features inside of the core ASP.NET runtime. The build manager is the component that locates view files on disk (like .aspx or .cshtml files) and converts them into source code and compiles them. The virtual path provider helps to locate files of any type; by default, the system will look for files on disk, but a developer could also replace the virtual path provider with one that loads the view content from other locations (like from a database or from an embedded resource). These two base classes allow a developer to replace the build manager and/or the virtual path provider, if needed.
A more common scenario for overriding is changing the locations on disk where the view engines look for files. By convention, it finds them in the following locations:
∼/Areas/AreaName/Views/ControllerName∼/Areas/AreaName/Views/Shared∼/Views/ControllerName∼/Views/Shared
These locations are set into collection properties of the view engine during its constructor, so developers could create a new view engine that derives from their view engine of choice and override these locations. The following excerpt shows the relevant code from one of the constructors of WebFormViewEngine:
AreaMasterLocationFormats = new string[] {
    "∼/Areas/{2}/Views/{1}/{0}.master",
    "∼/Areas/{2}/Views/Shared/{0}.master"
};
AreaViewLocationFormats = new string[] {
    "∼/Areas/{2}/Views/{1}/{0}.aspx",
    "∼/Areas/{2}/Views/{1}/{0}.ascx",
    "∼/Areas/{2}/Views/Shared/{0}.aspx",
    "∼/Areas/{2}/Views/Shared/{0}.ascx"
};
AreaPartialViewLocationFormats = AreaViewLocationFormats;
MasterLocationFormats = new string[] {
    "∼/Views/{1}/{0}.master",
    "∼/Views/Shared/{0}.master"
};
ViewLocationFormats = new string[] {
    "∼/Views/{1}/{0}.aspx",
    "∼/Views/{1}/{0}.ascx",
    "∼/Views/Shared/{0}.aspx",
    "∼/Views/Shared/{0}.ascx"
};
PartialViewLocationFormats = ViewLocationFormats;
These strings are sent through String.Format, and the parameters that are passed to them are:
{0}= View Name{1}= Controller Name{2}= Area Name
Changing these strings allows the developer to change the conventions for view location. For example, say you only wanted to serve .aspx files for full views and .ascx files for partial views. This would allow you to have two views with the same name but different extensions, and which one got rendered would depend on whether you requested a full or partial view.
The code inside the Razor view engine's constructor looks similar:
AreaMasterLocationFormats = new string[] {
    "∼/Areas/{2}/Views/{1}/{0}.cshtml",
    "∼/Areas/{2}/Views/{1}/{0}.vbhtml",
    "∼/Areas/{2}/Views/Shared/{0}.cshtml",
    "∼/Areas/{2}/Views/Shared/{0}.vbhtml"
};
AreaViewLocationFormats = AreaMasterLocationFormats;
AreaPartialViewLocationFormats = AreaMasterLocationFormats;
MasterLocationFormats = new string[] {
    "∼/Views/{1}/{0}.cshtml",
    "∼/Views/{1}/{0}.vbhtml",
    "∼/Views/Shared/{0}.cshtml",
    "∼/Views/Shared/{0}.vbhtml"
};
ViewLocationFormats = MasterLocationFormats;
PartialViewLocationFormats = MasterLocationFormats;
The small differences in this code account for the fact that Razor uses the file extension to differentiate the programming language (C# versus VB), but does not have separate file types for master views, views, and partial views; it also does not have separate file types for pages versus controls because those constructs don't exist in Razor.
After you have the customized view engine, you'll need to let MVC know to use it. In addition, you'll need to remove the existing view engine that you're planning to replace. You should configure MVC from within your Global.asax file (or by using one of the Config classes in the App_Start folder of the default MVC 5 templates).
For example, if you are replacing the Razor view engine with your own custom view engine, the code might look something like this:
var razorEngine = ViewEngines.Engines
                      .SingleOrDefault(ve => ve is RazorViewEngine);
if (razorEngine != null)
    ViewEngines.Engines.Remove(razorEngine);
ViewEngines.Engines.Add(new MyRazorViewEngine());
This code uses a little bit of LINQ magic to determine whether a Razor view engine is already installed (removing it if so), and then adds an instance of your new Razor view engine instead. Remember that view engines are run in order, so if you want your new Razor view engine to take precedence over whatever other view engines are registered, you should use .Insert instead of .Add (with an index of 0 to make sure it goes first).
Writing HTML Helpers
HTML helpers are those methods that help you generate HTML inside your views. They are primarily written as extension methods to the HtmlHelper, AjaxHelper, or UrlHelper classes (depending on whether you're generating plain HTML, Ajax-enabled HTML, or URLs). HTML and Ajax helpers have access to the ViewContext (because they can only be called from views), and URL helpers have access to the ControllerContext (because they can be called from both controllers and views).
Extension methods are static methods in a static class that use the this keyword on their first parameter to tell the compiler which type they are providing the extension for. For example, if you wanted an extension method for HtmlHelper that took no parameters, you might write:
public static class MyExtensions {
    public static string MyExtensionMethod(this HtmlHelper html) {
        return "Hello, world!";
    }
}
You can still call this method the traditional way (by calling MyExtensions.MyExtensionMethod(Html)), but calling it via the extension syntax (by calling Html.MyExtensionMethod()) is more convenient. Any additional parameters you provide to the static method will become parameters in the extension method as well; only the extension parameter marked with the this keyword “disappears.”
Extension methods in MVC 1.0 all tended to return values of the String type, and that value would be directly placed into the output stream with a call much like this one (Web Forms view syntax):
<%= Html.MyExtensionMethod() %>Unfortunately, a problem existed with the old Web Forms syntax: letting unintended HTML escape into the wild was too easy. The Web world of the late 1990s through the early 2000s, in which ASP.NET started its life, was quite different from today, where your web apps must be very careful of things such as cross-site scripting (XSS) attacks and cross-site request forgeries (CSRF). To make the world slightly safer, ASP.NET 4 introduced a new syntax for Web Forms that automatically encodes HTML values:
<%: Html.MyExtensionMethod() %>Notice how the colon has replaced the equals sign. This is great for data safety, but what happens when you actually need to return HTML, as many HTML helpers will? ASP.NET 4 also introduced a new interface (IHtmlString) that any type can implement. When you pass such a string through the <%: %> syntax, the system recognizes that the type is already promising to be safe HTML and outputs it without encoding. In ASP.NET MVC 2, the team made the decision to mildly break backward compatibility, and make all HTML helpers return instances of MvcHtmlString.
When you write HTML helpers that are generating HTML, it's almost always going to be the case that you want to return IHtmlString instead of String, because you don't want the system to encode your HTML. This is even more important when using the Razor view engine, which only has a single output statement, and it always encodes:
@Html.MyExtensionMethod()Writing Razor Helpers
In addition to the HTML helper syntax that's been available since MVC 1.0, developers can also write Razor helpers in the Razor syntax. This feature shipped as part of the Web Pages 1.0 framework, which is included in MVC applications. These helpers don't have access to the MVC helper objects (like HtmlHelper, AjaxHelper, or UrlHelper) or to the MVC context objects (like ControllerContext or ViewContext). They can get access to the core ASP.NET runtime intrinsic context objects through the traditional static ASP.NET API HttpContext.Current.
Developers might choose to write a Razor helper for simple reuse with a view, or if they wanted to reuse the same helper code from within both an MVC application and a Web Pages application (or if the application they are building is a combination of the two technologies). For the pure MVC developer, the traditional HTML Helper route offers more flexibility and customizability, albeit with a slightly more verbose syntax.
EXTENDING CONTROLLERS
Controller actions are the glue that pulls together your application; they talk to models via data access layers, make rudimentary decisions about how to achieve activities on behalf of the user, and decide how to respond (with views, JSON, XML, and so on). Customizing how actions are selected and executed is an important part of the MVC extensibility story.
Selecting Actions
ASP.NET MVC lets you influence how actions are selected for execution through two mechanisms: choosing action names and selecting (filtering) action methods.
Choosing Action Names with Name Selectors
Renaming an action is handled by attributes that derive from ActionNameSelectorAttribute. The most common use of action name selection is through the [ActionName] attribute that ships with the MVC framework. This attribute allows the user to specify an alternative name and attach it directly to the action method itself. Developers who need a more dynamic name mapping can implement their own custom attribute derived from ActionNameSelectorAttribute.
Implementing ActionNameSelectorAttribute is a simple task: implement the IsValidName abstract method, and return true or false as to whether the requested name is valid. Because the action name selector is allowed to vote on whether or not a name is valid, the decision can be delayed until you know what name the request is asking for. For example, say you wanted to have a single action that handled any request for an action name that began with “product-” (perhaps you need to map some existing URL that you cannot control). By implementing a custom naming selector, you can do that quite easily:
public override bool IsValidName(ControllerContext controllerContext,
                                 string actionName,
                                 MethodInfo methodInfo) {
    return actionName.StartsWith("product-");
}
When you apply this new attribute to an action method, it responds to any action that begins with “product-”. The action still needs to do more parsing of the actual action name to extract the extra information. You can see an example of this in the code in ∼/Areas/ActionNameSelector. The sample includes parsing of the product ID out from the action name, and placing that value into the route data so that the developer can then model bind against the value.
Filtering Actions with Method Selectors
The other action selection extensibility point is filtering actions. A method selector is an attribute class that derives from ActionMethodSelectorAttribute. Much like action name selection, this involves a single abstract method that is responsible for inspecting the controller context and method, and saying whether the method is eligible for the request. Several built-in implementations of this attribute are in the MVC framework: [AcceptVerbs] (and its closely related attributes [HttpGet], [HttpPost], [HttpPut], [HttpDelete], [HttpHead], [HttpPatch], and [HttpOptions]) as well as [NonAction].
If a method selector returns false when MVC calls its IsValidForRequest method, the method is not considered valid for the given request and the system keeps looking for a match. If the method has no selectors, it's considered a potentially valid target for dispatching; if the method has one or more selectors, they must all agree (by returning true) that the method is a valid target.
If no matching method is found, the system returns an HTTP 404 error code in response to the request. Similarly, if more than one method matches a request, the system returns an HTTP 500 error code (and tells you about the ambiguity on the error page).
If you're wondering why [Authorize] isn't in the preceding list, it's because the correct action for [Authorize] is to either allow the request or to return an HTTP 401 (“Unauthorized”) error code, so that the browser knows that you need to authenticate. Another way to think of it is that for [AcceptVerbs] or [NonAction], there is nothing the end user can do to make the request valid; it's always going to be invalid (because it is using the wrong HTTP verb, or trying to call a non-action method), whereas [Authorize] implies that the end user could do something to make the request succeed. That's the key difference between a filter like [Authorize] and a method selector like [AcceptVerbs].
An example of a place where you might use a custom method selector is to differentiate Ajax requests from non-Ajax requests. You could implement a new [AjaxOnly] action method selector with the IsValidForRequest method, as follows:
public override bool IsValidForRequest(ControllerContext controllerContext,
                                       MethodInfo methodInfo) {
    return controllerContext.HttpContext.Request.IsAjaxRequest();
}
Using the Ajax example, combined with the rule regarding the presence or absence of method selectors, you can conclude that an undecorated action method is a valid target for both Ajax and non-Ajax requests. After you've decorated the method with this new AjaxOnly attribute, it gets filtered out of the list of valid targets whenever the request is a non-Ajax request.
With an attribute like this available, you can then create separate action methods that have the same name, but are dispatched based on whether the user appears to be making a direct request in a browser versus a programmatic Ajax request. You may choose to do different work based on whether the user is making a full request or an Ajax request. You can find a full example of this in ∼/Areas/ActionMethodSelector. It contains the implementation of the [AjaxOnly] attribute, as well as the controller and view that show the system choosing between two Index methods, depending on whether the user is making a full request or an Ajax request.
Filters
After an action method has been selected, the action is then executed, and if it returns a result, the result is then executed. Filters allow the developer to participate in the action and result execution pipeline in five ways:
- Authentication
- Authorization
- Pre- and post-processing of actions
- Pre- and post-processing of results
- Error handling
A sixth kind of filter, an override filter, allows specifying exceptions to the default set of global or controller filters.
Filters can be written as attributes that are applied directly to the action methods (or controller classes), or as standalone classes that are registered in the global filter list. If you intend to use your filter as an attribute, it must derive from FilterAttribute (or any subclass, such as ActionFilterAttribute). A global filter that is not an attribute has no base class requirements. Regardless of which route you take, the filtering activities you support are determined by the interfaces you implement.
Authentication Filters
New in MVC 5, authentication filters support custom authentication at the controller and action levels. The design of HTTP allows authentication to vary per resource (URI), but traditional web frameworks do not support this flexibility. Traditionally, web frameworks have supported configuring authentication per application. That approach does make turning on Windows or Forms authentication for your entire site easy. When every action in your site has exactly the same authentication needs, this server configuration approach works well. But modern web applications often have different authentication needs for different actions. For example, you might have some actions called by JavaScript in the browser that return JSON. These actions might use bearer tokens rather than cookies (which avoids cross-site request forgery concerns and the need to use anti-forgery tokens). Previously, you would have had to resort to techniques such as partitioning the site, with one child application for each new set of authentication methods. However, that approach is messy and complicates both development and deployment.
MVC 5 provides a clean solution to this problem with authentication filters. To support an authentication method for just one controller or action, you can apply an authentication filter attribute and only that controller or action will use it. The sample in ∼/Areas/BasicAuthenticationFilter shows how to use HTTP Basic authentication for a specific action on a controller.
MVC 5 does not include a base class or any implementations for the IAuthenticationFilter interface, so if you need to support per-action or per-controller authentication, you'll want to learn how to implement the interface. After you've implemented the filter as an attribute, applying it to an action is easy:
public ActionResult Index()
{
    return View();
}
[BasicAuthentication(Password = "secret")]
[Authorize]
public ActionResult Authenticated()
{
    User model = new User { Name = User.Identity.Name };
    return View(model);
}
Note that the Authenticated action in this example has two attributes: one authentication filter and one authorization filter.
It's worth understanding how they work together. Both are required to get the browser to prompt the user to log in via HTTP Basic. If a request happens to come in with the correct header, having just the authentication filter by itself would be enough to process the header. But the authentication filter by itself is not enough to require authentication or to trigger the browser to send an authenticated request in the first place. To do that, you also need to prohibit anonymous requests via the Authorize attribute. The Authorize attribute is what causes MVC to send back a 401 Unauthorized status code. The authentication filter then checks for this status code and prompts the browser for an authentication dialog.
An action with an authentication filter but no authorization filter would work like many home pages, which allow either anonymous or authenticated users but show different content depending on whether the user is logged in. An action with both an authentication filter and an authorization filter is like a “subscribers-only content” page, which only returns content to authenticated users.
Implementing an authentication filter involves two methods, OnAuthentication and OnAuthenticationChallenge. The OnAuthentication method in the sample does some fairly low-level work to handle the details of the HTTP Basic protocol. If you're curious about the protocol details, see section 2 of RFC 2617 at tools.ietf.org and the full sample source code. Here, let's skip some of the protocol details and focus on the example's high-level authentication filter behavior.
public void OnAuthentication(AuthenticationContext filterContext)
{
    if (!RequestHasAuthorizationBasicHeader())
    {
        return;
    }
    IPrincipal user = TryToAuthenticateUser();
    if (user != null)
    {
        // When user != null, the request had a valid user ID and password.
        filterContext.Principal = user;
    }
    else
    {
        // Otherwise, authentication failed.
        filterContext.Result = CreateUnauthorizedResult();
    }
}
If you compare the preceding snippet with the full example source code, you'll notice the snippet has placeholder methods rather than full implementations. The preceding snippet emphasizes the three actions a filter can take in its OnAuthentication method:
- The filter can do nothing if authentication was not attempted.
- The filter can indicate successful authentication by setting the
Principalproperty. - The filter can indicate an authentication failure by setting the
Resultproperty.
Figure 15.1 summarizes how to implement OnAuthentication.
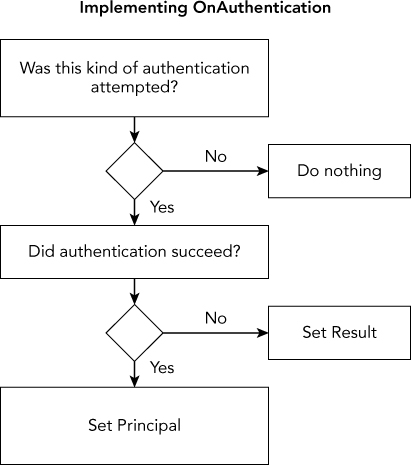
If the request does not include an authentication attempt for this filter (in this example, an Authorization: Basic header indicating HTTP Basic authentication), the filter should return without taking any action. Multiple authentication filters can be active at the same time, and to play well together, a filter should only act on requests that attempt to use its authentication method. For example, a cookie-based authentication filter would only act if it detected the presence of its cookie. If no matching authentication attempt is detected, the filter should make sure it does not set either the Principal property (indicating success) or the Result property (indicating a failure). A “didn't try to authenticate” request is different from a “tried to authenticate but failed” request, and doing nothing is the right way to handle the “didn't try to authenticate” case.
When an authentication filter sets a successful Principal, any remaining authentication filters run and (unless a later authentication filter fails) the normal pipeline continues by running authorization and other filter types as well as the action method. The principal provided by the last authentication filter is passed on to the rest of the pipeline in all the standard places such as Thread.CurrentPrincipal, HttpContext.Current.User, and Controller.User. If an authentication filter wants to combine its result with a previous authentication filter, it can examine the current Principal property on AuthenticationContext before overriding it.
When an authentication filter sets a failure Result, MVC stops running the rest of the pipeline, including later filter types or the action method. Instead, it immediately runs the challenges for all the action's authentication filters and then returns. We'll talk more about authentication challenges shortly.
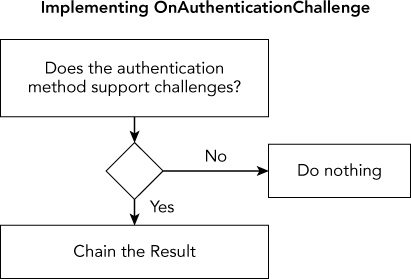
The other half of an authentication filter is telling the browser (or client) how to authenticate. That's the job of the OnAuthenticationChallenge method. For HTTP Basic authentication, you just add a WWW-Authenticate: Basic header to any response with a 401 Unauthorized status code. The OnAuthenticationChallenge method runs on every response, and it runs just before the action result is executed. Because the action result hasn't yet been executed, the OnAuthenticationChallenge can't do things such as check the status code. Instead, it overrides the existing action result by replacing the Result property. Inside the result, it checks the status code right after the existing result runs, and then it adds the WWW-Authenticate header. The overall behavior is as follows (slightly modified for simplicity):
public void OnAuthenticationChallenge(
    AuthenticationChallengeContext filterContext)
{
    filterContext.Result = new AddBasicChallengeOn401Result
        { InnerResult = filterContext.Result };
}
class AddBasicChallengeOn401Result : ActionResult
{
    public ActionResult InnerResult { get; set; }
    public override void ExecuteResult(ControllerContext context)
    {
            InnerResult.ExecuteResult(context);
            var response = context.HttpContext.Response;
            if (response.StatusCode == 401)
            {
                response.Headers.Add("WWW-Authenticate", "Basic");
            }
        }
    }
This code is an example of the Decorator pattern. The challenge wraps (or “decorates”) the existing result by holding a reference to it, delegating to it, and then adding some extra behavior on top (in this case, all the extra behavior happens after delegating). The AddChallengeOnUnauthorizedResult class provided in the sample is slightly more generic so it can work with any HTTP authentication scheme rather than just Basic. That way, multiple authentication filters can reuse the same challenge action result class.
You should remember three important things about challenge action results:
- They run on all responses, not just authentication failures or 401 Unauthorized. Unless you want to add a header to every 200 OK response, make sure you check the status code first.
- The challenge result replaces the action result produced by the rest of the pipeline. Unless you want to ignore rendering the
View()results your action methods return, make sure you pass along the current result and execute it first, just like this example does. - You can apply multiple authentication filters and all of their challenges will run. For example, if you had authentication filters for Basic, Digest, and Bearer, each could add its own authentication header. So, unless you want to overwrite the output from the other filters, make sure any changes you make to the response message are additive. For example, add a new authentication header rather than just setting a replacement value.
Your challenge method runs even when your own OnAuthentication method indicates a failure (by setting the Result property). So your OnAuthenticationChallenge method will always run—if the pipeline runs normally, if another authentication filter short-circuits with an error, or if the same authentication filter instance short-circuits with an error. You'll want to make sure your challenge result does the correct thing in all three cases.
In our HTTP Basic sample implementation, we always set a challenge result. Some authentication mechanisms might not need to challenge at all. For example, you might have an action called from programmatic clients that returns JSON. This action might support HTTP Basic as your main authentication mechanism but also allow using cookies as a secondary mechanism. In that case, you wouldn't want to have the cookie authentication filter do any kind of challenge, like sending a 302 Redirect to a login form, because that would break the prompt for HTTP Basic authentication.
When you don't want a filter to do an authentication challenge, you can simply leave the existing Result property alone; you don't need to do anything in your OnAuthenticationChallenge method. For filters that do need to challenge, you can have a simple one-liner that always wraps the existing result, like the example does. But you should never need to do anything more complicated in this method. Because the action result hasn't run yet, it's unlikely there's any conditional logic you would want to run in your OnAuthenticationChallenge method. Either you always wrap the existing result method with your challenge, or you do nothing; doing anything more complicated probably doesn't make sense here.
Authentication filters are powerful and custom-built to handle HTTP authentication just right. We've covered quite a few details here, but don't let that scare you. Just as Figure 15.1 summarized how to implement OnAuthentication, Figure 15.2 summarizes how to implement OnAuthenticationChallenge. Refer to both these figures, and enjoy the flexibility of per-resource authentication using filters in MVC.
Authorization Filters
A filter that wants to participate in authorization implements the IAuthorizationFilter interface. Authorization filters execute just after authentication filters. Because they run relatively early in the action pipeline, authorization filters are appropriately used for activities that short-circuit the entire action execution. Several classes in the MVC framework implement this interface, including [Authorize], [ChildActionOnly], [RequireHttps], [ValidateAntiForgeryToken], and [ValidateInput].
A developer might choose to implement an authorization filter to provide this kind of early escape from the action pipeline when some pre-condition isn't properly met and where the resulting behavior is something other than returning an HTTP 404 error code.
Action and Result Filters
A filter that wants to participate in pre- and post-processing of actions should implement the IActionFilter interface. This interface offers two methods to implement: OnActionExecuting (for pre-processing) and OnActionExecuted (for post-processing). Similarly, for pre- and post-processing of results, a filter should implement IResultFilter, with its two filter methods: OnResultExecuting and OnResultExecuted. Two action/result filters are in the MVC framework itself: [AsyncTimeout] and [OutputCache]. A single filter often implements both of these interfaces as a pair, so talking about them together makes sense.
The output cache filter is an excellent example of this pairing of action and result filter. It overrides OnActionExecuting to determine whether it already has a cached answer (and can thereby completely bypass the action and result execution, and instead return a result directly from its cache). It also overrides OnResultExecuted so that it can save away the results of executing an as-yet uncached action and result.
For an example of this kind of filter, look at the code in ∼/Areas/TimingFilter. This class is an action and result filter that records the amount of time that the action and result takes to execute. The four overridden methods look like this:
public override void OnActionExecuting(ActionExecutingContext filterContext)
{
    GetStopwatch("action").Start();
}
public override void OnActionExecuted(ActionExecutedContext filterContext)
{
    GetStopwatch("action").Stop();
}
public override void OnResultExecuting(ResultExecutingContext filterContext)
{
    GetStopwatch("result").Start();
}
public override void OnResultExecuted(ResultExecutedContext filterContext)
{
    var resultStopwatch = GetStopwatch("result");
    resultStopwatch.Stop();
    var actionStopwatch = GetStopwatch("action");
    var response = filterContext.HttpContext.Response;
    if (!filterContext.IsChildAction && response.ContentType == "text/html")
        response.Write(
            String.Format(
                "<h5>Action "{0} :: {1}', Execute: {2}ms, Result: {3}ms.</h5>",
                filterContext.RouteData.Values["controller"],
                filterContext.RouteData.Values["action"],
                actionStopwatch.ElapsedMilliseconds,
                resultStopwatch.ElapsedMilliseconds
            )
        );
}
The example keeps two instances of the .NET Stopwatch class—one for action execution and one for result execution—and when it's done, it appends some HTML to the output stream so that you can see exactly how much time was spent running the code.
Exception Filters
The next kind of filter available is the exception filter, used to process exceptions that might be thrown during action or result execution. An action filter that wants to participate in the handling of exceptions should implement the IExceptionFilter interface. The MVC framework has a single exception filter: [HandleError].
Developers often use exception filters to perform some sort of logging of the errors, notification of the system administrators, and choosing how to handle the error from the end user's perspective (usually by sending the user to an error page). The HandleErrorAttribute class does this last operation, so creating an exception filter attribute by deriving from HandleErrorAttribute, and then overriding the OnException method to provide additional handling before calling base.OnException, is quite common.
Filter Overrides
The last kind of filter is a new filter type in MVC 5, and it's a bit different from the others. Unlike the other filter types, override filters don't have any methods at all. Instead, they simply return a type of filter to override. In fact, in might be helpful not to think of filter overrides as normal filters at all. They're really more of a way to control when the other kinds of filters should apply.
Suppose you have an exception filter that you use everywhere in your application to log error information to a database. But suppose you have one very sensitive action (let's say it's related to payroll), and you don't want error information from that action showing up in the database. Previously, you would have had two options: either don't use a global filter (put the exception filter on every other controller, and then also on every other action in the controller except the payroll action), or customize the global exception filter to know about the payroll action (so that it can skip over its normal logic when that action is running). Neither approach is particularly appealing. In MVC 5, you can create a simple override filter for exception filters and then apply this attribute to your action:
public class OverrideAllExceptionFiltersAttribute :
    FilterAttribute, IOverrideFilter
{
    public Type FiltersToOverride
    {
        get { return typeof(IExceptionFilter); }
    }
}
public static class FilterConfig
{
    public static void RegisterGlobalFilters(
        GlobalFilterCollection filters)
    {
        filters.Add(new LogToDatabaseExceptionFilter());
    }
}
[OverrideAllExceptionFilters]
public ActionResult Payroll()
{
    return View();
}As another example, suppose you have a global cookie authentication filter, but you have one action method that returns JSON and supports bearer authentication. You don't want the complexity of dealing with anti-forgery tokens, so simply adding an authentication filter for bearer authentication isn't sufficient because both authentication filters will run. You need to make sure the action doesn't authenticate using a cookie at all. You can add a filter override to your action that blocks all global- and controller-level authentication filters. Then you only allow the bearer authentication filter placed directly on your action. (In the case of authentication, note that filter overrides only block filters; they won't affect any other authentication mechanisms such as server-level HTTP modules.)
After MVC picks the action to run, it gets a list of filters that apply to that action. When it builds this list, it skips any filters defined at a higher level than the override filter. Specifically, an override of exception filters placed on a controller causes MVC to omit any exception filters in the global collection. An override of exception filters placed on an action causes MVC to omit any exception filters in the global collection as well as those on the controller. When the action is run, MVC behaves as though the overridden filters didn't exist, because they won't be in the list MVC uses to run that action's pipeline.
As shown in the code snippet earlier, an override filter returns the type of filters to override. The only types supported here are the other filter interface types (IActionFilter, IAuthenticationFilter, IAuthorizationFilter, IExceptionFilter, and IResultFilter). Returning the type of a specific filter class or base class is not supported. When you use filter overrides, you're overriding all filters of that type (if they're at a higher level). If you want to override only some higher-level filters, you'll need to do that manually. For example, if you have multiple global action filters and want to override only one of them on your controller, you can add an attribute to override all action filters and then re-add attributes for the specific action filters you want to keep.
Providing Custom Results
The final line of code in most action methods returns an action result object. For example, the View method on the Controller class returns an instance of ViewResult, which contains the code necessary to look up a view, execute it, and write its results out to the response stream. When you write return View(); in your action, you're asking the MVC framework to execute a view result on your behalf.
As a developer, you're not limited to the action results provided by the MVC framework. You can make your own action result by deriving it from the ActionResult class and implementing ExecuteResult.
In the example in ∼/Areas/CustomActionResult, you have an XML action result class that serializes an object into an XML representation and sends it down to the client as a response. In the full sample code, you have a custom Person class that is serialized from within the controller:
public ActionResult Index() {
    var model = new Person {
        FirstName = "Brad",
        LastName = "Wilson",
        Blog = "http://bradwilson.typepad.com"
    };
    return new XmlResult(model);
}
The implementation of the XmlResult class relies upon the built-in XML serialization capabilities of the .NET Framework:
public class XmlResult : ActionResult {
    private object data;
    public XmlResult(object data) {
        this.data = data;
    }
    public override void ExecuteResult(ControllerContext context) {
        var serializer = new XmlSerializer(data.GetType());
        var response = context.HttpContext.Response.OutputStream;
        context.HttpContext.Response.ContentType = "text/xml";
        serializer.Serialize(response, data);
    }
}
SUMMARY
This chapter covered several advanced extensibility points in the ASP.NET MVC framework. The extensibility points were grouped roughly into three categories, depending on whether they were intending to extend models, views, or controllers (and actions). For models, you learned about the inner workings of value providers and model binders, and saw examples of how to extend the way MVC handles editing of models through the use of model metadata and model validators. To extend views, you saw how to customize view engines to provide your own conventions about locating view files, as well as two variations of helper methods for generating HTML inside your views. Finally, you learned about controller extensibility through the use of action selectors, filters, and custom action result types, all providing powerful and flexible ways for uniquely crafting the actions that glue together your models and views. Using these extensibility points can help you bring your MVC application to the next level of functionality and reuse, while also making it easier to understand, debug, and enhance.