
Chapter 8
Ajax
—by K. Scott Allen and Jon Galloway
What's In This Chapter?
- Understanding jQuery
- Using Ajax helpers
- Understanding client validation
- Using jQuery plugins
- Improving Ajax performance
WROX.COM CODE DOWNLOADS FOR THIS CHAPTER
You can find the wrox.com code downloads for this chapter at http://www.wrox.com/go/proaspnetmvc5 on the Download Code tab. The code for this chapter is contained in the following files:
- MvcMusicStore.C08.ActionLink
- MvcMusicStore.C08.AjaxForm
- MvcMusicStore.C08.Autocomplete
- MvcMusicStore.C08.CustomClientValidation
- MvcMusicStore.C08.jQuery
- MvcMusicStore.C08.Templates
Building a new web application today and not including Ajax features is rare. Technically, Ajax stands for asynchronous JavaScript and XML. In practice, Ajax stands for all the techniques you use to build responsive web applications with a great user experience. Being responsive does require some asynchronous communication now and then, but the appearance of responsiveness can also come from subtle animations and color changes. If you can visually encourage your users to make the right choices inside your application, they'll love you and come back for more.
ASP.NET MVC 5 is a modern web framework, and like every modern web framework it has support for Ajax right from the start. The core of the Ajax support comes from the open source jQuery JavaScript library. Most of the major Ajax features in ASP.NET MVC 5 build on or extend features in jQuery.
To understand what is possible with Ajax in ASP.NET MVC 5, you have to start with jQuery.
JQUERY
The jQuery “write less, do more” tagline is a perfect description of the jQuery experience. The API is terse yet powerful. The library itself is flexible yet lightweight. Best of all, jQuery supports all the modern browsers (including Internet Explorer, Firefox, Safari, Opera, and Chrome), and hides the inconsistencies (and bugs) you might experience if you wrote code directly against the API each browser provides. When you use jQuery, you'll not only be writing less code and finishing jobs in less time, you'll keep the hair on your head, too.
jQuery is one of the most popular JavaScript libraries in existence, and remains an open source project. You can find the latest downloads, documentation, and plugins on the jquery.com website. You can also find jQuery in your ASP.NET MVC application. Microsoft supports jQuery, and the project template for ASP.NET MVC will place all the files you need in order to use jQuery into a Scripts folder when you create a new MVC project. In MVC 5, the jQuery scripts are added via NuGet, meaning you can easily upgrade the scripts when a new version of jQuery arrives.
As you'll see in this chapter, the MVC framework builds on top of jQuery to provide features like client-side validation and asynchronous postbacks. Before drilling into these ASP.NET MVC features, let's take a quick tour of the underlying jQuery features.
jQuery Features
jQuery excels at finding, traversing, and manipulating HTML elements inside an HTML document. After you've found an element, jQuery also makes it easy to wire up event handlers on the element, animate the element, and build Ajax interactions around the element. This section begins looking at these capabilities by discussing the gateway to jQuery functionality: the jQuery function.
The jQuery Function
The jQuery function object is the object you'll use to gain access to jQuery features. The function has a tendency to perplex developers when they first start using jQuery. Part of the confusion occurs because the function (named jQuery) is aliased to the $ sign (because $ requires less typing and is a legal function name in JavaScript). Even more confusing is how you can pass nearly any type of argument into the $ function, and the function will deduce what you intend to achieve. The following code demonstrates some typical uses of the jQuery function:
$(function () {
   $("#album-list img").mouseover(function () {
       $(this).animate({ height: "+=25', width: "+=25" })
              .animate({ height: "-=25', width: "-=25" });
   });
});
The first line of code invokes the jQuery function ($) and passes an anonymous JavaScript function as the first parameter.
$(function () {
   $("#album-list img").mouseover(function () {
       $(this).animate({ height: "+=25', width: "+=25" })
              .animate({ height: "-=25', width: "-=25" });
   });
});
When you pass a function as the first parameter, jQuery assumes you are providing a function to execute as soon as the browser is finished building a document object model (DOM) from HTML supplied by the server—that is, the code will run after the HTML page is done loading from the server. This is the point in time when you can safely begin executing script against the DOM, and we commonly call this the “DOM ready” event.
The second line of code passes the string “#album-list img” to the jQuery function:
$(function () {
   $("#album-list img").mouseover(function () {
       $(this).animate({ height: "+=25', width: "+=25" })
              .animate({ height: "-=25', width: "-=25" });
   });
});
jQuery interprets this string as a selector. A selector tells jQuery what elements you are searching for in the DOM. You can find elements by their attribute values, their class names, their relative position, and more. The selector in the second line of code tells jQuery to find all the images inside the element with an id value of album-list.
When the selector executes, it returns a wrapped set of zero or more matching elements. Any additional jQuery methods you invoke will operate against all the elements in the wrapped set. For example, the mouseover method hooks an event handler to the onmouseover event of each image element that matched the selector.
jQuery exploits the functional programming capabilities of JavaScript. You'll often find yourself creating and passing functions as parameters into jQuery methods. The mouseover method, for example, knows how to wire up an event handler for onmouseover regardless of the browser in use, but it doesn't know what you want to do when the event fires. To express what you want to happen when the event fires, you pass in a function with the event handling code:
$(function () {
   $("#album-list img").mouseover(function () {
       $(this).animate({ height: "+=25', width: "+=25" })
              .animate({ height: "-=25', width: "-=25" });
   });
});
In the preceding example, the code animates an element during the mouseover event. The element the code animates is referenced by the this keyword (this points to the element where the event occurred). Notice how the code first passes the element to the jQuery function ($(this)). jQuery sees the argument as a reference to an element and returns a wrapped set with the element inside.
After you have the element wrapped inside of jQuery goodness, you can invoke jQuery methods such as animate to manipulate the element. The code in the example makes the image grow a bit (increase the width and height by 25 pixels), and then shrink a bit (decrease the width and height by 25 pixels).
The result of the code is as follows: When users move their mouse over an album image, they see a subtle emphasizing effect when the image expands, then contracts. Is this behavior required to use the application? No! However, the effect is easy and gives the appearance of polish. Your users will love it (as long as you keep it tasteful).
As you progress through this chapter, you'll see more substantive features. First, let's take a closer look at the jQuery features you'll need.
jQuery Selectors
Selectors are the strings you pass to the jQuery function to select elements in the DOM. In the previous section, you used “#album-list img” as a selector to find image tags. If you think the string looks like something you might use in a cascading style sheet (CSS), you would be correct. The jQuery selector syntax derives from CSS 3.0 selectors, with some additions. Table 8.1 lists some of the selectors you'll see in everyday jQuery code.
Table 8.1 Common Selectors
| Example | Meaning |
$("#header") |
Find the element with an id of “header" |
$(".editor-label") |
Find all elements with a class name of “.editor-label" |
$("div") |
Find all <div> elements |
$("#header div") |
Find all <div> elements that are descendants of the element with an id of “header" |
$("#header > div") |
Find all <div> elements that are children of the element with an id of “header" |
$("a:even") |
Find evenly numbered anchor tags |
The last line in the table demonstrates how jQuery supports the same pseudo-classes you might be familiar with from CSS. Using a pseudo-class allows you to select even or odd numbered elements, visited links, and more. For a full list of available CSS selectors, visit http://www.w3.org/TR/css3-selectors/.
jQuery Events
Another one of jQuery's strengths is the API it provides for subscribing to events in the DOM. Although you can use a generic on method to capture any event using an event name specified as a string, jQuery also provides dedicated methods for common events, such as click, blur, and submit.
As demonstrated earlier, you tell jQuery what to do when the event occurs by passing in a function. The function can be anonymous, as in the example you saw in the section “The jQuery Function” earlier in the chapter, or you can also pass a named function as an event handler, as in the following code:
$("#album-list img").mouseover(function () {
   animateElement($(this));
});
function animateElement(element) {
   element.animate({ height: "+=25', width: "+=25" })
          .animate({ height: "-=25', width: "-=25" });
}
After you have some DOM elements selected, or are inside an event handler, jQuery makes manipulating elements on a page easy. You can read the values of their attributes, set the values of their attributes, add CSS classes to or remove them from the element, and more. The following code adds the highlight class to or removes it from anchor tags on a page as the user's mouse moves through the element. The anchor tags should appear differently when users move their mouse over the tag (assuming you have a highlight style set up appropriately).
$("a").mouseover(function () {
   $(this).addClass("highlight");
}).mouseout(function () {
   $(this).removeClass("highlight");
});
A couple of interesting notes about the preceding code:
- All the jQuery methods you use against a wrapped set, like the
mouseovermethod, return the same jQuery wrapped set. This means you can continue invoking jQuery methods on elements you've selected without reselecting those elements. We call this method chaining. - Shortcuts are available in jQuery for many common operations. Setting up effects for
mouseoverandmouseoutis a common operation, and so is toggling the presence of a style class. You could rewrite the last snippet using some jQuery shortcuts and the code would morph into the following:
There's a lot of power in three lines of code—that's why jQuery is awesome.$("a").hover(function () { $(this).toggleClass("highlight"); });
jQuery and Ajax
jQuery includes everything you need to send asynchronous requests back to your web server. You can generate POST requests or GET requests and jQuery notifies you when the request is complete (or if there is an error). With jQuery, you can send and receive XML data (the x in Ajax stands for XML, after all), but as you'll see in this chapter, consuming data in HTML, text, or JavaScript Object Notation (JSON) format is trivial. jQuery makes Ajax easy.
In fact, jQuery makes so many things easy it has changed the way web developers write script code.
Unobtrusive JavaScript
In the early days of the web (before jQuery came along), intermingling JavaScript code and HTML inside the same file was fashionable. Putting JavaScript code inside an HTML element as the value of an attribute was even normal. You've probably seen an onclick handler like the following:
<div onclick="javascript:alert('click'),">Testing, testing</div>You might have written markup with embedded JavaScript in those days because there was no easier approach to catching click events. Although embedded JavaScript works, the code is messy. jQuery changes the scenario because you now have a clearly superior approach to finding elements and catching click events. You can now remove JavaScript code from inside HTML attributes. In fact, you can remove JavaScript code from HTML entirely.
Unobtrusive JavaScript is the practice of keeping JavaScript code separate from markup. You package all the script code you need into .js files. If you look at the source code for a view, you don't see any JavaScript intruding into the markup. Even when you look at the HTML rendered by a view, you still don't see any JavaScript inside. The only sign of script you'll see is one or more <script> tags referencing the JavaScript files.
You might find unobtrusive JavaScript appealing because it follows the same separation of concerns that the MVC design pattern promotes. Keep the markup that is responsible for the display separate from the JavaScript that is responsible for behavior. Unobtrusive JavaScript has additional advantages, too. Keeping all of your script in separately downloadable files can give your site a performance boost because the browser can cache the script file locally.
Unobtrusive JavaScript also allows you to use a strategy known as progressive enhancement for your site. Progressive enhancement is a focus on delivering content. Only if the device or browser viewing the content supports features like scripts and style sheets will your page start doing more advanced things, such as animating images. Wikipedia has a good overview of progressive enhancement here: http://en.wikipedia.org/wiki/Progressive_enhancement.
ASP.NET MVC 5 takes an unobtrusive approach to JavaScript. Instead of emitting JavaScript code into a view to enable features such as client-side validation, the framework sprinkles metadata into HTML attributes. Using jQuery, the framework can find and interpret the metadata, and then attach behaviors to elements, all using external script files. Thanks to unobtrusive JavaScript, the Ajax features of ASP.NET MVC support progressive enhancement. If the user's browser doesn't support scripting, your site will still work (they just won't have the “nice to have” features such as client validation).
To see unobtrusive JavaScript in action, let's start by taking a look at how to use jQuery in an MVC application.
Using jQuery
The Visual Studio project templates for ASP.NET MVC give you everything you need to use jQuery when you create a new project: the script file is included and already referenced in the site layout for use in any view in your application. We'll look at exactly what's preconfigured for you so that you know how to add or modify it if needed.
Each new project contains a Scripts folder with a number of .js files inside it, as shown in Figure 8.1.
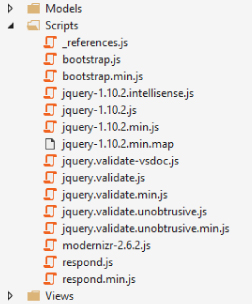
The core jQuery library is the file named jquery-<version>.js, where the version was 1.10.2 at the time of the Visual Studio 2013 / ASP.NET MVC 5 release. If you open this file, you'll find a readable, commented version of the jQuery source code inside.
Because jQuery is so commonly used, a jQuery script reference is included in the footer of the site layout (/Views/Shared/_Layout.cshtml), so by default it's available in any view in your site. In any views that aren't using the default layout—or if you remove the jQuery script reference from the site layout—you can easily add a jQuery script reference using either a direct script reference or using the preconfigured jQuery bundle.
Adding a script reference is as easy as including the following code:
<script src="~/Scripts/jquery-1.10.2.js"></script>Note that ASP.NET MVC's Razor view engine will resolve the ~ operator to the root of the current website, even when the ~ appears in an src attribute. Also note that specifying the type attribute as text/javascript isn't needed in HTML 5.
Although a simple script reference (as shown earlier) works, it's version dependent: If you want to update to a newer version of jQuery, you must search through your code and replace the script references with the updated version number. A better way of including a jQuery reference in your views is to use the built-in, version-independent jQuery script bundle. You can see this approach in the script references in /Views/Shared/_Layout.cshtml as shown in the following code:
@Scripts.Render("~/bundles/jquery")In addition to simplifying script updates in the future, this bundle reference also provides a number of other benefits, such as automatically using minimized scripts in release mode and centralizing script references so you can make updates in one place. Bundling and minification are discussed in some more detail at the end of this chapter.
jQuery and NuGet
The jQuery library is actually included in the ASP.NET project templates using a NuGet package. This is so you can update to a newer version of jQuery using the standard NuGet package update mechanisms. The combination of NuGet-based script inclusion and version-independent bundle references means you can very easily update your project to the newest version of jQuery. Of course, you must still test that your jQuery-based code works well with the new version of jQuery, but you won't have to spend time with busywork to download and add the script, and then manually change script references.
However, the real value of using the jQuery NuGet package is dependency checking. Any NuGet packages with jQuery-based libraries indicate which versions of jQuery they are compatible with, ensuring that they're all kept in sync. For example, if you update the jQuery Validation package (discussed later in this chapter), NuGet ensures that the new version of jQuery Validation to which you're upgrading continues to work with your installed jQuery version.
Custom Scripts
When you write your own custom JavaScript code, you can add your code into new files in the Scripts directory (unless you want to write intrusive JavaScript; then go ahead and embed script code directly in your view, but you lose 25 karma points when you do this). Because the Scripts directory in a new project already includes more than a dozen script files that you didn't write (often called vendor scripts), creating a separate application-specific subdirectory for your custom scripts is a good practice. This makes it obvious to both you and other developers who work with your code which scripts are libraries and which are custom application specific. A common convention is to place your custom scripts in a /Scripts/App subdirectory.
For example, if you wanted to include the code from the beginning of this chapter in a custom script file, you could start by creating a new /Scripts/App subdirectory, and then right-clicking to add a new JavaScript file named MusicScripts.js as shown in Figure 8.2.
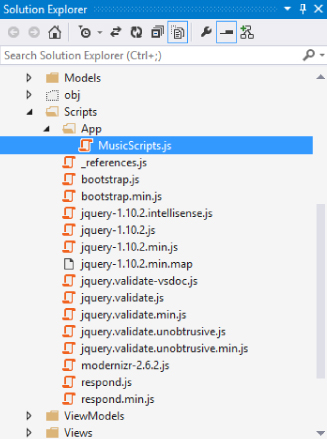
MusicScripts.js would look like the following:
$(function () {
   $("#album-list img").mouseover(function () {
       $(this).animate({ height: "+=25', width: "+=25" })
              .animate({ height: "-=25', width: "-=25" });
   });
});
This script is now available for use in your application, but to actually use MusicScripts.js in the application you'll need another script tag. This is a little more complicated than you might expect. The script tag must appear later in the rendered document than the script reference for jQuery, because MusicScripts.js requires jQuery and the browser loads scripts in the order in which they appear in the document.
If the script contains functionality the entire application will use, you can place the script tag in the _Layout view, after the bundle reference for jQuery. In this example, you need to use the script only on the front page of the application, so it needs to be added inside the Index view of the HomeController (/Views/Home/Index.cshtml). This presents a problem: Individual view content is rendered in the @RenderBody() call before the script bundle references at the end of the _Layout view, but custom scripts, which depend on jQuery, must appear after the jQuery reference. The comments added to the default _Layout view in the code listing that follows illustrate the issue:
<body>
    <div class="navbar navbar-inverse navbar-fixed-top">
    <!-- content removed for clarity -->
    </div>
    <div class="container body-content">
              <!-- any script tags in a view will be written here -->
               @RenderBody()
        <hr />
        <footer>
            <p>© @DateTime.Now.Year - My ASP.NET Application</p>
        </footer>
    </div>
           <!-- jQuery is not included until this bundle is written -->
           @Scripts.Render("~/bundles/jquery")
    @Scripts.Render("~/bundles/bootstrap")
    @RenderSection("scripts", required: false)
</body>
The solution to this problem is to render your custom scripts in the predefined scripts section, discussed next.
Placing Scripts in Sections
Rather than just writing out script tags inline in individual views, you can inject scripts into the output using defined Razor sections where scripts should appear. You can add your own custom sections, but the default _Layout view in a new ASP.NET MVC 5 application includes a section specifically for you to include scripts that depend on jQuery. The name of the section is Scripts, and it will appear after jQuery is loaded so that your custom scripts can take a dependency on jQuery.
Inside of any content view, you can now add a scripts section to inject view-specific scripts. This example shows how to place it at the bottom of the /Views/Home/Index.cshtml view:
<ul class="row list-unstyled" id="album-list">
        @foreach (var album in Model)
{
    <li class="col-lg-2 col-md-2 col-sm-2 col-xs-4 container">
        <a href="@Url.Action("Details", "Store", new { id = album.AlbumId })">
            <img alt="@album.Title" src="@Url.Content( @album.AlbumArtUrl)" />
            <h4>@album.Title</h4>
        </a>
    </li>
}
</ul>
@section Scripts {
    <script src="~/Scripts/App/MusicScripts.js"> </script>
}
</div>
The section approach allows you to have precise placement of script tags and ensure required scripts are included in the proper order. By default, the _Layout view in a new MVC 5 application renders the script toward the bottom of the page, just before the closing body tag.
The Rest of the Scripts
What are all these other .js files in the Scripts folder? A new ASP.NET MVC 5 application includes the following script references:
_references.jsbootstrap.jsbootstrap.min.jsjquery-1.10.2.intellisense.jsjquery-1.10.2.jsjquery-1.10.2.min.jsjquery-1.10.2.min.mapjquery.validate-vsdoc.jsjquery.validate.jsjquery.validate.min.jsjquery.validate.unobtrusive.jsjquery.validate.unobtrusive.min.jsmodernizr-2.6.2.jsrespond.jsrespond.min.js
That looks like quite a list! However, it's really only six libraries. To narrow down the list, we'll start by discussing the things that aren't really JavaScript libraries.
_references.js is just a list of JavaScript libraries in your project, written out using triple-slash (///) comments. Visual Studio uses it to determine which libraries to include in global JavaScript IntelliSense throughout your project (in addition to other in-page script references, which are also included at the individual view level). You can read a lot more about how _references.js works and how it came to be in Mads Kristensen's post: http://madskristensen.net/post/the-story-behind-_referencesjs.
Visual Studio shows IntelliSense based on method names and any inline triple-slash comments included in scripts. However, in order to include more useful IntelliSense information (such as parameter descriptions or usage help), a few of the scripts include full IntelliSense documentation in scripts containing vsdoc and intellisense in the names. They're conceptually identical; the intellisense format is essentially a 2.0 version of the IntelliSense JavaScript documentation format and includes more advanced information. You never have to reference these files directly, or send them to the client.
There are also several .min.js files. Each contains a minimized version of another script file. JavaScript minimization is the process of shrinking a JavaScript file by removing comments, thus shortening variable names, and other processes that reduce the file size. Minimized JavaScript files are great for performance because they cut down on bandwidth and client-side parsing, but they're not easy to read. For this reason, both minimized and unminimized versions are included in the project templates. This allows you to read and debug using the easy-to-read, commented versions, but gain the performance benefits of using minimized files in production. This is all handled for you by the ASP.NET bundling and minification system—in debug mode it serves the unminimized versions; in release mode it automatically finds and serves the .min.js versions.
jQuery also includes a .min.map.js version. This is a source map file. Source maps are an emerging standard, which allows browsers to map minified, compiled code back to the original code that was authored. If you're debugging JavaScript in a browser that supports source maps and one is available for the script you're debugging, it shows you the original source.
Okay, now that we've covered the odds and ends, the list of scripts has become a lot more manageable. Here's the updated list, sorted in the order we'll discuss them:
jquery-1.10.2.jsbootstrap.jsrespond.jsmodernizr-2.6.2.jsjquery.validate.jsjquery.validate.unobtrusive.js
We've already talked about jQuery in some detail.
Bootstrap.js contains a set of jQuery-based plugins that complement Bootstrap by adding some additional interactive behavior. For example, the Modals plugin shows simple modal displays using Bootstrap styles, using jQuery for display and events.
Respond.js is a tiny JavaScript library, included because it's required by Bootstrap. It's what's known as a polyfill: a JavaScript library that adds support for newer browser standards to older browsers. In the case of Respond.js, that missing standard is min-width and max-width CSS3 media query support for Internet Explorer 6–8. This allows Bootstrap's responsive CSS to work great on Internet Explorer 6–8, and it's ignored in newer browsers that have native support for CSS3 media queries.
Modernizr.js is a JavaScript library that helps you build modern applications by modernizing older browsers. For example, one important job of Modernizr is to enable the new HTML 5 elements (such as header, nav, and menu) on browsers that don't natively support HTML 5 elements (like Internet Explorer 6). Modernizr also allows you to detect whether advanced features such as geolocation and the drawing canvas are available in a particular browser.
The files with “unobtrusive” in the name are those written by Microsoft. The unobtrusive scripts integrate with jQuery and the MVC framework to provide the unobtrusive JavaScript features mentioned earlier. You'll need to use these files if you want to use Ajax features of the ASP.NET MVC framework, and you'll also see how to use these scripts in this chapter.
Now that you know what jQuery is and how to reference the script in your application, it's time to take a look at Ajax features directly supported by the MVC framework, found in the following section.
AJAX HELPERS
You've seen the HTML helpers in ASP.NET MVC. You can use the HTML helpers to create forms and links that point to controller actions. You also have a set of Ajax helpers in ASP.NET MVC. Ajax helpers also create forms and links that point to controller actions, but they behave asynchronously. When using these helpers, you don't need to write any script code to make the asynchrony work.
Behind the scenes, these Ajax helpers depend on the unobtrusive MVC extensions for jQuery. To use the helpers, you need to install the jquery.unobtrusive-ajax.js script in your project and add script references to your views. This is a change from previous versions of MVC, which included the script in the project template as well as a script reference in the _Layout view. You will learn how to add the jquery.unobtrusive-ajax.js script to your project using Ajax in the following section.
Adding the Unobtrusive Ajax Script to Your Project
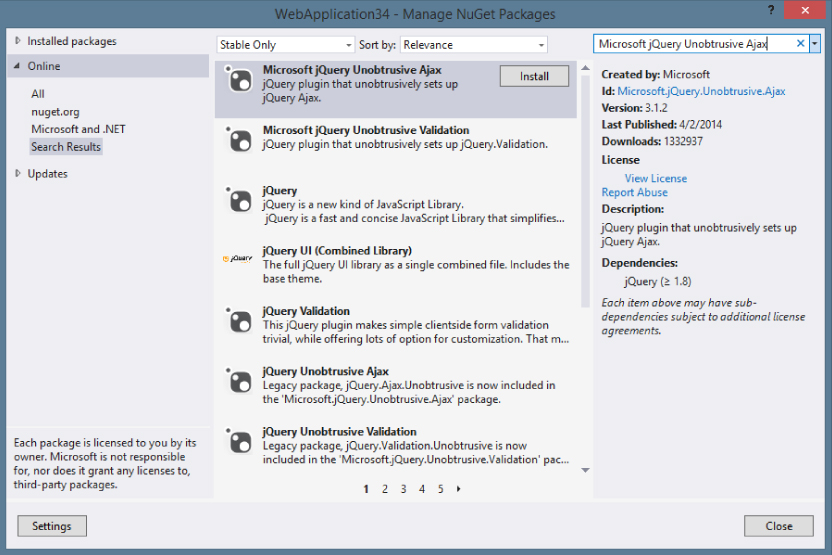
Fortunately, adding the unobtrusive Ajax script to your project is really easy using NuGet. Right-click your project, open the Manage NuGet Packages dialog, and search for Microsoft jQuery Unobtrusive Ajax, as shown in Figure 8.3. Alternatively, you can install it via the Package Manager Console using the following command: Install-Package Microsoft.jQuery.Unobtrusive.Ajax.
You can either add a script reference to the application's _Layout view or just in views that will be using the Ajax helpers. Unless you're making a lot of Ajax requests throughout your site, I recommend just adding script references to individual views.
This example shows how to add an Ajax request to the Scripts section of the Home Index view (Views/Home/Index.cshtml). You can manually type in the script reference, or you can drag and drop jQuery file from Solution Explorer into the view and Visual Studio will automatically add the script reference.
The updated view should now include the following script references (assuming you followed the earlier example, which added the MusicScripts.js reference):
@section Scripts {
    <script src="~/Scripts/App/MusicScripts.js"></script>
    <script src="~/Scripts/jquery.unobtrusive-ajax.min.js"> </script>
}
Ajax ActionLinks
Ajax helpers are available through the Ajax property inside a Razor view. Like HTML helpers, most of the methods on this property are extension methods (except for the AjaxHelper type).
The ActionLink method of the Ajax property creates an anchor tag with asynchronous behavior. Imagine you want to add a “daily deal” link at the bottom of the opening page for the MVC Music Store. When users click the link, you don't want them to navigate to a new page, but you want the existing page to automatically display the details of a heavily discounted album.
To implement this behavior, you can add the following code into the Views/Home/Index.cshtml view, just below the existing album list:
<div id="dailydeal">
    @Ajax.ActionLink("Click here to see today's special!",
        "DailyDeal",
        null,
        new AjaxOptions
        {
            UpdateTargetId = "dailydeal",
            InsertionMode = InsertionMode.Replace,
            HttpMethod = "GET"
        },
        new {@class = "btn btn-primary"})
</div>
The first parameter to the ActionLink method specifies the link text, and the second parameter is the name of the action you want to invoke asynchronously. Like the HTML helper of the same name, the Ajax ActionLink has various overloads you can use to pass a controller name, route values, and HTML attributes.
One significantly different type of parameter is the AjaxOptions parameter. The options parameter specifies how to send the request, and what will happen with the result the server returns. Options also exist for handling errors, displaying a loading element, displaying a confirmation dialog, and more. In the above code listing, you are using options to specify that you want to replace the element with an id of “dailydeal” using whatever response comes from the server.
The final parameter, htmlAttributes, specifies the HTML class you'll use for the link to apply a basic Bootstrap button style.
To have a response available, you'll need a DailyDeal action on the HomeController:
        public ActionResult DailyDeal()
        {
            var album = GetDailyDeal();
            return PartialView("_DailyDeal", album);
        }
        // Select an album and discount it by 50%
        private Album GetDailyDeal()
        {
            var album = storeDB.Albums
                .OrderBy(a => System.Guid.NewGuid())
                .First();
            album.Price *= 0.5m;
            return album;
}The target action for an Ajax action link can return plain text or HTML. In this case, you'll return HTML by rendering a partial view. The following Razor code will live in a _DailyDeal.cshtml file in the Views/Home folder of the project:
@model MvcMusicStore.Models.Album
<div class="panel panel-primary">
    <div class="panel-heading">
        <h3 class="panel-title">Your daily deal: @Model.Title</h3>
    </div>
    <div class="panel-body">
        <p>
            <img alt="@Model.Title" src="@Url.Content(@Model.AlbumArtUrl)" />
        </p>
        <div id="album-details">
            <p>
                <em>Artist:</em>
                @Model.Artist.Name
            </p>
            <p>
                <em>Price:</em>
                @String.Format("{0:F}", Model.Price)
            </p>
            @Html.ActionLink("Add to cart", "AddToCart",
                    "ShoppingCart",
                    new { id = Model.AlbumId },
                    new { @class = "btn btn-primary" })
        </div>
    </div>
</div>
The _DailyDeal uses a standard (non-Ajax) ActionLink, so clicking it navigates you away from the home page. This demonstrates an important point: Just because you can use Ajax links doesn't mean you should use them everywhere. You might update the content shown in the Deals section frequently and thus want to fetch it right when the user clicks it. The shopping cart system doesn't change, though, so you use a standard HTML link to navigate to it.
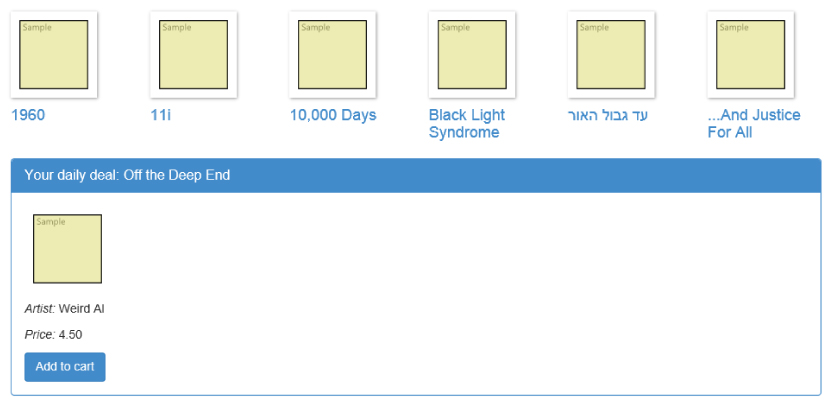
Now when the user clicks the link, an asynchronous request is sent to the DailyDeal action of the HomeController. After the action returns the HTML from a rendered view, the script behind the scenes takes the HTML and replaces the existing dailydeal element in the DOM. Before the user clicks, the bottom of the homepage would look something like Figure 8.4.
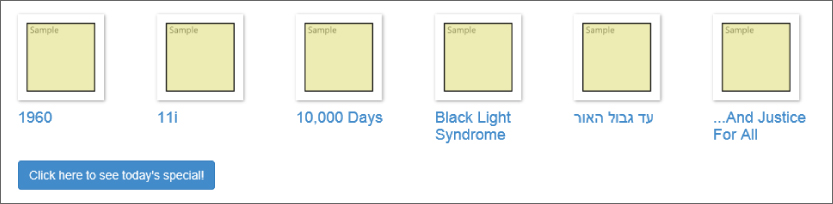
After the user clicks to see the special, the page (without doing a full refresh) will look something like Figure 8.5.
Ajax.ActionLink produces something that will take a response from the server and graft new content directly into a page. How does this happen? The next section covers how the asynchronous action link works behind the scenes.
HTML 5 Attributes
If you look at the rendered markup for the action link, you'll find the following:
<div id="dailydeal">
<a class="btn btn-primary" data-ajax="true" data-ajax-method="GET"
data-ajax-mode="replace" data-ajax-update="#dailydeal"
href="/Home/DailyDeal">
Click here to see today's special!
</a>
</div>The hallmark of unobtrusive JavaScript is not seeing any JavaScript in the HTML, and you certainly have no script code in sight. If you look closely, you'll see all the settings specified in the action link are encoded into the HTML element as attributes, and most of these attributes have a prefix of data- (we say they are data dash attributes).
The HTML 5 specification reserves data dash attributes for private application state. In other words, a web browser does not try to interpret the content of a data dash attribute, so you are free to put your own data inside and the data does not influence the display or rendering of a page. Data dash attributes even work in browsers released before an HTML 5 specification existed. Internet Explorer 6, for example, ignores any attributes it doesn't understand, so data dash attributes are safe in older versions of IE.
The purpose of the jquery.unobtrusive-ajax file you added to the application is to look for specific data dash attributes and then manipulate the element to behave differently. If you know that with jQuery it is easy to find elements, you can imagine a piece of code inside the unobtrusive JavaScript file that looks like the following:
$(function () {
       $("a[data-ajax]=true"). // do something
   });
The code uses jQuery to find all the anchor elements with the attribute data-ajax holding the value true. The data-ajax attribute is present on the elements that need asynchronous behavior. After the unobtrusive script has identified the asynchronous elements, it can read other settings from the element (like the replace mode, the update target, and the HTTP method) and modify the element to behave accordingly (typically by wiring up events using jQuery, and sending off requests using jQuery, too).
All the ASP.NET MVC Ajax features use data dash attributes. By default, this includes the next topic: asynchronous forms.
Ajax Forms
Let's imagine another scenario for the front page of the music store. You want to give the user the ability to search for an artist. Because you need user input, you must place a form tag on the page, but not just any form—an asynchronous form:
<div class="panel panel-default">
    <div class="panel-heading">Artist search</div>
    <div class="panel-body">
        @using (Ajax.BeginForm("ArtistSearch", "Home",
           new AjaxOptions
           {
               InsertionMode = InsertionMode.Replace,
               HttpMethod = "GET",
               OnFailure = "searchFailed",
               LoadingElementId = "ajax-loader",
               UpdateTargetId = "searchresults",
           }))
        {
            <input type="text" name="q" />
            <input type="submit" value="search" />
            <img id="ajax-loader"
                 src="@Url.Content("~/Images/ajax-loader.gif")"
                 style="display:none" />
        }
        <div id="searchresults"></div>
    </div>
</div>
In the form you are rendering, when the user clicks the submit button the browser sends an asynchronous GET request to the ArtistSearch action of the HomeController. Notice you've specified a LoadingElementId as part of the options. The client framework automatically shows this element when an asynchronous request is in progress. You typically put an animated spinner inside this element to let the user know some work is in progress in the background. Also, notice you have an OnFailure option. The options include a number of parameters you can set to catch various client-side events that flow from every Ajax request (OnBegin, OnComplete, OnSuccess, and OnFailure). You can give these parameters the name of a JavaScript function to invoke when the event occurs. For the OnFailure event, you specify a function named searchFailed, so you'll need the following function to be available at run time (perhaps by placing it in your MusicScripts.js file):
function searchFailed() {
   $("#searchresults").html("Sorry, there was a problem with the search.");
}
You might consider catching the OnFailure event because the Ajax helpers all fail silently if the server code returns an error. If users click the search button and nothing happens, they might become confused. By displaying an error message as you do with the previous code, at least they know you tried your hardest!
The output of the BeginForm helper behaves like the ActionLink helper. In the end, when the user submits the form by clicking the submit button, an Ajax request arrives at the server, and the server can respond with content in any format. When the client receives the response, the unobtrusive scripts place the content into the DOM. In this example, you replace an element with the id of searchresults.
For this example, the controller action needs to query the database and render a partial view. Again, you could return plain text, but you want the artists to be in a list, so the action renders a partial view:
public ActionResult ArtistSearch(string q)
{
   var artists = GetArtists(q);
   return PartialView(artists);
}
private List<Artist> GetArtists(string searchString)
{
   return storeDB.Artists
       .Where(a => a.Name.Contains(searchString))
       .ToList();
}
The partial view takes the model and builds the list. This view is named ArtistSearch.cshtml and lives in the Views/Home folder of the project:
@model IEnumerable<MvcMusicStore.Models.Artist>
<div id="searchresults">
<ul>
@foreach (var item in Model) {
<li>@item.Name</li>
}
</ul>
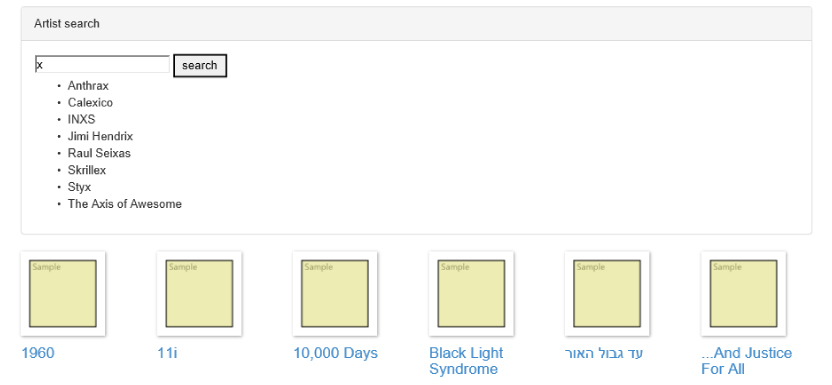
</div>With that in place, running the application now shows an Ajax search form on the home page of the site as you can see in Figure 8.6.
We'll return to this search form later in the chapter to add some additional features. For now, turn your attention to another built-in Ajax feature of the ASP.NET MVC framework—the support for client-side validation.
CLIENT VALIDATION
Client validation for data annotation attributes is on by default with the MVC framework. As an example, look at the Title and Price properties of the Album class:
[Required(ErrorMessage = "An Album Title is required")]
[StringLength(160)]
public string   Title      { get; set; }
[Required(ErrorMessage = "Price is required")]
[Range(0.01, 100.00,
   ErrorMessage = "Price must be between 0.01 and 100.00")]
public decimal Price       { get; set; }
The data annotations make these properties required, and also put in some restrictions on the length and the range of the values the properties hold. The model binder in ASP.NET MVC performs server-side validation against these properties when it sets their values. These built-in attributes also trigger client-side validation. Client-side validation relies on the jQuery Validation plugin.
jQuery Validation
As mentioned earlier, the jQuery Validation plugin (jquery.validate) exists in the Scripts folder of a new MVC 5 application by default. If you want client-side validation, you'll need a reference to the jqueryval bundle to the applicable views. As with other references in this chapter, this reference could be in your _Layout, but you would sacrifice performance by loading the script on all views rather than those that actually require jQuery Validation.
You can see that the jqueryval bundle is included on many of the Account views. For example, the last few lines of /Views/Account/Login.cshtml are as follows:
@section Scripts {
    @Scripts.Render("~/bundles/jqueryval")
}
Looking in /App_Start/BundleConfig.cs, we can see that this bundle includes all scripts matching the pattern ~/Scripts/jquery.validate*.
bundles.Add(new ScriptBundle("~/bundles/jqueryval").Include(
                    "~/Scripts/jquery.validate*"));
This means the bundle will include both jquery.validate.js and jquery.validate.unobtrusive.js—everything you need for unobtrusive validation based on jQuery Validation.
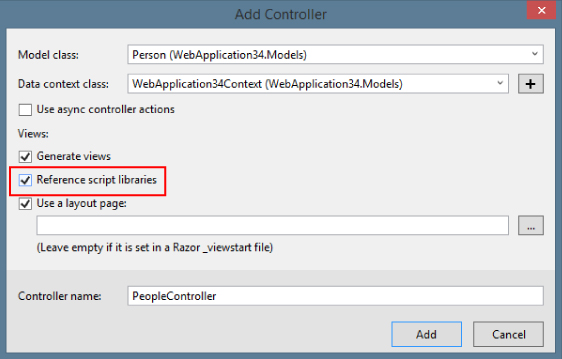
The easiest way to include this script reference is to make sure you select the Reference script libraries checkbox when you scaffold a new controller, as shown in Figure 8.7.
You can add this to any view in your application simply by adding the same script block you just saw at the bottom of the Login.cshtml view:
@section Scripts {
    @Scripts.Render("~/bundles/jqueryval")
}The jqueryval bundle references two scripts.
The first reference is to the minified jQuery Validation plugin. jQuery Validation implements all the logic needed to hook into events (like submit and focus events) and execute client-side validation rules. The plugin provides a rich set of default validation rules.
The second reference is to Microsoft's unobtrusive adapter for jQuery Validation. The code inside this script is responsible for taking the client-side metadata the MVC framework emits and adapting (transforming) the metadata into data. jQuery Validation understands (so it can do all the hard work). Where does the metadata come from? First, remember how you built an edit view for an album? You used EditorForModel inside your views, which uses the Album editor template in the Shared folder. The template has the following code:
<p>
   @Html.LabelFor(model => model.Title)
   @Html.TextBoxFor(model => model.Title)
   @Html.ValidationMessageFor(model => model.Title)
</p>
<p>
   @Html.LabelFor(model => model.Price)
   @Html.TextBoxFor(model => model.Price)
   @Html.ValidationMessageFor(model => model.Price)
</p>
The TextBoxFor helper is the key. The helper builds out inputs for a model based on metadata. When TextBoxFor sees validation metadata, such as the Required and StringLength annotations on Price and Title, it can emit the metadata into the rendered HTML. The following markup is the editor for the Title property:
<input
  data-val="true"
  data-val-length="The field Title must be a string with a maximum length of 160."
  data-val-length-max="160" data-val-required="An Album Title is required"
  id="Title" name="Title" type="text" value="Greatest Hits" />
Once again, you see data dash attributes. It's the responsibility of the jquery.validate.unobtrusive script to find elements with this metadata (starting with data-val="true") and to interface with the jQuery Validation plugin to enforce the validation rules expressed inside the metadata. jQuery Validation can run rules on every keypress and focus event, giving a user instant feedback on erroneous values. The validation plugin also blocks form submission when errors are present, meaning you don't need to process a request doomed to fail on the server.
To understand how the process works in more detail, looking at a custom client validation scenario is useful, as shown in the next section.
Custom Validation
In Chapter 6 you wrote a MaxWordsAttribute validation attribute to validate the number of words in a string. The implementation looked like the following:
public class MaxWordsAttribute : ValidationAttribute
   public MaxWordsAttribute(int maxWords)
       :base("Too many words in {0}")
   {
       MaxWords = maxWords;
   }
   public int MaxWords { get; set; }
   protected override ValidationResult IsValid(
       object value,
       ValidationContext validationContext)
   {
       if (value != null)
       {
           var wordCount = value.ToString().Split(" ").Length;
           if (wordCount > MaxWords)
           {
               return new ValidationResult(
                   FormatErrorMessage(validationContext.DisplayName)
               );
           }
       }
       return ValidationResult.Success;
   }
}
You can use the attribute as the following code demonstrates, but the attribute provides only server-side validation support:
[Required(ErrorMessage = "An Album Title is required")]
[StringLength(160)]
[MaxWords(10)]
public string   Title      { get; set; }
To support client-side validation, you need your attribute to implement an interface, as discussed in the next section.
IClientValidatable
The IClientValidatable interface defines a single method: GetClientValidationRules. When the MVC framework finds a validation object with this interface present, it invokes GetClientValidationRules to retrieve—you guessed it—a sequence of ModelClientValidationRule objects. These objects carry the metadata, or the rules, the framework sends to the client.
You can implement the interface for the custom validator with the following code:
public class MaxWordsAttribute : ValidationAttribute,
       IClientValidatable
{
       public MaxWordsAttribute(int wordCount)
              : base("Too many words in {0}")
       {
              WordCount = wordCount;
       }
       public int WordCount { get; set; }
       protected override ValidationResult IsValid(
              object value,
              ValidationContext validationContext)
       {
              if (value != null)
              {
                    var wordCount = value.ToString().Split(" ").Length;
                    if (wordCount > WordCount)
                    {
                           return new ValidationResult(
                             FormatErrorMessage(validationContext.DisplayName)
                           );
                    }
              }
              return ValidationResult.Success;
       }
              public IEnumerable<ModelClientValidationRule>
                       GetClientValidationRules(
                    ModelMetadata metadata, ControllerContext context)
              {
                    var rule = new ModelClientValidationRule();
                    rule.ErrorMessage =
                      FormatErrorMessage(metadata.GetDisplayName());
                    rule.ValidationParameters.Add("wordcount", WordCount);
                    rule.ValidationType = "maxwords";
                    yield return rule;
       }
}
If you think about the scenario, there are a few pieces of information you would need on the client to run the validation:
- What error message to display if the validation fails
- How many words are allowed
- An identifier for a piece of JavaScript code that can count the words
This information is exactly what the code is putting into the rule that is returned. Notice you can return multiple rules if you need to trigger multiple types of validation on the client.
The code puts the error message into the rule's ErrorMessage property. Doing so allows the server-side error message to exactly match the client-side error message. The ValidationParameters collection is a place to hold parameters you need on the client, like the maximum number of words allowed. You can put additional parameters into the collection if you need them, but the names are significant and have to match names you see in client script. Finally, the ValidationType property identifies a piece of JavaScript code you need on the client.
The MVC framework takes the rules given back from the GetClientValidationRules method and serializes the information into data dash attributes on the client:
<input
  data-val="true"
  data-val-length="The field Title must be a string with a maximum length of 160."
  data-val-length-max="160"
  data-val-maxwords="Too many words in Title"
  data-val-maxwords-wordcount="10"
  data-val-required="An Album Title is required" id="Title" name="Title"
  type="text" value="For Those About To Rock We Salute You" />
Notice how maxwords appears in the attribute names related to the MaxWordsAttribute. The maxwords text appears because you set the rule's ValidationType property to maxwords (and yes, the validation type and all validation parameter names must be lowercase because their values must be legal to use as HTML attribute identifiers).
Now you have metadata on the client, but you still need to write some script code to execute the validation logic.
Custom Validation Script Code
Fortunately, you do not have to write any code that digs out metadata values from data dash attributes on the client. However, you'll need two pieces of script in place for validation to work:
- The adapter: The adapter works with the unobtrusive MVC extensions to identify the required metadata. The unobtrusive extensions then take care of retrieving the values from data dash attributes and adapting the data to a format jQuery Validation can understand.
- The validation rule itself: This is called a validator in jQuery parlance.
Both pieces of code can live inside the same script file. Rather than putting them in a site scripts file (for example, the MusicScripts.js file you created in the section “Custom Scripts” earlier in this chapter), you'll put them in a separate script file. Otherwise, every view that included MusicScripts.js would require the jqueryval bundle. Instead, you'll create a new script file called CustomValidators.js.
The reference to CustomValidators.js must appear after the reference to the jqueryval bundle. Using the scripts section created earlier, you could do this with the following code:
@section Scripts {
    @Scripts.Render("~/bundles/jqueryval")
    <script src="~/Scripts/App/CustomValidators.js"></script>
}
Inside of CustomValidators.js, adding two additional references will give you all the IntelliSense you need. Alternatively, you could add these references to _references.js.
/// <reference path="jquery.validate.js" />
/// <reference path="jquery.validate.unobtrusive.js" />
The first piece of code to write is the adapter. The MVC framework's unobtrusive validation extension stores all adapters in the jQuery.validator.unobtrusive.adapters object. The adapters object exposes an API for you to add new adapters, which are shown in Table 8.2.
Table 8.2 Adapter Methods
| Name | Description |
addBool |
Creates an adapter for a validator rule that is “on” or “off.” The rule requires no additional parameters. |
addSingleVal |
Creates an adapter for a validation rule that needs to retrieve a single parameter value from metadata. |
addMinMax |
Creates an adapter that maps to a set of validation rules—one that checks for a minimum value and one that checks for a maximum value. One or both of the rules may run, depending on the data available. |
add |
Creates an adapter that doesn't fit into the preceding categories because it requires additional parameters or extra setup code. |
For the maximum words scenario, you could use either addSingleVal or addMinMax (or add, because it can do anything). Because you do not need to check for a minimum number of words, you can use the addSingleVal API, as shown in the following code:
/// <reference path="jquery.validate.js" />
/// <reference path="jquery.validate.unobtrusive.js" />
$.validator.unobtrusive.adapters.addSingleVal("maxwords", "wordcount");
The first parameter is the name of the adapter, and must match the ValidationProperty value you set on the server-side rule. The second parameter is the name of the single parameter to retrieve from metadata. Notice you don't use the data- prefix on the parameter name; it matches the name of the parameter you placed into the ValidationParameters collection on the server.
The adapter is relatively simple. Again, the primary goal of an adapter is to identify the metadata that the unobtrusive extensions need to locate. With the adapter in place, you can now write the validator.
All the validators live in the jQuery.validator object. Like the adapters object, the validator object has an API to add new validators. The name of the method is addMethod:
$.validator.addMethod("maxwords", function (value, element, maxwords) {
   if (value) {
       if (value.split(" ").length > maxwords) {
           return false;
       }
   }
   return true;
});
The method takes two parameters:
- The name of the validator, which by convention matches the name of the adapter (which matches the
ValidationTypeproperty on the server). - A function to invoke when validation occurs.
The validator function accepts three parameters and can return true (validation passed) or false (validation failed):
- The first parameter to the function will contain the input value (like the title of an album).
- The second parameter is the input element containing the value to validate (in case the value itself doesn't provide enough information).
- The third parameter will contain all the validation parameters in an array, or in this case, the single validation parameter (the maximum number of words).
The complete code for CustomValidators.js appears as follows:
/// <reference path="jquery.validate.js" />
/// <reference path="jquery.validate.unobtrusive.js" />
$.validator.unobtrusive.adapters.addSingleVal("maxwords", "wordcount");
$.validator.addMethod("maxwords", function (value, element, maxwords) {
if (value) {
if (value.split(" ").length > maxwords) {
return false;
}
}
return true;
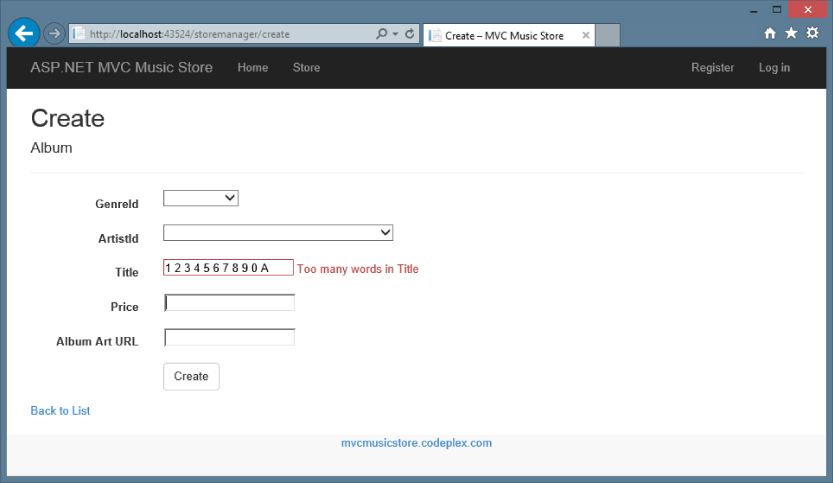
});Now, when you run the application and try to create an album, you'll get Ajax validation as soon as you tab off the Title field, as shown in Figure 8.8.
BEYOND HELPERS
If you send your browser to http://plugins.jquery.com, you'll find thousands of jQuery extensions. Some of these extensions are graphically oriented and can make things explode (in an animated way). Other extensions are widgets like date pickers and grids.
Using a jQuery plugin usually involves downloading the plugin, extracting the plugin, and then adding the plugin to your project. Many of the most popular jQuery plugins are available as NuGet packages (there are 625 jQuery-related packages at the time of this writing), which makes adding the plugin to your project very easy. In addition to at least one JavaScript file, many plugins, particularly the UI-oriented plugins, might also come with images and a style sheet you'll need to use.
Probably the most popular jQuery plugins collection—and not coincidentally, one of the most popular NuGet packages—is jQuery UI. You'll learn about that next.
jQuery UI
jQuery UI is a jQuery plugin that includes both effects and widgets. Like all plugins it integrates tightly with jQuery and extends the jQuery API. As an example, let's return to the first bit of code in this chapter—the code to animate album items on the front page of the store:
$(function () {
   $("#album-list img").mouseover(function () {
       $(this).animate({ height: "+=25', width: "+=25" })
              .animate({ height: "-=25', width: "-=25" });
   });
});
Instead of the verbose animation, let's take a look at how you would use jQuery UI to make the album bounce. The first step is to install the jQuery UI Combined Library NuGet package (Install-Package jQuery.UI.Combined). This package includes the script files (minified and unminified), CSS files, and images used by the core jQueryUI plugins.
Next, you need to include a script reference to the jQuery UI library. You could either add it immediately after the jQuery bundle in the _Layout view, or in an individual view where you'll be using it. Because you're going to use it in your MusicScripts and you want to use those throughout the site, add the reference to the _Layout as shown in the following:
@Scripts.Render("~/bundles/jquery")
@Scripts.Render("~/bundles/bootstrap")
       <script src="~/Scripts/jquery-ui-1.10.3.min.js"></script>
@RenderSection("scripts", required: false)Now you can change the code inside the mouseover event handler:
$(function () {
   $("#album-list img").mouseover(function () {
       $(this).effect("bounce");
   });
});
When users run their mouse across an album image, the album bounces up and down for a short time. As you can see, the UI plugin extended jQuery by giving you additional methods to execute against the wrapped set. Most of these methods take a second options parameter, which allows you to tweak the behavior.
$(this).effect("bounce", { time: 3, distance: 40 });You can find out what options are available (and their default values) by reading the plugin documentation on jQuery.com. Additional effects in jQuery UI include explode, fade, shake, and pulsate.
jQuery UI isn't just about effects and eye candy. The plugin also includes widgets such as accordion, autocomplete, button, datepicker, dialog, progressbar, slider, and tabs. The next section looks at the autocomplete widget as an example.
Autocomplete with jQuery UI
As a widget, autocomplete needs to position new user interface elements on the screen. These elements need colors, font sizes, backgrounds, and all the typical presentation details every user interface element needs. jQuery UI relies on themes to provide the presentation details. A jQuery UI theme includes a style sheet and images. Every new MVC project starts with the “base” theme underneath the Content directory. This theme includes a style sheet (jquery-ui.css) and an images folder full of .png files.
Before you use autocomplete, you can set up the application to include the base theme style sheet by adding it to the layout view:
<head>
    <meta charset="utf-8" />
    <meta name="viewport" content="width=device-width, initial-scale=1.0">
    <title>@ViewBag.Title – MVC Music Store</title>
    @Styles.Render("~/Content/css")
    @Scripts.Render("~/bundles/modernizr")
    <link href="~/Content/themes/base/jquery-ui.css"
          rel="stylesheet"
          type="text/css" />
If you start working with jQuery and decide you don't like the base theme, you can go to http://jqueryui.com/themeroller/ and download any of two dozen or so prebuilt themes. You can also build your own theme (using a live preview) and download a custom-built jquery-ui.css file.
Adding the Behavior
First, remember the artist search scenario you worked on in the section “Ajax Forms” earlier in the chapter? Now, you want the search input to display a list of possible artists when the user starts typing inside the input. You'll need to find the input element from JavaScript and attach the jQuery autocomplete behavior. One approach to do this is to borrow an idea from the MVC framework and use a data dash attribute:
    <input type="text" name="q"
          data-autocomplete-source="@Url.Action("QuickSearch", "Home")" />
The idea is to use jQuery and look for elements with the data-autocomplete-source attribute present. This tells you what inputs need an autocomplete behavior. The autocomplete widget requires a data source it can use to retrieve the candidates for auto completion. Autocomplete can consume an in-memory data source (an array of objects) as easily as it can consume a remote data source specified by a URL. You want to use the URL approach because the number of artists might be too large to reasonably send the entire list to the client. You've embedded the URL that autocomplete should call into the data dash attribute.
In MusicScripts.js, you can use the following code during the ready event to attach autocomplete to all inputs with the data-autocomplete-source attribute:
$("input[data-autocomplete-source]").each(function () {
   var target = $(this);
   target.autocomplete({ source: target.attr("data-autocomplete-source") });
});
The jQuery each function iterates over the wrapped set, calling its function parameter once for each item. Inside the function, you invoke the autocomplete plugin method on the target element. The parameter to the autocomplete method is an options parameter, and unlike most options, one property is required—the source property. You can also set other options, like the amount of delay after a keypress before autocomplete jumps into action and the minimum number of characters needed before autocomplete starts sending requests to the data source.
In this example, you've pointed the source to a controller action. Here's the code again (just in case you forgot):
    <input type="text" name="q"
          data-autocomplete-source="@Url.Action("QuickSearch", "Home")" />
Autocomplete expects to call a data source and receive a collection of objects it can use to build a list for the user. The QuickSearch action of the HomeController needs to return data in a format autocomplete will understand.
Building the Data Source
Autocomplete expects to call a data source and receive objects in JSON format. Fortunately, generating JSON from an MVC controller action is easy, as you'll see soon. The objects must have a property called label, or a property called value, or both a label and a value. Autocomplete uses the label property in the text it shows the user. When the user selects an item from the autocomplete list, the widget places the value of the selected item into the associated input. If you don't provide a label, or don't provide a value, autocomplete will use whichever property is available as both the value and the label.
To return the proper JSON, you implement QuickSearch with the following code:
public ActionResult QuickSearch(string term)
{
   var artists = GetArtists(term).Select(a => new {value = a.Name});
   return Json(artists, JsonRequestBehavior.AllowGet);
}
private List<Artist> GetArtists(string searchString)
{
   return storeDB.Artists
       .Where(a => a.Name.Contains(searchString))
       .ToList();
}
When autocomplete calls the data source, it passes the current value of the input element as a query string parameter named term, so you receive this parameter by having a parameter named term on the action. Notice how you transform each artist into an anonymously typed object with a value property. The code passes the resulting collection into the Json method, which produces a JsonResult. When the framework executes the result, the result serializes the objects into JSON.
The fruits of your labor are shown in Figure 8.9.
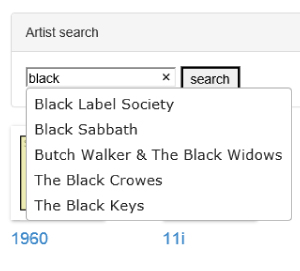
- However, a chance exists that a malicious user can gain access to the JSON payload through a process known as JSON hijacking. You do not want to return sensitive information using JSON in a GET request. For more details, see Phil's post at http://haacked.com/archive/2009/06/25/json-hijacking.aspx.
JSON is not only fantastically easy to create from a controller action, it's also lightweight. In fact, responding to a request with JSON generally results in a smaller payload than responding with the same data embedded into HTML or XML markup. A good example is the search feature. Currently, when the user clicks the search button, you ultimately render a partial view of artists in HTML. You can reduce the amount of bandwidth you use if you return JSON instead.
The classic problem with retrieving JSON from the server is what to do with the deserialized objects. Taking HTML from the server and grafting it into the page is easy. With raw data you need to build the HTML on the client. Traditionally this is tedious, but templates are here to make the job easy.
JSON and Client-Side Templates
There are many JavaScript template libraries to choose from these days. Every library has a slightly different style and syntax, so you can pick the library that suits your tastes. All the libraries provide functionality that is similar to Razor, in the sense that you have HTML markup and then placeholders with special delimiters where the data is to appear. The placeholders are called binding expressions. The following code is an example using Mustache, a template library we will use in this chapter:
<span class="detail">
   Rating: {{AverageReview}}
   Total Reviews: {{TotalReviews}}
</span>
This template would work against an object with AverageReview and TotalReviews properties. When rendering templates with Mustache, the templates place the values for those properties in their proper location. You can also render templates against an array of data. More documentation for Mustache is available at https://github.com/janl/mustache.js.
In the following section, you rewrite the search feature to use JSON and templates.
Adding Templates
You'll add mustache.js to your project as you would expect: by installing the mustache.js NuGet package. You can do that using Install-Package mustache.js or via the Manage NuGet Packages dialog as shown in Figure 8.10.

When NuGet is finished adding the package to the project, you should have a new file, named mustache.js, in your Scripts folder. To begin writing templates, you can include a script reference to Mustache in the layout view:
@Scripts.Render("~/bundles/jquery")
@Scripts.Render("~/bundles/bootstrap")
<script src="~/Scripts/jquery-ui-1.10.3.min.js"></script>
<script src="~/Scripts/mustache.js"></script>
@RenderSection("scripts", required: false)
With the plugin in place, you can start using templates in your search implementation.
Modifying the Search Form
The artist search feature you built in the section “Ajax Forms” earlier in the chapter uses an Ajax helper:
@using (Ajax.BeginForm("ArtistSearch", "Home",
   new AjaxOptions {
    InsertionMode=InsertionMode.Replace,
    HttpMethod="GET",
    OnFailure="searchFailed",
    LoadingElementId="ajax-loader",
    UpdateTargetId="searchresults",
}))
{
   <input type="text" name="q"
          data-autocomplete-source="@Url.Action("QuickSearch", "Home")" />
   <input type="submit" value="search" />
   <img id="ajax-loader"
          src="@Url.Content("~/Content/Images/ajax-loader.gif")"
          style="display:none" />
}
Although the Ajax helper provides a lot of functionality, you're going to remove the helper and start from scratch. jQuery provides various APIs for retrieving data from the server asynchronously. You've been taking advantage of these features indirectly by using the autocomplete widget, and now you'll take a direct approach.
You first want to change the search form to use jQuery directly instead of the Ajax helper, but you'll make things work with the existing controller code (no JSON yet). The new markup inside Index.cshtml looks like the following:
<form id="artistSearch" method="get" action="@Url.Action("ArtistSearch", "Home")">
   <input type="text" name="q"
          data-autocomplete-source="@Url.Action("QuickSearch", "Home")" />
   <input type="submit" value="search" />
   <img id="ajax-loader" src="~/Content/Images/ajax-loader.gif"
        style="display:none"/>
</form>
The only change in the preceding code is that you are building the form tag explicitly instead of using the BeginForm Ajax helper. Without the helper you'll also need to write your own JavaScript code to request HTML from the server. You'll place the following code inside MusicScripts.js:
$("#artistSearch").submit(function (event) {
   event.preventDefault();
   var form = $(this);
   $("#searchresults").load(form.attr("action"), form.serialize());
});
This code hooks the submit event of the form. The call to preventDefault on the incoming event argument is the jQuery technique to prevent the default event behavior from occurring (in this case, prevent the form from submitting itself to the server directly; instead, you'll take control of the request and response).
The load method retrieves HTML from a URL and places the HTML into the matched element (the searchresults element). The first parameter to load is the URL—you are using the value of the action attribute in this example. The second parameter is the data to pass in the query string. The serialize method of jQuery builds the data for you by taking all the input values inside the form and concatenating them into a string. In this example you only have a single text input, and if the user enters black in the input, serialize uses the input's name and value to build the string “q=black".
Getting JSON
You've changed the code, but you are still returning HTML from the server. Let's change the ArtistSearch action of the HomeController to return JSON instead of a partial view:
public ActionResult ArtistSearch(string q)
{
   var artists = GetArtists(q);
   return Json(artists, JsonRequestBehavior.AllowGet);
}
Now you'll need to change the script to expect JSON instead of HTML. jQuery provides a method named getJSON that you can use to retrieve the data:
$("#artistSearch").submit(function (event) {
   event.preventDefault();
   var form = $(this);
   $.getJSON(form.attr("action"), form.serialize(), function (data)
       // now what?
   });
});
The code didn't change dramatically from the previous version. Instead of calling load, you call getJSON. The getJSON method does not execute against the matched set. Given a URL and some query string data, the method issues an HTTP GET request, deserializes the JSON response into an object, and then invokes the callback method passed as the third parameter. What do you do inside of the callback? You have JSON data—an array of artists—but no markup to present the artists. This is where templates come into play. A template is markup embedded inside a script tag. The following code shows a template, as well as the search result markup where the results should display:
<script id="artistTemplate" type="text/html">
    <ul>
        {{#artists}}
            <li>{{Name}}</li>
        {{/artists}}
   </ul>
</script>
<div id="searchresults">
</div>
Notice that the script tag is of type text/html. This type ensures the browser does not try to interpret the contents of the script tag as real code. The {{#artists}} expression tells the template engine to loop through an array named artists on the data object you'll use to render the template. The {{Name}} syntax is a binding expression. The binding expression tells the template engine to find the Name property of the current data object and place the value of the property between <li> and </li>. The result will make an unordered list from JSON data. You can include the template directly below the form, as shown in the following code:
<form id="artistSearch" method="get" action="@Url.Action("ArtistSearch", "Home")">
       <input type="text" name="q"
              data-autocomplete-source="@Url.Action("QuickSearch", "Home")" />
       <input type="submit" value="search" />
       <img id="ajax-loader"
              src="@Url.Content("~/Content/Images/ajax-loader.gif")"
              style="display:none" />
</form>
<script id="artistTemplate" type="text/html">
       <ul>
             {{#artists}}
             <li>{{Name}}</li>
             {{/artists}}
       </ul>
</script>
<div id="searchresults"></div>
To use the template, you need to select it inside the getJSON callback and tell Mustache to render the template into HTML:
$("#artistSearch").submit(function(event) {
    event.preventDefault();
    var form = $(this);
    $.getJSON(form.attr("action"), form.serialize(), function(data) {
        var html = Mustache.to_html($("#artistTemplate").html(),
                     { artists: data });
        $("#searchresults").empty().append(html);
    });
});
The to_html method of Mustache combines the template with the JSON data to produce markup. The code takes the template output and places the output in the search results element.
Client-side templates are a powerful technology, and this section only scratches the surface of the template engine features. However, the code is not on a par with the behavior of the Ajax helper from earlier in the chapter. If you remember from the “Ajax Helpers” section earlier in the chapter, the Ajax helper had the ability to call a method if the server threw an error. The helper also turned on an animated gif while the request was outstanding. You can implement all these features, too; you just have to remove one level of abstraction.
jQuery.ajax for Maximum Flexibility
When you need complete control over an Ajax request, you can turn to the jQuery ajax method. The ajax method takes an options parameter where you can specify the HTTP verb (such as GET or POST), the timeout, an error handler, and more. All the other asynchronous communication methods you've seen (load and getJSON) ultimately call down to the ajax method.
Using the ajax method, you can achieve all the functionality you had with the Ajax helper and still use client-side templates:
$("#artistSearch").submit(function (event) {
    event.preventDefault();
    var form = $(this);
    $.ajax({
        url: form.attr("action"),
        data: form.serialize(),
        beforeSend: function () {
            $("#ajax-loader").show();
        },
        complete: function () {
            $("#ajax-loader").hide();
        },
        error: searchFailed,
        success: function (data) {
            var html = Mustache.to_html($("#artistTemplate").html(),
                                        { artists: data });
            $("#searchresults").empty().append(html);
        }
    });
});
The call to ajax is verbose because you customize quite a few settings. The url and data properties are just like the parameters you passed to load and getJSON. What the ajax method gives you is the ability to provide callback functions for beforeSend and complete. You will respectively show and hide the animated, spinning gif during these callbacks to let the user know a request is outstanding. jQuery will invoke the complete callback even if the call to the server results in an error. Of the next two callbacks, error and success, however, only one can win. If the call fails, jQuery calls the searchFailed error function you already defined in the “Ajax Forms” section. If the call succeeds, you will render the template as before.
Running the application shows you exactly the same thing you saw when you implemented Ajax forms, as shown earlier in Figure 8.6. So, what's the point? Well, instead of sending a request to the server and getting back a big block of HTML that's inserted into the page, you get back some data in lightweight JSON format that's rendered using a client-side template. You've cut down on bandwidth and offloaded rendering from your server to your users' more-than-capable browsers.
Bootstrap Plugins
The new Bootstrap-based ASP.NET project templates include several other useful jQuery plugins, covering things such as modal dialogs, tooltips, and carousels. These integrate with the Bootstrap classes and follow the unobtrusive pattern you saw earlier.
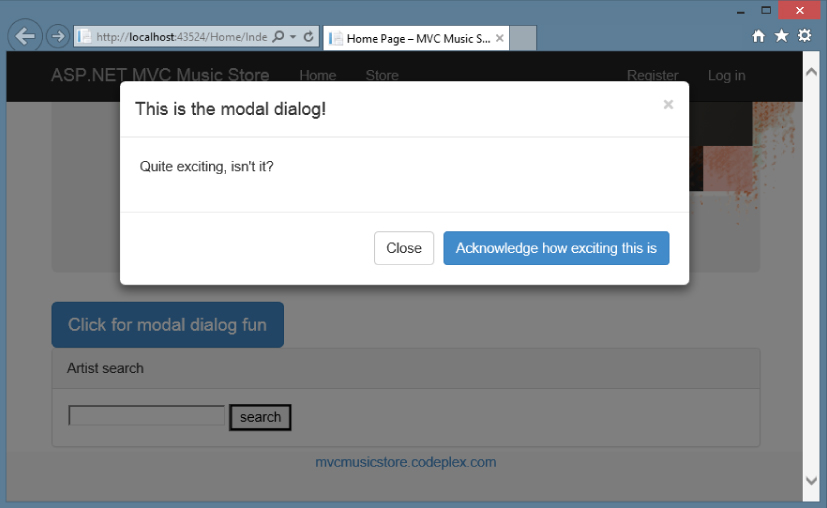
For example, you can add a modal dialog that launches by clicking a button just by adding the following HTML:
<!-- Button trigger modal -->
<button class="btn btn-primary btn-lg" data-toggle="modal" data-target="#myModal">
    Click for modal dialog fun
</button>
<!-- Modal dialog -->
<div class="modal fade" id="myModal" tabindex="-1" role="dialog"
             aria-labelledby="myModalLabel" aria-hidden="true">
    <div class="modal-dialog">
        <div class="modal-content">
            <div class="modal-header">
                <button type="button" class="close" data-dismiss="modal"
                    aria-hidden="true">×</button>
                <h4 class="modal-title" id="myModalLabel">
                    This is the modal dialog!</h4>
            </div>
            <div class="modal-body">
                Quite exciting, isn't it?
            </div>
            <div class="modal-footer">
                <button type="button" class="btn btn-default"
                    data-dismiss="modal">Close</button>
                <button type="button" class="btn btn-primary">
                    Acknowledge how exciting this is</button>
            </div>
        </div>
    </div>
</div>
Clicking the button displays a dialog, as shown in Figure 8.11.
These plugins are well documented on the Bootstrap page, and include nice in-page demonstrations so you can see example HTML and interact with it in the page. Find out more about the Bootstrap plugins here: http://getbootstrap.com/javascript/.
IMPROVING AJAX PERFORMANCE
When you start sending large amounts of script code to the client, you have to keep performance in mind. Many tools are available you can use to optimize the client-side performance of your site, including YSlow for Firebug (see http://developer.yahoo.com/yslow/) and the developer tools for Internet Explorer (see http://msdn.microsoft.com/en-us/library/bg182326.aspx). This section provides a few performance tips.
Using Content Delivery Networks
Although you can certainly work with jQuery by serving the jQuery scripts from your own server, you might instead consider sending a script tag to the client that references jQuery from a content delivery network (CDN). A CDN has edge-cached servers located around the world, so there is a good chance your client will experience a faster download. Because other sites will also reference jQuery from CDNs, the client might already have the file cached locally. Plus, it's always great when someone else can save you the bandwidth cost of downloading scripts.
Microsoft is one such CDN provider you can use. The Microsoft CDN hosts all the files used in this chapter. If you want to serve jQuery from the Microsoft CDN instead of your server, you can use the following script tag:
<script src="//ajax.aspnetcdn.com/ajax/jQuery/jquery-1.10.2.min.js"
type="text/javascript"></script>- Note that the previous script source URL starts with two slashes, omitting the usual
http:orhttps:you're familiar with. This is a relative reference and is defined according to RFC 3986 (http://tools.ietf.org/html/rfc3986#section-4.2). It's perfectly legal, and it's not just a neat trick—it's a really good idea when you're requesting scripts from a CDN so your references will work regardless of whether your page uses HTTP or HTTPS. If you use an HTTP script reference from an HTTPS page, your users might get a mixed content warning due to the requesting of HTTP content from an HTTPS page.
You can find a list of supported scripts and script versions on the Microsoft CDN at http://www.asp.net/ajaxlibrary/CDN.ashx.
Script Optimizations
Many web developers do not use script tags inside the head element of a document. Instead, they place script tags as close as possible to the bottom of a page. The problem with placing script tags inside the <head> tag at the top of the page is that when the browser comes across a script tag, it blocks other downloads until after it retrieves the entire script. This blocking behavior can make a page load slowly. Moving all your script tags to the bottom of a page (just before the closing body tag) yields a better experience for the user.
Another optimization technique for scripts is to minimize the number of script tags you send to a client. You have to balance the performance gains of minimizing script references versus caching individual scripts, but the tools mentioned earlier, like YSlow, can help you make the right decisions. ASP.NET MVC 5 has the ability to bundle scripts, so you can combine multiple script files into a single download for the client. MVC 5 can also minify scripts on the fly to produce a smaller download.
Bundling and Minification
Bundling and minification features are provided by classes in the System.Web.Optimization namespace. As the namespace implies, these classes are designed to optimize the performance of a web page by minifying files (reducing their size) and bundling files (combining multiple files into a single download). The combination of bundling and minification generally decreases the amount of time needed to load a page into the browser.
When you create a new ASP.NET MVC 5 application, you'll find bundles are automatically configured for you during application startup. The configured bundles will live in a file named BundleConfig.cs in the App_Start folder of a new project. Inside is code like the following to configure script bundles (JavaScript) and style bundles (CSS):
bundles.Add(new ScriptBundle("~/bundles/jquery").Include(
                    "~/Scripts/jquery-{version}.js"));
bundles.Add(new ScriptBundle("~/bundles/jqueryval").Include(
                    "~/Scripts/jquery.validate*"));
bundles.Add(new StyleBundle("~/Content/css").Include(
               "~/Content/bootstrap.css",
               "~/Content/site.css"));
A script bundle is a combination of a virtual path (such as ~/bundles/jquery, which is the first parameter to the ScriptBundle constructor) and a list of files to include in the bundle. The virtual path is an identifier you'll use later when you output the bundle in a view. The list of files in a bundle can be specified using one or more calls to the Include method of a bundle, and in the call to include you can specify a specific filename or a filename with a wildcard to specify multiple files at once.
In the previous code, the file specifier ~/Scripts/jquery.validate* tells the run time to include all the scripts matching that pattern, so it picks up both jquery.validate.js and jquery.validate.unobtrusive.js. The run time is smart enough to differentiate between minified and unminified versions of a JavaScript library based on standard JavaScript naming conventions. It also automatically ignores files that include IntelliSense documentation or source map information. You can create and modify your own bundles in BundleConfig.cs. Custom bundles can include custom minification logic, which can do quite a bit—for example, it takes a few lines of code and a NuGet package to create a custom bundle that compiles CoffeeScript to JavaScript, then passes it to the standard minification pipeline.
After you have bundles configured, you can render the bundles with Scripts and Styles helper classes. The following code outputs the jQuery bundle and the default application style sheet:
@Scripts.Render("~/bundles/jquery")
@Styles.Render("~/Content/css")
The parameter you pass to the Render methods is the virtual path used to create a bundle. When the application is running in debug mode (specifically, the debug flag is set to true in the compilation section of web.config), the script and style helpers render a script tag for each individual file registered in the bundle. When the application is running in release mode, the helpers combine all the files in a bundle into a single download and place a single link or script element in the output. In release mode, the helpers also minify files by default to reduce the download size.
SUMMARY
This chapter was a whirlwind tour of Ajax features in ASP.NET MVC 5. As you now should know, these features rely heavily on the open source jQuery library, as well as some popular jQuery plugins.
The key to success with Ajax in ASP.NET MVC 5 is in understanding jQuery and making jQuery work for you in your application. Not only is jQuery flexible and powerful, but it also allows you to separate your script code from your markup and write unobtrusive JavaScript. The separation means you can focus on writing better JavaScript code and embracing all the power jQuery has to offer.
This chapter also looked at using client-side templates and serving JSON from a controller action. Although you can produce JSON from a controller action easily, you could also use the Web API to serve JSON. Web API includes some additional features and flexibility when it comes to building web services that produce data. You find out more about the Web API in Chapter 11.
Some applications rely almost completely on JavaScript interactions with backend services with infrequent or no page requests. This style of application is referred to as a single page application or SPA. You'll learn more about SPAs in Chapter 12.