
CMSs make publishing to the Web significantly easier than traditional media, but that is only half the picture. One of the biggest advantages of web publishing is that you can enable your readers to search the content, be updated when the content changes, and even manipulate the data (with proper security measures, of course).
In this chapter, you will create a search engine for your CMS project using Zend_Search_Lucene. This framework component greatly simplifies indexing and searching site content. Then you will work with Zend_Feed, creating an RSS feed that your site visitors can subscribe to. Once this is done you will create an API for your CMS project that will allow other sites to access your content.
Zend Framework includes a version of the Lucene search engine that is so easy to use that I rarely build anything without it. Lucene is a full text search engine that was originally developed in Java and has been ported to a number of different languages. In this section you will use it to implement the default search engine for all of the content served by your CMS.
Before you get started, it makes sense to take a moment and go over what Zend_Search_Lucene does and does not do. It does provide a very straightforward way to build and search indexes of content. It does not automatically index your site like a search engine spider would. You have to manually add items to the index, but this extra step gives you a great deal of flexibility; you can build an index from virtually any data source.
A Zend_Search_Lucene search index consists of documents, which in turn have fields containing searchable content. I often compare these to database tables, rows, and columns when explaining how to index content.
Creating a new search index is a simple process. Zend_Search_Lucene has a static create method, to which you pass the path to the directory where the index will be stored.
Zend_Search_Lucene uses documents as the container for your searchable content. To create a new document, you instantiate the Zend_Search_Lucene_Document class.
You add fields to the document using the addField() method. There are five types of fields: keyword, un-indexed, binary, text, and un-stored. Each of these types of fields has a combination of the following attributes:
Stored fields: These fields are stored in the index and returned with the search results.
Indexed: These fields are indexed and searchable.
Tokenized: These fields are split into individual words.
Binary: These fields can store binary data.
Table 9-1 describes the fields and their attributes.
The first step for adding the search functionality to your CMS is creating a new controller for it. You can create the controller using the Zend_Tool command in Listing 9-1.
This command will create the search controller and its associated views.
Before you can access the search controller you need to add it to the ACL plug-in you created earlier. The first step is to add a resource to ACL for the search controller. So open library/CMS/Controller/Plugin/Acl.php and add a new resource for the search controller, as shown in Listing 9-2.
Example 9.2. Adding the Resource for the Search Controller to library/CMS/Controller/Plugin/Acl.php
$acl->add(new Zend_Acl_Resource('search'));The search controller will have two actions: the build action that will rebuild the search index and the index action that will perform a search and render the results. Everyone should be able to search the site, but only administrators should be able to rebuild the search index. Allow guests to access the index action, as shown in Listing 9-3.
The next thing you need to do is create a folder for the index to reside in. Create a new folder in the application folder named indexes.
Next you need to create an action in the search controller that will build the search index. Create a new action in the search controller named build. You can do this using Zend_Tool with the command shown in Listing 9-4.
Example 9.4. Creating the Build Action in the Search Controller with Zend_Tool
zf create action build searchNow open the search controller, and locate the buildAction() method. The first thing you need to do in the buildAction() method is to create the search index, which you can do with the Zend_Search_Lucene::create() method.
Once you have the index, you need to load it with the site content. Fetch all the pages from the Model_Page() model. Then create a CMS_Content_Item_Page object for each page. Next create a new document and add the page ID, headline, description, and content to it. Once the document is loaded add it to the index.
The final step is optimizing the index and passing data about the index to the view to report. You can see the completed buildAction() method in Listing 9-5.
Example 9.5. Building the Search Index in the buildAction() of the SearchController in application/controllers/SearchController.php
public function buildAction(){// create the index$index = Zend_Search_Lucene::create(APPLICATION_PATH . '/indexes'),// fetch all of the current pages$mdlPage = new Model_Page();$currentPages = $mdlPage->fetchAll();if($currentPages->count() > 0) {
// create a new search document for each pageforeach ($currentPages as $p) {$page = new CMS_Content_Item_Page($p->id);$doc = new Zend_Search_Lucene_Document();// you use an unindexed field for the id because you want the id// to be included in the search results but not searchable$doc->addField(Zend_Search_Lucene_Field::unIndexed('page_id',$page->id));// you use text fields here because you want the content to be searchable// and to be returned in search results$doc->addField(Zend_Search_Lucene_Field::text('page_name',$page->name));$doc->addField(Zend_Search_Lucene_Field::text('page_headline',$page->headline));$doc->addField(Zend_Search_Lucene_Field::text('page_description',$page->description));$doc->addField(Zend_Search_Lucene_Field::text('page_content',$page->content));// add the document to the index$index->addDocument($doc);}}// optimize the index$index->optimize();// pass the view data for reporting$this->view->indexSize = $index->numDocs();}
Now that the buildAction() is complete, you need to update the view script that Zend_Tool created. This view script should display a headline, a confirmation message, and how many pages are in the index, as shown in Listing 9-6.
Example 9.6. The Build View Script in application/views/scripts/search/build.phtml
<h2>Build Search Index</h2><p>You have successfully built the site search index.</p><p>Total pages indexed: <?php echo $this->indexSize; ?></p>
The final step for index management is to add a link to the admin menu. I created one with the label Rebuild Search Index that points to the /search/build URL.
Now that you have an up-to-date search index, you are ready to wire up the site search.
The first thing you are going to need is a search form. Create a new file in application/forms named SearchForm.php. Then create a class in the SearchForm.php file named Form_SearchForm, which extends Zend_Form. Zend_Form runs a method called init() when it is constructed; this is where you build the form. Add a field for the search keywords and a submit button to the form, as shown in Listing 9-7.
Example 9.7. The Search Form in application/forms/Search.php
<?phpclass Form_SearchForm extends Zend_Form{public function init(){// create new element$query = $this->createElement('text', 'query'),// element options$query->suserinput('Keywords'),$query->setRequired(true);$query->setAttrib('size',20);// add the element to the form$this->addElement($query);$submit = $this->createElement('submit', 'search'),$submit->setLabel('Search Site'),$submit->setDecorators(array('ViewHelper'));$this->addElement($submit);}}
Now you need to add the search form to the site. The search form should be on all the pages, so you need to add it to the layout file. Open the site layout script and locate the sidebar. Add the block that is in Listing 9-8 to the top of the sidebar.
The search form posts to the search controller's index action, which Zend_Tool created when it created the controller. Now you need to update this action to fetch the search keywords from the request object. Then you need to parse the query, which you can do automatically with the Zend_Search_Lucene_Search_QueryParser. Next open the search index and run the search. Finally, you pass the search results to the view to render, as shown in Listing 9-9.
Example 9.9. The Updated indexAction() in application/controllers/SearchController.php
public function indexAction(){if($this->_request->isPost()) {$keywords = $this->_request->getParam('query'),$query = Zend_Search_Lucene_Search_QueryParser::parse($keywords);$index = Zend_Search_Lucene::open(APPLICATION_PATH . '/indexes'),$hits = $index->find($query);$this->view->results = $hits;$this->view->keywords = $keywords;}else{$this->view->results = null;}}
Now you need to update the view script that was created for the index action of the search controller. Start by adding a headline. Then check to confirm that there are search results to render. Next let the user know how many results their search returned, and render each result, as shown in Listing 9-10.
Example 9.10. Rendering the Search Results in application/views/scripts/search/index.phtml
<h2>Search Results</h2><?php if(is_array($this->results) && count($this->results) > 0) { ?><p>Your search for <em><?php echo $this->keywords; ?></em> returned <?php echocount($this->results); ?> results.</p><?php foreach ($this->results as $result) { ?><h3><a href='/page/open/title/<?php echo $result->page_name; ?>'><?php echo$result->page_headline; ?></a></h3><p><?php echo $result->page_description; ?></p><?php }} else {?><p>Your search did not return any results</p><?php }?>
Now you should be able to test the site search. First go to http://localhost/search/build to rebuild the search index. Enter a search term (or terms) in the search form and click Submit Search. You should see something like Figure 9-1.

Zend_Feed provides an interface for RSS and Atom feeds. It has methods to consume feeds as well as create them. In this section you will create an RSS feed for your CMS project that will publish a list of recent pages.
The "what's new" feed will publish a list of the 10 newest pages. To get started, create a controller for the feeds called feed. You can do this with Zend_Tool using the command shown in Listing 9-11.
Next create an action for the feed named rss. Listing 9-12 shows the Zend_Tool command to do this.
Now you'll update your ACL plug-in, granting everyone access to the feed controller. First create the feed resource (Listing 9-13).
Example 9.13. Adding the Feed Resource to the ACL Plug-in in library/CMS/Controller/Plugin/Acl.php
$acl->add(new Zend_Acl_Resource('feed'));Then grant guests access to the feed resource without specifying which actions they have access to, as shown in Listing 9-14.
Building a feed with Zend_Feed is a trivial task. You simply create an array with the feed data, add each entry, and then call the send() method, which sets the proper headers and renders the XML.
The first thing you need to do is open the feed controller and locate the RSS action. Then create the feed array and set the feed title, link, published timestamp, and character set (see Listing 9-15). You can add a number of other optional elements to the feed itself; refer to the Zend Framework web site for a complete list.
Example 9.15. Creating the Feed Array in the RSS Action of the Feed Controller in application/controllers/FeedController.php
// build the feed array$feedArray = array();// the title and link are required$feedArray['title'] = 'Recent Pages';$feedArray['link'] = 'http://localhost';// the published timestamp is optional$feedArray['published'] = Zend_Date::now()->toString(Zend_Date::TIMESTAMP);// the charset is required$feedArray['charset'] = 'UTF8';
Now that you have created the feed array you need to fetch the recent pages and add each page to the feed. You do this by loading an array of entries and adding this to the feed array, as shown in Listing 9-16.
Example 9.16. Adding the Recent Pages to the Feed in the RSS Action of the Feed Controller in application/controllers/FeedController.php
// first get the most recent pages$mdlPage = new Model_Page();$recentPages = $mdlPage->getRecentPages();//add the entriesif(is_array($recentPages) && count($recentPages) > 0) {foreach ($recentPages as $page) {// create the entry$entry = array();$entry['guid'] = $page->id;$entry['title'] = $page->headline;$entry['link'] = 'http://localhost/page/open/title/' . $page->name;$entry['description'] = $page->description;$entry['content'] = $page->content;// add it to the feed$feedArray['entries'][] = $entry;}}
Once you have built the feed array it is a trivial task to create the feed. You simply call the Zend_Feed::importArray() method, which you pass the array and the protocol to use. Then disable the layout and view renderer, and you are ready to send the feed, as shown in Listing 9-17.
Example 9.17. Rendering the Feed in the RSS Action of the Feed Controller in application/controllers/FeedController.php
// create an RSS feed from the array$feed = Zend_Feed::importArray($feedArray, 'rss'),// now send the feed$this->_helper->viewRenderer->setNoRender();$this->_helper->layout->disableLayout();$feed->send();
Now that you have an RSS feed you need to let your site visitors know about it. Create a new box on the sidebar for the feed and add a link that points to /feed/rss, as shown in Listing 9-18.
Example 9.18. The feed Block to Add to application/layouts/scripts/layout.phtml
<div id="feeds"><h2>Feeds</h2><p><a href='/feed/rss'>Click Here</a> to subscribe to our RSS feed.</p></div>
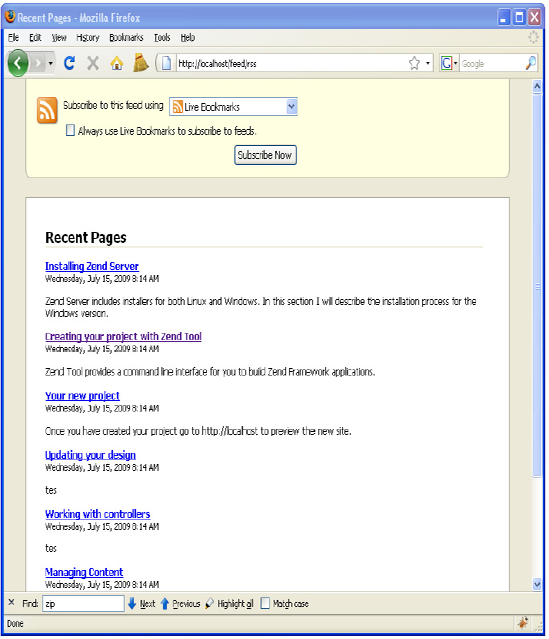
Now when you click on this link your browser should load the RSS, as shown in Figure 9-2.
Zend Framework includes a number of components that enable you to work with existing web services as well as create your own.
Zend_Service provides a straightforward interface to a number of popular web services. These include Amazon, Flickr, Twitter, and Yahoo. The framework also features tight integration with a number of Google's services using the Zend_Gdata component.
REST is arguably the simplest web service protocol. REST web services generally use arguments from URL parameters (a GET request), and they use POST to return the data.
The Zend_Rest component includes client and server functionality, making creating and interacting with REST web services a very straightforward process. In this section, you will create an API for the CMS project, which will enable other developers to interact with it directly. The API will contain methods to do the following:
Search pages
Create a new page
Update an existing page
Delete a page
The first thing you need to do is create the base class that will contain the methods that the service will expose. To get started create a file in the library/CMS folder named Api.php. Then create a class in the file named CMS_Api, as shown in Listing 9-19.
It is very important that you secure your CMS project's API prior to deploying it to a public server. You can do this in a number of ways, but for the time being, the CMS_Api class will handle authentication. It will do so by validating an API key, which you can hard-code for now.
Add a new protected method called _validateKey() to the CMS_Api class. This method should accept a single argument, the API key to validate. Validate the API key in the method and return true if it passes and false if not (see Listing 9-20).
The search method will be very similar to the index action of the search controller.
Create a new method in the CMS_Api class called search(). Then parse the query and run the search.
Once you have run the search you start building the response array. You can add whatever information you need to here, but for now it just needs to return the keywords you searched for, the number of hits, and the page for each hit. Now you return the response array for Zend_Rest to handle, as shown in Listing 9-21.
Example 9.21. The search() Method of the CMS_Api Class in library/CMS/Api.php
public function search($apiKey, $keywords){if(!$this->_validateKey($apiKey)) {return array('error' => 'invalid api key', 'status' => false);}// fetch the index and run the search$query = Zend_Search_Lucene_Search_QueryParser::parse($keywords);$index = Zend_Search_Lucene::open(APPLICATION_PATH . '/indexes'),$hits = $index->find($query);// build the response arrayif(is_array($hits) && count($hits) > 0) {$response['hits'] = count($hits);foreach ($hits as $page) {$pageObj = new CMS_Content_Item_Page($page->page_id);$response['results']['page_' . $page->page_id] = $pageObj->toArray();}} else {$response['hits'] = 0;}}
Add a new method to the CMS_Api class called createPage(). The create page method creates a new instance of the CMS_Content_Item_Page object, which it loads with the data that was passed to the method. It then saves the new page and converts the page object into an array to return, as shown in Listing 9-22.
Example 9.22. The createPage() Method of the CMS_Api Class in library/CMS/Api.php
public function createPage($apiKey, $name, $headline, $description, $content){if(!$this->_validateKey($apiKey)) {return array('error' => 'invalid api key', 'status' => false);}
// create a new page item$itemPage = new CMS_Content_Item_Page();$itemPage->name = $name;$itemPage->headline = $headline;$itemPage->description = $description;$itemPage->content = $content;// save the content item$itemPage->save();// return the page as an array, which Zend_Rest will convert into the XML responsereturn $itemPage->toArray();}
Add a new method to the CMS_Api class named updatePage(). The update page method creates a new instance of the CMS_Content_Item_Page object, which it passes the page id to. The page object then loads the page and its content. Then it updates the page ID, saves the changes, and converts the page object into an array to return, as shown in Listing 9-23.
Example 9.23. The updatePage() Method of the CMS_Api Class in library/CMS/Api.php
public function updatePage($apiKey, $id, $name, $headline, $description, $content){if(!$this->_validateKey($apiKey)) {return array('error' => 'invalid api key', 'status' => false);}// open the page$itemPage = new CMS_Content_Item_Page($id);// update it$itemPage->name = $name;$itemPage->headline = $headline;$itemPage->description = $description;$itemPage->content = $content;// save the content item$itemPage->save();// return the page as an array, which Zend_Rest will convert into the XML responsereturn $itemPage->toArray();}
Add a new method to the CMS_Api class called deletePage(). The delete page method will load a CMS_Content_Item_Page with the ID that was passed to it. If it is successful it needs to delete the page and return true; if not, then it returns false, as shown in Listing 9-24.
Example 9.24. The deletePage() Method of the CMS_Api Class in library/CMS/Api.php
public function deletePage($apiKey, $id){if(!$this->_validateKey($apiKey)) {return array('error' => 'invalid api key', 'status' => false);}// open the page$itemPage = new CMS_Content_Item_Page($id);if($itemPage) {$itemPage->delete();return true;}else{return false;}}
Now that the underlying class is in place, it is very easy to create a REST server. Note that Zend Framework's REST service expects standard URL parameters, so the most straightforward way to create this server is to create a standalone file for it. Create a new file in the public directory called Api.php. Note that since this file exists on the file system, the .htaccess rewrite rules will map directly to it rather than rerouting the request to the index.php file.
The API file set up the application much like the index.php file, but it does not run the application. Instead, it creates a new instance of Zend_Rest_Server, which it passes the name of the CMS_Api class. Then it calls the server's handle() method, which does all the rest of the work for you, as shown in Listing 9-25.
Example 9.25. Creating the REST Server in public/Api.php
<?php// Define path to application directorydefined('APPLICATION_PATH')|| define('APPLICATION_PATH', realpath(dirname(__FILE__) . '/../application'));// Define application environmentdefined('APPLICATION_ENV')|| define('APPLICATION_ENV', (getenv('APPLICATION_ENV') ? getenv('APPLICATION_ENV') :'production'));
// Ensure library/ is on include_pathset_include_path(implode(PATH_SEPARATOR, array(realpath(APPLICATION_PATH . '/../library'),get_include_path(),)));/** Zend_Application */require_once 'Zend/Application.php';// Create application, bootstrap, and run$application = new Zend_Application(APPLICATION_ENV,APPLICATION_PATH . '/configs/application.ini');$application->bootstrap();// now create the service$server = new Zend_Rest_Server();$server->setClass('CMS_Api'),$server->handle();
Now that the API is completed it is time to test it. Keep in mind that the API follows the REST protocol, rather than the standard Zend Framework URLs.
Start by testing the search functionality. Point your browser to the following URL: http://localhost/Api.php?method=search&apiKey=test&keywords=zend. The API should return your search results as a neatly formed XML response, as shown in Listing 9-26.
Example 9.26. The Search Method Response
<cms_api generator="zend" version="1.0"><search><hits>1</hits><results><page_{guid}><id>guid</id><name>name</name><headline>headline</headline><image>image path</image><description>description text</description><content>content text</content><parent_id>0</parent_id></page_{guid}></results>
<status>success</status></search></cms_api>
Now test creating a page. Point your browser to http://localhost/Api.php?method=createPage&apiKey=test&name=test%20name&headline=test%20headline&description=test%20description&content=test%20content. The API should create the new page, and return it as the response, as shown in Listing 9-27.
Example 9.27. The Create Page Method Response
<cms_api generator="zend" version="1.0"><createpage><id>12</id><name>test name</name><headline>test headline</headline><image /><description>test description</description><content>test content</content><parent_id>0</parent_id><status>success</status></createpage></cms_api>
Now update the page you just created. The update method is very similar to the create method, with the exception that you need to pass it the ID of the page to update. Point your browser to http://localhost/Api.php?method=updatePage&apiKey=test&id=12&name=new-name&headline=new-headline&description=new-description&content=new-content. The API will update the page and return it as the response, as shown in Listing 9-28.
Example 9.28. The Update Page Method Response
<cms_api generator="zend" version="1.0"><updatepage><id>12</id><name>new-name</name><headline>new-headline</headline><image /><description>new-description</description><content>new-content</content><parent_id>0</parent_id><status>success</status></updatepage></cms_api>
The final method to test is the delete method. You pass the delete method the id of the page to delete. Point your browser to http://localhost/Api.php?method=deletePage&apiKey=test&id=12. The API should delete the page and return a 1 as the response if it is deleted successfully, as shown in Listing 9-29.
In this chapter, you first learned the basics of how Zend_Search_Lucene works. You then added search functionality to the CMS project, including building the index, searching it, and rendering the results.
After adding search to the CMS, you learned about working with feeds and Zend Framework, adding a "what's new" feed to the project.
Once the feed was set up, you learned about working with web services and ZF, exposing some of the basic CMS functionality as a REST service.