
When working with JavaScript in the browser, the first and most important subject to learn is the DOM and its relationship to the JavaScript language. In fact, the bulk of the work done with browser-based JavaScript belongs to the category of DOM Scripting, a fancy term that basically means programming the DOM.
In this chapter, we'll learn about the DOM Tree, which is the representation of the HTML document as an object, and how to manipulate it through MooTools' DOM API. We'll also learn about the Element and Elements types, the two main type objects MooTools uses to add functionality to elements in the DOM Tree.
This chapter will guide you through the basics of DOM Scripting, and the concepts you learn here will be applied throughout the rest of the book. So if you're ready, let's start our exploration of the DOM.
We learned in the previous chapter that after it downloads an HTML resource, the browser starts parsing the HTML markup to turn it into a DOM Tree. This special data structure is used for some internal preprocessing involving calculations related to how the page will eventually be rendered, but it's used for other things as well. In particular, the DOM Tree is also eventually used to create an object that will be exposed to JavaScript as part of an API, which we refer to as the DOM.
At the heart of the DOM is the idea of an HTML page as an object. Because JavaScript was originally intended as a language for working with web pages, it needed an appropriate API for manipulating the contents of a web page. And since, at heart, it's an object-oriented language, it's only fitting that JavaScript be given an API that represents an HTML page as an object.
A web page's representation in the DOM is called a document, which is not just an object but a special structural object called a tree. As its name implies, the tree structure is taken from the real world concept of a tree—although in reality it doesn't look anything like a tree. The name is actually a metaphor for a tree's hierarchical and branching structure, as we'll see.
A tree is composed of several linked items called nodes. At the starting point in the tree is a special node called the root node, from which all other nodes branch. A node that branches off from another node is called a child node, and the node from which that node branches is called a parent node. A parent can have multiple child nodes, as in the case of the root node, but a node can only have one parent node—or no parent node if it's the root node. If nodes have the same parent, they're said to be sibling nodes, while a node with no children is called a leaf node.
Take a look at Figure 8-1:
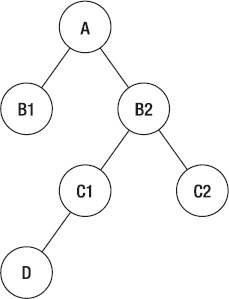
Here we have a basic tree with six nodes. The node named A is the root node and it is the parent node of two child nodes, B1 and B2. B1 is a leaf node, but B2 has two children of its own, C1 and C2. C1 has a single child, a leaf node called D, while C2 has none. The nodes B1 and B2 are sibling nodes, as are the two nodes C1 and C2.
To apply this idea of a tree structure to an HTML document, we need to examine the source markup of the page and see how it is turned into object. Let's look at the following example:
<html>
    <head>
        <title>Greeter</title>
    </head>

    <body>
        <img src="helloworld.png">
        <p>Hello <em>World!</em></p>
    </body>
</html>
Since I expect that you already understand this HTML document, I won't go into detail about tags and attributes. The first thing you'll notice is that the HTML source is already hierarchical, but in a container sense. For example, the <html> is the container for all the items: everything in the source is within the <html> tag and its corresponding </html> end tag. You'll also notice that some tags, like <html>, <body> and <p> can contain other tags as well as text, while other tags like <img> don't contain anything (and <img> doesn't have an end tag, either).
When transforming the markup to a tree structure, the <html> tag becomes our root node since it's the tag that contains everything else. The <head> and <body> tags then become the child nodes for <html> and the tags within these tags become child nodes themselves. An interesting case is the <img> tag, which is always a leaf node, since it can't contain any other tags.
Transforming this into a diagram, we have Figure 8-2:

However, we have something missing. How about the text inside some of those tags? How is that represented? We could actually represent it as nodes too, but we'd have to designate those nodes as a special type called a text node to differentiate them from normal tags. Figure 8-3 shows the text nodes in place.

Note
Whitespace, like tabs and spaces, is actually treated using additional text nodes in the DOM Tree. To keep it simple, though, our discussion will disregard whitespace and limit itself to elements and text nodes.
Now that our HTML source is ordered in a tree structure, we can easily transform it into a JavaScript object. As I said, the DOM's main object representation is the document object, which is an object of type Document and represents the whole tree. Each of the nodes we saw in Figure 8-3 is transformed into an object that inherits from the Node type, which represents a single node in the document structure. A page's document will have a single node object representing the root <html> node, a single node object representing the <head> node, and a single node object that represents the <body> node. Within the <head> and <body> nodes go all the other nodes from the tree.
The Node type, though, isn't itself used, but it is further subtyped into the Element and CharacterData types.
The Element node represents actual HTML tags, which are called elements when they are transformed into objects. Element is then further subtyped to HTMLElement, which represents element objects from HTML documents (as opposed to other documents that use the DOM model). Furthermore, HTMLElement is subtyped into particular elements, like HTMLHtmlElement for the <html> node, HTMLParagraphElement for <p> nodes and so forth.
The CharacterData type, on the other hand, only has two main subtypes: Comment and Text. Comment represents HTML comments in the document, while Text represents the text nodes that are contained within tags.
These subtypes enable nodes to have specialized properties and methods that aren't available from the top Node type. However, the properties that associate a particular node to the tree itself are inherited by node objects directly from the Node type:
The
parentNodeproperty is a reference to the node object that is the parent of the current node ornullif it has no parent. In our original example, theparentNodeproperty of the<p>node object is the<body>node object, while the<html>node object—being the root node—has aparentNodeproperty ofnull.The
childNodesproperty is an array-like object containing a list of all the children of a node. Accessing thelengthproperty of this object will give you the total number of children for a node. In our example, the<html>element has achildNodesproperty with thelengthof 2, and this property contains two objects: the<head>node object and the<body>node object.Related to the
childNodesproperty are two properties namedfirstChildandlastChild, which are references to the first and last children of a node. If a node has no children, both properties will benull. If a node has only one child, both properties will point to the same node object.The
previousSiblingandnextSiblingproperties reference the sibling nodes of a node object. If a node is the only child of its parent, both properties will benull. In the same vein, thepreviousSiblingproperty of the first child node and thenextSiblingof the last child node will always benull.
All nodes regardless of type have these properties and it is these properties that make it possible to find a particular node within the document tree using JavaScript, which will be discussed in depth in Chapter 9 when we talk about the Selector Engine.
The document object itself is actually a node, but it's important to note that it's not actually the root node—although it may seem as such—but rather the object representation of the html page itself as an object tree of nodes. The true root node of a document is the <html> node, although it is rarely used. The more commonly accessed nodes are the <head> and <body> nodes, since these are the nodes that contain the data relevant to the page. In the native DOM API, the <body> node is accessible through document.body, but no such shortcut is available for <head>. MooTools, though, adds a feature to make the <head> node available via document.head.
When working with nodes in MooTools, you can use the typeOf function to distinguish between elements and textnodes. The typeOf function will return 'element' for element nodes and 'textnode' for text nodes. In practice, you won't have to distinguish between them that much, since MooTools puts much more focus on elements, as we'll see. But before we do, we have to look back at <script> tags.
In the previous chapter, we learned that the HTML source is parsed sequentially to create the DOM tree. The browser goes through the HTML source and "interprets" each of the tags it encounters, creating new nodes and elements for the DOM tree. We also learned that <script> tags are executed sequentially by the browser. When the browser encounters a <script> tag, it executes the code contained between the tags before moving on to parse the next tag in the HTML source. In the case of external scripts, the browser downloads the external code first and then executes it, and only after that will the parsing start again.
This sequential parsing of the DOM, together with the blocking nature of script execution, presents a gotcha when it comes to DOM scripting. To truly understand this issue, let's suppose we're browsers trying to parse the following HTML source sequentially:
<html>
    <head>
        <title>Test</title>
    </head>

    <body>
        <img src="hello.png">
    </body>
</html>
Let's do it step by step:
First, we see the
<html>tag and create a new node. Since the<html>tag has a corresponding closing tag, we know it can contain other tags as well, so we'll mark it as our current parent. Our DOM Tree currently has one node.We parse the next tag,
<head>, and create a new node that becomes the child of our current parent,<html>. Because<head>also has a corresponding closing tag, it can be a parent as well, so we set this new node as our current parent. Our DOM Tree now has two nodes.The next tag we encounter is
<title>and we create a new node for this. The current parent is<head>, so our<title>node becomes a child of the<head>node. As with<html>and<head>, we'll mark the<title>node as our current parent since it can contain other tags. We now have three nodes.Within the
<title>tag we encounter our first text, so we create a new textnode that will be a child node of our current parent,<title>. Because text nodes can't have child nodes, we won't set this node as our current parent, so<title>is still the current parent node. The DOM Tree now has four nodes.We now encounter
</title>, a closing tag that tells us that the<title>node is complete and has no other children. We set our current parent back to the parent of<title>, which is<head>. Since we didn't add any new nodes, we still have four nodes in our DOM Tree.Another end tag comes into our view,
</head>, which marks the end of the<head>node. We set the current parent to the parent node of<head>so our current parent is<html>again. Our DOM tree is unchanged with four nodes.We see a new tag,
<body>, so we create a new child node for our current parent,<html>. Since<body>has an end tag, we set<body>as our current parent. We now have five nodes in our tree.The next tag is an
<img>tag, so we create a new child node for the current parent<body>. The<img>tag is one of the few tags that doesn't have a closing tag, and is therefore seen as "self-closing." It can't have any child nodes, so we won't set it as the current parent. Our DOM Tree now has six nodes.We then encounter an end tag,
</body>, signaling the end of the<body>tag, so we set the current parent back to the parent node of the<body>tag,<html>. Our DOM Tree remains unchanged, so we still have six nodes.Finally, we get to the last tag,
</html>, signaling the end of the<html>tag and the end of our HTML source. The final DOM Tree has been built and it contains six nodes in total.
Now if you've been paying attention to the steps, you'll notice that the DOM Tree grows as each tag is parsed. We started with a single node and ended up having six nodes. The number of nodes in each step can be different from the number of nodes before or after that step, and only after everything has been parsed will we know how many nodes there actually are in the DOM Tree.
With this in mind, we can say that our DOM tree only becomes final after we've parsed the HTML source completely. We call the final DOM Tree—with all tags parsed and turned into nodes—the completed DOM Tree. From the start of parsing right up to the step before we finally parse the </html> end tag, we don't have a completed DOM Tree, only part of it—and we call this a partial DOM Tree. The interesting thing about the partial DOM Tree is that each step of the parsing process can potentially change the DOM Tree, and so the partial DOM Tree in one step can be different from the partial DOM Tree in another step.
Now suppose we add a <script> tag into our HTML source, like so:
<html>
    <head>
        <title>Test</title>
        <script src="mootools.js"></script>
        <script>
            console.log(typeOf(document.body));
        </script>
    </head>

    <body>
        <img src="hello.png">
    </body>
</html>
We won't parse this step by step again, since we can just think of the extra step we'll add to the parsing we did above: after step 5, we now have to parse the two <script> tags and then create new child nodes for the current parent <head>. However, we also have to execute the code contained within the <script> tag before we move on to the next step. Only after console.log(typeOf(document.body)); finishes can we move to the next step of parsing the </head> tag and closing the <head> node.
Okay, so what's the gotcha I was talking about then? The best way to see the issue is to run the example HTML page in your browser. Remember that document.body points to the <body> node, so you'll probably expect typeOf(document.body) to return 'element'. However, if you try to run it in your browser, you'll see that typeOf(document.body) doesn't return 'element'—it returns 'null'.
And that's the gotcha. Our main interface for manipulating the DOM is the document object, and we use this object to access the nodes in our DOM Tree. But an important thing to remember is that the document is a true mirror of the DOM Tree: whatever the state of the DOM Tree is, it will be reflected in the document object.
This goes back to the idea of a partial DOM Tree. In our example, typeOf(document.body) returns 'null' instead of 'element' because at the point that the script is executed, we only have a partial DOM Tree. This partial DOM Tree already contains the <html>, <head>, and <title> nodes, but the <body> node is yet to be parsed, so document.body is truly null at that point. And because executing the script is a blocking process, the browser can't just continue parsing the rest of the HTML source: it has to wait until the JavaScript interpreter finishes before it can parse the rest of the HTML source.
Because browser-based JavaScript is largely concerned with manipulating elements in the DOM tree, we need to make sure they're accessible when we start working with them. If we start working on elements before they're created—like we did in the preceding example—we'll run into errors and other weird behavior.
There are several ways around this. The first is to move your script to right after the element you're working on to make sure that the element is already in the DOM tree when you need it:
<html>
    <head>
        <title>Test</title>
        <script src="mootools.js"></script>
    </head>

    <body>
        <script>
            console.log(typeOf(document.body));
        </script>
        <img src="hello.png">
    </body>
</html>
In this example, typeOf(document.body) will return 'element' as expected since the <body> node will be available by the time our script is executed.
While this technique works, it gets hard to manage as your script grows. For example, if we add some new function to our script that modifies the <img> element in our page, we have to move the script again. If our script changes yet again after that, we'll have to move our script to reflect the change.
Moving scripts around could get taxing after a while, especially if you have many of them. So a better technique is to move the scripts to the bottom of the page, right before the </body> tag:
<html>
    <head>
        <title>Test</title>
        <script src="mootools.js"></script>
    </head>

    <body>
        <img src="hello.png">
        <script>
console.log(typeOf(document.body));
</script>
</body>
</html>Placing scripts right before the </body> is a good way to ensure that the elements you'll need to access are already available. Since the </body> tag is almost always the second to the last tag in the page (the last always being the </html> tag), it is safe to assume that all tags would have been parsed and turned into proper nodes in the DOM tree by the time this closing tag is reached. Therefore, the partial DOM Tree right before the </body> tag—even though it's not yet truly complete—will be close to being a complete DOM Tree. Scripts executed at this point will therefore have access to an almost complete DOM Tree with the necessary nodes accessible and ready for manipulation.
Placing scripts right before </body> also yields an additional benefit: pages appear to load faster. Since executing scripts halt the parsing of the DOM tree, they also block the rendering steps. While a script is executing, the browser can't render anything on the page. If you have a script in the <head> of your page that takes too long to execute or one that takes too long to download, it will take quite some time before the browser can start the reflow and painting processes that will output the page in the window.
If the scripts are at the bottom of the page, however, the browser can start the reflow and painting process earlier. Since there are no scripts to block the rendering process, the browser can output the page faster and the user will be able to see it immediately. By the time the browser reaches the scripts at the bottom of the page, most of your site would already be visible, so there's no blocking behavior apparent to the viewer.
Unfortunately, this technique has one flaw. Say we have the following HTML source:
<html>
    <head>
        <title>Test</title>
        <script src="mootools.js"></script>
    </head>

    <body>
        <img id="hello" src="hello.png">
        <p>Some text.</p>
        <p>Another text.</p>
        <div>
            <p>More Text Here</p>
        </div>
        <script src="change_content.js"></script>
    </body>
</html>
Here we have an external script called change_content.js instead of an embedded one. The script is huge, several hundred kilobytes, and includes the following snippet:
...

// Remove the hello image..
var img = $('hello'),
img.destroy();

...
The snippet says to retrieve the element with the id "hello" and remove it from the DOM. Easy enough, right? However, consider the rendering flow: the browser first renders the image; then when it gets to the script tag, it has to download the script first before executing the code that removes the image from the page. The result is that the user will see the image appear and then disappear—which could get pretty confusing.
While the example might sound contrived, this is actually a very common phenomenon called Flash of Unstyled Content or FOUC for short. Originally an issue with Cascading Style Sheets, FOUCs have now entered the JavaScript domain because of the numerous style and behavioral modifications added via scripts. What happens is that users see the page's initial "unstyled" content, which then suddenly changes because of modifications done via JavaScript.
But while FOUCs are more annoying than truly problematic, a similar issue—which I'll dub as a Moment of Behaviorless Interaction or MOBI—is worse. Instead of styles, MOBIs are concerned with behavior. Let's change the code above:
<html>
    <head>
        <title>Test</title>
        <script src="mootools.js"></script>
    </head>

    <body>
        <p><a id="greeter" href="#">Click Me!</a></p>
        <script src="add_events.js"></script>
    </body>
</html>
And here's the corresponding add_events.js script:
...

// Say hello
var greeter = $('greeter'),
greeter.addEvent('click', function(event){
    event.preventDefault();
    alert('Hey There Mister!'),
});

...
The scenario remains the same: add_events.js is a large script file that has to be downloaded and executed by the browser at the end of the page. Unlike the previous example, though, add_events.js doesn't change the style of an element in the page; instead it adds behavior to an element. In particular, it defines an event handler (we'll discuss these in Chapter 10) that will be fired when the link with the id "greeter" is clicked.
However, the same FOUC issue rears its head here: the link will be rendered by the browser first, and then the browser will download and execute the external script. Because the script will be executed a bit later, there will be a few moments when users will be able to click the link and nothing will happen. The behavior hasn't been added at that point, and your page will seem interactionless—and thus you'll get a "Moment of Behaviorless Interaction."
Both FOUCs and MOBIs present an interesting issue for DOM scripting. On the one hand, this is where the blocking behavior of script tags comes in handy: by placing script tags in the <head> of the document, you'll be sure that they're executed and ready before any of the actual content in the <body> is displayed—so styles and behavior will already be defined by the JavaScript interpreter. On the other, however, this brings us back to our original problem: if our script is in the <head> of our document, we'll only have access to a partial DOM tree.
The solution then has to be two-fold: first, the script must be placed early on the page (preferably in the <head>) so that it will be downloaded and ready beforehand, and second, the execution of the script must somehow be delayed until after we have a complete enough DOM tree to work with. The solutions we've seen so far can't meet these requirements, so we'll have to look in another place: JavaScript events.
An event in the broadest sense is something that happens within the lifetime of a page. In our previous add_events.js snippet, for instance, we added an event handler—which is basically a function—that will be executed as an effect of an event happening (in that case, a link being clicked). For our particular issue right now, we'll also make use of an event, one that tells us when there is a complete enough DOM tree to work with.
That event is called the DOMReady event, and it's a special event that MooTools provides. Changing our FOUC example to use this event, we end up with this:
<html>
    <head>
        <title>Test</title>
        <script src="mootools.js"></script>
        <script src="change_content.js"></script>
    </head>

    <body>
        <img id="hello" src="hello.png">
        <p>Some text.</p>
        <p>Another text.</p>
        <div>
            <p>More Text Here</p>
        </div>
    </body>
</html>
Now for the change_content.js:
...

window.addEvent('domready', function(){
    // Remove the hello image..
    var img = $('hello'),
    img.destroy();
});

...
We do two things here: first we move our script to the top of the HTML source so that we'll get the blocking behavior. This ensures that our event handlers and other necessary boilerplate code are executed and prepared before any content is rendered. Next, we wrap the original image-destroying code inside a function and register that function as an event handler for the DOMReady event. If we run this on the browser, we'll get our desired result.
We'll talk more about how the DOMReady event works in Chapter 10, but right now it suffices to say that by using DOMReady, we're telling the browser to defer the execution of the event handler function until the DOM tree is complete enough.
Applying the same to our second example, we get the following:
<html>
    <head>
        <title>Test</title>
        <script src="mootools.js"></script>
        <script src="add_events.js"></script>
    </head>
<body>
<p><a id="greeter" href="#">Click Me!</a></p>
</body>
</html>As for the add_events.js script:
...

window.addEvent('domready', function(){
    // Say hello
    var greeter = $('greeter'),
    greeter.addEvent('click', function(event){
        event.preventDefault();
        alert('Hey There Mister!'),
    });
});

...
As in our previous example, we move the script to the <head> of the page to ensure that it's executed before any content rendering happens. We again use the DOMReady event to defer execution of the code until the DOM Tree is in a complete enough state for manipulation. The result is that we get rid of the MOBI, and users will be able to interact with our page without seeing any undefined behavior.
Note
There is another way to achieve the same results in browsers, one that involves using a special <script> tag attribute called defer. When a <script> is declared with a defer attribute, the browser delays execution of the script until the DOM is ready—just like the DOMReady event. Unfortunately, support for defer isn't available in all major browsers, so we'll stick to DOMReady for the time being.
The obvious question then is whether it's better to entirely replace the technique of adding scripts at the bottom with DOMReady handlers. The answer to this question, of course, is "it depends." Using DOMReady handlers has the benefit of making sure that style and behavioral changes are declared before any content is rendered, but putting all scripts on the top of your page will slow rendering time. On the other hand, putting scripts in the bottom enables the browser to render the page quicker, but at the expense of getting FOUCs and MOBIs.
Personally, I find that the sweet spot lies in using both techniques at the same time. The best way to do this is to divide your JavaScript programs into small logical parts. Scripts that declare important style and behavioral changes should be placed at the top, while scripts that aren't particularly important should be placed at the bottom. With this scheme, FOUCs and MOBIs are eliminated, and the blocking time before rendering is minimized.
Since we won't be creating complex programs in this chapter, we'll be using both techniques separately. For examples that use only the native DOM APIs, we'll place scripts at the bottom of the page, while examples that work with MooTools will use a DOMReady handler.
DOM scripting is the common term for using JavaScript to program a web page, and much of it involves manipulating elements on a page: selecting elements, creating new elements, moving elements around, changing their attributes and styles, and destroying them when necessary.
To script the DOM, you'll need to use the API provided by the DOM itself. Unfortunately, it's not a perfect API. In fact, a common saying in the JavaScript world is that when people say they hate JavaScript, what they're really saying is that they hate the DOM. I find this somewhat true, but unfortunate: the DOM API is one of the harder APIs to work with, but not because it was designed that way. The problem lies with the browsers that implement the API: somehow, browsers always find a way to add bugs and deviations from the specs. As such, the DOM API is inconsistent, and what works for one browser may not work for another.
The developers of MooTools know this, and the bulk of the framework was created just for the purpose of taming the mess that is the DOM. In fact, the MooTools API effectively replaces the DOM API, making it almost unnecessary to use native DOM methods for most tasks.
With this in mind, we won't go through the native DOM API in detail. Aside from the fact that MooTools abstracts this API so we don't have to worry about it, the subject has already been covered in numerous JavaScript books—and is therefore not worth repeating. If you want to learn more about it, you can refer to any of the DOM Scripting books in the References section at the end of this book.
What follows is an overview of how basic DOM manipulation is done through the MooTools-provided API. Be sure to pay attention to what follows, since we'll be discussing what forms the core of DOM scripting with MooTools.
The most basic task in DOM scripting is selecting a particular element from the DOM Tree. In order to manipulate a particular element in the DOM Tree, we must first find it using special functions called selector functions.
The most commonly used selector function is the ID Selector, document.id, which takes a single string argument id and returns the element from the DOM Tree with the corresponding id:
<html>
    <head>
        <title>test</title>
        <script src="mootools.js"></script>
        <script>
            window.addEvent('domready', function(){
                console.log(document.id('hello').get('tag')); // 'img'
            });
        </script>
    </head>

    <body>
        <img id="hello" src="hello.png">
        <p>some text.</p>
        <p>another text.</p>
        <div>
<p>more text here</p>
</div>
</body>
</html>Here we use document.id to fetch the element with the id "hello", which is an image element. We then confirm that we got the proper element by calling the get method of the element to determine the element's tag name. This call returns 'img', which confirms that we got the proper method.
The semantics of HTML require id attributes to be unique: a particular id should be used only once for a single element. Because document.id selects an element based on its id attribute, it will always return a single element if an appropriate one is found. If there is no element in the DOM Tree with the id passed to document.id, it returns null:
<html>
<head>
<title>test</title>
<script src="mootools.js"></script>
<script>
window.addEvent('domready', function(){
console.log(document.id('hi')); // null
});
</script>
</head>
<body>
<img id="hello" src="hello.png">
<p>some text.</p>
<p>another text.</p>
<div>
<p>more text here</p>
        </div>
    </body>
</html>The document.id method is idempotent: applying the function to a result of the function returns the same result:
<html>
    <head>
        <title>test</title>
        <script src="mootools.js"></script>
        <script>
            window.addEvent('domready', function(){
                var result = document.id('hello'),

                // pass result to document.id again
                console.log(document.id(result) === result); // true

                // result's tag
                console.log(result.get('tag')); // 'img'
            });
        </script>
    </head>

    <body>
<img id="hello" src="hello.png">
<p>some text.</p>
<p>another text.</p>
<div>
<p>more text here</p>
</div>
</body>
</html>We first invoke document.id to fetch our element with the id hello, and then store the returned image element in our variable result. We then invoke document.id again, but this time pass the image element using the result variable. Comparing the result of this new call to the original result, we see that they are indeed the same objects. This is because document.id returns the passed argument immediately if it's already an element—which makes it safe to apply the function on an element object more than once. In the same vein, document.id('hello') === document.id('hello') will be true, because document.id will always return the same element when called with the same argument.
The document.id method is similar to the native document.getElementById function. The difference is that the native document.getElementById function returns a native HTMLElement, while document.id returns an instance of the MooTools Element type—which we'll discuss in depth later. However, MooTools overrides the native getElementById function with its own variant that's more or less like the document.id function, which we can confirm by comparing the results of both:
<html>
<head>
<title>test</title>
<script src="mootools.js"></script>
<script>
window.addEvent('domready', function(){
console.log(document.id('hello') === document.getElementById('hello')); // true
});
</script>
</head>
<body>
<img id="hello" src="hello.png">
        <p>some text.</p>
        <p>another text.</p>
        <div>
            <p>more text here</p>
        </div>
    </body>
</html>In this example we see that the return value of document.id('Hello') and document.getElementById('hello') are the same element objects. This is because of MooTools' overriding of the native getElementById function. If MooTools didn't override this function, the results would not be the same objects: document.id would return a MooTools Element instance, while getElementsById would return a native HTMLImageElement object.
As I mentioned, document.id is a very popular function, and it's not uncommon to use it more than once in a single program. Because of this, MooTools provides a shortcut, called the dollar selector function: $:
<html>
    <head>
<title>test</title>
<script src="mootools.js"></script>
<script>
window.addEvent('domready', function(){
console.log($('hello').get('tag')); // 'img'
console.log(document.id('hello') === $('hello')); // true
});
</script>
</head>
<body>
<img id="hello" src="hello.png">
<p>some text.</p>
<p>another text.</p>
<div>
<p>more text here</p>
</div>
</body>
</html>Both $ and document.id return the same element in this example, and you can use $ as a replacement for document.id in most instances.
The use of the dollar symbol ($) as a function shortcut is a popular practice, and most JavaScript frameworks include a similar function. In fact, some libraries—JQuery being the most notable example—actually depend on $ by default. Unfortunately, this creates issues with library interoperability: loading two different libraries in a single page would lead to one library overriding the $ function of the other library.
In order to add some interoperability, MooTools includes a feature called dollar-safe mode: MooTools automatically checks whether a $ function has already been declared, and if so, it won't declare its own $ function. This way, MooTools won't override the $ function of other libraries.
Of course, this might not be the behavior you want. Because document.id is used often, you might want to have the $ shortcut ready for use all the time. Some older MooTools scripts also depend on the MooTools $ function and it will lead to errors if they get another library's $ function instead. You can force the MooTools $ function by adding a declaration as a prelude to your scripts:
<html>
    <head>
        <title>test</title>
        <script src="mootools.js"></script>
        <script>
            // ensure that $ is MooTools'..
            window.$ = document.id;

            window.addEvent('domready', function(){
                console.log($('hello').get('tag')); // 'img'
            });
        </script>
    </head>

    <body>
        <img id="hello" src="hello.png">
        <p>some text.</p>
        <p>another text.</p>
        <div>
<p>more text here</p>
</div>
</body>
</html>By declaring window.$ = document.id, you'll be able to force the use of the MooTools document.id function as the $ function.
By doing this however, you'll override the $ function of any other library loaded along with MooTools, which may affect interoperability with other scripts. If you simply want to use the $ function for your own scripts, you can use a single-execution function to localize $:
<html>
<head>
<title>test</title>
<script src="mootools.js"></script>
<script>
// localize the $ function
(function($){
window.addEvent('domready', function(){
console.log($('hello').get('tag')); // 'img'
});
})(document.id);
</script>
</head>
<body>
<img id="hello" src="hello.png">
<p>some text.</p>
<p>another text.</p>
<div>
<p>more text here</p>
        </div>
    </body>
</html>Note
Most JavaScript developers agree, though, that using multiple JavaScript frameworks in a single page is a recipe for disaster. In general, JavaScript frameworks were designed to be used separately, and MooTools is no exception. Because it's strongly recommended to avoid using MooTools with another framework on a single page, most of the issues with the dollar-safe mode will likely never pop up. However, if you're developing scripts that you'll be distributing to other users, you should use document.id instead of the dollar function since you can't be sure your end users will be using MooTools alone.
The MooTools document.id function and the native DOM API document.getElementById function are considered simple selector functions: you pass them a string id and they return the element with that particular id. However, the native DOM API provides two simpler selector functions: document.getElementsByTagName and document.getElementsByClassName:
<html>
    <head>
        <title>test</title>
    </head>

    <body>
        <img class="viewable" src="hello.png">
        <p>some text.</p>
        <p>another text.</p>
        <div class="viewable">
            <p>more text here</p>
        </div>
        <script>
            console.log(document.getElementsByTagName('p').length); // 3
            console.log(document.getElementsByClassName('viewable').length); // 2
        </script>
    </body>
</html>
The document.getElementsByTagName function takes one argument, tag, and returns all elements of the corresponding tag, while document.getElementsByClassName also takes a single argument, class, and returns all elements with the corresponding class. In our example, we used getElementsByTagName to get all paragraph elements and we used getElementsByClassName to get all elements that have the class viewable.
HTML semantics allow multiple instances of a tag type in a single document, as well as using a single class attribute value for multiple elements. Because of this, getElementsByTagName and getElementsByClassName don't return single elements—they return instances of NodeList. A NodeList is a read-only array-like object containing the elements that were gathered by the selector function. As we saw in the example above, our code received two NodeList instances, and we were able to determine the number of elements in the NodeList by the length method.
MooTools doesn't override these two functions, but instead unifies them in a single function: the double-dollar function, or $$. This function takes a single argument, selector, and returns all the elements that correspond to the selector. For example, we can use $$ to replace document.getElementsByTagName:
<html>
    <head>
        <title>test</title>
        <script src="mootools.js"></script>
        <script>
            window.addEvent('domready', function(){
                console.log($$('p').length); // 3
            });
        </script>
    </head>

    <body>
<img class="viewable" src="hello.png">
<p>some text.</p>
<p>another text.</p>
<div class="viewable">
<p>more text here</p>
</div>
</body>
</html>Instead of calling document.getElementsByTagName('p') in this example, we simply used $$('p') and it returns similar results. Checking the length property of the returned value, we see that the number of elements returned is 3, which is consistent with our previous getElementsByTagName example.
Replacing getElementsByClassName though, is a bit different because you can't just pass the class name:
<html>
<head>
<title>test</title>
<script src="mootools.js"></script>
<script>
window.addEvent('domready', function(){
console.log($$('viewable').length); // 0
});
</script>
</head>
<body>
<img class="viewable" src="hello.png">
        <p>some text.</p>
        <p>another text.</p>
        <div class="viewable">
            <p>more text here</p>
        </div>
    </body>
</html>Calling $$('viewable') gives back a return value with a length property of 0—which means that no elements were selected. This is because the $$ function's argument, the string selector, is expected to be a CSS Selector.
The semantics of CSS selectors is a complex subject in itself, and we'll learn more about them in Chapter 9 when we discuss the selector engine. For now, it is enough to understand that an identifier such as p or viewable is interpreted in CSS selector semantics as a type selector. Type selectors correspond to particular HTML tags. When we use $$('p'), it returned all elements with the tag p. In the same way, $$('viewable') will return all elements with the tag viewable—which, in the case of our example, corresponds to no elements.
In order to use $$ to select elements with the particular classname, you must prefix your classname with a period:
<html>
    <head>
        <title>test</title>
        <script src="mootools.js"></script>
        <script>
            window.addEvent('domready', function(){
                console.log($$('.viewable').length); // 2
});
</script>
</head>
<body>
<img class="viewable" src="hello.png">
<p>some text.</p>
<p>another text.</p>
<div class="viewable">
<p>more text here</p>
</div>
</body>
</html>Notice that we used the argument '.viewable' instead of 'viewable' like in the previous example. By prepending a period to the identifier, we tell $$ that we're looking for a class and not an element. The result is that $$('.viewable') returns a value with the length property of 2, which is what we'd expect.
The $$ function can also be used to retrieve elements using their ids by prepending the selector id with a hash symbol:
<html>
<head>
<title>test</title>
<script src="mootools.js"></script>
<script>
window.addEvent('domready', function(){
console.log($$('#hello').length); // 1
});
</script>
</head>
<body>
<img id="hello" class="viewable" src="hello.png">
<p>some text.</p>
<p>another text.</p>
<div class="viewable">
<p>more text here</p>
</div>
</body>
</html>Here we called $$ with the argument '#hello', which means we want to select all elements with the id "hello". Take note, though, that while they do the same thing here, document.id and $$ are not interchangeable: the former always returns a single element, while the latter always returns a collection of elements—a collection that contains a single element in this case.
While getElementsByTagName and getElementsByClassName return NodeList instances, the $$ function returns another array-like object called Elements. As its name implies, Elements is a collection of MooTools Element objects. We'll learn more about Elements later, but right now it's important to keep in mind that the selector functions in MooTools that return a collection of elements will return an Elements instance and not a NodeList.
Unlike document.id, which is idempotent, the $$ function will always return a new instance of Elements, even when called with the same arguments:
<html>
<head>
<title>test</title>
<script src="mootools.js"></script>
<script>
window.addEvent('domready', function(){
console.log($$('.viewable') === $$('.viewable')); // false
});
        </script>
    </head>

    <body>
        <img class="viewable" src="hello.png">
        <p>some text.</p>
        <p>another text.</p>
        <div class="viewable">
            <p>more text here</p>
        </div>
    </body>
</html>Our snippet $$('.viewable') === $$('.viewable') is false here because the result of a $$ call will always return a new Elements instance, and therefore these two calls produce different objects. In the same vein, passing the result of a previous $$ call to another, like $$($$('.viewable')), won't return the same Elements instance, unlike document.id, which returns the same element no matter how many times it's applied.
Passing a single element—such as the result of document.id or $—to $$ will produce a new Elements instance with a single item, but passing an Elements instance—such as the result of $$—to document.id or $ will produce null:
<html>
    <head>
        <title>test</title>
        <script src="mootools.js"></script>
        <script>
            window.addEvent('domready', function(){
                var img = $('hello'),
                var viewable = $$('viewable'),

                console.log($$(img).length); // 1
                console.log($$(img)[0] === img); // true

                console.log($(viewable)); // null
            });
        </script>
    </head>

    <body>
        <img id="hello" class="viewable" src="hello.png">
        <p>some text.</p>
        <p>another text.</p>
        <div class="viewable">
            <p>more text here</p>
        </div>
</body> </html>
So far we've used the id, the tag, and the class selectors, but not together. The $$ function also allows for the use of combined CSS selectors, which use combinations of all of these as well as more complex CSS selectors:
<html>
<head>
<title>test</title>
<script src="mootools.js"></script>
<script>
window.addEvent('domready', function(){
// all images with the class viewable..
console.log($$('img.viewable').length); // 1
// all images that have the src attribute
console.log($$('img[src]').length); // 2
// all images with the src attribute 'hi.png'
console.log($$('img[src="hi.png"]').length); // 1
// all elements that have class attributes
console.log($$('[class]').length); // 2
// all paragraphs and images
console.log($$('p, img').length); // 5
});
</script>
</head>
<body>
<img id="hello" class="viewable" src="hello.png">
<img src="hi.png">
<p>some text.</p>
<p>another text.</p>
<div class="viewable">
<p>more text here</p>
</div>
</body>
</html>We'll learn more about complex CSS selectors in Chapter 9 when we discuss Slick, the selector engine that MooTools uses. For now, it's enough to remember that $$ accepts not only simple selectors but complex selectors as well.
Aside from $$, MooTools also provides two other selector functions that accept CSS selector strings as arguments. The first one is getElements, which is actually an Element method. When invoked from an element, getElements returns the elements inside the element that match the selector string. To illustrate, let's look at this snippet:
<html>
    <head>
        <title>test</title>
<script src="mootools.js"></script>
<script>
window.addEvent('domready', function(){
console.log($('wrapper').getElements('p').length); // 2
});
</script>
</head>
<body>
<img id="hello" class="viewable" src="hello.png">
<img src="hi.png">
<p>some text.</p>
<div id="wrapper" class="viewable">
<p>more text here</p>
<p>another text.</p>
</div>
</body>
</html>First we use $('wrapper') to select the element with the id wrapper, which is our div element. Next, we call the getElements method of our div element and pass the argument 'p', and we get back an Elements instance that contains the two paragraph elements inside our div element. To translate this to English, our code says, "From the element with the id 'wrapper', get all elements with the tag 'p'."
The great thing about getElements is that it's an Element method: you can use it to limit the search to only a part of the DOM Tree. In our example, the search is limited to only the contents of our div, which means that the search will be faster.
You can actually use getElements to replace $$ by calling document.getElements, which searches the whole document:
<html>
    <head>
        <title>test</title>
        <script src="mootools.js"></script>
        <script>
            window.addEvent('domready', function(){
                console.log($$('p').length); // 3
                console.log(document.getElements('p').length); // 3
            });
        </script>
    </head>

    <body>
        <img id="hello" class="viewable" src="hello.png">
        <img src="hi.png">
        <p>some text.</p>
        <div id="wrapper" class="viewable">
            <p>more text here</p>
            <p>another text.</p>
        </div>
    </body>
</html>
Another element method, getElement, works like getElements—but instead of returning an Elements instance, it returns a single Element that matches the selector string.
<html>
    <head>
        <title>test</title>
        <script src="mootools.js"></script>
        <script>
            window.addEvent('domready', function(){
                console.log($('wrapper').getElement('p').get('text')); // 'more text here'
            });
        </script>
    </head>

    <body>
        <img id="hello" class="viewable" src="hello.png">
        <img src="hi.png">
        <p>some text.</p>
        <div id="wrapper" class="viewable">
            <p>more text here</p>
            <p>another text.</p>
        </div>
    </body>
</html>
Like our getElements example, we pass the argument 'p' as our selector string. This time, though, we use the method getElement, which returns only the first matching element. In this case, we confirm this by getting the text contained by our paragraph, which is 'more text here' as expected.
Note
It is worth noting that the getElement and getElements functions act like the MooTools counterparts of the native querySelector and querySelectorAll functions, respectively. However, these two native methods have limited browser support, unlike the MooTools methods that work across all supported browsers. Keep in mind, though, that they are not interchangeable within MooTools.
Both getElements and getElement have a trick up their sleeves: they understand CSS combinators as prefixes. Combinators are special markers that join two simple selectors, and we'll learn more about them in Chapter 9. By default, getElement and getElements use the descendant combinator when no combinator-prefix is present in the argument passed to them. The descendant selector is marked by a space in between two simple selectors, and it's used to select elements within a particular element. Doing $('wrapper').getElements('p'), for example, is the same as doing $$('#wrapper p').
But to illustrate how combinator-prefixes work with these two functions, we need a more complex combinator as an example. The adjacent sibling combinator, denoted by +, is used to select an element that is an adjacent sibling of an element. Let's take a look at how we can use it:
<html>
    <head>
        <title>test</title>
        <script src="mootools.js"></script>
        <script>
            window.addEvent('domready', function(){
                console.log($('hello').getElement('+').get('src')); // 'hi.png'
            });
</script>
</head>
<body>
<img id="hello" class="viewable" src="hello.png">
<img src="hi.png">
<p>some text.</p>
<div id="wrapper" class="viewable">
<p>more text here</p>
<p>another text.</p>
</div>
</body>
</html>First we select the element with an id "hello", which is the first image element in our DOM Tree. We then call the getElement method of this element, passing the adjacent sibling selector '+' as an argument. This returns the first adjacent sibling of our element, which is the second image element in this example. We confirm this by calling the get method of the element returned by getElement to retrieve the value of its src attribute.
The last set of selector functions select elements based on their relation to a particular element. These selector functions are methods of the Element type, and are therefore available to all element objects.
The first ones are the sibling selectors, getPrevious and getNext, which return the previous and next sibling element of an element. Both functions take an optional selector argument, which is used to match the sibling. When invoked without an argument, they return the adjacent sibling of the element.
<html>
    <head>
        <title>test</title>
        <script src="mootools.js"></script>
        <script>
            window.addEvent('domready', function(){
                var el = $('img2'),

                // without arguments
                console.log(el.getPrevious().get('id')); // 'img1'
                console.log(el.getNext().get('id')); // 'div2'

                // with selector arguments
                console.log(el.getPrevious('div').get('id')); // 'div1'
                console.log(el.getNext('.textual').get('id')); // 'p2'
            });
        </script>
    </head>

    <body>
        <p id="p1" class="textual">Hello!</p>
        <div id="div1"></div>
        <img id="img1" class="viewable" src="hello.png">
        <img id="img2" src="hi.png">
        <div id="div2"></div>
<p id="p2" class="textual">Hi!</p>
</body>
</html>The getPrevious and getNext methods have "greedy" versions, getAllPrevious and getAllNext, which return an Elements instance instead of a single element. Like their non-greedy counterparts, these two methods also accept an optional selector argument that is used to match the elements.
<html>
<head>
<title>test</title>
<script src="mootools.js"></script>
<script>
window.addEvent('domready', function(){
var el = $('img2'),
// without arguments
console.log(el.getAllPrevious().length); // 3
console.log(el.getAllNext().length); // 2
// with selector arguments
console.log(el.getAllPrevious('div').length); // 1
console.log(el.getAllNext('.textual').length); // 1
});
</script>
</head>
<body>
<p id="p1" class="textual">Hello!</p>
<div id="div1"></div>
<img id="img1" class="viewable" src="hello.png">
<img id="img2" src="hi.png">
<div id="div2"></div>
<p id="p2" class="textual">Hi!</p>
    </body>
</html>
The getPrevious and getNext methods return either a single element or null if there is no sibling found, while getAllPrevious and getAllNext always return an Elements instance.
The getSiblings method is like a combination of both getAllPrevious and getAllNext methods, and returns all siblings regardless of position:
<html>
    <head>
        <title>test</title>
        <script src="mootools.js"></script>
        <script>
            window.addEvent('domready', function(){
                var el = $('img2'),

                // without arguments
                console.log(el.getSiblings().length); // 5

                // with selector arguments
                console.log(el.getSiblings('.textual').length); // 2
});
</script>
</head>
<body>
<p id="p1" class="textual">Hello!</p>
<div id="div1"></div>
<img id="img1" class="viewable" src="hello.png">
<img id="img2" src="hi.png">
<div id="div2"></div>
<p id="p2" class="textual">Hi!</p>
</body>
</html>The next set of relation-based selector functions comprises the children selectors, the first of which is the getChildren method of Element instances. Like the previous relation-based selector functions, getChildren can take an optional selector string argument to limit the return value. When invoked without an argument, it returns all child elements regardless of type.
<html>
    <head>
        <title>test</title>
        <script src="mootools.js"></script>
        <script>
            window.addEvent('domready', function(){
                var el = $('wrapper'),

                // without arguments
                console.log(el.getChildren().length); // 4

                // with selector argument
                console.log(el.getChildren('img').length); // 2

                // getChildren versus getElements
                console.log(el.getElements('*').length); // 6
            });
        </script>
    </head>

    <body>
        <div id="wrapper">
            <div id="hello">
                <p>Hello World!</p>
            </div>
            <img src="img1.png">
            <div id="hi">
                <p>Hi Universe!</p>
            </div>
            <img src="img2.png">
        </div>
    </body>
</html>
Notice the last line in our code where we used the getElements method instead of the getChildren method. Calling getElements with the universal selector returns an Elements collection with six items, but getChildren only returns four items. This is because getChildren selects child nodes while getElements selects descendant nodes by default: getChildren does not count the two paragraph elements inside the divs since they're descendants of wrapper and not direct child nodes.
The last two children selector functions are getFirst and getLast, which respectively return the first and last child of an element. Like the other functions so far, you can pass an optional selector string argument to limit the selection.
<html>
    <head>
        <title>test</title>
        <script src="mootools.js"></script>
        <script>
            window.addEvent('domready', function(){
                var el = $('wrapper'),

                // without arguments
                console.log(el.getFirst().get('id')); // 'hello'
                console.log(el.getLast().get('id')); // 'img2'

                // with selector argument
                console.log(el.getFirst('img').get('id')); // 'img1'
                console.log(el.getLast('div').get('id')); // 'hi'
            });
        </script>
    </head>

    <body>
        <div id="wrapper">
            <div id="hello">
                <p>Hello World!</p>
            </div>
            <img id="img1" src="img1.png">
            <div id="hi">
                <p>Hi Universe!</p>
            </div>
            <img id="img2" src="img2.png">
        </div>
    </body>
</html>
And finally, we have the parent selector function, getParent, which returns the parent element of a particular element. When called without an argument, getParent returns the direct parent of the element, while calling it with a selector argument returns the first parent (direct or indirect) that satisfies the selector matcher.
<html>
    <head>
        <title>test</title>
        <script src="mootools.js"></script>
        <script>
            window.addEvent('domready', function(){
                var el = $('world'),

                // without an argument
                console.log(el.getParent().get('tag')); // 'p'
// with selector arguments
console.log(el.getParent('section').get('id')); // 'greeting'
console.log(el.getParent('div').get('id')); // 'wrapper'
});
</script>
</head>
<body>
<div id="wrapper">
<section id="greeting">
<p>
Hello <em id="world">World</em>!
</p>
</section>
</div>
</body>
</html>The getParent selector function also has a greedy version, getAllParents, which works like the getParent method but returns all parents of an element as an Elements collection.
<html>
    <head>
        <title>test</title>
        <script src="mootools.js"></script>
        <script>
            window.addEvent('domready', function(){
                var el = $('world'),

                // without an argument
                console.log(el.getParents().length); // 6

                // with selector arguments
                console.log(el.getParents('div, p').length); // 3
                console.log(el.getParents('div').length); // 2
            });
        </script>
    </head>

    <body>
        <div>
            <div id="wrapper">
                <section id="greeting">
                    <p>
                        Hello <em id="world">World</em>!
                    </p>
                </section>
            </div>
        </div>
    </body>
</html>
You'll notice that the getParent method, when called without an argument, returned an Elements collection with six members. We get six and not five because the root element, <html> is also counted as a parent.
Before we move on, we need to clear up some things about Element objects and Elements objects. As I've mentioned in passing, an Element object refers to a single element node in the DOM Tree, while an Elements object is an array-like collection that represents a group of Element objects. We'll have an in-depth look at these types in a later section, so right now we'll discuss some important details regarding their usage.
The first one involves the use of Element and Elements for existence checks. All MooTools selector functions that return a single element—like document.id or getElement—will return either an Element instance, or null. This makes it easy to check for the existence of an element:
<html>
    <head>
        <title>test</title>
        <script src="mootools.js"></script>
        <script>
            window.addEvent('domready', function(){
                var el1 = document.getElement('div'),
                console.log( el1 ? 'el1 exists!' : 'el1 does not exist!'), // 'el1 exists!'

                var el2 = document.getElement('section'),
                console.log( el2 ? 'el2 exists!' : 'el2 does not exist!'), // 'el2 does not
exist!'
            });
        </script>
    </head>

    <body>
        <p id="para1">some text.</p>
        <p>another text.</p>
        <div class="viewable">
            <p>more text here</p>
        </div>
    </body>
</html>
For our first existence check, we use document.getElement to return the first div in our document. Because this div element exists, the function returns an element object and our console.log call outputs 'el1 exists!'. Our second check, on the other hand, tries to select the first section element in the document. Since there are no section elements in our document, the function returns null and console.log outputs "el2 does not exist!". So for functions that return single elements or null, checking the existence of an element is simply a matter of a falsy comparison.
Functions that return Elements objects, in contrast, aren't as straightforward. These functions—like $$ and getElements—always return an Elements collection, regardless of whether it did or did not find elements. This means that if no elements are found, you won't get back a null value, but simply an Elements instance containing no elements. Now if you recall our previous discussion on types, we learned that all array-like objects—empty or not—are truthy values, which means that a simple truth check like we did above won't suffice.
Instead, of using Boolean comparison, we need to access the length property of Elements objects to determine whether the object is empty. Thus, we could do the following:
<html>
    <head>
        <title>test</title>
        <script src="mootools.js"></script>
        <script>
            window.addEvent('domready', function(){
                var els1 = document.getElements('div'),
                console.log( els1.length > 0 ? 'els1 has members!' : 'els1 is empty!'), //
'els1 has members!'

                var els2 = document.getElements('section'),
                console.log( els2.length > 0 ? 'els2 has members!' : 'els2 is empty!'), //
'els2 is empty!'
            });
        </script>
    </head>

    <body>
        <p id="para1">some text.</p>
        <p>another text.</p>
        <div class="viewable">
            <p>more text here</p>
        </div>
    </body>
</html>
Here we compared the length property of the returned Elements objects to see if they're greater than 0. If the length is greater than 0, it implies that our collection isn't empty, and the opposite if it's not greater than 0.
Elements also has a very interesting interface. We've seen that a single element object has its own set of special methods, like get or destroy. These methods are inherited by element objects from Element.prototype. The interesting thing about these methods is that they can be used with an Elements instance as you would in a single element object.
To illustrate, we'll use one of the basic element methods, get, to return the text of an element:
<html>
    <head>
        <title>test</title>
        <script src="mootools.js"></script>
        <script>
            window.addEvent('domready', function(){
                console.log($('para1').get('text')); // 'some text.'
            });
        </script>
    </head>

    <body>
        <p id="para1">some text.</p>
        <p>another text.</p>
        <div class="viewable">
            <p>more text here</p>
        </div>
</body> </html>
First we select our paragraph element using the $ function, as in $('para1'). This returns the paragraph element, whose get method we invoke with the argument 'text' to retrieve the text inside the element. This method returns a string, 'some text' which corresponds to the text of our paragraph.
Nothing surprising so far. But what happens if instead of a single element, we invoke the get method of an Elements collection?
<html>
<head>
<title>test</title>
<script src="mootools.js"></script>
<script>
window.addEvent('domready', function(){
var result = $$('p').get('text'),
console.log(result); // ['some text.', 'another text.', 'more text here']
console.log(typeOf(result)); // 'array'
});
</script>
</head>
<body>
<p id="para1">some text.</p>
<p>another text.</p>
<div class="viewable">
<p>more text here</p>
</div>
</body>
</html>We select all the paragraphs in the document using the $$ function, and then we call the get method of the returned Elements object, storing it in our result variable. When we log the result variable, it shows us that the get method doesn't return a string like our previous example. Instead, it returns an array of strings.
The basic rule is that when an Element method is called on an Elements instance, it will return an array of results instead of a single return value. The code above could be done like so:
<html>
    <head>
        <title>test</title>
        <script src="mootools.js"></script>
        <script>
            window.addEvent('domready', function(){
                var result = [];

                $$('p').each(function(element){
                    result.push(element.get('text'));
                });

                console.log(result); // ['some text.', 'another text.', 'more text here']
                console.log(typeOf(result)); // 'array'
            });
        </script>
    </head>
<body>
<p id="para1">some text.</p>
<p>another text.</p>
<div class="viewable">
<p>more text here</p>
</div>
</body>
</html>Calling an Element method on an Elements instance will iterate over each element in the Elements collection and then invoke that particular method on each element. Therefore, doing $$('p').get('text') is technically the same as invoking the get method of each element in the collection and storing the value in an array.
A tricky thing to consider is when calling an Element method that returns a collection object on an Elements instance. If we do $('id').getParents(), for example, the method will return an Elements collection containing all the parent element objects of the element with the id "id". If we call $$('a').getParents(), on the other hand, it will return an array containing several Elements object, each representing the parent elements of each anchor element in the document. This could get confusing really fast.
To avoid the complexity of nested collections, it is recommended you perform operations like this by iterating over each element in the Elements object. You can easily do this using the each method of Elements. So instead of doing $$('a').getParents(), you could do:
$$('a').each(function(element){
    element.getParents();
});
The each function of an Elements object is similar to the each function of arrays: it takes a single argument, callback, which is a function with the signature: function(item, index, collection). It then iterates over each element in the collection and invokes the callback function, passing in the appropriate arguments.
Interestingly, MooTools uses the each method internally to transform Element methods into methods that can be used on Elements. We'll see how MooTools does this when we look at these types later in this chapter.
Now that we know how to select elements from the DOM Tree, the next thing we need to learn is how to move them around. However, since we're moving away from simply selecting elements to actually changing them, it is important that we first consider the DOM Tree's relationship to the rendered page.
The DOM Tree that's accessible for our use via the JavaScript DOM API isn't just an abstraction of the page, it is a true representation of the document. Any changes we make in the DOM Tree are reflected immediately and will be apparent to the user interacting with your page. For instance, changing the src attribute of an image element or changing the styles of a paragraph will immediately trigger a reflow and a repaint, which then updates the displayed page. Changing the property of an element doesn't just affect the DOM Tree, it also affects what your users will see on their screen.
It's important to keep this idea in mind when working with the DOM Tree and elements in general. Some operations performed on elements will be silent and will not show any visible change on the page, but most actions will trigger a noticeable change. Remembering this helps us make informed decisions as to how to craft our code, and will make our programs better.
MooTools provides several Element methods for moving elements in and around the DOM Tree, the most popular being inject. It has two forms, the simpler of which involves passing the id of the element to where the subject element will be moved as an argument. For example, suppose we have this section in our DOM Tree:
<div id="items"></div>
<a id="home-link" href="home.html">Home Page</a>
Now we want to move the link inside the empty div. We can use the inject method like so:
var link = $('home-link'),
link.inject('items'),
First we select our link element using $('home-link') and store it in a variable link. We then call the inject method of the element, passing in the id of our div, 'items', as a string. As a result, the DOM Tree now looks like this:
<div id="items">
    <a id="home-link" href="home.html">Home Page</a>
</div>
By calling the inject method, we turn our link object—which was originally a sibling of the div—into a child of the div object. The inject method therefore takes the subject (i.e., the element from which the method was called) and moves it into the target (i.e., the element passed as an argument to inject).
Note
We'll be using the previous form for our examples from now on. Instead of showing the whole HTML source, we'll only show snippets that represent sections in our DOM Tree. All of the HTML source code in our examples should go into the <body> tag, while all our JavaScript source code is supposed to go into a <script> tag in the head, wrapped in a DOMReady handler. We're using this form for two reasons: to keep our examples shorter and to work around the fact that the actions modify the DOM Tree as an object and not the actual HTML source. That final reason is important: modifying the DOM Tree does not actually change the HTML source code, only the object representation of it (i.e., the DOM Tree itself).
The inject method uses document.id internally, which is why we can simply pass a string id as an argument. But one thing we learned about document.id is that it's idempotent: passing an element object to document.id will return the same element object. This means that we can also do the following to achieve the same results:
var link = $('home-link'),
    div = $('items'),

link.inject(div);
Instead of passing a string argument, we simply pass an actual element object that will be the new parent of our link object. The resulting DOM Tree will be the same:
<div id="items">
    <a id="home-link" href="home.html">Home Page</a>
</div>
The second form of the inject method involves passing a second argument called where. This is a string argument that tells inject exactly where to place the element. Suppose we have the following section in our DOM Tree:
<div id="items">
    <a href="profile.html">Profile</a>
    <a href="contact.html">Contact</a>
</div>
<a id="home-link" href="home.html">Home Page</a>
We want to move our "home-link" link element into the "items" div, but we want it to go on the top before any other element. If we do a simple inject:
var link = $('home-link'),
link.inject('items'),
We'll get this:
<div id="items">
    <a href="profile.html">Profile</a>
    <a href="contact.html">Contact</a>
    <a id="home-link" href="home.html">Home Page</a>
</div>
Our home-link element is injected into the bottom of the items div, which is not what we wanted. However, we can use the second form of the inject method by passing a second argument, where:
var link = $('home-link'),
link.inject('items', 'top'),
This will produce a result like this:
<div id="items">
    <a id="home-link" href="home.html">Home Page</a>
    <a href="profile.html">Profile</a>
    <a href="contact.html">Contact</a>
</div>
By specifying the where argument as 'top', we're able to control the inject method's positioning of the element. By default, the inject method uses the where option 'bottom' when no argument is specified, which is why it usually inserts the subject element as the last child of the target.
Aside from 'top' and 'bottom', you can also use two other values as arguments to where: 'before' and 'after'. These two options alter the behavior of inject such that the method no longer moves the subject element to inside the target, but moves the subject around the target as a sibling.
To illustrate, let's take the original DOM Tree section:
<div id="items">
    <a href="profile.html">Profile</a>
    <a href="contact.html">Contact</a>
</div>
<a id="home-link" href="home.html">Home Page</a>
Now let's use 'before' as the argument:
var link = $('home-link'),
link.inject('items', 'before'),
Our resulting DOM Tree section will now look like this:
<a id="home-link" href="home.html">Home Page</a>
<div id="items">
    <a href="profile.html">Profile</a>
    <a href="contact.html">Contact</a>
</div>
Instead of moving the link inside the items div, the inject method moved the link object so that it comes before the items div. On the other hand, if we use the 'after' option:
var link = $('home-link'),
link.inject('items', 'after'),
Our resulting DOM Tree section will remain the same:
<div id="items">
    <a href="profile.html">Profile</a>
    <a href="contact.html">Contact</a>
</div>
<a id="home-link" href="home.html">Home Page</a>
Because the link object is already after the items div, calling link.inject('items', 'after') has no effect.
The 'before' and 'after' options may not seem that useful in these examples, but they can actually help in fine-tuning your inserts. Suppose we have the following section:
<div id="items">
    <a href="home.html">Home Page</a>
    <a href="profile.html">Profile</a>
    <a href="contact.html">Contact</a>
</div>
<a id="projects-link" href="projects.html">Projects</a>
Now we want to move the projects-link element into the items div, but we want it to be the second element inside items. We can't use 'top' or 'bottom' because they insert elements at the topmost and bottommost area of the target, but we can use 'after':
var link = $('projects-link'),
var links = $('items').getElements('a'),

link.inject(links[0], 'after'),
Right after we select our projects-link element, we use the getElements method to select all the links inside out items div. Now instead of injecting projects-link right inside our items div, we tell the inject function to insert the subject element after the first link element inside items—which we reference by accessing the element via its numeric index (collections are array-like, remember?). The resulting section looks like this:
<div id="items">
    <a href="home.html">Home Page</a>
    <a id="projects-link" href="projects.html">Projects</a>
    <a href="profile.html">Profile</a>
    <a href="contact.html">Contact</a>
</div>
Aside from showing us a great way to use the 'after' option, this example also gives us a new insight about moving elements: it's not just about parents and children. For the most part, a lot of DOM element movement is concerned with inserting elements into other elements but there are also times when you'll want to do sibling-based insertions, as we did above.
Like all Element methods, inject can also be used with an Elements instance. Suppose we have these two lists:
<ul id="first">
    <li>Item A</li>
    <li>Item B</li>
    <li>Item C</li>
</ul>

<ul id="second">
</ul>
To transfer all the list items from the first list to the second list, all we have to do is to select those items and use inject:
var items = $('first').getElements('li'),
items.inject('second'),
This will move items between lists, producing the following DOM Tree section:
<ul id="first">
</ul>

<ul id="second">
    <li>Item A</li>
    <li>Item B</li>
    <li>Item C</li>
</ul>
An important thing to note, though is that you can't use an Elements instance as the target for inject. Because inject uses document.id internally, passing an Elements instance to will result in a null value as the target and will therefore throw an error.
The next movement method is called replaces, and it's used to replace one element with another.
<div>
    <a id="home-link" href="home.html">Home</a>
</div>

<a id="profile-link" href="profile.html">Profile</a>
Now we want to replace the home-link element with the profile-link element, so we use replaces:
var link = $('profile-link'),
link.replaces('home-link'),
Like the inject method, the replaces method also uses document.id internally, which means we can pass it either a string id or an actual element—but not an Elements instance. Running the script above, our DOM Tree will now look like this:
<div>
    <a id="profile-link" href="profile.html">Profile</a>
</div>
The profile-link element was moved to the original position of the home-link element, thereby replacing that element. But what happens to the home-link element? The short answer is that it gets destroyed and removed from the DOM Tree. This is an important thing to remember when using replaces: the target element that's replaced by the subject will be removed and destroyed—and that includes any elements inside that target element.
It might seem that using replaces isn't a good idea, especially because it tends to destroy elements. However, when we use it with the element creation techniques we'll discuss in the next section, it'll make a lot more sense: you'll see that you can use replaces to update elements in the DOM Tree with new ones.
One more caveat with replaces, though: don't use it for an Elements collection with more than one item or you'll get errors. This is because replaces removes the original element from the DOM, thereby turning it into a null value. For example, if we do $$('section').replaces('main-div'), the first section element will be used to replace the main-div element and main-div will be destroyed. The same process will be called for the next section element, but since main-div is now destroyed, it will try to replace a null value with an element—resulting in an error. My advice is to use replaces for single element-with-element replacements.
Next on our list is another element method called wraps. As its name implies, wraps takes the subject element and wraps the target element with it:
<a id="home-link" href="home.html">Home</a>
<div id="items"></div>
Now we'll use wraps to make the items div enclose the home-link element:
var items = $('items'),
items.wraps('home-link'),
Our resulting section will now look like this:
<div id="items">
    <a id="home-link" href="home.html">Home</a>
</div>
Like inject and replaces, wraps also uses document.id internally so you can pass string ids or element objects (but again, not Elements instances). And, like inject, wraps can also take a second argument so you can specify where the target element will be inserted. This is useful when your wrapping element already has children, like so:
<a id="home-link" href="home.html">Home</a>
<div id="items">
    <a href="profile.html">Profile</a>
</div>
By default, wraps uses 'bottom' as the value for the second argument, but you can also pass the other option values such as 'top':
var items = $('items'),
items.wraps('home-link', 'top'),
This produces the following DOM Tree section as a result:
<div id="items">
    <a id="home-link" href="home.html">Home</a>
    <a href="profile.html">Profile</a>
</div>
What's interesting with the wraps method is that it is similar to replaces: the subject element replaces the target element by taking its position in the DOM Tree. Unlike replaces however, wraps does not discard the target element but turns it into a child node of the subject. In the examples above, the items div element was moved to the original position of the home-link element, but home-link wasn't removed from the DOM Tree. Instead, it was moved inside the items div.
This behavior has weird consequences when wraps is used on an Elements instance. Take, for example, the following section:
<a id="home-link" href="home.html">Home</a>

<div id="div1"></div>
<div id="div2"></div>
<div id="div3"></div>
Now let's call wraps on a collection of divs:
var divs = $$('div'),
divs.wraps('home-link'),
The resulting DOM Tree section will look like this:
<div id="div1">
    <div id="div2">
        <div id="div3">
            <a id="home-link" href="home.html">Home</a>
        </div>
    </div>
</div>
To understand why we get this result, we need to remember that the Elements versions of Element methods are modified so they can be used with collections. This modification involves adding an internal loop that applies the method to each item of the collection. Our wraps code above can therefore be rewritten like this:
var divs = $$('div'),
divs.each(function(div){
    div.wraps('home-link'),
});
In the first iteration of the loop, the first div object, div1, is inserted in the original position of the home-link element, thereby replacing it. The home-link element is then inserted inside div1, turning it into a child node of the div. The loop then continues, and the second div, div2, is used to replace home-link. Because home-link is now inside div1, div2 is also injected inside div1 first so that it can take the new position of home-link and then home-link is again injected into div2. The process is repeated a third time for div3, and the final result is what we see in the DOM Tree section above. Because of this cascading behavior, it is advised not to use wraps for Elements instances.
The three movement methods we've seen so far—inject, replaces, and wraps—all follow the same pattern: the element from where the methods were called (the subject) is the element that's going to be moved to another location (the target). These methods are therefore nominative methods because the element becomes the subject of the method. However, MooTools has two other methods that are accusative. In this case, the element from where the methods are called becomes the target and the arguments passed to the methods are the ones that become the subject of the movement. That sounds more complicated than it is, so let's look at a few examples to make it clear.
The first of these two accusative methods is grab, which works like inject but instead of moving the subject, it moves the target.
<div id="items"></div>
<a id="home-link" href="home.html">Home Page</a>
With this example, we can move home-link to within items using grab:
var items = $('items'),
items.grab('home-link'),
This produces the following section in the DOM Tree:
<div id="items">
    <a id="home-link" href="home.html">Home Page</a>
</div>
The grab method moved the home-link element inside the items div. This illustrates why we call grab accusative: the subject of our code, items, isn't the one being moved. Instead, the target—which in our example is home-link—is the one that's inserted into the subject. This is the reverse of how nominative methods work. With a nominative method like inject, if we do $('items').inject('home-link'), the items div will be inserted inside home-link. However, this grab code would be equivalent to a reversed form of inject: $('home-link').inject('items').
Like inject, grab uses document.id internally, so you can pass a string id or an element object as an argument (but not an Elements instance). The grab method also accepts where arguments, such as 'bottom' and 'top'.
The second accusative method, and the last movement method, is called adopt. It is similar to grab, but it allows for multiple arguments: you can pass string ids, element objects, or even Elements instances. Revisiting our earlier two-list example:
<ul id="first">
    <li>Item A</li>
    <li>Item B</li>
    <li>Item C</li>
</ul>
<ul id="second"> </ul>
We can move the items from the first list to the second using adopt:
var listItems = $('first').getElements('li'),
$('second').adopt(listItems);
The result is as we'd expect:
<ul id="first">
</ul>

<ul id="second">
    <li>Item A</li>
    <li>Item B</li>
    <li>Item C</li>
</ul>
Unlike all other methods so far, adopt allows for several elements at once, so passing an Elements instance will not result in an error. It does not support where arguments, but it can take more than one argument. This allows us, for example, to move items from several places instantly:
<ul id="first">
    <li>Item A</li>
    <li>Item B</li>
    <li>Item C</li>
</ul>

<ul id="second">
    <li>Item D</li>
<li id="itemE">Item E</li>
</ul>
<ul id="third">
<li>Item F</li>
<li>Item G</li>
</ul>
<ul id="final">
</ul>We want to move all list items from the first and third lists into the final list and we also want to move the list item with the id "itemE" to the final list. We can do this quickly using adopt:
var firstItems = $('first').getElements('li'),
var thirdItems = $('third').getElements('li'),

$('final').adopt(firstItems, thirdItems, $('itemE'));
And here's the result:
<ul id="first">
</ul>

<ul id="second">
    <li>Item D</li>
</ul>

<ul id="third">
</ul>

<ul id="final">
    <li>Item A</li>
    <li>Item B</li>
    <li>Item C</li>
    <li>Item F</li>
    <li>Item G</li>
    <li id="itemE">Item E</li>
</ul>
With a single adopt call, we were able to move several elements from different sources at once. This makes adopt ideal for multiple transfers between elements.
Note
The adopt method isn't just fast in terms of code: it's also fast internally because it uses a special DOM feature called document fragments. A document fragment is like a mini DOM Tree that can be used to store elements prior to inserting them into the DOM. The amazing thing about this feature is that a fragment can be inserted directly into the DOM without having to loop through its contents. This makes for very fast inserts—something that's important for large element collections.
Aside from moving them around, another common operation on elements is modifying their attributes and styles. MooTools provides both separate and unified APIs for these processes, and we'll look at the methods from these APIs one by one.
The first attribute method is setProperty, which is used to add or modify element attributes. It takes two arguments: attribute and value, which are the attribute being set and the value it will be set to.
<a id="home-link" href="home.html">Home</a>
Here we have a simple link element. We want this link to open in a new page, so we decide to add a target attribute to it and point it to _blank. We can do this using setProperty:
var link = $('home-link'),
link.setProperty('target', '_blank'),
This will add a new target attribute to our element, like so:
<a id="home-link" href="home.html" target="_blank">Home</a>
When the attribute argument is an attribute that does not exist yet on the element, setProperty will add this new attribute to the element. However, if the element already has that attribute defined, setProperty will update the value of the attribute. This means we can change the href of our original link like so:
var link = $('home-link'),
link.setProperty('href', 'otherhome.html'),
This updates our link's href property:
<a id="home-link" href="otherhome.html">Home</a>
The setProperty method is not limited to attributes that are considered "valid" in the sense that they're included in the HTML specs. You can use any attribute you'd like, even weird ones. The snippet $('home-link').setProperty('super-weird-attrib', 'wow'), for example, is just as "valid" as our other example with setProperty.
You can define multiple properties using the setProperties method, which takes a single object argument instead of two string arguments:
var link = $('home-link'),
link.setProperties({
    'href': 'otherhome.html',
    'target': '_blank',
    'super-weird-attrib': 'wow'
});
This will update our original example to produce this:
<a id="home-link" href="otherhome.html" target="_blank" super-weird-attrib="wow">Home</a>
The getProperty method is the accessor equivalent of setProperty. It takes a single string argument, attribute, and returns the corresponding value of the attribute as a string for existing attributes and null for nonexistent attributes.
var link = $('home-link'),
console.log(link.getProperty('target')); // '_blank'
console.log(link.getProperty('silliness')); // null
It also has a multiple-argument equivalent, getProperties, that accepts several attribute arguments and returns a map of the values:
var link = $('home-link'),
console.log(link.getProperties('target', 'silliness')); // {target: '_blank', silliness: null}
The final attribute method is removeProperty, which is used to remove an attribute from an element. It takes a single argument, attribute, which is the name of the attribute to remove:
var link = $('home-link'),
console.log(link.getProperty('target')); // '_blank'

// remove the target attribute
link.removeProperty('target'),

console.log(link.getProperty('target')); // null
An interesting thing to note is that if you pass null as the value argument for the setProperty method, setProperty will behave like removeProperty:
var link = $('home-link'),
console.log(link.getProperty('target')); // '_blank'

// remove the target attribute
link.setProperty('target', null);

console.log(link.getProperty('target')); // null
This works because setProperty checks the value argument and if it is null, it calls removeProperty automatically. The check is actually a non-existence check, which means simply that calling setProperty('target') will trigger removeProperty('target'), because the value argument is undefined (and therefore equal to null).
While attributes are a straightforward topic, element styles are much more complicated because they involve a discussion of browser style rendering and CSS styles. In order to keep our focus, we'll defer the deep discussion on styles to Chapter 12, when we talk about animation and the Fx classes. For now, we'll talk about the simple style-related methods: setStyle and getStyle.
The setStyle method takes two arguments, property and value. The property argument is a string that corresponds to the specific style property that will be set, while the value argument is the value that will be used for the property.
<div id="wrapper"></div>
Suppose we have a div element with the id "wrapper" in our DOM Tree and we want to set its background color to black. We can do this using setStyle, like so:
var div = $('wrapper'),
div.setStyle('background-color', '#000'),
We called setStyle and passed two arguments: first is the string 'background-color' and the second is another string '#000'. The first argument tells setStyle that we want to change the background-color style property of our div, and the second tells it that we want to change this particular style property to black (#000 is the HEX color code for black).
Internally, the setStyle method works by modifying the element's style property, which is a CSSStyleDeclaration object. An element's style property represents the particular styles defined via the element's style attribute. After we called the code above, the div's style attribute will be updated to reflect the changes in the style property:
<div id="wrapper" style="background-color: #000;"></div>
This change of the style property will be reflected in the rendered page, and your users will see it in their browser window immediately.
You can set several styles at once using a variant of the setStyle method called setStyles. This variant takes a single object as an argument, each key-value pair of which represents a single style declaration. Suppose we want to update our wrapper div to have a white background and a height of 200px:
var div = $('wrapper'),
div.setStyles({
    'background-color': '#FFF',
    'height': '200px'
});
This results in an update of the div element:
<div id="wrapper" style="background-color: #FFF; height: 200px;"></div>
The accessor equivalent of setStyle is getStyle. It takes a single argument, property, and returns the value of the style property with that name. Continuing with our example, we can find out the value of our wrapper div's background-color using getStyle:
var div = $('wrapper'),
console.log(div.getStyle('background-color')); // '#FFF'
Finally, like setStyle, getStyle also has a multi-argument method: getStyles. It takes multiple property arguments and returns an object containing the values for those properties.
Undoubtedly the most useful set of element modification methods is composed of three simple functions: set, get, and erase. These three methods can be used to do the work of all the modification methods we've seen so far—which gives them their nickname universal modificators—and their use extends to areas we haven't covered yet.
These three methods are dynamic: their behavior changes depending on the argument passed to them. In particular, they get their behaviors using a special object called Element.Properties, which defines the rules—called dynamic property objects—for how they behave according to how they were called and the arguments passed to them. We'll learn more about how this all works in a later section, but right now we'll focus on how they're used.
The set method is called the universal setter because it can be used to set the value of almost any element property. It takes two arguments: property, which tells the method which property we'd like to set, and value, which is the value to set that property to.
The set method understands several property values by default. For example, passing 'html' as the property argument, like $('myEl').set('html', '<p>Hello!</p>'), will turn set into an innerHTML setter that changes the HTML source of the element. Other default properties include 'text', which sets the inner text of an element, and 'class', which changes the element's class attribute.
But that's only the simple property options. Remember our setStyle method? The set method also understands the 'style' option, which means we can do something like this:
$('wrapper').set('style', 'background-color: #000'),And how about setStyles, which uses an object argument? No problem, it's supported via the 'styles' option, too:
$('wrapper').set('styles', {'background-color': '#000', 'height': '200px'});For attributes, it gets even simpler: if set receives a property argument that it doesn't understand, it automatically uses setProperty:
$('home-link').set('target', '_blank'),Because set doesn't understand the 'target' option by default, it will invoke setProperty to handle the setting. The code above is in fact conceptually the same as doing setProperty('target', '_blank')—but it's much terser.
One great thing about set is that it can be used to set multiple properties at once. Instead of calling set multiple times, you can simply pass it an object argument with the things you want to set:
$('wrapper').set({
    'html': '<p>Hello!</p>',
    'class': 'greeting',
    'styles': {
        'background-color': '#000',
        'color': '#FFF'
    },
    'fancy-attrib': 'magical'
});
The resulting update will be similar to this:
<div id="wrapper" class="greeting" style="background-color: #000; color: #FFF;"
   fancy-attrib="magical">
    <p>Hello!</p>
</div>
The get method, in a similar manner, is the universal getter method. This method takes a single argument, property, and returns the value associated with that property. Like set, get understands the default property options, like 'html' or 'text', as well as special options like 'style', and it also defaults to getProperty when it doesn't understand the passed property option.
var div = $('wrapper'),
console.log(div.get('html')); // '<p>Hello!</p>'
console.log(div.get('class')); // 'greeting'
console.log(div.get('style')); // 'background-color: #000; color: #FFF;'
console.log(div.get('fancy-attrib')); // 'magical'
You can also use a single get call to retrieve multiple properties. To do this, you have to pass it an array containing the properties you want to access. It then returns an object containing the results, like so:
var div = $('wrapper'),
var result = div.get(['html', 'class', 'style', 'fancy-attrib']);

console.log(result);
/*
{
    'html': '<p>Hello!</p>',
    'class': 'greeting',
    'style': 'background-color: #000; color: #FFF;',
    'fancy-attrib': 'magical'
}
*/
The final universal modificator, erase, is the universal remover method. It is invoked in the same fashion as get, but it removes properties instead of returning them. Since erase is pretty much self-explanatory, we won't go into detail—although I do have to mention that erase is rarely used because you can achieve the same results by passing a null value with set.
These three universal modificators are the swiss-army knives of element modification, and their use is much broader that what we see here. We'll take a look at how they're implemented in a later section, and we'll see more of their use in the next chapters.
While moving elements around the DOM Tree and modifying their properties is enough for some scripting tasks, some programs involve creating new elements and inserting them into the DOM Tree. MooTools provides several ways to do this, each with its own pros and cons.
The easiest way to add new elements to the page is by adding new HTML source to the document. You can do this by setting the HTML source of an element using the set method.
Suppose we have an empty list like so:
<ul id="list">
</ul>
We can add an item to the list by inserting some new HTML source:
var list = $('list'),
var htmlString = '<li>Item A</li>';

list.set('html', htmlString);
We called the set method of the list element, passing in 'html' to tell it that we want to modify the HTML source of the element. We also passed a second argument, htmlString, which contains the actual HTML source string we want to insert. This code will produce a DOM Tree section like this:
<ul id="list">
    <li>Item A</li>
</ul>
Setting the HTML source of the element will create new elements, and we can then use the selector functions to select the new elements and manipulate them as we would with elements that are already in the tree.
This technique is the fastest way to create new elements, and it is the preferred method to use for really large element insertions—such as updating the document using HTML responses from XMLHttpRequest. Internally, set('html') works by setting the innerHTML property of the element, which is fast because it's a simple assignment statement.
However, this method is not the holy grail of element creation. For one, it changes the actual structure of your element by replacing its internal HTML source: any child nodes inside the element will be destroyed and replaced with the new HTML. While this is fine in some cases, most of the time you'll want to keep structure, so simply replacing the HTML source of an element won't suffice.
The second technique involves cloning an already existing element using the clone method. Take, for instance, the following section:
<ul id="list">
    <li>Item A</li>
    <li>Item B</li>
</ul>
Now we simply want to add a new list item to the list, without destroying the original list items. We can do this by cloning one of the list items:
var newItem = $('list').getElement('li').clone();We use the getElement method to select a single list item from the list, then we use clone to create a new element that copies the element. However, if we look at the result of this snippet, we'll see that nothing changed:
<ul id="list">
    <li>Item A</li>
    <li>Item B</li>
</ul>
The clone was created, but it didn't appear in the DOM Tree. What gives?
What happened is that the new element was indeed created, but it's not yet in the DOM Tree. This is an important point that you have to understand: when you create new elements, they exist outside the DOM Tree. They are not yet part of the DOM Tree, and you have to explicitly insert them using one of the movement methods we saw in the previous section. Until then, they are simply element objects that are inside the JavaScript environment but outside the DOM.
With this in mind, we can modify our original snippet:
var newItem = $('list').getElement('li').clone();
newItem.inject('list'),
And this will update the list element like so:
<ul id="list">
    <li>Item A</li>
<li>Item B</li>
<li>Item A</li>
</ul>As you can see, the new element is exactly like the element it was cloned from. In fact, almost every property from the original element will be copied to the clone. One exception is event handlers, which are not cloned by default—but you can clone event handlers from one element to another using the cloneEvents method, which we'll talk about in Chapter 10.
You can update your newly cloned object using the methods we saw in the previous section. For example, we can use set to change the text of our new element:
var newItem = $('list').getElement('li').clone();
newItem.set('text', 'Item C').inject('list'),
This will yield the following result:
<ul id="list">
    <li>Item A</li>
    <li>Item B</li>
    <li>Item C</li>
</ul>
Like using set('html') however, cloning elements using the clone method is a very limited technique. Because cloning involves copying elements, the kinds of elements you can create are limited to the ones already in your DOM Tree. In order to have true flexibility, we need a proper element constructor—and that constructor is, of course, Element.
Like other type constructors, the Element constructor is used in conjunction with the new keyword. It takes a single required argument, tag, which corresponds to the type of element you want to create. Going back to our list example:
<ul id="list">
    <li>Item A</li>
    <li>Item B</li>
</ul>
We can add a new list item by creating a new element object via the Element constructor and then injecting it into our list:
var newItem = new Element('li'),
 newItem.inject('list'),
This will update our list with the new element:
<ul id="list">
    <li>Item A</li>
    <li>Item B</li>
    <li></li>
</ul>
The new element we created has no inner text, nor does it have any attributes attached because the Element constructor creates blank element objects by default. Like in the example for clone, we can update our newly created element using the modification methods we saw in the previous section.
var newItem = new Element('li'),
 newItem.set('text', 'Item C').inject('list'),
We use the set method to change the inner text of our new list item, and this will update the result like this:
<ul id="list">
    <li>Item A</li>
    <li>Item B</li>
    <li>Item C</li>
</ul>
While this works, there's an even easier way to do it. The Element constructor actually allows a second argument, properties, which is an object that will automatically be passed to set. We can remove the extra call to set in our example above and move the text setting to the Elements constructor:
var newItem = new Element('li', {'text': 'Item C'});
newItem.inject('list'),
This internal use of the set method makes it easy to define really complex elements:
new Element('div', {
    'id': 'wrapper',
    'class': 'container',
    'html': '<p>Hello!</p>',
    'styles': {
        'background': '#000',
        'color': '#FFF',
        'font-size': '12px'
    },
    'data-name': 'wrapper div'
});
This snippet creates a new div element and automatically sets both its attributes and styles, as well as its innerHTML value. Using the Element constructor this way makes it easy to create elements on the fly and decreases additional calls to the element modification methods.
Before we close this section, though, there's one more nifty trick with Element: you aren't limited to passing just an HTML tag for the first argument—you can also use a full CSS selector.
Suppose you want to create a new link that looks like this:
<a id="home-link" class="internal" href="home.html" target="_blank">Home Page</a>
The common way would be to specify all those properties using the second argument, like so:
new Element('a', {
    'id': 'home-link',
    'class': 'internal',
    'href': 'home.html',
    'target': '_blank',
    'text': 'Home Page'
});
This is the preferred way of doing it. However, a nifty feature is that you can move all those declarations (except text) into the first argument by passing a CSS selector instead:
new Element('a#home-link.internal[href="home.html"][target="_blank"]', {text: 'Home Page'});This will produce the same results as the previous example. Unfortunately, it doesn't look as pretty, but it does showcase the selector-parsing abilities built into the Element constructor.
Finally, we end with the methods for destroying elements. Let's say we have the following DOM Tree section:
<div id="nav">
    <a id="home-link" href="home.html">Home</a>
</div>
We can destroy the element in several ways. The first is with the destroy method, which removes an element from the DOM Tree and destroys the object completely:
var homelink = $('home-link').destroy();
console.log(typeOf(homelink)); // 'null'
In this snippet we call the destroy method of the home-link element, which removes the element from the DOM Tree and then deletes the actual node object, making it completely unusable from thereon. The resulting HTML section will look like this:
<div id="nav"></div>
Another way to remove elements is through the dispose method. Like the destroy method, the dispose method also removes an element from the DOM Tree. However, it does not completely destroy the element, which makes it possible to reuse the element later:
var homelink = $('home-link').dispose();
console.log(typeOf(homelink)); // 'element'
Like the previous example, this snippet also results in the following DOM Tree section:
<div id="nav"></div>
However, the dispose method does not destroy our element completely, but instead only removes it from the DOM Tree. This is why we get 'element' instead of 'null' when we pass the argument to typeOf. The dispose method thus makes it possible for us to remove an element from the DOM Tree and reinject it later if needed.
Finally, we have the empty method. Unlike the previous two methods, the empty method does not remove the element from where it was called, but instead destroys the children of the element.
$('nav').empty();In this snippet we called the empty method of the nav element. This will remove all the elements inside the nav element, producing the same DOM Tree section as above:
<div id="nav"></div>
Internally, the empty element uses destroy, which means that all the child elements are completely obliterated. We can achieve the same thing by calling destroy on all child nodes:
$('nav').getChildren().destroy();The Element type is unarguably the most important MooTools type object when it comes to DOM scripting. All element objects—both inside and outside the DOM Tree—inherit from Element.prototype and with this type object, MooTools is able to extend all elements in the page to create a better API for working with the DOM.
In the native DOM API, the Element constructor is a placeholder constructor: you can access it using its identifier, but you can't invoke it as a constructor using the new keyword. This is because the Element constructor isn't actually used for creating elements. Instead, the Element constructor is used to implement a proper prototype chain between Node and HTMLElement, which means it's used for nothing else aside from inheriting properties from Element.prototype. In fact, Internet Explorer versions prior to version 9 go the extra mile and hide the Element constructor from the DOM API, making it inaccessible from JavaScript.
MooTools, on the other hand, gives good use to the Element constructor by turning it into a proper constructor. MooTools does this by storing the browser's native Element constructor (if available) in Browser.Element and then overriding this native constructor with a new global type object. This involves declaring a new constructor function called Element in the global scope to override the native constructor. The prototype of this new constructor is then pointed to the prototype of the original using Browser.Element.prototype, which effectively turns the new Element type into a full replacement for the native one—prototype included.
On the inside, Element is a very simple constructor. As we saw in the previous section, it can take two arguments: tag, which is the element to be created, and properties, which are properties passed to the set method of the newly created element.
When the value of the tag argument is a string and is a simple HTML tag like 'a' or 'section', the Element constructor simply passes the arguments to a special function called document.newElement. This function first calls on the document.createElement function, which is a function from the native DOM API, to create a new element with that particular tag. It then passes the new element to document.id, which will return the element immediately, and then the set method is invoked using the properties object as an argument. The resulting element is then be returned by the Element constructor.
If the value of the tag argument is a complex string selector like our last example in the previous section, an extra step is added to the process. The Element constructor first parses the string selector using the selector engine so it can separate the actual tag from the attributes, and then adds these attributes to the properties object. It then goes through the same process as above, producing an element as a result.
However, if the tag argument isn't a string to begin with, all these steps are skipped and the tag argument is passed directly to document.id for processing. The result then is whatever document.id returns.
You'll notice that the return value of the Element constructor is never the instance created through the new keyword. This is intentional: for the most part, we want our elements to be instances of their true types, like HTMLAnchorElement for links or HTMLDivElement for divs. The Element constructor, on the other hand, creates generic elements. We therefore discard this generic element and use document.createElement to create a proper instance.
In any case, the results are the same: document.createElement returns an element that inherits from Element, so our Element methods are still present in the new elements even if they weren't constructed directly via the Element constructor.
The document.id function, which we first encountered as a means to select elements from the DOM, is a very interesting function. As we found out, this function is used throughout the Element constructor, as well as inside the document.newElement function. So what exactly does it do?
Like the universal modificator methods, document.id is a dynamic method: its behavior changes depending on the arguments passed to it. The function can understand three kinds of arguments: strings, elements, and objects. Each of these argument types has its own special operation stored in a special function named after that type.
When you pass a string argument to document.id, it performs the string operation. This operation starts with an id search using the selector engine. The selector engine called Slick (which we'll learn more about in Chapter 9), is the one responsible for actually selecting elements from the DOM Tree. MooTools only wraps the Slick API to provide its own variants, but all element selection still happens using the selector engine.
The selector engine will search for the element using the string id argument passed to document.id. If it doesn't find a match, document.id will simply return null. If it finds a match, however, a second operation is done.
This second operation is called the element operation. It involves turning the element returned by the selector engine into a unique MooTools element by providing it with a special property called uid. This uid property is used internally by MooTools, and is therefore not of concern right now. The element operation also does object extension for elements that do not inherit methods automatically from Element. When this operation is done, the final element object is returned by document.id.
If the argument to document.id is an element object, something else happens. The function will first check this element instance if it's already a proper MooTools element by checking its $family and uid property. If these properties exist in the element object, document.id simply returns the object immediately. However, if one of the properties is missing, it means that the element hasn't been properly extended yet, and document.id will perform the element operation on this object to turn it into a proper element before returning it.
When document.id receives an object argument that's not an element, though, it performs an object operation. This is one of the more interesting operations because it involves a special feature of objects (and classes). In particular, the object operation involves checking whether the object argument has a special method called toElement. If it doesn't, the object operation will exit and document.id will return null. If it does, however, the object operation will invoke this method to retrieve the element value of object, and then use the returned value for the element operation.
To understand how the object operation works, let's look at these examples:
console.log(document.id({})); // nullHere we passed an empty object to document.id, which then performs the object operation on the argument. The object operation checks whether the object has a toElement method, and since it doesn't, it simply terminates and document.id returns null.
However, suppose we pass an object with a toElement method:
var obj = {
    toElement: function(){
        return new Element('div'),
    }
};

console.log(document.id(obj)); // <div></div>
Here we define a new object called obj with a toElement method that returns a new div element. When we pass this object to document.id, we no longer get null. Instead, document.id performs the object operation, which calls the toElement method of the obj. The div element returned by the method is then processed through the element operation to turn it into a proper element, before returning it from document.id.
This special feature makes it possible for us to create types and classes that can be used with document.id:
var Widget = new Class({

    initialize: function(element){
        this.element = element;
    },

    toElement: function(){
        return this.element;
} });
Instances of this Widget class can now be simply passed to document.id to retrieve an actual element. When the instance of a class with a toElement method is passed to it, document.id will call the toElement method in order to get the element value of the class. We can therefore treat toElement like the valueOf method, but for exporting the element value of an object instead of its primitive value.
Because the Element constructor is a type object, we can use the same type object methods we saw in Chapter 6 to add new methods to element objects.
As with other types, we use the implement method to add new methods to Element:
Element.implement({
switchClass: function(first, second){
var hasSecond = this.hasClass(second);
this.removeClass(hasSecond ? second : first);
this.addClass(hasSecond ? first : second);
return this;
}

});This adds a new method to Element.prototype that's used for switching between two classes:
var myDiv = new Element('div', { 'class': 'yes' });

console.log(myDiv.get('class')); // 'yes'

myDiv.switchClass('yes', 'no'),
console.log(myDiv.get('class')); // 'no'

myDiv.switchClass('yes', 'no'),
console.log(myDiv.get('class')); // 'yes'
One thing you'll notice in our switchClass method is that we end the function by returning the element itself, via return this. This is deliberate: almost all Element methods—with the exception of selector and getter methods—will return the element itself. This is to provide for a chaining pattern, which allows us to call multiple methods in a single chain.
new Element('div').set({
    'class': 'yes'
}).switchClass('yes', 'no').inject(document.body);
This chaining pattern is popular, and it's especially useful for instances where you don't want to keep references to the element using a variable. However, method chaining should be used moderately: very long chains make your code very unreadable and can sometimes lead to errors if a part of your chain returns a value other than an element. Because this problem plagues new MooTools users who come from other libraries that heavily use chaining, I will give you just a single piece of advice regarding it: variables are cheap in JavaScript—use them.
As with other types, the methods of Element can also be used as generics. They follow the same rule as other generic functions: the first argument needs to be the object that will be the this keyword value, followed by the actual arguments to the method:
Element.set(document.id('wrapper'), 'class', 'container'),While the Element type is a native constructor that is turned into a type object by MooTools, the Elements type, in contrast, is a purely MooTools construct and it is a very interesting type to study because it showcases one of the real-world uses of custom types.
The Elements type is a special array-like type created by MooTools to represent collections made up of several Element instances. In older versions of MooTools, the Elements type was actually a real array instance with additional properties. However, its current implementation is no longer based on a true array but on an array-like object.
Being an array-like object, an Elements instance has a length property that denotes the number of elements in the collection, and an Elements instance with a length property of 0 is considered an empty collection. Each item inside the collection is referenced by a zero-based numeric index, which can be accessed using the bracket notation.
In itself, Elements is a boring type. Unlike the Element constructor that can be used to create new elements, the Elements constructor functions only as an aggregator. It takes a single optional argument, nodes, which must be an array or array-like object containing elements. The Elements constructor itself does not perform DOM Tree lookups nor create new elements, but only iterates through the arguments passed to it, checking whether the argument is an element and then pushing it into itself. In fact, functions that return Elements instances, like $$ or getElements, first search for the elements using the selector engine and then pass the results from the selector engine to a new Elements instance as a final step.
The basic methods that are available from Elements instances, like each or slice, are in fact methods that Elements copies directly from Array.prototype. Elements copies all Array methods for its use, and then hooks to Array.implement via Array.mirror(Elements) so that any newly implemented Array method will also be available to Elements. However, Elements does reimplement a few Array methods with its own variants that check whether the arguments passed are element objects.
But the really cool thing about Elements is how it receives Element methods. If you recall our earlier examples, we saw that Element methods can be called through Elements instances. This is possible because of a special hook attached to Element using the mirror. This hook automatically implements a looping version of the Element method that iterates over the collection and applies the function to each of the elements in the collection. The result is Element methods that are collection-aware that can be used on Elements instances.
Finally, as with other type objects, you can use the implement method of Elements to add new methods to its instances. However, it is rarely used, since most of the methods for Elements are better implemented through Array or Element instead.
Earlier, when we were discussing element modification, we came across a set of element methods called the universal modificators. These three functions—set, get, and erase—are the three most useful modification functions in MooTools, and their dynamic behavior supports a wide array of uses.
As I mentioned earlier, the behavior of these modificator methods is controlled by a special object, Element.Properties. This object is reminiscent of the Class.Mutators object, because like Class.Mutators, Element.Properties is used to store special objects called property objects.
When a universal modificator function is called, the first thing it does is to take the passed property argument and use it to search for a property object in the Element.Properties object, like so: Element.Properties[property]. If a corresponding property object is found, the universal modificator method will then check if the property object has a method that corresponds to the name of the universal modificator, and if so, it will invoke this function, passing in the arguments it received. If no property object is found, or if the property object does not have a method that corresponds to the name of the modificator function, the modificator will default to using an attribute-modifying function.
Let's clear this up with some examples. Here, for instance, are property object definitions for the 'style' option:
Element.Properties.style = {

    set: function(style){
        this.style.cssText = style;
    },

    get: function(){
        return this.style.cssText;
    },

    erase: function(){
this.style.cssText = '';
}
};When we call $('wrapper').set('style', 'background: #000'), the first thing the set function does is to look for the property object 'style' via Element.Properties['style']. Because a style property object is present, as we see above, the set function will proceed by checking if Element.Properties.style has a method called set—which it does. As a final step, it invokes the set method using Element.Properties.style.set.apply(this, value), binding the this keyword of the method to the current element and passing 'background: #000' to the method. The function then sets the style.cssText property of the element, thereby changing its style. If we invoked get('style') or erase('style') instead of set, the same lookup will occur, but the get or erase method of Element.Properties.style will be invoked instead of set.
However, if a corresponding property object is not found, the modificator method will default to an attribute method. For example, if we do set('magical', 'wand'), the set method won't be able to find Element.Properties['magical'], so no property object will be used. This will force set to use setProperty instead, which adds the attribute "magical" to the element. In the same vein, get will default to getProperty, and erase will default to removeProperty.
The great thing about dynamic properties is that you can define your own property objects. The process is as simple as adding a new property object to Element.Properties. Here's an example that adds a dynamic property, "display":
Element.Properties.display = {

    set: function(type){
        return this.style['display'] = type || 'block';
    },

    get: function(){
        return this.getComputedStyle('display'),
    },

    erase: function(){
        return this.style['display'] = 'none';
    }

};
After adding this property object, we can use it in conjunction with our modificator methods, like so:
var main = $('main'),

main.erase('display'),
console.log(main.get('display')); // 'none'

main.set('display', 'block'),
console.log(main.get('display')); // 'block'
Dynamic properties like 'style' or 'html' are only a couple of the default properties included in MooTools that can be used with universal modificator methods. MooTools adds properties for other complex operations involving things like events, XMLHttpRequest functions, and even Fx animations. We'll see more uses for dynamic properties in the next chapters.
There are times when you want to associate certain data to elements. For most kinds of objects, we'd normally do this by augmenting the object itself with new properties. However, augmenting new properties to elements can sometimes have weird effects on some browsers that track the state of elements, so directly attaching this data to the element itself isn't recommended.
A commonly used technique is to attach such data to the element using attributes. We could, for example, use the get and set method to do this:
var element = $('item'),

// store the data
element.set('price', 20);

// retrieve the data
console.log(element.get('price')); // '20'Here we attach the price data to our item element using the set method, which adds a new attribute to our item element and stores the data as the value of that attribute. We then fetch the data back using the get method, which returns the value of this attribute.
While this technique works, it has some limitations. First, we need to make sure that we'll use keys for our data that don't conflict with the known element attributes. For instance, we used price in our example, but we can't use keys like id, name, or href because these are known attributes that have special meaning in HTML.
Second and most important, using attributes for storage limits us to string data. Since attribute values are stored and retrieved as strings, all our values will be typecast to strings:
var element = $('item'),

// store the data
element.set('items', [1, 2, 3]);

// retrieve the data
console.log(element.get('items')); // '[1,2,3]'
Here we tried storing an array in our element object using an attribute. Because attributes need to be strings, our array was first cast to a string value before it was attached to our element. When we retrieve the data again using get, we get back a string and not the original array.
Because associating data with elements is a common operation, MooTools provides a special feature called element storage that enables us to attach data directly to an element. We can do this using two element methods, store and retrieve.
var element = $('item'),

// store the data
element.store('price', 20);

// retrieve the data
console.log(element.retrieve('price')); // 20
In this snippet we modified our original example to use the store and retrieve methods from the element storage API. Like in our original example, the price data was attached to the element, which makes it possible for us to retrieve it later.
Unlike using attributes for data storage, the MooTools element storage API is much more flexible because it does not actually store anything on the element. Instead, the element storage API uses a private object store that's accessible only to store and retrieve. This private object store uses the uid property of an element to determine the data associated with the object, which it then exposes to store and retrieve for processing.
Because the element storage API uses a JavaScript object, it's possible to store any kind of data inside it without losing references.
var element = $('item'),

var array = [1, 2, 3];

// store the data
element.store('items', array);

// retrieve the data
console.log(element.retrieve('items') === array); // true
In this snippet we use element storage to store an array in the element. When we retrieve this stored array and compare it with the original, we see that it's still the same array.
This flexibility of the element storage API makes it usable in many areas, and MooTools employs it for some of its most important features. We'll see these storage uses as we go through the next chapters.
Wow, we certainly covered quite a bit of ground in this chapter, didn't we? We learned about the DOM Tree and how the various objects inside it are connected through a hierarchy. We also learned about elements, and got a taste of DOM Scripting, MooTools style.
We found out the different ways to select elements, modify their position, and change their properties and styles. We learned about the various ways to create new elements and how the Element and Elements constructors work. Finally, we discussed the universal modificator functions and how they can be used for easier DOM Scripting.
I can't stress enough the importance of this chapter. The concepts you learned here are the basics of all DOM Scripting using MooTools, and the stuff we saw in this chapter will appear a lot in the next chapters. If you still haven't gotten a hang of how everything works, I suggest you reread this chapter once more. Go on—it will be worth it.
We'll continue talking about elements in the next chapter, but we'll focus on how they're selected from the DOM Tree. We won't talk about functions and methods to do these, though, since we already did that here. Instead, we'll explore the Deus behind the Machina: the thing that enables us to actually find that elemental needle in the DOM Tree haystack.
So line up at the concession stand and get yourself a soda and some popcorn because the show's about to begin: the supporting cast are CSS Selectors, and the star is the Selector Engine.