
Chapter 3
Word Styles
IN THIS CHAPTER
![]() Discovering how styles and templates work
Discovering how styles and templates work
![]() Applying and creating styles
Applying and creating styles
![]() Altering a style
Altering a style
![]() Creating a new template
Creating a new template
Welcome to what may be the most important chapter of this book — or the most important in Book 2, anyway. Styles can save a ridiculous amount of time that you would otherwise spend formatting and wrestling with text. And many Word features rely on styles. You can’t create a table of contents or use the Navigation pane unless each heading in your document has been assigned a heading style. Nor can you take advantage of Outline view and the commands for moving text around in that view. You can’t cross-reference headings or number the headings in a document.
If you want to be stylish, at least where Word is concerned, you have to know about styles.
All about Styles
A style is a collection of formatting commands assembled under one name. When you apply a style, you give many formatting commands simultaneously, and you spare yourself the trouble of visiting numerous tabs and dialog boxes to format text. Styles save time and make documents look more professional. Headings assigned the same style — Heading 1, for example — all look the same. When readers see that headings and paragraphs are consistent with one another across all the pages of a document, they get a warm, fuzzy feeling. They think the person who created the document really knew what he or she was doing.
Styles and templates
 Every document comes with built-in styles that it inherits from the template with which it was created. You can create your own styles to supplement styles from the template. For that matter, you can create a template, populate it with styles you design, and use your new template to create distinctive letters or reports for your company.
A simple document created with the Blank Document template — a document that you create by pressing Ctrl+N — has only a few styles, but a document that was created with a sophisticated template comes with many styles. The Oriel Report template, for example, comes with styles for formatting titles, subtitles, headings, and quotations. Figure 3-1 illustrates how choosing styles from a template changes text formatting. Notice how choosing style options in the Styles pane reformats the text.

FIGURE 3-1: Apply styles to reformat text.
Types of styles
In the Styles pane (refer to Figure 3-1), the symbol next to each style name tells you what type of style you’re dealing with. Word offers three style types:
- Paragraph styles: Determine the formatting of entire paragraphs. A paragraph style can include these settings: font, paragraph, tab, border, language, bullets, numbering, and text effects. Paragraph styles are marked with the paragraph symbol (¶).
- Character styles: Apply to text, not to paragraphs. You select text before you apply a character style. Create a character style for text that is hard to lay out and for foreign-language text. A character style can include these settings: font, border, language, and text effects. When you apply a character style to text, the character-style settings override the paragraph-style settings. For example, if the paragraph style calls for 14-point Arial font but the character style calls for 12-point Times Roman font, the character style wins. Character styles are marked with the letter a.
- Linked (paragraph and character): Apply paragraph formats as well as text formats throughout a paragraph. These styles are marked with the paragraph symbol (¶) as well as the letter a.
Applying Styles to Text and Paragraphs
Word offers several ways to apply a style, and you are invited to choose the one that works best for you. These pages explain how to apply a style and tell Word how to present style names in the various places where style names are presented for your enjoyment and pleasure.
Applying a style
The first step in applying a style is to select the part of your document that needs a style change:
- A paragraph or paragraphs: Because paragraph styles apply to all the text in a paragraph, you need only click in a paragraph before applying a style to make a style apply throughout the paragraph. To apply a style to several paragraphs, select all or part of them.
- Text: To apply a character style, select the letters whose formatting you want to change.
Next, apply the style with one of these techniques:
- Styles gallery: On the Home tab, choose a style in the Styles gallery. (Depending on the size of your screen, you may have to click the Styles button first.) Figure 3-2 shows where the Styles gallery is located. The formatted letters above each style name in the gallery show you what your style choice will do to paragraphs or text. You can “live-preview” styles on the Styles gallery by moving the pointer over style names.
- Styles pane: On the Home tab, click the Styles group button to open the Styles pane, and select a style, as shown in Figure 3-2. Click the Show Preview check box at the bottom of the Styles pane to see formatted style names in the pane and get an idea of what the different styles are. You can drag the Styles pane to different locations on your screen. It remains onscreen after you leave the Home tab.
- Apply Styles task pane: Choose a style on the Apply Styles task pane, as shown in Figure 3-2. To display this task pane, go to the Home tab, open the Styles gallery, and choose Apply Styles (look for this option at the bottom of the gallery). You can drag the Apply Styles task pane to a corner of the screen. As does the Styles pane, the Apply Styles task pane remains onscreen after you leave the Home tab.
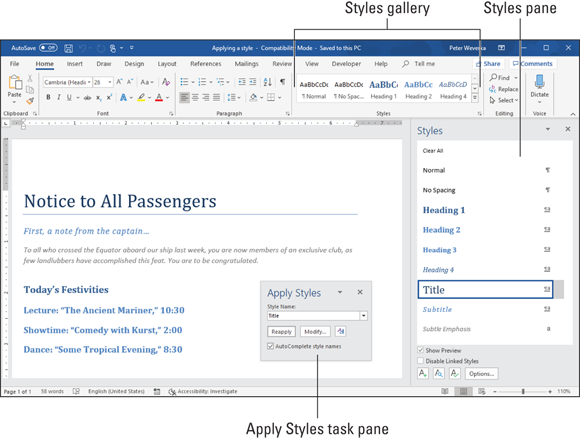
FIGURE 3-2: The three ways to apply a style.
To strip a paragraph or text of its style and give it the generic Normal style, select it and choose Clear Formatting in the Styles gallery or Clear All at the top of the Styles pane.
Experimenting with style sets
A style set is a slight variation on the styles in the template that you chose when you created your document. Figure 3-3 shows examples of style sets. Style sets include Classic, Elegant, Fancy, and Modern. Choosing a style set imposes a slightly different look on your document — you can make it classier, more elegant, fancier, or more modern. All templates, even those you create yourself, offer style sets. Style sets are a convenient way to experiment with the overall look of a document.

FIGURE 3-3: Examples of style sets.
To experiment with style sets, go to the Design tab and choose an option in the Style Set gallery.
To return to the original styles in a template, open the Style Set gallery and choose Reset to the Default Style Set.
Choosing which style names appear on the Style menus
One of the challenges of applying styles is finding the right style to apply in the Styles gallery, Styles pane, or Apply Styles task pane (refer to Figure 3-2). All three can become crowded with style names. To make finding and choosing styles names easier, you can decide for yourself which names appear on the three style menus.
Styles gallery
In the Styles gallery, remove a style name by right-clicking it and choosing Remove from Style Gallery.
Styles pane and Apply Styles task pane
To decide for yourself which style names appear in the Styles pane and Apply Styles task pane, click the Styles group button on the Home tab, and in the Styles pane, click the Options button (found near the bottom of the pane). You see the Style Pane Options dialog box, shown in Figure 3-4. Choose options to tell Word which style names appear in the Styles pane and Apply Styles task pane:
- Select Styles to Show: Choose All Styles to show all style names. The other options place a subset of names in the window and task pane. Recommended style names are those that Microsoft thinks you need most often.
- Select How List Is Sorted: Choose an option to describe how to list styles. Except for Based On, these options are, I think, self-explanatory. The Based On option lists styles in alphabetical order according to which style each style is based on (later in this chapter, “Creating a style from the ground up” explains how the Based On setting is used in constructing styles).
- Select Formatting to Show As Styles: Choose options to declare which styles to list — those that pertain to paragraph level formatting, fonts, and bulleted and numbered lists.
- Select How Built-In Style Names Are Shown: Choose options to tell how to handle built-in styles, the obscure styles that Word applies on its own when you create tables of contents and other self-generating lists.
- Apply to this document or to the template as well: Click the Only in This Document option button to apply your choices only to the document you’re working on; click the New Documents Based on This Template option button to apply your choices to your document and to all future documents that you create with the template you’re using.

FIGURE 3-4: Deciding which names to put in the Styles pane and Apply Styles task pane.
Creating a New Style
You can create a new style by creating it from a paragraph or building it from the ground up. To do a thorough job, build it from the ground up because styles you create this way can be made part of the template you are currently working in and can be copied to other templates. (Later in this chapter, “Creating and Managing Templates” explains templates.)
Creating a style from a paragraph
Follow these steps to create a new style from a paragraph:
- Click in a paragraph whose formatting you want to turn into a style.
On the Home tab, open the Styles gallery and choose Create a Style.
You see the Create New Style from Formatting dialog box.
- Enter a name for your new style.
Click OK.
A style you create this way becomes a part of the document you’re working on; it isn’t made part of the template from which you created your document.
Creating a style from the ground up
To make a style available in documents you will create in the future, make it part of a template and build it from the ground up. In the Styles pane, click the New Style button (you can find it at the bottom of the pane). You see the Create New Style from Formatting dialog box, shown in Figure 3-5. Fill in the dialog box and click OK.

FIGURE 3-5: Creating a brand-spanking-new style.
Here’s a rundown of the options in the Create New Style from Formatting dialog box:
- Name: Enter a descriptive name for the style.
- Style Type: On the drop-down list, choose a style type (“Types of styles,” earlier in this chapter, describes the style types).
 Style Based On: If your new style is similar to a style that is already part of the template with which you created your document, choose the style to get a head start on creating the new one. Be warned, however, that if you or someone else changes the Based On style, your new style will inherit those changes and be altered as well.
- Style for Following Paragraph: Choose a style from the drop-down list if the style you’re creating is always followed by an existing style. For example, a new style called Chapter Title might always be followed by a style called Chapter Intro Paragraph. For convenience, someone who applies the style you’re creating and presses Enter automatically applies the style you choose here on the next line of the document. Applying a style automatically to the following paragraph saves you the trouble of having to apply the style yourself.
- Formatting: Choose options from the menus or click buttons to fashion or refine your style. (You can also click the Format button to do this.)
- Add to Styles Gallery: Select this check box to make the style’s name appear in the Styles gallery, Styles pane, and Apply Styles task pane.
- Automatically Update: Normally, when you make a formatting change to a paragraph, the style assigned to the paragraph does not change at all, but the style does change if you select this box. Selecting this box tells Word to alter the style itself each time you alter a paragraph to which you've assigned the style. With this box selected, all paragraphs in the document that were assigned the style are altered each time you change a single paragraph that was assigned the style.
- Only in This Document/New Documents Based on This Template: To make your style a part of the template from which you created your document as well as the document itself, click the New Documents Based on This Template option button. This way, new documents you create that are based on the template you are using can also make use of the new style.
- Format: This is the important one. Click the button and make a formatting choice. Word takes you to dialog boxes so that you can create or refine the style.
Modifying a Style
What if you decide at the end of an 80-page document that all 35 introductory paragraphs to which you assigned the Intro Para style look funny? If you clicked the Automatically Update check box in the Create New Style from Formatting dialog box when you created the style, all you have to do is alter a paragraph to which you assigned the Intro Para style to alter all 35 introductory paragraphs. However, if you decided against updating styles automatically, you can still change the introductory paragraphs throughout your document.
Follow these steps to modify a style that isn't updated automatically:
- Click in any paragraph, table, or list to which you’ve assigned the style; if you want to modify a character style, select the characters to which you’ve assigned the style.
In the Styles pane or Apply Styles task pane, make sure that the name of the style that you want to modify is selected.
If the right name isn’t selected, select it now in the Styles pane or Apply Styles task pane.
In the Styles pane, open the style’s drop-down list and choose Modify, as shown in Figure 3-6; in the Apply Styles task pane, click the Modify button.
You see the Modify Style dialog box. Does the dialog box look familiar? It is identical to the Create New Style from Formatting dialog box that you used to create the style in the first place (refer to Figure 3-5).
Change the settings in the Modify Styles dialog box and click OK.
The previous section in this chapter explains the settings.

FIGURE 3-6: Choosing to modify a style.
After you modify a style, all paragraphs or text to which the style was assigned are instantly changed. You don’t have to go back and reformat text and paragraphs throughout your document.
Creating and Managing Templates
As I explain at the start of this chapter, every document you create is fashioned from a template. The purpose of a template is to store styles for documents. In the act of creating a document, you choose a template, and the styles on the template become available to you when you work on your document (Chapter 1 of this minibook explains how to choose a template when you create a new document).
For example, when you select Blank Template in the New window or press Ctrl+N, you create a document with the Blank Document template, a relatively simple template with few styles. When you create a document with a template from Office.com or a template from the New window, more styles are available to you because these templates are more sophisticated.
To save time formatting your documents, you are invited to create templates with styles that you know and love. You can create a new template on your own or create a template by assembling styles from other templates and documents. Styles in templates can, like styles in documents, be modified, deleted, and renamed.
To create a document from a template you created yourself, open the New window (on the File tab, choose New), click the Personal tab, and select your template (see Chapter 1 of this minibook for details).
 To find out which template was used to create a document, go to the File tab and choose Info. Then click the Show All Properties link in the Info window. You see a list of document properties, including the name of the template used to create the document.
Creating a new template
How do you want to create a new template? You can do it on your own or assemble styles from other templates. Read on.
Creating a template on your own
One way to create a template is to start by opening a document with many or all the styles you know and love. When you save this document as a template, you pass along the styles in the document to the template, and you save yourself the trouble of creating styles for the template after you create it.
Follow these steps to create a template on your own:
- Create a new document or open a document with styles that you can recycle.
On the File tab, choose Save As.
The Save As window opens.
- Click This PC.
Click the Browse button.
The Save As dialog box appears.
Open the Save As Type menu and choose Word Template.
The Save As dialog box opens to the folder where templates are stored on your computer.
- Enter a name for your template.
- Click the Save button.
Create, modify, and delete styles as necessary (see “Creating a New Style” and “Modifying a Style,” earlier in this chapter).
Assembling styles from different documents and templates
Suppose that you like a style in one document and you want to copy it to another so that you can use it there. Or you want to copy it to a template to make it available to documents created with the template. Read on to find out how to copy styles between documents and between templates.
COPYING A STYLE FROM ONE DOCUMENT TO ANOTHER
Copy a style from one document to another when you need the style on a one-time basis. Follow these steps:
Select a paragraph that was assigned the style you want to copy.
Be sure to select the entire paragraph. If you want to copy a character style, select text to which you have assigned the character style.
- Press Ctrl+C or right-click and choose Copy to copy the paragraph to the Clipboard.
- Switch to the document you want to copy the style to and press Ctrl+V or click the Paste button on the Home tab.
Delete the text you just copied to your document.
The style remains in the Styles pane and Styles gallery even though the text is deleted. You can call upon the style whenever you need it.
COPYING STYLES TO A TEMPLATE
Use the Organizer to copy styles from a document to a template or from one template to another. After making a style a part of a template, you can call upon the style in other documents. You can call upon it in each document you create or created with the template. Follow these steps to copy a style into a template:
Open the document or template with the styles you want to copy.
Later in this chapter, “Opening a template so that you can modify it” explains how to open a template.
In the Styles pane, click the Manage Styles button.
This button is located at the bottom of the window. The Manage Styles dialog box appears.
Click the Import/Export button.
You see the Organizer dialog box, shown in Figure 3-7. Styles in the document or template that you opened in Step 1 appear in the In list box on the left side.
Click the Close File button on the right side of the dialog box.
The button changes names and becomes the Open File button.
Click the Open File button and, in the Open dialog box, find and select the template to which you want to copy styles; then, click the Open button.
See the sidebar “Telling Word where templates are stored,” earlier in this chapter, if you have trouble finding the Templates folder.
The names of styles in the template you chose appear on the right side of the Organizer dialog box.
In the Organizer dialog box, Ctrl+click to select the names of styles on the left side of the dialog box that you want to copy to the template listed on the right side of the dialog box.
As you click the names, they become highlighted.
Click the Copy button.
The names of styles that you copied appear on the right side of the Organizer dialog box.
- Click the Close button and click Save when Word asks whether you want to save the new styles in the template.

FIGURE 3-7: Copying styles to a template.
Opening a template so that you can modify it
Follow these steps to open a template in Word and be able to modify it:
On the File tab, choose Open.
You see the Open window.
- Click This PC.
- Click the Browse button.
In the Open dialog box, go to the Templates folder where you store templates.
See the sidebar “Telling Word where templates are stored,” earlier in this chapter, if you have trouble finding the Templates folder.
- Select the template.
- Click the Open button.
The template opens in the Word window. Style modifications that you make in the template become available to all documents that were fashioned from the template.
Modifying, deleting, and renaming styles in templates
Modify, delete, and rename styles in a template the same way you do those tasks to styles in a document (see “Modifying a Style,” earlier in this chapter). However, in the Modify Style dialog box, select the New Documents Based on This Template option button before clicking OK.
Your style modifications will apply to all documents you create in the future with your template. For the style modifications to take effect in documents you already created with your template, tell Word to automatically update document styles in those documents. Follow these steps:
Save and close your template if it is still open.
If any documents you fashioned from the template are open, close them as well.
- Open a document that you want to update with the style modifications you made to the template.
Go to the Developer tab.
To display this tab if necessary, open the File tab, choose Options, go to the Customize Ribbon category in the Word Options dialog box, select the Developer check box, and click OK.
Click the Document Template button.
The Templates and Add-ins dialog box opens. It should list the path to the Templates folder and the template you modified. If the wrong template is listed, click the Attach button and select the correct template in the Attach Template dialog box.
- Select the Automatically Update Document Styles check box.
- Click OK.