
Chapter 1
Speed Techniques for Using Word
IN THIS CHAPTER
![]() Getting acquainted with Word
Getting acquainted with Word
![]() Creating a Word document
Creating a Word document
![]() Exploring speedy editing techniques
Exploring speedy editing techniques
![]() Making Word read aloud
Making Word read aloud
This chapter explains shortcuts and commands that can help you become a speedy user of Word 365. Everything in this chapter was put here so that you can get off work earlier and take the slow, scenic route home. Starting here, you discover how to create and change your view of documents. You find out how to select text, get from place to place, and mark your place in long documents. You also explore how to insert one document into another, have Word read aloud to you, and create data-entry forms to make entering information a little easier.
Book 1, Chapter 2 explains the basics of entering and formatting text in Word 365 and the other Office 365 applications.
Introducing the Word Screen
Seeing the Word screen for the first time is like trying to find your way through Tokyo’s busy Ikebukuro subway station. It’s intimidating. But when you start using Word, you quickly learn what everything is. To help you get going, Figure 1-1 shows you the different parts of the screen. Here are shorthand descriptions of these screen parts:
- Quick Access toolbar: This toolbar offers the Automatically Save, Save, Undo, Repeat, and Customize buttons (and on touchscreens, the Touch/Mouse mode button). Wherever you go in Word, you see the Quick Access toolbar. (Book 1, Chapter 1 explains the toolbar in detail; Book 9, Chapter 1 explains how to customize and move the Quick Access toolbar.)
- Ribbon Display Options button: Clicking this button opens a menu for handling the Ribbon.
- Minimize, Restore, Close buttons: These three magic buttons make it very easy to shrink, enlarge, and close the window you are working in.
- The Ribbon: Select a tab on the Ribbon to undertake a new task. Tab names — File, Home, Insert, and so on — are located along the top of the Ribbon. (Book 1, Chapter 1 explains the Ribbon in detail, and Book 9, Chapter 1 explains how to customize the Ribbon.)
- Status bar: The status bar gives you basic information about where you are and what you’re doing in a document. It tells you what page and what section you’re in, and the total number of pages and words in your document. Book 9, Chapter 1 explains how to customize the status bar.
- View buttons: Click one of these buttons — Read Mode, Print Layout, or Web Layout — to change your view of a document. (Later in this chapter, “Getting a Better Look at Your Documents” describes the different ways to view a document.)
- Zoom controls: Use these controls to zoom in and out on your work.

FIGURE 1-1: The Word screen.
Creating a New Document
Document is just a fancy word for a letter, report, announcement, or proclamation that you create with Word. All documents are created using a special kind of file called a template. The template provides the formats — the fonts, styles, margin specifications, layouts, and other stuff — that give a document its appearance.
When you create a document, you are asked to choose a template to establish what your document will look like. If your aim is to create an academic report, flyer, newsletter, calendar, résumé, or other sophisticated document, see whether you can spare yourself the formatting work by choosing the appropriate template when you create your document. (Chapter 3 of this minibook explains templates in detail and how to create your own templates.)
Follow these basic steps to create a document:
On the File tab, choose New.
The New window shown in Figure 1-2 appears.
Click to select a template.
A preview window appears with a description of the template you chose, as shown in Figure 1-2.
Click the Create button in the preview window.
Your new Word document opens.

FIGURE 1-2: To create a document, choose a template in the New window.
Use these techniques in the New window to choose a template and create a document:
- Choose the Blank Document template: Choose Blank Document to create a bare-bones document with few styles. Blank Document is the default template for creating documents. (By pressing Ctrl+N, you can create a new document without opening the New window.)
- Search online for a template: Enter a search term in the Search box and click the Start Searching button (or click a suggested search term). Templates appear in the New window. You can click a template to examine it closely in a preview window (refer to Figure 1-2). Click the Create button to create a document from the template.
- Choose a template: Select a template to examine it in a preview window (refer to Figure 1-2). Click the Create button in the preview window to create a document from the template.
- Choose a personal template: On the Personal tab, click to select a template and create a document. A personal template is one that you created or copied to your computer or network. Chapter 3 of this minibook explains how to create templates. The Personal tab appears in the New window only if you’ve created templates or copied them to your computer.
 If your search for the perfect template takes you too far afield, you can click the Home button to return to the New window.
To find out which template was used to create a document, go to the File tab, choose Info, and in the Info window, click the Show All Properties link (it’s located in the lower-right corner of the window). The Properties list appears. Among other things, it tells you the template with which the document was created.
Book 1, Chapter 1 explains how to save documents after you create them, as well as how to open a document you want to work on.
Getting a Better Look at Your Documents
A computer screen can be kind of confining. There you are, staring at the darn thing for hours at a stretch. Do you wish the view were better? The Word screen can’t be made to look like the Riviera, but you can examine documents in different ways and work in two places at one time in the same document. Better read on.
Viewing documents in different ways
In word processing, you want to focus sometimes on the writing, sometimes on the layout, and sometimes on the organization of your work. To help you stay in focus, Word offers different ways of viewing a document. Figure 1-3 shows these views. These pages explain how to change views, the five different views, and why to select one view over another. (Be sure to visit Book 1, Chapter 3 as well; it describes how to view a document through more than one window and how to open a second window in a document.)

FIGURE 1-3: The different document views (top to bottom): Read Mode, Print Layout, Web Layout, Outline, and Draft.
Changing views
Use these techniques to change views:
- Click one of the three View buttons on the right side of the status bar.
- On the View tab, click one of the five buttons in the Views group.
Read mode
Switch to Read mode to focus on the text itself and proofread your documents. You can’t enter or edit text in Read mode. Everything is stripped away — the Ribbon, scroll bars, status bar, and all. All you see are the text and artwork in your documents. Read mode is designed for reading documents on tablet computers. (To leave Read mode, select View on the menu bar and the top of the screen and choose Edit Document on the drop-down list.)
Print Layout view
Switch to Print Layout view to see the big picture. In this view, you can see what your document will look like when you print it. You can see graphics, headers, footers, and even page borders in Print Layout view. You can also see clearly where page breaks occur (where one page ends and the next begins). In Print Layout view, you can click the One Page, Multiple Pages, or Page Width button on the View tab to display more or fewer pages on your screen.
Web Layout view
Switch to Web Layout view to see what your document would look like as a web page. Background colors appear (if you chose a theme or background color for your document). Text is wrapped to the window rather than around the artwork in the document. Book 9, Chapter 2 explains how to save an Office file, including a Word document, as a web page.
Outline view
Switch to Outline view to see how your work is organized. In this view, you can see only the headings in a document. You can get a sense of how your document unfolds and easily move sections of text backward and forward in a document. In other words, you can reorganize a document in Outline view. Chapter 8 of this minibook explains outlines in torturous detail.
Draft view
Switch to Draft view when you’re writing a document and you want to focus on the words. Pictures, shapes, and other distractions don’t appear in this view, nor do page breaks (although you can clearly see section breaks). Draft view is best for writing first drafts.
Splitting the screen
Besides opening a second window on a document (a subject of Book 1, Chapter 3), you can be two places at one time in a Word document by splitting the screen. One reason you might do this: You’re writing a long report and want the introduction to support the conclusion, plus you want the conclusion to fulfill all promises made by the introduction. Achieving both goals can be difficult to do sometimes, but you can make it easier by splitting the screen so that you can be two places at one time as you write your introduction and conclusion.
Splitting a window means to divide it into north and south halves, as shown in Figure 1-4. In a split screen, two sets of scroll bars appear so that you can travel in one half of the screen without disturbing the other half. Follow these steps to split the screen:
On the View tab, click the Split button.
A gray line appears onscreen.
Drag the gray line until the gray line is where you want the split to be.
You get two screens split down the middle. You can also split the screen by pressing Ctrl+Alt+S.
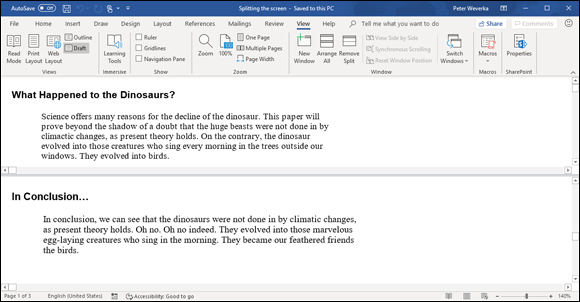
FIGURE 1-4: A split screen.
When you tire of this split-screen arrangement, click the Remove Split button on the View tab or drag the line to the top or bottom of the screen. You can also double-click the line that splits the screen in two.
In a split screen, you can choose a different view for the different halves. For example, click in the top half of the screen and choose Outline view to see your document in outline form, and click in the bottom half and choose Draft view to see the other half in Draft view. This way, for example, you can see the headings in a document while you write the introduction.
Selecting Text in Speedy Ways
Book 1, Chapter 2 explains how to enter text and change its appearance and size. After you enter text, you inevitably have to copy, move, or delete it, but you can’t do those tasks until you select it first. Table 1-1 describes shortcuts for selecting text.
TABLE 1-1 Shortcuts for Selecting Text
To Select This |
Do This |
A word |
Double-click the word. |
A line |
Click in the left margin next to the line. |
Some lines |
Drag the mouse pointer over the lines or drag it down the left margin. |
A sentence |
Ctrl+click the sentence. |
A paragraph |
Double-click in the left margin next to the paragraph. |
A mess of text |
Click at the start of the text, hold down the Shift key, and click at the end of the text. |
A gob of text |
Put the cursor where you want to start selecting, press F8, and press an arrow key, drag the mouse, or click at the end of the selection. |
Text with the same formats |
On the Home tab, click the Select button and choose Select Text with Similar Formatting (you may have to click the Editing button first). |
A document |
Hold down the Ctrl key and click in the left margin; triple-click in the left margin; press Ctrl+A; or go to the Home tab, click the Select button, and choose Select All (you may have to click the Editing button first). |
 If a bunch of highlighted text is onscreen and you want it to go away but it won’t (because you pressed F8), press the Esc key.
After you press F8, all the keyboard shortcuts for moving the cursor also work for selecting text. For example, press F8 and then press Ctrl+Home to select everything from the cursor to the top of the document. Later in this chapter, “Keys for getting around quickly” describes keyboard shortcuts for getting from place to place.
Moving around Quickly in Documents
Besides sliding the scroll bar, Word offers a handful of very speedy techniques for jumping around in documents: pressing shortcut keys, using the Go To command, and navigating with the Navigation pane. Read on to discover how to get there faster, faster, faster.
Keys for getting around quickly
One of the fastest ways to go from place to place is to press the keys and key combinations listed in Table 1-2.
TABLE 1-2 Keys for Moving around Documents
Key to Press |
Where It Takes You |
PgUp |
Up the length of one screen |
PgDn |
Down the length of one screen |
Home |
To the start of the line |
End |
To the end of the line |
Ctrl+PgUp |
To the previous page in the document |
Ctrl+PgDn |
To the next page in the document |
Ctrl+Home |
To the top of the document |
Ctrl+End |
To the bottom of the document |
Here’s a useful keystroke for getting from place to place: Shift+F5. Press it once to go to the location of your most recent edit. Press it two or three times to go back one or two edits before that. Pressing Shift+F5 is useful when you want to return to the place where you made an edit but can’t quite remember where that place is.
Navigating from page to page or heading to heading
In lengthy documents such as the one in Figure 1-5, the best way to get from place to place is to make use of the Navigation pane. Click a heading or a page in the Navigation pane, and Word takes you there in the twinkling of an eye.

FIGURE 1-5: In the Navigation pane, click a heading or page thumbnail to go from place to place.
To display the Navigation pane, go to the View tab and click the Navigation Pane check box (you may have to click the Show button first). Then select a tab in the Navigation pane and go to it:
- Going from heading to heading: Select the Headings tab. Headings in your document appear (provided you assigned heading styles to headings, a subject of Book 2, Chapter 3). You can use the Navigation pane like a table of contents and click headings to get from place to place. Right-click a heading and choose a Show Heading Levels option on the shortcut menu to tell Word which headings to display. You can also right-click a heading and choose Expand All or Collapse All to see or hide lower-level headings.
- Going from page to page: Select the Pages tab. A thumbnail image of each page in the document appears. To quickly move from page to page, use the scroll bar in the Navigation pane or click a page thumbnail. Each thumbnail is numbered so that you always know which page you’re viewing.
Going there fast with the Go To command
Another fast way to go from place to place in a document is to use the Go To command. On the Home tab, open the drop-down list on the Find button and choose Go To (you may have to click the Editing button first). You see the Go To tab of the Find and Replace dialog box, shown in Figure 1-6. You can also open this dialog box by pressing Ctrl+G or F5.

FIGURE 1-6: Using the Go To command.
The Go to What menu in this dialog box lists everything that can conceivably be numbered in a Word document, and other things, too. Click a menu item, enter a number, choose an item from the drop-down list, or click the Previous, Next, or Go To buttons to go elsewhere.
Bookmarks for hopping around
Rather than press PgUp or PgDn or click the scroll bar to thrash around in a long document, you can use bookmarks. All you do is put a bookmark in an important spot in your document that you'll return to many times. To return to that spot, open the Bookmark dialog box and select a bookmark name, as shown in Figure 1-7. True to the craft, the mystery writer whose bookmarks are shown in Figure 1-7 wrote the end of the story first and used bookmarks to jump back and forth between the beginning and end to make all the clues fit together.
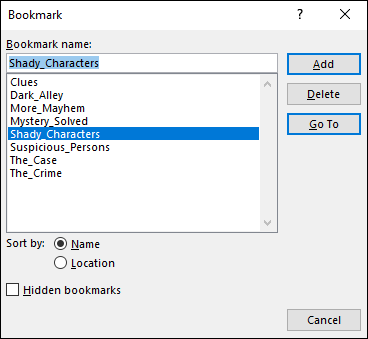
FIGURE 1-7: The Bookmark dialog box.
Follow these instructions to handle bookmarks:
- Inserting a bookmark: Click where you want the bookmark to go, visit the Insert tab, and click the Bookmark button (you may have to click the Links button first, depending on the size of your screen). Then, in the Bookmark dialog box, type a descriptive name in the Bookmark Name box, and click the Add button. Bookmarks can’t start with numbers or include blank spaces. You can also open the Bookmark dialog box by pressing Ctrl+Shift+F5.
- Going to a bookmark: On the Insert tab, click the Bookmark button (you may have to click the Links button first), double-click the bookmark in the Bookmark dialog box, and click the Close button.
- Deleting a bookmark: Select the bookmark in the Bookmark dialog box and click the Delete button.
 Word uses bookmarks for many purposes. For example, bookmarks indicate where cross-references are located in a document.
Inserting a Whole File into a Document
One of the beautiful things about word processing is being able to recycle documents. Say that you wrote an essay on the Scissor-Tailed Flycatcher that would fit very nicely in a broader report on North American birds. You can insert the Scissor-Tailed Flycatcher document into your report document:
- Place the cursor where you want to insert the document.
On the Insert tab, open the drop-down list on the Object button and choose Text from File.
You see the Insert File dialog box. (The Object button is located in the Text group on the right side of the Ribbon.)
- Find and select the file you want to insert.
Click the Insert button.
You can insert more than one file with the Text from File command. Select more than one file in the Insert File dialog box and click the Insert button. Files land in the document in the order in which they appear in the Insert File dialog box.
Getting Word to Read It
Rather than read it yourself, you can get Word to read it aloud. Word can read you a bedtime story if you open it onscreen first. Follow these steps to hear Word read all or part of a document:
- Open the document that needs to be read.
Switch to Print Layout view or Web Layout view, if necessary.
Earlier in this chapter, “Getting a Better Look at Your Documents” explains views.
On the Review tab, click the Read Aloud button.
A toolbar appears with buttons you can click to make Word pause or stop reading. Click the Settings button on the toolbar to change reading speeds or choose a different reading voice.
To start reading in the middle of a document, click where you want the reading to start before you click the Read Aloud button. To read a passage, select it before clicking the Read Aloud button.
- Click the Stop button on the toolbar or the Read Aloud button a second time to tell Word to stop reading.
Entering Information Quickly in a Computerized Form
A form is a means of soliciting and recording information. You can use forms like the one shown in Figure 1-8 to enter data faster and to reduce data-entry errors. Instead of entering all the information manually, which takes time, you or a data-entry clerk can choose entries from combo boxes, drop-down lists, and date pickers. Information you enter manually is more likely to be accurate because you choose it from prescribed lists instead of entering it yourself.

FIGURE 1-8: A data-entry form.
To create a form like the one shown in Figure 1-8, start by creating a template for your form and putting data-entry controls — the combo boxes, drop-down lists, and date pickers — in the form. To fill out a form, you create a document from the form template and go to it. These pages explain how to create a form and use forms to record information.
Creating a computerized form
The first step in creating a data-entry form is to create a template for holding the form. After that, you design the form itself by labeling the data fields and creating the data-entry controls. Better keep reading.
Creating a template to hold the form
Follow these steps to create a new template:
- Press Ctrl+N to create a new document.
On the File tab, choose Save As.
You see the Save As window.
Click the Browse button.
The Save As dialog box opens.
- Open the Save As Type menu and choose Word Template.
Enter a descriptive name for your template and click the Save button.
Word stores your template in the Default Personal Templates Location folder. Chapter 3 of this minibook explains templates in detail, as well as where this folder is located.
Creating the form and data-entry controls
Your next task is to create the form and data-entry controls for your template. Enter labels on the form where you will enter information. The form in Figure 1-8, for example, has five labels: Name, Phone, Fee Paid?, Association, and Date. After you enter the labels, follow these steps to create the data-entry controls:
Display the Developer tab, if necessary.
If this tab isn’t showing, go to the File tab, choose Options, and on the Customize Ribbon category of the Word Options dialog box, look for the Developer check box on the right side of the screen, select this check box, and click OK. (Book 9, Chapter 1 explains in detail how to customize the Ribbon.)
Click where you want to place a control, and then create the control by clicking a Controls button followed by the Properties button on the Developer tab.
Here are instructions for creating three types of controls:
- Drop-down list: A drop-down list is a menu that “drops” when you open it to reveal different option choices (refer to Figure 1-8). Click the Drop-Down List Content Control button and then the Properties button. You see the Content Control Properties dialog box, as shown in Figure 1-9. For each option you want to place on the drop-down list, click the Add button, and in the Add Choice dialog box, enter the option’s name in the Display Name text box and click OK, as shown in Figure 1-9.
- Combo box: As with a drop-down list, a combo box “drops” to reveal choices. However, as well as choose an option on the drop-down list, data-entry clerks can enter information in the box (refer to Figure 1-8). Click the Combo Box Content Control button and then the Properties button. In the Content Control Properties dialog box, enter option names the same way you enter them in a drop-down list, as shown in Figure 1-9.
- Date picker: A date picker is a mini-calendar from which data-entry clerks can enter a date (refer to Figure 1-8). Click the Date Picker Content Control button and then the Properties button. In the Content Control Properties dialog box, choose a display format for dates and click OK.
Click the Save button to save your template.
Now you’re ready to use your newly made form to enter data.

FIGURE 1-9: Click the Add button to create options for a drop-down list or combo box.
Entering data in the form
Now that you have the template, you or someone else can enter data cleanly in easy-to-read forms by following these steps:
On the File tab, choose New.
You see the New window.
Click the Personal tab.
This tab lists templates stored on your computer.
Double-click the name of the template you created for entering data in your form.
The form appears.
Enter information in the input fields.
Press the up or down arrow, or press Tab and Shift+Tab to move from field to field. You can also click an input field to move the cursor there.
- When you’re done, print the document or save it.