
Chapter 11
Ten Retouch Menu Tricks
IN THIS CHAPTER
![]() Finding the in-camera editing tools
Finding the in-camera editing tools
![]() Seeing original and retouched photos side-by-side
Seeing original and retouched photos side-by-side
![]() Eliminating red-eye
Eliminating red-eye
![]() Leveling horizon lines and correcting distortion
Leveling horizon lines and correcting distortion
![]() Brightening shadows with a D-Lighting adjustment
Brightening shadows with a D-Lighting adjustment
![]() Making a black-and-white copy of a color photo
Making a black-and-white copy of a color photo
![]() Cropping away excess background
Cropping away excess background
Every photographer produces a clunker now and then. When it happens to you, don’t be too quick to press the Delete button, because many common problems can be fixed by using tools on the camera’s Retouch menu. It’s easy and completely risk-free, too: When you apply these tools, the camera doesn’t alter your original file; it makes a copy and applies changes to only the copy.
This chapter offers tips for putting the major retouching tools to best use. See Chapter 9 for help with the Resize and Raw Processing tools; Chapter 7 for details about Trim Video tool; and Chapter 12 for a look at Overlay Pictures, a special-effects tool that creates the look of a multiple-exposure image.
Accessing Retouching Tools
You can take either of these routes to access most retouching tools:
- Open the Retouch menu, represented by the icon labeled in Figure 11-1. The figure shows the first page of the menu; scroll to the second page to uncover more tools. Choose a tool to display a thumbnails screen like the one shown on the right in the figure. The thumbnail surrounded by the yellow box is currently selected. To select a different photo for editing, tap it or use the Multi Selector to move the box over it. Then tap the OK symbol or press the OK button to display options related to the chosen retouching tool.

FIGURE 11-1: One way to get to the editing tools is from the Retouch menu.
 During playback, use the i menu. Display the photo you want to retouch, press the i button, and choose Retouch, as shown on the left in Figure 11-2. On the next screen, shown on the right in the figure, select a tool and press OK to access the tool settings.
You can’t use the i menu to access one tool, Overlay Pictures. You can get to that feature only through the regular Retouch menu.
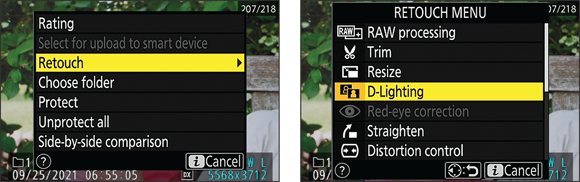
FIGURE 11-2: During playback, you also can access the tools from the i menu.
 When you use the first method, the camera displays a yellow X over any images or videos that can’t be altered using the selected tool, as shown on the right in Figure 11-1. When you access the tools via the i menu, any tools not compatible with the current image or video are dimmed. A tool may be off-limits for these reasons:
- The tool isn't relevant to the current file. For example, Red-Eye Correction is unavailable for pictures you shot without flash. The camera knows that you don’t need the tool because red-eye is caused by flash.
- You previously applied a tool that prevents further editing. You can apply multiple tools to the same original, creating a new edited copy each time, but you need to be careful in what order you edit because some tools produce a file that can't be altered by other tools. If you see a Retouched symbol (labeled on the right in Figure 11-1) plus the yellow X, the previous edit prevents further changes. As I detail each tool in this chapter, I explain which other tools it may derail.
- You already used the selected tool on the current image. You can apply a tool only once to an image.
 You used the Protect feature to lock the file. A key symbol marks locked files. To unlock a file, press the AE-L/AF-L button.
- The picture wasn’t taken with the Z fc. If you use your memory card in other cameras, you may be able to view the images taken on those cameras, but you usually can’t apply the retouching tools.
Applying the Tools
After you choose a retouching tool, you see options specific to that tool. I provide details later for tools covered in this chapter. But you should know a few things about applying all retouching tools:
 Get a bigger preview: If the Zoom symbol appears at the bottom of any screen, press the Zoom In button or tap the Zoom symbol to magnify the image. Release the button or tap the exit arrow in the upper right corner of the screen to exit the magnified view.
Create the edited copy of the file: Unless I specify otherwise, tap the OK Save symbol on the editing screen or press the OK button to create the retouched copy of the image. The copy is saved in the JPEG format, using the same Image Quality setting as the original. If you begin with a Raw image, the copy is saved in the JPEG format, using the Fine setting.
 The retouched image is assigned the next available file number. During picture playback, a Retouched symbol like the one shown in Figure 11-1 appears on all images you created by applying a retouching tool unless you use the display mode that hides onscreen data, called None (Picture Only). Chapter 8 explains how to change playback display modes.
Comparing Original and Edited Versions
![]() During playback, you can view the original photo and the retouched copy side by side. Start by displaying either the original or retouched image. Then press the i button and select Side-by-Side Comparison, as shown on the left in Figure 11-3. A screen similar to the one shown on the right in the figure appears, with your original on the left and the edited version on the right. A text label indicates the tool used to create the edited copy. For example, I used the Monochrome tool to create a black-and-white copy in the figure.
During playback, you can view the original photo and the retouched copy side by side. Start by displaying either the original or retouched image. Then press the i button and select Side-by-Side Comparison, as shown on the left in Figure 11-3. A screen similar to the one shown on the right in the figure appears, with your original on the left and the edited version on the right. A text label indicates the tool used to create the edited copy. For example, I used the Monochrome tool to create a black-and-white copy in the figure.
![]() The yellow box indicates the selected image. Select the other image by using the Multi Selector to move the box or by tapping the image. You can then tap Zoom or press the Zoom In button to study the selected image at a larger size. Release the button or tap the exit arrow to return to the side-by-side view.
The yellow box indicates the selected image. Select the other image by using the Multi Selector to move the box or by tapping the image. You can then tap Zoom or press the Zoom In button to study the selected image at a larger size. Release the button or tap the exit arrow to return to the side-by-side view.

FIGURE 11-3: The Side-by-Side Comparison option is available only from the i menu.
When the retouched version is selected, you can also use these tricks:
- If you applied more than one tool to the picture, yellow arrows appear at the side of the yellow selection box. Press the Multi Selector right and left to display thumbnails that show how each tool affected the image.
- If you created multiple edited copies of the photo, press the Multi Selector up and down to scroll through them. The same trick enables you to see the two images used to create a multiple-exposure image using the Overlay Picture tool (again, I cover that tool in Chapter 12).
Two caveats: If you deleted the original file, the camera can’t display it in the side-by-side view. Nor can it display original files that you locked by using the Protect feature that I cover in Chapter 9.
![]() To return to normal playback, select the image you want to display (the original or the altered version). Then press the Playback button.
To return to normal playback, select the image you want to display (the original or the altered version). Then press the Playback button.
Removing Red-Eye
For portraits marred by red-eye, choose Red-Eye Correction. When the camera detects red-eye, it applies the filter and displays the retouched image. Figure 11-4 shows an example of a successful red-eye reduction repair — well, partially successful, anyway. The boy’s eyes were addressed perfectly, but the dog’s weren’t. That’s because animal eyes turn green, yellow, or white in response to a flash, and the red-eye repair tool knows how to replace only red-eye pixels. So, repairing animal eyes can’t be done in the camera. You can paint in the proper eye colors in a photo-editing program or find a software tool specifically designed to repair the animal version of red-eye.
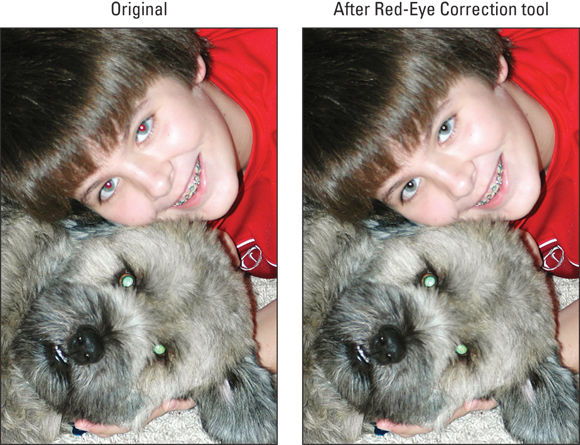
FIGURE 11-4: The Red-Eye Correction tool works on human eyes but not on animal eyes.
Leveling Horizon Lines
Despite my best efforts, my landscape and architectural photos rarely feature a level horizon line. I don't understand why I can't seem to “shoot straight,” even with the aid of the grid display I introduce in Chapter 1. All I know is that I'm glad I can use the Straighten tool to rotate the image into proper alignment.
After you select the Straighten tool, a grid appears over the photo, as shown in Figure 11-5. The yellow marker under the scale at the bottom of the screen shows the direction and amount of rotation. To move the marker, drag left or right on the scale or press the Multi Selector right or left. You can achieve a maximum rotation of 5 degrees in either direction.

FIGURE 11-5: Use the Straighten tool to level crooked horizon lines.
 When you use the Straighten tool (or the tools discussed next), the camera needs to crop the image slightly in order to make the correction. So frame your subject loosely when shooting if you think you may need to use these tools. That way, critical areas aren’t lost due to the correction.
Eliminating Lens Distortion
Certain lenses create barrel distortion, in which objects at the center of a picture appear to be magnified and pushed outward — as if you wrapped the photo around the outside of a barrel. The left image in Figure 11-6 shows an example. Pincushion distortion produces the opposite result, making center objects appear smaller and farther away.

FIGURE 11-6: I used the Distortion Control tool to eliminate barrel distortion.
The Auto Distortion Control option on the Photo Shooting menu is designed to correct distortion as you shoot. If it doesn’t do the trick, the Distortion Control tool on the Retouch menu is available for post-capture editing. You’re offered two tool settings:
- Auto: If the camera recognizes your lens, it attempts to correct distortion based on its knowledge of the lens.
- Manual: Choose this option if Auto is dimmed or you simply prefer to make the correction on your own. A scale indicating the degree and direction of the correction appears under the photo. Use the Multi Selector to move the yellow marker along the scale until you remove as much distortion as possible. I used the Manual setting to create the corrected photo shown on the right in Figure 11-6.
As with the Straighten tool, some of the original image is cropped as a result of the correction.
Correcting Converging Lines
When you photograph a tall building and tilt the camera upward to fit it all into the frame, an effect known as convergence occurs, causing vertical lines to appear to lean inward. Buildings sometimes look like they’re falling away from you, as shown in the left image in Figure 11-7. If the lens is tilting down, vertical structures lean outward, and the building appears to be falling toward you. Either way, try applying the Perspective Control tool. I used the tool to produce the second image in Figure 11-7.

FIGURE 11-7: The original photo exhibited convergence (left); applying the Perspective Control tool corrected the problem (right).
After you select the tool, you see a grid and two scales: a horizontal scale at the bottom of the screen, and a vertical scale on the left side of the screen. Drag left or right on the bottom scale (or press the Multi Selector left and right) to move the out-of-whack structure horizontally. Drag up and down on the vertical scale or press the Multi Selector up and down to rotate the object toward or away from you.
For the camera to perform this magic, it actually distorts the original, tugging the corners this-way-and-that to maneuver things into proper alignment. This distortion produces an irregularly shaped image, which then must be cropped and enlarged or reduced to create a copy that has the same pixel dimensions as the original. That’s why the After photo in Figure 11-7 contains slightly less subject matter than the original. (The same cropping occurs if you make these changes in a photo editor.)
Adjusting Exposure with D-Lighting
Chapter 3 explains Active D-Lighting, an exposure setting that brightens shadows but leaves highlights alone. You can apply a similar adjustment to an existing photo by choosing D-Lighting from the Retouch menu, as shown on the left in Figure 11-8. After you choose the option, adjust the Effect setting to specify the strength of the adjustment, as shown on the right.

FIGURE 11-8: D-Lighting brightens shadows without affecting highlights.
You can’t apply the D-Lighting tool to pictures taken using the Monochrome Picture Control. Nor does D-Lighting work on pictures to which you previously applied the Monochrome tool (detailed next) or that you cropped using the Trim tool (covered at the end of this chapter).
Creating a Monochrome Version
Choose this tool to create a black-and-white, sepia, or cyanotype (blue-and-white) copy of a color photo. For the sepia and cyanotype tools, you can adjust the intensity of the tint by pressing the Multi Selector up or down.
After creating a monochrome image, you can't apply the D-Lighting tool to it. So if you want to use that tool, do so before applying the Monochrome tool.
Cropping Your Photo
To crop means to trim away a portion of the perimeter of a photo. You might crop a photo for compositional reasons, or you may need to create an image that has proportions different from the original.
The Trim tool enables you to crop directly in the camera. However, always make this your last editing step because you can't alter the cropped version using any other Retouch menu tools. After you select the Trim tool, you see the screen shown in Figure 11-9. The yellow box represents the crop frame, which you can adjust as described in the following list:
- Set the crop aspect ratio. You can crop to one of five aspect ratios: 3:2, 4:3, 5:4, 1:1, or 16:9. The current aspect ratio appears in the upper right corner of the screen, as shown in the figure. To cycle through the settings, rotate the Main command dial. The camera presents you with two orientations for each setting except 1:1; just keep rotating the dial to find the orientation you want (vertical or horizontal frame).
Adjust the crop frame size. For each aspect ratio, you can choose from a variety of crop sizes, which depend on the size of the original. Sizes are stated in pixels, explained in Chapter 2. The number of pixels within the crop box is displayed in the upper left corner of the screen. Use these techniques to change how much image is cropped away:
- Crop the photo more tightly. Tap the Reduce symbol, labeled in the figure, or press and release the Zoom In button. Each tap or button press crops the image more.
 Retain more of the original. To enlarge the crop frame so that it includes more of the original image area, tap the symbol labeled “Enlarge frame size” in Figure 11-9, or press the Zoom Out button.
If you're cropping in advance of printing the image, remember that in order to generate a good print, you need about 300 pixels per linear inch of the print — 1200 x 1800 pixels for a 4 x 6 print, for example.- Reposition the cropping frame. Press the Multi Selector up, down, right, or left. Or just drag the frame around on the screen.

FIGURE 11-9: The yellow box indicates the cropping frame.
When you view cropped images during playback, a scissors symbol appears in the lower right corner of the frame, along with the new image size (in pixels). You also see the Retouch symbol.