
Chapter 10
Ten More Customization Settings
IN THIS CHAPTER
![]() Editing the i menu
Editing the i menu
![]() Creating your own menu
Creating your own menu
![]() Choosing new folder names and filenames
Choosing new folder names and filenames
![]() Changing the behavior of certain buttons and dials
Changing the behavior of certain buttons and dials
![]() Adjusting automatic camera shutdown
Adjusting automatic camera shutdown
As you’ve no doubt deduced, Nikon is eager to let you customize almost every aspect of the camera's operation. This chapter provides a quick overview of adjustments not considered in earlier chapters. Space limitations prevent me from providing in-depth coverage of these features, so for full details on options that intrigue you, see the camera instruction manual.
Swapping Out Items on the i Menu
![]() Pressing the i button brings up the i menu, which gives you a quick way to access certain settings. If you rarely access a setting on the menu, you can replace it with one you use regularly. This trick works only for the i menus that appear during shooting; you can’t alter the playback i menu.
Pressing the i button brings up the i menu, which gives you a quick way to access certain settings. If you rarely access a setting on the menu, you can replace it with one you use regularly. This trick works only for the i menus that appear during shooting; you can’t alter the playback i menu.
To edit the i menu that appears when you’re shooting photos, open the Custom Settings menu, choose Controls, and then choose Customize i Menu, as shown on the left in Figure 10-1. On the next screen, use the Multi Selector to highlight the setting you want to replace, as shown on the right in the figure. Press OK to display a list of alternative settings; select your choice and press OK again to return to the right screen in the figure. Then press the Menu button or tap the Menu Done symbol.
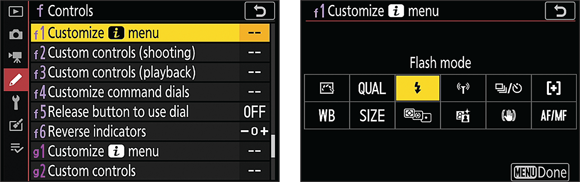
FIGURE 10-1: Customize the i menu for photography via this Custom Settings menu option.
The process is the same for customizing the i menu that appears when you’re shooting videos except that you start by choosing Customize i Menu from the Video section of the Custom Settings menu. The option appears on the left menu screen in Figure 10-1 as setting g1.
Creating Your Own Menu
In addition to creating custom i menus, you can build your own regular menu, called My Menu, that holds up to 20 options. The idea is to put all your favorite options in one place so that you don’t have to rummage through multiple menus to reach them. Follow these steps:
Choose the My Menu icon, labeled on the left in Figure 10-2, and then press the Multi Selector right to activate the menu.
My Menu shares a slot on the list of menu icons with the Recent Settings menu. To switch from one menu to the other, select Choose Tab from either menu.
Choose Add Items, as shown on the left in Figure 10-2.
A list of other menus appears, as shown on the right in the figure.
Choose a menu that contains a setting you want to add to your menu.
A list of all settings on the selected menu appears.
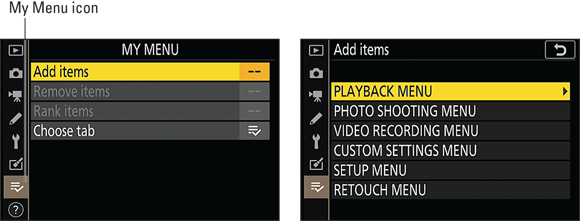
FIGURE 10-2: Display the My Menu screen, choose Add Items, and then select a menu that contains an option you want to put on the menu.
To add an item, tap it or use the Multi Selector to highlight it and then press the OK button.
The camera displays the Choose Position screen, showing the menu item you just added. On this screen, you can set the order of each item as you add it. Ignore that possibility for now; it’s better to add all items to your menu and then reorder them. (I explain how at the end of these steps.)
Press the OK button or tap the return arrow at the top of the screen to return to the My Menu screen.
The item you just added appears at the top of the screen.
Repeat Steps 2–5 to add more items to your menu.
 A few items can’t be added to a custom menu. A box with a slash through it appears next to those items. A check mark means that the item is already on your menu.
After you add two or more menu items, the Rank Items and Remove Items options on the initial My Menu screen become available. Use Rank Items to reorder the menu; choose Remove Items to delete entries from the menu.
Editing Filenames
Normally, filenames begin with DSC_ or _DSC, depending on the Color Space setting, detailed in Chapter 5. DSC_ indicates the sRGB space; _DSC, Adobe RGB. You can substitute other characters for DSC as follows:
Change the prefix for photos: Open the Photo Shooting menu and choose File Naming. On the screen shown on the left in Figure 10-3, choose File Naming again to display the keyboard shown on the right. Rotate the Main command dial to select the character you want to replace (D is selected in the figure). Then tap the replacement character on the keyboard. For other ways to enter text on keyboard screens, review the Chapter 5 section about creating custom White Balance presets.
 To lock in the edited filename, tap OK or press the Zoom In button.
- Change the prefix for videos: Open the Video Recording menu and then proceed as outlined for photo filenames.
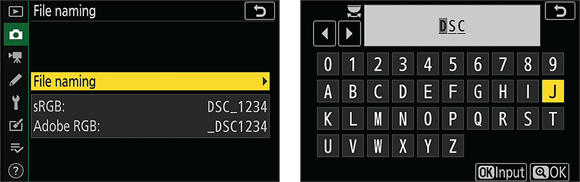
FIGURE 10-3: You can customize the first three characters of filenames.
The camera uses your custom name for new files only.
Creating New Storage Folders
By default, your camera stores files in a folder named 100NZ_FC. Folders have a limit of 999 files; when you exceed that number or the last photo in that folder has the file number 9999, the camera creates a new folder, assigning the next available folder number. You can create a new folder or folders at any time, however. Doing so can make it easier to find a certain type of files. You might set up one folder numbered 200NZ_FC for work images and use the default 100NZ_FC folder for personal photos, for example. You also can replace the first five characters of the folder name, changing NZ_FC to something like JULIE.
Start by opening the Photo Shooting menu and selecting Storage Folder. The screen shown on the left in Figure 10-4 appears. Move forward as follows:
- Replace the 5-character prefix: Choose Rename to display a keyboard screen as shown on the right in Figure 10-4. Enter the new folder prefix by using the techniques outlined in the preceding section.
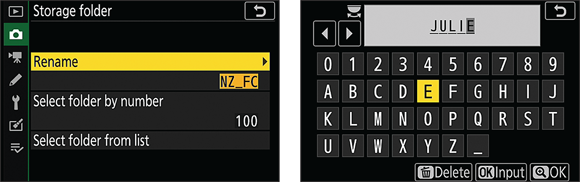
FIGURE 10-4: You can create new folders or change the default folder prefix.
- Create a new folder: Choose Select Folder by Number, as shown on the left in Figure 10-5, to display the options shown on the right, which enable you to specify the folder number. (If you select a number that already exists, a folder icon appears to the left of the value boxes.) After setting the folder number, press OK. The camera creates the folder and selects it as the current storage folder.

FIGURE 10-5: Use this option to select a folder to hold the next images or videos you shoot.
Each time you shoot, verify that the folder you want to use is shown for the Storage Folder option on the Photo Shooting menu. If not, select that option and then choose Select Folder by Number to enter the folder number or choose Select Folder from List to pick from a list of all available folders. A half-full folder icon to the left of the folder number, like the one shown in Figure 10-5, shows that the folder contains files but has room for more. A full icon means the folder is either stuffed to its capacity or contains a file with the number 9999. Either way, you can't put any more pictures in that folder.
Controlling File Numbering
At the default settings, the first file you create is assigned a filename that ends in the number 0001. When you reach number 9999, numbering is reset to 0001. You can change this numbering scheme by choosing File Number Sequence in the Shooting/Display section of the Custom Settings menu. When the option is On, the default scheme is in play. Choose Off to restart numbering at 0001 each time you insert a new memory card or when a new storage folder is created. To manually restart numbering at 0001, choose Reset. After you choose Reset, the camera behaves as though On is enabled.
 If you choose Off or Reset, you can easily wind up with multiple images that have the same filename — not on the current memory card, but when you download files to your computer. Also, if the file number count reaches image 9999 in folder 999, you must choose Reset and then either format the current memory card (erasing everything on it) or install a brand-new one.
Assigning New Tasks to Buttons
You can modify the function of various buttons from the Controls section of the Custom Settings menu. To assign button functions for photo shooting, choose Custom Controls (Shooting), as shown on the left in Figure 10-6, which leads to the screen shown on the right. Don’t panic: It’s not as complicated as it seems. Here’s what you need to know:
Check the current settings: The table on the right shows customizable buttons and their current assignments. For example, in the figure, the Fn button bears the WB label, meaning that pressing the button displays a White Balance settings screen. To the left of the table, the camera symbol contains a yellow dot to indicate the location of the selected button. The Function (Fn) button is spotlighted in the figure. You also see a text label naming the button and its current job.
Some buttons are specific to lenses that contain customizable buttons. For those options, you see a lens diagram instead of a camera. If your lens has no customizable buttons, don’t worry about these settings.
- Change a button function: Tap the button’s symbol or highlight it and press OK. The camera displays a list of jobs you can assign. Select your choice and press OK to return to the right screen in Figure 10-6. When you’re satisfied with all your button assignments, press the Menu button or tap Menu Done on the screen.

FIGURE 10-6: Use this option to assign new functions to certain camera and lens buttons.
To customize buttons for video recording, choose Custom Controls from the Video section of the Custom Settings menu. (Look for item g2, shown at the bottom of the left screen in Figure 10-6.) From there, things work as just described, but you get one option not available for photo shooting: You can customize the function of the shutter button. Normally, pressing the button takes a photo, but you can set it to start and stop recording instead.
To customize Playback button functions, choose Custom Controls (Playback) from the Controls menu (it’s item f3, right below the Custom Controls (Shooting) option that’s highlighted on the left in Figure 10-6). This time, you can set new jobs only for the AE-L/AF-L and OK buttons.
Customizing the Command Dials
You can modify several aspects of how the camera’s command dials behave, too. Open the Custom Settings menu, choose Controls, and then choose Customize Command Dials, as shown on the left in Figure 10-7, to display the four options shown on the right in the figure.
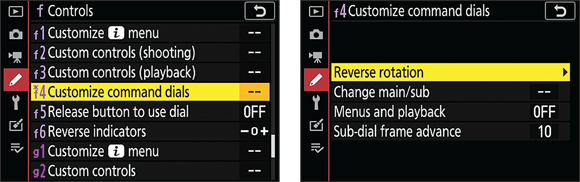
FIGURE 10-7: You can change what the command dials do during shooting and playback via these settings.
Due to space limitations, I can’t cover the myriad ways you can customize the command dials, so I’ll just point out two options that I find helpful and leave you to discover the rest in the camera’s instruction manual:
Use the command dials to select menu items and to scroll through pictures during playback. Choose Menus and Playback from the screen shown on the right in Figure 10-7 and then select On. You then can rotate the Main command dial to highlight menu options and rotate the Sub-command dial right to display any submenu associated with the current item. Rotating the Sub-command dial left jumps to the previously displayed menu.
During playback, you can rotate the Main command dial to scroll through your photos and videos in single-image view and to highlight images in Thumbnail view. Rotating the Sub-command dial in single-image view advances forward or backward ten frames by default (use the Sub-dial Frame Advance option directly below the Menus and Playback option to set the number of frames for this feature and other playback functions).
Use the command dials plus a button to quickly change the Focus mode and AF-area mode. First use the options explained in the preceding section to assign a button to the Focus mode/AF-area mode function. Assign the button function for normal shooting through the Custom Controls (Shooting) option; for video shooting, use the Custom Controls option in the Video section of the Custom Settings menu. Then travel to the screen shown on the right in Figure 10-7, choose Change Main/Sub, and set Autofocus to On. Now you can change the Focus mode by holding down the designated button while rotating the Main command dial and change the AF-area mode by using the button together with the Sub-command dial. This setup makes faster work of adjusting the autofocus settings than using the i menu.
I use the Fn button for this purpose. By default, the button displays the White Balance settings, but I’m happy to give up that button function because I don’t change the White Balance setting nearly as often as I adjust the Focus mode and AF-area mode.
 Normally, an operation that involves both a camera button and a command dial requires you to hold down the button while spinning the dial. If you find that process difficult, locate the Release Button to Use Dial setting, found in the Controls section of the Custom Settings menu, and change the setting to On. You then use a different technique to adjust settings: Press the button, release it, rotate the associated command dial, and then press the button again to deactivate the option.
Modifying the Shutter Button’s Role
At the default settings for still photography, pressing the shutter button halfway initiates autofocusing and exposure metering, but the camera adjusts exposure up to the time you take the picture. To set the button to lock exposure and focus, open the Custom Settings menu, choose Timers/AE Lock, and choose Shutter-Release Button AE-L. Choose from two settings: ON (half-press) locks exposure when you press the button halfway. ON (burst mode) enables this shutter-button feature only when you use one of the Continuous Release modes. Remember that you can also lock exposure and focus by pressing the AE-L/AF-L button, as explained in Chapter 3, though some people find it easier to use the shutter button.
You also can change the role of the shutter button during video recording, using it to stop and start recording instead of taking a still photo. Make this change via the Custom Controls option for video, as outlined in the earlier section “Assigning New Tasks to Buttons.”
Adjusting Auto Shutdown Timing
After a period of inactivity, you camera turns off certain features to save battery power. You can modify the delay time before auto shutdown occurs, by opening the Custom Settings menu and choosing Power Off Delay, as shown in Figure 10-8. On the next screen, shown on the right in the figure, specify shutdown timing for picture playback, menu display, the picture review period (the length of time a photo is displayed immediately after you shoot it), and the standby timer, which controls how long the monitor, viewfinder, and control panel remain visible after you press the shutter button halfway. Regardless of the picture review setting, you must enable Picture Review on the Playback menu to take advantage of that feature.
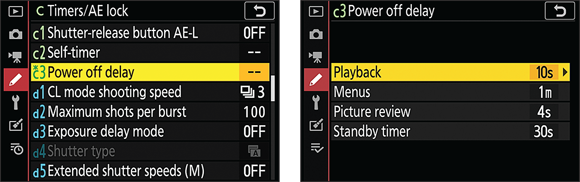
FIGURE 10-8: Set the delay times for automatic shutdown by using this option.
Setting HDMI Output Options
By connecting your camera to an HDMI television or monitor, you can view on a large screen the photos and videos on the installed memory card. You also can display the camera’s live preview on the external monitor or TV while shooting. To connect the two devices, you need a Type D HDMI cable. Plug the small end of the cable into the port shown in Figure 10-9; the regular HD plug goes into your TV or monitor.
To configure how your camera interacts with the external display, open the Setup menu and choose HDMI. You’re presented with two options, Output Resolution and Advanced. Choose Output Resolution to specify a video resolution to send to the display; select Auto to let the camera decide.
Choose Advanced to specify the Output Range setting, which controls the range of brightness levels in the video picture. The second advanced setting, External Recording Control, applies only if you connect an external recording device. Check the camera instruction manual for a list of compatible recorders and details that will help you decide whether to turn External Recording Control on or off. Note that — whatever settings you choose — HDMI output isn’t possible with a video frame size of 1920 x 1080 and a frame rate of 100, 120, or slow motion. (Chapter 7 details these settings.)
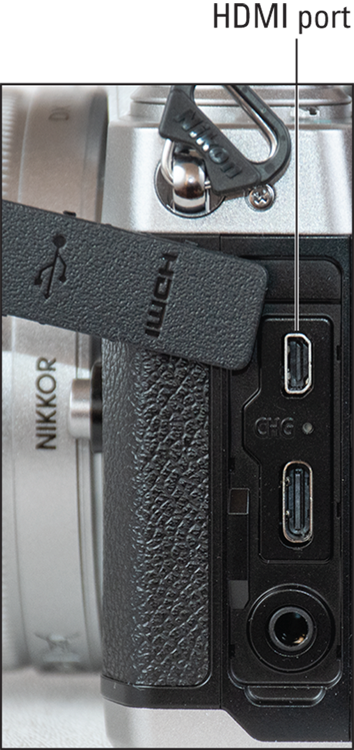
FIGURE 10-9: Plug a Type D HDMI cable into this port to connect to an HDMI device.