
Chapter 12
Ten Features to Try on a Slow Day
IN THIS CHAPTER
![]() Storing camera settings for later use
Storing camera settings for later use
![]() Taking advantage of Exposure Delay mode
Taking advantage of Exposure Delay mode
![]() Shooting time-lapse photos and videos
Shooting time-lapse photos and videos
![]() Embedding copyright notices and comments into file metadata
Embedding copyright notices and comments into file metadata
![]() Creating slide shows and multiple-exposure images
Creating slide shows and multiple-exposure images
![]() Expanding depth of field with focus stacking
Expanding depth of field with focus stacking
![]() Trying out tools that diminish sensor spots
Trying out tools that diminish sensor spots
Consider this chapter the equivalent of the end of an infomercial — the part where the host exclaims, “But wait! There’s more!” Features covered here aren’t a major camera selling point for most people, but they’re included at no extra charge, so check ’em out when you have a few spare moments.
 The length of this book prohibits me from providing full details about these tools, so if you want more help using them, visit the Nikon web site and download the electronic copy of the Z fc user manual. It contains more complete information than the paper manual included in your camera box.
Storing Settings on a Memory Card
If you share your camera with other users, such as in an office environment, you may find the Save/Load Settings option on the Setup menu helpful. When your time with the camera is up, choose this menu option to store the current camera settings in a data file on the installed memory card. The next time you pick up the camera, insert the memory card and choose Save/Load Settings again. The camera loads the stored settings, relieving you of the chore of resetting each option one by one to match your preferences.
Using Exposure Delay Mode
When you use a very slow shutter speed, the slightest movement of the camera can blur your photos. Even if you put the camera on a tripod, the action of pressing the shutter button can be enough to cause problems. One solution is to use the Self-Timer Release mode explained in Chapter 2 and take your hands off the camera before the shutter is released. That mode offers a minimum delay time of 2 seconds, though, which can be annoyingly long if you’re shooting a series of shots. As an alternative, try Exposure Delay mode, which offers delay times ranging from 0.2 to 3 seconds. Open the Custom Settings menu, select Shooting/Display, and choose Exposure Delay Mode. On the next screen, select the delay time. As a reminder that the feature is turned on, the letters DLY appear in the displays.
 At the end of your Exposure Delay series, always turn the feature off. Otherwise, I guarantee that the next time you shoot, you'll forget that it’s on and spend frustrating minutes (or more) trying to figure out why the camera isn't responding immediately when you press the shutter button.
Interval Timer Shooting
With Interval Timer Shooting, you can set the camera to automatically release the shutter at intervals ranging from seconds to hours apart. This feature enables you to capture a subject as it changes over time — a technique commonly known as time-lapse photography — without having to stand around pressing the shutter button the whole time.
To use this feature, set the Release Mode to any setting except Self-Timer. Then open the Photo Shooting menu and select Interval Timer Shooting, as shown on the left in Figure 12-1. You’re presented with two pages of options, the first of which is shown on the right in Figure 12-1. The options let you specify how many frames you want to capture, how long a delay you want between shots, and a few other parameters.
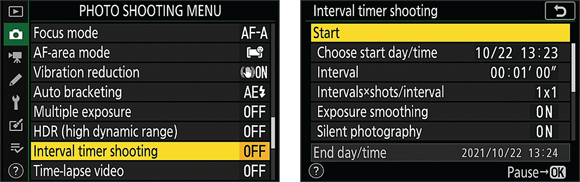
FIGURE 12-1: Interval Timer Shooting automates the process of time-lapse photography.
After setting your preferences, select Start (at the top of the right screen in Figure 12-1) to begin interval shooting. The letters INTVL blink in the display while shooting is in progress. Before each shot is captured, the display changes to show the number of intervals remaining and the number of shots remaining in the current interval. When the sequence is complete, the Interval Timer Shooting menu option is automatically set to Off.
Creating a Time-Lapse Video
The Time-Lapse Video feature is similar to Interval Timer Shooting in that it also records a series of photographs at specified intervals. Two differences: First, it stitches the photos together into a silent video. Second, it uses the same aspect ratio as videos: 16:9. So, before trying it out, select Choose Image Area from the Photo Shooting menu and set the aspect ratio to 16:9. That way, you can see the proper image-framing boundaries in the displays. You can use any Release mode except Self-Timer. Also make sure the camera Photo/Video switch is set to Photo mode — despite the feature name, you don’t use Video mode to create a time-lapse video.
The next step is to choose Time-Lapse Video from the Photo Shooting menu. You’re asked to set such preferences as the resulting video’s frame size, frame rate, quality, and length of time the camera records photographs after you start the capture session. By default, pictures are taken every 5 seconds for 25 minutes. At a frame size of 1920 x 1080, a frame rate of 60 frames per second, and the High quality setting, the finished video is 5.1 minutes.
After setting recording options, choose Start from the top of the settings screen. When the camera finishes shooting pictures, it combines the individual frames into a video. See Chapter 8 for details on playing videos.
Adding Copyright Notices and Comments
By using the Copyright Information option on the Setup menu, you can embed a copyright notice in your files. Similarly, the Image Comment feature enables you to embed other text, such as the location of a shoot. The copyright notice and comment don’t appear on the photo itself; instead, they’re stored along with the camera settings used to record a shot as metadata (hidden text data). You can view metadata during playback (see Chapter 8) or on your computer in Nikon NX Studio (see Chapter 9).
Enable both options via the Setup menu, as described in this list:
Copyright Information: Choose this option, as shown on the left in Figure 12-2, to display the screen shown on the right. (The first time you choose the option, the Attach Copyright Information box is empty and the Artist and Copyright fields are blank.) Choose Artist to display a keyboard where you can enter your name using the techniques covered in the Chapter 5 section about editing White Balance presets.
 After entering the Artist text, press the Zoom In button or tap the OK box that has the magnifying glass symbol to finalize your text and go back one menu screen. Choose Copyright to display another keyboard entry screen, and add whatever data you want to include for that item. The maximum character count for Artist is 36; for Copyright, 54. Again, press the Zoom In button or tap the OK box that has the magnifying glass to exit the text entry screen.
You should then see your name and copyright information, as shown on the right in Figure 12-2. But you’re not done yet: Highlight the Attach Copyright Information option and press the Multi Selector right to place a check mark in the adjacent box, as shown in the figure. Then press the OK button or tap OK Done to exit to the Setup menu.
- Image Comment: To embed a text comment other than copyright information, choose this menu option (it’s just above the Copyright Information item on the Setup menu). On the keyboard screen, enter a comment up to 36 characters long and then press the Zoom In button. After proofreading your comment, select the Attach Comment box as just described for the Attach Copyright Information box. Then press OK or tap OK Done.
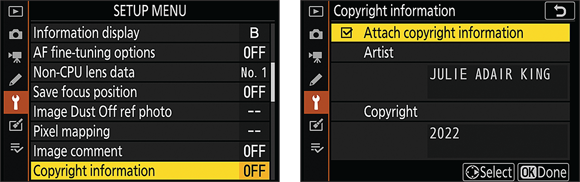
FIGURE 12-2: You can store a text comment up to 36 characters long in the file metadata.
 Your comment or copyright information is added to the metadata of any new pictures or movies you shoot. To disable either feature, revisit the menu option, remove the check mark from the item’s Attach box, and press OK. When the box is unchecked, the word OFF appears next to the item on the Setup menu.
Creating a Digital Slide Show
The Slide Show feature automatically displays photos and movies one-by-one. Which files are included depends on the current setting of the Playback Folder option on the Playback menu, explained in Chapter 8. After selecting that option, choose Slide Show from the Playback menu. On the next screen, select Picture Type to specify whether you want the show to include photographs and movies, photos only, or movies only. You also have the option to limit the show to files to which you’ve assigned a particular rating — a feature you can explore in Chapter 9. On the initial Slide Show screen, choose Frame Interval to specify how long each image is displayed. (Movies always play in their entirety.)
To begin playing the show, select Start. To pause the show, press OK. A menu appears that offers you the choice to restart playback, change the frame interval, or exit the show.
Two Roads to a Multi-Image Exposure
These two camera features combine multiple photographs into one:
- Multiple Exposure (Photo Shooting menu): When you set the Image Quality option to Raw, as outlined in Chapter 2, this feature lets you shoot a series of two to ten photos that are immediately combined into a single composite image.
- Image Overlay (Retouch menu): This option merges two existing Raw images to create a third Raw image. I used this option to combine a photo of a werewolf friend, shown on the left in Figure 12-3, with a nighttime garden scene, shown in the center. The result is the ghostly image shown on the right. Oooh, scary!

FIGURE 12-3: Image Overlay merges two Raw (NEF) photos into one.
On the surface, both options sound cool. The problem is that you can’t control the opacity or positioning of the images in the combined photo. For example, my overlay picture would have been more successful if I could move the werewolf to the left in the combined image so that he and the lantern aren't blended. I'd also prefer to keep the background of Image 2 at full opacity in the overlay image rather than get a 50/50 mix of that background and the one in Image 1, which creates a fuzzy-looking background.
However, you can create one useful effect with either option: a two-views composite, like the one in Figure 12-4. For this image, I used Image Overlay to combine the front and rear views of the antique match striker into the composite scene. For this trick to work, the background in both images must be the same solid color (black seems to be best), and you must compose each photo so that the subjects don't overlap in the combined image, as shown here.

FIGURE 12-4: If you want each subject to appear solid, use a black background and position the subjects so that they don’t overlap.
Shooting Photos for Focus Stacking
When you shoot close-ups, depth of field (the distance over which focus appears sharp) is limited, for reasons you can explore in Chapter 4. The depth of field can be so shallow, in fact, that it can be difficult to keep the entire subject in sharp focus.
Focus stacking is a trick that enables you to expand depth of field by shooting multiple photos, each using a different focusing distance. After downloading the files to your computer, you use focus-stacking software to combine the photos into a single image that includes the sharpest areas of each frame. You can marry the images in Adobe Photoshop or use software specially designed for focus stacking, such as Helicon Focus (www.heliconsoft.com).
To shoot your frames, put your camera on a tripod and lock in exposure so that framing and exposure remain consistent throughout all shots taken for the stack. Then open the Photo Shooting menu, choose Focus Shift Shooting, and specify how many frames you want to record, the amount of focus shift between frames, and so on. Then choose Start to begin capturing frames. To interrupt shooting, press the OK button.
Creating a Dust Reference File
If spots appear in the same place on every photo, even after you clean the lens, they’re likely caused by dust that made its way onto the camera’s image sensor. The best remedy is to take your camera to a qualified technician for sensor cleaning, but until you can do so, there’s a possible make-do. Unfortunately, it only works for files that you shoot in the Raw file format.
First, find a piece of blank paper to photograph. Set the Image Quality option on the Shooting menu to Raw and then open the Setup menu and choose Image Dust-Off Reference Photo. Fill the frame with the blank paper, choose Start, and take the picture. Download the picture (it will have the file extension .NDF) to your computer and open it in Nikon NX Studio, introduced in Chapter 9. The program creates a reference file that notes where spots show up on the photo. When you next open a Raw file in NX Studio, look on the Adjustments tab for the Camera and Lens Corrections settings and enable Image Dust Off. The program applies some corrective magic to the dust spots, consulting the reference file to know where the spots are located.
Trying Pixel Mapping for Sensor Repair
Pixel mapping is a camera feature that’s designed to repair image sensor issues that can cause random bright spots in a photo when nothing in the scene would have created those spots. Pixel mapping is available only when you’re using a Z-mount lens or have attached a lens via the FTZ adapter.
Before you try pixel mapping, make sure the camera battery is fully charged. After that, the process is simple: Open the Setup menu, choose Pixel Mapping, choose Start, and then let the camera to do its thing. When prompted, turn the camera off and then back on.
The option name refers to the tiny squares that make up every digital photo, called pixels. Chapter 2 gives you a close-up look at pixels.