
Chapter 8. Replication Deep Dive
Previous chapters introduced the basics of configuring and deploying replication to keep your site up and available, but to understand replication’s potential pitfalls and how to use it effectively, you should know something about its operation and the kinds of information it uses to accomplish its tasks. This is the goal of this chapter. We will cover a lot of ground, including:
How to promote slaves to masters more robustly
Tips for avoiding corrupted databases after a crash
Multisource replication
Row-based replication
Global transaction identifiers
Multithreaded replication
Replication Architecture Basics
Chapter 4 discussed the binary log along with some of the tools that are available to investigate the events it records. But we didn’t describe how events make it over to the slave and get re-executed there. Once you understand these details, you can exert more control over replication, prevent it from causing corruption after a crash, and investigate problems by examining the logs.
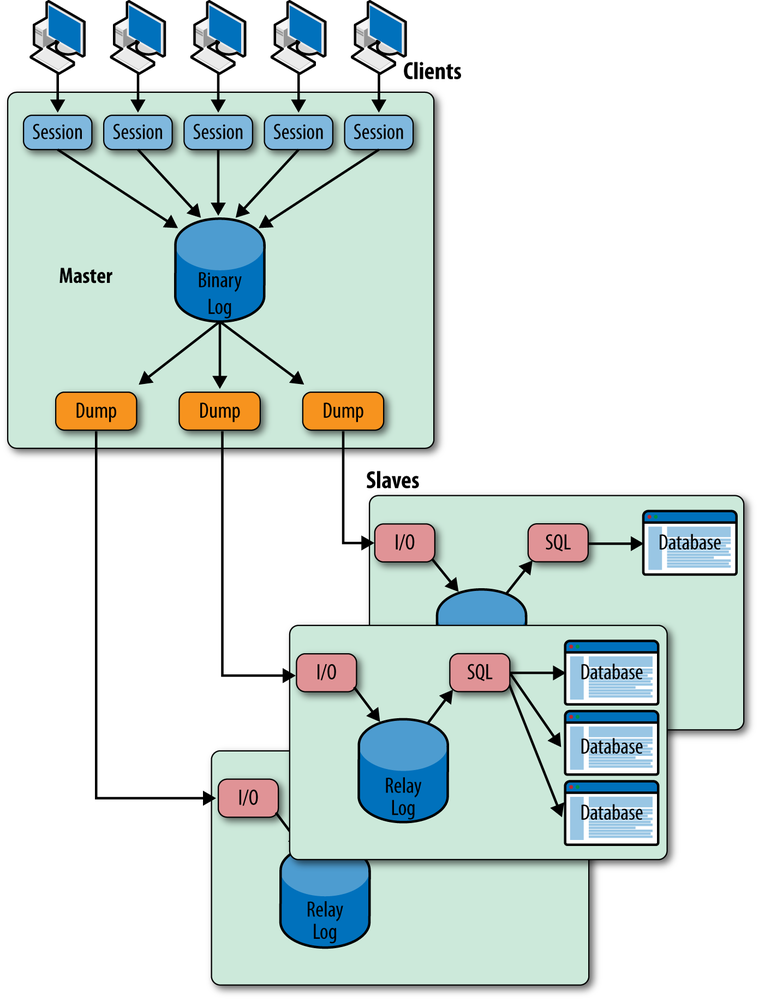
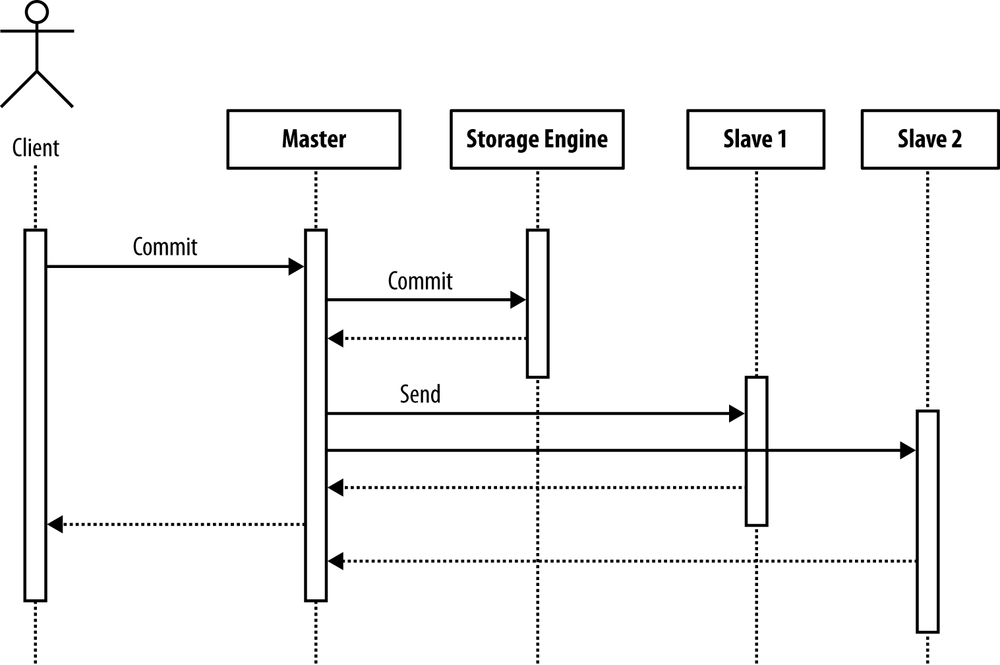
Figure 8-1 shows a schematic illustration of the internal replication architecture, consisting of the clients connected to the master, the master itself, and several slaves. For each client that connects to the master, the server runs a session that is responsible for executing all SQL statements and sending results back to the client.
The events flow through the replication system from the master to the slaves in the following manner:
The session accepts a statement from the client, executes the statement, and synchronizes with other sessions to ensure each transaction is executed without conflicting with other changes made by other sessions.
Just before the statement finishes execution, an entry consisting of one or more events is written to the binary log. This process is covered in Chapter 3 and will not be described again in this chapter.
After the events have been written to the binary log, a dump thread in the master takes over, reads the events from the binary log, and sends them over to the slave’s I/O thread.
When the slave I/O thread receives the event, it writes it to the end of the relay log.
Once in the relay log, a slave SQL thread reads the event from the relay log and executes the event to apply the changes to the database on the slave.
If the connection to the master is lost, the slave I/O thread will try to reconnect to the server in the same way that any MySQL client thread does. Some of the options that we’ll see in this chapter deal with reconnection attempts.
The Structure of the Relay Log
As the previous section showed, the relay log is the information that ties the master and slave together—the heart of replication. It’s important to be aware of how it is used and how the slave threads coordinate through it. Therefore, we’ll go through the details here of how the relay log is structured and how the slave threads use the relay log to handle replication.
As described in the previous section, the events sent from the master are stored in the relay log by the I/O thread. The relay log serves as a buffer so that the master does not have to wait for the slave execution to finish before sending the next event.
Figure 8-2 shows a schematic view of the relay log. It’s similar in structure to the binlog on the master but has some extra files.
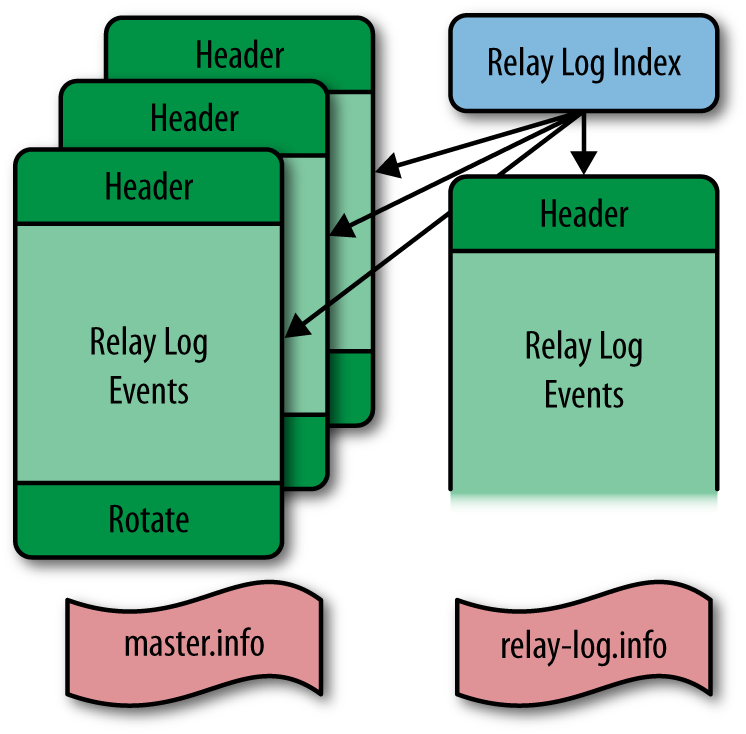
In addition to the content files and the index files in the binary log, the relay log maintains two files to keep track of replication progress: the relay log information file and the master log information file. The names of these two files are controlled by two options in the my.cnf file:
relay-log-info-file=filenameThis option sets the name of the relay log information file. It is also available as the read-only server variable
relay_log_info_file. Unless an absolute filename is given, the filename is relative to the data directory of the server. The default filename is relay-log.info.master-info-file=filenameThis option sets the name of the master log information file. The default filename is master.info.
Warning
The information in the master.info file takes precedence over information in the my.cnf file. This means that if you change information in the my.cnf file and restart the server, the information will still be read from the master.info file instead of from the my.cnf file.
For this reason, we recommend not to put any of the
options that can be specified with the CHANGE
MASTER TO command in the my.cnf file, but instead to use the
CHANGE
        MASTER TO
command to
configure replication. If, for some reason, you want to put any of the
replication options in the my.cnf
file and you want to make sure that the options are read from it when
starting the slave, you have to issue RESET
SLAVE before editing the my.cnf file.
Beware when executing RESET
SLAVE! It will delete the master.info file, the relay-log.info file, and all the relay logfiles!
For convenience, we will use the default names of the information files in the discussion that follows.
The master.info file contains the master read position as well as all the information necessary to connect to the master and start replication. When the slave I/O thread starts up, it reads information from this file, if it is available.
Example 8-1 shows a short example of a master.info file. We’ve added a line number before each line and an annotation in italics at the end of each line (the file itself cannot contain comments). If the server is not compiled with SSL support, lines 9 through 15—which contain all the SSL options—will be missing. Example 8-1 shows what these options look like when SSL is compiled. The SSL fields are covered later in the chapter.
Warning
The password is written unencrypted in the master.info file. For that reason, it is critical to protect the file so it can be read only by the MySQL server. The standard way to ensure this is to define a dedicated user on the server to run the server, assign all the files responsible for replication and database maintenance to this user, and remove all permissions from the files except read and write by this user.
 1  23                          Number of lines in the file
 2  master-bin.000001           Current binlog file being read (Master_Log_File)
 3  151                         Last binlog position read (Read_Master_Log_Pos)
 4  localhost                   Master host connected to (Master_Host)
 5  root                        Replication user (Master_User)
 6                              Replication password
 7  13000                       Master port used (Master_Port)
 8  60                          Number of times slave will try to  reconnect (Connect_Retry)
 9  0                           1 if SSL is enabled, otherwise 0
10                              SSL Certification Authority (CA)
11                              SSL CA Path
12                              SSL Certificate
13                              SSL Cipher
14                              SSL Key
15  0                           SSL Verify Server Certificate
16  60.000                      Heartbeat
17                              Bind Address
18  0                           Ignore Server IDs
19                         Master UUID
                                8c6d027e-cf38-11e2-84c7-0021cc6850ca
20  10                           Retry Count
21                               SSL CRL
22                               SSL CRL Path
23  0                            Auto Position
If you have an old server, the format can be slightly different.
In MySQL versions earlier than 4.1, the first line did not appear. Developers added a line count to the file in version 4.1.1 so they could extend the file with new fields and detect which fields are supported by just checking the line count.
Version 5.1.16 introduced line 15, SSL Verify Server Certificate, and the lines after that were introduced in different versions of 5.6.
The relay-log.info file tracks the progress of replication and is updated by the SQL thread. Example 8-2 shows a sample excerpt of a relay-log.info file. These lines correspond to the beginning of the next event to execute.
./slave-relay-bin.000003     Relay log file (Relay_Log_File)
380                          Relay log position (Relay_Log_Pos)
master1-bin.000001           Master log file (Relay_Master_Log_File)
234                          Master log position (Exec_Master_Log_Pos)
If any of the files are not available, they will be created from
information in the my.cnf file and
the options given to the CHANGE MASTER TO
command when the slave is started.
The Replication Threads
As you saw earlier in the chapter, replication requires several specialized threads on both the master and the slave. The dump thread on the master handles the master’s end of replication. Two slave threads—the I/O thread and the SQL thread—handle replication on the slave.
- Master dump thread
This thread is created on the master when a slave I/O thread connects. The dump thread is responsible for reading entries from the binlog on the master and sending them to the slave.
There is one dump thread per connected slave.
- Slave I/O thread
This thread connects to the master to request a dump of all the changes that occur and writes them to the relay log for further processing by the SQL thread.
There is one I/O thread on each slave. Once the connection is established, it is kept open so that any changes on the master are immediately received by the slave.
- Slave SQL thread
This thread reads changes from the relay log and applies them to the slave database. The thread is responsible for coordinating with other MySQL threads to ensure changes do not interfere with the other activities going on in the MySQL server.
From the perspective of the master, the I/O thread is just another client thread and can execute both dump requests and SQL statements on the master. This means a client can connect to a server and pretend to be a slave to get the master to dump changes from the binary log. This is how the mysqlbinlog program (covered in detail in Chapter 4) operates.
The SQL thread acts as a session when working with the database. This means it maintains state information similar to that of a session, but with some differences. Because the SQL thread has to process changes from several different threads on the master—the events from all threads on the master are written in commit order to the binary log—the SQL thread keeps some extra information to distinguish events properly. For example, temporary tables are session-specific, so to keep temporary tables from different sessions separated, the session ID is added to the events. The SQL thread then refers to the session ID to keep actions for different sessions on the master separate.
The details of how the SQL thread executes events are covered later in the chapter.
Note
The I/O thread is significantly faster than the SQL thread because the I/O thread merely writes events to a log, whereas the SQL thread has to figure out how to execute changes against the databases. Therefore, during replication, several events are usually buffered in the relay log. If the master crashes, you have to handle these before connecting to a new master.
To avoid losing these events, wait for the SQL thread to catch up before trying to reconnect the slave to another master.
Later in the chapter, you will see several ways of detecting whether the relay log is empty or has events left to execute.
Starting and Stopping the Slave Threads
In Chapter 3, you saw how to start the slave using the START SLAVE command, but a lot of details were
glossed over. We’re now ready for a more thorough description of
starting and stopping the slave threads.
When the server starts, it will also start the slave threads if
there is a master.info file.
As mentioned earlier in this chapter, the master.info file is created if the server was
configured for replication and if START
SLAVE commands were issued on the slaves to start their I/O
and SQL threads. So if the previous session had been used for
replication, replication will be resumed from the last position stored
in the master.info and relay-log.info
files, with slightly different behavior for the two slave
threads:
- Slave I/O thread
The slave I/O thread will resume by reading from the last read position according to the master.info file.
For writing the events, the I/O thread will rotate the relay logfile and start writing to a new file, updating the positions accordingly.
- Slave SQL thread
The slave SQL thread will resume reading from the relay log position given in relay-log.info.
You can start the slave threads explicitly using the START SLAVE command and stop them explicitly
with the STOP SLAVE command. These
commands control the slave threads and can be used to stop and start the
I/O thread or SQL thread separately:
When you stop the slave threads, the current state of replication is saved to the master.info and relay-log.info files. This information is then picked up when the slave threads are started again.
Note
If you specify a master host using the master-host option (which can be either in
the my.cnf file or passed as an
option when starting mysqld), the slave will also
start.
Because the recommendation is not to use this option, but
instead to use the MASTER_HOST
option to the CHANGE MASTER
command, the master-host option
will not be covered here.
Running Replication over the Internet
There are many reasons to replicate between two geographically separated data centers. One reason is to ensure you can recover from a disaster such as an earthquake or a power outage. You can also locate a site strategically close to some of your users, such as content delivery networks, to offer them faster response times. Although organizations with enough resources can lease dedicated fiber, we will assume you use the open Internet to connect.
The events sent from the master to the slave should never be considered secure in any way: as a matter of fact, it is easy to decode them to see the information that is replicated. As long as you are behind a firewall and do not replicate over the Internet—for example, replicating between two data centers—this is probably secure enough, but as soon you need to replicate to another data center in another town or on another continent, it is important to protect the information from prying eyes by encrypting it.
The standard method for encrypting data for transfer over the Internet is to use SSL. There are several options for protecting your data, all of which involve SSL in some way:
Use the support that is built into the server to encrypt the replication from master to slave.
Use Stunnel, a program that establishes an SSL tunnel (essentially a virtual private network) to a program that lacks SSL support.
Use SSH in tunnel mode.
This last alternative does not appear to really offer any significant advantages over using Stunnel, but can be useful if you are not allowed to install any new programs on a machine and can enable SSH on your servers. In that case, you can use SSH to set up a tunnel. We will not cover this option further.
When using either the built-in SSL support or stunnel for creating a
secure connection, you need:
The details of generating, managing, and using SSL certificates is beyond the scope of this book, but for demonstration purposes, Example 8-3 shows how to generate a self-signed public certificate and associated private key. This example assumes you use the configuration file for OpenSSL in /etc/ssl/openssl.cnf.
$sudo openssl req -new -x509 -days 365 -nodes-config /etc/ssl/openssl.cnf>-out /etc/ssl/certs/master.pem -keyout /etc/ssl/private/master.keyGenerating a 1024 bit RSA private key .....++++++ .++++++ writing new private key to '/etc/ssl/private/master.key' ----- You are about to be asked to enter information that will be incorporated into your certificate request. What you are about to enter is what is called a Distinguished Name or a DN. There are quite a few fields but you can leave some blank For some fields there will be a default value, If you enter '.', the field will be left blank. ----- Country Name (2 letter code) [AU]:SEState or Province Name (full name) [Some-State]:UpplandLocality Name (eg, city) []:StorvretaOrganization Name (eg, company) [Internet Widgits Pty Ltd]:Big Inc.Organizational Unit Name (eg, section) []:Database ManagementCommon Name (eg, YOUR name) []:master-1.example.comEmail Address []:[email protected]
The certificate signing procedure puts a self-signed public certificate in /etc/ssl/certs/master.pem and the private key in /etc/ssl/private/master.key (which is also used to sign the public certificate).
On the slave, you have to create a server key and a server certificate in a similar manner. For the sake of discussion, we’ll use /etc/ssl/certs/slave.pem as the name of the slave server’s public certificate and /etc/ssl/private/slave.key as the name of the slave server’s private key.
Setting Up Secure Replication Using Built-in Support
The simplest way to encrypt the connection between the master and slave is to use a server with SSL support. Methods for compiling a server with SSL support are beyond the scope of this book; if you are interested, consult the online reference manual.
To use the built-in SSL support, it is necessary to do the following:
Configure the master by making the master keys available.
Configure the slave to encrypt the replication channel.
To configure the master to use SSL support, add the following options to the my.cnf file:
[mysqld]
ssl-capath=/etc/ssl/certs
ssl-cert=/etc/ssl/certs/master.pem
ssl-key=/etc/ssl/private/master.key
The ssl-capath option
contains the name of a directory that holds the
certificates of trusted CAs, the ssl-cert option contains the name of the file that holds the server
certificate, and the ssl-key option
contains the name of the file that holds the private key
for the server. As always, you need to restart the server after you have
updated the my.cnf file.
The master is now configured to provide SSL support to any client, and because a slave uses the normal client protocol, it will allow a slave to use SSL as well.
To configure the slave to use an SSL connection, issue CHANGE MASTER TO
with the MASTER_SSL option to turn on
SSL for the connection, then issue MASTER_SSL_CAPATH, MASTER_SSL_CERT, and MASTER_SSL_KEY, which function like the ssl-capath, ssl-cert, and ssl-key configuration options just mentioned,
but specify the slave’s side of the connection to the master:
slave>CHANGE MASTER TO->MASTER_HOST = 'master-1',->MASTER_USER = 'repl_user',->MASTER_PASSWORD = 'xyzzy',->MASTER_SSL_CAPATH = '/etc/ssl/certs',->MASTER_SSL_CERT = '/etc/ssl/certs/slave.pem',->MASTER_SSL_KEY = '/etc/ssl/private/slave.key';Query OK, 0 rows affected (0.00 sec) slave>START SLAVE;Query OK, 0 rows affected (0.15 sec)
Now you have a slave running with a secure channel to the master.
Setting Up Secure Replication Using Stunnel
Stunnel is an easy-to-use SSL tunneling application that you can set up either as an SSL server or as an SSL client.
Using Stunnel to set up a secure connection is almost as easy as setting up an SSL connection using the built-in support, but requires some additional configuration. This approach can be useful if the server is not compiled with SSL support or if for some reason you want to offload the extra processing required to encrypt and decrypt data from the MySQL server (which makes sense only if you have a multicore CPU).
As with the built-in support, you need to have a certificate from
a CA as well as a public certificate and a private key for each server.
These are then used for the stunnel
command instead of for the server.
Figure 8-3 shows a master, a slave, and two Stunnel instances that communicate over an insecure network. One Stunnel instance on the slave server accepts data over a standard MySQL client connection from the slave server, encrypts it, and sends it over to the Stunnel instance on the master server. The Stunnel instance on the master server, in turn, listens on a dedicated SSL port to receive the encrypted data, decrypts it, and sends it over a client connection to the non-SSL port on the master server.

Example 8-4 shows a configuration file that sets up Stunnel to listen on socket 3508 for an SSL connection, where the master server is listening on the default MySQL socket 3306. The example refers to the certificate and key files by the names we used earlier.
cert=/etc/ssl/certs/master.pem
key=/etc/ssl/private/master.key
CApath=/etc/ssl/certs
[mysqlrepl]
accept = 3508
connect = 3306
Example 8-5 shows the configuration file that sets up Stunnel on the client side. The example assigns port 3408 as the intermediate port—the non-SSL port that the slave will connect to locally—and Stunnel connects to the SSL port 3508 on the master server, as shown in Example 8-4.
cert=/etc/ssl/certs/slave.pem
key=/etc/ssl/private/slave.key
CApath=/etc/ssl/certs
[mysqlrepl]
accept = 3408
connect = master-1:3508
You can now start the Stunnel program on each server and configure the slave to connect to the Stunnel instance on the slave server. Because the Stunnel instance is on the same server as the slave, you should give localhost as the master host to connect to and the port that the Stunnel instance accepts connections on (3408). Stunnel will then take care of tunneling the connection over to the master server:
slave>CHANGE MASTER TO->MASTER_HOST = 'localhost',->MASTER_PORT = 3408,->MASTER_USER = 'repl_user',->MASTER_PASSWORD = 'xyzzy';Query OK, 0 rows affected (0.00 sec) slave>START SLAVE;Query OK, 0 rows affected (0.15 sec)
You now have a secure connection set up over an insecure network.
Note
If you are using Debian-based Linux (e.g., Debian or Ubuntu), you can start one
Stunnel instance for each configuration file in the /etc/stunnel directory by setting ENABLED=1 in /etc/default/stunnel4.
So if you create the Stunnel configuration files as given in this section, one slave Stunnel and one master Stunnel instance will be started automatically whenever you start the machine.
Finer-Grained Control Over Replication
With an understanding of replication internals and the information replication uses, you can control it more expertly and learn how to avoid some problems that can occur. We’ll give you some useful background in this section.
Information About Replication Status
You can find most of the information about replication status on the slave, but there is some information available on the master as well. Most of the information on the master relates to the binlog (covered in Chapter 4), but information relating to the connected slaves is also available.
The SHOW SLAVE HOSTS command
only shows information about slaves that use the report-host option, which the slave uses to
give information to the master about the server that is connected. The
master cannot trust the information about the connected slaves, because
there are routers with NAT between the master and the slave. In addition
to the hostname, there are some other options that you can use to
provide information about the connecting slave:
report-hostThe name of the connecting slave. This is typically the domain name of the slave, or some other similar identifier, but can in reality be any string. In Example 8-6, we use the name “Magic Slave.”
report-portThe port on which the slave listens for connections. This default is 3306.
report-userThis is the user for connecting to the master. The value given does not have to match the value used in
CHANGE MASTER TO. This option is only shown when theshow-slave-auth-infooption is given to the server.report-passwordThis is the password used when connecting to the master. The password given does not have to match the password given to
CHANGE MASTER TO.show-slave-auth-infoIf this option is enabled, the master will show the additional information about the reported user and password in the output from
SHOW SLAVE HOSTS.
Example 8-6 shows
sample output from SHOW SLAVE HOSTS
where three slaves are connected to the master.
master> SHOW SLAVE HOSTS;
+-----------+-------------+------+-------------------+-----------+
| Server_id | Host        | Port | Rpl_recovery_rank | Master_id |
+-----------+-------------+------+-------------------+-----------+
|         2 | slave-1     | 3306 |                 0 |         1 |
|         3 | slave-2     | 3306 |                 0 |         1 |
|         4 | Magic Slave | 3306 |                 0 |         1 |
+-----------+-------------+------+-------------------+-----------+
1 row in set (0.00 sec)
The output shows slaves that are connected to the master and some
information about the slaves. Notice that this display also shows slaves
that are indirectly connected to the master via relays. There are two
additional fields shown when show-slave-auth-info is enabled (which we do
not show here).
The following fields are purely informational and do not
necessarily show the real slave host or port, nor the user and password
used when configuring the slave in CHANGE MASTER
TO:
Server_idThis is the server ID of the connected slave.
HostThis is the name of the host as given by
report-host.UserThis is the username reported by the slave by using
report-user.PasswordThis column shows the password reported by the slave using
report-password.PortThis shows the port.
Master_idThis shows the server ID that the slave is replicating from.
Rpl_recovery_rankThis field has never been used and is removed in MySQL version 5.5.
Note
The information about indirectly connected slaves cannot be entirely trusted, because it is possible for the information to be inaccurate in certain situations where slaves are being added.
For this reason, there is an effort underway to remove this information and show only directly connected slaves, as this information can be trusted.
You can use the SHOW MASTER
LOGS command to see which logs the master is keeping track of in the
binary log. A typical output from this command can be seen in Example 8-7.
The SHOW MASTER STATUS
command (shown in Example 8-8) shows where the
next event will be written in the binary log. Because a master has only
a single binlog file, the table will always contain only a single line.
And because of that, the last line of the output of SHOW MASTER LOGS will match the output of this
command, only with different headers. This means that if you need to
execute a SHOW MASTER LOGS to
implement some feature, you do not need to execute a SHOW MASTER STATUS as well but can instead use
the last line of SHOW MASTER
LOGS.
master> SHOW MASTER LOGS;
+-------------------+-----------+
| Log_name | File_size |
+-------------------+-----------+
| master-bin.000011 | 469768 |
| master-bin.000012 | 1254768 |
| master-bin.000013 | 474768 |
| master-bin.000014 | 4768 |
+-------------------+-----------+
1 row in set (0.00 sec)master> SHOW MASTER STATUS;
+--------------------+----------+--------------+------------------+
| File | Position | Binlog_Do_DB | Binlog_Ignore_DB |
+--------------------+----------+--------------+------------------+
| master-bin.000014 | 4768 | | |
+--------------------+----------+--------------+------------------+
1 row in set (0.00 sec)To determine the status for the slave threads, use the SHOW SLAVE STATUS
command. This command contains almost everything you need to know about
the replication status. Let’s go through the output in more detail. A
typical output from SHOW SLAVE STATUS
is given in Example 8-9.
Slave_IO_State: Waiting for master to send event
Master_Host: master1.example.com
Master_User: repl_user
Master_Port: 3306
Connect_Retry: 1
Master_Log_File: master-bin.000001
Read_Master_Log_Pos: 192
Relay_Log_File: slave-relay-bin.000006
Relay_Log_Pos: 252
Relay_Master_Log_File: master-bin.000001
Slave_IO_Running: Yes
Slave_SQL_Running: Yes
Replicate_Do_DB:
Replicate_Ignore_DB:
Replicate_Do_Table:
Replicate_Ignore_Table:
Replicate_Wild_Do_Table:
Replicate_Wild_Ignore_Table:
Last_Errno: 0
Last_Error:
Skip_Counter: 0
Exec_Master_Log_Pos: 192
Relay_Log_Space: 553
Until_Condition: None
Until_Log_File:
Until_Log_Pos: 0
Master_SSL_Allowed: No
Master_SSL_CA_File:
Master_SSL_CA_Path:
Master_SSL_Cert:
Master_SSL_Cipher:
Master_SSL_Key:
Seconds_Behind_Master: 0
Master_SSL_Verify_Server_Cert: No
Last_IO_Errno: 0
Last_IO_Error:
Last_SQL_Errno: 0
Last_SQL_Error:The state of the I/O and SQL threads
The two fields Slave_IO_Running and Slave_SQL_Running indicate whether the slave I/O thread or the SQL thread,
respectively, is running. If the slave threads are not running, it
could be either because they have been stopped or because of an error
in the replication.
If the I/O thread is not running, the fields Last_IO_Errno and Last_IO_Error will show the reason it
stopped. Similarly, Last_SQL_Errno
and Last_SQL_Error will show the
reason why the SQL thread stopped. If either of the threads stopped
without error—for example, because they were explicitly stopped or
reached the until condition—there
will be no error message and the errno field will be 0, similar to the output
in Example 8-9. The fields
Last_Errno and Last_Error are synonyms for Last_SQL_Errno and Last_SQL_Error, respectively.
The Slave_IO_State shows a
description of what the I/O thread is currently doing. Figure 8-4 shows a state diagram of
how the message can change depending on the state of the I/O
thread.
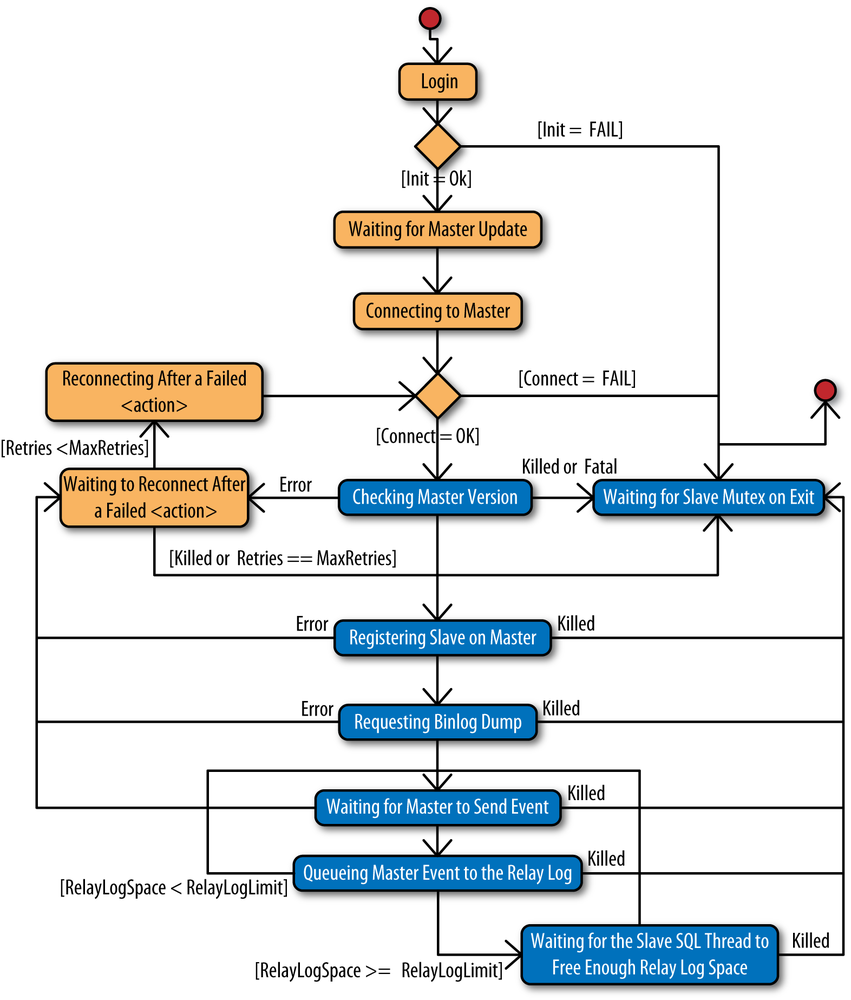
The messages have the following meanings:
- Waiting for master update
This message is shown briefly when the I/O thread is initialized and before it tries to establish a connection with the master.
- Connecting to master
This message is shown while the slave is trying to establish a connection with the master, but has not yet made the connection.
- Checking master version
This message is shown when the slave has managed to connect to the master and is performing a handshake with the master.
- Registering slave on master
This message is shown while the slave is trying to register itself with the master. When registering, it sends the value of the
report-hostoption described earlier to the master. This usually contains the hostname or the IP number of the slave, but can contain any string. The master cannot depend simply on checking the IP address of the TCP connection, because there might be routers running inetwork address translation (NAT) between the master and slave.- Requesting binlog dump
This message is shown when the slave starts to request a binlog dump by sending the binlog file, binlog position, and server ID to the master.
- Waiting for master to send event
This message is printed when the slave has established a connection with the master and is waiting for the master to send an event.
- Queueing master event to the relay log
This message is shown when the master has sent an event and the slave I/O thread is about to write it to the relay log. This message is displayed regardless of whether the event is actually written to the relay log or skipped because of the rules outlined in Filtering Replication Events.
Note
Note the spelling in the previous message (“Queueing” instead of “Queuing”).
When checking for messages using scripts or other tools, it is very important to check what the message really says and not just what you think it should read.
- Waiting to reconnect after
action This message is shown when a previous
actionfailed with a transient error and the slave will try to reconnect. Possible values foractionare:registration on masterWhen attempting to register with the master
binlog dump requestWhen requesting a binlog dump from the master
master event readWhen waiting for or reading an event from the master
- Reconnecting after failed
action This message is shown when the slave is trying to reconnect to the master after trying
actionbut has not yet managed to establish a connection. The possible values foractionare the same as for the “Waiting to reconnect afteraction” message.- Waiting for slave mutex on exit
This message is shown while the I/O thread is shutting down.
- Waiting for the slave SQL thread to free enough relay log space
This message is shown if the relay log space limit (as set by the
relay-log-space-limitoption) has been reached and the SQL thread needs to process some of the relay log to write the new events.
The binary log and relay log positions
As replication processes events on the slave, it maintains three positions in parallel.
These positions are shown in the output from SHOW SLAVE
STATUS in Example 8-9, as the following
pairs of fields:
Master_Log_File,Read_Master_Log_PosThe master read position: the position in the master’s binary log of the next event to be read by the I/O thread.
The values of these fields are taken from lines 2 and 3 of master.info, as shown in Example 8-1.
Relay_Master_Log_File,Exec_Master_Log_PosThe master execute position: the position in the master’s binlog of the next event to be executed by the SQL thread.
The values of these fields are taken from lines 3 and 4 of relay-log.info, as shown in Example 8-2.
Relay_Log_File,Relay_Log_PosThe relay log execute position: the position in the slave’s relay log of the next event to be executed by the SQL thread.
The values of these fields are taken from lines 1 and 2 of relay-log.info, as shown in Example 8-2.
You can use the positions to gain information about replication progress or to optimize some of the algorithms developed in Chapter 5.
For example, by comparing the master read position and the master execute position, it is possible to determine whether there are any events waiting to be executed. This is particularly interesting if the I/O thread has stopped, because it allows an easy way to wait for the relay log to become empty: once the positions are equal, there is nothing waiting in the relay log, and the slave can be safely stopped and redirected to another master.
Example 8-10 shows sample
code that waits for an empty relay log on a slave. MySQL provides the
convenient MASTER_POS_WAIT function
to wait until a slave’s relay log has processed all
waiting events. In the event that the slave thread is not running,
then MASTER_POS_WAIT will return
NULL, which is caught and generates an exception.
frommysql.replicant.errorsimportErrorclassSlaveNotRunning(Error):passdefslave_wait_for_empty_relay_log(server):result=server.sql("SHOW SLAVE STATUS")log_file=result["Master_Log_File"]log_pos=result["Read_Master_Log_Pos"]running=server.sql("SELECT MASTER_POS_WAIT(%s,%s)",(log_file,log_pos))ifrunningisNone:raiseSlaveNotRunning
Using these positions, you can also optimize the scenarios in Chapter 5. For instance, after running Example 8-21, which promotes a slave to master, you will probably have to process a lot of events in each of the other slaves’ relay logs before switching the slave to the new master. In addition, ensuring that the promoted slave has executed all events before allowing any slaves to connect will allow you to lose a minimum of data.
By modifying the function order_slaves_on_position in Example 5-5 to create Example 8-11, you can make
the former slaves execute all events they have in their relay logs
before performing the switch. The code uses the slave_wait_for_empty_relay_log function in
Example 8-10 to wait for the
relay log to become empty before reading the slave position.
frommysql.replicant.commandsimport(fetch_slave_position,slave_wait_for_empty_relay_log,)deforder_slaves_on_position(slaves):entries=[]forslaveinslaves:slave_wait_for_empty_relay_log(slave)pos=fetch_slave_position(slave)gtid=fetch_gtid_executed(slave)entries.append((pos,gtid,slave))entries.sort(key=lambdax:x[0])return[entry[1:2]forentryinentries]
In addition to the technique demonstrated here, another
technique mentioned in some of the literature is to check the status
of the SQL thread in the SHOW PROCESSLIST
output. If the State field is “Has
read all relay log; waiting for the slave I/O thread to update it,”
the SQL thread has read the entire relay log. This State message is generated only by the SQL
thread, so you can safely search for it in all threads.
Options for Handling Broken Connections
The I/O thread has the responsibility for maintaining the connection with the master and, as you have seen in Figure 8-4, includes quite a complicated bit of logic to do so.
If the I/O thread loses the connection with the master, it will attempt to reconnect to the master a limited number of times. The period of inactivity after which the I/O thread reacts, the retry period, and the number of retries attempted are controlled by three options:
--slave-net-timeoutThe number of seconds of inactivity accepted before the slave decides that the connection with the master is lost and tries to reconnect. This does not apply to a situation in which a broken connection can be detected explicitly. In these cases, the slave reacts immediately, moves the I/O thread into the reconnection phase, and attempts a reconnect (possibly waiting according to the value of
master-connect-retryand only if the number of retries done so far does not exceedmaster-retry-count).The default is 3,600 seconds.
--master-connect-retryThe number of seconds between retries. You can specify this option as the
CONNECT_RETRYparameter for theCHANGE MASTER TOcommand. Use of the option in my.cnf is deprecated.The default is 60 seconds.
--master-retry-countThe number of retries before finally giving up.
The default is 86,400.
These defaults are probably not what you want, so you’re better off supplying your own values.
How the Slave Processes Events
Central to replication are the log events: they are the information carriers of the replication system and contain all the metadata necessary to ensure replication can execute the changes made on the master to produce a replica of the master. Because the binary log on the master is in commit order for all the transactions executed on the master, each transaction can be executed in the same order in which it appears in the binary log to produce the same result on the slave as on the master.
The slave SQL thread executes events from all the sessions on the master in sequence. This has some consequences for how the slave executes the events:
- The slave reply is single-threaded, whereas the master is multithreaded
The log events are executed in a single thread on the slave, but on multiple threads on the master. This can make it difficult for the slave to keep up with the master if the master is committing a lot of transactions.
- Some statements are session-specific
Some statements on the master are session-specific and will cause different results when executed from the single session on the slave:
- The binary log decides execution order
Even though two transactions in the binary log appear to be independent—and in theory could be executed in parallel—they may in reality not be independent. This means that the slave is forced to execute the transactions in sequence to guarantee the master and the slave are consistent.
Housekeeping in the I/O Thread
Although the SQL thread does most of the event processing, the I/O does some housekeeping before the events even come into the SQL thread’s view. So we’ll look at I/O thread processing before discussing the “real execution” in the SQL thread. To keep up processing speed, the I/O thread inspects only certain bytes to determine the type of the event, then takes the necessary action to the relay log:
- Stop events
These events indicate that a slave further up in the chain has been stopped in an orderly manner. This event is ignored by the I/O thread and is not even written to the relay log.
- Rotate event
If the master binary log is rotated, so is the relay log. The relay log might be rotated more times than the master, but the relay log is rotated at least each time the master’s binary log is rotated.
- Format description events
These events are saved to be written when the relay log is rotated. Recall that the format between two consecutive binlog files might change, so the I/O thread needs to remember this event to process the files correctly.
If replication is set up to replicate in a circle or through a dual-master setup (which is circular replication with only two servers), events will be forwarded in the circle until they arrive at the server that originally sent them. To avoid having events continue to replicate around in the circle indefinitely, it is necessary to remove events that have been executed before.
To implement this check, each server determines whether the event
has the server’s own server ID. If it does, this event was sent from
this server previously, and replication on the slave has come full
circle. To avoid an event that circulates infinitely (and hence is
applied infinitely) this event is not written to the relay log, but just
ignored. You can turn this behavior off using the replicate-same-server-id option on the server.
If you set this option, the server will not carry out the check for an
identical server ID and the event will be written to the relay log
regardless of which server ID it has.
SQL Thread Processing
The slave SQL thread reads the relay log and re-executes the master’s database statements on the slave. Some of these events require special information that is not part of the SQL statement. The special handling includes:
- Passing master context to the slave server
Sometimes state information needs to be passed to the slave for the statement to execute correctly. As mentioned in Chapter 4, the master writes one or more context events to pass this extra information. Some of the information is thread-specific but different from the information in the next item.
- Handling events from different threads
The master executes transactions from several sessions, so the slave SQL thread has to decide which thread generated some events. Because the master has the best knowledge about the statement, it marks any event that it considers thread-specific. For instance, the master will usually mark events that operate on temporary tables as thread-specific.
- Filtering events and tables
The SQL thread is responsible for doing filtering on the slave. MySQL provides both database filters, which are set up by
replicate-do-dbandreplicate-ignore-db, and table filters, which are set up byreplicate-do-table,replicate-ignore-table,replicate-wild-do-table, andreplicate-wild-ignore-table.- Skipping events
To recover replication after it has stopped, there are features available to skip events when restarting replication. The SQL thread handles this skipping.
Context events
On the master, some events require a context to execute correctly. The context is usually thread-specific features such as user-defined variables, but can also include state information required to execute correctly, such as autoincrement values for tables with autoincrement columns. To pass this context from the master to the slave, the master has a set of context events that it can write to the binary log.
The master writes each context event before the event that
contains the actual change. Currently, context events are associated
only with Query events and
are added to the binary log before the Query events.
Context events fall into the following categories:
- User variable event
This event holds the name and value of a user-defined variable.
This event is generated whenever the statement contains a reference to a user-defined variable.
SET @foo = 'SmoothNoodleMaps'; INSERT INTO my_albums(artist, album) VALUES ('Devo', @foo);- Integer variable event
This event holds an integer value for either the
INSERT_IDsession variable or theLAST_INSERT_IDsession variable.The
INSERT_IDinteger variable event is used for statements that insert into tables with anAUTO_INCREMENTcolumn to transfer the next value to use for the autoincrement column. This information, for example, is required by this table definition and statement:CREATE TABLE Artist (id INT AUTO_INCREMENT PRIMARY KEY, artist TEXT); INSERT INTO Artist VALUES (DEFAULT, 'The The'),
The
LAST_INSERT_IDinteger variable event is generated when a statement uses theLAST_INSERT_IDfunction, as in this statement:INSERT INTO Album VALUES (LAST_INSERT_ID(), 'Mind Bomb'),
- Rand event
If the statement contains a call to the
RANDfunction, this event will contain the random seeds, which will allow the slave to reproduce the “random” value generated on the master:INSERT INTO my_table VALUES (RAND());
These context events are necessary to produce correct behavior in the situations just described, but there are other situations that cannot be handled using context events. For example, the replication system cannot handle a user-defined function (UDF) unless the UDF is deterministic and also exists on the slave. In these cases, the user variable event can solve the problem.
User variable events can be very useful for avoiding problems with replicating nondeterministic functions, for improving performance, and for integrity checks.
As an example, suppose that you enter documents into a database
table. Each document is automatically assigned a number using
the AUTO_INCREMENT
feature. To maintain the integrity of the documents, you also add an
MD5 checksum of the documents in the same table. A definition of such
a table is shown in Example 8-12.
CREATE TABLE document(
id INT UNSIGNED AUTO_INCREMENT PRIMARY KEY,
doc BLOB,
checksum CHAR(32)
);Using this table, you can now add documents to the table together with the checksum and also verify the integrity of the document, as shown in Example 8-13, to ensure it has not been corrupted. Although the MD5 checksum is currently not considered cryptographically secure, it still offers some protection against random errors such as disk and memory problems.
master>INSERT INTO document(doc) VALUES (document);Query OK, 1 row affected (0.02 sec) master>UPDATE document SET checksum = MD5(doc) WHERE id = LAST_INSERT_ID();Query OK, 1 row affected (0.04 sec) master>SELECT id,->IF(MD5(doc) = checksum, 'OK', 'CORRUPT!') AS Status->FROM document;+-----+----------+ | id | Status | +-----+----------+ | 1 | OK | | 2 | OK | | 3 | OK | | 4 | OK | | 5 | OK | | 6 | OK | | 7 | CORRUPT! | | 8 | OK | | 9 | OK | | 10 | OK | | 11 | OK | +-----+----------+ 11 row in set (5.75 sec)
But how well does this idea play with replication? Well, it depends
on how you use it. When the INSERT
statement in Example 8-13 is executed, it
is written to the binary log as is, which means the MD5 checksum is
recalculated on the slave. So what happens if the document is
corrupted on the way to the slave? In that case, the MD5 checksum will
be recalculated using the corrupt document, and the corruption will
not be detected. So the statement given in Example 8-13 is not
replication-safe. We can, however, do better than this.
Instead of following Example 8-13, write your code
to look like Example 8-14, which stores
the checksum in a user-defined variable and uses it in the INSERT statement. The user-defined variable
contains the actual value computed by the MD5 function, so it will be identical on the master and the slave even
if the document is corrupted in the transfer (but, of course, not if
the checksum is corrupted in the transfer). Either way, a corruption
occurring when the document is replicated will be noticed.
master>INSERT INTO document(doc) VALUES (); Query OK, 1 row affected (0.02 sec) master>documentSELECT MD5(doc) INTO @checksum FROM document WHERE id = LAST_INSERT_ID();Query OK, 0 rows affected (0.00 sec) master>UPDATE document SET checksum = @checksum WHERE id = LAST_INSERT_ID();Query OK, 1 row affected (0.04 sec)
Thread-specific events
As mentioned earlier, some statements are thread-specific and will yield a different result when executed in another thread. There are several reasons for this:
- Reading and writing thread-local objects
A thread-local object can potentially clash with an identically named object in another thread. Typical examples of such objects are temporary tables or user-defined variables.
We have already examined how replication handles user-defined variables, so this section will just concentrate on how replication handles the temporary tables.
- Using variables or functions that have thread-specific results
Some variables and functions have different values depending on which thread they are running in. A typical example of this is the server variable
connection_id.
The server handles these two cases slightly differently. In addition, there are a few cases in which replication does not try to account for differences between the server and client, so results can differ in subtle ways.
To handle thread-local objects, some form of thread-local store (TLS) is required, but because the slave is executing from a single thread, it has to manage this storage and keep the TLSes separate. To handle temporary tables, the slave creates a unique (mangled) filename for the table based on the server process ID, the thread ID, and a thread-specific sequence number. This means that the two statements in Example 8-15—each runs from a different client on the master—create two different filenames on the slave to represent the temporary tables.
master-1>CREATE TEMPORARY TABLE cache (a INT, b INT);Query OK, 0 rows affected (0.01 sec) master-2>CREATE TEMPORARY TABLE cache (a INT, b INT);Query OK, 0 rows affected (0.01 sec)
All the statements from all threads on the master are stored in sequence in the binary log, so it is necessary to distinguish the two statements. Otherwise, they will cause an error when executed on the slave.
To distinguish the statements in the binary log so that they do
not conflict, the server tags the Query events containing the statement as
thread-specific and also adds the thread ID to the event. (Actually,
the thread ID is added to all Query events, but
is not really necessary except for thread-specific statements.)
When the slave receives a thread-specific event, it sets a variable special to the replication slave thread, called the pseudothread ID, to the thread ID passed with the event. The pseudothread ID will then be used when constructing the temporary tables. The process ID of the slave server—which is the same for all master threads—will be used when constructing the filename, but that does not matter as long as there is a distinction among tables from different threads.
We also mentioned that thread-specific functions and variables require special treatment to work correctly when replicated. This is not, however, handled by the server. When a server variable is referenced in a statement, the value of the server variable will be retrieved on the slave. If, for some reason, you want to replicate exactly the same value, you have to store the value in a user-defined variable as shown in Example 8-14, or use row-based replication, which we will cover later in the chapter.
Filtering and skipping events
In some cases, events may be skipped either because they are filtered out using replication filters or because the slave has been specifically instructed to skip a number of events.
The SQL_SLAVE_SKIP_COUNTER
variable instructs the slave server to skip a specified number of
events. The SQL thread should not be running when you set the
variable. This condition is typically easy to satisfy, because the
variable is usually used to skip some events that caused replication
to stop already.
An error that stops replication should, of course, be
investigated and handled, but if you fix the problem manually, it is
necessary to ignore the event that stopped replication and force
replication to continue after the offending event. This variable is
provided as a convenience, to keep you from having to use CHANGE MASTER TO. Example 8-16 shows the
feature in use after a bad statement has caused replication to
stop.
slave> SET GLOBAL SQL_SLAVE_SKIP_COUNTER = 3; Query OK, 0 rows affected (0.02 sec) slave> START SLAVE; Query OK, 0 rows affected (0.02 sec)
When you start the slave, three events will be skipped before resuming replication. If skipping three events causes the slave to end up in the middle of a transaction, the slave will continue skipping events until it finds the end of the transaction.
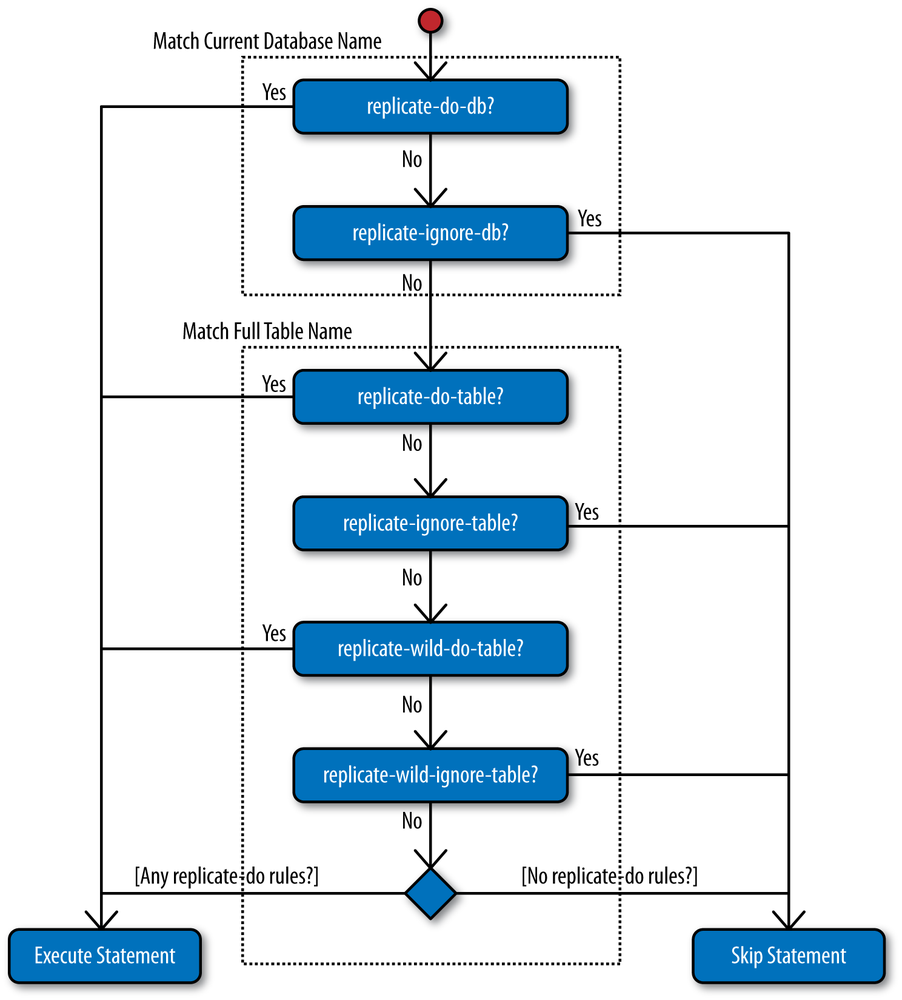
Events can also be filtered by the slave if replication filters are set up. As we discussed in Chapter 4, the master can handle filtering, but if there are slave filters, the events are filtered in the SQL thread, which means that the events are still sent from the master and stored in the relay log.
Filtering is done differently depending on whether database filters or table filters are set up. The logic for deciding whether a statement for a certain database should be filtered out from the binary log was detailed in Chapter 4, and the same logic applies to slave filters, with the addition that here a set of table filters have to be handled as well.
One important aspect of filtering is that a filter applying to a single table causes the entire statement referring to that filter to be left out of replication. The logic for filtering statements on the slave is shown in Figure 8-5.
Filtering that involves tables can easily become difficult to understand, so we advise the following rules to avoid unwanted results:
Do not qualify table names with the database they’re a part of. Precede the statement with a
USEstatement instead to set a new default database.Do not update tables in different databases using a single statement.
Avoid updating multiple tables in a statement, unless you know that all tables are filtered or none of the tables are filtered. Notice that from the logic in Figure 8-5, the whole statement will be filtered if even one of the tables is filtered.
Semisynchronous Replication
Google has an extensive set of patches for MySQL and InnoDB to tailor the server and the storage engine. One of the patches that is available for MySQL version 5.0 is the semisynchronous replication patch. MySQL has since reworked the patch and released it with MySQL 5.5.
The idea behind semisynchronous replication is to ensure the changes are written to disk on at least one slave before allowing execution to continue. This means that for each connection, at most one transaction can be lost due to a master crash.
It is important to understand that the semisynchronous replication patch does not hold off commits of the transaction; it just avoids sending a reply back to the client until the transaction has been written to the relay log of at least one slave. Figure 8-6 shows the order of the calls when committing a transaction. As you can see, the transaction is committed to the storage engine before the transaction is sent to the slave, but the return from the client’s commit call occurs after the slave has acknowledged that the transaction is in durable storage.
For each connection, one transaction can be lost if a crash occurs after the transaction has been committed to the storage engine but before the transaction has been sent to the slave. However, because the acknowledgment of the transaction goes to the client after the slave has acknowledged that it has the transaction, at most one transaction can be lost. This usually means that one transaction can be lost per client.
Configuring Semisynchronous Replication
To use semisynchronous replication, both the master and the slave need to support it, so both the master and the slave have to be running MySQL version 5.5 or later and have semisynchronous replication enabled. If either the master or the slave does not support semisynchronous replication, it will not be used, but replication works as usual, meaning that more than one transaction can be lost unless special precautions are taken to ensure each transaction reaches the slave before a new transaction is started.
Use the following steps to enable semisynchronous replication:
Install the master plug-in on the master:
master>
INSTALL PLUGIN rpl_semi_sync_master SONAME 'semisync_master.so';Install the slave plug-in on each slave:
slave>
INSTALL PLUGIN rpl_semi_sync_slave SONAME 'semisync_slave.so';Once you have installed the plug-ins, enable them on the master and the slave. This is controlled through two server variables that are also available as options, so to ensure that the settings take effect even after restart, it is best to bring down the server and add the options to the my.cnf file of the master:
[mysqld] rpl-semi-sync-master-enabled = 1
and to the slave:
[mysqld] rpl-semi-sync-slave-enabled = 1
Restart the servers.
If you followed the instructions just given, you now have a semisynchronous replication setup and can test it, but consider these cases:
What happens if all slaves crash and therefore no slave acknowledges that it has stored the transaction to the relay log? This is not unlikely if you have only a single server attached to the master.
What happens if all slaves disconnect gracefully? In this case, the master has no slave to which the transaction can be sent for safekeeping.
In addition to rpl-semi-sync-master-enabled and
rpl-semi-sync-slave-enabled, there are two options that
you can use to handle the situations we just laid out:
rpl-semi-sync-master-timeout=millisecondsTo prevent semisynchronous replication from blocking if it does not receive an acknowledgment, it is possible to set a timeout using the
rpl-semi-sync-master-timeout=option.millisecondsIf the master does not receive any acknowledgment before the timeout expires, it will revert to normal asynchronous replication and continue operating without semisynchronous replication.
This option is also available as a server variable and can be set without bringing the server down. Note, however, that as with every server variable, the value will not be saved between restarts.
rpl-semi-sync-master-wait-no-slave={ON|OFF}If a transaction is committed but the master does not have any slaves connected, it is not possible for the master to send the transaction anywhere for safekeeping. By default, the master will then wait for a slave to connect—as long as it is within the timeout limit—and acknowledge that the transaction has been properly written to disk.
You can use the
rpl-semi-sync-master-wait-no-slave=option to turn off this behavior, in which case the master reverts to asynchronous replication if there are no connected slaves.{ON|OFF}
Warning
Note that if the master does not receive any acknowledgment
before the timeout given by
rpl-semi-sync-master-timeout expires, or if
rpl-semi-sync-master-wait-no-slave=ON,
semi-synchronous replication will silently revert to normal
asynchronous replication and continue operating without
semisynchronous replication.
Monitoring Semisynchronous Replication
Both plug-ins install a number of status variables that allow you to monitor semisynchronous replication. We will cover the most interesting ones here (for a complete list, consult the online reference manual for semisynchronous replication):
rpl_semi_sync_master_clientsThis status variable reports the number of connected slaves that support and have been registered for semisynchronous replication.
rpl_semi_sync_master_statusThe status of semisynchronous replication on the master is 1 if it is active, and 0 if it is inactive—either because it has not been enabled or because it was enabled but has reverted to asynchronous replication.
rpl_semi_sync_slave_statusThe status of semisynchronous replication on the slave is 1 if active (i.e., if it has been enabled and the I/O thread is running) and 0 if it is inactive.
You can read the values of these variables either using the SHOW STATUS command
or through the information schema table GLOBAL_STATUS. If you want to use the values
for other purposes, the SHOW STATUS
command is hard to use and a query as shown in Example 8-17 uses SELECT on the information schema to extract
the value and store it in a user-defined variable.
Global Transaction Identifiers
Starting with MySQL 5.6, the concept of global transaction identifiers (GTIDs) was added, which means that each transaction is assigned a unique identifier. This section introduces GTIDs and demonstrates how they can be used. For a detailed description of GTIDs, look in “Replication with Global Transaction Identifiers” in the MySQL 5.6 Reference Manual.
In MySQL 5.6, each transaction on a server is assigned a transaction identifier,
which is a nonzero 64-bit value assigned to a transaction based on the
order in which they committed. This number is local
to the server (i.e., some other server might assign the same number to
some other transaction). To make this transaction identifier global, the
server UUID is added to form a pair. For example, if the server has
a server UUID (as given by the server variable
@@server_uuid) 2298677f-c24b-11e2-a68b-0021cc6850ca, the
1477th transaction committed on the server will
have GTID 2298677f-c24b-11e2-a68b-0021cc6850ca:1477.
When a transaction is replicated from a master to a slave, the binary log position of the transaction changes because the slave has to write it to the binary logfile on the slave. Because a slave might be configured differently, the positions can be vastly different from the position on the master—but the global transaction identifier will be the same.
When transactions are replicated and global transaction identifiers are enabled, the GTID of the transaction is retained regardless of the number of times that the transaction is propagated. This simple idea makes GTIDs a very powerful concept, as you will soon see.
While the notation just shown indicates an
individual transaction, it is also necessary to have
a notation for a global transaction identifier set
(or GTID set). This helps, for example, when talking about transactions
that have been logged on a server. A GTID set is written by giving a
range, or list of ranges, of transaction identifiers. So the set of
transactions 911-1066 and 1477-1593 is written as 2298677f-c24b-11e2-a68b-0021cc6850ca:911-1066:1477-1593.
Warning
GTIDs are written to the binary log and assigned only to transactions that are written to the binary log. This means that if you turn off the binary log, transactions will not get assigned GTIDs. This applies to the slave as well as the master. The consequence is that if you want to use a slave for failover, you need to have the binary log enabled on it. If you do not have a binary log enabled, the slave will not remember the GTIDs of the transactions it has executed.
Setting Up Replication Using GTIDs
To set up replication using global transaction identifiers, you must enable global transaction identifiers when configuring the servers. We’ll go through what you need to do to enable global transaction identifers here. To configure a standby for using global transaction identifiers, you need to update my.cnf as follows:
[mysqld] user = mysql pid-file = /var/run/mysqld/mysqld.pid socket = /var/run/mysqld/mysqld.sock port = 3306 basedir = /usr datadir = /var/lib/mysql tmpdir = /tmp log-bin = master-binlog-bin-index = master-bin.index server-id = 1 gtid-mode = ON
log-slave-updates
enforce-gtid-consistency
-
It is necessary to have the binary log enabled on the standby. This ensures that all changes are logged to the binary log when the master becomes the primary, but it is also a requirement for
log-slave-updates.-
This option is used to enable the generation of global transaction identifiers.
-
This option ensures that events received from the master and executed are also written to the standby’s binary log. If this is not enabled, it will not be possible for the standby to send out changes done indirectly to slaves connected to it. Note that by default, this option is not enabled.

This option ensures that statements throw an error if they cannot be logged consistently with global transaction identifiers enabled. This is recommended to ensure that failover happens correctly.
After updating the options file, you need to restart the server for the changes to take effect. Once you’ve done this for all servers that are going to be used in the setup, you’re set for doing a failover. Using the GTID support in MySQL 5.6, switching masters just requires you to issue the command:
CHANGE MASTER TO MASTER_HOST =host_of_new_master, MASTER_PORT =port_of_new_master, MASTER_USER =replication_user_name, MASTER_PASSWORD =replication_user_password, MASTER_AUTO_POSITION = 1
The MASTER_AUTO_POSITION causes
the slave to automatically negotiate what transactions should
be sent over when connecting to the master.
To see status of replication in GTID positions, SHOW SLAVE STATUS has been extended with a few new columns. You can see an
example of those in Example 8-18.
    Slave_IO_State: Waiting for master to send event
                .
                .
                .
  Slave_IO_Running: Yes
 Slave_SQL_Running: Yes
                .
                .
                .
       Master_UUID: 4e2018fc-c691-11e2-8c5a-0021cc6850ca
                .
                .
                .
Retrieved_Gtid_Set: 4e2018fc-c691-11e2-8c5a-0021cc6850ca:1-1477
 Executed_Gtid_Set: 4e2018fc-c691-11e2-8c5a-0021cc6850ca:1-1593
Auto_Position: 1Master_UUIDThis is the server UUID of the master. The field is not strictly tied to the GTID implementation (it was added before the GTIDs were introduced), but it is useful when debugging problems.
Retrieved_Gtid_SetThis is the set of GTIDs that have been fetched from the master and stored in the relay log.
Executed_Gtid_SetThis is the set of GTIDs that have been executed on the slave and written to the slave’s binary log.
Failover Using GTIDs
Hot Standby described how to switch to a hot standby without using global transaction identifiers. That process used binary log positions, but with global transaction identifiers, there is no longer a need to check the positions.
Switching over to a hot standby with global transaction identifiers is very easy (it is
sufficient to just redirect the slave to the new master using CHANGE MASTER):
CHANGEMASTERTOMASTER_HOST='standby.example.com';
As usual, if no other parameters change, it is not necessary to repeat them.
When you enable MASTER_AUTO_POSITION, the
master will figure out what transactions need to be sent over. The
failover procedure is therefore easily defined using the Replicant ilibrary:
_CHANGE_MASTER=("CHANGE MASTER TO ""MASTER_HOST =%s, MASTER_PORT =%d, ""MASTER_USER =%s, MASTER_PASSWORD =%s, ""MASTER_AUTO_POSITION = 1")defchange_master(server,master):server.sql(_CHANGE_MASTER,master.host,master.port,master.user,master.password)defswitch_to_master(server,standby):change_master(server,standby)server.sql("START SLAVE")
By comparing this procedure with the one in Example 5-1, you can see that there are a few things that have been improved by using GTIDs:
Because you do not need to check the position of the master, it is not necessary to stop it to ensure that it is not changing.
Because the GTIDs are global (i.e., they never change when replicated), there is no need for the slave to “align” with the master or the standby to get a good switchover position.
It is not necessary to fetch the position on the standby (which is a slave to the current primary) because everything is replicated to the slave.
It is not necessary to provide a position when changing the master because the servers automatically negotiate positions.
Because the GTIDs are global (i.e., it is not necessary to do any sort of translation of the positions), the preceding procedure works just as well for switchover and failover, even when a hierarchical replication is used. This was not the case in Hot Standby, where different procedures had to be employed for switchover, non-hierarchical failover, and failover in a hierarchy.
In order to avoid losing transactions when the master fails, it is
a good habit to empty the relay log before actually executing the
failover. This avoids re-fetching transactions that have already been
transferred from the master to the slave. The best approach would be to
redirect only the I/O thread to the new master, but unfortunately, this
is (not yet) possible. To wait for the relay log to become empty, the
handy WAIT_UNTIL_SQL_THREAD_AFTER_GTIDS function
will block until all the GTIDs in a GTID set have been
processed by the SQL thread. To use this function, we change the
function in Example 8-19
.
Slave Promotion Using GTIDs
The procedure shown in the previous section for failover works fine when the slave is actually behind the standby. But, as mentioned in Slave Promotion, if the slave knows more transactions than the standby, failing over to the standby does not put you in a better situation. It would actually be better if the slave were the new master. So how can this be implemented using global transaction identifiers?
The actual failover using the procedure in Example 8-19 can still be used,
but if there are multiple slaves to a master, and the master fails, it
is necessary to compare the slaves to see what slave is more
knowledgable. To help with this, MySQL 5.6 introduced the variable
GTID_EXECUTED. This global variable contains a GTID
set consisting of all transactions that have been written to the binary
log on the server. Note that no GTID is generated unless the transaction
is written to the binary log, so only transactions that were written to
the binary log are represented in this set.
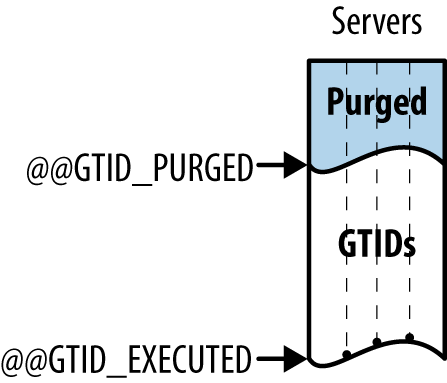
There is also a global variable GTID_PURGED
that contains the set of all transactions that have been purged
(i.e., removed) from the binary log and are no longer available to
replicate. This set is always a subset of (or equal
to) GTID_EXECUTED.
This variable can be used to check that a candidate master has
enough events in the binary log to act as master to some slave. If there
are any events in GTID_PURGED on the master that are
not in GTID_EXECUTED on the slave, the
master will not be able to replicate some events that the slave needs
because they are not in the binary log. The relation between these two
variables can be seen in Figure 8-7,
where each variable represents a “wavefront” through the space of all
GTIDs.
Using GTID_EXECUTED, it is easy to compare the
slaves and decide which one knows the most transactions. The code in
Example 8-20
orders the slaves based on GTID_EXECUTED and picks
the “best” one as the new master. Note that GTID sets are not normally
totally ordered (i.e., two GTID sets can differ but have the same size).
In this particular case, however, the GTID sets
will be totally ordered, because they were ordered
in the binary log of the master.
frommysql.replicant.serverimportGTIDSetdeffetch_gtid_executed(server):returnGTIDSet(server.sql("SELECT @@GLOBAL.GTID_EXECUTED"))deffetch_gtid_purged(server):returnGTIDSet(server.sql("SELECT @@GLOBAL.GTID_PURGED"))deforder_slaves_on_gtid(slaves):entries=[]forslaveinslaves:pos=fetch_gtid_executed(slave)entries.append((pos,slave))entries.sort(key=lambdax:x[0])returnentries
Combining the examples in Example 8-19 and Example 8-20 allows the function to promote the best slave to be written as simply as what is shown in Example 8-21.
Replication of GTIDs
The previous sections showed how to set up the MySQL server to use global transaction identifiers and how to handle failover and slave promotion, but one piece of the puzzle is still missing: how are GTIDs propagated between the servers?
A GTID is assigned to every group in the binary log—that is, to each transaction, single-statement DML (whether transactional or nontransactional), and DDL statement. A special GTID event is written before the group and contains the full GTID for the transaction, as illustrated in Figure 8-8.

To handle the replication of transactions with a GTID assigned, the SQL thread processes the GTID event in the following manner:
If the GTID is already present in the
GTID_EXECUTED, the transaction will be skipped entirely, not even written to the binary log. (Recall thatGTID_EXECUTEDcontains all transactions already in the binary log, so there is no need to write it again.)Otherwise, the GTID will be assigned to the transaction that follows, and the next transaction is executed as normal.
When the transaction commits, the GTID assigned to the transaction is used to generate a new GTID event, which is then written to the binary log before the transaction.
The contents of the transaction cache are then written to the binary log after the GTID event.
Note that with GTIDs assigned to every transaction, it is possible to filter out transactions that have already been executed in the first step, which was not possible before MySQL 5.6.
You can control what GTID is assigned to a transaction through a
new variable named GTID_NEXT. This variable can
either contain a GTID or have the value AUTOMATIC. (It can also take the value
ANONYMOUS, but this can be used only
when GTID_MODE = ON, so we disregard
this case.) When committing a transaction, different actions are taken
depending on the value of GTID_NEXT:
If
GTID_NEXThas the valueAUTOMATIC, a new GTID is created and assigned to the transaction.If
GTID_NEXThas a GTID as a value, that GTID will be used when the transaction is written to the binary log.
The GTID assigned to GTID_NEXT is
not changed after the transaction commits. This
means you have to set it either to a new GTID or to AUTOMATIC after you have committed the
transaction. If you do not change the value of
GTID_NEXT, you will get an error when you try to
start a new transaction, regardless of whether it is done explicitly or
implicitly.
Observe that GTID_NEXT has to be set
before the transaction starts. If you try to set
the variable after starting a transaction, you will just get an
error.
Once you set GTID_NEXT and start a transaction,
the GTID is owned by the transaction. This will be
reflected in the variable GTID_OWNED:
mysql> SELECT @@GLOBAL.GTID_OWNED;
+-------------------------------------------+
| @@GLOBAL.GTID_OWNED                       |
+-------------------------------------------+
| 02020202-0202-0202-0202-020202020202:4#42 |
+-------------------------------------------+
1 row in set (0.00 sec)
In this case, the only owned GTID, which is owned by the session
with ID 42, is 02020202-0202-0202-0202-020202020202:4.
GTID_OWNED should be considered internal and is
intended for testing and debugging.
Replicating from a master to a slave directly is not the only way
changes can be replicated. MySQL replication is also designed to work
with mysqlbinlog so
that SQL statements can be generated, saved to a file, and applied to a
server. To handle propagation of GTIDs even when it is done indirectly
through mysqlbinlog,
GTID_NEXT is used. Whenever mysqlbinlog encounters a GTID event, it will
generate a statement to set GTID_NEXT. In Example 8-22, you
can see an example of the output.
# at 410
#130603 20:57:54 server id 1  end_log_pos 458 CRC32 0xc6f8a5eb
#       GTID [commit=yes]
SET @@SESSION.GTID_NEXT= '01010101-0101-0101-0101-010101010101:3'/*!*/;
# at 458
#130603 20:57:54 server id 1  end_log_pos 537 CRC32 0x1e2e40d0
# Position  Timestamp   Type   Master ID        Size      Master Pos    Flags
#       Query   thread_id=4     exec_time=0     error_code=0
SET TIMESTAMP=1370285874/*!*/;
BEGIN
/*!*/;
# at 537
#130603 20:57:54 server id 1  end_log_pos 638 CRC32 0xc16f211d
#       Query   thread_id=4     exec_time=0     error_code=0
SET TIMESTAMP=1370285874/*!*/;
INSERT INTO t VALUES (1004)
/*!*/;
# at 638
#130603 20:57:54 server id 1  end_log_pos 669 CRC32 0x91980f0b
COMMIT/*!*/;
Slave Safety and Recovery
Slave servers can crash too, and when they do, you need to recover them. The first step in handling a crashed slave is always to investigate why it crashed. This cannot be automated, because there are so many hard-to-anticipate reasons for crashes. A slave might be out of disk space, it may have read a corrupt event, or it might have re-executed a statement that resulted in a duplicate key error for some reason. However, it is possible to automate some recovery procedures and use this automation to help diagnose a problem.
Syncing, Transactions, and Problems with Database Crashes
To ensure slaves pick up replication safely after a crash on the master or slave, you need to consider two different aspects:
Ensuring the slave stores all the necessary data needed for recovery in the event of a crash
Executing the recovery of a slave
Slaves do their best to meet the first condition by syncing to disk. To provide acceptable performance, operating systems keep files in memory while working with them, and write them to disk only periodically or when forced to. This means data written to a file is not necessarily in safe storage. If there is a crash, data left only in memory will be lost.
To force a slave to write files to disk, the database server
issues an fsync call,
which writes all data stored in memory to disk. To protect replication
data, the MySQL server normally executes fsync calls for the relay log, the master.info file, and the relay-log.info file at regular
intervals.
I/O thread syncing
For the I/O thread, two fsync calls are made whenever an event has been processed: one to flush the
relay log to disk and one to flush the master.info file to disk. Doing the flushes
in this order ensures that no events will be lost if the slave crashes
between flushing the relay log and flushing the master.info file. This, however, means that
an event can be duplicated if a crash occurs in any of the following
cases:
The server flushes the relay log and is about to update the master read position in master.info.
The server crashes, which means that the master read position now refers to the position before the event that was flushed to the relay log.
The server restarts and gets the master read position from master.info, meaning the position before the last event written to the relay log.
Replication resumes from this position, and the event is duplicated.
If the files were flushed in the opposite order—the master.info file first and the relay log second—there would be potential for losing an event in the same scenario, because the slave would pick up replication after the event that it was about to write to the relay log. Losing an event is deemed to be worse than duplicating one, hence the relay log is flushed first.
SQL thread syncing
The SQL thread processes the groups in the relay log by processing each event in turn. When all the events in the group are processed, the SQL thread commits the transaction using the following process:
While executing inside a group, the thread increments the event position to keep track of where the SQL thread is reading in the relay log, but if there is a crash, execution will resume from the last recorded position in the relay-log.info file.
This behavior leaves the SQL thread with its own version of the atomic update problem mentioned for the I/O thread, so the slave database and the relay-log.info file can get out of sync in the following scenario:
The event is applied to the database and the transaction is committed. The next step is to update the relay-log.info file.
The slave crashes, which means relay-log.info now points to the beginning of the just-completed transaction.
On recovery, the SQL thread reads the information from the relay-log.info file and starts replication from the saved position.
The last executed transaction is repeated.
What all this boils down to is that committing a transaction on the slave and updating the replication information is not atomic: it is possible that relay-log.info does not accurately reflect what has been committed to the database. The next section describes how transactional replication is implemented in MySQL 5.6 to solve this problem.
Transactional Replication
As noted in the previous section, replication is not crash-safe, because the information about the progress of replication is not always in sync with what has actually been applied to the database. Although transactions are not lost if the server crashes, it can require some tweaking to bring the slaves up again.
MySQL 5.6 has increased crash safety for the slave by committing the replication information together with the transaction as shown in Figure 8-9. This means that replication information will always be consistent with what has been applied to the database, even in the event of a server crash. Also, some fixes were done on the master to ensure that it recovers correctly.
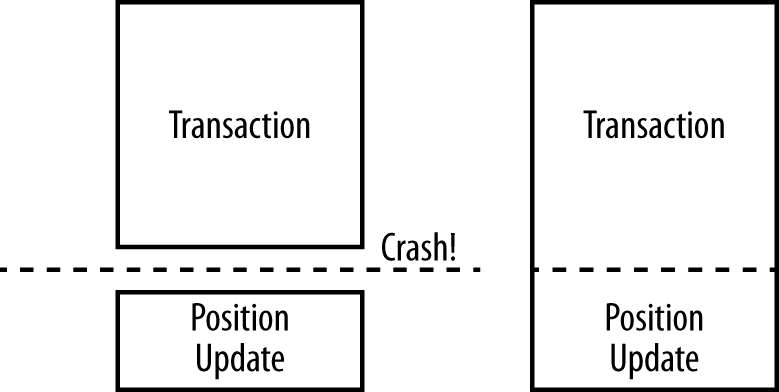
Recall that the replication information is stored in two files: master.info and relay-log.info. The files are arranged so that they are updated after the transaction has been applied. This means that if you have a crash between the transaction commit and the update of the files, as on the left in Figure 8-9, the position information will be wrong. In other words, a transaction cannot be lost this way, but there is a risk that a transaction could be applied again when the slave recovers.
The usual way to avoid this is to have a primary key on all your
tables. In that case, a repeated update of the table would cause the
slave to stop, and you would have to use SQL_SLAVE_SKIP_COUNTER to skip the
transaction and get the slave up and running again (or
GTID_NEXT to commit a dummy transaction). This is
better than losing a transaction, but it is nevertheless a nuisance.
Removing the primary key to prevent the slave from stopping will only
solve the problem partially: it means that the transaction would be
applied twice, which would both place a burden on the application to
handle dual entries and also require that the tables be cleaned
regularly. Both of these approaches require either manual intervention
or scripting support. This does not affect reliability, but crashes are
much easier to handle if the replication information is committed in the
same transaction as the data being updated.
To implement transactional replication in MySQL 5.6, the replication information can be stored either in files (as before) or in tables. Even when storing the replication information in tables, it is necessary either to store the data and the replication information in the same storage engine (which must be transactional) or to support XA on both storage engines. If neither of these steps are taken, the replication information and the data cannot be committed as a single transaction.
Setting up transactional replication
The default in MySQL 5.6 is to use files for the replication information, so to use
transactional replication, it is necessary to reconfigure the server
to use tables for the replication information. To control where the
replication information is placed, two new options have been
added: master_info_repository and
relay_log_info_repository. These options take the
value FILE or TABLE to use either the file or the table
for the respective piece of information.
Thus, to use transactional replication, edit your configuration file, add the options as shown in Example 8-23, and restart the server.
[mysqld]
...
master_info_repository = TABLE
relay_log_info_repository = TABLE
...
Warning
Before MySQL 5.6.6, the default engine for slave_master_info and slave_relay_log_info was MyISAM. For replication to be transactional, you need
to change the engine to use a transactional engine, typically
InnoDB, using ALTER
TABLE:
slave>ALTER TABLE mysql.slave_master_info ENGINE = InnoDB;slave>ALTER TABLE mysql.slave_relay_log_info ENGINE = InnoDB;
Details of transactional replication
Two tables in the mysql database preserve information needed for transactional
replication: slave_master_info,
corresponding to the file master.info,
and slave_relay_log_info,
corresponding to the file relay_log.info.
Just like the master.info
file, the slave_master_info table
stores information about the connection to the master. Table 8-1 shows each
field of the table, and which row in the master.info file and SHOW SLAVE STATUS output it corresponds to.
| Field | Line in file | Slave status column |
Number_of_lines | 1 | |
Master_log_name | 2 | Master_Log_File |
Master_log_pos | 3 | Read_Master_Log_Pos |
Host | 3 | Master_Host |
User_name | 4 | Master_User |
User_password | 5 | |
Port | 6 | Master_Port |
Connect_retry | 7 | Connect_Retry |
Enabled_ssl | 8 | Master_SSL_Allowed |
Ssl_ca | 9 | Master_SSL_CA_File |
Ssl_capath | 10 | Master_SSL_CA_Path |
Ssl_cert | 11 | Master_SSL_Cert |
Ssl_cipher | 12 | Master_SSL_Cipher |
Ssl_key | 13 | Master_SSL_Key |
Ssl_verify_servert_cert | 14 | Master_SSL_Verify_Server_Cert |
Heartbeat | 15 | |
Bind | 16 | Master_Bind |
Ignored_server_ids | 17 | Replicate_Ignore_Server_Ids |
Uuid | 18 | Master_UUID |
Retry_count | 19 | Master_Retry_Count |
Ssl_crl | 20 | Master_SSL_Crl |
Ssl_crlpath | 21 | Master_SSL_Crlpath |
Enabled_auto_position | 22 | Auto_Position |
Similarly, Table 8-2 shows the
definition of the slave_relay_log_info table corresponding to
the relaylog.info file.
| Field | Line in file | Slave status column |
Number_of_lines | 1 | |
Relay_log_name | 2 | Relay_Log_File |
Relay_log_pos | 3 | Relay_Log_Pos |
Master_log_name | 4 | Relay_Master_Log_File |
Master_log_pos | 5 | Exec_Master_Log_Pos |
Sql_delay | 6 | SQL_Delay |
Number_of_workers | 7 | |
Id | 8 |
Now, suppose that the following transaction was executed on the master:
START TRANSACTION;
UPDATE titles, employees SET titles.title = 'Dictator-for-Life'
 WHERE first_name = 'Calvin' AND last_name IS NULL;
UPDATE salaries SET salaries.salary = 1000000
 WHERE first_name = 'Calvin' AND last_name IS NULL;
COMMIT;
When the transaction reaches the slave and is executed there, it
behaves as if it was executed the following way (where
Exec_Master_Log_Pos,
Relay_Master_Log_File,
Relay_Log_File, and
Relay_Log_Pos are taken from the SHOW SLAVE STATUS output):
START TRANSACTION; UPDATE titles, employees SET titles.title = 'Dictator-for-Life' WHERE first_name = 'Calvin' AND last_name IS NULL; UPDATE salaries SET salaries.salary = 1000000 WHERE first_name = 'Calvin' AND last_name IS NULL; SET @@SESSION.LOG_BIN = 0; UPDATE mysql.slave_relay_log_info SET Master_log_pos =Exec_Master_Log_Pos, Master_log_name =Relay_Master_Log_File, Relay_log_name =Relay_Log_File, Relay_log_pos =Relay_Log_Pos; SET @@SESSION.LOG_BIN = 1; COMMIT;
Note that the added “statement” is not logged to the binary log
on the master, because the binary log is temporarily disabled when the
“statement” is executed. If both slave_relay_log_info and the tables are
placed in the same engine, this will be committed as a unit.
The result is to update slave_relay_log_info with each transaction
executed on the slave, but note that slave_master_info does not contain
information that is critical for ensuring that transactional
replication works. The only fields that are updated are the positions
of events fetched from the master. On a crash, the slave will pick up
from the last executed position, and not from the
last fetched position, so this information is
interesting to have only in the event that the
master crashes. In this case, the events in the
relay log can be executed to avoid losing more events than
necessary.
Similar to flushing the disk, committing to tables is expensive.
Because the slave_master_info table
does not contain any information that is critical for ensuring
transactional replication, avoiding unnecessary commits to this table
improves performance.
For this reason, the sync_master_info option was
introduced. The option contains an integer telling how often the
replication information should be committed to the slave_master_info (or flushed to disk, in
the event that the information is stored in the traditional files). If
it is nonzero, replication information is flushed each time the master
fetches the number of events indicated by the variable’s value. If it
is zero, no explicit flushing is done at all, but the operating system
will flush the information to disk. Note, however, that the
information is flushed to disk or committed to the table when the
binary log is rotated or the slave starts or stops.
If you are using tables for storing the replication information, this means that if:
sync_master_info = 0
the slave_master_info table is
updated only when the slave starts or stops, or the binary log is
rotated, so changes to the fetched position are not visible to other
threads. If it is critical for your application that you can view this
information, you need to set sync_master_info to a
nonzero value.
Rules for Protecting Nontransactional Statements
Statements executed outside of transactions cannot be tracked and protected from re-execution after a crash. The problem is comparable on masters and slaves. If a statement against a MyISAM table is interrupted by a crash on the master, the statement is not logged at all, because logging is done after the statement has completed. Upon restart (and successful repair) the MyISAM table will contain a partial update, but the binary log will not have logged the statement at all.
The situation is similar on the slave: if a crash occurs in the middle of execution of a statement (or a transaction that modifies a nontransactional table), the changes might remain in the table, but the group position will not be changed. The nontransactional statement will be re-executed when the slave starts up replication again.
It is not possible to automatically catch problems with crashes in the middle of updating a nontransactional table, but by obeying a few rules, it is possible to ensure you at least receive an error when this situation occurs.
INSERTstatementsTo handle these statements, you need to have a primary key on the tables that you replicate. In this way, an
INSERTthat is re-executed will generate a duplicate key error and stop the slave so that you can check why the master and the slave are not consistent.DELETEstatementsTo handle these, you need to stay away from
LIMITclauses. If you do this, the statement will just delete the same rows again (i.e., the rows that match theWHEREclause), which is fine since it will either pick up where the previous statement left off or do nothing if all specified rows are already deleted. However, if the statement has aLIMITclause, only a subset of the rows matching theWHEREcondition will be executed, so when the statement is executed again, another set of rows will be deleted.UPDATEstatementsThese are the most problematic statements. To be safe, either the statement has to be idempotent—executing it twice should lead to the same result—or the occasional double execution of the statement should be acceptable, which could be the case if the
UPDATEstatement is just for maintaining statistics over, say, page accesses.
Multisource Replication
As you may have noticed, it is not possible to have a slave connect to multiple masters and receive changes from all of them. This topology is called multisource and should not be confused with the multimaster topology introduced in Chapter 6. In a multisource topology, changes are received from several masters, but in a multimaster topology, the servers form a group that acts as a single master by replicating changes from each master to all the other masters.
There have been plans for introducing multisource replication into MySQL for a long time, but one issue stands in the way of the design: what to do with conflicting updates. These can occur either because different sources make truly conflicting changes, or because two intermediate relays are forwarding a change made at a common master. Figure 8-10 illustrates both types of conflicts. In the first, two masters (sources) make changes to the same data and the slave cannot tell which is the final change. In the second, only a single change is made, but it looks to the slave like two changes from two different sources. In both cases, the slave will not be able to distinguish between events coming from the two relays, so an event sent from the master will be seen as two different events when arriving at the slave.
Note
The diamond configuration does not have to be explicitly set up: it can occur inadvertently as a result of switching from one relay to another if the replication stream is overlapping during a switchover. For this reason, it is important to ensure all events in queue—on the slave and on all the relays between the master and the slave—have been replicated to the slave before switching over to another master.
You can avoid conflicts by making sure you handle switchovers correctly and—in the case of multiple data sources—ensuring updates are done so that they never have a chance of conflicting. The typical way to accomplish this is to update different databases, but it is also possible to assign updates of different rows in the same table to different servers.
Although MySQL does not currently let you replicate from several sources simultaneously, you can come close by switching a slave among several masters, replicating periodically from each of them in turn. This is called round-robin multisource replication. It can be useful for certain types of applications, such as when you’re aggregating data from different sources for reporting purposes. In these cases, you can separate data naturally by storing the writes from each master in its own database, table, or partition. There is no risk of conflict, so it should be possible to use multisource replication.
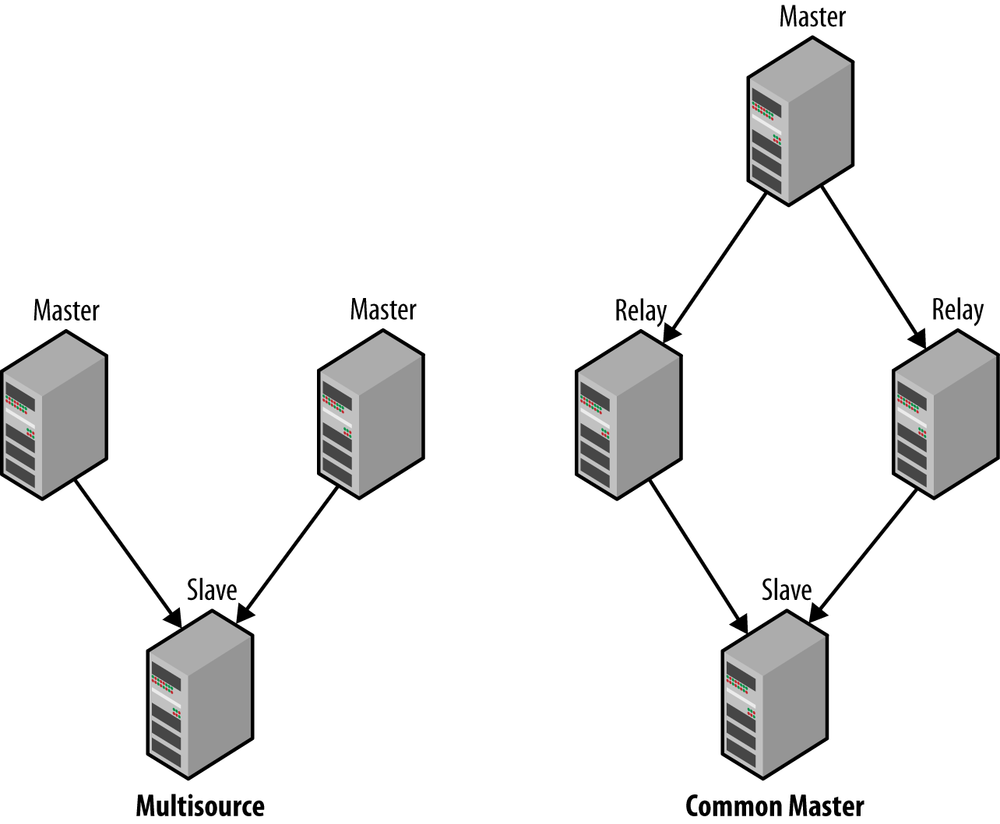
Figure 8-11 shows a slave that replicates from three masters in a round-robin fashion, running a client dedicated to handling the switches between the masters. The process for round-robin multisource replication is as follows:
Set the slave up to replicate from one master. We’ll call this the current master.
Let the slave replicate for a fixed period of time. The slave will then read changes from the current master and apply them while the client responsible for handling the switching just sleeps.
Stop the I/O thread of the slave using
STOP SLAVE IO_THREAD.Wait until the relay log is empty.
Stop the SQL thread using
STOP SLAVE SQL_THREAD.CHANGE MASTERrequires that you stop both threads.Save the slave position for the current master by saving the values of the
Exec_Master_Log_PosandRelay_Master_Log_Filecolumns from theSHOW SLAVE STATUSoutput.Change the slave to replicate from the next master in sequence by taking the previously saved positions and using
CHANGE MASTERto set up replication.Repeat the sequence starting from step 2.
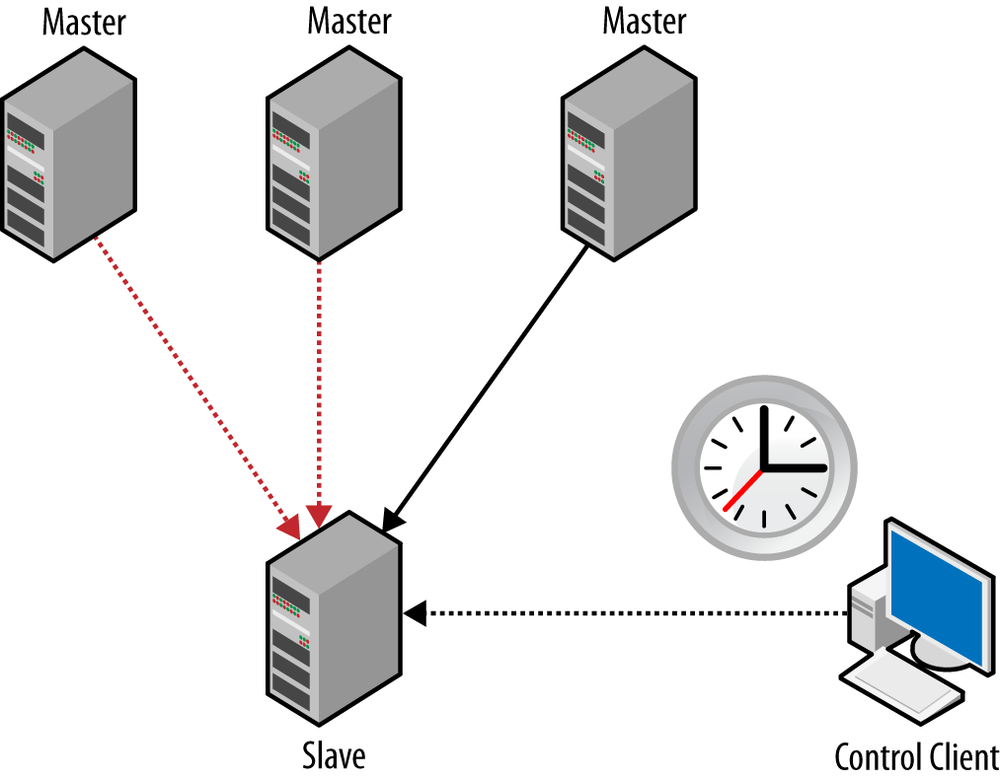
Note that in steps 3 through 5, we stop first the I/O thread and then the SQL thread. The reason for doing this and not just stopping replication on the slave is that the SQL thread can be lagging behind (and usually is), so if we just stop both threads, there will be a bunch of outstanding events in the relay log that will just be thrown away. If you are more concerned about executing only, say, one minute’s worth of transactions from each master and don’t care about throwing away those additional events, you can simply stop replication instead of performing steps 3 through 5. The procedure will still work correctly, because the events that were thrown away will be refetched from the master in the next round.
This can, of course, be automated using a separate client connection
and the MySQL Replicant library, as shown in Example 8-24. By using the
cycle function from the itertools module, you can repeatedly read from a
list of masters in turn.
importitertoolsposition={}defround_robin_multi_master(slave,masters):current=masters[0]formasterinitertools.cycle(masters):slave.sql("STOP SLAVE IO_THREAD");slave_wait_for_empty_relay_log(slave)slave.sql("STOP SLAVE SQL_THREAD");position[current.name]=fetch_slave_position(slave)slave.change_master(position[current.name])master.sql("START SLAVE")current=mastersleep(60)# Sleep 1 minute
Details of Row-Based Replication
Row-Based Replication left out one major subject concerning row-based replication: how the rows are executed on the slave. In this section, you will see the details of how row-based replication is implemented on the slave side.
In statement-based replication, statements are handled by writing
the statement in a single Query event.
However, because a significant number of rows can be changed in each
statement, row-based replication handles this differently and therefore
requires multiple events for each statement.
To handle row-based replication, four new events have been introduced:
Table_mapThis maps a table ID to a table name (including the database name) and some basic information about the columns of the table on the master.
The table information does not include the names of the columns, just the types. This is because row-based replication is positional: each column on the master goes into the same position in the table on the slave.
Write_rows,Delete_rows, andUpdate_rowsThese events are generated whenever rows are inserted, deleted, or updated, respectively. This means that a single statement can generate multiple events.
In addition to the rows, each event contains a table ID that refers to a table ID introduced by a preceding
Table_mapevent and one or two column bitmaps specifying the columns of the table affected by the event. This allows the log to save space by including only those columns that have changed or that are necessary to locate the correct row to insert, delete, or update.
Whenever a statement is executed, it is written into the binary log
as a sequence of Table_map events,
followed by a sequence of row events. The last row event of the statement
is marked with a special flag indicating it is the last event of the
statement.
Example 8-25 shows the execution of a statement and the resulting events. We have skipped the format description event here, because you have already seen it.
master>START TRANSACTION;Query OK, 0 rows affected (0.00 sec) master>INSERT INTO t1 VALUES (1),(2),(3),(4);Query OK, 4 rows affected (0.01 sec) Records: 4 Duplicates: 0 Warnings: 0 master>INSERT INTO t1 VALUES (5),(6),(7),(8);Query OK, 4 rows affected (0.01 sec) Records: 4 Duplicates: 0 Warnings: 0 master>COMMIT;Query OK, 0 rows affected (0.00 sec) master>SHOW BINLOG EVENTS IN 'master-bin.000053' FROM 106G*************************** 1. row *************************** Log_name: master-bin.000054 Pos: 106 Event_type: Query Server_id: 1 End_log_pos: 174 Info: BEGIN *************************** 2. row *************************** Log_name: master-bin.000054 Pos: 174 Event_type: Table_map Server_id: 1 End_log_pos: 215 Info: table_id: 18 (test.t1) *************************** 3. row *************************** Log_name: master-bin.000054 Pos: 215 Event_type: Write_rows Server_id: 1 End_log_pos: 264 Info: table_id: 18 flags: STMT_END_F *************************** 4. row *************************** Log_name: master-bin.000054 Pos: 264 Event_type: Table_map Server_id: 1 End_log_pos: 305 Info: table_id: 18 (test.t1) *************************** 5. row *************************** Log_name: master-bin.000054 Pos: 305 Event_type: Write_rows Server_id: 1 End_log_pos: 354 Info: table_id: 18 flags: STMT_END_F *************************** 6. row *************************** Log_name: master-bin.000054 Pos: 354 Event_type: Xid Server_id: 1 End_log_pos: 381 Info: COMMIT /* xid=23 */ 6 rows in set (0.00 sec)
This example adds two statements to the binary log. Each statement
starts with a Table_map event followed
by a single Write_rows event holding
the four rows of each statement.
You can see that each statement is terminated by setting the statement-end flag of
the row event. Because the statements are inside a transaction, they are
also wrapped with Query events
containing BEGIN and
COMMIT statements.
The size of the row events is controlled by the option binlog-row-event-max-size, which
gives a threshold for the number of bytes in the binary log. The option
does not give a maximum size for a row event: it is
possible to have a binlog row event that has a larger size if a row
contains more bytes than
binlog-row-event-max-size.
Table_map Events
As already mentioned, the Table_map event maps a table name to an
identifier so that it can be used in the row events, but that is not its
only role. In addition, it contains some basic information about the
fields of the table on the master. This allows the slave to check the
basic structure of the table on the slave and compare it to the
structure on the master to make sure they match well enough for
replication to proceed.
The basic structure of the table map event is shown in Figure 8-12. The common header—the header that all replication events have—contains the basic information about the event. After the common header, the post header gives information that is special for the table map event. Most of the fields in Figure 8-12 are self-explanatory, but the representation of the field types deserves a closer look.
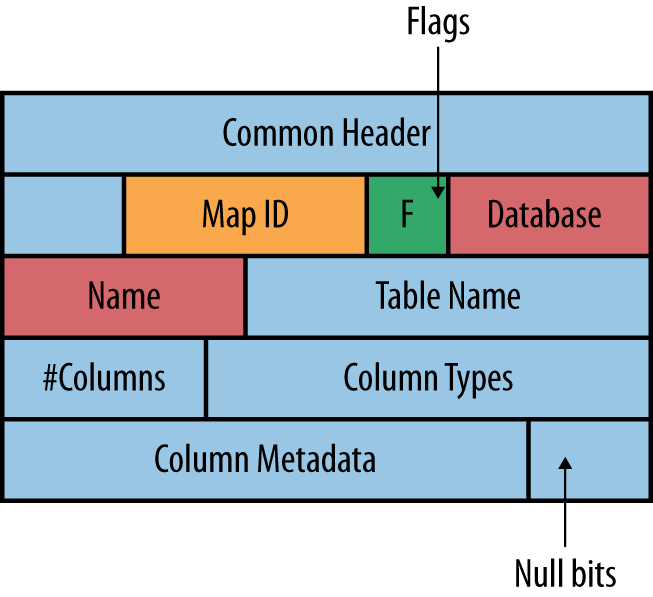
The following fields together represent the column type:
- Column type array
An array listing the base types for all the columns. It indicates whether this is an integer, a string type, a decimal type, or any of the other available types, but it does not give the parameters for the column type. For example, if the type of a column is
CHAR(5), this array will contain 254 (the constant representing a string), but the length of the string (in this case, 5) is stored in the column metadata mentioned later.- Null bit array
An array of bits that indicate whether each field can be
NULL.- Column metadata
An array of metadata for the fields, fleshing out details left out of the column type array. The piece of metadata available to each field depends on the type of the field. For example, the
DECIMALfield stores the precision and decimals in the metadata, whereas theVARCHARtype stores the maximum length of the field.
By combining the data in these three arrays, it is possible to deduce the type of the field.
Not all type information is stored in the arrays, so in two particular cases, it is not possible for the master and the slave to distinguish between two types:
When there is no information about whether an integer field is signed or unsigned. This means the slave will be unable to distinguish between a signed and unsigned field when checking the tables.
When the character sets of string types are not part of the information. This means that replicating between different character sets is not supported and may lead to strange results, because the bytes will just be inserted into the column with no checking or conversion.
The Structure of Row Events
Figure 8-13 shows the structure of a row event. This structure can vary a little depending on the type of event (write, delete, or update).

In addition to the table identifier, which refers to the table ID of a previous table map event, the event contains the following fields:
- Table width
The width of the table on the master. This width is length-encoded in the same way as for the client protocol, which is why it can be either one or two bytes. Most of the time, it will be one byte.
- Columns bitmap
The columns that are sent as part of the payload of the event. This information allows the master to send a selected set of fields with each row. There are two types of column bitmaps: one for the before image and one for the after image. The before image is needed for deletions and updates, whereas the after image is needed for writes (inserts) and updates. See Table 8-3 for more information.
Execution of Row Event
Because multiple events can represent a single statement executed by the master, the slave has to keep state information to execute the row events correctly in the presence of concurrent threads that update the same tables. Recall that each statement in the binary log starts with one or more table map events followed by one or more row events, each of the same type. Use the following procedure to process a statement from the binary log:
If the event is a table map event, the SQL thread extracts the information about the table and saves a representation of how the master defines the table.
When the first row event is seen, all tables in the list are locked.
For each table in the list, the thread checks that the definition on the master is compatible with the definition on the slave.
If the tables are not compatible, the thread reports an error and stops replication on the slave.
Row events are processed according to the procedure shown later in this section, until the thread reads the last event of the statement (i.e., an event with the statement end flag set).
This procedure is required to lock tables the correct way on the slave and is similar to how the statement was executed on the master. All tables are locked in step 3 and then checked in step 4. If the tables are not locked before checking the definitions, a thread on the slave can come between the steps and change the definition, causing the application of the row events to fail later.
Each row event consists of a set of rows that are used differently
depending on the event type. For Delete_rows and Write_rows events, each row represents a change. For the Update_rows event, it is necessary to have two
rows—one to locate the correct row to update and one with values to use
for the update—so the event consists of an even number of rows, where
each pair represents an update.
Events that have a before image require a search to locate the
correct row to operate on: for a Delete_rows event, the row will be removed,
whereas for the Update_rows event, it
will be changed. In descending order of preference, the searches are:
- Primary key lookup
If the table on the slave has a primary key, it is used to perform a primary key lookup. This is the fastest of all the methods.
- Index scan
If there is no primary key defined for the table but an index is defined, this will be used to locate the correct row to change. All rows in the index will be scanned and the columns compared with the row received from the master.
If the rows match, this row will be used for the
Delete_rowsorUpdate_rowsoperation. If no rows match, the slave will stop replication with an error indicating that it could not locate the correct row.- Table scan
If there is no primary key or index on the table, a full table scan is used to locate the correct row to delete or update.
In the same way as for the index scan, each row in the scan will be compared with the row received from the master, and if they match, that row will be used for the delete or update operation.
Because the index or primary key on the slave rather than the master is used to locate the correct row to delete or update, you should keep a couple of things in mind:
When replicating a table, it is always wise to have a primary key on the table regardless of whether row-based or statement-based replication is used.
Because statement-based replication actually executes each statement, a primary key on updates and deletes speeds up replication significantly for statement-based replication as well.
Events and Triggers
The execution of events and triggers differs in statement-based replication and row-based replication. The only difference for events is that row-based replication generates row events instead of query events.
Triggers, on the other hand, reveal a different and more interesting story.
As discussed in Chapter 4, for statement-based replication, trigger definitions are replicated to the slave so that when a statement is executed that affects a table with a trigger, the trigger will be executed on the slave as well.
For row-based replication, it doesn’t matter how the rows change—whether changes come from a trigger, a stored procedure, an event, or directly from the statement. Because the rows updated by the trigger are replicated to the slave, the trigger does not need to be executed on the slave. As a matter of fact, executing it on the slave would lead to incorrect results.
Consider Example 8-26, which defines a table with a trigger.
CREATE TABLE log (
    number INT AUTO_INCREMENT PRIMARY KEY,
    user CHAR(64),
    brief TEXT
);


CREATE TABLE user (
    id INT AUTO_INCREMENT PRIMARY KEY,
    email CHAR(64),
    password CHAR(64)
);


CREATE TRIGGER tr_update_user AFTER UPDATE ON user FOR EACH ROW
    INSERT INTO log SET
       user = NEW.email,
       brief = CONCAT("Changed password from '",
                      OLD.password, "' to '",
                      NEW.password, "'");

CREATE TRIGGER tr_insert_user AFTER INSERT ON user FOR EACH ROW
    INSERT INTO log SET
        user = NEW.email,
        brief = CONCAT("User '", NEW.email, "' added");
Given these table and trigger definitions, this sequence of statements can be executed:
master>INSERT INTO user(email,password) VALUES ('mats@example.com', 'xyzzy'),Query OK, 1 row affected (0.05 sec) master>UPDATE user SET password = 'secret' WHERE email = '[email protected]';Query OK, 1 row affected (0.01 sec) Rows matched: 1 Changed: 1 Warnings: 0 master>SELECT * FROM log;+--------+--------------+-------------------------------------------+ | number | user | brief | +--------+--------------+-------------------------------------------+ | 1 | [email protected] | User '[email protected]' added | | 2 | [email protected] | Changed password from 'xyzzy' to 'secret' | +--------+--------------+-------------------------------------------+ 2 rows in set (0.00 sec)
This is, of course, not very secure, but at least it illustrates the situation. So, how do these changes appear in the binary log when using row-based replication?
master> SHOW BINLOG EVENTS IN 'mysqld1-bin.000054' FROM 2180;
+--------------+----+-----------+---------+-----------+------------------------+
|Log_name      |Pos |Event_type |Server_id|End_log_pos|Info                    |
+--------------+----+-----------+---------+-----------+------------------------+
|master-bin…54|2180|Query      |        1|       2248|BEGIN                   |
|master-bin…54|2248|Table_map  |        1|       2297|table_id: 24 (test.user)|
|master-bin…54|2297|Table_map  |        1|       2344|table_id: 26 (test.log) |
|master-bin…54|2344|Write_rows |        1|       2397|table_id: 24            |
|master-bin…54|2397|Write_rows |        1|       2471|table_id: 26 flags:     |
|             |    |           |         |           |  STMT_END_F            |
|master-bin…54|2471|Query      |        1|       2540|COMMIT                  |
|master-bin…54|2540|Query      |        1|       2608|BEGIN                   |
|master-bin…54|2608|Table_map  |        1|       2657|table_id: 24 (test.user)|
|master-bin…54|2657|Table_map  |        1|       2704|table_id: 26 (test.log) |
|master-bin…54|2704|Update_rows|        1|       2783|table_id: 24            |
|master-bin…54|2783|Write_rows |        1|       2873|table_id: 26 flags:     |
|             |    |           |         |           |  STMT_END_F            |
|master-bin…54|2873|Query      |        1|       2942|COMMIT                  |
+--------------+----+-----------+---------+-----------+------------------------+
12 rows in set (0.00 sec)
As you can see, each statement is treated as a separate
transaction containing only a single statement. The statement changes
two tables—the test.user and
test.log tables—and therefore there are two table
maps at the beginning of the statement in the binary log. When
replicated to the slave, these events are executed directly and the
execution goes “below the trigger radar,” thereby avoiding execution of
the triggers for the tables on the slave.
Filtering in Row-Based Replication
Filtering also works differently in statement-based and row-based replication. Recall from Chapter 4 that statement-based replication filtering is done on the entire statement (i.e., either all of the statement is executed or the statement is not executed at all) because it is not possible to execute just part of a statement. For the database filtering options, the current database is used and not the database of the table that is being changed.
Row-based replication offers more choice. Because each row for a specific table is caught and replicated, it is possible to filter on the actual table being updated and even filter out some rows based on arbitrary conditions. For this reason, row-based replication also filters changes based on the actual table updated and is not based on the current database for the statement.
Consider what will happen with filtering on a slave set up to
ignore the ignore_me database. What
will be the result of executing the following statement under
statement-based and row-based replication?
USE test; INSERT INTO ignore_me.t1 VALUES (1),(2);
For statement-based replication, the statement will be executed,
but for row-based replication, the changes to table
t1 will be ignored, because the
ignore_me database is on the ignore list.
Continuing on this path, what will happen with the following multitable update statement?
USE test; UPDATE ignore_me.t1, test.t2 SET t1.a = 3, t2.a = 4 WHERE t1.a = t2.a;
With statement-based replication, the statement will be executed, expecting the table
ignore_me.t1 to exist—which it might not, because the
database is ignored—and will update both the
ignore_me.t1 and test.t2 tables.
Row-based replication, on the other hand, will update only the test.t2 table.
Partial Row Replication
As mentioned earlier, the events Write_rows, Delete_rows, and Update_rows each contain a column bitmap that
tells what columns are present in the rows in the body of the event.
Note that there is one bitmap for the before image and one for the after
image.
Prior to MySQL 5.6.2, only the MySQL Cluster engine uses the
option of limiting the columns written to the log, but starting with
MySQL 5.6.2, it is possible to control what colums are written to the
log using the option binlog-row-image. The option accepts three different values: full, noblob, and minimal.
fullThis is the default for
binlog-row-imageand will replicate all columns. Prior to MySQL 5.6.2, this is how the rows were always logged.noblobWith this setting, blobs will be omitted from the row unless they change as part of the update.
minimalWith this setting, only the primary key (in the before image) and the columns that change values (in the after image) are written to the binary log.
The reason for having full as
default is because there might be different indexes on the master, and
the slave and columns that are not part of the primary key on the
master might be needed to find the correct row on
the slave.
If you look at Example 8-27, there are different
definitions of the tables on the master and slave, but the only
difference is that there are different indexes. The rationale for this
difference could be that on the master it is necessary for the id column to be a primary key for
autoincrement to work, but on the slave all selects are done using the
email column.
In this case, setting binlog-row-image to
minimal will store the values of the
id column in the binary log, but this
column cannot be used to find the correct row on the slave. This will
cause replication to fail. Because it is expected that replication
should work even if this mistake is made, the default for
binlog-row-image is full.
If you are using identical indexes on the master and slave (or at
least have indexes on the slave on the columns that are indexed on the
master), you can set binlog-row-image to minimal and save space by reducing the size of
the binary log.
So what’s the role of the noblob value then? Well... it acts as a middle
ground. Even though it is possible to have different indexes on the
master and slave, it is very rare for blobs to be part of an index.
Because blobs usually take a lot of space, using noblob will be almost as safe as full, under the assumption that blobs are
never indexed.
/* Table definition on the master */CREATETABLEuser(idINTAUTO_INCREMENTPRIMARYKEY,CHAR(64),passwordCHAR(64));/* Table definition on the slave */CREATETABLEuser(idINT,CHAR(64)PRIMARYKEY,passwordCHAR(64));
Conclusion
This chapter concludes a series of chapters about MySQL replication. We discussed advanced replication topics such as how to promote slaves to masters more robustly, looked at tips and techniques for avoiding corrupted databases after a crash, examined multisource replication configurations and considerations, and finally looked at row-based replication in detail.
In the next chapters, we examine another set of topics for building robust data centers, including monitoring, performance tuning of storage engines, and replication.