
Chapter 7. Data Sharding
In the previous chapter, you learned how to scale reads by attaching slaves to a master and directing reads to the slaves while writes go to the master. As the load increases, it is easy to add more slaves to the master and serve more read queries. This allows you to easily scale when the read load increases, but what about the write load? All writes still go to the master, so if the number of writes increases enough, the master will become the bottleneck preventing the system from scaling. At this point, you will probably ask whether there is some way to scale writes as well as reads. We’ll present sharding as a solution in this chapter, but let’s start with a look at some background.
In previous chapters, the data in the database is fully stored in a
single server, but in this chapter, you will see the data in the database
distributed over several servers. To avoid confusion, we’ll use the term
schema to denote the name that you use with the statement USE
or schemaCREATE DATABASE
.[6] We’ll reserve the term database for the
collection of all the data that you have stored, regardless of how many
machines it is distributed over.schema
For example, you can choose to break up a database by placing some tables on different machines (also known as functional partitioning), and splitting some tables placing some of the rows on different machines (called horizontal partitioning, which is what we are talking about in this chapter).
What Is Sharding?
Most attempts to scale writes start with using the setup in Figure 7-1, consisting of two masters using bidirectional replication and a set of clients that update different masters depending on which data they need to change. Although the architecture appears to double the capacity for handling writes (because there are two masters), it actually doesn’t. Writes are just as expensive as before because each statement has to be executed twice: once when it is received from the client and once when it is received from the other master. All the writes done by the A clients, as well as the B clients, are replicated and get executed twice, which leaves you in no better position than before. In short, a dual-master setup doesn’t help you scale writes, so it is necessary to find some other means to scale the system. The only way forward is to remove replication between the servers so that they are completely separate.
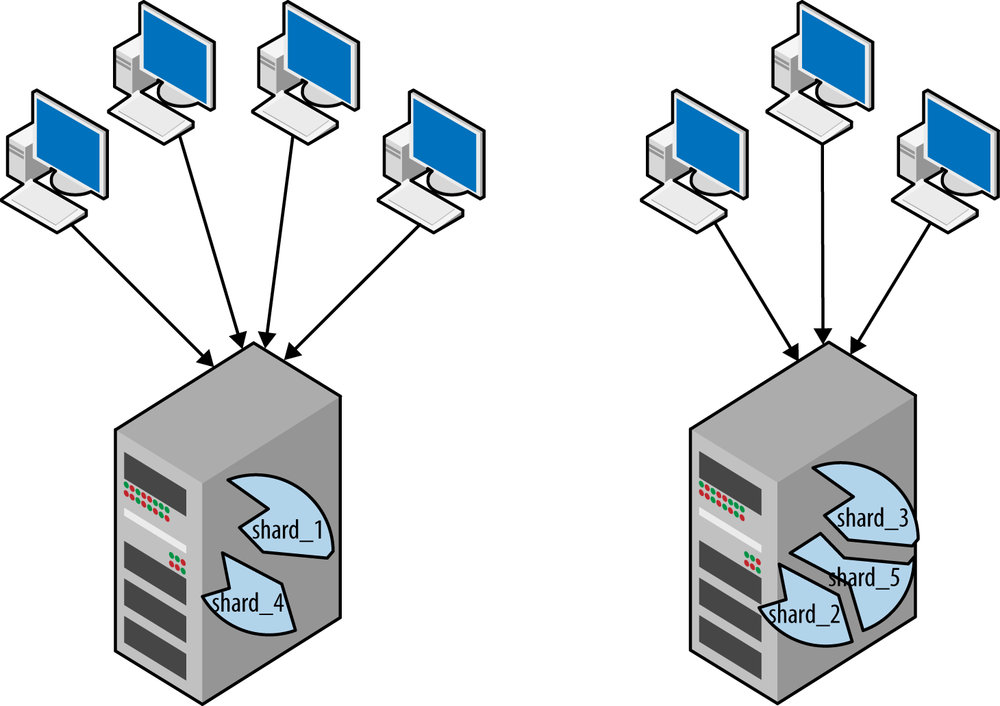
With this architecture, it is possible to scale writes by partitioning the data into two completely independent sets and directing the clients to the partition that is responsible for each item of data the clients attempt to update. This way, no resources need to be devoted to processing updates for other partitions. Partitioning the data in this manner is usually referred to as sharding (other common names are splintering or horizontal partitioning) and each partition in this setup is referred to as a shard.

Why Should You Shard?
Depending on where your application is experiencing strain, you have different reasons to shard. The biggest advantages of sharding, and the most common reasons to shard, are:
- Placing data geographically close to the user
By placing bulky data such as pictures or videos close to the user, it is possible to reduce latency. This will improve the perceived performance of the system.
- Reducing the size of the working set
If the table is smaller, it is possible that a larger part of the table, maybe even the entire table, can fit into main memory. Searching through a table that is entirely in main memory is very efficient, so splitting a large table into many small tables may improve performance drastically. This means that performance can be improved by sharding tables, even if multiple shards are stored on a single server.
Another aspect that affects performance is that the algorithms that search the tables are more efficient if the table is smaller. This can give a performance boost even when multiple shards are stored on the same machine. There are, however, technical limitations and overheads associated with storing multiple shards on a machine, so it is necessary to strike a balance between the number of shards and the size of the shards.
Deciding the optimal size of the tables requires monitoring the performance of the MySQL server and also monitoring InnoDB (or any other storage engine you use) to learn the average number of I/O operations required on average for each row scanned and to see if you need to make the shards even smaller. You will learn more about monitoring the server using the performance schema in Chapter 11 and monitoring InnoDB in Chapter 12 (especially getting statistics on the buffer pool, as it is important to optimize the size of the shards).
- Distributing the work
If the data is sharded, it is possible to parallelize the work, provided that it is simple enough. This approach is most efficient when the shards are approximately the same size. So if you shard your database for this reason, you must find a way to balance the shards as they grow or shrink over time.
It’s worth noting that you do not have to shard all the data in the database. You can shard some of the big tables, and duplicate the smaller tables on each shard (these are usually called global tables). You can also combine sharding and functional partitioning and shard bulky data such as posts, comments, pictures, and videos, while keeping directories and user data in an unsharded central store, similar to the deployment shown in Figure 7-2.
Limitations of Sharding
Sharding can improve performance, but it is not a panacea and comes with its own set of limitations that may or may not affect you. Many of these can be handled, and you will in this section learn about the limitations and how to handle them.
The challenge is to ensure that all queries give the same result when executed toward the unsharded database and the sharded database. If your queries access multiple tables (which is usually the case) you have to be careful to ensure that you get the same result for the unsharded database and the sharded database. This means that you have to pick a sharding index that ensures that the queries get the same result on a sharded or unsharded database.
In some cases, it is not practical or possible to solve the
problem using sharding indexes, and it is necessary to rewrite the query
(or eliminate it entirely, if possible). Two common problems you need to
handle are cross-shard joins and AUTO_INCREMENT columns. We’ll briefly cover
them in the following sections.
Cross-shard joins
One of the most critical limitations that might affect you are cross-shard joins. Because the tables are partitioned, it is not possible to join two tables that belong to different shards and get the same result as if you executed the query in an unsharded database.
The most common reason for using cross-shard joins is to create reports. This usually requires collecting information from the entire database, so two approaches are generally used:
The advantage of executing the query in a map-reduce fashion is that you can get a snapshot of the live database, but it means that you take resources from the business application that is using the database. If your query is short and you really need to have a result reflecting the current state of the application database, this might be a useful approach. It is probably wise to monitor these queries, though, to make sure that they are not taking up too many resources and impacting application performance.
The second approach, replication, is easier. It’s usually feasible, as well, because most reporting is done at specific times, is long-running, and does not depend on the current state of the database.
Later, in Mapping the Sharding Key, you will see a technique to automatically detect cross-shard joins and raise an error when attempts are made to execute such queries.
Using AUTO_INCREMENT
It is quite common to use AUTO_INCREMENT to create a unique identifier for a column. However, this fails in a
sharded environment because the shards do not synchronize their
AUTO_INCREMENT identifiers. This
means that if you insert a row in one shard, it might well happen that
the same identifier is used on another shard. If you truly want to
generate a unique identifier, there are basically two
approaches:
Generate a unique UUID. The drawback is that the identifier takes 128 bits (16 bytes). There is also a slight possibility that the same UUID is picked independently, but it is so small that you can ignore it.
Use a composite identifier, as in Figure 7-3, where the first part is the shard identifier (see Mapping the Sharding Key) and the second part is a locally generated identifier (which can be generated using
AUTO_INCREMENT). Note that the shard identifier is used when generating the key, so if a row with this identifier is moved, the original shard identifier has to move with it. You can solve this by maintaining, in addition to the column with theAUTO_INCREMENT, an extra column containing the shard identifier for the shard where the row was created.

Note
In case you are interested, the probability of a collision can be computed using the equation that solves the Birthday Problem, where d is the number of “days” and n is the number of “people”:

Elements of a Sharding Solution
The way you shard your database is ultimately determined by the queries that users intend to execute. For instance, it may make sense to shard sales data by year (2012 in one shard, 2013 in another, etc.), but if users run a lot of queries comparing sales in one December to another December, you will force the queries to cross shards. As we noted before, cross-shard joins are notoriously difficult to handle, so this would hamper performance and even force users to rewrite their queries.
In this section, we will cover the issues you need to handle in order to build a good sharding solution. These decide how you can distribute the data, as well as how you can reshard the data in an efficient manner:
You have to decide how to partition the application data. What tables should be split? What tables should be available on all shards? What columns are the tables going to be sharded on?
You have to decide what sharding metadata (information about the shards) you need and how to manage it. This covers such issues as how to allocate shards to MySQL servers, how to map sharding keys to shards, and what you need to store in the “sharding database.”
You have to decide how to handle the query dispatch. This covers such issues as how to get the sharding key necessary to direct queries and transactions to the right shard.
You have to create a scheme for shard management. This covers issues such as how to monitor the load on the shards, how to move shards, and how to rebalance the system by splitting and merging shards.
In this chapter, you will become familiar with each of these areas and understand what decisions you have to make to develop a working sharding solution.
Applications are usually not designed originally to handle shards. After, such an extensive redesign does not emerge as a requirement until the database is starting to grow enough to impact performance. So normally you start off with an unsharded database and discover that you need to start sharding it. To describe the elements of sharding, we use the example employee schema in Figure 7-4. The entities in that figure represent a schema of employees, one of the standard example schema available on the MySQL site. To get an idea of how big the database is, you can see a row count in Table 7-1.
Table | Rows |
| 9 |
| 331603 |
| 24 |
| 300024 |
| 2844047 |
| 443308 |

High-Level Sharding Architecture
Figure 7-5 shows the high-level architecture of a sharding solution. Queries come from an application and are received by a broker. The broker decides where to send the query, possibly with the help of a sharding database that keeps track of sharding information. The query is then sent to one or more shards of the application database and executed. The result set from the executions are collected by the broker, possibly post-processed, and then sent back to the application.

Partitioning the Data
Writing each item of data to a particular server allows you to scale writes efficiently. But that’s not sufficient for scalability: efficient data retrieval is also important, and to achieve that, it is necessary to keep associated data together. For this reason, the biggest challenge in efficient sharding is to have a good sharding index so that data commonly requested together is on the same shard. As you will see, a sharding index is defined over columns in multiple tables; typically you use only a single column from each table, but multiple columns are also possible. The sharding index will decide what tables will be sharded and how they will be sharded.
After having picked a sharding index, you will end up with something similar to Figure 7-6.
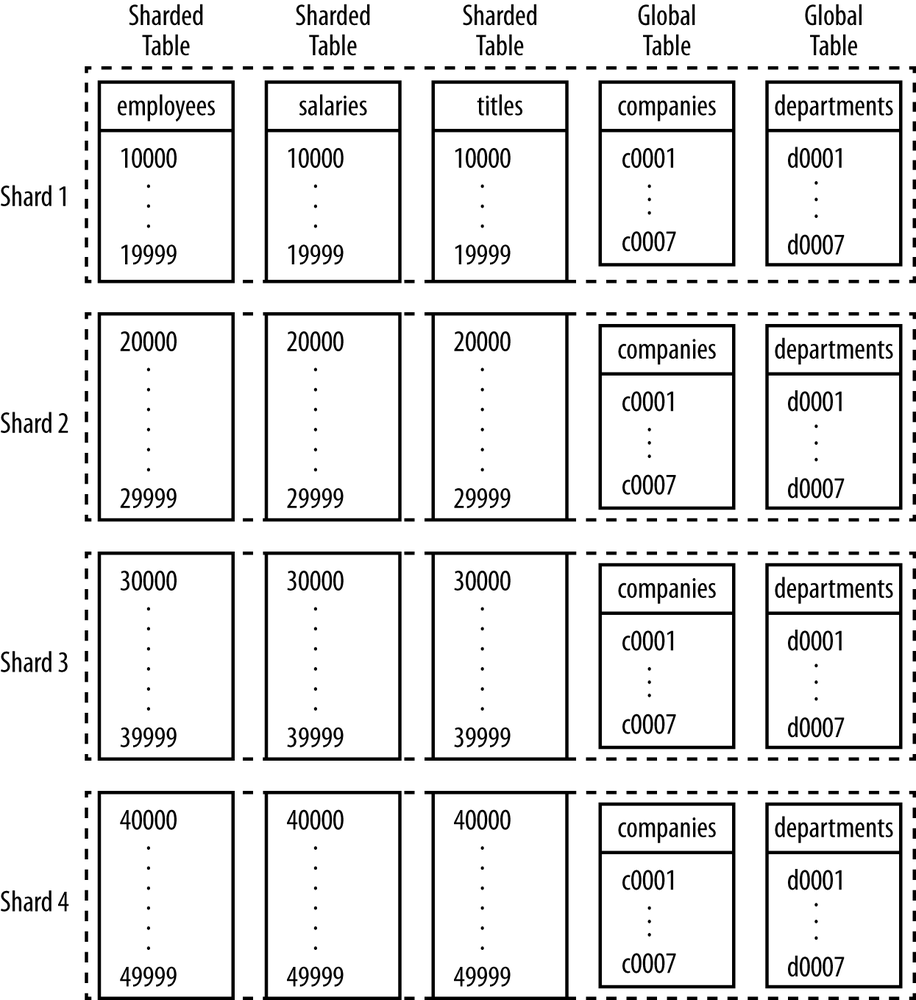
Here you can see several tables that have been sharded and where the
rows are distributed over the shards (employees, salaries, and titles). Identical copies of the global tables
(companies and departments) are present on each shard. We’ll
cover how to select columns for the sharding index and show how we came
up with this particular solution for our sample
schema.
To split the database over shards, you need to pick one or more of the columns for the sharding index and use them to distribute the rows over the shards. Using multiple sharding columns from a single table for the index can be hard to maintain unless they are used correctly. For this reason, it is usually best to pick a single column in a table and use that for the sharding index.
Sharding on a column that is a primary key offers significant advantages. The reason for this is that the column should have a unique index, so that each value in the column uniquely identifies the row.
To illustrate the problem of picking a sharding column that does not contain unique values, suppose that you picked the country of an employee as the sharding key. In this case, all rows that belong to Sweden (for example) will go to one shard, and all that belong to China (for example) will go to another shard. This can be an appealing choice for sharding the database if reports or updates are often done on a per-country basis. But even though this might work as long as the size of each shard is relatively small, it will break down once the shards start to grow and need to be split further. At this point, because all rows in a shard will have the same sharding key, it won’t be possible to split the shards further when they have grown to the point where they need to be split again. In the end, the shard for Sweden can contain a maximum of 9 million entries, while the shard for China can contain a maximum of 1.3 billion entries, and these shards cannot be split further. This is a quite unfair distribution, and the server managing China has to perform more than 100 times better than the server managing Sweden to achieve the same performance.
If you instead pick the primary key of the table (in this case, the column with the employee number), you can group the employees any way you like and create partitions of arbitrary sizes. This will allow you to distribute the rows into shards of roughly the same size, hence distributing the workload evenly over the servers.
So how should you pick columns for the sharding index for the schema in Figure 7-4? Well, the first question is what tables need to be sharded. A good starting point for deciding that is to look at the number of rows in the tables as well as the dependencies between the tables.
Table 7-1 shows the number of rows
in each table in the employees schema. Now, the numbers are nothing like
what you would see in a real database in need of sharding—the contents of
this database easily fit onto a single server—but it serves as a good
example to demonstrate how to construct a sharded database from an
unsharded one. A good candidate table for sharding is employees. Not only is it a big table, but
several other tables are dependent on it, and as you will see later, if
there are dependencies between tables, there are opportunities for
sharding them as well.
The primary key of the employees
table is the emp_no column. Because
this is the primary key, sharding on this column will allow you to
distribute the rows of the employees
table on the shards evenly and split the tables as you need.
So if we shard on the emp_no
column in the employees table, how does
that affect the tables that are dependent on employees? Because there is a foreign key
reference to the employees table, this
suggests that the intention is to support joining the tables on that
column. Take a look at this query, which could be a typical query for
fetching the title and salary of an employee:
SELECTfirst_name,last_name,titleFROMtitlesJOINemployeesUSING(emp_no)WHEREemp_no=employeenumberANDCURRENT_DATEBETWEENfrom_dateANDto_date
As previously mentioned, the goal is to make sure the query returns
the same result in both the sharded and unsharded databases. Because
employees is sharded on column emp_no, this query can never reference rows in
titles and employees that are on different shards. So after
sharding employees, all rows in
titles that have an emp_no that is not in the employees shard you use will never be
referenced. To fix this, titles should be sharded on column emp_no as well. The same reasoning holds for all
tables that have a foreign key reference into the employees table, so employees, titles, salaries, emp_dep, and dept_manager need to be sharded. In short, even
though you picked a single column to start with, you will shard several
tables, each on a column that is related to your original sharding of the
employees table.
Now that we have sharded almost all the tables in the schema, only
the departments table remains. Can this
also be sharded? The table is so small that it is not necessary to shard
it, but what would be the consequence if it was sharded? As noted before,
it depends on the queries used to retrieve information from the database,
but because dept_manager and dept_emp are used to connect departments and employees, it is a strong hint that the schema
is designed to execute queries joining these tables. For example, consider
this query to get the name and department for an employee:
SELECTfirst_name,last_name,dept_nameFROMemployeesJOINdept_empUSING(emp_no)JOINdepartmentsUSING(dept_no)WHEREemp_no=employeenumber
This query puts more stress on your sharding choices than the
previous SELECT, because
it is not dealing with a single column shared by two tables (the primary
key of the employees table) but with
two columns that can range anywhere throughout the three tables involved.
So how can you ensure that this query returns all the results from a
sharded database as it would in the unsharded one? Because the employees table is sharded on the emp_no column, every row where dept_emp.emp_no = employees.emp_no and dept_emp.dept_no = departments.dept_no has to be
in the same shard. If they are in different shards, no rows will match,
and the query will return an empty result.
Because employees in the same department can reside on different
shards, it is better not to shard the departments table, but instead to keep it
available on all shards as a global table. Duplicating a table on multiple
shards makes updating the tables a little more complicated (this will be
covered later) but because the departments table is not expected to change
frequently, this is likely to be a good trade-off.
Usually, you have only one big set of tables that need to be
sharded, as in the example schema in Figure 7-4. In other cases, however, you
have several “sets” of tables that you want to shard
independently. For example, assume that, in addition
to the employees of the company, you want to keep track of all the
publications of each department. The relation between employees and
publications is a many-to-many relationship, which in classic database
schema design is created by a junction table with foreign keys pointing to
the employees and publications tables. So tracking publications requires,
in addition to the schema shown earlier, a publications table and a dept_pub table to be added to the schema, as in
Figure 7-7.
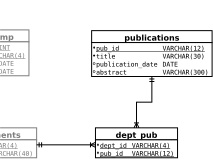
If the publications table is so
large that it needs to be sharded as well, you can do so. If you look
carefully in Figure 7-7, you’ll
see that the departments table is still
available on all nodes, and there are foreign key references from dept_pub to publications and departments. This means that you can shard the
publications and dept_pub tables, leading to a system where you have multiple independent sharding
indexes.
What are the consequences of multiple independent sharding indexes? A single query can contain references to tables in one of the sets in Table 7-2 plus global tables, but it must never reference tables from different sets at the same time. In other words, you can query employees together with their titles, or query employees together with their publications, but you must not write a query that asks for information on titles and publications.
An example of a query that cannot be executed with this sharding in place is a query that joins a table in the “employee” part of the schema with the “publications” part of the schema:
SELECTfirst_name,last_name,dept_name,COUNT(pub_id)FROMemployeeJOINdept_managerON(emp_no)JOINdepartmentsON(dept_no)JOINdept_pubON(dept_no)JOINpublicationsON(pub_id)WHEREemp_no=110386;
Index name | Sharding column set |
si_emps |
|
|
|
Shard Allocation
To work efficiently with shards, you need to store them in a way that speeds up physical access. The most straightforward approach is to keep one shard per server, but it is also possible to keep multiple virtual shards per server.
To decide how shards should be allocated for your solution, ask the following questions:
- Do your applications use cross-schema queries?
If each of your queries always uses a single schema (e.g., the
employeesschema), sharding becomes a lot easier. In that case, you can keep multiple shards on a server by using one schema per shard and there is no need to rewrite the queries because they will always go to a single schema.
- Can queries be tailored to the sharding solution?
If your queries are cross-schema but you can request the application developers to write queries with the sharding solution in mind, you can still keep multiple shards per server.
This will allow you to rewrite queries in a controlled manner, which means that you can have, for example, the shard number as a suffix on the names of all databases.
- Do you need to re-shard frequently?
If you cannot rewrite the queries easily, or if you require the application programmer to write queries a specific way, you have to use a single shard per server because they can potentially be cross-schema queries. If, however, you are required to re-shard frequently (to reflect changes in the application or other reasons), a single shard per server can be a performance bottleneck, so there is always a trade-off between having to adapt the application and getting the performance you need.
If you need to re-shard frequently, having multiple shards on each server can be part of a solution. This allow you to move shards between servers to balance the load. However, you might still have to split shards if a single shard grows too hot.
- How can you back up a shard?
Apart from being able to easily back up a single shard at a time, you also need to be able to easily create backups to move shards between servers. Most backup methods can create a backup of an entire server, or one or more schemas. For that reason, it is prudent to ensure that a schema is entirely in a shard (but there can be multiple schemas in each shard).
Single shard per server
The most straightforward approach is to keep a single shard on each server. This allows cross-schema queries, so it is not necessary to rewrite queries. There are two drawbacks to this approach: multiple tables may exceed the size of main memory on the server, which affects performance, and balancing the load between servers becomes more expensive in case you need to re-shard the tables.
As mentioned earlier, one of the goals of sharding a database is to reduce the size of the tables so that it can fit into memory. Smaller tables take less time to search, both because they contain fewer rows and because more of each table can fit in memory.
If the server becomes overloaded and it is necessary to reduce the load, this principle suggests the solution: split the shard and either create a new shard using a spare server, or move the now extraneous rows to another shard and merge them with the rows there. If the rows are moved to an existing shard, and there is just one shard per server, the rows have to be merged with the rows already on that shard. Because merging is very difficult to do as an online operation, splitting and remerging is expensive when only one shard is allowed per server. In the next section, we will consider how to avoid having to merge shards when moving them.
Multiple shards per server (virtual shards)
As we’ve explained, if you can keep multiple shards on a single
machine, the data can be moved between machines in a more efficient
manner because the data is already sharded. This offers some
flexibility to move shards around to balance the load on the machines,
but if you do that, you need to be able to distinguish between the
shards that coexist on the same server. For example, you need to be
able to distinguish table employees.dept_emp in shard 123 from
employees.dept_emp in shard 234
even if they are on the same machine.
A common approach is to attach the shard identifier to the name of the schema. For example,
the schema employees in shard 123
would then be named employees_123
and a partition of each table is placed in each schema (e.g., the
dept_emp table consists of employees_1.dept_emp, employees_2.dept_emp, … employees_).N.dept_emp
Because the MySQL server stores each schema in its own
directory, most backup methods can make backups of schemas but have
problems backing up individual tables.[7] The approach just shown separates the tables for
different shards into different directories, making it easy to take
backups of shards (something that you will need later). Because you
can limit replicate-do-db to specific
schemas on a server, you can replicate changes to the individual
shards as well, which will prove useful when you move shards between
servers.
Keeping multiple shards on each server makes it comparably easy to move one of the shards to another server to reduce the load on the server. Because you can have multiple shards on each server, you can even move the shard to a server that already has other shards, without having to merge the rows of the shards. Note that this approach is not a replacement for re-sharding, because you need to have techniques in place to split a shard anyway.
In addition to adding the schema names with the shard
identifier, you can add the shard identifier to the name of the table.
So, with this approach, the names would be employees_123.dept_emp_123, employees_124.dept_emp_124, and so on.
Although the shard number on the table seems redundant, it can be
useful for catching problems where the application code mistakenly
queries the wrong shard.
The drawback of adding the shard number to the schema names
and/or the tables is that users need to rewrite their queries. If all
your queries always go to a single schema, never executing
cross-schema queries, it is easy to issue USE
employee_identifier before sending the query to the server
and keep the old table names. But if cross-schema queries are allowed,
it is necessary to rewrite the query to locate all the schema names
and append the shard identifier to each.
Inserting specific table numbers into queries can be quite error-prone, so if you can, generalize the query and automate the insertion of the right table number. For example, you can use braces to wrap the number in the schema name, and then use a regular expression to match and replace the schema and table name with the schema and table name for the shard in question. Example PHP code is shown in Example 7-1.
classmy_mysqliextendsmysqli{public$shard_id;privatefunctiondo_replace($query){returnpreg_replace(array('/{(w+).(w+)}/','/{(w+)}/'),array("$1_{$this->shard_id}.$2","$1"),$query);}publicfunction__construct($shard_id,$host,$user,$pass,$db,$port){parent::__construct($host,$user,$pass,"{$db}_{$shard_id}",$port);$this->shard_id=$shard_id;}publicfunctionprepare($query){returnparent::prepare($this->do_replace($query));}publicfunctionquery($query,$resultmode=MYSQLI_STORE_RESULT){returnparent::query($this->do_replace($query),$resultmode);}}
The code creates a subclass of
mysqli, overriding the prepare and query functions with specialized versions
that rewrite the names of the databases. Then the original function is
called, passing the correct database name to connect to. Because there
are no changes to the mysqli interface, no
changes are normally necessary in the application code. An example
using the class is:
if ($result = $mysqli->query("SELECT * FROM {test.t1}")) {
  while ($row = $result->fetch_object())
    print_r($row);
  $result->close();
}
else {
  echo "Error: " . $mysql->error;
}
However, this works only if the application writers are willing (and able) to add this markup to the queries. It is also error-prone because application writers can forget to add the markup.
Mapping the Sharding Key
In the previous section, you saw how the choice of sharding column decides what tables need to be sharded. You also saw how to partition a table by range. In this section, partition functions will be discussed in more depth: you will see what sharding meta-data is needed to compute the right shards as well as how to map the rows of a sharded table to actual shards.
As explained earlier in the chapter, the goal of mapping the sharding key is to create a partition function that accepts a sharding key value and outputs a shard identifier for the shard where the row exists. As also noted earlier, there can be several sharding keys, but in that case, we create a separate partition function for each sharding key. For the discussions in this section, we assume that each shard has a unique shard identifier, which is just an integer and can be used to identify each database or table as shown in the previous section.
You saw in Partitioning the Data that each
partition function is associated with several columns if there are foreign
keys relationships between the tables. So when you have a sharding key
value you want to map (e.g., “20156”) it does not matter whether it was
the employees.emp_no column or the
dept_emp.emp_no column: both tables are
sharded the same way. This means that when talking about mapping a
sharding key value to a shard, the columns are implicitly given by the
partition function and it is sufficient to provide the key.
Sharding Scheme
The partition function can be implemented using either a static sharding scheme or a dynamic sharding scheme (as the names suggest, the schemes just tell whether the sharding can change or is fixed):
- Static sharding
In a static sharding scheme, the sharding key is mapped to a shard identifier using a fixed assignment that never changes. The computation of the shard identifier is usually done in the connector or in the application, which means that it can be done very efficiently.
For example, you could use range-based assignment, such as making the first shard responsible for users 0 through 9,999, the second shard responsible for users 10,000 through 19,999, and so on. Or you could scatter users semirandomly through a hash based on the value of the last four digits of the identifier.
- Dynamic sharding schemes
In a dynamic sharding scheme, the sharding key is looked up in a dictionary that indicates which shard contains the data. This scheme is more flexible than a static scheme, but requires a centralized store called the sharding database in this chapter.
Static sharding schemes
As you might have realized, static sharding schemes run into problems when the distribution of the queries is not even. For example, if you distribute the rows to different shards based on country, you can expect the load on the China shard to be about 140 times that of the Sweden shard. Swedes would love this, because assuming that the servers have the same capacity, they will experience very short response times. Chinese visitors may suffer, however, because their shard has to take 140 times that load. The skewed distribution can also occur if the hash function does not offer a good distribution. For this reason, picking a good partition key and a good partition function is of paramount importance.
An example partition function for a static schema appears in Example 7-2.
class Dictionary {  public $shards; /* Our shards */
public function __construct() {
$this->shards = array(array('127.0.0.1', 3307),
array('127.0.0.1', 3308),
array('127.0.0.1', 3309),
array('127.0.0.1', 3310));
}
public function get_connection($key, $user, $pass, $db) {
public $shards; /* Our shards */
public function __construct() {
$this->shards = array(array('127.0.0.1', 3307),
array('127.0.0.1', 3308),
array('127.0.0.1', 3309),
array('127.0.0.1', 3310));
}
public function get_connection($key, $user, $pass, $db) {  $no = $key % count($this->shards);
  list($host, $port) = $this->shards[$no];
$link = new my_mysqli($host, $user, $pass, $db, $port);
list($host, $port) = $this->shards[$no];
$link = new my_mysqli($host, $user, $pass, $db, $port);  $link->shard_id = $no;
$link->select_db("{$db}_{$no}");
return $link;
}
}
$DICT = new Dictionary('localhost', 'mats', 'xyzzy', 'sharding'),
$link->shard_id = $no;
$link->select_db("{$db}_{$no}");
return $link;
}
}
$DICT = new Dictionary('localhost', 'mats', 'xyzzy', 'sharding'),-
We define a
Dictionaryclass to be responsible for managing the connections to the sharded system. All logic for deciding what host to use is made inside this class.-
This is a factory method that provides a new connection when given a sharding key. Because each sharding key potentially can go to a different server, a new connection is established each time this function is called.
-
This creates a new connection using the
my_mysqlifunction that we defined in Example 7-1. It is also possible to fetch a connection from a connection pool here, if you decide to implement one. However, for the sake of simplicity, no such pooling mechanism was implemented here.-
The partition function that we use here computes a shard based on the modulo of the employee number (which is the sharding key).
In Example 7-2, you can
see an example of how to create a dictionary for static sharding using
PHP. The Dictionary class is used to manage
connections to the sharded system and will return a connection to the
correct shard given the sharding key. In this case, assume that the
sharding key is the employee number, but the same technique can be
generalized to handle any sharding key. In Example 7-3, you can see an example
usage where a connection is fetched and a query executed on the
shard.
$mysql = $DICT->get_connection($key, 'mats', 'xyzzy', 'employees'),
$stmt = $mysql->prepare(
    "SELECT last_name FROM {employees} WHERE emp_no = ?");
if ($stmt)
{
  $stmt->bind_param("d", $key);
  $stmt->execute();
  $stmt->bind_result($first_name, $last_name);
  while ($stmt->fetch())
    print "$first_name $last_name
";
  $stmt->close();
}
else {
  echo "Error: " . $mysql->error;
}
Dynamic sharding schemes
Dynamic sharding schemes are distinguished from static ones by their flexibility. Not only do they allow you to change the location of the shards, but it is also easy to move data between shards if you have to. As always, the flexibility comes at the price of a more complex implementation, and potentially also impacts performance. Dynamic schemes require extra queries to find the correct shard to retrieve data from, which adds to complexity as well as to performance. A caching policy will allow information to be cached instead of sending a query each time, helping you reduce the performance impact. Ultimately, good performance requires a careful design that matches the patterns of user queries. Because the dynamic sharding scheme is the most flexible, we will concentrate on that for the rest of the chapter.
The simplest and most natural way to preserve the data you need
for dynamic sharding is to store the sharding database as a set of
tables in a MySQL database on a sharding server, which you query to
retrieve the information. Example 7-4 shows a sample locations table containing information for
each shard, and a partition_function table containing one row
for each partition function. Given a sharding identifier, you can
figure out what service instance to contact by joining with the
locations table. We’ll look at the
sharding types later.
CREATETABLElocations(shard_idINTAUTO_INCREMENT,hostVARCHAR(64),portINTUNSIGNEDDEFAULT3306,PRIMARYKEY(shard_id));CREATETABLEpartition_functions(func_idINTAUTO_INCREMENT,sharding_typeENUM('RANGE','HASH','LIST'),PRIMARYKEY(func_id));
Now we’ll change the static implementation of the
Dictionary class from Example 7-2 to use the tables in
Example 7-4. In Example 7-5, the class now
fetches the shard information from a sharding database instead of
looking it up statically. It uses the information returned to create a
connection as before. As you can see, the query for fetching the shard
information is not filled in. This is dependent on how the mapping is
designed and is what we’ll discuss next.
$FETCH_SHARD=<<<END_OF_QUERYquerytofetchshardingkeyEND_OF_QUERY;classDictionary{private$server;publicfunction__construct($host,$user,$pass,$port=3306){$mysqli=newmysqli($host,$user,$pass,'sharding',$port);$this->server=$mysqli;}publicfunctionget_connection($key,$user,$pass,$db,$tables){global$FETCH_SHARD;if($stmt=$this->server->prepare($FETCH_SHARD)){$stmt->bind_param('i',$key);$stmt->execute();$stmt->bind_result($no,$host,$port);if($stmt->fetch()){$link=newmy_mysqli($no,$host,$user,$pass,$db,$port);$link->shard_id=$no;return$link;}}returnnull;}}
Shard Mapping Functions
Our sharding database in Example 7-4
showed three different sharding types in the partition_function table. Each partition type,
described in the online MySQL
documentation, uses a different kind of mapping between the data
in the sharded column and the shards themselves. Our table includes the
three most interesting ones:
- List mapping
Rows are distributed over the shards based on a set of distinct values in the sharding column. For example, the list could be a list of countries.
- Range mapping
Rows are distributed over the shards based on where the sharding column falls within a range. This can be convenient when you shard on an ID column, dates, or other information that falls conveniently into ranges.
- Hash mapping
Rows are distributed over the shards based on a hash value of the sharding key value. This theoretically provides the most even distribution of data over shards.
Of these mappings, the list mapping is the easiest to implement, but is the most difficult to use when you want to distribute the load efficiently. It can be useful when you shard for locality, because it can ensure that each shard is located close to its users. The range partitioning is easy to implement and eliminates some of the problems with distributing the load, but it can still be difficult to distribute the load evenly over the shards. The hash mapping is the one that distributes the load best over the shards of all three, but it is also the most complicated to implement in an efficient manner, as you will see in the following sections. The most important mappings are the range mapping and the hash mapping, so let’s concentrate on those.
For each shard mapping, we will consider both how to add a new shard and how to select the correct shard based on the sharding key chosen.
Range mapping
The most straightforward approach to range mapping is to separate the rows of a table into ranges based on the sharding column and to assign one shard for each range. Even though ranges are easy to implement, they have the problem of potentially becoming very fragmented. This solution also calls for a data type that supports ranges efficiently, which you are not always lucky to have. For example, if you are using URIs as keys, “hot” sites will be clustered together when you actually want the opposite, to spread them out. To get a good distribution in that case, you should use a hash mapping, which we cover in Hash mapping and consistent hashing.
Creating the index table
To implement a range mapping, create a table containing the ranges and map them to the shard identifiers:
CREATETABLEranges(shard_idINT,func_idINT,lower_boundINT,UNIQUEINDEX(lower_bound),FOREIGNKEY(shard_id)REFERENCESlocations(shard_id),FOREIGNKEY(func_id)REFERENCESpartition_functions(func_id))
Table 7-3 shows the
typical types of information contained in such a table, which also
includes the function identifier from the partition_functions table (you will see
what the function identifier is used for momentarily). Only the
lower bound is kept for each shard, because the upper bound is
implicitly given by the lower bound of the next shard in the range.
Also, the shards do not have to be the same size, and having to
maintain both an upper and lower bound when splitting the shards is
an unnecessary complication. Table 7-3 shows the definition of the table.
Adding new shards
To add new shards when using range-based sharding, you insert a row in
the ranges table as well as a row
in the locations table. So,
assuming that you want to add a shard shard-1.example.com with the range
1000−2000 for the partition function given by @func_id, you would first insert a row
into the locations table, to get
a new shard identifier, and then use the new shard identifier to add
a row in the ranges table:
INSERTINTOlocations(host)VALUES('shard-1.example.com');SET@shard_id=LAST_INSERT_ID();INSERTINTOrangesVALUES(@shard_id,@func_id,1000);
Note that the upper bound is implicit and given by the next
row in the ranges table. This
means that you do not need to provide the upper bound when adding a
new shard.
Fetching the shard
After defining and populating this table, you can fetch the shard number, hostname, and port for the shard using the following query, to be used in Example 7-5:
SELECT shard_id, hostname, port
  FROM ranges JOIN locations USING (shard_id)
 WHERE func_id = 0 AND ? >= ranges.lower_bound
ORDER BY ranges.lower_bound DESC
LIMIT 1;
The query fetches all rows that have a lower bound below the key provided, orders them by lower bound, and then takes the first one. Note that the code in Example 7-5 prepares the query before executing it, so the question mark in the query will be replaced with the sharding key in use. Another option would be to store both the lower and upper bound, but that makes it more complicated to update the sharding database if the number of shards or the ranges for the shards should change.
Hash mapping and consistent hashing
One of the issues you might run into when using a range mapping is that you do not get a good distribution of the “hot” clusters of data, which means that one shard can become overloaded and you have to split it a lot to be able to cope with the increase in load. If you instead use a function that distributes the data points evenly over the range, the load will also be distributed evenly over the shards. A hash function takes some input and computes a number from it called the hash. A good hash function distributes the input as evenly as possible, so that a small change in the input string still generates a very different output number. You saw one very common hash function in Example 7-2, where modulo arithmetic was used to get the number of the shard.
The naïve hash function in common use computes a hash of the input in some manner (e.g., using MD5 or SHA-1 or even some simpler functions) and then uses modulo arithmetic to get a number between 1 and the number of shards. This approach does not work well when you need to re-shard to, for example, add a new shard. In this case, you can potentially move a lot of rows between the shards, because computing the modulo of the hashed string can potentially move all the elements to a new shard. To avoid this problem, you can instead use consistent hashing, which is guaranteed to move rows from just one old shard to the new shard.
To understand how this is possible, look at Figure 7-8. The entire hash range (the output of the hash function) is shown as a ring. On the hash ring, the shards are assigned to points on the ring using the hash function (we’ll show you how to do this later). In a similar manner, the rows (here represented as the red dots) are distributed over the ring using the same hash function. Each shard is now responsible for the region of the ring that starts at the shard’s point on the ring and continues to the next shard point. Because a region may start at the end of the hash range and wrap around to the beginning of the hash range, a ring is used here instead of a flat line. But this cannot happen when using the regular hash function shown earlier, as each shard has a slot on the line and there is no slot that wraps around from the end to the beginning of the range.
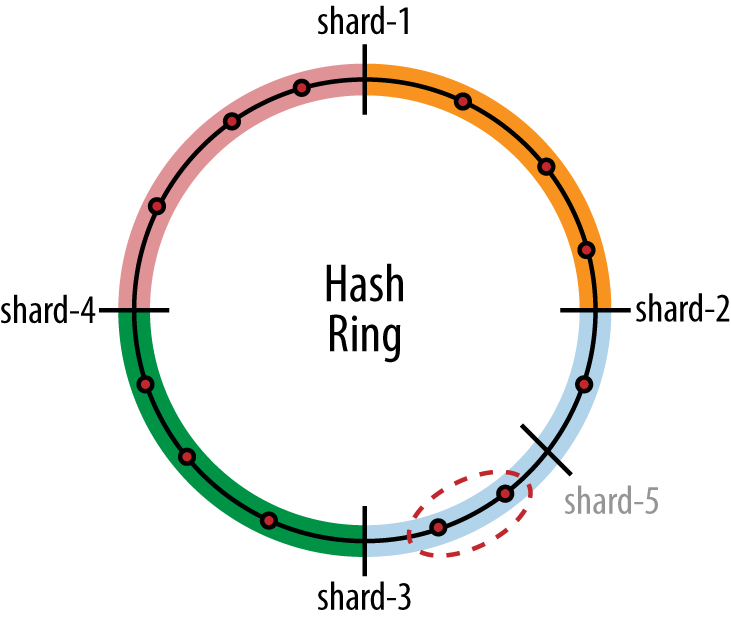
Now suppose that a new shard is added to the ring, say shard-5 in the figure. It will be assigned
to a position on the ring. Here it happens to split shard-2, but it could have been either of
the existing shards. Because it splits shard-2, only the circled rows from the old
shard-2 will have to be moved to
shard-5. This means that the new
shard will just take over the rows that are in one shard and move them
to the new shard, which improves performance significantly.
So, how do you implement this consistent hashing? Well, the first thing that you need is a good hash function, which will generate values on the hash ring. It must have a very big range, hence a lot of “points” on the hash ring where rows can be assigned. A good set of hash functions having the needed properties comes from cryptography.
Cryptography uses hash functions to create “signatures” of messages to detect tampering. These functions take as input an arbitrary string, and produce a number as output. Cryptography requires a number of complex mathematical properties from its hash functions, but for our purpose, the two most important properties are to provide a hash value containing a large number of bits and to distribute the input strings evenly over the output range. Cryptographic hash functions have these properties, so they are a good choice for us.
The most commonly used functions are MD5 and the SHA family of hash functions (i.e., SHA-1, SHA-256/224, and SHA-512/384). Table 7-4 shows the most common hash functions and the number of bits in the numbers they produce. These functions are designed to be fast and accept any string as input, which makes them perfect for computing a hash of arbitrary values.
Hash function | Output size (bits) |
| MD5 | 128 |
| SHA-1 | 160 |
| SHA-256 | 256 |
| SHA-512 | 512 |
Creating the index table
To define a hash mapping, define a table containing the hash values of the servers containing the shards (as usual, we store the location of the shards in a separate table, so only the shard identifier needs to be stored in the table):
CREATETABLEhashes(shard_idINT,func_idINT,hashBINARY(32),UNIQUEINDEX(hash)FOREIGNKEY(shard_id)REFERENCESlocations(shard_id),FOREIGNKEY(func_id)REFERENCESpartition_functions(func_id))
An index is added to allow fast searching on the hash value. Table 7-5 shows typical contents of such a table.
Adding new shards
To add new shards, you need to insert an entry both in the locations table and in the hashes table. To compute the row for the
hashes table, you build a string
for the server and compute the hash value for the strings. The
string representing the server could, for example, be the fully
qualified domain name, but any representation will do. For example,
you might need to add the port to the string if you want to
distinguish the servers. The hash values are stored in the hashes table, and assuming that the
function identifier is in @func_id, the following
statements will do the job:
INSERT INTO locations(host) VALUES ('shard-1.example.com'),
SET @shard_id = LAST_INSERT_ID();
INSERT INTO hashes VALUES (@shard_id, @func_id, MD5('shard-1.example.com'));
Fetching the shard
You have now prepared the table containing information about the shards. When you need to look up the location of a shard using the sharding key, you compute the hash value of the sharding key and locate the shard identifier with the largest hash value that is smaller than the hash value of the sharding key. If no hash value is smaller than the hash key, pick the largest hash value.
(SELECTshard_idFROMhashesWHEREMD5(shardingkey)>hashORDERBYhashDESC)UNIONALL(SELECTshard_idFROMshard_hashesWHEREhash=(SELECTMAX(hash)fromhashes))LIMIT1
-
This
SELECTpicks all shards that have a hash value smaller than the hash of the sharding key. Note that this select might be empty.-
This
SELECTprovides a default value in case the previous one does not match anything.-
Because you need only one row, and the union of
SELECTstatements can potentially match multiple shards, just pick the first shard. This will either be the a shard from or, if that
select did not match any shards, the shard from .
Processing Queries and Dispatching Transactions
By now you have decided how to partition your data by selecting an appropriate sharding column, how to handle the sharding data (the data about the sharding setup, such as where the shards are located), and how to map your sharding keys to shards. The next steps are to work out:
How to dispatch transactions to the right shard
How to get the sharding key for the transaction
How to use caching to improve performance
If you recall the high-level architecture in High-Level Sharding Architecture, it includes a broker that has the responsibility of dispatching the queries to the right shards. This broker can either be implemented as an intermediate proxy or be part of the connector.
To implement the broker as a proxy, you usually send all queries to a dedicated host that implements the MySQL protocol. The proxy extracts the sharding key from each query somehow and dispatches the query to the correct shard. The advantage of using a proxy as broker is that the connectors can be unaware that they are connecting to a proxy: it behaves just as if they connected to a server. This looks like a very transparent solution, but in reality, it is not. For simple applications, a proxy works well, but as you will see in Handling Transactions, using a proxy requires you to extend the protocol and/or limit what the application can do.
Handling Transactions
To dispatch transactions correctly through a broker, you need to know the parameters of transactions that it needs to handle.
From the application’s side, each transaction consists of a sequence of queries or statements, where the last statement is a commit or an abort. To get an understanding for how transaction processing needs to be handled, take a look at the following transaction and consider what problems you need to solve for each line of the transaction:
START TRANSACTION;START TRANSACTION;
INSERT INTO …; COMMIT;
-
At the start of a transaction, there is no way to know the sharding key of the tables or databases it will affect. It is not possible to deduce it from the query, because it is not present at all. However, the
START TRANSACTIONcan be deferred until a real statement is seen, which then hopefully would contain the sharding key.However, a broker needs to know when a new transaction starts, because it may cause a switch to a different server, and it’s important to know this for load balancing.
-
The first statement of this transaction makes it look like a read transaction. If it is a read transaction, it means it can be sent to a slave to balance the load. Here you can also find the sharding key, so at this point, you can figure out what shard the transaction should go to.
-
Setting a user-defined variable creates a session-specific state. The user variable is not global, so all following transactions can refer to (and hence be dependent on) the user-defined variable.
-
It is now clear that this is a read-write transaction, so if you assumed at
that the
transaction was a read-only transaction and sent it to a slave, you
will now start updating the slave instead of the master.If you can generate an error here, it is possible to abort the transaction to indicate that there was a user error, but in that case, you still have to be able to indicate that this is a read-write transaction and that it should go to the master despite the initial
SELECT.-
This is guaranteed to end the transaction, but what do you do with the session state? In this example, a few user-defined variables were set: do they persist to the next transaction?
From this example, you can see that your proxy needs to handle several issues:
To be able to send the transaction to the right shard, the sharding key has to be available to the broker when it sees the first statement in the transaction.
You have to know whether the transaction is a read-only or read-write transaction before sending the first statement to a server.
You need to be able to deduce that you are inside a transaction and that the next statement should go to the same connection.
You need to be able to see whether the previous statement committed a transaction, so that you can switch to another connection.
You need to decide how to handle session-specific state information such as user-defined variables, temporary tables, and session-specific settings of server variables.
It is theoretically possible to solve the first issue by holding
back the START TRANSACTION and then
extracting the sharding key from the first statement of the transaction
by parsing the query. This is, however, very error-prone and still
requires the application writer to know that it has to make the sharding
key clearly visible in the first statement. A better solution is for the
application to provide the sharding key explicitly with the first
statement of the transaction, either through special comments or by
allowing the broker to accept the sharding key out of band (i.e., not as
part of the query).
To solve the second issue, you can use the same technique just described and mark a transaction as read-write or read-only. This can be done either through a special comment in the query or by providing the broker with this information out-of-band. A transaction marked as read-only will then be sent to the slave and executed there.
For the first and second issues, you need to be able to detect
when the user makes an error by either issuing update statements in a
read-only transaction or sending a transaction to the wrong shard.
Fortunately, MySQL 5.6 has added START
TRANSACTION READ ONLY so you can easily make sure that the
application does not succeed in issuing an update statement. Detecting
whether the statement is sent to the right shard can be more tricky. If
you rewrite your queries as shown in Example 7-2, you will automatically
get an error when you access the wrong shard because the schema name
will be wrong. If you do not rewrite the queries, you have to tailor
some assert-like functionality to ensure that the query is executed on
the correct shard.
To detect whether a transaction is in progress, the response packet of the MySQL Protocol contains two flags: SERVER_STATUS_IN_TRANS and SERVER_STATUS_AUTOCOMMIT. The first flag is
true if a transaction has been started explicitly
using START TRANSACTION, but will not be set when
AUTOCOMMIT=0. The flag SERVER_STATUS_AUTOCOMMIT is set if autocommit
is on, and is clear otherwise. By combining these two flags, it is
possible to see whether a statement is part of a transaction and the
next statement should be sent to the same connection. There is currently
no support in the MySQL connectors to check these flags, so currently
you have to track transaction-starting statements and the autocommit
flag in the broker.
Handling the fourth issue (detecting whether a new transaction has started) would be easy if there were a server flag in the response packet that told you if a new transaction had started. Unfortunately, this is currently not available in the server, so you just have to monitor queries as they come in and recognize those that start a new transaction. Remember that some statements cause an implicit commit, so make sure to include them if you want a generic solution.
Dispatching Queries
As explained in the discussion in Handling Transactions, handling transactions in a sharded environment is far from transparent, and applications have to take into account that they are working with a sharded database. For this reason, the goal for the sample implementation demonstrated in this chapter is not to make query dispatch transparent, but rather to make it easy to use for the application developer.
Most of the discussion in this section applies both when using a proxy as a broker and when placing the broker close to the application, such as if you implement the broker in a PHP program on the application server. For the purposes of illustration, we’ll assume a PHP implementation in this section. Let’s continue with the model introduced in Example 7-2 through Example 7-5, and implement a dynamic sharding scheme for range sharding.
So what kind of information can you reasonably ask the application developer to provide? As you saw previously, it is necessary to provide the sharding key one way or the other. A typical range mapping, such as shown in Table 7-3, allows you to fetch the shard identifier only if you also provide the function identifier of the function used to shard the tables used in the query. It’s unreasonable to expect the application developer to know the function identifier that is needed for the query, and doing so would not be very robust either because the partition functions might change. However, because each table in a query is sharded based on the function identifier, it is possible to deduce the function identifier if all the tables accessed in the query are provided. It will also be possible to check that the query truly accesses only the tables sharded using one partition function, along with optional global tables.
To figure out the partition function from the tables, we need to add an additional table that maps tables to partition functions. Such a table is shown in Example 7-6, where each fully qualified table name is mapped to the partition function used for that table. If a table is not present here, it is a global table and exists on all shards.
CREATETABLEcolumns(schema_nameVARCHAR(64),table_nameVARCHAR(64),func_idINT,PRIMARYKEY(schema_name,table_name),FOREIGNKEY(func_id)REFERENCESpartition_functions(func_id))
Given a set of tables, we can both compute the partition function identifier and the shard identifier at the same time (as in Example 7-7).
$FETCH_SHARD=<<<END_OF_QUERYSELECTshard_id,host,portFROMrangesJOINlocationsUSING(shard_id)WHEREranges.func_id=(SELECTDISTINCTfunc_idFROMcolumnsJOINpartition_functionsUSING(func_id)WHERECONCAT(schema_name,'.',table_name)IN(%s))AND%s>=ranges.lower_boundORDERBYranges.lower_boundDESCLIMIT1;END_OF_QUERY;classDictionary{private$server;publicfunction__construct($host,$user,$pass,$port=3306){$mysqli=newmysqli($host,$user,$pass,'sharding',$port);$this->server=$mysqli;}publicfunctionget_connection($key,$user,$pass,$db,$tables){global$FETCH_SHARD;$quoted_tables=array_map(function($table){return"'$table'";},$tables);$fetch_query=sprintf($FETCH_SHARD,implode(', ',$quoted_tables),$this->server->escape_string($key));if($res=$this->server->query($fetch_query)){list($shard_id,$host,$port)=$res->fetch_row();$link=newmy_mysqli($shard_id,$host,$user,$pass,$db,$port);return$link;}returnnull;}}
-
This query fetches the shard identifier, the host, and the port of the shard using the tables accessed in a query and the sharding key.
-
This query returns one row for each partition function being used by the tables. This means that if the tables belong to more than one partition function, this subselect will return more than one row. Because this subselect is not allowed to return more than one row, an error will be raised and the entire query will fail with a “subselect returned more than one row.”
-
The where condition can match more than one row (i.e., all rows that have a lower bound smaller than the key). Because only the row with the highest lower bound is needed, the result sets are ordered in descending order (placing the highest lower bound first in the result set) and only the first row is picked using a
LIMITclause.-
Establish a connection to the sharding database so that we can fetch information about the shards. For this we use a “plain” connector.
-
Construct the list of tables to look up and insert them into the statement.
-
Establish a connection to the shard by passing the necessary information. Here we use the specialized connector that can handle schema name replacement in the queries.
Shard Management
To keep the system responsive even as the load on the system changes, or just for administrative reasons, you will sometimes have to move data around, either by moving entire shards to different nodes or moving data between shards. Each of these two procedures presents its own challenges in rebalancing the load with a minimum of downtime—preferably no downtime at all. Automated solutions should be preferred.
Moving a Shard to a Different Node
The easiest solution is to move an entire shard to a different node. If you have followed our earlier advice and placed each shard in a separate schema, moving the schema is as easy as moving the directory. However, doing this while continuing to allow writes to the node is a different story.
Moving a shard from one node (the source node) to another node (the target node) without any downtime at all is not possible, but it is possible to keep the downtime to a minimum. The technique is similar to the description in Chapter 3 of creating a slave. The idea is to make a backup of the shard, restore it on the target node, and use replication to re-execute any changes that happened in between. This is what you’ll need to do:
Create a backup of the schemas on the source node that you want to move. Both online and offline backup methods can be used.
Each backup, as you could see in earlier chapters, backs up data to a particular point in the binary log. Write this log position down.
Bring the target node down by stopping the server.
While the server is down:
Bring the server up again.
Configure replication to start reading from the position that you noted in step 2 and start replication on the target server. This will read events from the source server and apply any changes to the shard that you are moving.
Plan to have excess capacity on the target node so that you can temporarily handle an increase in the number of writes on it.
When the target node is sufficiently close to the source node, lock the shard’s schema on the source node in order to stop changes. It is not necessary to stop changes to the shard on the target node, because no writes will go there yet.
The easiest way to handle that is to issue
LOCK TABLESand lock all the tables in the shard, but other schemes are possible, including just removing the tables (e.g., if the application can handle a table that disappears, as outlined next, this is a possible alternative).Check the log position on the source server. Because the shard is not being updated anymore, this will be the highest log position you need to restore.
Wait for the target server to catch up to this position, such as by using
START SLAVE UNTILandMASTER_POS_WAIT.Turn off replication on the target server by issuing
RESET
          SLAVE
. This will remove all replication information, including master.info, relay-log.info, and all relay logfiles. If you added any replication options to the my.cnf file to configure replication, you have to remove them, preferably in the next step.Optionally bring the target server down, remove the
replicate-do-dbfrom the my.cnf file for the target server, and bring the server up again.This step is not strictly necessary, because the
replicate-do-dboption is used only to move shards and does not affect the functioning of the shard after the shard has been moved. When the time comes to move a shard here again, you have to change the option at that time anyway.Update the shard information so that update requests are directed to the new location of the shard.
Unlock the schema to restart writes to the shard.
Drop the shard schema from the source server. Depending on how the shard is locked, there might still be readers of the shard at this point, so you have to take that into consideration.
Whew! That took quite a few steps. Fortunately, they can be automated using the MySQL Replicant library. The details for each individual step vary depending on how the application is implemented.
Various backup techniques are covered in Chapter 15, so we won’t list them here. Note that when designing a solution, you don’t want to tie the procedure to any specific backup method, because it might later turn out that other ways of creating the backup are more suitable.
To implement the backup procedure just described, it is necessary to bring the shard offline, which means that it is necessary to prevent updates to the shard. You can do this either by locking the shard in the application or by locking tables in the schema.
Implementing locking in the application requires coordination of all requests so that there are no known conflicts, and because web applications are inherently distributed, lock management can become quite complicated very quickly.
In our case, we simplify the situation by locking a single
table—the locations table—instead of
spreading out the locks among the various tables accessed by many
clients. Basically, all lookups for shard locations go through the
locations table, so a single lock on
this table ensures that no new updates to any shard will be
started while we perform the move and remap the
shards. It is possible that there are updates in
progress that either have started to update the shard or are
just about to start updating the shard. So you should also lock the
entire server using READ_ONLY. Any updates about to
start will be locked out and be given an error message. Updates in
progress will be allowed to finish (or might be killed after a timeout).
When the lock on the shard is released, the shard will be gone, so the
statements doing the update will fail and will have to be redone on the
new shard.
Example 7-8 automates the procedures just described. You can also use the Replicant library to do it.
_UPDATE_SHARD_MAP = """
UPDATE locations
   SET host = %s, port = %d
 WHERE shard_id = %d
"""

def lock_shard(server, shard):
    server.use("common")
    server.sql("BEGIN")
    server.sql(("SELECT host, port, sock"
                "  FROM locations"
                " WHERE shard_id = %d FOR UPDATE"), (shard,))

def unlock_shard(server):
    server.sql("COMMIT")

def move_shard(common, shard, source, target, backup_method):
    backup_pos = backup_method.backup_to()
    config = target.fetch_config()
    config.set('replicate-do-db', shard)
    target.stop().replace_config(config).start()
    replicant.change_master(target, source, backup_pos)
    replicant.slave_start(target)

    # Wait until slave is at most 10 seconds behind master
    replicant.slave_status_wait_until(target,
                                      'Seconds_Behind_Master',
                                      lambda x: x < 10)
    lock_shard(common, shard)
    pos = replicant.fetch_master_pos(source)
    replicant.slave_wait_for_pos(target, pos)
    source.sql("SET GLOBAL READ_ONLY = 1")
    kill_connections(source)
    common.sql(_UPDATE_SHARD_MAP,
               (target.host, target.port, target.socket, shard))
    unlock_shard(common, shard)
    source.sql("DROP DATABASE shard_%s", (shard))
    source.sql("SET GLOBAL READ_ONLY = 1")
As described earlier, you have to keep in mind that even though the table is locked, some client sessions may be using the table because they have retrieved the node location but are not yet connected to it, or alternatively may have started updating the shard.
The application code has to take this into account. The easiest solution is to have the application recompute the node if the query to the shard fails. Example 7-9 shows the changes that are necessary to fix Example 7-3 to re-execute the lookup if certain errors occurred.
  do {
    $error = 0;
    $mysql = $DICT->get_connection($key, 'mats', 'xyzzy', 'employees',
                                   array('employees.employees', 'employees.dept_emp',
                                         'employees.departments'));
    if ($stmt = $mysql->prepare($QUERY))
    {
      $stmt->bind_param("d", $key);
      if ($stmt->execute()) {
        $stmt->bind_result($first_name, $last_name, $dept_name);
        while ($stmt->fetch())
          print "$first_name $last_name $dept_name @{$mysql->shard_id}
";
      }
      else
        $error = $stmt->errno;
      $stmt->close();
    }
    else
      $error = $mysql->errno;

    /* Handle the error */
    switch ($error) {
    case 1290:
    case 1146:
    case 2006:
      continue;
    }
} while (0);-
In this case, execution failed because the server was set in read-only mode. The application looked up the shard, but the move procedure started before it had a chance to start executing the query.
-
In this case, execution failed because the schema disappeared. The connection looked up the shard location before it was moved, and tried to execute the query after it was moved.
Recall from Multiple shards per server (virtual shards) that the shard identifier is part of each schema name. This is how you can detect that the shard is gone. If you did not have a unique name for each schema, you would not be able to distinguish the shards.
-
In this case, execution failed because the connection was killed. The connection looked up the shard location before it was moved and started to execute the query, but the server decided that it took too long to execute.
Splitting Shards
When a host becomes too loaded, you can move one of the shards on the host to another server, but what do you do when the shard becomes too hot? The answer is: you split it.
Splitting a shard into multiple smaller shards can be very expensive, but the downtime can be kept to a minimum if done carefully. Assume that you need to split a shard and move half of the contents of the shard to a new node. Here’s a step-by-step explanation:
Take a backup of all the schemas in the shard. If you use an online backup method, such as MEB, XtraDB, or filesystem snapshots, the shard can be kept online while the backup is taken.
Write down the binary log position that this backup corresponds to.
Restore the backup from step 1 on the destination node.
Start replication from the source node to the destination node. If you want to avoid copying more changes than necessary, you can use
binlog-do-dborreplication-do-dbto just replicate changes for the schemas that you moved. At this point, all requests still go to the original shard and the new shard is “dark” and not visible.Wait until replication has caught up and the destination is close enough to the source. Then lock the source shard so that neither reads nor writes are possible.
Wait until the destination host is fully up to date with the source. During this step, all data in the shard will be unavailable.
Update the sharding database so that all requests for data in the new shard go to the new shard.
Unlock the source shard. At this point, all data is available, but there is too much data on both the source and destination shards. This data is, however, not part of the new shard data and queries sent to the server will not access this data.
Start two jobs in parallel that remove the superfluous rows on each shard using a normal
DELETE. To avoid a large impact on performance, you can remove just a few rows at a time by adding aLIMIT.
Conclusion
This chapter presented techniques for increasing the throughput of your applications by scaling out, whereby we introduced more servers to handle more requests for data. We presented ways to set up MySQL for scaling out using replication and gave practical examples of some of the concepts. In the next chapter, we will look at some more advanced replication concepts.
[6] The MySQL Reference Manual refers to a schema as a
database, making that term ambiguous. The SQL
standard actually uses the name schema and the
syntax for the create statement is CREATE SCHEMA
schema in the SQL standard.
[7] Many backup techniques can handle individual tables as well, but it is more complicated to manage backup and restore of individual tables. Using databases to structure the database makes the job of managing backups easier.