
Chapter 9. MySQL Cluster
When high performance, high availability, redundancy, and scalability are paramount concerns for database planners, they often seek to improve their replication topologies with commodity high-availability hardware and load-balancing solutions. Although this approach often meets the needs of most organizations, if you need a solution with no single points of failure and extremely high throughput with 99.999% uptime, chances are the MySQL Cluster technology will meet your needs.
In this chapter, you will be introduced to the concepts of the MySQL Cluster technology. It provides you an example of starting and stopping a simple cluster, and discusses the key points of using MySQL Cluster, including high availability, distributed data, and data replication. We begin by describing what MySQL Cluster is and how it differs from a normal MySQL server.
What Is MySQL Cluster?
MySQL Cluster is a shared-nothing storage solution with a distributed node architecture designed for fault tolerance and high performance. Data is stored and replicated on individual data nodes, where each data node runs on a separate server and maintains a copy of the data. Each cluster also contains management nodes. Updates use read-committed isolation to ensure all nodes have consistent data and a two-phased commit to ensure the nodes have the same data (if any one write fails, the update fails).
The original implementation of MySQL Cluster stored all information in main memory with no persistent storage. Later releases of MySQL Cluster permit storage of the data on disk. Perhaps the best quality of MySQL Cluster is that it uses the MySQL server as the query engine via the storage engine layer. Thus, you can migrate applications designed to interact with MySQL to MySQL Cluster transparently.
The shared-nothing, peer node concept permits an update executed on one server to become visible immediately on the other servers. The transmission of the updates uses a sophisticated communication mechanism designed for very high throughput across networks. The goal is to have the highest performance possible by using multiple MySQL servers to distribute the load, and high availability and redundancy by storing data in different locations.
Terminology and Components
Typical installations of the MySQL Cluster involve installing the components of the cluster on different machines on a network. Hence, MySQL Cluster is also known as a network database (NDB). When we use the term “MySQL Cluster,” we refer to the MySQL server plus the NDB components. However, when we use “NDB” or “NDB Cluster” we refer specifically to the cluster components.
MySQL Cluster is a database system that uses the MySQL server as the frontend to support standard SQL queries. A storage engine named NDBCluster is the interface that links the MySQL server with the cluster technology. This relationship is often confused. You cannot use the NDBCluster storage engine without the NDBCluster components. However is it is possible to use the NDB Cluster technologies without the MySQL server, but this requires lower-level programming with the NDB API.
The NDB API is object-oriented and implements indexes, scans, transactions, and event handling. This allows you to write applications that retrieve, store, and manipulate data in the cluster. The NDB API also provides object-oriented error-handling facilities to allow orderly shutdown or recovery during failures. If you are a developer and want to learn more about the NDB API, see the MySQL NDB API online documentation.
How Does MySQL Cluster Differ from MySQL?
You may be wondering, “What is the difference between a cluster and replication?” There are several definitions of clustering, but it can generally be viewed as something that has membership, messaging, redundancy, and automatic failover capabilities. Replication, in contrast, is simply a way to send messages (data) from one server to another. We discuss replication within a cluster (also called local replication) and MySQL replication in more detail later in this chapter.
Typical Configuration
You can view the MySQL Cluster as having three layers:
Applications that communicate with the MySQL server
The MySQL server that processes the SQL commands and communicates to the NDB storage engine
The NDB Cluster components (i.e., the data nodes) that process the queries and return the results to the MySQL server
Note
You can scale up each layer independently with more server processes to increase performance.
Figure 9-1 shows a conceptual drawing of a typical cluster installation.
The applications connect to the MySQL server, which accesses the NDB Cluster components via the storage engine layer (specifically, the NDB storage engine). We will discuss the NDB Cluster components in more detail momentarily.
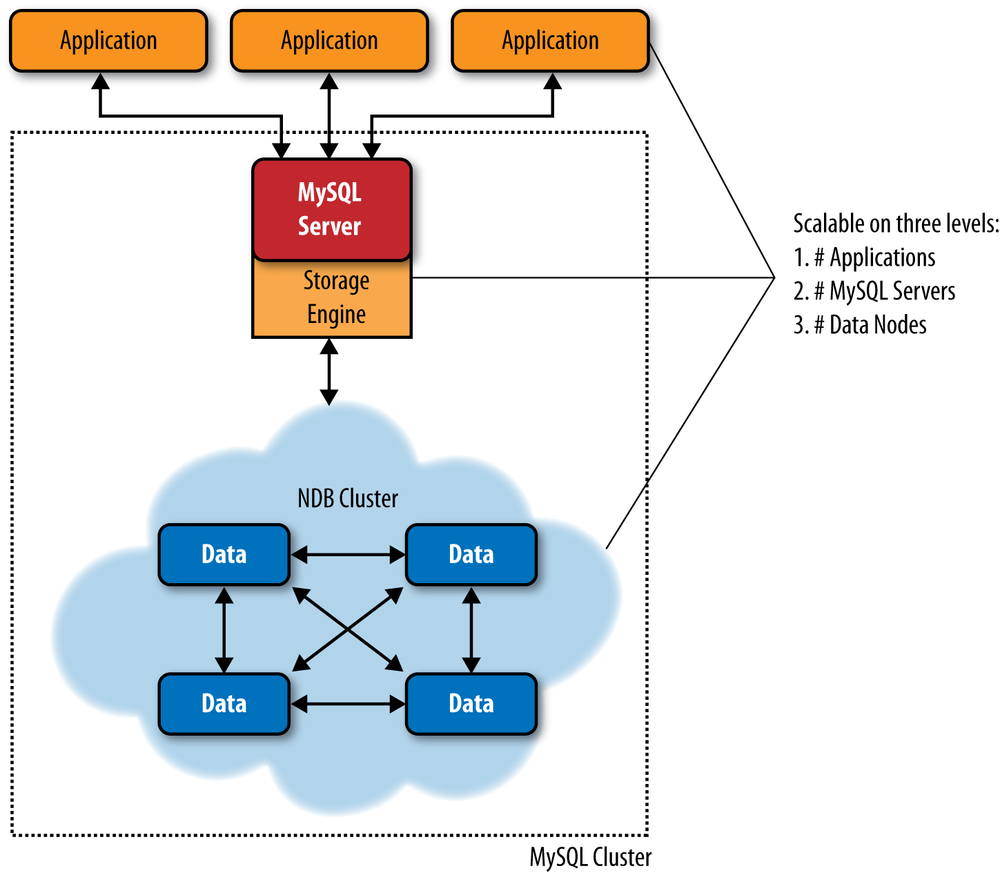
There are many possible configurations. You can use multiple MySQL servers to connect to a single NDB Cluster and even connect multiple NDB Clusters via MySQL replication. We will discuss more of these configurations in later sections.
Features of MySQL Cluster
To satisfy the goals of having the highest achievable performance, high availability, and redundancy, data is replicated inside the cluster among the peer data nodes. The data is stored on multiple data nodes and is replicated synchronously, each data node connecting to every other data node.
Note
It is also possible to replicate data between clusters, but in this case, you use MySQL replication, which is asynchronous rather than synchronous. As we’ve discussed in previous chapters, asynchronous replication means you must expect a delay in updating the slaves; slaves do not report back the progress in committing changes, and you cannot expect a consistent view across all servers in the replicated architecture like you can expect within a single MySQL cluster.
MySQL Cluster has several specialized features for creating a highly available system. The most significant ones are:
- Node recovery
Data node failures can be detected via either communication loss or heartbeat failure, and you can configure the nodes to restart automatically using copies of the data from the remaining nodes. Failure and recovery can comprise single or multiple storage nodes. This is also called local recovery.
- Logging
During normal data updates, copies of the data change events are written to a log stored on each data node. You can use the logs to restore the data to a point in time.
- Checkpointing
The cluster supports two forms of checkpoints, local and global. Local checkpoints remove the tail of the log. Global checkpoints are created when the logs of all data nodes are flushed to disk, creating a transaction-consistent snapshot of all node data to disk. In this way, checkpointing permits a complete system restore of all nodes from a known good synchronization point.
- System recovery
In the event the whole system is shut down unexpectedly, you can restore it using checkpoints and change logs. Typically, the data is copied from disk into memory from known good synchronization points.
- Hot backup and restore
You can create simultaneous backups of each data node without disturbing executing transactions. The backup includes the metadata about the objects in the database, the data itself, and the current transaction log.
- No single point of failure
The architecture is designed so that any node can fail without bringing down the database system.
- Failover
To ensure node recovery is possible, all transactions are committed using read commit isolation and two-phase commits. Transactions are then doubly safe (i.e., they are stored in two separate locations before the user gets acceptance of the transaction).
- Partitioning
Data is automatically partitioned across the data nodes. Starting with MySQL version 5.1, MySQL Cluster supports user-defined partitioning.
- Online operations
You can perform many of the maintenance operations online without the normal interruptions. These are operations that normally require stopping a server or placing locks on data. For example, it is possible to add new data nodes online, alter table structures, and even reorganize the data in the cluster.
For more information about MySQL Cluster, see the MySQL Cluster Documentation containing reference guides for the different versions of cluster.
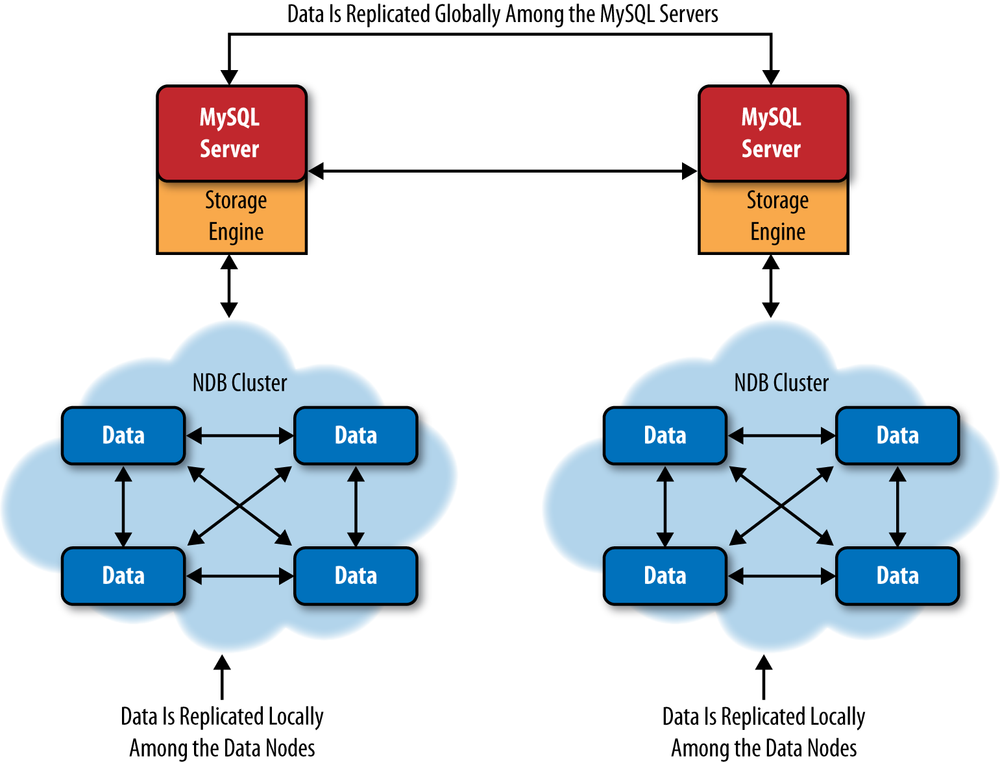
Local and Global Redundancy
You can create local redundancy (inside a particular cluster) using a two-phase commit protocol. In principle, each node goes through a round in which it agrees to make a change, then undergoes a round in which it commits the transaction. During the agreement phase, each node ensures that there are enough resources to commit the change in the second round. In NDB Cluster, the MySQL server commit protocol changes to allow updates to multiple nodes. NDB Cluster also has an optimized version of two-phase commit that reduces the number of messages sent using synchronous replication. The two-phase protocol ensures the data is redundantly stored on multiple data nodes, a state known as local redundancy.
Global redundancy uses MySQL replication between clusters. This establishes two nodes in a replication topology. As discussed previously, MySQL replication is asynchronous because it does not include an acknowledgment or receipt for arrival or execution of the events replicated. Figure 9-2 illustrates the differences.
Log Handling
MySQL Cluster implements two types of checkpoints: local checkpoints to purge part of the redo log, and a global checkpoint that is mainly for synchronizing between the different data nodes. The global checkpoint becomes important for replication because it forms the boundary between sets of transactions known as epochs. Each epoch is replicated between clusters as a single unit. In fact, MySQL replication treats the set of transactions between two consecutive global checkpoints as a single transaction.
Redundancy and Distributed Data
Data redundancy is based on replicas, where each replica has a copy of the data. This allows a cluster to be fault tolerant. If any data node fails, you can still access the data. Naturally, the more replicas you allow in a cluster, the more fault tolerant the cluster will be.
You can specify how many copies of the data (NoOfReplicas) exist in the cluster. You need
to set up as many data nodes as you want replicas. You can also
distribute the data across the data nodes using partitioning. In this
case, each data node has only a portion of the data, making queries
faster. But because you have multiple copies of the data, you can still
query the data in the event that a node fails, and the recovery of the
missing node is assured (because the data exists in the other replicas).
To achieve this, you need multiple data nodes for each replica. For
example, if you want two replicas and partitioning, you need to have at
least four data nodes (two data nodes for each replica).
Architecture of MySQL Cluster
MySQL Cluster is composed of one or more MySQL servers communicating via the NDB storage engine to an NDB cluster. An NDB cluster itself is composed of several components: data or storage nodes that store and retrieve the data and one or more management nodes that coordinate startup, shutdown, and recovery of data nodes. Most of the NDB components are implemented as daemon processes, while MySQL Cluster also offers client utilities to manipulate the daemons’ features. Here is a list of the daemons and utilities (Figure 9-3 depicts how each of these components communicates):
- mysqld
The MySQL server
- ndbd
A data node
- ndbmtd
A multithreaded data node
- ndb_mgmd
The cluster’s management server
- ndb_mgm
The cluster’s management client
Each MySQL server with the executable name mysqld typically supports one or more applications that issue SQL queries and receive results from the data nodes. When discussing MySQL Cluster, the MySQL servers are sometimes called SQL nodes.
The data nodes are NDB daemon processes that store and retrieve the data either in memory or on disk depending on their configuration. Data nodes are installed on each server participating in the cluster. There is also a multithreaded data node daemon named ndbmtd that works on platforms that support multiple CPU cores. You can see improved data node performance if you use the multithreaded data node on dedicated servers with modern multiple-core CPUs.
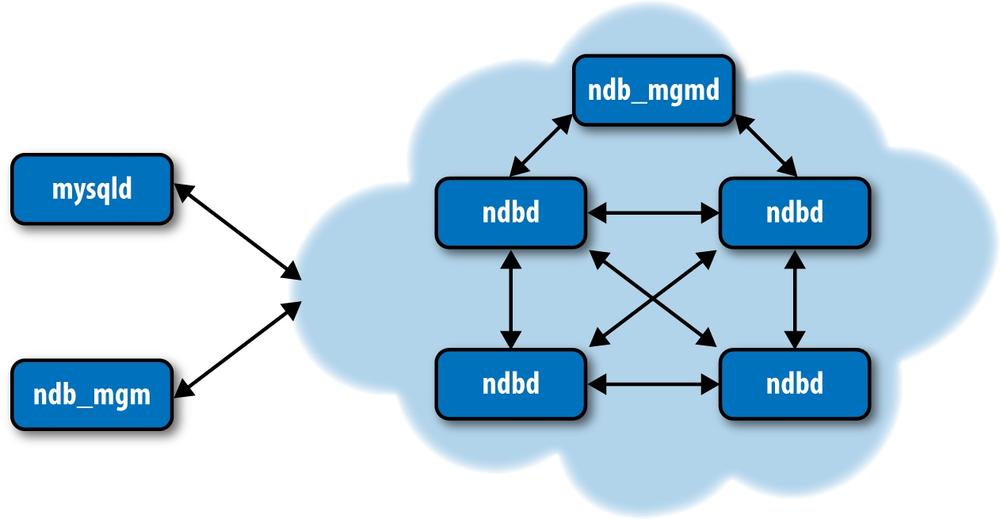
The management daemon, ndb_mgmd, runs on a server and is responsible for reading a configuration file and distributing the information to all of the nodes in the cluster. ndb_mgm, the NDB management client utility, can check the cluster’s status, start backups, and perform other administrative functions. This client runs on a host convenient to the administrator and communicates with the daemon.
There are also a number of utilities that make maintenance easier. Here are a few of the more popular ones (consult the NDB Cluster documentation for a complete list):
- ndb_config
Extracts configuration information from existing nodes.
- ndb_delete_all
Deletes all rows from an NDB table.
- ndb_desc
Describes NDB tables (like
SHOW CREATE TABLE).- ndb_drop_index
Drops an index from an NDB table.
- ndb_drop_table
Drops an NDB table.
- ndb_error_reporter
Diagnoses errors and problems in a cluster.
- ndb_redo_log_reader
Checks and prints out a cluster redo log.
- ndb_restore
Performs a restore of a cluster. Backups are made using the NDB management client.
How Data Is Stored
MySQL Cluster keeps all indexed columns in main memory. You can store the remaining nonindexed columns either in memory or on disk with an in-memory page cache. Storing nonindexed columns on disk allows you to store more data than the size of available memory.
When data is changed (via INSERT, UPDATE, DELETE, etc.), MySQL Cluster writes a record
of the change to a redo log, checkpointing data to disk regularly. As
described previously, the log and the checkpoints permit recovery from
disk after a failure. However, because the redo logs are written
asynchronously with the commit, it is possible that a limited number of
transactions can be lost during a failure. To mitigate against this
risk, MySQL Cluster implements a write delay (with a default of two
seconds, but this is configurable). This allows the checkpoint write to
complete so that if a failure occurs, the last checkpoint is not lost as
a result of the failure. Normal failures of individual data nodes do not
result in any data loss due to the synchronous data replication within
the cluster.
When a MySQL Cluster table is maintained in memory, the cluster accesses disk storage only to write records of the changes to the redo log and to execute the requisite checkpoints. Because writing the logs and checkpoints is sequential and few random access patterns are involved, MySQL Cluster can achieve higher write throughput rates with limited disk hardware than the traditional disk caching used in relational database systems.
You can calculate the size of memory you need for a data node using the following formula. The size of the database is the sum of the size of the rows times the number of rows for each table. Keep in mind that if you use disk storage for nonindexed columns, you should count only the indexed columns in calculating the necessary memory.
This is a simplified formula for rough calculation. When planning the memory of your cluster, you should consult the online MySQL Cluster Reference Manual for additional details to consider.
You can also use the Perl script ndb_size.pl found in most distributions. This script connects to a running MySQL server, traverses all the existing tables in a set of databases, and calculates the memory they would require in a MySQL cluster. This is convenient, because it permits you to create and populate the tables on a normal MySQL server first, then check your memory configuration before you set up, configure, and load data into your cluster. It is also useful to run periodically to keep ahead of schema changes that can result in memory issues and to give you an idea of your memory usage. Example 9-1 depicts a sample report for a simple database with a single table. To find the total size of the database, multiply the size of the data row from the summary by the number of rows. In Example 9-1, we have (for MySQL version 5.1) 84 bytes per row for data and index. If we had 64,000 rows, we would need to have 5,376,000 bytes of memory to store the table.
Note
If the script generates an error about a missing Class/MethodMaker.pm module, you need to install this class on your system. For example, on Ubuntu you can install it with the following command:
sudo apt-get install libclass-methodmaker-perl
$./ndb_size.pl>--database=cluster_test --user=rootndb_size.pl report for database: 'cluster_test' (1 tables) ---------------------------------------------------------- Connected to: DBI:mysql:host=localhost Including information for versions: 4.1, 5.0, 5.1 cluster_test.City ----------------- DataMemory for Columns (* means varsized DataMemory): Column Name Type Varsized Key 4.1 5.0 5.1 district char(20) 20 20 20 population int(11) 4 4 4 ccode char(3) 4 4 4 name char(35) 36 36 36 id int(11) PRI 4 4 4 -- -- -- Fixed Size Columns DM/Row 68 68 68 Varsize Columns DM/Row 0 0 0 DataMemory for Indexes: Index Name Type 4.1 5.0 5.1 PRIMARY BTREE N/A N/A N/A -- -- -- Total Index DM/Row 0 0 0 IndexMemory for Indexes: Index Name 4.1 5.0 5.1 PRIMARY 29 16 16 -- -- -- Indexes IM/Row 29 16 16 Summary (for THIS table): 4.1 5.0 5.1 Fixed Overhead DM/Row 12 12 16 NULL Bytes/Row 0 0 0 DataMemory/Row 80 80 84 (Includes overhead, bitmap and indexes) Varsize Overhead DM/Row 0 0 8 Varsize NULL Bytes/Row 0 0 0 Avg Varside DM/Row 0 0 0 No. Rows 3 3 3 Rows/32kb DM Page 408 408 388 Fixedsize DataMemory (KB) 32 32 32 Rows/32kb Varsize DM Page 0 0 0 Varsize DataMemory (KB) 0 0 0 Rows/8kb IM Page 282 512 512 IndexMemory (KB) 8 8 8 Parameter Minimum Requirements ------------------------------ * indicates greater than default Parameter Default 4.1 5.0 5.1 DataMemory (KB) 81920 32 32 32 NoOfOrderedIndexes 128 1 1 1 NoOfTables 128 1 1 1 IndexMemory (KB) 18432 8 8 8 NoOfUniqueHashIndexes 64 0 0 0 NoOfAttributes 1000 5 5 5 NoOfTriggers 768 5 5 5
Although Example 9-1 uses a very simple table, the output shows not only the row size, but also a host of statistics for the tables in the database. The report also shows the indexing statistics, which are the key mechanism the cluster uses for high performance.
The script displays the different memory requirements across MySQL versions. This allows you to see any differences if you are working with older versions of MySQL Cluster.
Partitioning
One of the most important aspects of MySQL Cluster is data partitioning. MySQL Cluster partitions data horizontally (i.e., the rows are automatically divided among the data nodes using a function to distribute the rows). This is based on a hashing algorithm that uses the primary key for the table. In early versions of MySQL, the software uses an internal mechanism for partitioning, but MySQL versions 5.1 and later allow you to provide your own function for partitioning data. If you use your own function for partitioning, you should create a function that ensures the data is distributed evenly among the data nodes.
Note
If a table does not have a primary key, MySQL Cluster adds a surrogate primary key.
Partitioning allows the MySQL Cluster to achieve higher performance for queries because it supports distribution of queries among the data nodes. Thus, a query will return results much faster when gathering data across several nodes than from a single node. For example, you can execute the following query on each data node, getting the sum of the column on each one and summing those results:
SELECTSUM(population)FROMcluster_db.city;
Data distributed across the data nodes is protected from failure if you have more than one replica (copy) of the data. If you want to use partitioning to distribute your data across multiple data nodes to achieve parallel queries, you should also ensure you have at least two replicas of each row so that your cluster is fault tolerant.
Transaction Management
Another aspect of MySQL Cluster’s behavior that differs from MySQL server concerns transactional data operations. As mentioned previously, MySQL Cluster coordinates transactional changes across the data nodes. This uses two subprocesses called the transaction coordinator and the local query handler.
The transaction coordinator handles distributed transactions and other data operations on a global level. The local query handler manages data and transactions local to the cluster’s data nodes and acts as a coordinator of two-phase commits at the data node.
Each data node can be a transaction coordinator (you can tune this behavior). When an application executes a transaction, the cluster connects to a transaction coordinator on one of the data nodes. The default behavior is to select the closest data node as defined by the networking layer of the cluster. If there are several connections available within the same distance, a round-robin algorithm selects the transaction coordinator.
The selected transaction coordinator then sends the query to each data node, and the local query handler executes the query, coordinating the two-phased commit with the transaction coordinator. Once all data nodes verify the transaction, the transaction coordinator validates (commits) the transaction.
MySQL Cluster supports the read-committed transaction isolation level. This means that when there are changes during the execution of the transaction, only committed changes can be read while the transaction is underway. In this way, MySQL Cluster ensures data consistency while transactions are running.
For more information about how transactions work in MySQL Cluster and a list of important limitations on transactions, see the MySQL Cluster chapter in the online MySQL Reference Manual.
Online Operations
In MySQL versions 5.1 and later, you can perform certain operations while a cluster is online, meaning that you do not have to either take the server down or lock portions of the system or database. The following list briefly discusses a few of the online operations available in MySQL Cluster and lists the versions that include each feature:
- Backup (versions 5.0 and later)
You can use the NDB management console to perform a snapshot backup (a nonblocking operation) to create a backup of your data in the cluster. This operation includes a copy of the metadata (names and definitions of all tables), the table data, and the transaction log (a historical record of changes). It differs from a mysqldump backup in that it does not use a table scan to read the records. You can restore the data using the special ndb_restore utility.
- Adding and dropping indexes (MySQL Cluster version 5.1 and later)
You can use the
ONLINEkeyword to perform theCREATE INDEXorDROP INDEXcommand online. When online operation is requested, the operation is noncopying—it does not make a copy of the data in order to index it—so indexes do not have to be recreated afterward. One advantage of this is that transactions can continue during alter table operations, and tables being altered are not locked against access by other SQL nodes. However, the table is locked against other queries on the SQL node performing the alter operation.Note
In MySQL Cluster version 5.1.7 and later, add and drop index operations are performed online when the indexes are on variable-width columns only.
- Alter table (MySQL Cluster version 6.2 and later)
You can use the
ONLINEkeyword to execute anALTER TABLEstatement online. It is also noncopying and has the same advantages as adding indexes online. Additionally, in MySQL Cluster version 7.0 and later, you can reorganize the data across partitions online using theREORGANIZE PARTITIONcommand as long as you don’t use theINTO (partition_definitions)option.Note
Changing default column values or data types online is currently not supported.
- Add data nodes and node groups (MySQL Cluster version 7.0 and later)
You can manage the expansion of your data nodes online, either for scale-out or for node replacement after a failure. The process is described in great detail in the reference manual. Briefly, it involves changing the configuration file, performing a rolling restart of the NDB management daemon, performing a rolling restart of the existing data nodes, starting the new data nodes, and then reorganizing the partitions.
For more information about MySQL Cluster, its architecture and features, you can find white papers covering MySQL Cluster, but also many other MySQL-related topics.
Example Configuration
In this section, we present a sample configuration of a MySQL Cluster running two data nodes on two systems, with the MySQL server and NDB management node on a third system. We present examples of simplified data node setup. Our example system is shown in Figure 9-4.

You can see one node that contains both the NDB management daemon and the SQL node (the MySQL server). There are also two data nodes, each on its own system. You need a minimum of three computers to form a basic MySQL Cluster configuration with either increased availability or performance.
This is a minimal configuration for MySQL Cluster and, if the number of replicas is set to two, the minimal configuration for fault tolerance. If the number of replicas is set to one, the configuration will support partitioning for better performance but will not be fault tolerant.
It is generally permissible to run the NDB management daemon on the same node as a MySQL server, but you may want to move this daemon to another system if you are likely to have a high number of data nodes or want to ensure the greatest level of fault tolerance.
Getting Started
You can obtain MySQL Cluster from the MySQL downloads page. It is open source, like the MySQL server. You can download either a binary distribution or an installation file for some of the top platforms. You can also download the source code and build the cluster on your own platform. Be sure to check the platform notes for specific issues for your host operating system.
You should follow the normal installation procedures outlined in the MySQL Reference Manual. Aside from one special directory, the NDB tools are installed in the same location as the MySQL server binaries.
Before we dive into our example, let us first review some general concepts concerning configuring a MySQL cluster. The cluster configuration is maintained by the NDB management daemon and is read (initially) from a configuration file. There are many parameters that you can use to tune the various parts of the cluster, but we will concentrate on a minimal configuration for now.
There are several sections in the configuration file. At a minimum, you need to include each of the following sections:
[mysqld]The familiar section of the configuration file that applies to the MySQL server, the SQL node.
[ndb default]A default section for global settings. Use this section to specify all of the settings you want applied to every node, both data and management. Note that the name of the section contains a space, not an underscore.
[ndb_mgmd]A section for the NDB management daemon.
[ndbd]You must add one section with this name for each data node.
Example 9-2 shows a minimal configuration file that matches the configuration in Figure 9-4.
[ndbd default]
NoOfReplicas= 2
DataDir= /var/lib/mysql-cluster

[ndb_mgmd]
hostname=192.168.0.183
datadir= /var/lib/mysql-cluster

[ndbd]
hostname=192.168.0.12

[ndbd]
hostname=192.168.0.188

[mysqld]
hostname=192.168.0.183
This example includes the minimal variables for a simple two
data-node cluster with replication. Thus, the NoOfReplicas option is set to 2. Notice we
have set the datadir variable to /var/lib/mysql-cluster. You can set it to
whatever you want, but most installations of MySQL Cluster use this
directory.
Finally, notice we have specified the hostname of each node. This is important, because the NDB management daemon needs to know the location of all of the nodes in the cluster. If you have downloaded and installed MySQL Cluster and want to follow along, make the necessary changes to the hostnames so they match our example.
The MySQL Cluster configuration file is by default placed in /var/lib/mysql-cluster and is named config.ini.
Note
It is not necessary to install the complete MySQL Cluster binary package on the data nodes. As you will see later, you need only the ndbd daemon on the data nodes.
Starting a MySQL Cluster
Starting MySQL Cluster requires a specific order of commands. We will step through the procedures for this example, but it is good to briefly examine the general process:
Start the management node(s).
Start the data nodes.
Start the MySQL servers (SQL nodes).
For our example, we first start the NDB management node on 192.168.0.183. Then we start each of the data nodes (192.168.0.12 and 192.168.0.188, in either order). Once the data nodes are running, we can start the MySQL server on 192.168.0.183 and, after a brief startup delay, the cluster is ready to use.
Starting the management node
The first node to start is the NDB management daemon named ndb_mgmd. This is located in the libexec folder of the MySQL installation. For example, on Ubuntu it is located in /usr/local/mysql/libexec.
Start the NDB management daemon by issuing a superuser launch and specify the --initial and
--config-file options. The --initial
option tells the cluster that this is our first time starting and we
want to erase any configurations stored from previous launches. The
--config-file option tells the daemon where to find
the configuration file. Example 9-3 shows how to start the
NDB management daemon for our example.
$sudo ../libexec/ndb_mgmd --initial--config-file /var/lib/mysql-cluster/config.iniMySQL Cluster Management Server mysql-5.6.11 ndb-7.3.2
It is always a good idea to provide the
--config-file option when you start, because some
installations have different default locations for the configuration
file search pattern. You can discover this pattern by issuing the
command ndb_mgmd --help and searching for the
phrase “Default options are read from.” It is not necessary to specify
the --config-file option on subsequent starts of the
daemon.
Starting the management console
While not absolutely necessary at this point, it is a good idea to now launch the
NDB management console and check that the NDB management
daemon has correctly read the configuration. The name of the NDB
management console is ndb_mgm and
it is located in the bin
directory of the MySQL installation. We can view the configuration by
issuing the SHOW command, as
shown in Example 9-4.
$./ndb_mgm-- NDB Cluster -- Management Client -- ndb_mgm>SHOWConnected to Management Server at: 192.168.0.183:1186 Cluster Configuration --------------------- [NDBd(NDB)] 2 node(s) id=2 (not connected, accepting connect from 192.168.0.188) id=3 (not connected, accepting connect from 192.168.0.12) [NDB_mgmd(MGM)] 1 node(s) id=1 @192.168.0.183 (mysql-5.5.31 ndb-7.2.13) [mysqld(API)] 1 node(s) id=4 (not connected, accepting connect from 192.168.0.183) ndb_mgm>
This command displays the data nodes and their IP addresses as well as the NDB management daemon and the SQL node. This is a good time to check that all of our nodes are configured with the right IP addresses and that all of the appropriate data nodes are loaded. If you have changed your cluster configuration but see the old values here, it is likely the NDB management daemon has not read the new configuration file.
This output tells us that the NDB management daemon is loaded
and ready. If it were not, the SHOW
command would fail with a communication error. If you see that error,
be sure to check that you are running the NDB management client on the
same server as the NDB management daemon. If you are not, use the
--ndb-connectstring option and provide the IP address or hostname of the machine
hosting the NDB management daemon.
Finally, notice the node IDs of your nodes. You will need this
information to issue commands to a specific node in the cluster from
the NDB management console. Issue the HELP command
at any time to see the other commands available. You will also need to
know the node ID for your SQL nodes so that they start up
correctly.
Note
You can specify the node IDs for each node in your cluster using the
--ndb-nodeid parameter in the config.ini file.
You can also use the STATUS command to see the status
of your nodes. Issue ALL STATUS to see the status
of all nodes or node-id
STATUS to see the status of a specific node. This
command is handy for watching the cluster start up, because the output
reports which startup phase the data node is in. If you want to see
the details, look in a version of the online MySQL Reference Manuals
containing MySQL Cluster for more details about the phases of data
node startup.
Starting data nodes
Now that we have started our NDB management daemon, it is time to start the data nodes. However, before we do that, let’s examine the minimal setup needed for an NDB data node.
To set up an NDB data node, all you need is the NDB data node daemon (ndbd) compiled for the targeted host operating system. First, create the folder /var/lib/mysql-cluster, then copy in the ndbd executable, and you’re done! Clearly, this makes it very easy to script the creation of data nodes (and many have).
You can start the data nodes (ndbd) using the --initial-start option, which
signals that this is the first time the cluster has been started. You
also must provide the --ndb-connectstring option,
providing the IP address of the NDB management daemon. Example 9-5 shows starting a data node for the
first time. Do this on each data node.
$ sudo ./ndbd --initial-start --ndb-connectstring=192.168.0.183
2013-02-11 06:22:52 [ndbd] INFO     -- Angel connected to '192.168.0.183:1186'
2013-02-11 06:22:52 [ndbd] INFO     -- Angel allocated nodeid: 2
If you are starting a new data node, have reset a data node, or
are recovering from a failure, you can specify the
--initial option to force the data node to erase any
existing configuration and cached data and request a new copy from the
NDB management daemon.
Warning
Be careful when using the --initial options.
They really do delete your data!
Return to the management console and check the status (Example 9-6).
ndb_mgm> SHOW
Cluster Configuration
---------------------
[ndbd(NDB)]     2 node(s)
id=2    @192.168.0.188  (mysql-5.5.31 ndb-7.2.13, Nodegroup: 0, Master)
id=3    @192.168.0.12  (mysql-5.5.31 ndb-7.2.13, Nodegroup: 0, Master)

[ndb_mgmd(MGM)] 1 node(s)
id=1    @192.168.0.183  (mysql-5.5.31 ndb-7.2.13)

[mysqld(API)]   1 node(s)
id=4 (not connected, accepting connect from 192.168.0.183)
You can see that the data nodes started successfully, because information about their daemons is shown. You can also see that one of the nodes has been selected as the master for cluster replication. Because we set the number of replicas to 2 in our configuration file, we have two copies of the data. Don’t confuse this notion of master with a master in MySQL replication. We discuss the differences in more detail later in the chapter.
Starting the SQL nodes
Once the data nodes are running, we can connect our SQL node. There are several options we must specify that enable a MySQL server to connect to an NDB cluster. Most people specify these in the my.cnf file, but you can also specify them on the startup command line if you start the server in that manner:
ndbclusterTells the server that you want to include the NDB Cluster storage engine.
ndb_connectstringTells the server the location of the NDB management daemon.
ndb_nodeidandserver_idNormally set to the node ID. You can find the node ID in the output from the
SHOWcommand in the NDB management console.
Example 9-7 shows a correct startup sequence for the SQL node in our cluster example.
$sudo ../libexec/mysqld --ndbcluster--console -umysql130211 9:14:21 [Note] Plugin 'FEDERATED' is disabled. 130211 9:14:21 InnoDB: Started; log sequence number 0 1112278176 130211 9:14:21 [Note] NDB: NodeID is 4, management server '192.168.0.183:1186' 130211 9:14:22 [Note] NDB[0]: NodeID: 4, all storage nodes connected 130211 9:14:22 [Note] Starting Cluster Binlog Thread 130211 9:14:22 [Note] Event Scheduler: Loaded 0 events 130211 9:14:23 [Note] NDB: Creating mysql.NDB_schema 130211 9:14:23 [Note] NDB: Flushing mysql.NDB_schema 130211 9:14:23 [Note] NDB Binlog: CREATE TABLE Event: REPL$mysql/NDB_schema 130211 9:14:23 [Note] NDB Binlog: logging ./mysql/NDB_schema (UPDATED,USE_WRITE) 130211 9:14:23 [Note] NDB: Creating mysql.NDB_apply_status 130211 9:14:23 [Note] NDB: Flushing mysql.NDB_apply_status 130211 9:14:23 [Note] NDB Binlog: CREATE TABLE Event: REPL$mysql/NDB_apply_status 130211 9:14:23 [Note] NDB Binlog: logging ./mysql/NDB_apply_status (UPDATED,USE_WRITE) 2013-02-11 09:14:23 [NdbApi] INFO -- Flushing incomplete GCI:s < 65/17 2013-02-11 09:14:23 [NdbApi] INFO -- Flushing incomplete GCI:s < 65/17 130211 9:14:23 [Note] NDB Binlog: starting log at epoch 65/17 130211 9:14:23 [Note] NDB Binlog: NDB tables writable 130211 9:14:23 [Note] ../libexec/mysqld: ready for connections. Version: '5.5.31-ndb-7.2.13-cluster-gpl-log' socket: '/var/lib/mysql/mysqld.sock' port: 3306 Source distribution
The output includes extra comments about the NDB Cluster connection, logs, and status. If you do not see these or if you see errors, be sure that you started your SQL node with the proper options. Of particular importance is the message stating the node ID and the management server. If you have multiple management servers running, be sure your SQL node is communicating with the correct one.
Once the SQL node starts correctly, return to the management console and check the status of all of your nodes (Example 9-8).
ndb_mgm> SHOW
Cluster Configuration
---------------------
[NDBd(NDB)]    2 node(s)
id=2    @192.168.0.188  (mysql-5.5.31 ndb-7.2.13, Nodegroup: 0, Master)
id=3    @192.168.0.12  (mysql-5.5.31 ndb-7.2.13, Nodegroup: 0)

[NDB_mgmd(MGM)]    1 node(s)
id=1    @192.168.0.183  (mysql-5.5.31 ndb-7.2.13)

[mysqld(API)]    1 node(s)
id=4    @192.168.0.183  (mysql-5.5.31 ndb-7.2.13)
As you can see, all of our nodes are now connected and running. If you see any details other than what is shown here, you have a failure in the startup sequence of your nodes. Be sure to check the logs for each node to determine what went wrong. The most common cause is network connectivity (e.g., firewall issues). The NDB nodes use port 1186 by default.
The logfiles for the data nodes and the NDB management daemon are located in the data directory. The SQL node logs are located in the usual location for a MySQL server.
Testing the Cluster
Now that our example cluster is running, let’s perform a simple test (shown in Example 9-9) to ensure we can create a database and tables using the NDB Cluster storage engine.
mysql>create database cluster_db;Query OK, 1 row affected (0.06 sec) mysql>create table cluster_db.t1 (a int) engine=NDBCLUSTER;Query OK, 0 rows affected (0.31 sec) mysql>show create table cluster_db.t1 G*************************** 1. row *************************** Table: t1 Create Table: CREATE TABLE `t1` ( `a` int(11) DEFAULT NULL ) ENGINE=NDBcluster DEFAULT CHARSET=latin1 1 row in set (0.00 sec) mysql>insert into cluster_db.t1 VALUES (1), (100), (1000);Query OK, 3 rows affected (0.00 sec) Records: 3 Duplicates: 0 Warnings: 0 mysql>select * from cluster_db.t1 G*************************** 1. row *************************** a: 1 *************************** 2. row *************************** a: 1000 *************************** 3. row *************************** a: 100 3 rows in set (0.00 sec)
Now that you have a running cluster, you can experiment by loading data and running sample queries. We invite you to “fail” one of the data nodes during data updates and restart it to see that the loss of a single data node does not affect accessibility.
Shutting Down the Cluster
Just as there is a specific order for startup, there is a specific order to shutting down your cluster:
If you have MySQL replication running among two or more clusters, the first step will ensure the replication slaves catch up (synchronize) with the master before you shut the SQL nodes down.
When you issue the SHUTDOWN
command in the NDB management console, it will shut down all of
your data nodes and the NDB management daemon.
Achieving High Availability
The main motivation for using high availability is to keep a service accessible. For database systems, this means we must always be able to access the data. MySQL Cluster is designed to meet this need. MySQL Cluster supports high availability through distribution of data across data nodes (which reduces the risk of data loss from a single node), replication among replicas in the cluster, automatic recovery (failover) of lost data nodes, detection of data node failures using heartbeats, and data consistency using local and global checkpointing.
Let’s examine some of the qualities of a high-availability database system. To be considered highly available, a database system (or any system) must meet the following requirements:
99.999% uptime
No single point of failure
Failover
Fault tolerance
A 99.999% uptime means the data is, for practical purposes, always available. In other words, the database server is considered a nonstop, continuous service. The assumption is that the server is never offline due to a component failure or maintenance. All operations such as maintenance and recovery are expected to work online, where access is not interrupted, to complete the procedure.
This ideal situation is rarely required, and only the most critical industries have a real need for this quality. Additionally, a small period of routine, preventive maintenance is expected (hence the asymptotic percentage rating). Interestingly, there is an accepted granularity of uptime related to the number of nines in the rating. Table 9-1 shows the acceptable downtime (offline time) per calendar year for each level of the rating.
Uptime | Acceptable downtime |
99.000% | 3.65 days |
99.900% | 8.76 hours |
99.990% | 52.56 minutes |
99.999% | 5.26 minutes |
Notice in this chart that the more nines there are in the rating, the lower the acceptable downtime. For a 99.999% uptime rating, it must be possible to perform all maintenance online without interruption except for a very short period of time in a single year. MySQL Cluster meets this need in a variety of ways, including the capability to perform rolling restarts of data nodes, several online database maintenance operations, and multiple access channels (SQL nodes and applications connecting via NDB API) to the data.
Having no single point of failure means that no single component of the system should determine the accessibility of the service. You can accomplish this with MySQL Cluster by configuring every type of node in the cluster with redundancy. In the small example in the previous section, we had two data nodes. Thus, the data was protected against one data node failing. However, we had only one management node and one SQL node. Ideally, you would also add extra nodes for these functions. MySQL Cluster supports multiple SQL nodes so that if the management node fails, the cluster can still operate.
Failover means that if a component fails, another can replace its functionality. In the case of a MySQL data node, failover occurs automatically if the cluster is configured to contain multiple replicas of the data. If a MySQL data node fails for one replica, access to the data is not interrupted. When you restart the missing data node, it will copy back its data from the other replica. In the case of SQL nodes, because the data is actually stored in the data nodes, any SQL node can substitute for another.
In the case of a failed NDB management node, the cluster can continue to operate without it and you can start a new management node at any time (provided the configuration has not changed).
And you can employ the normal high availability solutions discussed in previous chapters, including replication and automated failover between whole clusters. We discuss cluster replication in more detail later in this chapter.
Fault tolerance is normally associated with hardware such as backup power supplies and redundant network channels. For software systems, fault tolerance is a by-product of how well failover is handled. For MySQL Cluster, this means it can tolerate a certain number of failures and continue to provide access to the data. Much like a hardware RAID system that loses two drives on the same RAID array, loss of multiple data nodes across replicas can result in an unrecoverable failure. However, with careful planning, you can configure MySQL Cluster to reduce this risk. A healthy dose of monitoring and active maintenance can also reduce risk.
MySQL Cluster achieves fault tolerance by actively managing the nodes in the cluster. MySQL Cluster uses a heartbeat to check that services are alive, and when it detects a failed node, it takes action to perform a recovery.
The logging mechanisms in MySQL Cluster also provide a level of recovery for failover and fault tolerance. Local and global checkpointing ensures data is consistent across the cluster. This information is critical for rapid recovery of data node failures. Not only does it allow you to recover the data, but the unique properties of the checkpointing also allow for rapid recovery of nodes. We discuss this feature in more detail later.
Figure 9-5 depicts a MySQL cluster configured for high availability in a web service scenario.
The dotted boxes in the figure denote system boundaries. These components should reside on separate hardware to ensure redundancy. Also, you should configure the four data nodes as two replicas. Not shown in this drawing are additional components that interact with the application, such as a load balancer to divide the load across the web and MySQL servers.
When configuring a MySQL cluster for high availability, you should consider employing all of the following best practices (we discuss these in more detail later in this chapter when we examine high performance MySQL Cluster techniques):

System Recovery
There are two types of system recovery. In one type, you shut down the server for maintenance or similar planned events. The other is an unanticipated loss of system capability. Fortunately, MySQL Cluster provides a mechanism to recover functionality even if the worst should occur.
When MySQL Cluster is shut down properly, it restarts from the checkpoints in the logs. This is largely automatic and a normal phase of the startup sequence. The system loads the most recent data from the local checkpoints for each data node, thereby recovering the data to the latest snapshot on restart. Once the data nodes have loaded the data from their local checkpoints, the system executes the redo log up to the most recent global checkpoint, thereby synchronizing the data to the last change made prior to the shutdown. The process is the same for either a restart following an intentional shutdown or a full system restart after a failure.
You may not think a startup is something that would “recover,” but remember that MySQL Cluster is an in-memory database and, as such, the data must be reloaded from disk on startup. Loading the data up to the most recent checkpoint accomplishes this.
When recovering a system from a catastrophic failure or as a corrective measure, you can also recover from a backup of the data. As mentioned previously, you can restore data by invoking the ndb_restore utility from the NDB management console and using the output of a recent online backup.
To perform a complete system restore from backup, you should first place the cluster in single-user mode using the following command in the NDB management console:
ENTER SINGLE USER MODE node-idThe node-id is the node ID of
the data node you want to use for the ndb_restore utility. See the online MySQL Reference
Manual for more details about single-user mode and connecting
API-based utilities.
You then run restore on each data node in the cluster. Once you have restored the data on each data node, you can exit single-user mode and the cluster will be ready for use. To exit single-user mode, issue the following command in the NDB management console:
EXIT SINGLE USER MODE
For more information about MySQL Cluster backup and restore, see the “Using the MySQL Cluster Management Client to Create a Backup” and “Restore a MySQL Cluster Backup” sections of the online MySQL Reference Manual.
Warning
Do not use the --initial option when restarting
your server after a failure or scheduled takedown.
Node Recovery
There can be several reasons for a node failure, including network, hardware, memory, or operating system issues or failures. Here, we discuss the most common causes of these failures and how MySQL Cluster handles node recovery. In this section, we concentrate on data nodes, as they are the most important nodes with respect to data accessibility:
- Hardware
In the event the host computer hardware fails, clearly the data node running on that system will fail. In this case, MySQL Cluster will fail over to the other replicas. To recover from this failure, replace the failed hardware and restart the data node.
- Network
If the data node becomes isolated from the network due to some form of network hardware or software failure, the node may continue to execute, but because it cannot contact the other nodes (via heartbeating), MySQL Cluster will mark the node as “down” and fail over to another replica until the node returns and can be recovered. To recover from this failure, replace the failed network hardware and restart the data node.
- Memory
If there is insufficient memory on the host system, the cluster can essentially run out of space for data. This will result in that data node failing. To solve the problem, add more memory or increase the values of the configuration parameters for memory allocation and perform a rolling restart of the data node.
- Operating system
If the operating system configuration interferes with the execution of the data node, resolve the problems and restart the data node.
For more information about database high availability and MySQL high availability using MySQL Cluster, see the white papers on the MySQL website.
Replication
We have already briefly discussed how MySQL replication and replication inside the cluster differ. MySQL Cluster replication is sometimes called internal cluster replication or simply internal replication to clarify that it is not MySQL replication. MySQL replication is sometimes called external replication.
In this section, we discuss MySQL Cluster internal replication. We will also look at how MySQL replication (external replication) replicates data between MySQL clusters instead of between individual MySQL servers.
Replication inside the cluster versus MySQL replication
We mentioned earlier that MySQL Cluster uses synchronous replication inside the cluster. This is done to support the two-phase commit protocol for data integrity. Conversely, MySQL replication uses asynchronous replication, which is a one-way transfer of data that relies on the stable delivery and execution of events without verification that the data has been received before the commit.
Replicating inside the cluster
Internal MySQL Cluster replication provides redundancy by storing multiple copies of the data (which are called replicas). The process ensures data is written to multiple nodes before the query is acknowledged as complete (committed). This is done using a two-phase commit.
This form of replication is synchronous in that the data is guaranteed to be consistent at the point at which the query is acknowledged or that the commit has completed.
Data is replicated as fragments, where a fragment is defined as a subset of rows in a table. Fragments are distributed across the data nodes as a result of partitioning, and a copy of the fragment exists on another data node in each replica. One of the fragments is designated as the primary and is used for query execution. All other copies of the same data are considered secondary fragments. During an update, the primary fragment is updated first.
MySQL replication between clusters
Replication between clusters is very easy to do. If you can set up replication between two MySQL servers, you can set up replication between two MySQL clusters. This is because there are no special configuration steps or extra commands or parameters needed to start replication between clusters. MySQL replication works just as it does between individual servers. It just so happens that in this case, the data is stored in NDB clusters. However, there are some limitations to external replication. We list a few here for your consideration when planning external replication (consult the “MySQL Cluster Replication” section of the online MySQL Reference Manual for the latest details concerning external replication):
External replication must be row-based.
External replication cannot be circular.
External replication does not support the
auto_increment_*options.The size of the binary log may be larger than for normal MySQL replication.
MySQL replication to replicate data from one cluster to another permits you to leverage the advantages of MySQL Cluster at each site and still replicate the data to other sites.
Replication of the MySQL cluster using external replication
requires row-based MySQL replication, and the master SQL node must be
started with --binlog-format=ROW or
--binlog-format=MIXED. All other requirements for
MySQL replication also apply (e.g., unique server IDs for all SQL
nodes).
External replication also requires some special additions to the replication process, including use of the cluster binary log, the binlog injector thread, and special system tables to support updates between clusters. External replication also handles transactional changes a bit differently. We discuss these concepts in more detail in the next section.
Architecture of MySQL Cluster (external) replication
You can consider the basic concepts of the operations of external replication to be the same as MySQL replication. Specifically, we define the roles of master and slave for certain cluster installations. As such, the master contains the original copy of the data, and the slaves receive copies of the data in increments based on the incoming flow of changes to the data.
Replication in MySQL Cluster makes use of a number of dedicated
tables in the mysql database on each
SQL node on the master and the slave (whether the slave
is a single server or a cluster). These tables are created during the
MySQL installation process. The
two tables are ndb_binlog_index,
which stores index data for the binary log (local to the SQL node),
and ndb_apply_status, which stores
a record of the operations that have been replicated to the slave. The
ndb_apply_status table is
maintained on all SQL nodes and kept in sync so that is the same
throughout the cluster. You can use it to execute PITR of a failed
replicated slave that is part of a MySQL cluster.
These tables are updated by a new thread called the binlog injector thread.
This thread keeps the master updated with any changes performed in the
NDB Cluster storage engine by recording the changes made in the
cluster. The binlog injector thread is responsible for capturing all
the data events within the cluster as recorded in the binary log and
ensures all events that change, insert, or delete data are recorded in
the ndb_binlog_index table. The
master’s dump thread sends the events to the slave I/O thread using
MySQL replication.
One important difference in external replication involving MySQL Cluster is that each epoch is treated as a transaction. Because an epoch is a span of time between checkpoints, and MySQL Cluster ensures consistency at each checkpoint, epochs are considered atomic and are replicated using the same mechanism as a transaction in MySQL replication. The information about the last applied epoch is stored in the NDB system tables that support external replication between MySQL clusters.
Single-channel and multichannel replication
The MySQL replication connection between a master and slave is called a channel. A channel is, in effect, the networking protocol and medium used to connect the master to its slaves. Normally, there is only a single channel, but to ensure maximum availability, you can set up a secondary channel for fault tolerance. This is called multichannel replication. Figure 9-6 shows multichannel external replication.

Multichannel replication enhances recovery of a network link failure dramatically. Ideally, you would use active monitoring to trigger a potential failure of the network link to signal when the link is down. This can be accomplished in a variety of ways, from scripts that use simple heartbeat mechanisms to alerts and advisors such as those available in the MySQL Enterprise Monitor.
Notice that the setup in Figure 9-6 has a total of four SQL nodes (i.e., MySQL servers). The cluster acting as the master cluster has two SQL nodes acting as masters, one primary and one secondary. Likewise, the cluster acting as a slave cluster has two SQL nodes acting as primary and secondary slaves. The primary master/slave pair communicates over one network connection, and the secondary master/slave pair communicates over a different network connection.
Note
Don’t take your networking components for granted. Even a switch can fail. Using different cabling on the same switched network gains very little. It is best to use a completely separate set of redundant connections and intermediary networking components to achieve true network redundancy.
Setup of multichannel replication does not differ much from single-channel (normal) MySQL replication. However, the replication failover is a little different. The idea is that you do not start the slave on the secondary channel. Failover to the secondary channel requires some special steps.
Use the following procedure to start multichannel external replication with the primary channel active and the second channel in standby mode (we assume the redundant networking communication and hardware is in place and working properly):
Start the primary master.
Start the secondary master.
Connect the primary slave to the primary master.
Connect the secondary slave to the secondary master.
Start the primary slave.
Warning
Do not start the secondary slave (using START SLAVE). If you do, you risk primary
key conflicts and duplicate data issues. You should, however,
configure the secondary slave with information about the secondary
master (using CHANGE MASTER) so
the secondary channel can be started quickly if the primary channel
fails.
Failover to the secondary channel requires a different procedure. It is not enough to just start the secondary slave. To avoid having the same data replicated twice, you must first establish the last replicated epoch and use it to start replication. The procedure is as follows (notice that we use variables to store intermediate results):
Find the time of the most recent global checkpoint the slave received. This requires finding the most recent epoch from the
ndb_apply_statustable on the primary slave:SELECT@latest:=MAX(epoch)FROMmysql.ndb_apply_status;Get the rows that appear in the
ndb_binlog_indextable on the primary master following the failure. You can find these rows from the primary master with the following query:SELECT@file:=SUBSTRING_INDEX(File,'/',−1),@pos:=PositionFROMmysql.ndb_binlog_indexWHEREepoch>@latestORDERBYASCLIMIT1;Synchronize the secondary channel. Run this command on the secondary slave, where
fileis the actual filename andposis the position:CHANGEMASTERTOMASTER_LOG_FILE='file',MASTER_LOG_POS=pos;Start replication on the secondary channel by running this command on the secondary slave:
START SLAVE;
This failover procedure will switch the replication channel. If you have failures of any of the SQL nodes, you must deal with those issues and repair them before executing this procedure.
Note
It is a good idea to ensure the primary channel is indeed offline. You may want to consider stopping the primary slave just in case.
Achieving High Performance
MySQL Cluster is designed not only for high availability, but also for high performance. We have already reviewed many of these features, as they are often beneficial for high availability. In this section, we examine a few features that provide high performance. We conclude with a list of best practices for tuning your system for high performance.
The following features support high performance in MySQL Cluster; we have examined many of these in previous sections:
Considerations for High Performance
There are three main considerations when tuning your system to support high performance.
Ensure your applications are as efficient as they can be. Sometimes this requires modification of your database servers (e.g., optimizing the configuration of the servers or modifying the database schema), but often the application itself can be designed or refactored for higher performance.
Maximize access to your databases. This includes having enough MySQL servers for the number of connections (scale-out) and distributing the data for availability, such as through replication.
Consider making performance enhancements to your MySQL Cluster, for instance, by adding more data nodes.
Note
Queries with joins can often be very time-consuming. The main
source is the distributed nature of MySQL Cluster and that the MySQL
server did not have good support for handling MySQL Cluster joins.
Before MySQL Cluster 7.2, a JOIN operation was
executed by fetching data from the data nodes and performing the join
inside the SQL node, requiring the data to be transferred several
times over the network. With MySQL Cluster 7.2, MySQL Server 5.5 has
added support to allowing the join to be “pushed down” into the
engine, which then performs the actual join. This reduces the amount
of data that needs to be sent over the network and also allows
increased parallelism by executing the join on multiple data
nodes.
You may need to make certain trade offs between the level of high availability you desire and high performance. For example, adding more replicas increases availability. However, while more replicas protect against loss of data nodes, they require more processing power and you may see lower performance during updates. The reads are still quick, because multiple replicas do not need to be read for the same data. Having a greater number of data nodes (scale out) while keeping the number of replicas low leads to higher write performance.
Another primary consideration is the distributed nature of MySQL Cluster. Because each node performs best when run on a separate server, the performance of each server is critical, but so are the networking components. Coordination commands and data are being transported from node to node, so the performance of the networking interconnect must be tuned for high performance. You should also consider parameters such as selection of transport (e.g., TCP/IP, SHM, and SCI), latency, bandwidth, and geographic proximity.
You can set up and run MySQL Cluster in a cloud environment. One advantage of doing so is that the network interconnections are very fast and optimized. Because the data nodes require mainly a fast processor, adequate memory, and a fast network, virtual server technology is more than adequate for using MySQL Cluster in the cloud. Note, however, that MySQL Cluster is not officially supported in virtual server environments.
You can find a complete list of all of the considerations for high performance in the “MySQL Cluster” section of the online MySQL Reference Manual. For general MySQL performance improvements, see High Performance MySQL.
High Performance Best Practices
There are a number of things you can do to ensure your MySQL Cluster is running at peak performance. We list a few of the top performance enhancement practices here, along with a brief discussion of each. Some of these are more general in nature, but we do not want to overlook these in our quest for the highest performance possible.
- Tune for access patterns
Consider the methods your applications use to access data. Because MySQL Cluster stores indexed columns in memory, accesses referencing these columns show an even greater speed-up over nonindexed columns than you get on single MySQL servers. MySQL Cluster requires a primary key in every table, so applications that retrieve data by primary key are almost guaranteed to be fast.
- Make your applications distribution-aware
The best-case scenario for accessing data on a partitioned data store is to isolate a query to a single node in the cluster. By default, MySQL Cluster uses the primary key for hashing the rows across the partitions. Unfortunately, this isn’t always optimal if you consider the behavior of master/detail queries (common applications that consult a master table followed by details in other tables that refer back to the master table). In this case, you should alter the hashing function to ensure the master row and the detail rows are on the same node. One way to accomplish this is partition pruning, whereby you drop the secondary field used in the detail table partition hash and partition the detail rows with only the master’s primary key (which is the foreign key in the detail table). This allows both the master and detail rows to be allocated to the same node in the partition tree.
- Use batch operations
Each round trip of a query has significant overhead. For certain operations like inserts, you can save some of that overhead by using a multiple insert query (an
INSERTstatement that inserts multiple rows). You can also batch operations by turning on thetransaction_allow_batchingparameter and including multiple operations within a transaction (within theBEGINandENDblocks). This lets you list multiple data manipulation queries (INSERT,UPDATE, etc.) and reduce overhead.- Optimize schemas
Optimizing your database schemas has the same effect for MySQL Cluster as it does for normal database systems. For MySQL Cluster, consider using efficient data types (e.g., the minimum size needed to save memory; 30 bytes per row in a million-row table can save you a significant amount of memory). You should also consider denormalization for certain schemas to take advantage of MySQL Cluster’s parallel data access methods (partitioning).
- Optimize queries
Clearly, the more optimized the query, the faster the query performance. This is a practice common to all databases and should be one of the first things you do to improve the performance of your application. For MySQL Cluster, consider query optimization from the standpoint of how the data is retrieved. Specifically, joins are particularly sensitive to performance in MySQL Cluster. Poorly performing queries can sometimes cause anomalies that are easily mistaken for inefficiencies in other parts of your system.
- Optimize server parameters
Optimize your cluster configuration to ensure it is running as efficiently as possible. This may mean spending some time to understand the many configuration options as well as securing the correct hardware to exploit. There is no magic potion for this task—each installation becomes more and more unique as you change more parameters. Use this practice with care, tune one parameter at a time, and always compare the results to known baselines before instituting a change.
- Use connection pools
By default, SQL nodes use only a single thread to connect to the NDB cluster. With more threads to connect, the SQL nodes can execute several queries at once. To use connection pooling for your SQL nodes, add the
ndb-cluster-connection-pooloption in your configuration file. Set the value to be greater than 1 (say, 4) and place it in the[mysqld]section. You should experiment with this setting because it is frequently too high for the application or hardware.- Use multithreaded data nodes
If your data node has multiple CPU cores or multiple CPUs, you will gain additional performance by running the multithreaded data node daemon named ndbmtd. This daemon can make use of up to eight CPU cores or threads. Using multiple threads allows the data node to run many operations in parallel, such as the local query handler (LQH) and communication processes, to achieve even higher throughput.
- Use the NDB API for custom applications
While the MySQL server (the SQL node) offers a fast query processor frontend, MySQL has built a direct-access C++ mechanism called the NDB API. For some operations, such as interfacing MySQL Cluster with LDAP, this may be the only way to connect the MySQL cluster (in this case just the NDB cluster) to your application. If performance is critical to your application and you have the necessary development resources to devote to a custom NDB API solution, you can see significant improvements in performance.
- Use the right hardware
Naturally, faster hardware results in faster performance (generally speaking). However, you should consider every aspect of the cluster configuration. Consider not only faster CPUs and more and faster memory, but also high-speed interconnect solutions such as SCI and high-speed, hardware-redundant network connections. In many cases, these hardware solutions are built as turnkey commodities and do not require reconfiguring the cluster.
- Do not use swap space
Make sure your data nodes are using real memory and not swap space. You will notice a dramatic performance drop when the data nodes start using swap space. This affects not only performance, but also possibly the stability of the cluster.
- Use processor affinity for data nodes
In multiple-CPU machines, lock your data node processes to CPUs that are not involved in network communications. You can do this on some platforms (e.g., Sun CMT processor systems) using the
LockExecuteThreadToCPUandLockMaintThreadsToCPUparameters in the[ndbd]section of the configuration file.
If you follow these best practices, you will be well on your way to making MySQL Cluster the best high-performance, high-availability solution for your organization. For more information about optimizing MySQL Cluster, see the white paper “Optimizing Performance of the MySQL Cluster Database.”
Conclusion
In this chapter, we discussed the unique high availability solution for MySQL using MySQL Cluster. The strengths of MySQL Cluster include partitioning tables and distributing them across separate nodes and the parallel architecture of MySQL Cluster as a multimaster database. This allows the system to execute high volumes of both read and write operations concurrently. All updates are instantly available to all application nodes (via SQL commands or the NDB API) accessing data stored in the data nodes.
Because write loads are distributed across all of the data nodes, you can achieve very high levels of write throughput and scalability for transactional workloads. Finally, with the implementation of multiple MySQL server nodes (SQL nodes) running in parallel, where each server shares the load with multiple connections, and the use of MySQL replication to ensure data shipping among geographic sites, you can build highly efficient, high-concurrency transactional applications.
Although few applications may have such stringent needs, MySQL Cluster is a great solution for those applications that demand the ultimate form of MySQL high availability.