
1. Customizing iMovie Settings and Preferences
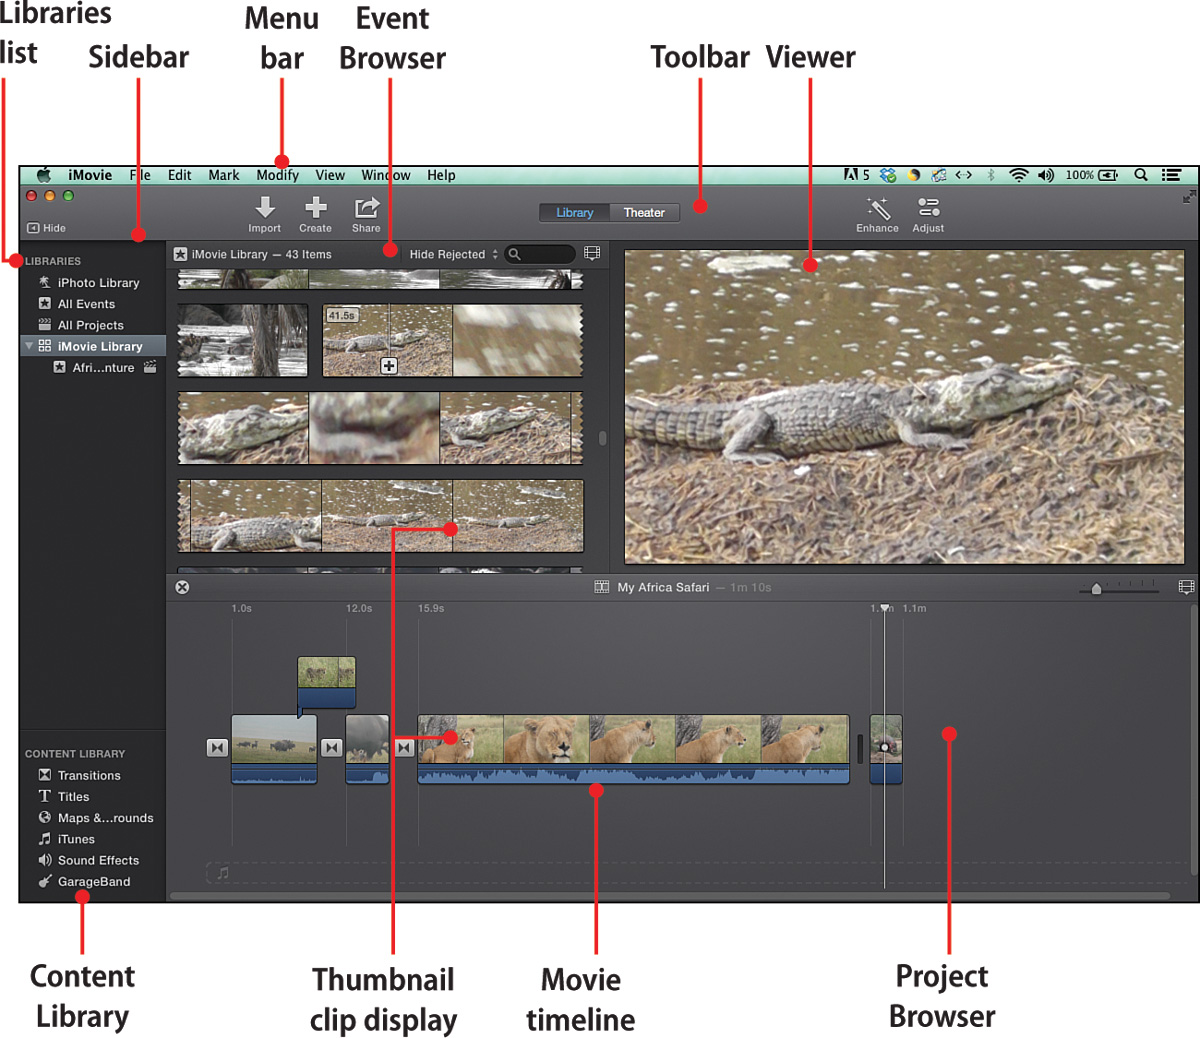
In this chapter, you learn about customizing the iMovie workspace and changing default preferences and settings. You also find out how to switch the location of the Project Browser and Event Browser as well as how to modify the size of other elements of the workspace and clip thumbnails. Topics include the following:
→ Rearranging and customizing the iMovie workspace
→ Switching Project Browser and Event Browser location
→ Modifying thumbnail clips
→ Wrapping a movie timeline
→ Customizing iMovie preferences
→ Changing default movie preferences
When you first open iMovie, you see the default workspace. iMovie automatically sets default preferences that control functionality and settings of iMovie as well as any new movie project. You can modify these preferences and settings and also modify the display of the iMovie workspace.
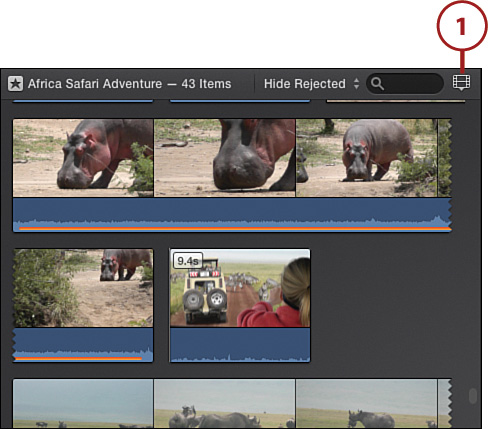
The workspace is made up of the sidebar, Event Browser, Project Browser, and Viewer. The sidebar contains the Libraries list and the Content Library. The Event Browser is also referred to as the Browser because it can display projects, events, clips, photos, and sound files. The Project Browser contains the movie timeline. Both the Browser and movie timeline display thumbnail images of clips that are set to a default display size. You can modify the size and location of these workspace elements and modify the display of the thumbnail clips.
iMovie Workspace and the Project Browser
When you first install iMovie and you haven’t opened a new project yet, the iMovie workspace displays just the sidebar, Event Browser, and Viewer. This is the iMovie default workspace layout.

When you create your first project (see Chapter 3) or open a project that you updated from an older version of iMovie (see Chapter 2), the workspace changes and the Project Browser displays at the bottom of the workspace with the Event Browser and Viewer above the Project Browser. You can close the Project Browser at any time by clicking the Close button, and the workspace reverts to the iMovie default layout.

Switching the Project and Event Browsers
You can modify and adjust the layout of the iMovie workspace. Say you need more space for displaying events, movie clips, and photos to add to your movie project. You can switch the position of the Project and Event Browsers.
1. Choose Window, Swap Project and Event.
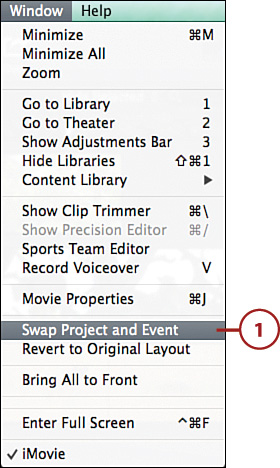
2. The Project Browser and the Event Browser swap locations in the workspace.

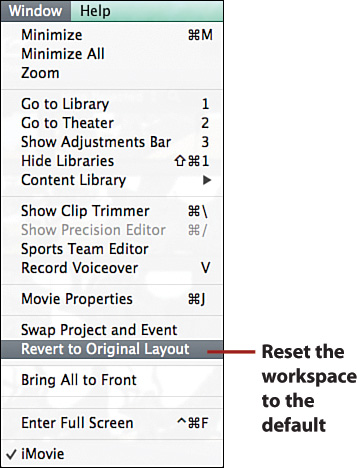
Reverting to the Default iMovie Workspace
If you have adjusted and modified the iMovie workspace, you can quickly reset the workspace to the default layout by choosing Window, Revert to Original Layout.
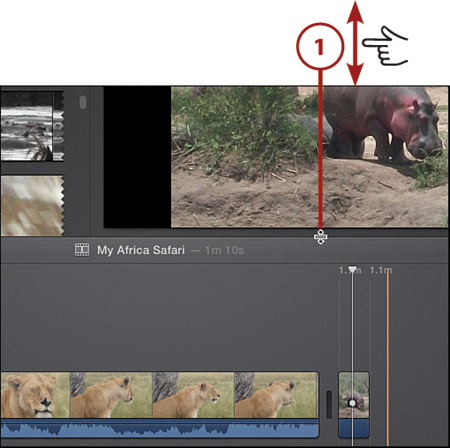
Resizing the Sidebar, Viewer, Event Browser, and Project Browser
You can also adjust the size of the iMovie sidebar, Event Browser, Viewer, and Project Browser. When you increase the size of any of these, the other iMovie workspace elements resize according to the space available.
1. Position your cursor on the horizontal border between the Project Browser and the Viewer/Event Browser. When the mouse becomes the double-headed arrow tool, click and drag the border up or down to resize the Project Browser. The Event Browser and the Viewer resize according to the space available.
2. Position your cursor on the vertical border to the right of the iMovie sidebar and either the Event Browser or the Project Browser, respectively. When the mouse becomes the double-headed arrow tool, click and drag left or right to resize the sidebar. The Event Browser, Viewer, and the Project Browser resize in relation to the space available.

Hiding the iMovie Sidebar
The iMovie sidebar contains the Libraries list and the Content Library. After you have your movie laid out, you might not need to have this sidebar displayed. You can hide the sidebar to give you more room to work on your movie.
1. Click the Hide button to hide the Libraries sidebar. The button’s label changes to Show after you click it.

2. Click the Show button to show the iMovie sidebar again.

Changing the Display of Project and Event Browser Content
You can change how things look in the Event Browser and Project Browser, such as the appearance of movie clips and the display of the timeline, as well as other default settings for applying Zoom to movie clips and the display of audio waveforms for audio tracks. You can have the timeline wrap in its display in the Project Browser, and increase or decrease the display of thumbnail images of the movie clips in both the Event and Project Browsers.
Wrap the Movie Timeline
By default, the movie timeline is displayed in one row that extends to the right until the movie ends. Often, movie projects are developed in a very long timeline. To see all the timeline, scroll right and left in the Project Browser by dragging the horizontal scrollbar. You can also make the movie timeline wrap in the Project Browser pane so that you can see more of it at a glance.
1. Select View, Wrapping Timeline.

2. The timeline wraps in the available width of the Project Browser. If your timeline extends farther down than what is displayed in the Project Browser, click and drag the vertical scrollbar.

Adjust a Clip Thumbnail in the Event Browser
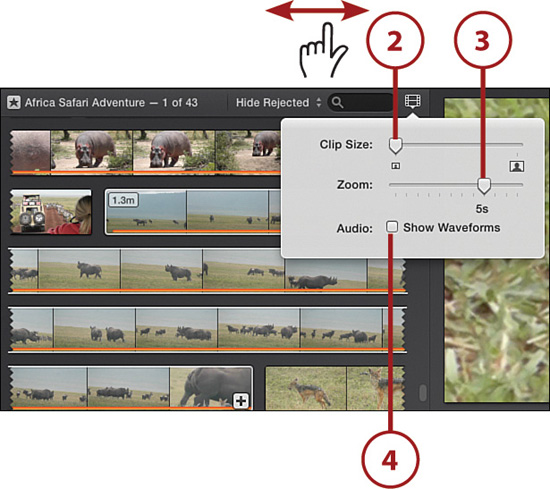
The Event Browser has a title bar at the top that includes the Adjust Thumbnail Appearance option. This option lets you adjust the size of the thumbnail image of each movie clip. You can increase the size of the thumbnail so you can focus on selecting the exact footage of the clip that you need for your movie.
1. Click the Adjust Thumbnail Appearance option.
2. Adjust the Clip Size slider to decrease or increase the size of the thumbnail by clicking and dragging the slider left or right.
3. Decrease or increase the Zoom duration for the footage displayed in the clip thumbnail by dragging the Zoom slider left or right.
Zoom Feature of a Movie Clip
You can set the amount of footage that is shown in each clip thumbnail by adjusting the Zoom duration. Dragging the Zoom slider to the right increases the duration of the clip footage to display more video footage in the clip thumbnail, and dragging to the left decreases the duration of the zoom. The default setting is 5 seconds. This lets you skim more or less footage in the thumbnail display.
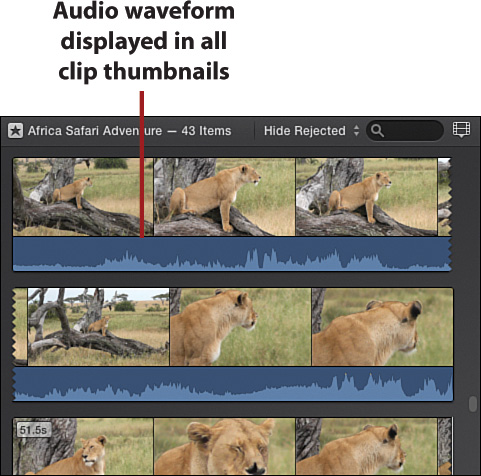
4. Turn on the display of the audio track waveform in the clip by selecting the Show Waveforms check box. You can turn this off by deselecting this check box.
Adjust the Clip Thumbnail in the Project Browser
The Project Browser also has an Adjust Thumbnail Appearance option that works pretty much the same as the option in the Event Browser, although it has fewer options to configure. Use this option to adjust the size of the thumbnail image of each movie clip in the movie timeline. You can also use the Zoom In or Out on Clips slider for quick access to adjust the movie clip thumbnail size display in the timeline.
1. Click the Adjust Thumbnail Appearance option in the Project Browser.
2. Click and drag the Clip Size slider left or right to decrease or increase the clip thumbnail size.
3. Turn off the default display of audio track waveforms by removing the check mark from the Show Waveforms check box. Click the check box again to display the audio track waveforms.
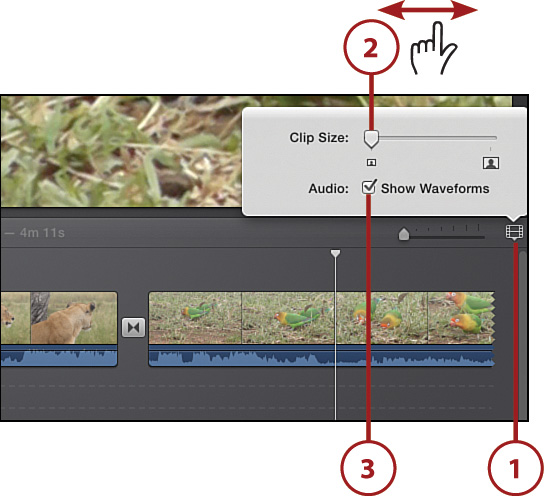

4. Click and drag the Zoom slider to increase the amount of footage displayed in clip thumbnails.

Showing Event Clips by Separate Days
The Event Browser can also display clips by the day it was recorded. To do this, select View, Show Separate Days in Events. You can also right-click anywhere in a blank area of the Browser and choose Show Separate Days in Events from the menu.

Setting iMovie Preferences
When you install iMovie, it’s set up with default preferences that control whether slow motion is automatically added to any imported clips and if iMovie Theater is linked to your iCloud account. By default, iMovie applies a slow-motion setting to all imported clips so that you can slow down any movie clip in your movie project to create a special effect. If you link iMovie Theater to iCloud, you can set iMovie to automatically publish your finished movie projects to iMovie Theater so they can be viewed on other Apple devices like the iPad or iPod.
iMovie Theater and iCloud
iMovie Theater is a new feature of iMovie that stores your finished movies in one location and in a high-quality format. If you link Theater to iCloud, you can share your finished movies on other personal devices such as iPads or iPods as well as Apple TV.
1. Select iMovie, Preferences. The iMovie Preferences window displays.

2. Deselect the Apply Slow-Motion Automatically check box to turn off the default setting.
3. If you already have an iCloud account, select the Automatically Upload Content to iCloud check box to establish the connection between Theater and your iCloud account.
4. If you need to learn more about iCloud or would like to set up an iCloud account, click the Learn More link.

iCloud by Apple
Apple makes use of cloud technology through iCloud. When you create an iCloud account, you are setting up an online storage area that lets you connect multiple devices, like your iPhone, iPad, iPod, and desktop computer. You can easily share songs, movies, and photos from all your Apple devices without having to download files multiple times to each device. iCloud even keeps track of your devices so that if they are lost or stolen, iCloud lets you know where they are at. The initial 5GBs are free, and Apple offers other plans based on your storage needs. Learn more by visiting www.apple.com/icloud/.
Setting Movie Properties
Besides iMovie preferences, you also have default movie properties that are automatically applied to a movie project. These properties control how photos are placed in a movie, what theme is used, and the default duration time for clips and transitions. There are also properties for placement and control of automatic content, such as transitions and titles and automatically trimming your movie’s background music to fit the movie’s duration time.
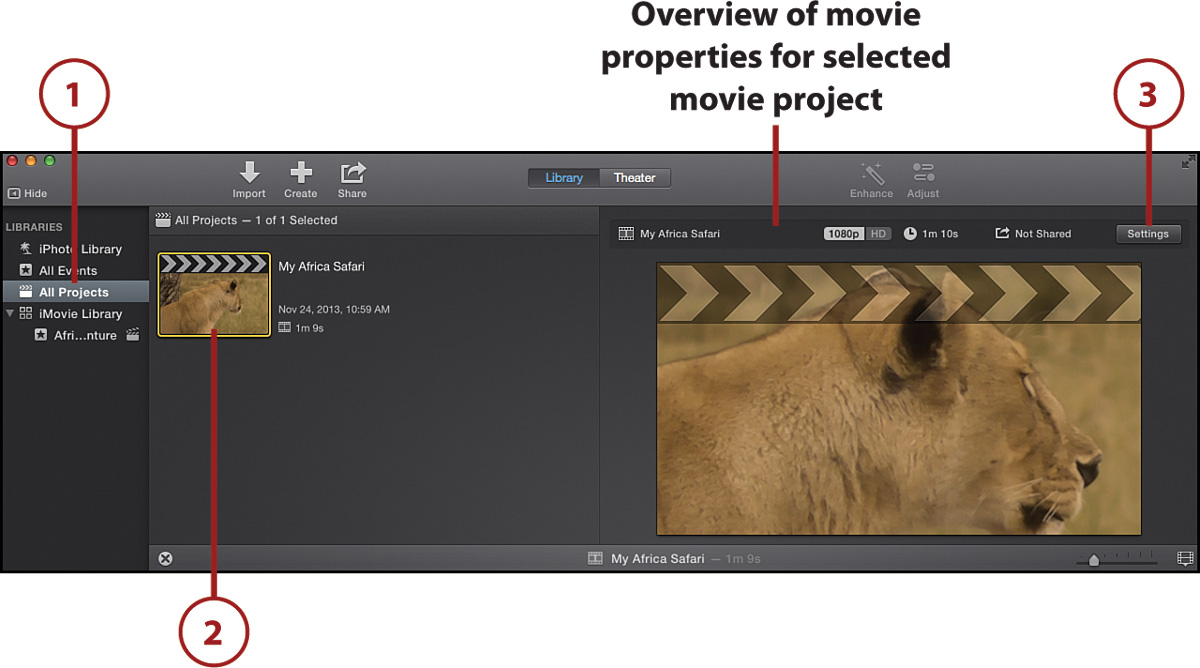
1. Select the movie project that you want to edit by clicking All Projects from the Libraries list in the iMovie sidebar.
2. Select the movie project in the Event Browser. An overview of the movie properties is displayed above the Viewer as well as a Settings button.
Accessing Movie Properties for the Active Movie
You can quickly access the movie properties for the movie project you have active by choosing Window, Movie Properties. This displays the properties settings for the movie above the Viewer.
3. Click the Settings button to access the movie properties settings.
My Movie Property Settings Disappeared!
If you move your mouse pointer down to the Project Browser while viewing movie properties settings, the settings disappear above the Viewer and are replaced with the clip image indicated by the playhead in the movie timeline. To display the movie properties again, repeat steps 1 and 2.
4. Select the placement setting for how photos are added to your movie project. Zoom applies the Ken Burns effect and creates a zoom into the photo. Crop automatically crops the photo to display in the movie frame dimensions. Fit automatically resizes the photo to display in the movie frame dimensions.
5. Select Automatic Content to set iMovie to automatically apply transitions and titles to the movie.
6. Click the Theme button to display the Themes window.

7. Select a new theme. Click Change to apply a new theme to your movie project.

The Automatic Content Setting and Themes
If you just select a new theme and do not turn on Automatic Content, you will not see the new theme applied to your movie. You need to have the Automatic Content setting active to see your theme. To learn more about themes, see Chapter 8.

8. Click and drag the Clips slider left or right to adjust the default Clips duration time. The default setting is 4.0 seconds.
9. Click and drag the Transitions slider left or right to adjust the default Transitions duration time. The default setting is 1.0 seconds.
10. Select the Trim Background Music check box to automatically trim the background music to stop playing at the end of the movie. This stops the music wherever it is at when the movie video ends.
11. Click the Info button to return to the overview of the movie properties.

How iMovie Calculates Clip and Transition Duration
If you do not have a theme applied to your movie, iMovie automatically sets transitions to a default setting of .5 seconds for both the start of the clip and the end of the clip. If you have a theme applied, iMovie sets the transition to a default setting of 2 seconds for both the start and end of the clip. When you adjust either the Clips Zoom duration or the Transition duration setting, both settings are manipulated to accommodate for the shortest clip duration setting based on the movie project.
Playing the Entire Audio Track
If you want your movie music soundtrack to play all the way through even if the movie ends prior to the music ending, deselect the Trim Background Music check box in the movie properties settings. This allows you to display a photo image at the end of your movie for a visual display as the soundtrack finishes playing.