
2. Importing and Organizing Video, Events, and Movie Clips
In this chapter, you find out about creating, organizing, and managing your iMovie libraries, events, and movie clips. You learn how to import movie clips as well as libraries and events created in older versions of iMovie. You also learn how to create new events and how to open other libraries from iPhoto or Aperture. Topics include the following:
→ Importing movie clips from your computer and from other devices
→ Updating libraries, events, and movie clips created in older versions of iMovie
→ Working with events and movie clips
→ Organizing libraries and events
→ Applying ratings to your movie clips
This chapter covers how to import your digital media into iMovie and how to organize your libraries, events, and movie clips. Your digital media can come from various devices, like a digital camera, iPhone or Android phone, iPad or other tablet device, iPod touch, or even FaceTime HD Camera. You also can import your existing media libraries and events that you created for use with older versions of iMovie. This chapter also explains how you can organize your libraries, events, and movie clips for easy browsing and finding of your media.
iMovie v10 Default Setup
When you first install iMovie v10, it automatically creates an empty event for the new iMovie workspace. An event is like a folder, and it can contain a single movie clip or multiple movie clips as well as iMovie movie projects, photos, and audio files. Because you have not created a new movie project yet, the iMovie workspace shows just the Library list, and the Event Browser displays in the lower half of the workspace. The Project Browser only displays when you have created your first movie project. iMovie v10 is ready for use, and the first step is to import video, audio, and photos into the iMovie Library.

Update Events and Projects from Older Versions of iMovie
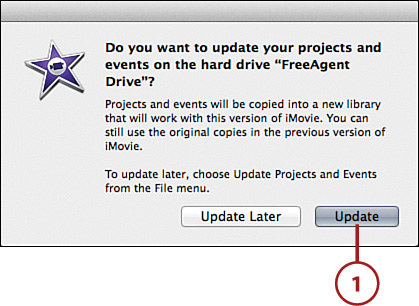
If you have used an older version of iMovie, when you open iMovie for the first time it automatically looks for existing iMovie events and movie projects on your computer. These would be any finalized iMovie events and movie projects created in an older version of iMovie so it can update them to work with iMovie v10. After being updated, they are automatically imported into the iMovie v10 Library.
1. When you first open iMovie v10, it automatically checks your computer for projects and events to update and then asks if you want to update now or later. Click Update.
Manually Updating Projects and Events from Older Versions
You can also select File, Update Projects and Events to initiate the update process for existing projects and events from older versions of iMovie.
2. After the updating process, you see your projects and events displayed in the Libraries list of the iMovie workspace.
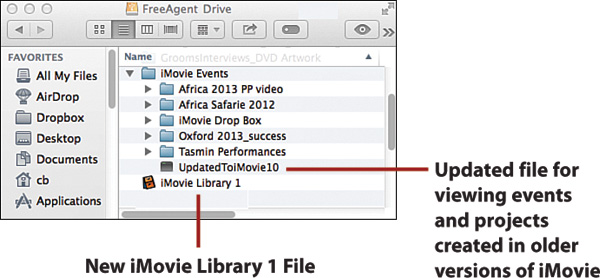
3. Each event is marked with a star icon. Any movies that were finalized or shared are grouped in the Finalized Movies event, and the Updated Projects event holds all other previously created projects updated to the iMovie v10 format.


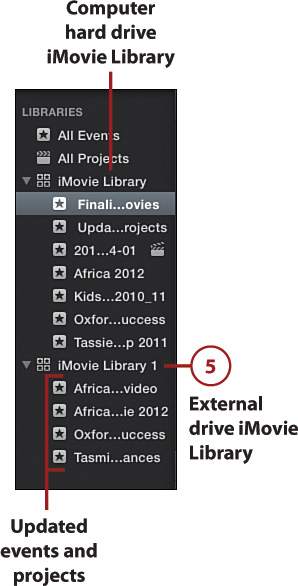
Update Events and Projects from an External Drive or Mobile Device
You can also update events and projects that are stored on an external drive or mobile device. The key to this is to make sure all the projects and events are located in the top level of the external drive or mobile device and then perform the update.
1. Attach the external drive to your computer.
2. Move all iMovie projects and events to the top-level of the external drive.

3. Open iMovie by double-clicking the iMovie icon on your desktop or by clicking it from the dock bar.

4. Choose File, Update Projects and Events.

5. iMovie creates a new library file and updates and imports the existing projects and events into this new library.
iMovie Automatically Detects Events and Projects from Older Versions
When you attach another device and you already have iMovie open, it automatically searches the new device for existing projects and events. If it finds any that were created in an older version of iMovie, you see the Update Projects and Events message. Click Update and these projects and events are updated and imported into the iMovie Libraries list.
>>>Go Further: Understanding the Update Process
Importing Movies from a Camera, Memory Card, and iMovie for iOS
iMovie can import movies from many different device types and file formats. You can use digital cameras, external drives, SAN disks, memory cards, flash drives, mobile phones, and tablets to import files to iMovie. You can even import movies, events, and projects from iMovie iOS. You can also record video directly into iMovie using your computer’s built-in camera. Most Apple computers have preinstalled iSight for recording video through the computer’s camera. If you can make a wired or wireless connection between the device and your computer, and the movie is in an iMovie-supported format, you can import it to iMovie.
iMovie supports the following digital media file formats and codecs:
• QuickTime supported formats (MOV)
• Apple Encoded Video (M4V)
• Digital video (DV)
• DV Widescreen (AVCHD)
• High-definition recordings 1080i and 720p (either recorded at 25fps or 30fps) (HDV)
• Moving Picture Experts Group (MPEG-4 or simple profile MP4)
• 3G Mobile Phone Video (3GP)
• Advanced Audio Coding (AAC)
• Digital Audio Compression (AC3)
• Audio specific format by the Moving Picture Experts Group (MP3)
• Audio Interchange File Format (AIFF)
iMovie cannot import video in the VOB (Video Object) file format. VOB is used for most DVD discs. There are third-party conversion applications that can convert the VOB file format to an iMovie-supported format. Search the Internet for more information about VOB and how to convert it to an iMovie-supported format.
Import New Media Files
After you have installed iMovie v10 and updated any events or projects from older versions of iMovie, you are ready to import new media into iMovie v10. You can import digital video, movies, audio files, and photos.
1. Click the Import button.

2. In the Import window, navigate to the device that has the movies, photo, audio, or video footage that you want to import. Click to select the movie or video.

3. Set where the video will be imported by clicking the Import To menu and selecting the appropriate menu choice from the menu. You can import to any iMovie Library, or directly into an existing event or you can create a new event.

4. Select New Event if you want to import to a new event. When this is selected, the New Event window displays. Type a name and then click OK.

Using Click and Drag to Import Files
You can also click and drag a digital media file from the Finder into iMovie and drop it directly in a library or event in the Library list.
5. Click the Import Selected button to import movies and video into the iMovie Library.

6. The selected movies and video are now displayed as events in the Libraries list, and the movie clips that are in each event are displayed in the Event Browser.
>>>Go Further: Selecting Multiple Files

Importing New Media from an External Device
The process for importing video, audio, photos, or video footage from an external device is the same as importing files from your computer, you just need to navigate to the new media on the external device in step 2 of the “Import New Media Files” task.
What Is iMovie for iOS?
Apple also offers iMovie for iOS for use with iPad and iPod. This application is designed for mobile devices and enables you to quickly create movies and share them with others through iCloud and social media. Once shared, you can access them to download them to your computer and use them in your movie projects in iMovie. To learn more about iMovie for iOS, see Chapter 11, “Using iMovie On Your iPhone and iPad.”
Importing from Other Libraries
iMovie can import entire events, photos, movies, and videos from other libraries. You can open a library created by an older version of iMovie or a library from iMovie v10. Then you can drag and drop entire events or movie clips into any other event or library listed in the iMovie Library list. iMovie even provides a direct link to the library used by iPhoto or Aperture in the Libraries list for quick access to media. Based on what you have installed on your computer, you see either iPhoto or Aperture in the Libraries list.
Import from iPhoto or Aperture
iMovie lets you easily import photos that you have in iPhoto or Aperture. iPhoto and Aperture are Apple’s photo gallery products that enable you to store and edit your digital photos. If you use iPhoto or Aperture, you see a corresponding link in the Libraries list in iMovie.
Importing Audio Files from Other Libraries
You can also import audio files from other libraries used by GarageBand, Sound Effects, and the very popular iTunes.
1. Click to select the iPhoto or Aperture Library in the Libraries list.
2. Preview an iPhoto or Aperture Library event by hovering your mouse over it and moving the mouse to the left or right to skim the photos and movies in that event.
3. Double-click an event to display the photos and movies in the event.

4. If you chose the wrong event, click All Events from the drill-down path—all events of the iPhoto or Aperture Library display. Double-click the event you want.

File Structure of the Event Browser
You can return quickly to the event display in the Event Browser by clicking the All Events tab in the drill-down path at the top of the Event Browser.
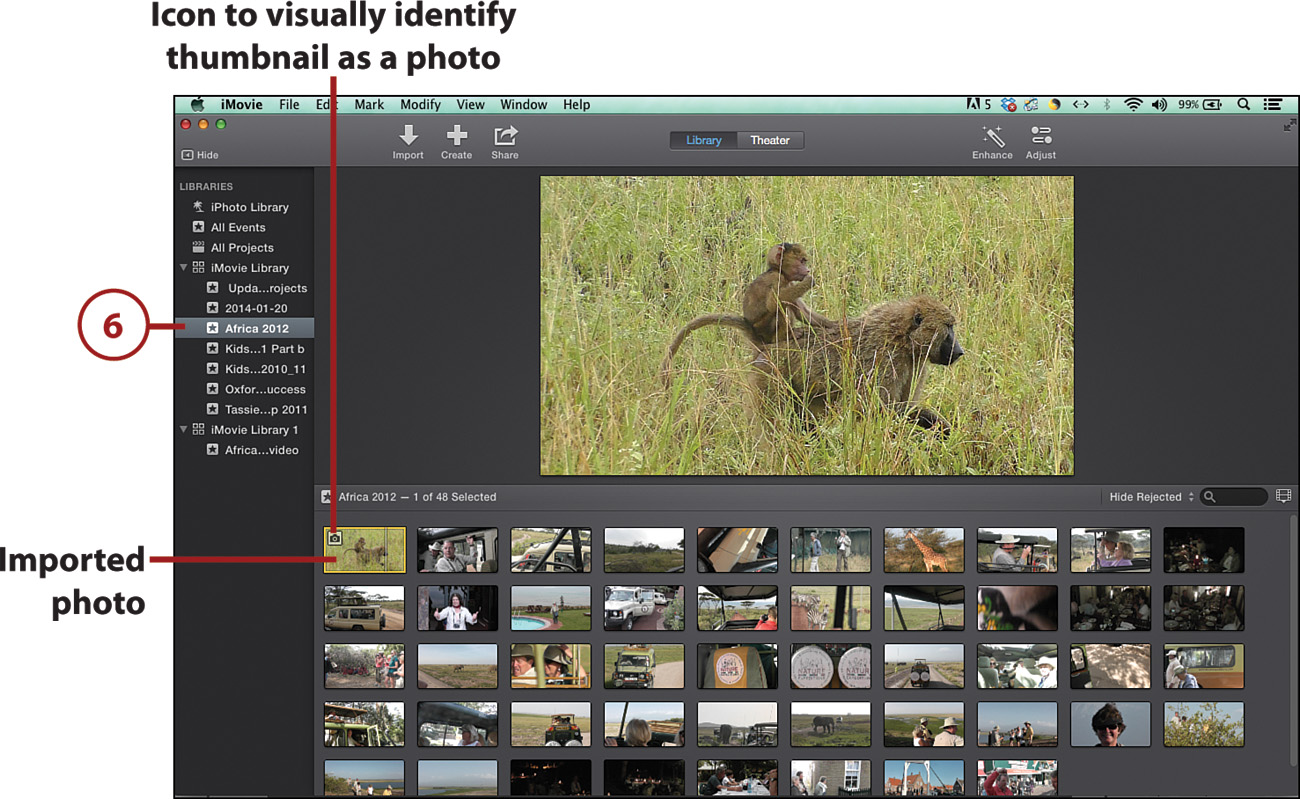
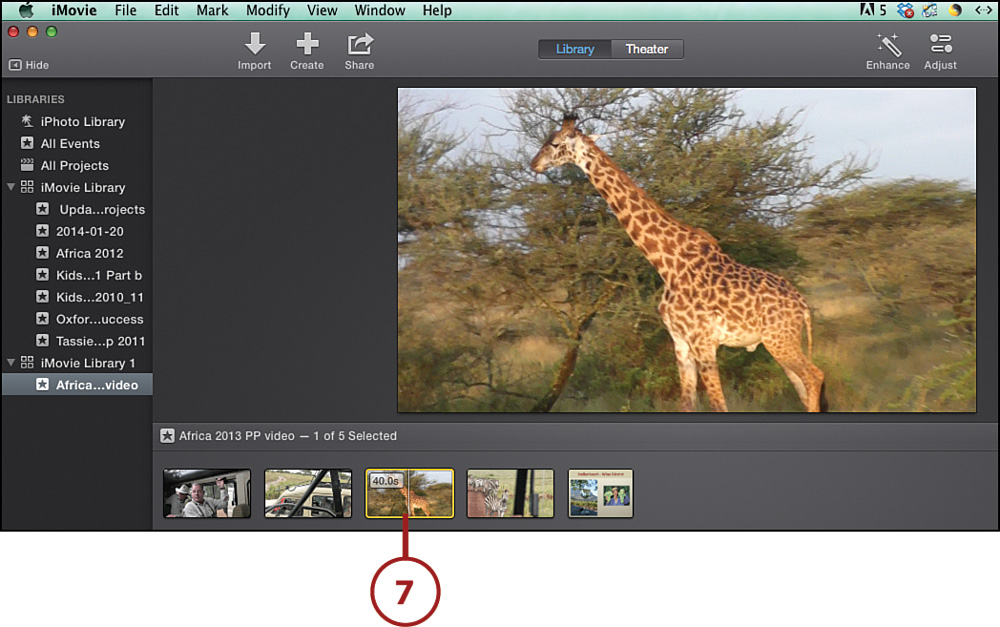
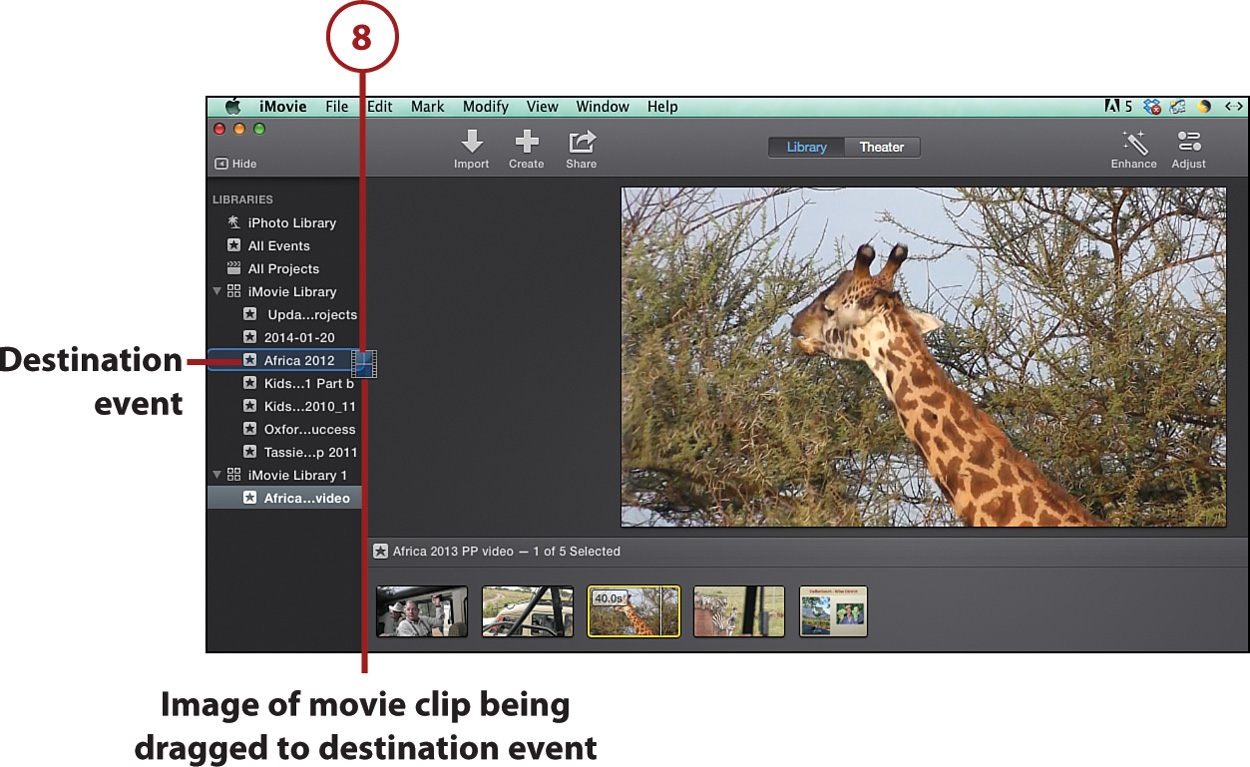
5. Click and drag the photo or movie clip from the Event Browser to the destination event in the iMovie Library list.
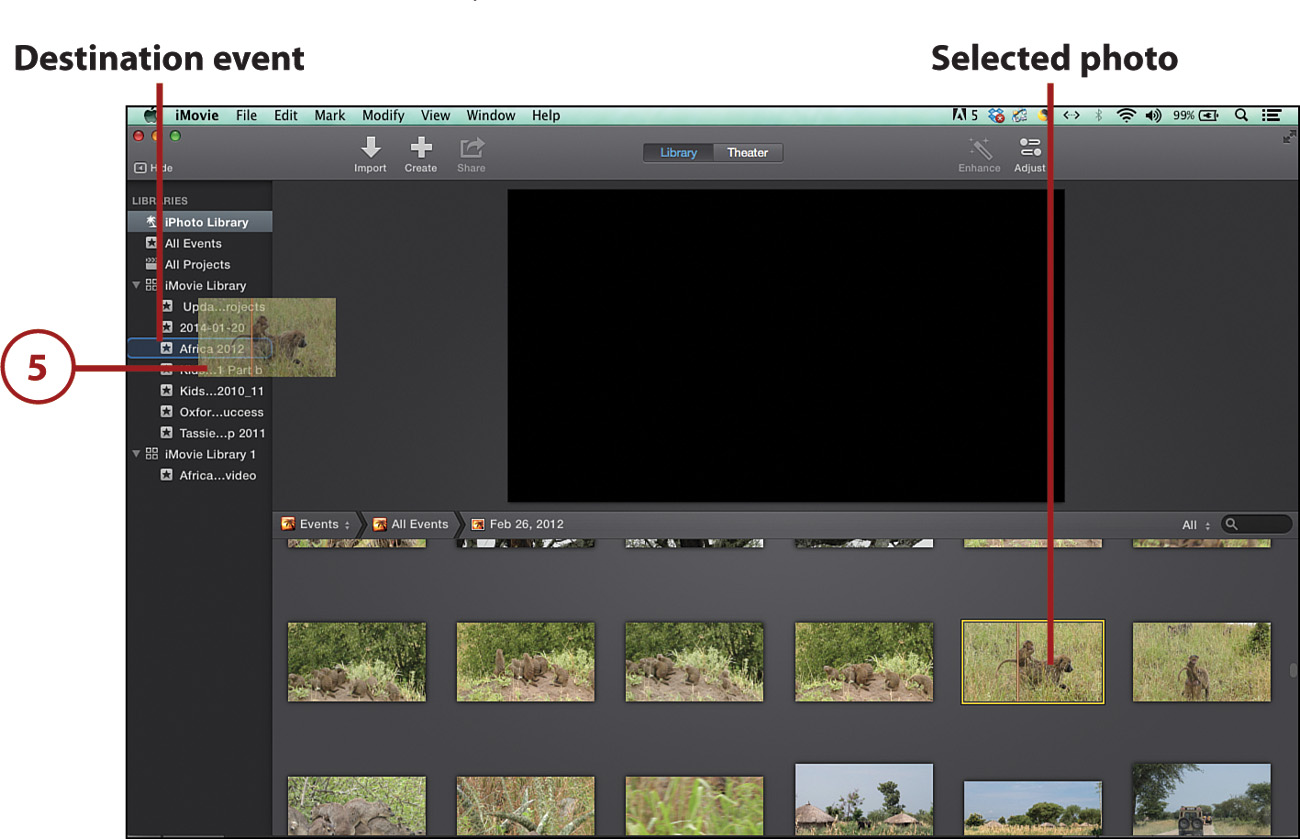
6. The photo or movie clip is imported into the destination event in the iMovie Library.
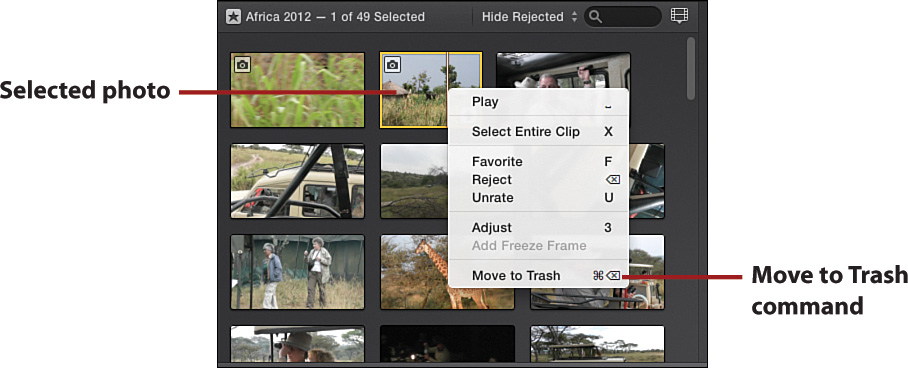
Deleting Events, Movie Clips, and Photos
You can delete movie clips or photos from any event by right-clicking the movie clip or photo in the Event Browser and choosing Move to Trash from the context menu. You can delete entire events by selecting the event in the Libraries list, right-clicking and selecting Move to Trash.
Import from Other Media Libraries
iMovie allows importing of events, audio files, and movie clips from other media libraries, like GarageBand, or from libraries created in older versions of iMovie. The key to this type of import is to be able to navigate to the library.
1. Connect the device that has the media library to your computer.
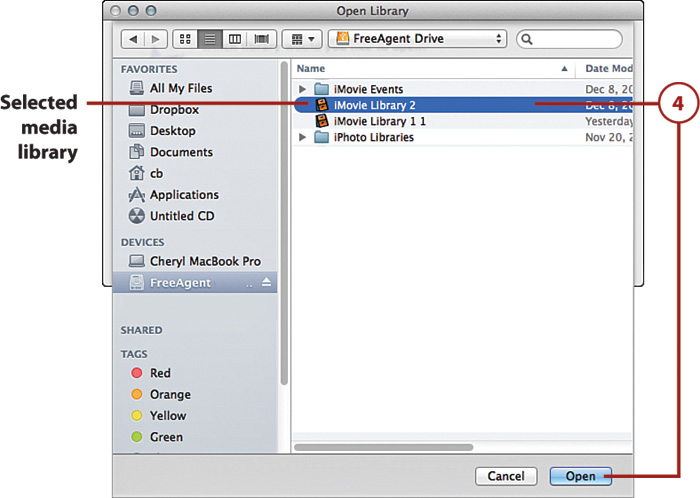
2. Choose File, Open Library, Other.

3. Click the Locate button in the Open Library window to open an existing library that you have not opened before.
4. Navigate to the location of the media library and click it to select it. Then click Open. The library opens and displays in the Libraries list. The new media library events are listed, too.
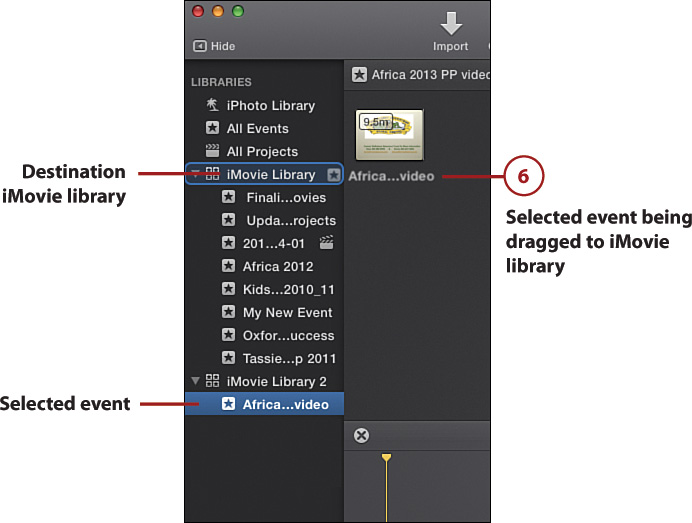
5. Click an event to select it.

6. To import the entire event, click and drag the event to the Libraries list to import the entire event into the iMovie Library.
7. To import a movie clip, audio file, or photo from the event (not an entire event) to a library or an event, select the event in the new library by double-clicking it.
8. In the Event Browser, double-click to select the movie clip, audio file, or photo, and drag it to the event or library in the Libraries list. The movie clip, audio file, or photo is imported into the designated event or library.
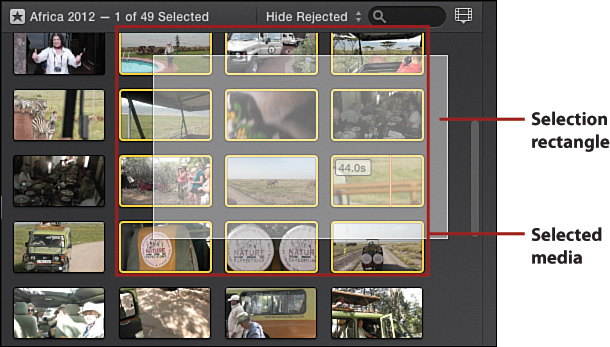
Selecting Multiple Movie Clips or Events
You can select more than one movie clip or event in the Event Browser by using the Command-click technique, or by clicking and dragging a selection rectangle through a group of movie clips and/or photos. As long as the rectangle touches any part of the movie clip/photo, it is included in the selection.
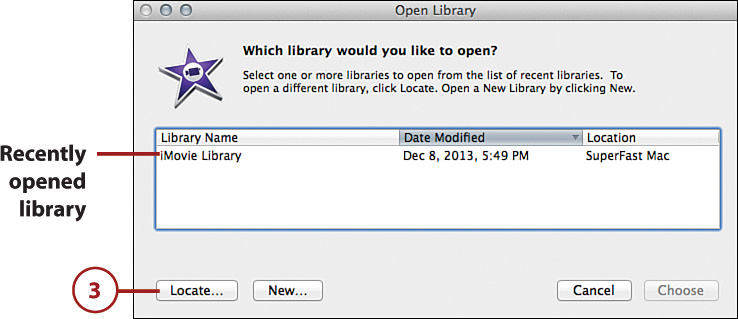
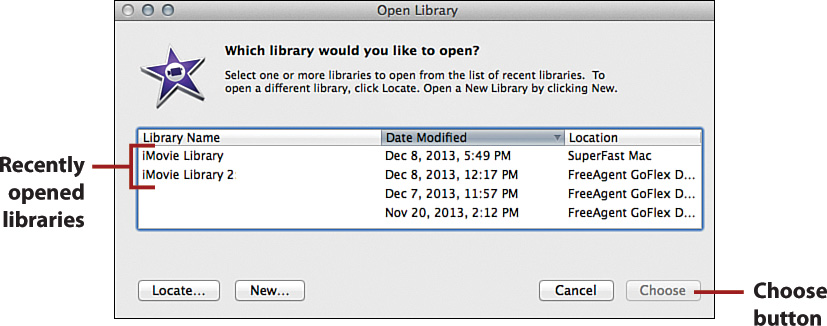
Accessing Previously Opened Libraries
After you have opened a library, the next time you access the Open Library command—File, Open Library—any previously opened libraries are displayed in the Open Library window. To reopen a library that you have previously opened, click the library to select it and then click Choose.
Where Is Imported Media from Another Library Stored?
If you use a movie clip or photo in your movie project, it is automatically added to the default iMovie Library. You do not need to import media from another library prior to using it in a movie project. You can access the media from the other library and place the media in your movie project.
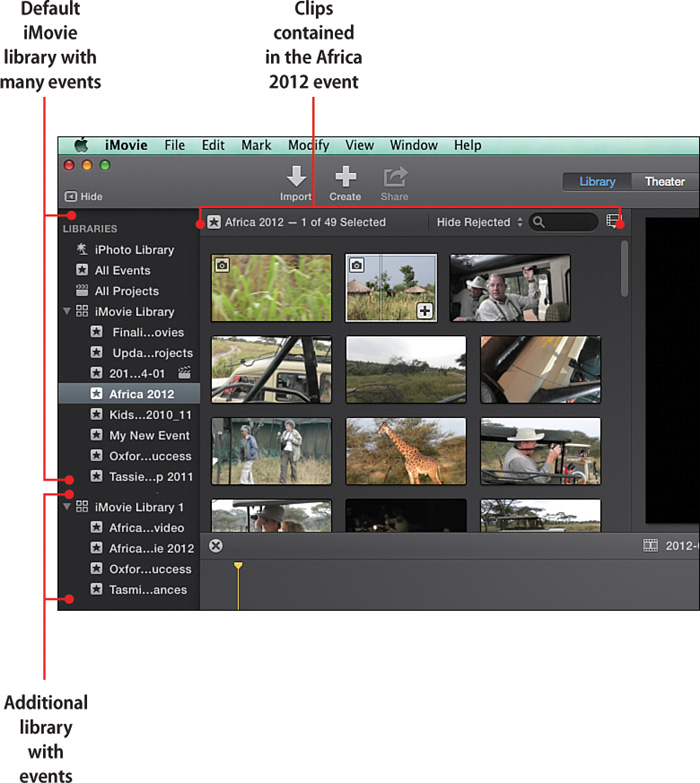
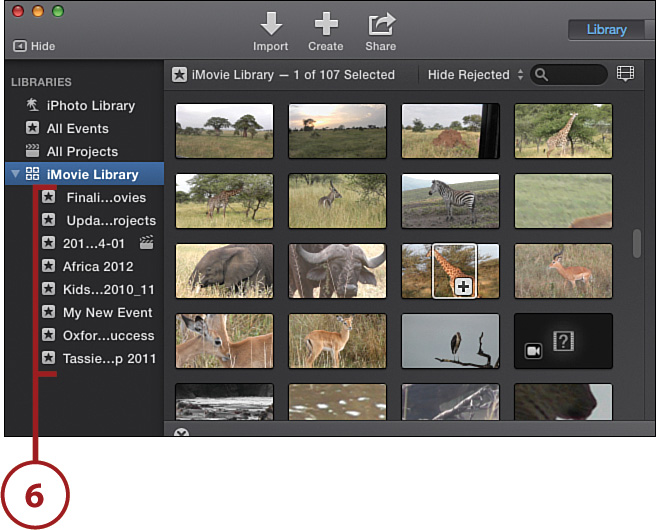
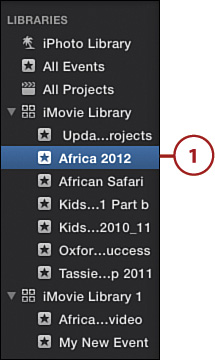
Working with Events and Movie Clips
After you import your video and photos into iMovie, they are grouped and displayed as events in the Libraries list. An event is like a folder in which one or more clips, photos, or audio files are grouped based on recording date and time. The iMovie workspace provides a streamlined way to work with and organize events and movie clips. It allows for multiple ways to view, find, and select your media.
1. Click All Events in the Libraries list. The Event Browser displays all events in the libraries that you have opened in iMovie. Use the vertical scrollbar to scroll through all clips.
2. In the Event Browser, double-click an event to select it.
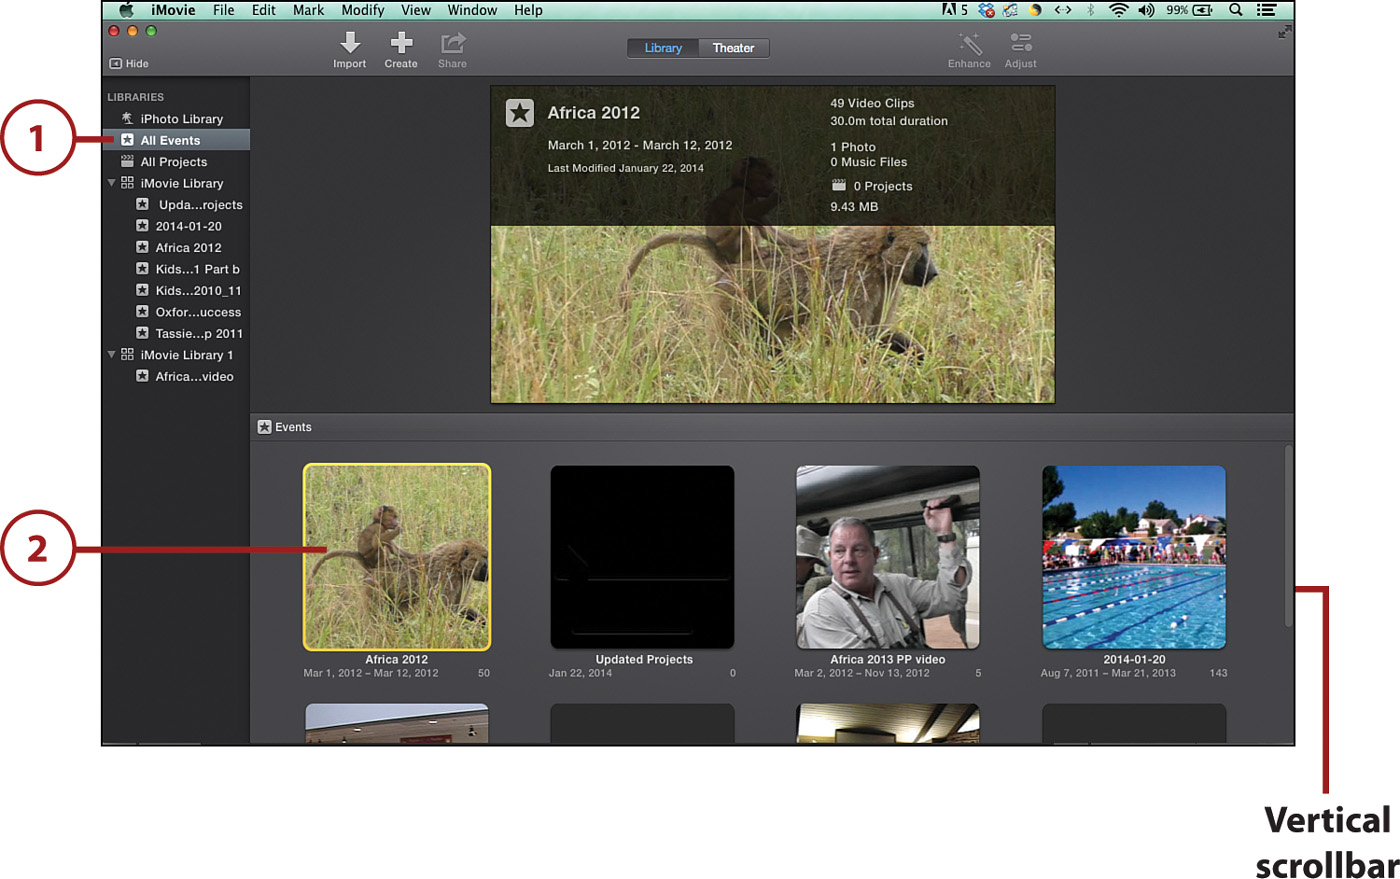
3. The Event Browser displays all movie clips and photos for the selected event, and the Libraries list highlights the event.

Viewing Library Event Media
You can select any opened library in the Libraries list, and the Event Browser displays all events contained in that library. You can also access all media in an event by selecting the event from the Libraries list, and the Event Browser displays all movie clips, photos, and audio files in the event.
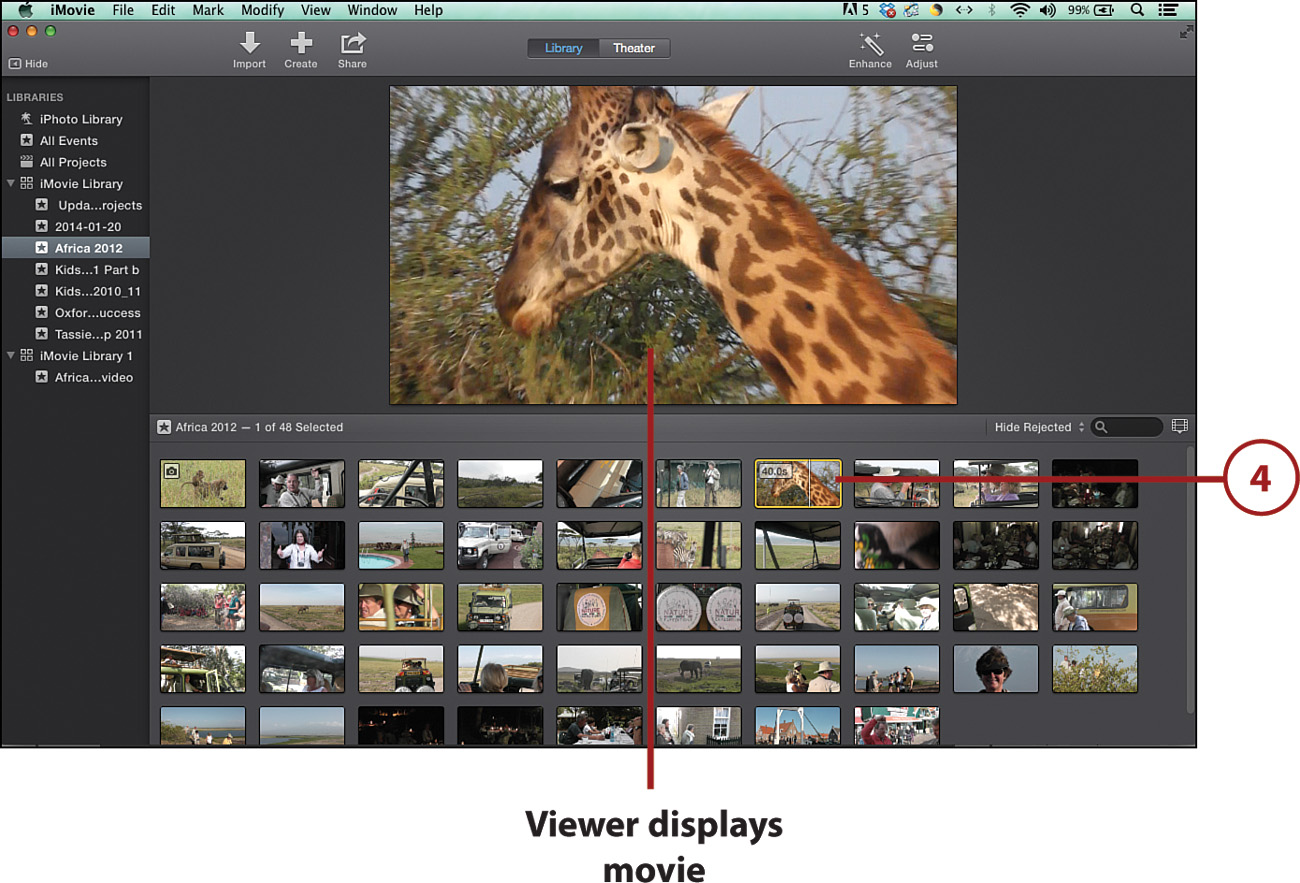
4. Double-click a movie clip to select it; the Viewer displays the video.
Selecting a Movie Clip with a Shortcut
You can select an entire movie clip in the Event Browser by clicking the movie clip and then pressing X on your keyboard.
Previewing the Video of a Movie Clip
You can also position your mouse over any movie clip in the Event Browser, and the Viewer displays video footage of that movie clip. Move your mouse left or right (don’t click), and you can skim through the clip.
Play a Movie Clip
iMovie makes it easy to preview the video of a movie clip. You have different techniques available for what video to play back in a movie clip. You can play the clip from the beginning or you can play just a selection of the clip. This enables you to quickly preview any video in your clips.
1. Select an event from the Libraries list by clicking it.
2. To preview your movie clip from the beginning, select a movie clip in the Event Browser by double-clicking it to select the entire clip.
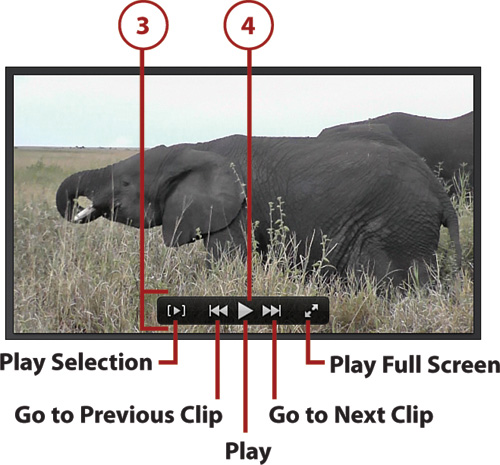
3. The Viewer displays the movie clip video. Move your mouse into the Viewer and the playback options display.
4. Click the Play button to play the movie clip from the beginning.
Manually Initiating Playback Options
You can also manually initiate playback options through menu bar commands or through keystrokes from your keyboard. To use a command, choose View and then select one of the playback menu commands. Notice that the keystroke for the command is listed to the right of the menu command. If you press any of these associated keystrokes, you initiate that playback command.

Select Part of a Movie Clip
Another playback option that is very useful is to play just part of a clip.
1. Select an event from the Libraries list by clicking it.
2. Position your mouse inside the movie clip and then click and drag to select a portion of the clip.
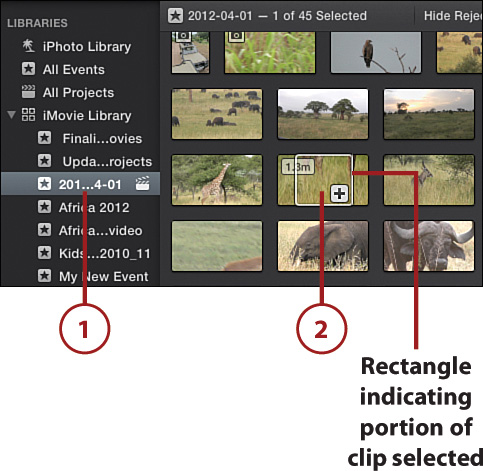
3. Move your mouse into the Viewer and click the Play Selection button in the playback options. The Viewer plays only the selected portion of the movie clip based on the starting frame and the ending frame of the selection.

Use the Skimmer and Playhead
Another technique for previewing your movie clips is to use the skimmer and playhead for quick review of the video. The playhead is used to set where the movie begins playing. The skimmer lets you quickly skim through the clip content by just moving your mouse.
1. Select an event from the Libraries list by clicking it.
2. In the Event Browser, hover your mouse over a clip. You will see an orange vertical line in the clip based on the location of your mouse. This is the skimmer.
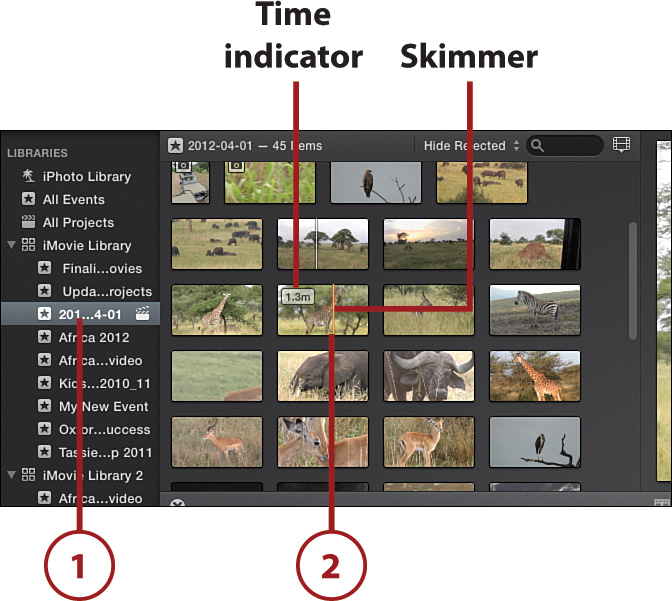
To play a movie clip from the position of the playhead, press the spacebar on your keyboard. The Viewer displays the video of the movie clip.
3. Move your mouse left or right in the parameter of the clip and the Viewer displays a quick preview of the video footage by skimming through the frames. This is called skimming.
4. Click to set the playhead at a specific frame in the video of the clip.

5. The Viewer displays the movie based on where the playhead is positioned in the movie. Click Play to begin playing the clip based on the position of the playhead in the movie.
Stepping Through a Movie Clip Frame by Frame
You might find that skimming is great, but not quite precise enough to select the exact starting frame of a clip you want. You can step through a video frame-by-frame using the left-arrow and right-arrow keys on your keyboard. First click to set the playhead in a movie clip, and then press the left- or right-arrow key to move the playhead one frame at a time to the exact location you want in the video. The Viewer displays this frame-by-frame progression through the video.
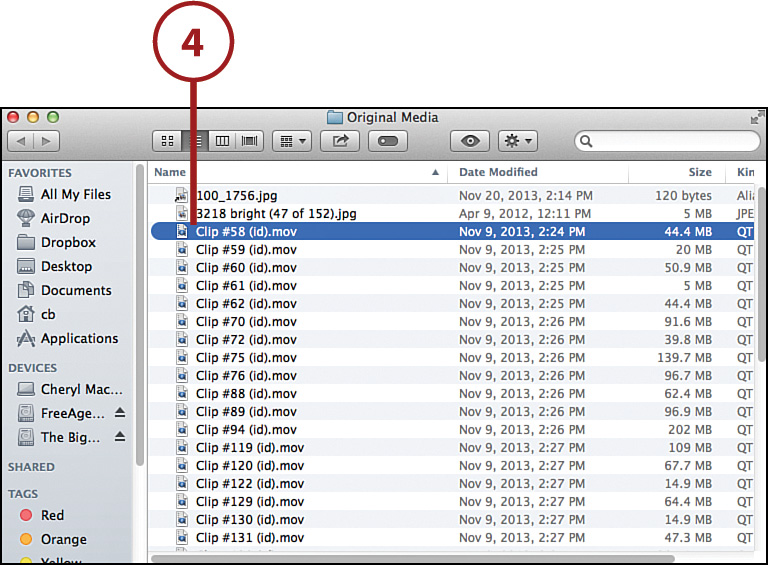
Locate a Movie File
There might be times when you need to find where a movie clip is located on your computer or on an attached device. You can do this through a menu command.
1. Select an event in the Libraries list.
2. In the Event Browser, select a movie clip by double-clicking it.
3. Select File, Reveal in Finder.
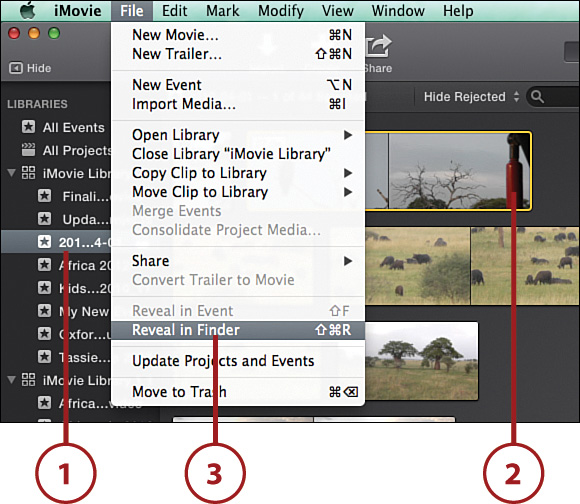
4. A Finder window is displayed with the movie clip file highlighted.
Getting Organized
As you might guess, when you start working with iMovie, things can get pretty cluttered because of multiple libraries opened and many events, movie clips, photos, and audio files available. You would quickly get confused and frustrated without some organization techniques that are included with iMovie. You can quickly find any movie clip through a search feature, and you can rename any event or library. You can create events for grouping similar clips together as well as combining and arranging clips and projects by copying, moving, or deleting them. You can also merge events so that all movie clips in the events are combined into one event.
Rename a Library or Event
Sometimes it is helpful to rename a library or event so that it visually provides more information about the media contents.
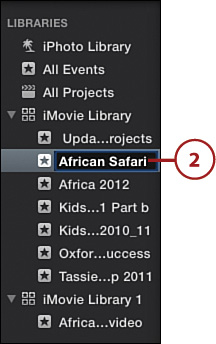
1. Click the library or event to select it from the Libraries list.

2. Click again on the name of the library or event to access the rename text box. Type a new name for the library or event.
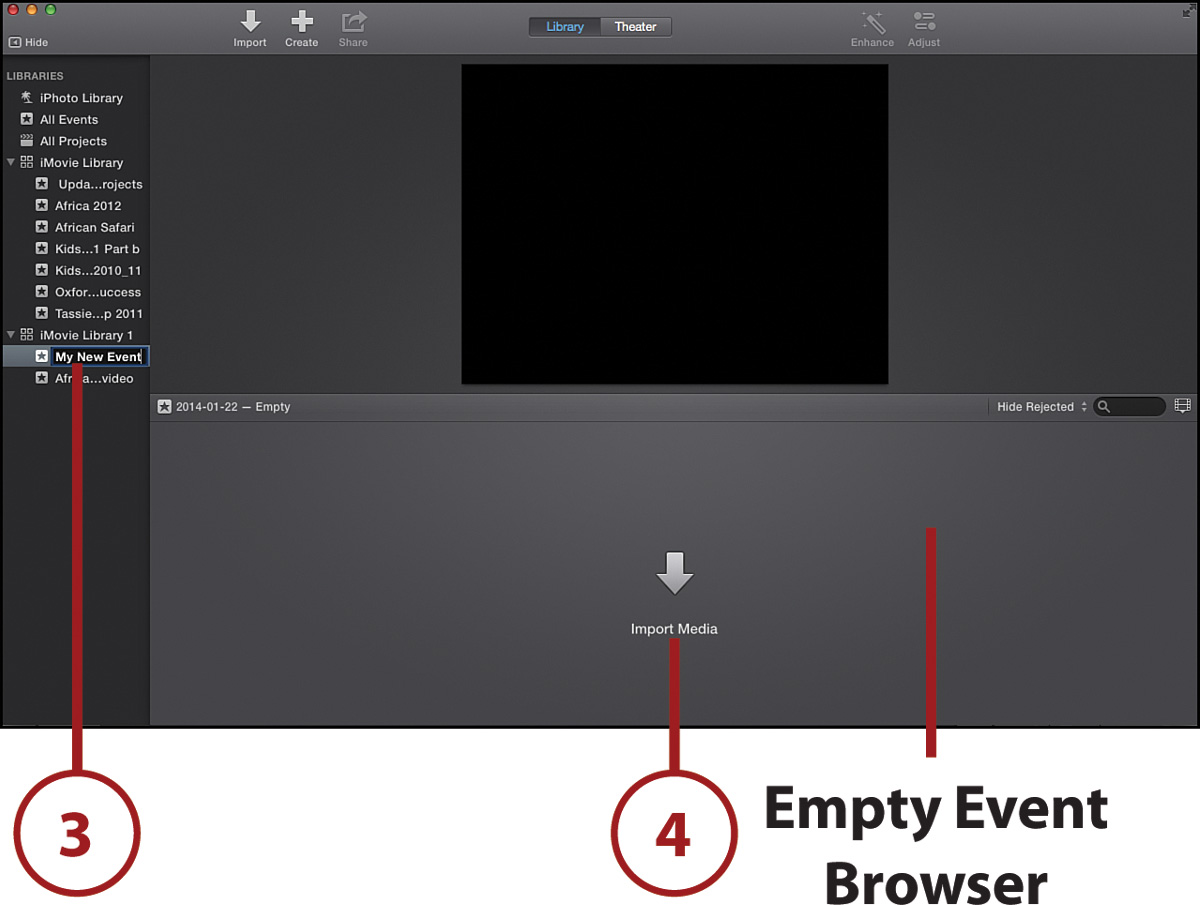
Create a New Event
There are other times when you will want to create a new event and organize your movie clips that have a similar theme into this new event.
1. Select the library you want the event to be associated with from the Libraries list.
2. Right-click the library and choose New Event from the context menu. You can also select File, New Event.

3. A new event is displayed under the selected library. Type a new name for the event in the rename text box.
4. Click the Import Media button in the Event Browser to import new movies and video. Alternatively, you can click and drag movie clips from other events into your new event.
Deleting an Event or Movie Clip
You can delete an event or movie clip by right-clicking it and choosing Move Event to Trash (if you are deleting an event) or Move Clip to Trash (if you are deleting a movie clip). The event or movie clip is deleted from the iMovie Library but still resides on your hard drive in the iMovie Events folder.
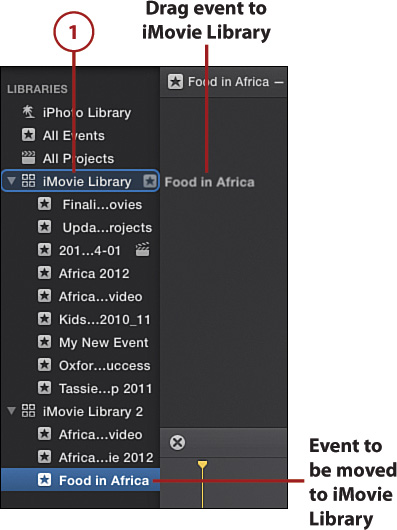
Rearrange Events Between Libraries
iMovie is a great video library platform, meaning if you want you can use it to organize your video and movies as a video library. Events can be rearranged between libraries.
1. Select the event or events to rearrange and drag them on top of a library. The event or events are moved to the destination library.
Copying an Event or Movie Clip
You can copy events and movie clips to other libraries or events by holding down the Option key while you drag the event or movie clips to the destination library or event. This creates a copy of the event or movie clip in the destination library or event rather than moving it.
2. You can also rearrange movie clips between events by clicking and dragging a movie clip from the Event Browser to a new event in the Libraries list.

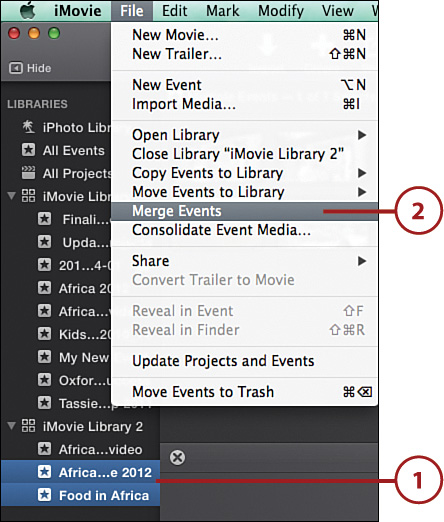
Merge Events
You can merge two or more events to combine the contained media files into one event.
1. In the Libraries list, select the events to be merged by using the Shift-click technique to select adjacent events, or by using the Command-click technique to select nonadjacent events.
2. Select File, Merge Events.
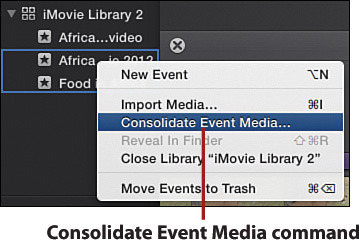
Using the Context Menu to Merge Events
You can also find the Merge Events command by right-clicking one of the selected events in the Libraries list and choosing Consolidate Event Media.
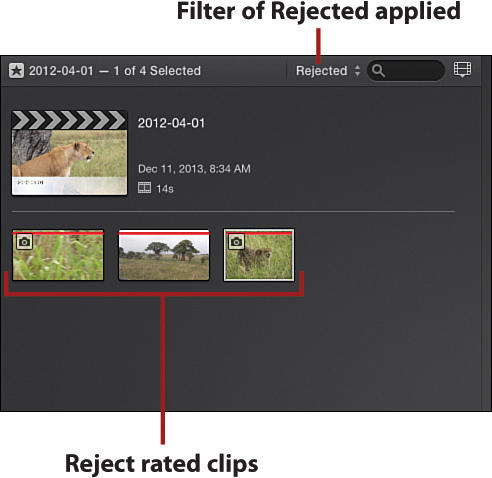
Rating Movie Clips
Another way you can organize your movie clips is to apply a rating to them. You have a choice of rating your movie clips either as a favorite or as rejected. After you have rated your clips, you can then search for your favorite clips or you can hide all rejected movie clips.
1. Select an event from the Libraries list.
2. In the Event Browser, select a movie clip by double-clicking it.
3. Right-click the clip and choose one of the two ratings from the menu, Favorite or Reject.
• Choose Favorite and the thumbnail of the movie clip displays a horizontal green line indicating that the Favorite rating has been applied.
• Choose Reject and the thumbnail of the movie clip displays a horizontal red line indicating that the Reject rating has been applied.

Using Menubar Commands to Rate Events or Movie Clips
You can also use the Favorite or Reject commands from the Mark menu to rate events and movie clips.
Rating Multiple Events
You can apply a rating to multiple events by using the Command-click technique to select multiple movie clips in the Event Browser and then select Mark, Favorite or Mark, Reject.
4. Use the filter feature of iMovie to filter your movie clips by rating. Select a library or event to search from the Library list.
The Filter by Rating Menu Default Setting
The default setting for the Filter By Rating menu is All Clips. This setting displays all events in a library or all movie clips and media contained in an event.
5. Click the Filter By Rating menu to display the four filter options.
• Choose Favorites and the Event Browser displays only the clips rated Favorite for the selected library or event.
• Choose Rejected and the Event Browser displays only the clips rated Reject for the selected library or event.
• Choose Hide Rejected to hide all rejected clips for the selected library or event.
• Choose All Clips to remove the filter and display all movie clips in the Event Browser.


6. To remove a rating applied to a clip, select the clip in the Event Browser, right-click the clip, and select Unrate or choose Mark, Unrate from the menu bar.

Search for Tags Applied in Previous Versions of iMovie
In previous versions of iMovie, you could apply a custom tag to a movie clip. The tag let you label your clips with anything you wanted. In iMovie v10, movie clips can’t be tagged, but you can still search your updated movie clips from previous versions of iMovie based on keywords that you have applied in that older version of iMovie.
1. Select a library or event from the Libraries list.
2. Make sure that no ratings filters have been applied by choosing All Clips from the Search By Rating menu.

3. The Event Browser displays all clips for the selected library or event. Type a keyword into the Search text box and the Event Browser displays all clips tagged with this keyword.
