
3. Creating a New Movie Project
In this chapter, you find out how to create a new movie project and add clips and photos to the movie. You also apply transitions and special effects for a more polished presentation of your movie. Topics include the following:
→ Creating a new movie project
→ Adding clips to your movie
→ Adding transitions between clips in your movie
→ Adding special effects to a photo or clip
→ Adding photos to your movie
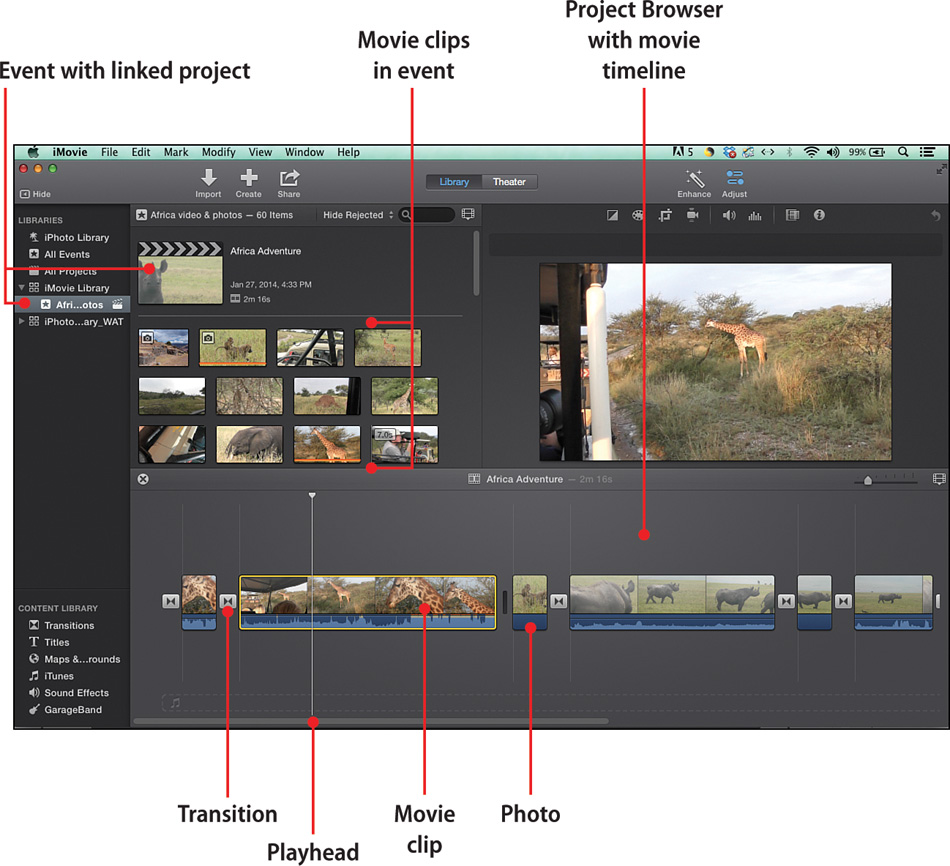
A movie in iMovie can be made up of lots of elements: movie clips, photos, audio, sound effects, titles, and transitions. iMovie represents a movie as a project. The project contains all your movie elements for the new movie, and automatically keeps track of all these elements. You can have multiple projects in iMovie.
Creating a New Movie Project
To create a new iMovie project, you first create a new movie.
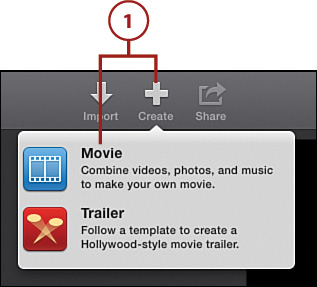
1. Choose File, New Movie or click the Create button in the toolbar and choose Movie. The Themes window displays.
2. Select the theme you want to use. If you don’t want to use a preexisting theme, select the No Theme option and then click Create.

New Themes
Themes have been available in all versions of iMovie. Themes help you quickly create a stylish movie—the theme has the design layout and design elements created for the movie. You can add your own movie clips, transitions, photos, audio, movie titles, and subtitles. iMovie v10 has 16 movie themes to choose, and Apple added 8 new themes in the iMovie for iOS product, which is part of iMovie v10 download. See Chapter 11, “Using iMovie on Your iPhone and iPad,” to learn how to use iMovie for iOS.
3. Name your new movie project and select the event you want to use for the movie.
iMovie and Events
Don’t worry if you don’t have all your clips or events available when you create a new movie. You can import media files, video footage, and audio files anytime by choosing File, Import Media, or by clicking the Import button from the toolbar.
4. Click OK to create your new movie project.

5. Your new movie is created and the iMovie Library displays the event with a new movie icon to the right indicating that a project is attached to that event.
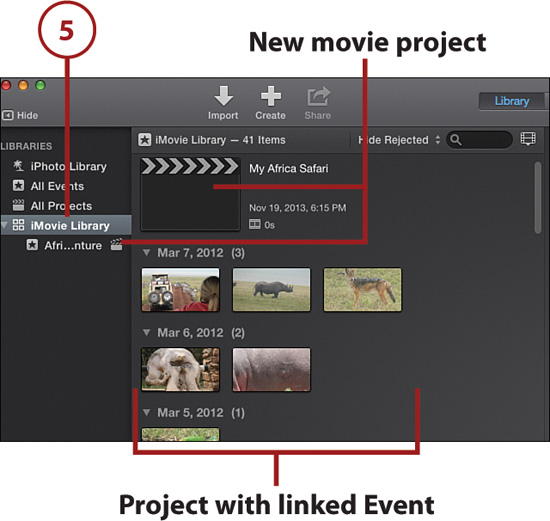
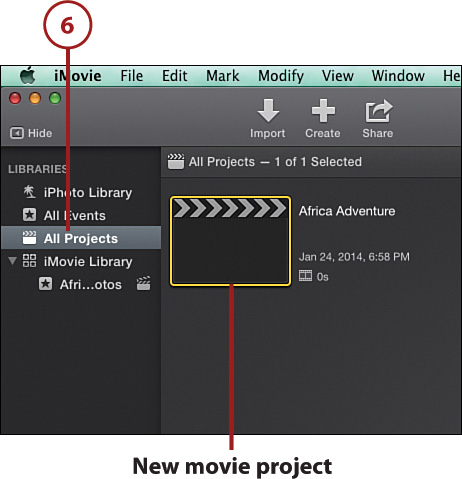
6. To see your project, click All Projects in the Libraries list.
Adding Clips to Your Movie Project
After you have a new movie project created and events imported into the iMovie Library, you can add clips and other media to your movie. You place them in the order that you want for your movie, and then edit them to create the sequence and flow of your movie. You can also add photos and audio files that display as audio waveforms in the timeline.
Aspect Ratios and iMovie
Aspect ratio is the size of the screen for the digital video—its width and height. The default aspect ratio for a movie project in iMovie is 16:9, and you cannot change it. If you add a clip to the timeline with a different aspect ratio, like 4:3, iMovie automatically adjusts the ratio to 16:9 by cropping the clip. You can adjust the cropping to change what is shown in the clip. To learn more about cropping, see Chapter 4, “Editing and Correcting Movie Clips.”
1. If you do not have a project open, click All Projects in the Library list.
2. Double-click the Movie Project in the Event Browser to open the movie timeline. The Event Browser displays the clips tied to the event used when you created your movie project.

3. Click the Adjust Thumbnail Appearance button to adjust the thumbnail of the clips.
4. Click the Clip Size slider and drag it to the left to decrease the thumbnail image size. Drag to the right to increase the clip thumbnail image size.
5. Click and drag the Zoom duration slider to the left and set it to All. Dragging the Zoom slider to the left decreases the amount of footage seen in a clip thumbnail; dragging to the right increases the amount of footage. Set the Zoom slider to All to see small thumbnail images of all clips in an event.

Scrolling Through Clips in an Event
You can scroll through all the clips in an event by dragging the vertical scrollbar up and down in the Event Browser.
6. Select the entire clip in the Event Browser either by double-clicking the clip or by clicking a clip and then pressing X on your keyboard.

You can choose just part of the clip in the Event Browser by clicking and dragging a portion of the clip to select it. To increase the size of the thumbnail image as well as the amount of video displayed in the thumbnail, click the Adjust Thumbnail Appearance button and set the Clip Size and Zoom duration settings.

7. Drag the clip to a location in the movie timeline. When you see the green plus sign icon display, release the mouse button and the clip is added to the movie timeline. Alternatively, you can add the movie to the last frame in the timeline by clicking the Add the Selection to Movie button in the active clip.

Adding a Clip to the Timeline
When you drag a movie clip to the timeline, it takes iMovie a few seconds to process the video of the clip into the timeline. When it is processed, you see a green plus sign icon in the clip. Now let go of the drag by releasing your mouse button. If you release the button before you see the green plus sign, the clip is not inserted into the timeline.
Identifying the Movie Clips in Your Movie Project
After you add a clip to a movie project, the Event Browser displays the thumbnail of the clip with an orange line at the bottom of the clip. This lets you easily distinguish clips that are used in the project with those that have not been used.

Often you will have many clips and photos in the movie timeline. Finding the clip used for the project in the Event Browser could be a tough process, especially if you have a lot of libraries, events, and clips. iMovie makes this easy. To reveal a clip in the Browser from a clip in the movie timeline, right-click the timeline clip and choose Reveal in Event from the context menu.


Rearrange Clips in the Movie Timeline
As you develop your movie timeline with clips and photos, you might need to rearrange the order in which the clips are placed.
1. Select a clip in the movie timeline by clicking it.
2. Click and drag the selected clip before or after another clip in the movie timeline. Place it on the vertical placement bar that is between each clip.

3. iMovie adjusts the movie timeline so you can drop the clip in place.

Replace a Clip in the Movie Timeline
You can also replace a clip in the movie timeline with another clip from the Event Browser.
1. Click and drag a new clip from the Event Browser and place it on top of a clip in the movie timeline.

2. The context menu displays—choose one of the following options.
• Choose Replace to replace the entire clip.
• Choose Replace from Start to replace the selected clip video from the start of the clip to the location of the playhead.
• Choose Replace from End to replace the clip video from the playhead to the end of the clip.
• Choose Insert to insert the clip into the clip at the location of the playhead.

Delete Clips in the Movie Timeline
To delete a clip that you have added to your movie timeline, just click to select the clip in the timeline and press the Delete key on your keyboard.
Adding Clip Transitions
As you gain skill developing your movies, you will use multiple clips and photos for your movies. Each clip is positioned in the movie timeline and they play sequentially, with an abrupt change between each clip. Transitions are used to create smooth transitions between your clips. iMovie has 24 preset transitions that you can use in your movie. You can add transitions manually to your clips or you can have iMovie automatically add one transition between all clips in your movie.
If you are using a theme for your movie, the theme style transitions are displayed above the standard iMovie transitions displayed in the Event Browser.
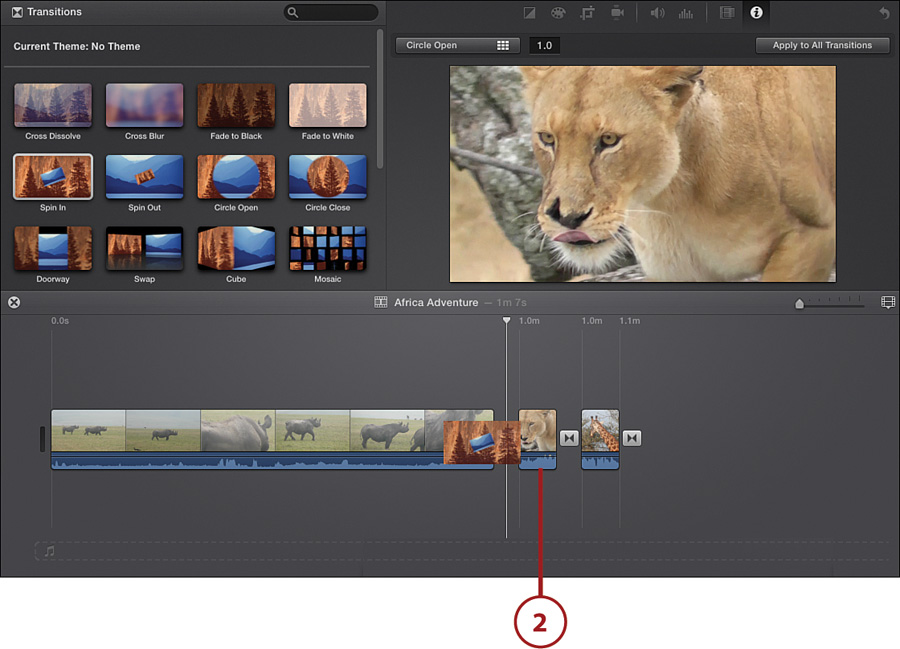
1. Click Transitions in the Content Library in the iMovie sidebar.

2. The Browser displays all transitions. Click a transition to select it.
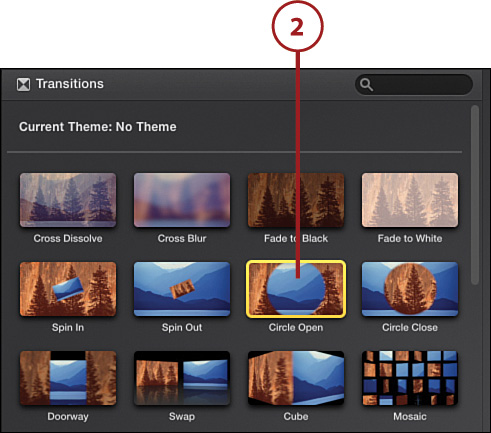
Clip Transitions
You can view the clip transition prior to placing it in your movie. To preview a clip transition, select the clip transition in the Browser, and then move your mouse pointer from the left edge of the selected transition to the right. The Skimmer displays as you move your mouse pointer, and the Viewer displays the video as you skim through the video in the transition.

3. Drag the transition from the Browser and place it between two sequential clips in your movie’s timeline. When you see the green plus sign indicating that iMovie has processed the transition, release your mouse button to insert the transition between the clips.
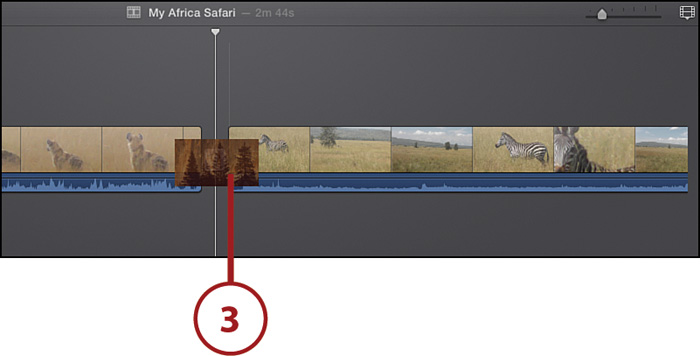
4. The Transition icon displays between your clips to indicate that a transition has been applied.
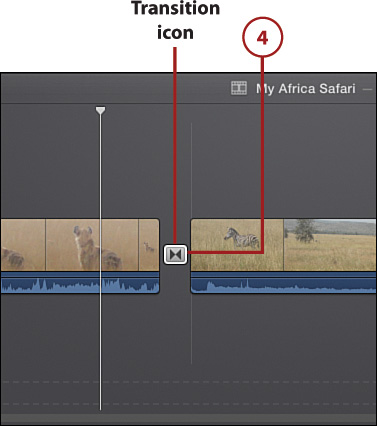
5. Click the Transition icon in the movie timeline to display the transition in the Viewer.

6. To use this transition for all other transitions set in your movie, double-click the Transition icon to access the Settings toolbar above the Viewer.
7. Click Apply to All Transitions if you want to apply the transition to any other transition you have set for your clips in your movie.

Deleting Transitions
To delete an applied transition, select it in the timeline and press the Delete key on your keyboard.
Switch Transitions
You can switch or replace a transition that you’ve set in your movie’s timeline to a different transition.
1. Click Transitions in the Content Library of the iMovie sidebar.

2. Click and drag a new transition from the Browser to the Transition icon in the movie timeline. The new transition replaces the applied transition.
3. The Viewer window displays the new transition effect in the Clip.
Edit Transition Duration Time
You can increase or decrease the duration of the transition. iMovie automatically applies one-half of the transition time to both adjacent clips. If either clip is too short to accommodate this new duration time, iMovie automatically adjusts the duration to the maximum amount possible based on the adjacent clips. The default transition is set to 2 seconds, so the transition for the beginning of the clip is set to 1 second, and the remaining 1 second is applied to the transition at the end of the clip.
1. Double-click the Transition icon in the movie’s timeline to display the transition settings above the Viewer.

2. Double-click the Duration Setting field and enter the time duration you want for the transition. Press Return to apply this new duration setting.

Don’t Forget to Return
You must press Return after typing in the new duration setting. If you do not press Return, the new duration is not applied and the old duration is used.
Fade to Transitions
You can also cause a movie or a photo to fade to different renditions of a clip. You have a choice of Black and White, Sepia, or Dream. A fade to Black and White causes the clip to transition from full color to black and white. A fade to Sepia causes the clip to transition from full color to sepia color, and the Dream setting creates a transition to a sepia version of the clip with a halo effect, which gives it a dreamlike quality.
1. Select the clip to which you want to apply a fade to transition.
2. Choose Modify, Fade To and then select one of the three transition effects.

Adding Photos to Your Movie
You can add still photos to your movie. You can add a photo from iPhoto or Aperture because they now share a common library. You can also create a freeze frame in a clip by freezing a frame and then inserting that frame into your movie. If you do not have iPhoto or Aperture, you can add photos from any location or device that can connect to your computer.

Add a Photo from iPhoto/Aperture
iMovie and iPhoto/Aperture work hand in hand when it comes to adding photos to your movie. Built in to the iMovie sidebar is a link to your iPhoto/Aperture Library, which displays your photo library by events. You can view Events and apply filters through the Events menu. Based on how you have iPhoto/Aperture set up, the search menu displays any of these available options: Faces, Places, Albums, Facebook, Flickr, or iCloud.
1. Click iPhoto/Aperture Library.
2. Double-click the event that contains the photo you want to add to the movie. You can view by Events, Faces, Places, Albums, Facebook, Flickr, or iCloud.

Skimming Through an iPhoto Event
You can skim through photos. Select the event in the Browser and then move the mouse left or right. The photos contained in the event display from the first to the last.
3. Click the photo you want to use.
4. Click the Add to Movie button or choose Edit, Add to Movie. The photo is inserted at the end of your movie.

5. Alternatively, click and drag the photo to any location in the movie timeline. Do not release your mouse button until you see the green plus sign icon that indicates that iMovie has processed the photo insert and it can be dropped into the movie timeline.

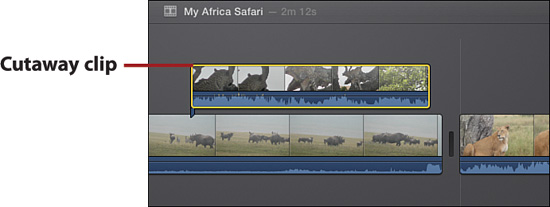
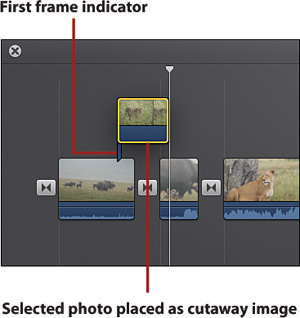
Using a Photo as a Cutaway Image
You can use a photo as a cutaway image. Drag the photo from the Event Browser above a clip in the movie timeline. You can also drag an already placed photo from the movie timeline above another clip in the timeline.
Add a Freeze-Frame Image
iMovie can also capture a still image from a clip. This is called freezing a frame. You can then use the freeze frame in your movie.
1. Click to position the playhead in your movie timeline on the frame of the image you want to capture.

2. Choose Modify, Add Freeze Frame or right-click the clip and choose Add Freeze Frame from the context menu.
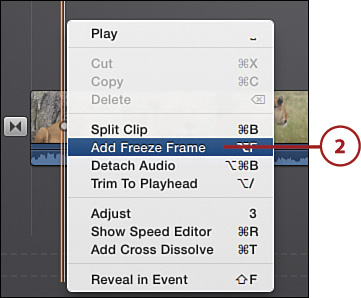
3. iMovie creates a photo of the freeze frame at the location of the playhead, splitting the movie clip into two pieces. You can now add transitions or relocate the photo by dragging it to a new location in the timeline.

Using the Flash and Hold Effect
Another effect that is similar to a Freeze Frame is the Flash and Hold effect. This effect applies a fade-to-white effect to the selected clip. The last frame of the clip is then converted to a freeze frame with the Ken Burns effect automatically applied to the freeze-frame image. (Read more about the Ken Burns effect later in this chapter.) To apply the Flash and Hold effect, select a clip and choose Modify, Flash and Hold Last Frame.
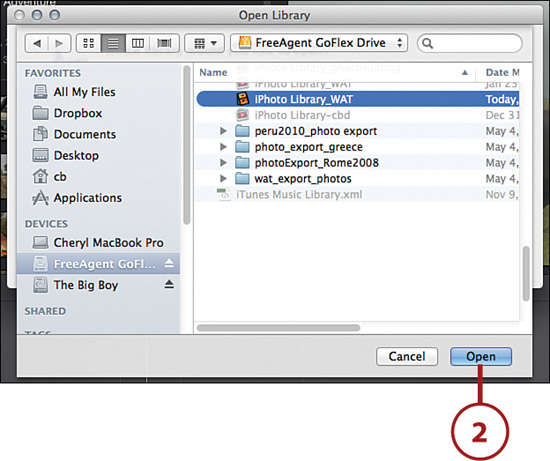
Use Multiple iPhoto Libraries
You can have multiple iPhoto Libraries opened and accessible in iMovie.
1. Choose File, Open Library, Other. This displays a window with options for opening a library in iMovie. Click Locate.

2. Navigate to an existing iPhoto Library and then click Open.
3. The new iPhoto Library displays in the iMovie Library list.
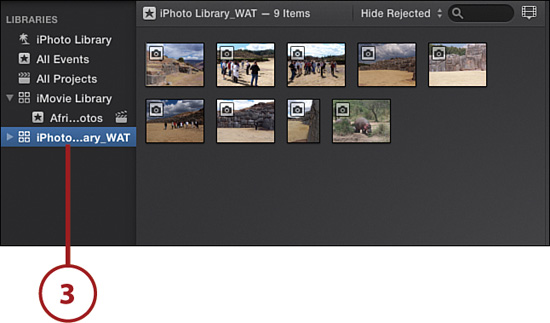
4. Click the new iPhoto Library to display the events and clips it contains.

Add Photos from Anywhere
You can import a photo from any connection on your computer. This could be your local hard drive, an external drive, or iCloud. If your computer can connect to it, you can import from it.
1. Click File, Import Media.

2. Navigate to the device or location of the new photo. Select the photo.
3. Click the Import To menu and select the event you want to import the photo to.
4. Click Import Selected.

Customize the Ken Burns Effect
When you add a photo to your movie, the Ken Burns effect is automatically applied. The Ken Burns effect is an animated zoom of the photo, and it is a very popular way to showcase an image. iMovie lets you customize this effect.
1. Click to select a photo in the timeline and then click the Adjust button above the Viewer.

Initiating the Adjust Toolbar with a Right-Click
You can also access the Adjust Toolbar by right-clicking a clip in the timeline and choosing Adjust from the context menu.

3. Click the Ken Burns button.

4. Adjust the Start frame and/or End frame size by clicking inside either the Start or End frame to make that frame active. Then resize the active frame by dragging any of the corners of the frame to make it larger or smaller.

5. Adjust the Start and/or End frame position in the photo by clicking in the middle of the frame and dragging left, right, up, or down. iMovie adds an arrow indicator to show the new position of the frame in relation to the other frame.
6. Click the Apply Crop Adjustment button to apply the revised Ken Burns effect.
7. Click the Remove Crop Adjustment button to revert the clip to its original format.

Applying the Ken Burns Effect to Clips
You can also apply the Ken Burns effect to a clip. Instead of first selecting a photo, select a clip in the movie timeline and then follow the steps for “Customize the Ken Burns Effect.”
Turn Off Automatic Effects
By default, iMovie automatically applies the Ken Burns effect to any inserted photos. You can turn this off so that photos are inserted in their normal static state.
1. Choose Window, Movie Properties to display movie properties above the Viewer.

3. Deselect the Automatic Content button in the Movie Settings view.
