12. Using Your Samsung Galaxy Note 3 with the Samsung Galaxy Gear

In this chapter, you discover how to set up your Samsung Galaxy Gear smart watch and use it with your Samsung Galaxy Note 3.
→ Setting up your Galaxy Gear
→ Choosing settings and installing apps
→ Navigating the Galaxy Gear’s interface
→ Using the Galaxy Gear’s apps
To get the most out of your Galaxy Note 3, you can link it to a Galaxy Gear smart watch. Samsung designed the Galaxy Gear as a companion product for the Galaxy Note 3 and other high-end phones in its range. The Galaxy Gear enables you to display essential information, make phone calls, and take photos without taking your Galaxy Note 3 out of your pocket.
Setting Up Your Samsung Galaxy Gear
To set up the Samsung Galaxy Gear, you need to use your Galaxy Note 3.
Setting Up Your Samsung Galaxy Gear with Another Phone
Normally, you’ll want to use your Galaxy Note 3 to set up your Galaxy Gear. But you can use another Samsung phone or tablet if necessary. At this writing, only the Galaxy Note 3 and the Galaxy Note 10.1 tablet work with the Galaxy Gear, but Samsung will doubtless add other models soon.
1. Unpack the Galaxy Gear and identify its components: the Galaxy Gear itself, a charging dock, and a charger.
2. Turn the Galaxy Gear on by pressing and holding its button for a moment. The button is on the right side of the Galaxy Gear.
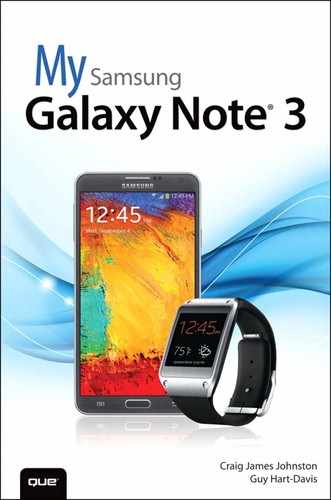
3. Touch the charging dock to the back of your Galaxy Note 3. The Installation dialog appears on the Galaxy Note 3’s screen.
4. Touch OK. The Gear Manager screen appears, telling you that you need to download and install the Gear Manager app.
Your Galaxy Note 3 May Already Have the Gear Manager App
If the Gear Manager app is already installed on your Galaxy Note 3, the Gear Manager app opens automatically. Skip to step 6.
5. Touch Install. Your Galaxy Note 3 installs the Gear Manager app and then launches it.

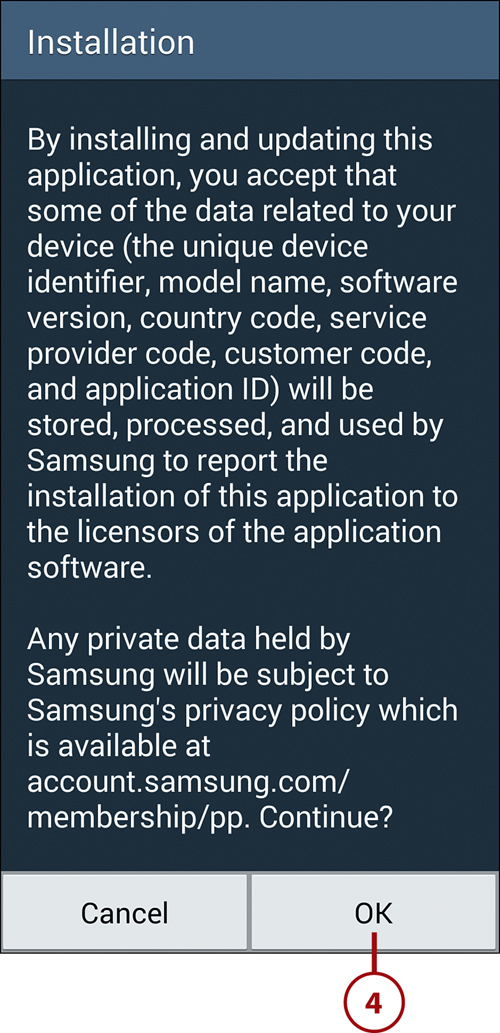
6. Gear Manager tries to connect to the Galaxy Gear automatically. If it succeeds, go to step 9. If not, touch Connect Manually and continue with the following steps to establish the connection manually.
7. Touch OK in the Notice dialog that opens. The Connect to Gear screen then appears.

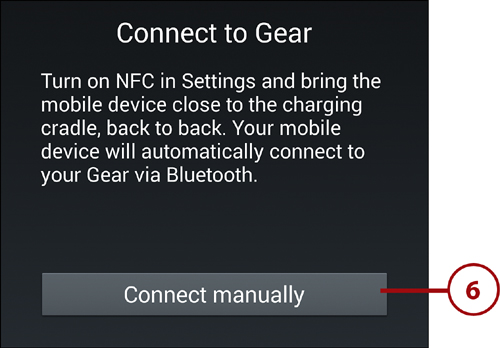
8. Touch the Galaxy Gear in the Available Devices list. Your Galaxy Note 3 connects to the Galaxy Gear. The End User License Agreement screen appears.

9. Touch to select the check boxes if you want to proceed.
10. Touch Yes or No Thanks to control whether Gear Manager shares its error logs with Samsung.
11. Touch Finish. The Information Provision Agreement screen appears, warning you that Voice Memo uses voice-recognition services that involve your voice information being stored on a server in the United States.
12. Touch Agree if you want to use Voice Memo (not shown). The Gear Manager screen then appears, and you can configure the Galaxy Gear as explained in the next section.
Choosing Settings for Your Galaxy Gear
After pairing your Galaxy Gear with your Galaxy Note 3, you’ll probably want to spend some time customizing the Galaxy Gear. You can use the Gear Manager app on your Galaxy Note 3 to configure overall settings for the Galaxy Gear, as explained in this section. To configure other settings, such as the display color and the ringtones, you use the Settings app on the Galaxy Gear itself, as discussed in the following section.
Choose Settings in the Gear Manager App
The Gear Manager app gives you access to features and settings for configuring and managing your Galaxy Gear. From the Gear Manager screen, you can control pairing, set clocks, install apps, locate your Galaxy Gear when it goes missing, and choose settings for everything from automatic locking to emergency notifications.
Control Paired Gear Settings
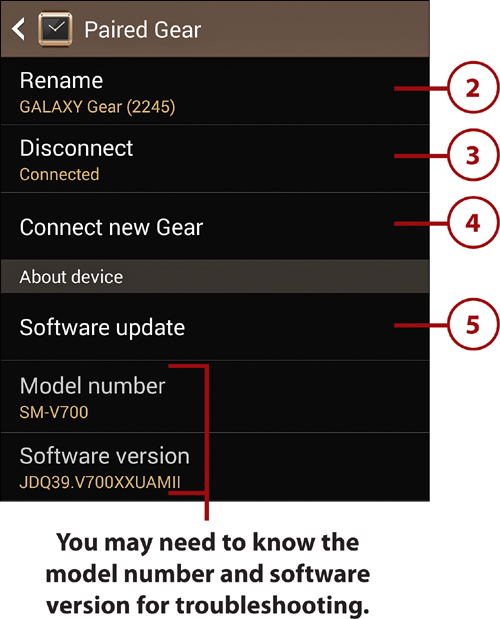
The Paired Gear screen lets you control which Galaxy Gear is paired with your Galaxy Note 3. You can connect and disconnect the Galaxy Gear, connect a new Galaxy Gear, and check for software updates.
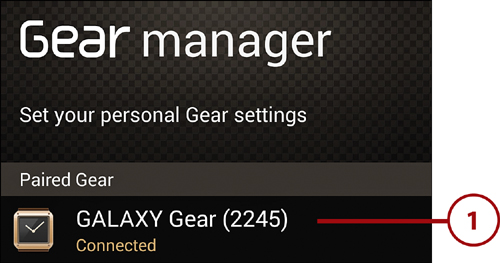
1. On the Gear Manager screen, touch the Galaxy Gear listed in the Paired Gear category. This button shows the name currently assigned to the Galaxy Gear. The Paired Gear screen appears.
2. Touch Rename if you want to rename your Galaxy Gear. Type the new name in the Device Name dialog, and then touch OK. For example, you might name your Galaxy Gear “Jane’s Gear” or a similar descriptive name.
3. Touch Disconnect if you want to disconnect the Galaxy Gear that’s currently connected, and then touch Disconnect in the Disconnect dialog that opens. The message “Bluetooth disconnected” appears briefly on the Galaxy Gear’s screen. Touch the resulting Connect button to connect to the paired Galaxy Gear. The message “Bluetooth connected” appears briefly on the Galaxy Gear’s screen.
4. Touch Connect New Gear if you want to connect to another Galaxy Gear. The Connect to Gear screen appears, and you can pick up from step 8 in the list in the previous section.
5. Touch Software Update if you want to check for software updates or change the settings for software updates. The Software Update screen appears.
6. Touch Update to check for updates now.
7. Touch to enable or disable checking for updates automatically.
8. Touch to enable or disable restricting the downloading of updates to Wi-Fi. Unless you have a generous data allowance, restricting downloads to Wi-Fi is wise.
9. Touch to return to the Paired Gear screen.

Choose Clocks Settings
By using the Clocks screen in Gear Manager, you can choose which of various preset clocks your Galaxy Gear displays on screen. You can customize the clocks to contain the items you find most useful.
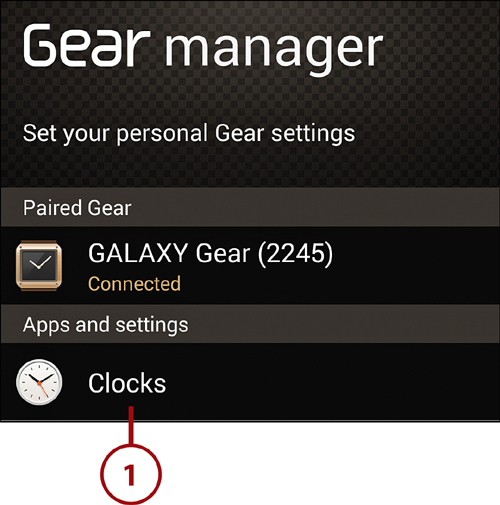
1. On the Gear Manager screen, touch Clocks to display the Clocks screen.
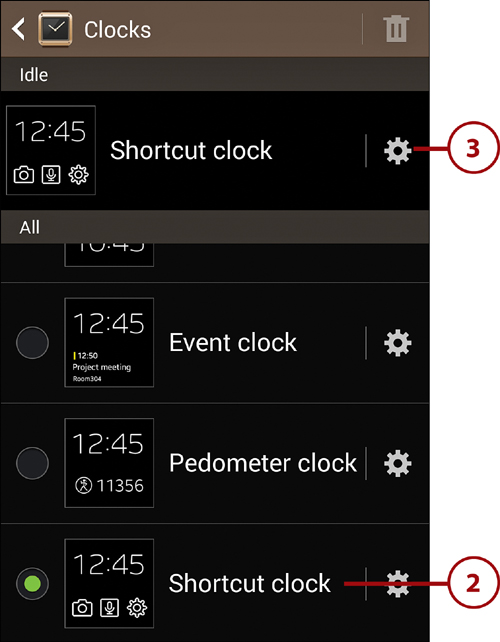
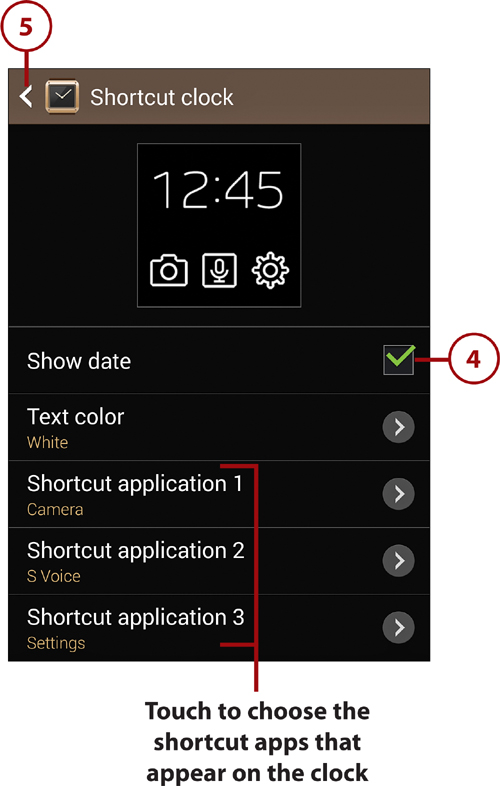
2. Touch the clock you want to use: Analog Clock 1, Analog Clock 2, Analog Clock 3, Digital Clock, Dual Clock (a digital clock with two time zones), Event Clock (a digital clock that shows your next calendar event), Pedometer Clock (a digital clock that shows the current count of steps), Shortcut Clock (a digital clock that shows three shortcuts), or Weather Clock (a digital clock that shows the current weather summary). The clock you touch moves to the Idle section at the top of the list.
3. Touch the Settings icon to display the configuration screen for the clock. The options on this screen vary depending on the clock. For example, the three analog clocks have a single option, letting you choose only whether to show the date, whereas the Shortcut Clock has a handful of options.
4. Use the controls to set options for the clock. For example, touch Show Date to enable or disable the display of the date.
5. Touch to return to the Clocks screen.
Set Up the My Apps Feature
To control which third-party apps the Galaxy Gear contains, you use the My Apps feature in Gear Manager. You can also install Samsung apps, as described later in this chapter.
1. In Gear Manager, touch My Apps to display the My Apps screen.

Understanding the Three Tabs of the My Apps Screen
The My Apps screen has three tabs. The Favorites tab enables you to choose whether to display the Logs app and the Contacts app and change the order of the apps listed in the All Favorites list. The Installed Apps tab lists all the apps installed on the Galaxy Gear and lets you configure some apps and remove apps you no longer want. The Featured tab presents a list of other apps you may want to install so as to get more out of your Galaxy Gear.
2. Touch Favorites to display the Favorites tab.
3. Touch the Logs check box to enable or disable the display of Logs.
4. Touch the Contacts check box to enable or disable the display of Contacts.
5. Touch a Settings button to display the Settings screen for an app.
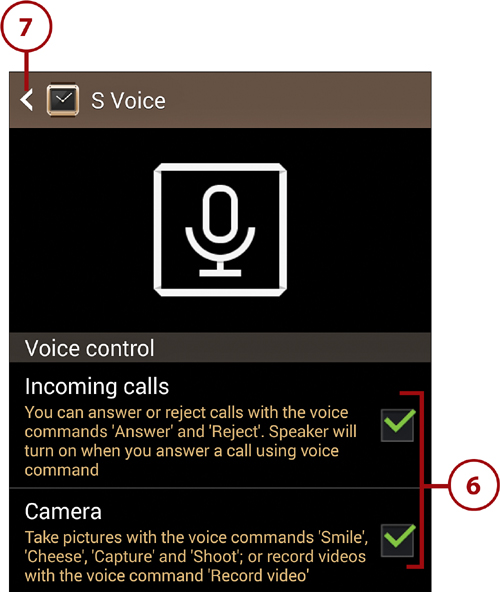
6. Choose settings for the app. The settings available vary depending on what the app is and what it does. For example, for the S Voice app, you can enable or disable the Voice Control feature for incoming calls and for the Camera app.
7. Touch the button in the upper-left corner to return to the Favorites tab.


8. Touch Installed Apps to display the Installed Apps tab.
9. Touch the Settings button for the app you want to configure. You can then choose settings for the app as discussed in step 6.

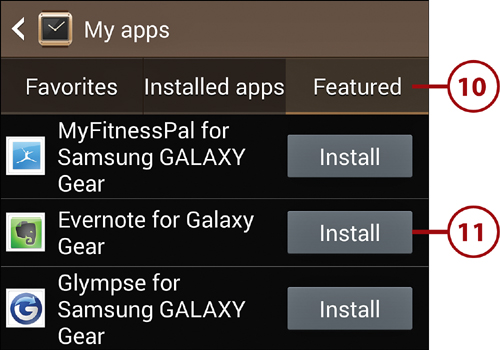
10. Touch Featured to display the Featured tab.
11. Touch an app you want to install, and then follow the instructions for installing it.
Install Samsung Apps on the Galaxy Gear
To get more out of your Galaxy Gear, you can install Samsung Apps on it by using Gear Manager. Samsung Apps are apps provided by Samsung rather than third-party developers.
You Need a Samsung Account to Use Samsung Apps
To download and install Samsung Apps, you must create a Samsung account. You can set up the free account while you’re browsing for Samsung Apps. In addition to enabling you to get Samsung Apps, a Samsung account gives you access to a range of services including ChatON Global Messenger, Samsung Music, Samsung Books, and Samsung Learning.
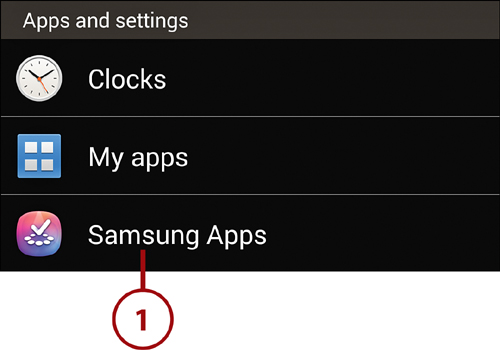
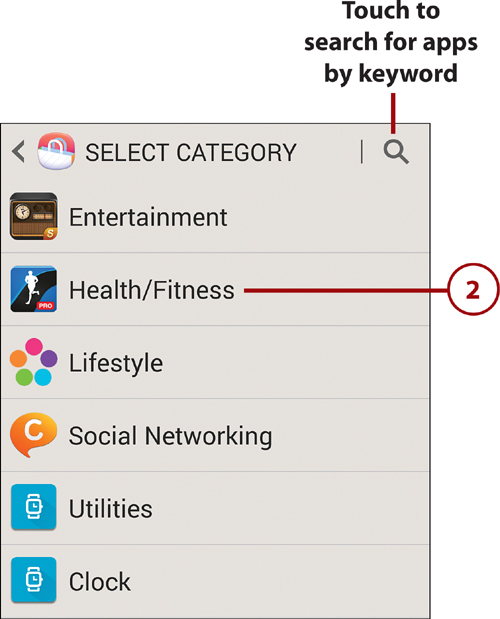
1. In Gear Manager, touch Samsung Apps. The Select Category screen appears.
2. Touch the category of apps you want to see.
3. Touch an app to see its details.
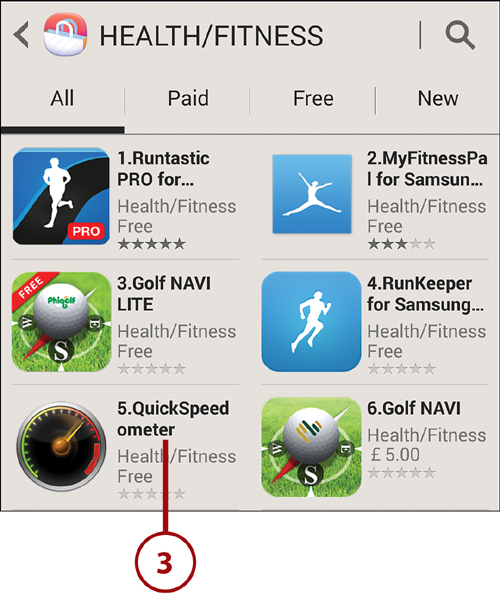
4. Touch the Free button or the price button to get the app.

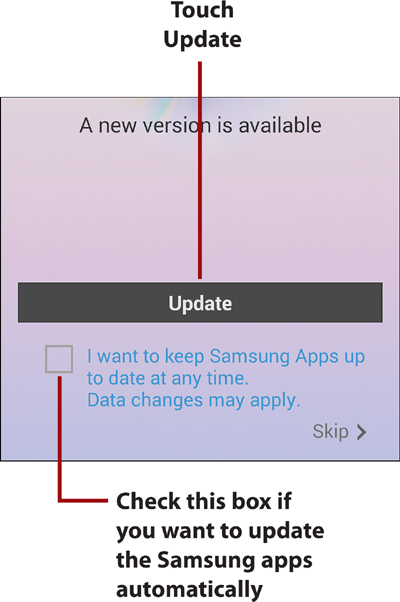
Keeping Your Samsung Apps Up to Date
If, when you touch Samsung Apps in Gear Manager, the Update screen appears, you should apply the updates before you work with the Samsung apps. Touch the Update button and wait while your Galaxy Note 3 downloads and installs the latest versions of the Samsung apps. The Samsung Apps screen then appears, and you can work with the apps.
Locate Your Galaxy Gear If You Misplace It
If you misplace your Galaxy Gear, you can use the Find My Gear feature in Gear Manager to locate it.
1. In Gear Manager, touch Find My Gear to display the Find My Gear screen.
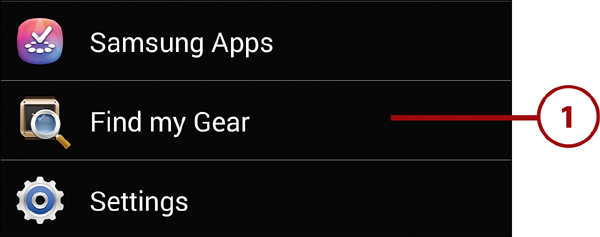
2. Touch Start to play a sound on the Galaxy Gear and turn its screen on if it is off. You can now locate the Galaxy Gear by tracking the sound or (if it is dark) looking for the glow of the screen.
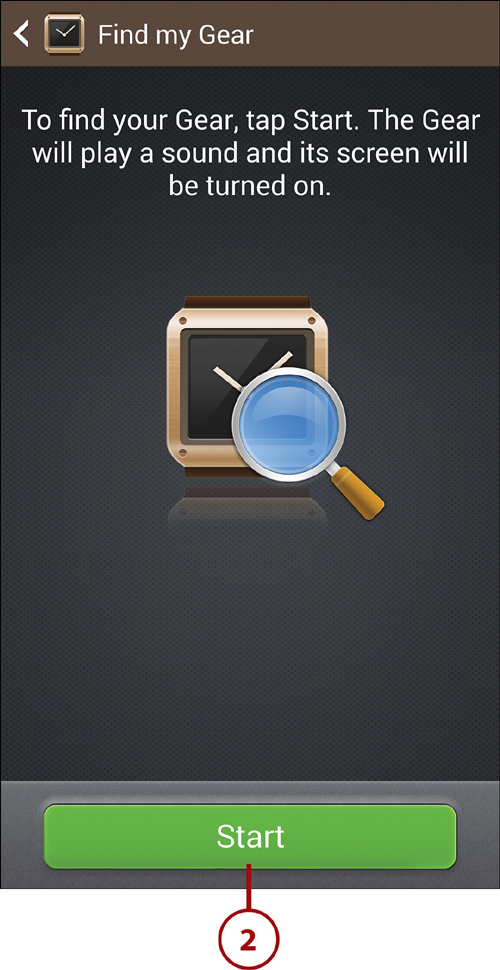
3. Touch Stop to stop playing the sound.

Configure Settings for the Galaxy Gear
To make your Galaxy Gear work your way, you can configure a variety of settings on it. These settings include configuring the Galaxy Gear to automatically unlock your Galaxy Note 3, controlling which notifications you receive on the Galaxy Gear, and turning on or off the gesture used to wake the Galaxy Gear.
1. On the Gear Manager screen, touch Settings to display the Settings screen.
2. Set the Auto Lock switch to On if you want to use your Galaxy Gear to unlock your Galaxy Note 3. This capability is often helpful. When you set the switch to On, the Auto-Lock screen appears automatically; if the switch is already set to On, you can display the Auto-Lock screen by touching anywhere on the Auto Lock button except the switch.

3. Read the information about auto-lock: When your Galaxy Note 3 can’t detect the Galaxy Gear, the Galaxy Note 3 uses pattern lock. When your Galaxy Note 3 can detect the Galaxy Gear, the phone uses swipe lock.
4. Touch Continue. The screen called Draw Pattern to Unlock Screen appears.

5. Draw the pattern you will use for unlocking.
6. Touch Continue. The Draw Pattern Again to Confirm screen appears.
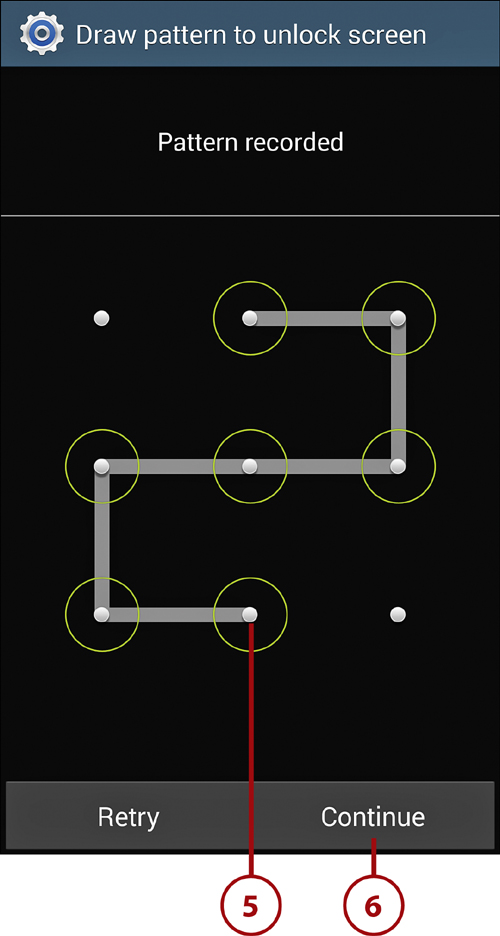
7. Draw the pattern again.
8. Touch Confirm. Your Galaxy Note 3 stores the pattern, and the Settings screen appears again.
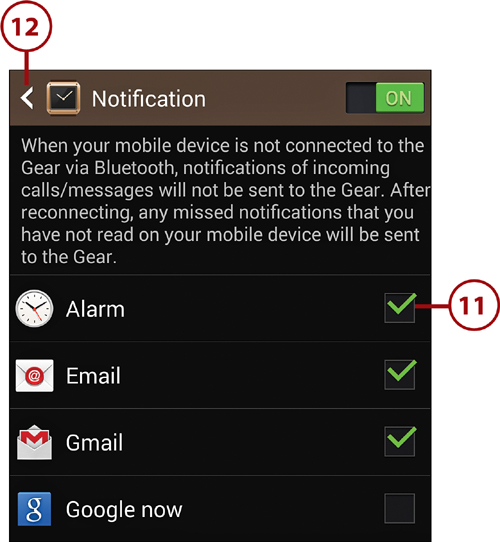
9. Make sure the Notification switch is set to On if you want to receive notifications on your Galaxy Gear.
10. Touch the Notification button (anywhere but the Notification switch) to display the Notification screen.

11. Touch to enable or disable alarms for each app in the list.
12. Touch to return to the Settings screen.
13. Touch Double Pressing Power Key if you want to change the action the Galaxy Gear takes when you press the power button twice in quick succession. The default action is S Voice. In the Double Pressing Power Key dialog that opens, you can choose other actions, including Camera, Contacts, Dialer, Find My Device, Pedometer, Stopwatch, Timer, and Voice Memo.
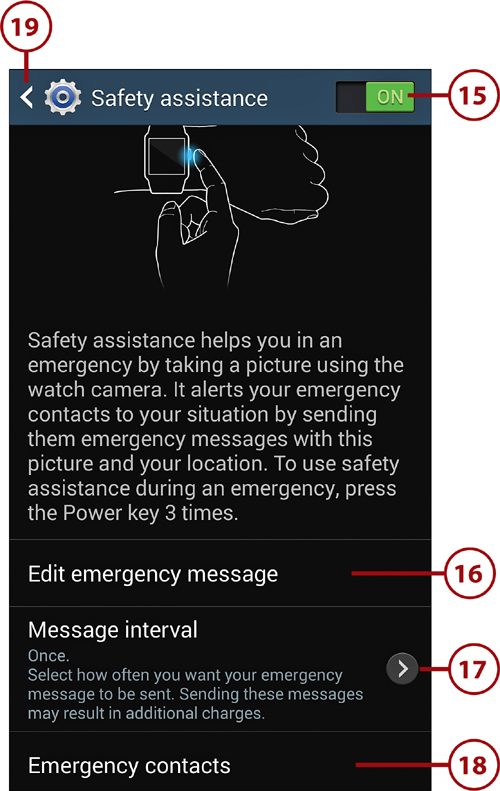
14. Touch Safety Assistance to display the Safety Assistance screen.

Understanding the Safety Assistance Features
Your Galaxy Gear includes a Safety Assistance feature designed to help you summon assistance when an emergency strikes. You set up Safety Assistance ahead of time by turning the feature on, creating an emergency message and choosing how often to send it, and specifying emergency contacts who will receive the message. Then, in an emergency, you press the Galaxy Gear’s power button three times. The Galaxy Gear takes a photo of whatever is in front of the lens and sends it with your emergency message and your GPS location to the emergency contacts.
15. Set the Safety Assistance switch to On. Another Safety Assistance screen appears, showing a detailed explanation and disclaimers. Touch each check box to select it, and then touch OK to agree to the conditions. The previous Safety Assistance screen appears again.
16. Touch Edit Emergency Message to display the Edit Emergency Message screen, type your emergency message, and then touch Save.
17. Touch Message Interval to display the Message Interval dialog, and then touch Once, Every 10 Minutes, or Every 20 Minutes, as needed. Sending multiple emergency messages may run up data charges, but if you are genuinely in trouble, it will be worth the extra expense.
18. Touch Emergency Contacts to display the Emergency Contacts screen. Here, you can set up your Emergency Contacts group by tapping Add Contact and then selecting the check box for each contact you want to add.
19. Touch to return to the Settings screen.
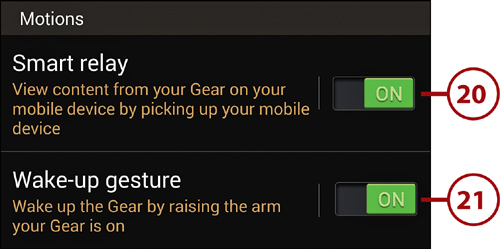
20. Set the Smart Relay switch to On if you want to be able to view content from your Galaxy Gear on your Galaxy Note 3 by picking up the Galaxy Note 3 when you receive a notification.
Turn On Motions to Make Smart Relay Work
For the Smart Relay function to work, you must set the Motions switch in the Settings app to On. Touch Settings on the Apps screen to open the Settings app, touch Controls to display the Controls screen, and then set the Motions switch to On.
21. Set the Wake-Up Gesture switch to On if you want to be able to wake up the Galaxy Gear by raising the wrist that’s wearing the watch. This feature is usually helpful, but it uses a bit more battery power because the Galaxy Gear has to keep monitoring the accelerometer. You might find you need to make an exaggerated movement to trigger the wake-up gesture.
22. Touch to return to the Gear Manager screen.

Choose Settings in the Settings App on the Galaxy Gear
The Galaxy Gear has its own Settings app that enables you to configure the way the Gear runs and behaves.
Open the Settings App
1. From the Galaxy Gear’s Home screen, swipe left or right until the Settings icon appears.
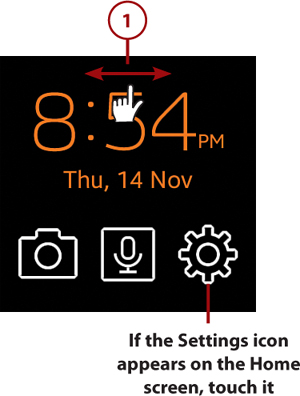
2. Touch the Settings icon to open the Settings app.

Choose Clock Settings
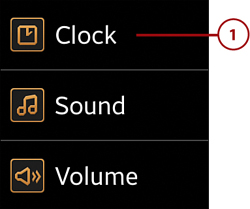
1. Touch Clock to display the Clock screen.
2. Touch Clock Type to set the clock type. You can then swipe left or right to cycle through the clock types discussed earlier in this chapter. When you reach the clock you want, swipe down to go back to the Clock screen.
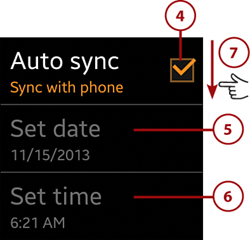
3. Touch Date and Time to display the Date and Time screen.

4. Touch Auto Sync to enable or disable syncing the date and time with your Galaxy Note 3. Enabling Auto Sync on your Galaxy Gear and having your Galaxy Note 3 sync with an Internet time server is usually the best way to have your Galaxy Gear set to the right time.
5. Touch Set Date if Auto Sync is disabled, and you need to set the date.
6. Touch Set Time if Auto Sync is disabled, and you need to set the time.
7. Swipe down to go back to the Clocks screen.
8. Touch Hourly Alert to enable or disable the hourly alert.
9. Swipe down to go back to the main Settings screen.

Choose Sound Settings
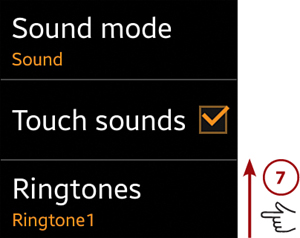
1. Touch Sound to display the Sound screen.

2. Touch Sound Mode to choose among the three sound modes: Sound, Vibrate, or Mute.
3. Touch the Touch Sounds button to enable or disable playing a sound when you touch the screen.
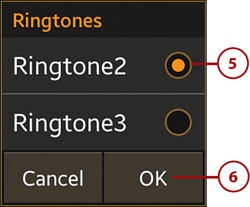
4. Touch Ringtones to display the Ringtones screen.

5. Touch the ringtone you want to hear. The Galaxy Gear plays the ringtone.
6. Touch OK to return to the Sound screen.
7. Swipe up to display the next group of Sound settings.
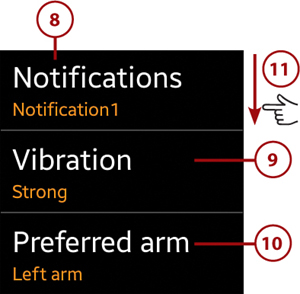
8. Touch Notifications to choose the notification sound to play.
9. Touch Vibration to set the vibration strength. Your choices are Strong, Medium, or Weak.
10. Touch Preferred Arm to set your preferred arm. This setting controls which microphone the Galaxy Gear uses—the right microphone if you choose Left Arm or the left microphone if you choose Right Arm. Left Arm is the default.
11. Swipe down to return to the main Settings screen.
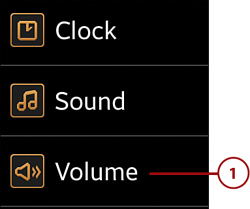
2. Touch Multimedia to display the Multimedia screen.

3. Touch + to increase the volume or – to decrease it.
4. Touch OK to return to the Multimedia screen.

5. Touch Ringtones to set the volume for ringtones.
6. Touch Notifications to set the volume for notifications.
7. Touch System to set the volume for system sounds.
8. Swipe down to return to the main Settings screen.


2. Touch Brightness to set the screen brightness.
3. Touch Screen Timeout to set the period of inactivity before the screen goes off. Your choices are 30 seconds, 1 Minute, or 5 Minutes. Keeping the screen on for longer can be useful, but it goes through the battery power faster.
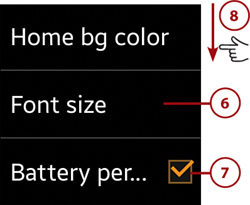
4. Touch Home BG Color to set the color of the background for the Galaxy Gear. Swipe left or right through the color options, and then swipe down to keep the current one.
5. Swipe down to reach the other Display options.

6. Touch Font Size to choose the font size for the display. Your choices are Small, Normal (the default), or Large.
7. Touch Battery Percentage to enable or disable the display of the battery percentage on the Home screen. Seeing the battery percentage can help you track power consumption—but the readout takes up valuable screen real estate.
8. Swipe down to return to the main Settings screen.
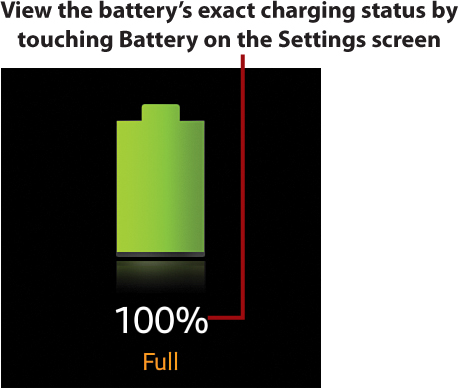
Viewing the Battery Status
If you don’t display the battery percentage on the Home screen, you can view the battery’s status by touching Battery on the Settings screen. Swipe down to return to the main Settings screen.
Control Bluetooth and Visibility
Your Galaxy Gear communicates with your Galaxy Note 3 via Bluetooth, so normally you’ll want to keep Bluetooth enabled to keep both devices happy. But if you separate them, you can disable Bluetooth on the Galaxy Gear to conserve battery power. You can also control whether the Galaxy Gear is visible via Bluetooth. Normally, you would do this only when the Galaxy Gear isn’t able to communicate with the Galaxy Note 3.
1. Touch Bluetooth to display the Bluetooth screen.

2. Touch Bluetooth to enable or disable Bluetooth.
3. If Visibility is available, touch to enable visibility. Visibility is only available when your Galaxy Gear is disconnected from your Galaxy Note 3.
4. Swipe down to return to the main Settings screen.

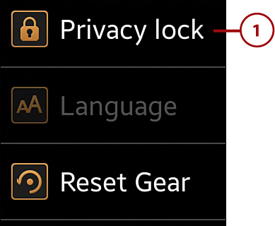
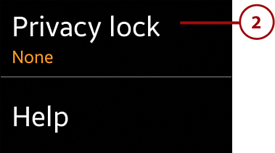
Set a Privacy Lock
To prevent anyone else using your Galaxy Gear, you can set a privacy lock pattern.
1. Touch Privacy Lock to display the Privacy Lock screen.
2. Touch Privacy Lock to display the next screen.
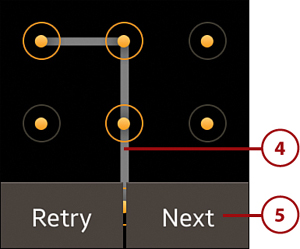
3. Touch Pattern.

4. Draw your pattern on the screen.
5. Touch Next.
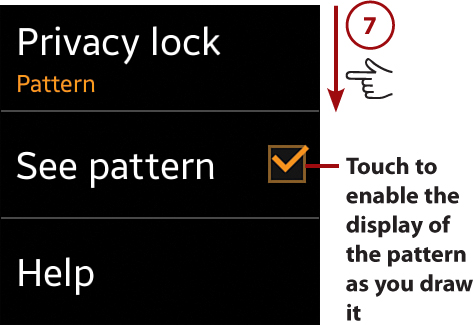
6. Repeat the pattern on the screen that appears. The Privacy Lock screen then reappears, including the See Pattern check box.
7. Swipe down to return to the main Settings screen.
Reset Your Galaxy Gear
If your Galaxy Gear stops responding to your Galaxy Note 3, you might need to reset it. Before resetting the Galaxy Gear, make sure that Bluetooth is enabled, as discussed a little earlier in this chapter.
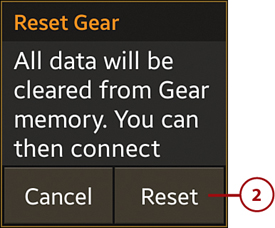
1. Touch Reset Gear on the main Settings screen.

2. Touch Reset to reset the Galaxy Gear.
3. After the Galaxy Gear restarts, follow the instructions onscreen for connecting it to your Galaxy Note 3 again.
Navigating the Galaxy Gear’s Interface
You can control your Galaxy Gear by using either gestures or the S Voice app. Normally, you will want to use a combination of gestures and S Voice to control the Galaxy Gear, depending on what exactly you’re doing and where you’re doing it.
Controlling the Galaxy Gear Using Gestures
If you followed through the previous section, you’ve already learned the main gestures for navigating the Galaxy Gear’s interface—but here’s a quick recap:
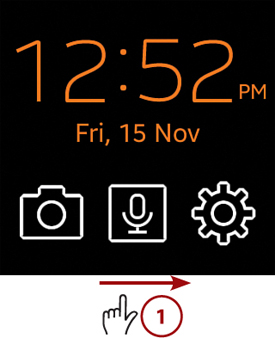
• Raise your wrist (or your arm) or press the Power button to wake the Galaxy Gear.
• Touch to select an option.
• Swipe left or right to navigate through options.
• Scroll up or down to reveal other options that don’t fit on the screen.
• Swipe down from the top of the screen to go up one menu level in the user interface.
Armed with this knowledge, you can quickly navigate through the interface. For example, here’s how to go to the Apps screen and launch the Stopwatch app.
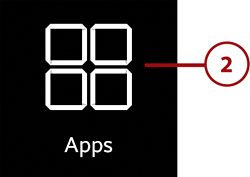
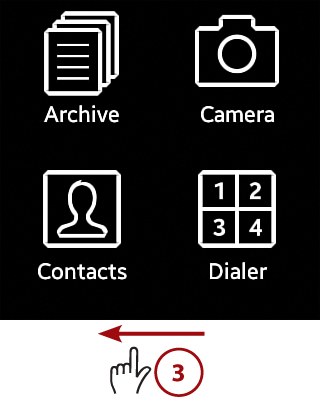
1. From the Home screen, swipe several times to display the Apps icon. The Galaxy Gear cycles through the icons, so you can swipe either way to go around the circle.
2. Touch Apps to display the Apps screen.
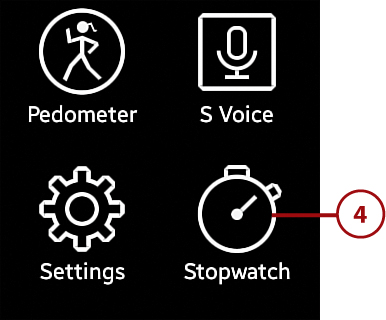
3. If necessary, swipe left or right one or more times until the screen with the Stopwatch icon appears.
4. Touch Stopwatch to open the Stopwatch app.
5. Use the Stopwatch app.
6. Swipe down the screen to return to the Apps screen.
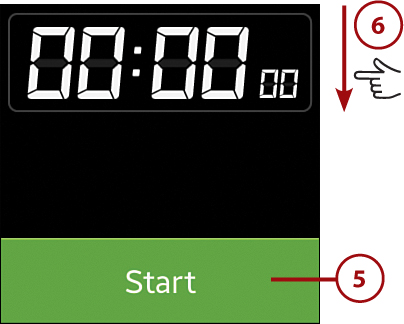
7. Swipe left or right until the Home screen appears.
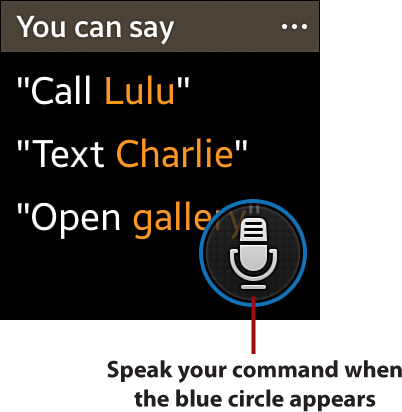
Controlling the Galaxy Gear Using S Voice
Instead of navigating by touch, you can control your Galaxy Gear using the S Voice app. This is especially useful when you are in a situation where you cannot use the touchscreen reliably.
1. From the Home screen, swipe left twice to display the S Voice icon.

2. Touch S Voice to display the S Voice screen.

3. When the microphone icon shows a blue circle around it and a beep sounds, give your command. For example, say “Call Chris Smith” to place a phone call or say “Open Camera” to open the Camera app.
Using the Galaxy Gear’s Apps
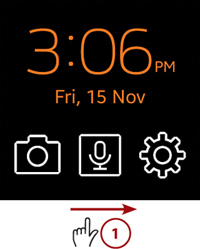
Now that you have configured your Galaxy Gear and learned how to navigate its interface, you will find its apps easy to use. You can launch an app in any of these ways:
• Touch its icon on the Home screen (if it appears there).
• Swipe left or right from the Home screen until the app’s icon appears, and then touch the icon. If the app is on the Apps screen, swipe until the Apps icon appears, touch the Apps icon, and then touch the app’s icon.
• Tell S Voice to open the app by saying “Open” and the app’s name.
Make and Receive Phone Calls
You can make phone calls easily using your Galaxy Gear to control your Galaxy Note 3. And you can receive incoming calls even more easily.
Make Phone Calls
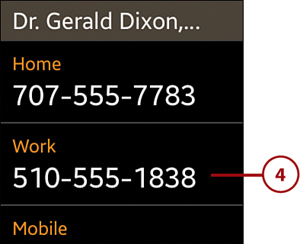
To make phone calls with the Galaxy Gear, choose the contact from the Contacts app and pick the correct number.
1. Swipe right from the Home screen to display the Contacts icon.
2. Touch Contacts to display the Contacts screen.

3. Touch the contact you want to call.

4. Touch the number to use. The Galaxy Gear makes the call via your Galaxy Note 3.
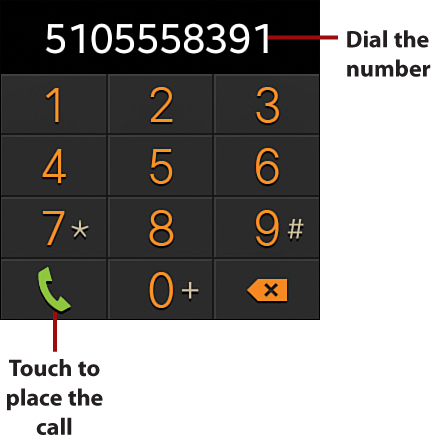
If you need to simply dial a call, swipe up from the Home screen to display the Dialer screen. You can then dial the number and touch the green Call icon to place the call.

Receive a Phone Call
When someone calls you, the Galaxy Gear displays details of the call. Touch the button to accept the call or reject it.

Take Photos and Videos
The Galaxy Gear’s Camera app is great for capturing quick shots of what’s happening without having to take out your Galaxy Note 3. It can also be useful for taking photos discreetly. For technical reasons, we can’t show you screens of the Camera app, but you’ll find it straightforward enough to use.
1. Open the Camera app by tapping its icon.

2. Tap the icon in the upper-left corner of the screen to switch between still photos (a camera icon appears) and taking videos of up to 15 seconds (a camcorder icon appears).
3. Aim the lens on the wrist strap at your subject. What the lens is seeing appears on the screen.
4. Touch the screen to take a photo or start the video recording (depending on which camera you’ve selected).
5. Touch the screen again to stop the video recording. Alternatively, let the recording run to its maximum 15 seconds, at which point the Galaxy Gear stops recording automatically.